A Fresh Twist on the Diagonal Cut Fun Fold!

Hello, Stampin’ Friends!

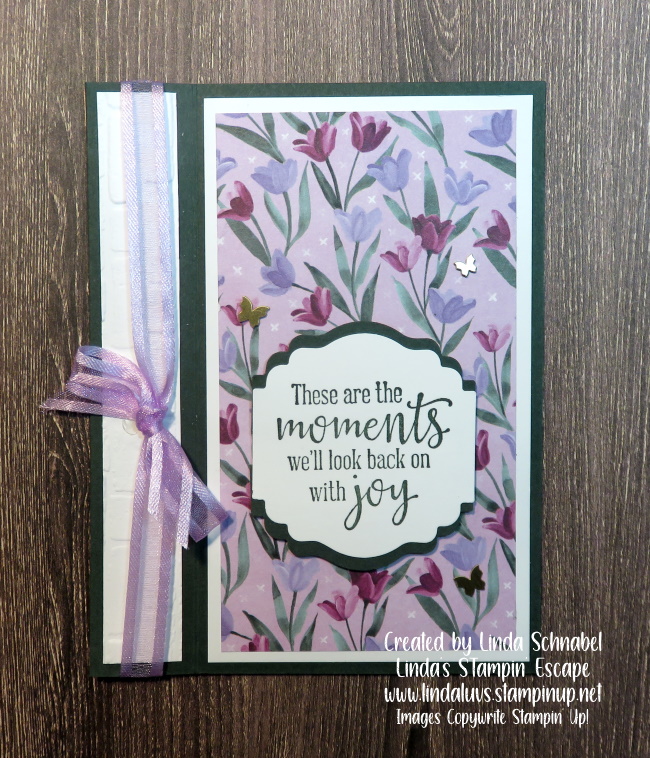
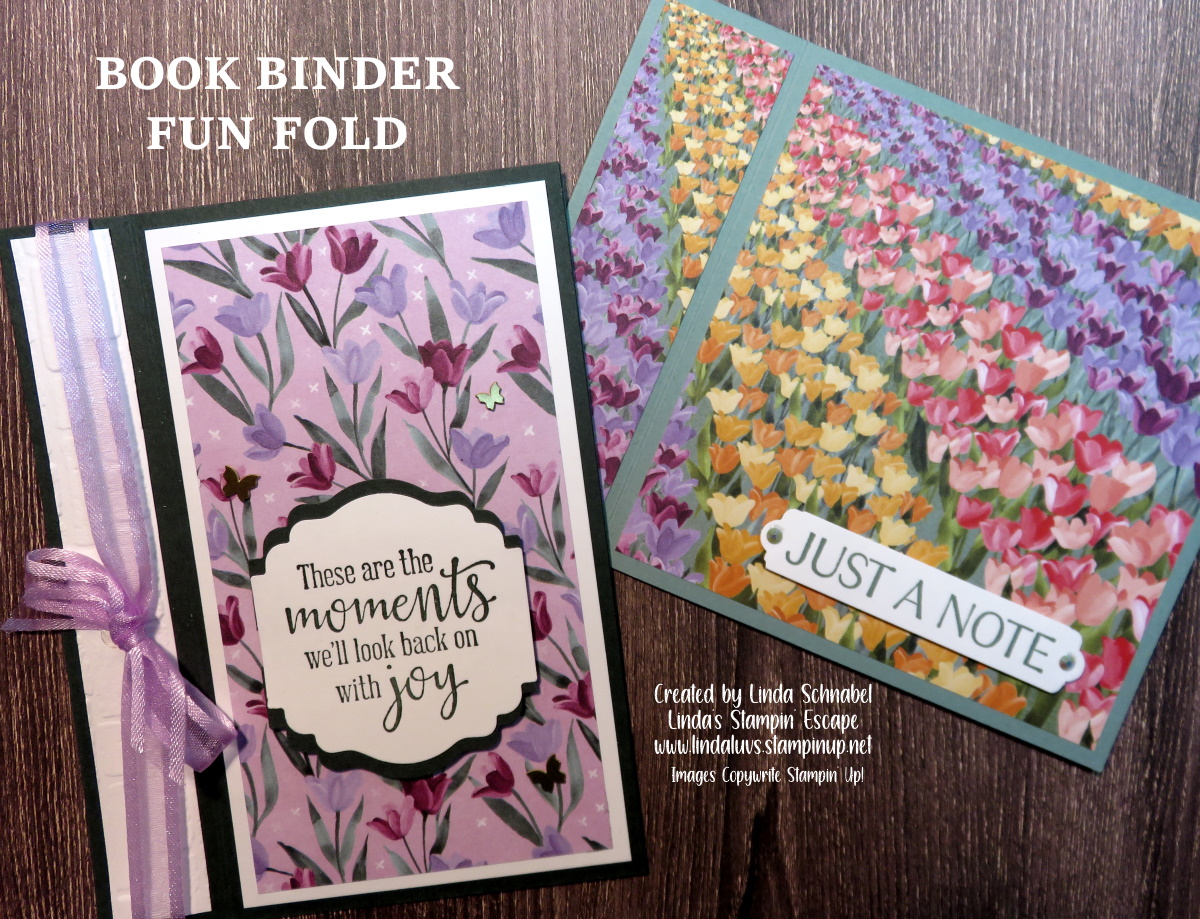
If you loved yesterday’s diagonal cut fun fold, you’re in for a treat today! I’ve got another way to use this eye-catching cut—this time with an even simpler approach, making it effortless to recreate. No extra layering, no fuss—just a beautiful, elegant design that comes together in minutes.

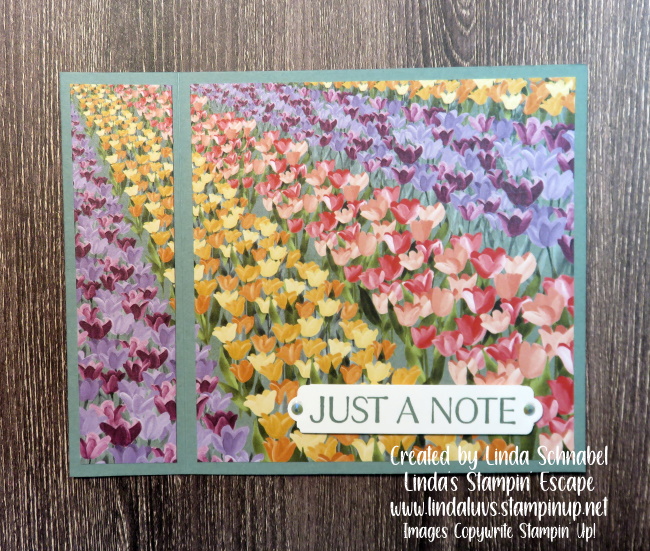
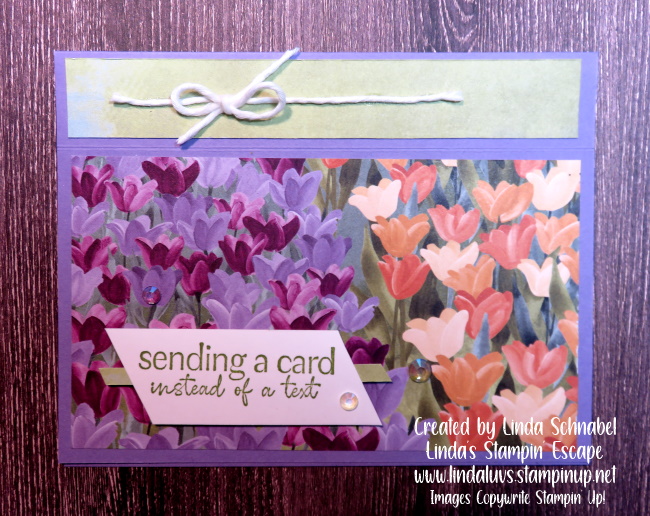
What makes this card truly stand out? The stunning Lovely Garden Designer Series Paper! This brand-new paper is a delightful contradiction—delicate yet bold, soft yet striking. Its high-contrast florals and intricate patterns add depth and dimension to any project. Whether you’re crafting heartfelt cards, scrapbook pages filled with floral accents, or creating charming gift packaging, this paper does all the work for you.

I’ll walk you through how I created this version of the diagonal fun fold, sharing tips to make it even easier. And trust me, once you see how beautifully this paper transforms your simple fun fold card into something extraordinary, you’ll want to grab a pack (or two!) before it disappears.

  1. Start with 8 1/2″ x 5 1/2″ cardstock / Score at 4 1/4″
  2. Place cardstock into cutter. Using the cutting “groove” align the Top Right-hand corner to the bottom of the score line.

3. You will use the cut off piece for your card … just flip it upside down with the wide part to the top, and narrow edge to bottom. Before assembly – you need your designer paper.

4. Your designer paper should be 4″ x 5 1/4″ and choose a sheet that has patterns you like on both sides, or you can cut two different sheets and use the designs you want.

5. Cut your designer paper just like the cardstock … From the top right-hand corner to the bottom left-hand corner. You’ll flip the paper just like the cardstock.

6. You can assemble your loose piece either over the top (like the picture above) or underneath like the one below.

7. Simply add a white piece of cardstock to your inside: 5 1/4″ x 4″ … stamp as desired!

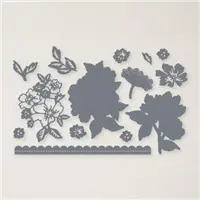
8. To complete your card … embellish as desired! I cut out one of the flowers from the designer paper and used that to embellish (plus a little Wink of Stella).

“With just a simple cut and the breathtaking designs of the Lovely Garden Designer Paper, we’ve transformed an easy Fun Fold into a stunning creation. I hope this inspires you to give it a try and let your creativity bloom!”

If this paper speaks to your creative heart, you can find it waiting for you in my [online store]!

Happy stamping! 💕✂️

Fun Fold Card Featuring the Splendid Autumn Designer Paper

Hello Stampin’ Friends ~

Today, I’m excited to showcase a gorgeous and easy-to-do Fun Fold card featuring the stunning Splendid Autumn 6 x 6 Designer Paper. I’m back after a week and a half of partying online on my Facebook page!! This card design really allows you to appreciate the beauty of the paper, as it’s cut to show off both the inside and outside on your continuous pattern. Fun folds are one of the easiest ways to take a simple card to the next level, and with designer paper as lovely as this, it does all the hard work for you! I call this fold my “Open Face Front”.

Card Details:

For this card, I began with a Cajun Craze card base cut at 5 1/2″ x 7 1/4″ and then scored and folded at 3″. This simple fold adds an elegant touch and can be used in both landscape (as shown) or portrait orientation, depending on your preference.

To create a continuous, cohesive look, I cut the designer paper to a width of 5″ and a height of 4″. I then cut 1 1/2″ off the bottom of this precut piece to use on the inside of the card. I layered the designer paper on top of a piece of Basic Vanilla cardstock (5″ x 3 3/4″) and then added a Pumpkin Pie layer (5 1/4″ x 4″) beneath it to tie all the colors together.

For the front, I took the remaining piece of designer paper and adhered it to another piece of Pumpkin Pie cardstock cut to 5 1/4″ x 2 3/4″. The layering really helps the designer paper stand out and gives the card a rich, polished feel.

The sentiment comes from the adorable Warms My Heart stamp set, then die-cut using the Spotlight on Nature Dies for a clean, elegant look. To finish off the card, I added a few Faux Glass Dots (currently unavailable) for a little extra sparkle.

The Splendid Autumn Designer Paper is a true standout with its warm, rich tones and intricate designs. It’s perfect for fall-themed cards, but its versatility means it can be used for a variety of occasions. Whether you’re working with fun folds or standard layouts, this paper is an effortless way to add dimension and interest to your projects.

Fun folds, like the one featured here, are a great way to elevate your cards without a lot of extra effort. With just a few extra cuts and scores, you can transform a basic card into something truly special. And when paired with designer paper, fun folds make it easy to showcase the beautiful patterns and colors both inside and outside the card.

Ready to create your own? Pick up the Splendid Autumn Designer Paper and other supplies listed below today, and start crafting your own beautiful fun fold cards!

Thanks for joining me today!

Hand Penned Petals Faux Step Card

Hello Stampin’ Friends ~

I am bringing back a favorite today…. the “FAUX” Step Card that I changed up a bit … and I’m going through step by step with dimensions on how to recreate this card. Today I’m using the Hand Penned Petals and Penned Flowers dies, both are on the retiring list … and I love the way this card turned out. I have this all on video for you to view.

Let’s take a look at the video now …

Dimensions:

  • Card Base: Basic Black: 9” x 4-1/4” then Score at 1-1/4”, 2-1/2” and 5-3/4”
  • Cardstock #2: Basic Black Center Step: 8-1/2” x 2-1/4” then Score and fold at 5-1/2”
  • Cardstock #3: Basic White 3″ x 4″ for inside of card / Scrap of white for greeting and Highland Heather as a mat (Cut with the Layering Circle Dies)
  • Designer Paper #1: Hand Penned Petals (Mint Macaron) for Center Step 2″ x 5-1/4″ and Floral Design paper is 3″ x 4″ and 1″ x 4″.

I find it easiest to lay the card base out flat when attaching the designer paper, as shown in the video.

What a fun twist to the card … placing your “center step” either on the right or the left side of the card. It gives you a totally different look. For my card, I choose to put my center step to the right to balance out the greeting which I let “hang over” the left side … that gives it another dimension to the card.

As for that greeting … It comes from the Flowering Tulips stamp set and one of the main reasons I bought that set! I love the way this card turned out! Don’t you just love that feeling when you’re done creating something that turned out sooo cool!

I hope you enjoyed the quick coloring technique as well …. it was fun and easy to recreate the watercolor look. As for the designer paper … you can use any that coordinates with the colors you choose to color with.

Enjoy making this fun fold … it’s really easy, and I love the twist of placing the “step” off to the side.

TODAY’S STAMPIN’ SUPPLY LIST … If you liked the products used in today’s projects, I have links for you below. Just click on the item you would like more information on, or to begin your shopping. It will take you directly to my website. Thank you ❤

Two Layouts Using the Book Binder Fun Fold

Hello Stampin’ Friends and Happy Monday ~

Today I’m going to share my replay of this Quick & Easy Fun Fold and all the dimensions and instructions with you because it highlights one of our beautiful designer papers that resurfaced in our Clearance Rack!! If you already have this pretty paper then here is a video and the two cards I made.

Let’s take a look at the video now …

Book Binder Fun Fold … Super Simple!

HORIZONTAL PROFILE (Above) How It’s Made  

  • Cut a 4-1/4 x 11″ piece of Soft Succulent cardstock for the card base. Score at 5-1/2 and 4-1/4.  Crease folds and add adhesive to the inside of the two scored lines.  The 4-1/4″ score line should be facing out on the front of the card. 
  • Cut a 4 x 4″ piece of Designer Paper (or cardstock) and adhere to card front. 
  • Cut a 1″ x 4″ strip from the tulip design designer series paper and adhere to the left side margin on the card front.

PORTRAIT PROFILE (Above) How It’s Made  

  • Cut a 5-1/2 x 8-1/2″ piece of Evening Evergreen cardstock for the card base. Score at 4-1/4” and 5-1/4”.  Crease folds and add adhesive to the inside of the two scored lines… You can add your ribbon at this time.
  • To layer card front; cut Basic White 5-1/4” x 3” (Cut 2: one for inside and one for mat on front)  Cut Designer paper to 5” x 2-3/4” to layer on top of white.
  • Binder area is cut in Basic White at 5-1/4” x 3/4” and I embossed with “Brick” embossing folder for some texture.

Cool … right! Now, let me share another layout you can use when creating the Book Binder Fun Fold. It’s another portrait however the card stock is cut at the usual 8-1/2″ x 5-1/2″ and it is scored at the 4-1/4″ and 5-1/4″ … now you will just position your “binder” to the “TOP” of your card.

The designer paper is cut at the same dimensions as well … however, you need to make sure you are “cutting” to the designer of the paper. On this card, my “binder” actually has the same designer paper, I just flipped it over. The greeting also comes from the Flowing Flowers stamp set, same as we used on our first card.

Enjoy making this fun fold … it’s really easy, and you’re going to have a blast creating with all your beautiful designer papers. Don’t forget, you can add in your embossing folders, die cuts or hand stamped items!

TODAY’S STAMPIN’ SUPPLY LIST … If you liked the products used in today’s projects, I have links for you below. Just click on the item you would like more information on, or to begin your shopping. It will take you directly to my website. Thank you ❤

Free Tutorial Friday: Birthday Brew

Hello Stampin’ Friends ~

It’s another FREE Tutorial Friday and if your from Wisconsin that also means it’s time for a Friday Night Fish Fry … and what goes better with your Fish Fry than a nice cold brew!! Today’s card tutorial features the Brewed for You stamp set.

Measurements: 

  • Card Base: Crushed Curry 5 ½” x 8 ½”
  • Cardstock #2: Basic White 4” x 5 ¼”

Instructions:

  • Cut a 5 ½’ x 8 ½” Crushed Curry card base. Fold in half.
  • Cut a 4” x 5 ¼” Basic White panel.
  • Stamp (3) large and (4) small Watercolor Circles onto the Basic White panel using Crushed Curry ink.
  • Lightly spritz a little water to soften the edges. Let dry completely.
  • Using a Water Painter, add Crushed Curry ink to the brush and tap to speckle ink all over the panel as desired. Let dry completely.
  • Adhere the panel to the card front.
  • On a scrap piece of Basic White, stamp the glasses and foam using Jet Black Stazon ink.
  • Color the glasses using Crushed Curry ink and a Water painter. Cut.
  •  Cut a ¾” x 2 ½” strip of Basic White cardstock.
  • Stamp the sentiment using Jet Black Stazon ink. Cut the right edge to form a banner.
  • Adhere the sentiment to the top of the card using Stampin’ Dimensionals.
  • Cut a 2 ¾” Crushed Curry circle.
  • Cut a 2 1/8” Basic White circle.
  • Stamp the sentiment onto the circle using Jet Black Stazon ink.
  • Adhere the sentiment to the Crushed Curry Circle.
  • Adhere the circle to the card front.
  • Adhere the glasses to the card front using Stampin’ Dimensionals.

I think this is a perfect card for a Friday FREE Tutorial, Oh, Ale Yes!! Enjoy your Friday and enjoy your weekend.

Thank you for hanging out with me for a cold one today!

Here is a list of supplies used to create this card ….

Free Tutorial Friday: Birthday Brew

Hello Stampin’ Friends ~

It’s another FREE Tutorial Friday and if your from Wisconsin that also means it’s time for a Friday Fish Fry … and what goes better with your Fish Fry than a nice cold brew!! Today’s card tutorial features the Brewed for You stamp set.

Measurements: 

  • Card Base: Crushed Curry 5 ½” x 8 ½”
  • Cardstock #2: Basic White 4” x 5 ¼”

Instructions:

  • Cut a 5 ½’ x 8 ½” Crushed Curry card base. Fold in half.
  • Cut a 4” x 5 ¼” Basic White panel.
  • Stamp (3) large and (4) small Watercolor Circles onto the Basic White panel using Crushed Curry ink.
  • Lightly spritz a little water to soften the edges. Let dry completely.
  • Using a Water Painter, add Crushed Curry ink to the brush and tap to speckle ink all over the panel as desired. Let dry completely.
  • Adhere the panel to the card front.
  • On a scrap piece of Basic White, stamp the glasses and foam using Jet Black Stazon ink.
  • Color the glasses using Crushed Curry ink and a Water painter. Cut.
  •  Cut a ¾” x 2 ½” strip of Basic White cardstock.
  • Stamp the sentiment using Jet Black Stazon ink. Cut the right edge to form a banner.
  • Adhere the sentiment to the top of the card using Stampin’ Dimensionals.
  • Cut a 2 ¾” Crushed Curry circle.
  • Cut a 2 1/8” Basic White circle.
  • Stamp the sentiment onto the circle using Jet Black Stazon ink.
  • Adhere the sentiment to the Crushed Curry Circle.
  • Adhere the circle to the card front.
  • Adhere the glasses to the card front using Stampin’ Dimensionals.

I think this is a perfect card for a Friday FREE Tutorial, Oh, Ale Yes!! Enjoy your Friday and enjoy your weekend.

Thank you for hanging out with me for a cold one today!

Here is a list of supplies used to create this card ….

FREE TUTORIAL FRIDAY: A Note of Thanks

Hello Stampin’ Friends ~

Today I’m going to share the cutest card with you… on my FREE TUTORIAL FRIDAY! This card features the Sweet Songbirds stamp set. This cute little bird is delivering a note of thanks.

Measurements: 

  • Card Base: Thick Basic White 4-1/4” x 11, scored at 5-1/2”
  • Cardstock #1: Tahitian Tide 4” x 5-1/4”
  • Cardstock #2: Parakeet Party 3-3/4” x 5″
  • Cardstock #3: Tahitian Tide 3-3/4” x 4-1/4” (for die cut frame)
  • Cardstock #4: 2-3/8” x 3”
  • Cardstock #5: Basic White 1-3/4” x 1/2”
  • Scraps of Basic White, Crumb Cake, Mango Melody Cardstock and Supple Shimmer Specialty Paper for stamped / punched images

Instructions:

  • Fold the Thick Basic White card base in half and burnish the fold.
  • Die cut the Parakeet Party Cardstock with the Stitched Greenery Die, then adhere to the Tahitian Tide Cardstock.
  • Adhere the Tahitian Tide Cardstock layer to the Thick Basic White card base.
  • Die cut the frame from the Tahitian Tide Cardstock and adhere to the card.
  • Stamp the musical notes on the piece of Basic White Cardstock in Tahitian Tide ink, then adhere to the inside of the frame with Stampin’ Dimensionals.
  • Stamp the nest in Soft Suede ink on a scrap of Crumb Cake Cardstock, fussy-cut around image and adhere to the card with Stampin’ Dimensionals.
  • On a scrap of Basic White Cardstock, stamp the bird in Tahitian Tide ink, stamp the bird’s eyes in Soft Suede ink, then punch the bird out and adhere to the card with   Stampin’ Dimensionals
  • Punch the bird’s wing and chest from a scrap of Supple Shimmer Specialty Paper and adhere to the bird’s body.
  • Punch the bird’s beak from a small scrap of Mango Melody Cardstock and adhere to the bird.
  • Stamp the sentiment in Soft Suede ink on the strip of Basic White Cardstock, punch the right side with the Banner Pick a Punch and adhere to the card with Stampin’ Dimensionals.
  • Tie a bow using the Tahitian Tide Metallic Woven Ribbon and adhere to the card using a Mini Glue Dot.
  • Add three Rhinestone Basic Jewels (one large, two small) to the card front as shown.

Don’t you just LOVE this color combination? It’s a sure sign of spring. Such a cute card.

Thank you for joining me today. I hope today’s FREE TUTORIAL FRIDAY has inspired you too add a little sparkle to your projects ~

Have a wonderful day!!

TODAY’S STAMPIN’ SUPPLY LIST … If you liked the products used in todays projects, I have links for you below. Just click on the item you would like more information on, or to begin your shopping. It will take you directly to my website. Thank you ❤

FREE TUTORIAL FRIDAY

Hello Stampin’ Friends ~

Today I’m going to share the cutest card with you… on my FREE TUTORIAL FRIDAY which features the Nothings Better Than stamp set. Grab your cup of coffee because I have mine right here … if that doesn’t wake you up, this color pallet will do the trick.

Measurements: 

  • Card Base: Polished Pink 4-1/4” x 11, scored at 5-1/2”
  • Cardstock #1: Basic Black 4” x 5-1/4”
  • Cardstock #2: Basic White 3-7/8” x 5-1/8”
  • DSP #1: Parakeet Party (plaid pattern) 3-3/4” x 2”
  • DSP #2: Parakeet Party (striped pattern) 3-3/4” x 2-7/8”
  • Scrap of Basic White Cardstock for stamping and die cut images

Instructions:

  • Fold the Polished Pink card base in half and burnish the fold.
  • Adhere the Parakeet Party DSP pieces to the Basic White Cardstock layer.
  • Adhere the Basic White Carstock layer to the Basic Black Cardstock, then adhere to the Polished Pink card base.
  • Using the Stylish Shapes Dies, cut out the largest square from Basic White Cardstock.
  • Stamp the sentiments on the die cut square in Momento ink as shown.
  • Stamp two coffee cup outline images on the die cut square in Momento ink. Stamp one filler image in Parakeet Party ink and one in Coastal Cabana ink.
  • Stamp the steam images in Momento ink and then stamp three of the tiny star images in Parakeet Party ink.
  • On a scrap of Basic White Cardstock, stamp the coffee cup outline image in Momento  ink, then stamp the filler image in Polished Pink ink. Die cut with the coordinating die from the Love You More Than Dies and adhere to the square with Stampin’ Dimensionals.
  • Stamp the sentiment in Momento ink on the Parakeet Party striped DSP, use the die cut square as a guide for placement.
  • Adhere the die cut square to the card with Stampin’ Dimensionals.
  • Tie a bow using the black baker’s twine and adhere to the card using a Mini Glue Dot.
  • Add three Rhinestone Basic Jewels (one large, one medium, one small) to the card front as shown.

Don’t you just LOVE this color combination? The Polished Pink combined with the Parakeet Party will set the mood and the Basic Black really makes it pop!! Such a fun card.

Thank you for joining me today. I hope today’s FREE TUTORIAL FRIDAY has inspired you too add a splash of color to your projects ~

Have a wonderful day!!

TODAY’S STAMPIN’ SUPPLY LIST … If you liked the products used in todays projects, I have links for you below. Just click on the item you would like more information on, or to begin your shopping. It will take you directly to my website. Thank you ❤

Finding a Little Paradise Card Tutorial

Hello Stampin’ Friends ~

Today I’m going to share my Paradise Palms Card with you… Finding a Little Paradise which I think we could all use right now. I’ll also be sharing the dimensions and step by step directions so you can create this card and transport yourself (or your friend) someplace warm and relaxing!

Measurements: 

  • Card Base: Basic Black: 8-1/2” x 5-1/2”, Score at 4-1/4” and fold in half.  Also need a piece of scrap to die cut palm tree.
  • Cardstock / Mango Medley: 5-1/4” x 4”
  • Cardstock / Basic White: 5” x 3-3/4” (front) 5-1/4” x 4” (inside) plus 4” x 4” to color with blending brushes.

Instructions:

  • Attach the Mango Melody cardstock onto your Basic Black Cardbase.
  • Using 4” x 4” piece of white and a Blending Brush, apply Daffodil Delight to the center of your card and brush out all the way to each edge.
  • Repeat the application of color using Mango Medley to the top portion of the card (edge to edge) and blend down into the Daffodil Delight.
  • Repeat the application of color using Coastal Cabana to the bottom portion of the card (edge to edge) and blend up into the Daffodil Delight.
  • When your cardstock is fully covered with ink, die cut using the () circle die.
  • Die cut large palm tree out of the scrap piece of Basic Black.
  • Attach the circle in the upper / center section of the Whisper White.
  • Stamp greeting with Momento Ink onto Basic White on the left hand side.
  • Take this assembly and using the Tasteful Textile Embossing Folder, run it through the Stampin’ Cut & Emboss Machine.
  • Secure die cut Palm onto front of card with a Mini Dimensional on top and adhesive on the bottom.
  • Attach card front assembly to the base of your card and the 5-1/4” x 4” Basic White to the inside of your card.

Don’t you just LOVE a fully textured card? Oh my gosh … it totally transforms this card. And of course I could not walk away without adding the Faux Sea Glass to my card, it even pulls color from the circle background.

Thank you for stopping by ~

Have a wonderful day!!

TODAY’S STAMPIN’ SUPPLY LIST … If you liked the products used in todays projects, I have links for you below. Just click on the item you would like more information on, or to begin your shopping. It will take you directly to my website. Thank you ❤

SNEAK PEEK: Hues of Happiness Suite & Quick Card Tutorial

Hello Stampin’ Friends ~

I am thrilled to share the NEW Hues of Happiness product suite with you today. This suite includes the Happiness Abounds bundle, the Hues of Happiness Designer Paper and the Glossy Dots Assortment!

I have the replay of last nights FACEBOOK LIVE that will show you the entire suite including each sheet of the stunning Hues of Happiness Designer Paper.

Let’s take a look at the video now …

We had so much fun last night creating the cards together! It’s easy when the designer paper is so pretty… I already have another pack on order!! You will be able to order any of these products when the catalog goes LIVE on May 3rd.

Here is the first card we made with the Gorgeous Grape card base ….

Our next card has the Mossy Meadow card base. My stampin’ friends enjoyed the punch tip that I shared in the video and used on this card …

It is so easy to create quick cards when you are working with stunning designer paper like the Hues of Happiness … and this is only part of the pretty paper. I used scraps to stamp my greetings on and one punch to create the layered look on the second card.

I hope you enjoyed my SNEAK PEEK into the Hues of Happiness Suite … can’t wait to share even more with you!

SPECIAL ANNOUNCEMENT … In the video I shared that Stampin’ Up! is offering FREE Shipping this Thursday, April 21st … I have a gift for each of you who place an order with the HOST CODE listed below and get your name in a drawing for a NEW item out of the catalog!! Please let me know if you need any help. Thank you ❤

Showcasing the NEW In-Colors with a Simple Layout

Hello Stampin’ Friends ~

I am thrilled to share the fabulous NEW In-Colors with you today. The new 2022-2024 In-Colors are fun and will coordinate not only with each other but will coordinate beautifully with our core colors as well. I demonstrated a simple layouts in my video (a replay of last nights Facebook LIVE) that is perfect for those of you who make multiple cards at a time … very quick & easy.

Let’s take a look at the video now …

Here is the card that I demonstrated in the video … I believe this is my very favorite but the others are pretty awesome! I’m having a hard time picking a favorite in this group.

Let me introduce you to Starry Sky ….

How It’s Made  

  • Cut a 4-1/4 x 8-1/2″ piece of Basic White cardstock for the card base. Score at 4-1/4.  Crease fold and set aside for assembly.
  • Cut a 2 x 2-1/2″ piece of Basic White to stamp image onto and a 2-1/4″ x 2-3/4″ for a double mat. 
  • Cut a 2-1/8″ x 2-5/8″ piece of the In-Color as the mat behind the stamped image, and a 4″ x 5-1/4″ to be stamped and layered onto the card base.
  • The stamped image will be layered and popped up onto your card front.

The next card is the beautiful Orchid Oasis …

Here is the bright and bold Parakeet Party … this color is anything but shy!

If you have a taste for the shades of red you will fall in love with Sweet Sorbet. The color reminds me of watermelon but it sure is a tasty shade of fun.

The last of this years In-Colors but most definitely not the least is the beautiful Tahitian Tide just waiting to take you someplace warm and sunny. The color reminds me of our old Tempting Turquoise which we loved and missed … this will easily fit the bill.

I hope you enjoyed my showcase into the fun and playful new In-Colors … can’t wait to share even more with you!

TODAY’S STAMPIN’ SUPPLY LIST … If you liked the products used in today’s projects, I have links for you below. Just click on the item you would like more information on, or to begin your shopping. It will take you directly to my website. Thank you ❤

Book Binder Fun Fold: Two Layouts

Hello Stampin’ Friends ~

I am thrilled to share this Quick & Easy Fun Fold with you today. Super simple to make yet it adds a fun twist to your cards. I demonstrated two different layouts in my video (a replay of last nights Facebook LIVE) and then I’ll have another layout that you can create as well.

Let’s take a look at the video now …

Book Binder Fun Fold … Super Simple!

HORIZONTAL PROFILE (Above) How It’s Made  

  • Cut a 4-1/4 x 11″ piece of Soft Succulent cardstock for the card base. Score at 5-1/2 and 4-1/4.  Crease folds and add adhesive to the inside of the two scored lines.  The 4-1/4″ score line should be facing out on the front of the card. 
  • Cut a 4 x 4″ piece of Designer Paper (or cardstock) and adhere to card front. 
  • Cut a 1″ x 4″ strip from the tulip design designer series paper and adhere to the left side margin on the card front.

PORTRAIT PROFILE (Above) How It’s Made  

  • Cut a 5-1/2 x 8-1/2″ piece of Evening Evergreen cardstock for the card base. Score at 4-1/4” and 5-1/4”.  Crease folds and add adhesive to the inside of the two scored lines… You can add your ribbon at this time.
  • To layer card front; cut Basic White 5-1/4” x 3” (Cut 2: one for inside and one for mat on front)  Cut Designer paper to 5” x 2-3/4” to layer on top of white.
  • Binder area is cut in Basic White at 5-1/4” x 3/4” and I embossed with “Brick” embossing folder for some texture.

Cool … right! Now, let me share another layout you can use when creating the Book Binder Fun Fold. It’s another portrait however the card stock is cut at the usual 8-1/2″ x 5-1/2″ and it is scored at the 4-1/4″ and 5-1/4″ … now you will just position your “binder” to the “TOP” of your card.

The designer paper is cut at the same dimensions as well … however, you need to make sure you are “cutting” to the designer of the paper. On this card, my “binder” actually has the same designer paper, I just flipped it over. The greeting also comes from the Flowing Flowers stamp set, same as we used on our first card.

Enjoy making this fun fold … it’s really easy, and you’re going to have a blast creating with all your beautiful designer papers. Don’t forget, you can add in your embossing folders, die cuts or hand stamped items!

TODAY’S STAMPIN’ SUPPLY LIST … If you liked the products used in today’s projects, I have links for you below. Just click on the item you would like more information on, or to begin your shopping. It will take you directly to my website. Thank you ❤

Faux Step Card with a Twist

Hello Stampin’ Friends ~

I am back today with the “FAUX” Step Card that I changed up a bit … and I’m going through step by step with dimensions on how to recreate this card. Today I’m using the Hand Penned Petals bundle… and I love the way this card turned out. I have this all on video for you to view.

Let’s take a look at the video now …

Dimensions:

  • Card Base: Basic Black: 9” x 4-1/4” then Score at 1-1/4”, 2-1/2” and 5-3/4”
  • Cardstock #2: Basic Black Center Step: 8-1/2” x 2-1/4” then Score and fold at 5-1/2”
  • Cardstock #3: Basic White 3″ x 4″ for inside of card / Scrap of white for greeting and Highland Heather as a mat (Cut with the Layering Circle Dies)
  • Designer Paper #1: Hand Penned Petals (Mint Macaron) for Center Step 2″ x 5-1/4″ and Floral Design paper is 3″ x 4″ and 1″ x 4″.

I find it easiest to lay the card base out flat when attaching the designer paper, as shown in the video.

What a fun twist to the card … placing your “center step” either on the right or the left side of the card. It gives you a totally different look. For my card, I choose to put my center step to the right to balance out the greeting which I let “hang over” the left side … that gives it another dimension to the card.

I love the way this card turned out! Don’t you just love that feeling when you’re done creating something that turned out sooo cool!

I hope you enjoyed the quick coloring technique as well …. it was fun and easy to recreate the watercolor look that you find on the Hand Penned Petals designer paper.

Enjoy making this fun fold … it’s really easy, and I love the twist of placing the “step” off to the side.

TODAY’S STAMPIN’ SUPPLY LIST … If you liked the products used in today’s projects, I have links for you below. Just click on the item you would like more information on, or to begin your shopping. It will take you directly to my website. Thank you ❤

Quick Cards with Foam Adhesive Sheets Video

Hello Stampin’ Friends ~

Oh my gosh … this video is perfect for those of us who need to make a quick last minute card! I will share some great tips to make your card making a bit easier, the Foam Adhesive sheet. Grab a cup of coffee and join me for a spell.

Let’s take a look at the video now …

Dimensions:

  • Card Base / Basic Black : 8-1/2” x 5-1/2” then Score at 4-1/4”
  • Basic Black Card front Embossed: 4″ x 5-1/4″ (Scrap to die cut letters out: HELLO)
  • Foam Adhesive Sheet: 4″ x 1-3/4”

This card was so fun to create … a great way to use up some of those scraps and the result is a bold, fun and colorful card!

Don’t we all that some scrap designer paper left over as well, so cut your Foam Adhesive sheet the size of your Designer Paper (Mine was 3″ x 3″) and adhere it to the card front you just embossed. Finish off your card with a cute greeting ….

There are so many ways to use these foam adhesive sheets, but I think that “Use Your Scraps Up” Card is my favorite!!

Have fun creating and thank you for hanging out with me today.

TODAY’S STAMPIN’ SUPPLY LIST … If you liked the products used in today’s projects, I have links for you below. Just click on the item you would like more information on, or to begin your shopping. It will take you directly to my website. Thank you ❤

Spring is Kite Weather …

Hello Stampin’ Friends ~

Warm sunny days with a nice breeze is the perfect time to pull out the kites and enjoy some family time … running, relaxing and watching those kites high in the sky.

Measurements: 

  • Card Base: Pool Party 4-1/4” x 11, scored at 5-1/2”
  • Cardstock #1: Daffodil Delight 4” x 5-1/4”
  • Cardstock #2: Basic White 3-3/4” x 5”
  • Cardstock #3: Basic White 3-1/4” x 4-1/2”
  • DSP #1: 3-3/4” x 1”
  • Cardstock #4: 3-1/2” x 1/2”  
  • Scrap of Daffodil Delight & Basic White Cardstock for stamped kites

Instructions:

  • Fold the Pool Party card base in half and burnish the fold.
  • On the piece of Basic White Cardstock, stamp the kite strings and three clouds in    Momento ink as shown.
  • Color the bows on the kite strings with Pool Party Dark & Daffodil Delight Dark Stampin’ Blends, then accent the shadows on the clouds with Pool Party Light Stampin’ Blends. Accent the clouds with Wink of Stella.
  • Adhere the DSP to the Basic White Cardstock, about 1/8” from the bottom.
  • Adhere the Basic White Cardstock layer to the Daffodil Delight Cardstock, then adhere to the Pool Party card base.
  • On a scrap of Daffodil Delight Cardstock, stamp the kite in Daffodil Delight ink, cut out the image and adhere to the card with Stampin’ Dimensionals.
  • On a scrap of Basic White Cardstock, stamp the kite in Momento ink, color the image with Stampin’ Blends (Daffodil Delight Dark and Pool Party Dark), then cut out the image and adhere to the card with Stampin’ Dimensionals. Accent the centers of the flowers with Wink of Stella.
  • Stamp the sentiment on the strip of Daffodil Delight Cardstock in Momento ink. Banner punch both ends of the sentiment strip using the Banners Pink a Punch and adhere to the card with Stampin’ Dimensionals.
  • Tie a bow using the silver Simply Elegant Trim and adhere to the card using a Mini Glue Dot.
  • Add three Bumblebee In Color Jewels (two medium, one small) to the card front as shown.

Brings back some lovely memories … or I’ll pick up the grandkids and make some more!!

Thank you for joining me ~

Have a wonderful day!!

TODAY’S STAMPIN’ SUPPLY LIST … If you liked the products used in todays projects, I have links for you below. Just click on the item you would like more information on, or to begin your shopping. It will take you directly to my website. Thank you ❤