My favorite new product …

Hello Stampin’ friends!

When I got my hands on the New 2013-14 Idea Book & Catalog, I knew right away what I had to have!  For those of you who come to my annual Kick-Off party, you know I have a “My Favorite Stamp Set Contest” … and I still will, but I couldn’t wait to share this product with you!

The BIGSHOT … just like the Lone Ranger, now has a side kick you can’t be without!  Meet Tonto!

The new Stampin’ Up! Magnetic Platform for Framelits & Edgelits (130658)

No more post-it notes since the magnet easily holds them in place!  I can’t wait to get my hands on it, because you all know… I love my framelits!

6a00e54f9444b988330192aa89c31d970d-800wi

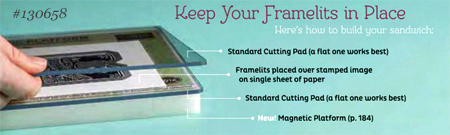
Watch the video from Stampin’ Up! to see how easy it really works!

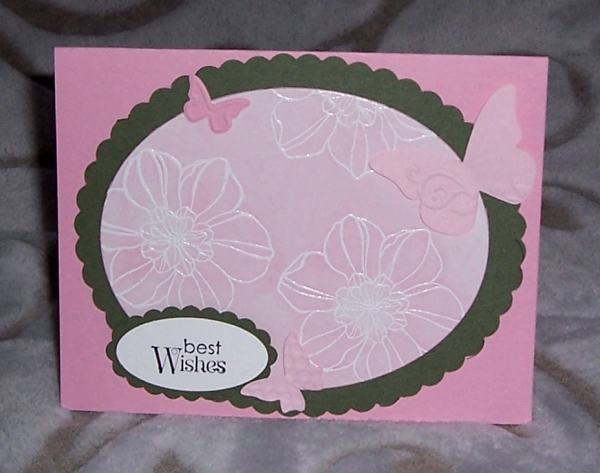
Now, you’ll need a cute idea to use with the new magnetic platform, here is a beautiful card that I received from one of my Star’s members Brenda Morateck!  I just love the neutral color pallet on this card, it works well with the “COLLAGE” Technique she used.

101_1242

The “Secret Garden” stamp set (page 94)  and coordinating framelits (page 187) were used to create this card.  Some of you will recognize the greeting as coming from the awesome stamp set “Lacy & Lovely” on page 117.

Hope you enjoyed today’s post, and my “Lone Ranger” reference …  
                                               You know I’ll be going to see Johnny Depp as Tonto!

blog closing-small

Best Wishes …. for savings!

Hello Stampers ~

Today I am sharing two cards…  Stampin’ Up! is having a sale on some of our most popular stamp sets.  Two of mine, the “Petite Pairs” and “Sweet Essentials” are featured today!

First, is a card that I received as a “swap” from my Star’s team member, Cindy Schneider.   Our Star’s group meets once a month to stamp, swap, share ideas and business tips!  Not to mention … we have fun too.

000_1317

To create this card, we embossed in white, the flower from ” Secret Garden” (pg. 94) and then sponged with “Pretty in Pink” ink.  Although that is one of the discontinued colors … there are plenty of pretty pinks you can use.  The “Oval Collection” framelits (129381 / pg. 186) was used to cut the flower pattern out and frame it with the scallop mat.

Oh  yes, I need to mention the contrasting cardstock is “Early Espresso”… I love the way espresso looks with the pastel colors (try it with Pool Party!)

The card was embellished with the butterflies from the “Beautiful Wings” Embosslit die… these dies emboss onto the butterfly and cut them out for us!  We also have buttons and heart embosslit dies, all are found on page 188 of the NEW Catalog.

000_1316

I’m thrilled to tell you that the fabulous “Petite Pairs” stamp set, one of three that is currently ON SALE!

You can save 25% when you purchase one, two or all three of the stamp sets!

Now I’d like to share a card that I made a while back that features the “Sweet Essentials” (pg. 41) stamp set!  ON SALE.  And y0u’ll recognize the cake from yesterdays post … Make a Cake stamp set.

000_1209

Little stampin’ tip …

If your making a special card for a wedding or special friend, embellish the inside of the card too!

It’s doesn’t take much, but it will leave a lasting impression.

000_1216_0001

Feel free to leave a comment about today’s post, I’d love to hear from you.

Have a great weekend and Happy Stampin’

Linda

B1_Grab-Your-Greetings

Sale: 25 percent off three of our greeting sets!
No limits and get them on any order type (workshop, customer, demonstrator, or online).

Dates: May 31-June 30, 2013

Sale Price Retail Price Description Item
$17.96 $23.95 Sassy Salutations Wood-Mount Stamp Set 132070
$13.46 $17.95 Sassy Salutations Clear-Mount Stamp Set 126707
$14.96 $19.95 Sweet Essentials Wood-Mount Stamp Set 132085
$11.21 $14.95 Sweet Essentials Clear-Mount Stamp Set 126457
$21.71 $28.95 Petite Pairs Wood-Mount Stamp Set 128706
$15.71 $20.95 Petite Pairs Clear-Mount Stamp Set 122497

MAKE A CAKE …

Hello stampers ~

It’s that time of year … lot’s of celebrating!  Graduations, anniversaries, and Birthdays!

So what do we do to get ready for a party …. MAKE A CAKE!

Make A Cake - May web

I just love using the “Patio Party Suite” when making cards for any kind of celebration.  The “Make a Cake” stamp set will be hanging around for another year (whew) but the awesomely fun “Patio Party” Designer Series Paper is retiring!  You can find the entire suite on page 43 of the 2012-13 catalog… but you’ll have to order today!

Make A Cake - May web2

To add a few special touches to this card I used the “Bitty Banner Framelits” and the “Beautiful Wings” Embosslits!  And for the cherry on top (so to speak) I topped it off with the medium and small size pearls.

To order any of the products shown,  just click here! AFTER NOON TODAY!

There are a few hours you cannot access the “Shop Now” feature on our websites … Stampin’ Up! is transitioning the NEW CATALOG!!  So excited… because you will be able to purchase from BOTH catalogs, but only for a short time.

Hope you have an awesome day and a great weekend!

Happy Stampin’

Lina

Everyday Snapshots …

Hello Stampers and Scrappers ~

Just a quick post today to share a page that I did with my Stamp-n-Scrap club.  We meet once a month and create one 12 x 12 page and a card!  The focus is generally on techniques and / or layouts.

I have to give a nod out to “Mary Fish” who’s design I cased (right center) to create this page!  Thank you Mary.

5-29-13 web

I love to create layouts that can be used over and over again… but with the addition of the photos (most important part) and some embellishments, they never look the same.


101_1211   butterfly

Punches are a great tool when embellishing your scrapbook page or a card.  Then top it off with a pearl or rhinestone!

Hope you enjoyed today’s quick post.  Let me know what you think.

Happy Stampin’

Linda

So Kind of You …

Hello Stampers ~

Today I am sharing a simply beautiful card created with the “By the Tide” stamp set from the Spring Catalog.

shell card

I am excited to say that this versatile stamp set will carry over into the NEW 2013-14 Idea Book and Catalog!

I love to layer white on white, it sets up the card with a great foundation.  Don’t forget to give the first layer of white a “lift” by using stampin’ dimensionals… they are definitely a necessity in any stampin’ kit!

The combination of a simple greeting “so kind of you” from the “Sweet Essentials” stamp set with the single shell from the “By the Tide” stamp set created this beautiful card.

close-up

The addition of texture to the card using the “Houndstooth Folder” really sets off the accent of the Midnight Muse 3/8″ Stitched Satin Ribbon.  As you can see, I only partially embossed the card to create a more dramatic effect.

Every now and then we all look for an easy to make, yet beautiful card.  I hope this fulfilled that need for you.

If you enjoyed this card, please leave a comment.  I’d love to hear from you!

Happy Stampin’

Linda

PLEASANT POPPIES

Hello Stampers ~

Today I’m sharing a quick and easy card made with the “Pleasant Poppies” stamp set (found in the Stampin’ Up! Idea Book & Catalog).

Pleasant Poppies

The technique used for this card is a “spotlighting” technique.  Begin simply by stamping the image onto Whisper White cardstock.  Then with VersaMark™ stamp the same image onto black cardstock… emboss.  I used the “Tangerine Tango” embossing Powder.

Next, punch out your embossed poppies and layer them over the stamped one on the Whisper White.

close-up poppies

Although this is a birthday card, I think it is quite fitting as today is Memorial Day.  A special day set aside to remember, honor and thank those who have fought for our freedoms.

I hope you are enjoying this holiday weekend… and don’t forget to thank a veteran.

God Bless,

Linda

combined-poppies-800

Hand Stamped Writing Tablet

Hello Stampers ~

Today I am sharing with you a project that my attendee’s made at my annual Spring Retreat.  You will need: Cardstock, Paper Cutter, Simply Score (or use your score blade on your cutter) Fav Stamp Set, Designer Paper and border punch to embellish and Sticky Strip to hold it all together.  Now you can create this cute project…  great for teachers, friends, and more.

paper & pen

You’ll begin with an 8-1/2″ x 11″ sheet of cardstock (we used Island Indigo).  Trim 1/4″ off the 8-1/2″ side, bringing it down to 8-1/4″ x 11.  Score at 5-1/5″ then 5-3/4″.

Simply Score                           Flowering Flourishes

Simply Score 122334                                                  Flowering Flourishes

To design the front we stamped the top with the “Flowering Flourishes” stamp set.  Then we used “Comfort Cafe” Designer Series Paper … embellished using Pool Party cardstock and the “Scallop Trim Border Punch”.

101_1226

To create the pocket, start with a 5 x 4-1/4″ piece of cardstock (Pool Party).  With your Simply Score, you will score 1/4″ then at 1/2″ on 3 sides.  Trim out the corners where the score lines over lap.  Then fold cardstock at the score lines to create a pocket.  You will “sticky strip” the outer most scored fold.

You will use your sticky strip to adhere your tablet to your project as well.  Don’t forget to add a strip of Designer Series Paper into your pen so you have a matching set.

I’d love to hear who you will be creating this cute project for.

Have fun and Happy Stampin’

Linda

GREAT CATCH …

Today’s post is great “Man Card”… done by guest stamper and my upline Vicki Towell.

100_6125

When I saw this fish in the “By the Tide” stamp set in the Spring Catalog, I just had to have it.  I knew the fish would make great man cards, not to mention the rest of the set which would create an awesome scrapbook page.

By the Tide

The background is stamped with VersaMark™ onto Crumb Cake cardstock.  The fish “popped” up with the Stampin’ Dimensionals are stamped in Chocolate Chip (with coordination cardstock used as card back).  Just a touch from the White Gel Pen is what brought the eyes to life.  Don’t forget to brush on some “Crystal Effects” onto the shell!

fish close-up

You’ll find the greetings from the “One in a Million” stamp set in the 2012-13 Idea Book & Catalog on page 135.

Back to the Spring Catalog for the beautiful embellishments added to the card … Basic Designer Buttons and Natural Trim Ribbon both found on page 20.

Button-n-Ribbon

If you enjoyed today’s post, please feel free to leave a comment.

Happy Stampin’

Linda

Rural Life Scrapbook Page

Hello everyone ~

Todays post is a scrapbook page that I did at my local Historical Society. We had a wonderful time, and I had my first gentleman scapper in a class! That means I made “history” too! lol

When working with historical photos or any photos for that matter, photos should always be the focal point (not the accessories)!

The page was created to “highlight” the photos … when working with historical photos or any photos for that matter, that you want to stand out on your page. Photos should always be the focal point (not the accessories!)

I did research to add to my page (journaling) which will brings the photos to life!  Journaling gives your page a “story” and helps future generations understand photos you are sharing.

Even though I kept the page very simple (as life was back in the early 1900’s) I added subtle techniques to help “age” and create a warm feel for the page.