Too Cool Ice Cream Cone Card

Hello Stampin’ Friends ~

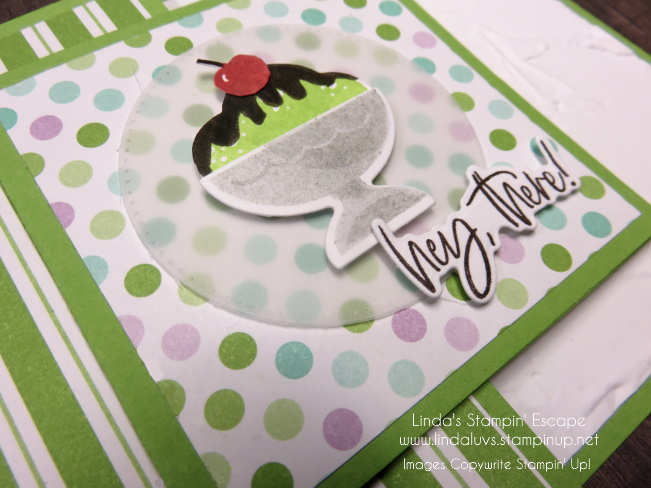
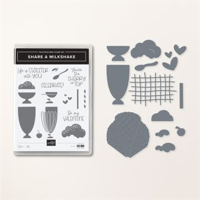
Have you ever made a card … thought it was cute …. but the more you looked at it, the more you thought it needed something? That is how I felt about this card I created with the Share a Milkshake stamps & Dies, along with the Wanted to Say Dies.

My cardbase is Early Espresso to coordinate with my chocolate ice cream, or if you’re a Chocolate Shoppe Ice Cream fan (out of Madison, WI) we call that deep rich chocolate; Zanzibar! My background is the Stargazing Designer paper and matted with Basic White. The cone is made from the Pecan Pie cardstock. It looked a little plain so I used the “waffle” die and pow ….. gave my pop I was looking for.

The Happy Birthday base or mat, is also die cut from the Stargazing designer paper and then topped off with the Basic White … a touch of Wink of Stella on our Happy Birthday. Just like building our cone! A few Berry Burst Tinsel Gems (4-pack) to embellish our cone … or you could call them “sprinkles”.

Making ice cream cones is pretty easy with these few ingredients and soooo tasty looking too. And that cone is going to be so good with all the warm weather we’ve been having

Thanks for joining me for a cone… Enjoy your weekend!

National Ice Cream Day Birthday Card!

Hello Stampin’ Friends ~

Happy National Ice Cream Day!! We’re going to celebrate using the Share a Milkshake stamps & Dies, along with the Wanted to Say Dies. What’s your favorite flavor? Today’s treat consists of a waffle cone with a scoop of vanilla, chocolate and topped off with raspberry! YUMMY

My cardbase is Early Espresso to coordinate with my chocolate ice cream, or if you’re a Chocolate Shoppe Ice Cream fan (out of Madison, WI) we call that deep rich chocolate; Zanzibar! My background is the Stargazing Designer paper and matted with Basic White. The cone is made from the Pecan Pie cardstock.

The Happy Birthday base or mat, is also die cut from the Stargazing designer paper and then topped off with the Basic White … a touch of Wink of Stella on our Happy Birthday. Just like building our cone! A few Berry Burst Tinsel Gems (4-pack) to embellish our cone … or you could call them “sprinkles”.

Making ice cream cones is pretty easy with these few ingredients and soooo tasty looking too.

Enjoy your Sunday and I hope you get out and grab some ice cream to celebrate National Ice Cream Day.

Thanks for joining me for a cone!

Punchin’ with Heart: Creating Cute Valentine Treat Boxes

Hello Stampin’ Friends ~

Happy Wednesday! Today I will be sharing the replay of my Facebook LIVE presentation from last night: Punchin’ with Heart: Creating Cute Valentine Treat Boxes I’m going to show you how quick & easy it is to make these cute boxes along with some fun tips for your Heart Punches. Did I mention cards too!!

Grab a beverage, sit back, relax and join me for my replay and the things that happen when your LIVE!

Hope you enjoyed and caught those tips! Here are the dimensions for the boxes. Start with a 12″ x 12″ – cut in half so you have a 12″ x 6″ sheet to start with.

  • Score at 2″ – 5″ – 7″ and 10″ at 11″ cut off end.
  • Turn paper 90 degrees and score at 1″
  • Turn 180 degrees and score at 1″

Burnish all score lines and cut and trim as shown in the video

Here is the card I created in the video too …

Thank you for hanging out with me today. I hope you enjoyed these cute boxes and were inspired to create some yourself.

Here is a list of ingredients used in today’s card. You can click on any one for more information about the product, or to begin shopping at my OnLine store. Thank you for your support.

Share a Milkshake Fun Fold Card

Hello Stampin’ Friends ~

Today I’d like to share the card that I demonstrated on during my Facebook LIVE last night: My Share a Milkshake Fun Fold Card. Sorry I couldn’t get the video to download, but you can view it HERE on my Facebook page. It will be much easier and quicker to understand how the card is created, plus I shared some tips as well.

So you know I’m highlighting the Share a Milkshake, the Designer Paper comes from our Sale-a-bration catalog!! The Dandy Designs has 48 – 12″ x 12″ sheets in the yummiest colors: Balmy Blue, Calypso Coral, Fresh Freesia, Granny Apple Green (what I used for my card base) Mango Melody and Petal Pink.

Let me show you the “closed” view … If you watched my LIVE last night, you will see a few changes!

Boy … that mint ice cream with hot fudge really does look delicious! And, I added the cherry on top and a greeting which I stamped in hot fudge, OH … I mean Early Espresso. The greeting comes from the Charming Sentiments bundle.

The vellum cardstock was cut with the Stylish Shapes Dies, a great staple to have in your stash because it has circles … squares … and banners for your greetings. I popped up the greeting and the ice cream with the small stamping dimensionals.

Ok … now lets get to the FUN in this fun fold. The card base is 8-1/4″ x 4-1/4″ then scored at 2-3/4″. The “z” part of our Fun Fold that gets attached to the front measures 9″ x 3″ and scored at 3″ and 6″. The striped designer paper measures 4″ x 2-1/2″. The two pieces for the “z” measure 2-3/4″ x 2-3/4″.

Now … isn’t that fun!? The front flap opens to the left but the “Z” folds over the top of that! You really need to head over to my Facebook page and check out the video HERE. The “sweet” sentiment on the inside comes from the Share a Milkshake bundle… Don’t you think those two fonts look nice together? Almost like they were made to be paired up … like the cherry on top!!

Thank you for stopping by and sharing a your time with me … Hope you enjoyed the Ice Cream!

Have a great day ~

Here is a list of the supplies used for this card …