It’s that time of year … prom, graduations, weddings and more! So, I have the perfect scrapbook page for the girlie side.
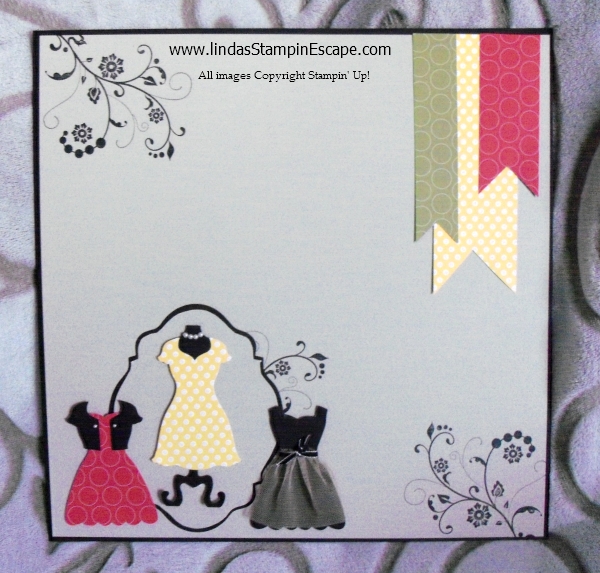
I created this page for my “Stamp-n-Scrap” club. Once I got my hands on the “Dress Up” framelit dies (130101) I fell in love with them… like a little girl with her first Barbie! It’s dress up day!
The “Polka Dot Parade” (126902) Designer Series Paper made it easy for dress up, as did the beautiful pearls (119247) used to “accessorize”. I borrowed the tulle as an item of the last Holiday Catalog for the little black dress. The used the “Apothecary Accents” framelit (127003) die to create an illusion of a mirror. My base colors used are Basic Black and Sahara Sand.
To draw your eye around the page, I stamped the beautiful images from the “Flowering Flourishes” stamp set: (C – 126367 / W – 131998). I think it suits this page so nice… Perfect for a Sweet 16 page! What do you think?
To balance out the page, the banners were added using the “Polka Dot Parade” Designer Series Paper. The page is now ready for your pictures. Choose your layout … and don’t forget to journal.
Here’s a tip: If this is your daughters Sweet 16 or prom page, let them write down their thoughts for the special event. Then in years to come those thoughts will trigger the precious memories of that day!
Every Tuesday, Stampin’ Up! releases new digital downloads! Don’t have “My Digital Studio”? It’s a great tool for creating cards, scrapbook pages and more!
Click on the link below and download yours FREE for 30 days …
What do you have to lose?
The first download I would like to share with you, is the Venetian Romance Designer Series Paper. It is so pretty, I have already ordered the regular DSP but now I’ll have to get the download … then I’ll never run out!
Venetian Romance Designer Series Paper – Digital Download 134735
Download includes: * 12 Designer Series Papers
Features: * Digital version of the traditional Designer Series Paper * European-inspired color scheme * Coordinates with the Venetian Romance traditional product suite
Colors: Crisp Cantaloupe, Island Indigo, Pistachio Pudding, Soft Suede, Tangerine Tango, Very Vanilla
I just love the colors in this series! But if your into BOLD … you are going to love this new kit!
Summer Possibilities Kit – Digital Download 134705
Download includes: * 11-piece SVG stamp brush set *12 Designer Series Papers * 22 embellishments * 4 punches
Features: * Digital exclusive * Perfect for summer picnics and parties
Today I wanted to share a fun scrapbook page I did a while back, but he is so cute I had to share!
Such a quick and easy page to do. You will need the Extra Large (119859) Oval Punch, the Large (119855) Oval Punch, and the Owl Builder (118074) Punch …. I used that for his eyes. You will also need the 1″ Square (124094) Punch to create his legs and punch the ovals to make his claws! I used circle and star punches to create the sun.
Although the alphabet used to create my title is no longer available… I suggest the “Notable Alphabet” – it’s fun and would look great on this page.
The waves are created using your favorite blue tones: I suggest Tempting Turquoise, Pacific Point, and Bermuda Bay! Even sounds like the ocean! The background (sky) is the tempting turquoise and the sand … Crumb Cake that was sponged to make it look more like sand.
Tear and layer the remaining blue tones and sponge the edges with Whisper White Craft Ink to create the illusion of waves. I also gently sponged the clouds with the White Craft Ink.
I hope you’re enjoying the beautiful weather we have finally received! I see many facebook posts about getting your gardens in, so I thought I would share this pretty bouquet of flowers with you!
I took this picture at the 2011 Stampin’ Up! National Convention who’s theme that year was “GROW”… so what better way to convey the “grow” message than with flowers! They are so pretty and they spread cheer to anyone receiving them, and my guess, to the givers too.
They are quite simple to make… just get out your Simply Score Tool (122334) and your favorite Designer Series Papers or cardstock!
Accordion-folded Flower
Directions:
1)Cut card stock or Designer Series paper to 12″ x 3/4″.
2) Score strip every 1/4″ the entire length of the card stock and accordion fold the score lines.
3) Adhere ends of card stock together (Sticky Strip works best).
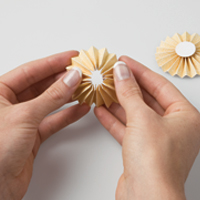
4) Holding the card stock with two hands, twist one edge of the strip into the center as shown to create a flower shape.
5) To hold the flower together, I use a hot glue gun and my Silicon Craft Sheet (127853) to hold shape in place. Just add a dot of hot glue directly onto your Silicon sheet and press the center of your flower into it. It’s soo cool … it just lifts right off and holds your flower firm.
6) Adhere a punched circle to the flower center on one or both sides.
Tip:Experiment with different sizes and score intervals to create the desired shape of your flower.
Have fun … and feel free to send me photos of your creations! I would love to see them.
I know most of you love the feel of a wood or clear block in your hand when your stamping, but for those of you who are fascinated with the digital age … here’s good news!
First, if you’re not already familiar with My Digital Studio (Creating Cards, Scrapbooks, Calendars and more) on your computer … You can get a FREE Download to TRY IT! Click on the 30 day Free Trial and sign up to get yours.
Are you always on the go, find you don’t have the time or energy to drag out your supplies? You can rescue those pictures “still” in your camera! MDS is simple … download them onto your computer and right onto a layout (or create your own)! Don’t you think it’s time you let the kids out! (tee hee) Here is a little video if you would like to learn a little more!
For those of you who have create projects already, it’s time to print … and you can save on your printing through June 15th! CLICK HERE FOR PRICE LIST
I’m really excited about this promotion … I’m hoping to finish my book quick, so I too can get the 25% off on my printing. Let me know what you have created with the My Digital Studio!
I am still on this “new blog” high! This is such an amazing way to keep in touch. For those of you who can’t make it to my classes or join my clubs, you can still get ideas and stay “in the know” of all things stampin’ and scrappin’.
On that note …
I want to share with you the “carry over” stamp sets that are not in the catalog but are still available to order. You guessed it, its Christmas sets! Plus, I’ll share some of the beautiful cards we made last year at my clubs, classes and the annual Holiday retreat!!
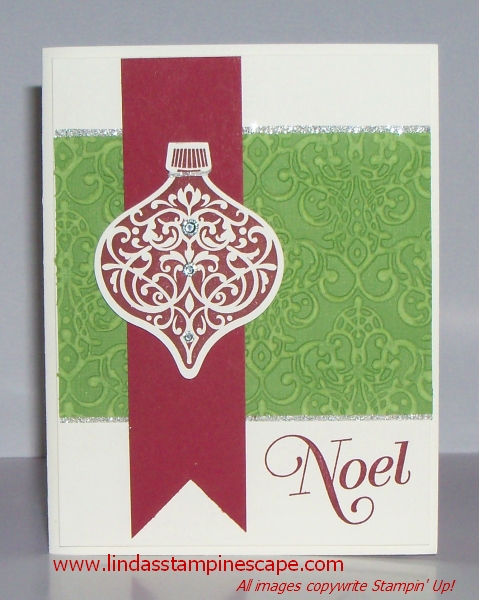
First, is the “Ornament Keepsakes” stamp set (128048 – W / 128051 – C) and the beautiful greetings from “Greetings of the Season” (128030 – W / 128033 – C)
I used the “Coordinations Cardstock as a background, a Cherry Cobbler banner that draws your eye to our focal point … the ornament! I then embellished with scraps (you got it) of the Silver Glimmer Paper (124005) and top it off with those precious “gotta have” Rhinestones (119246)
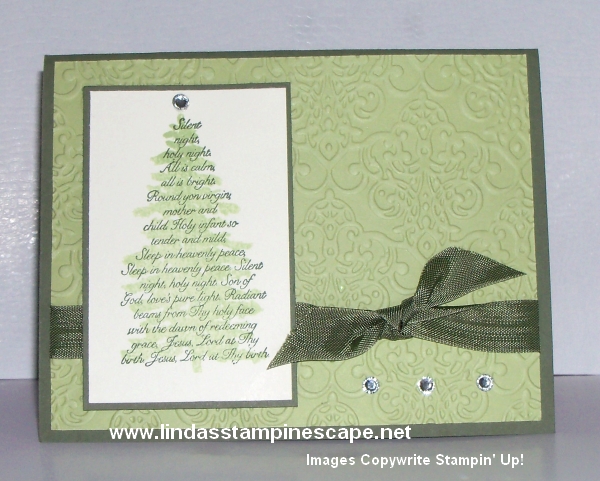
Next, the fabulous Two-Step Stamp Set, “Evergreen” (127970 – W / 127973 – C) You can make this with Always Artichoke and the NEW Pear Pizzazz or go wild and choose another color scheme!
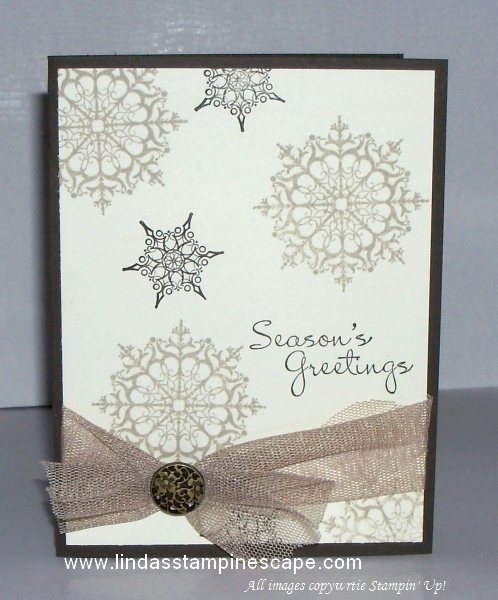
Last but definitely not least … I’ve got two great samples from the stunning “Snowflake Soiree” (127922 – W / 127925 – C) stamp set. The first is done in a soft neutrals pallet… Early Espresso, Very Vanilla, and Crumb Cake. It’s such a warm greeting for the holiday season. I used a brad from one of my favorite embellishments; “Vintage Brads” to tie the card together!
The second is so simple, yet simply beautiful. A very festive card when done in Whisper White and the simply delicious Cherry Cobbler!
It’s not too early to start thinking about the Christmas cards that you want to share with your friends and family.
I’ll soon be posting a date for my “Christmas in July … Oops August! Stamp Camp. We will kick-off the new Holiday Catalog at this event!
If you can’t wait and want to purchase any of the items I shared with you today, just click on the link below to get started.
Thank you so much for stopping by …
I appreciate that you take time out of your busy day to visit me!
I am stoked about sharing my card with you today! WHY… you say?
Because it is one of my favorite new Hostess stamp sets …
“Simply Sketched”
This stamp set is a beautifully designed “sketch” style that just calls your name. Oh, and the greetings are so pretty! The card below is the “Make & Take” that I designed from my 2013 Spring Demonstrator Retreat! We used aqua painters to do the “Watercolor” technique on the flower.
The base is “Crumb Cake” cardstock. The pretty green “Pear Pizzazz” paper comes from the “Gingham Garden” Designer Series Paper pack. The “pop” of color is the NEW “Strawberry Slush” from the 2013-15 In-Colors.
I used the 2-1/2 inch circle punch (120906) on the flower and the “Window Frames Collection” Framelits (129021) for the mat. The pretty button came from the new “Very Vintage Designer Buttons” (129327).
OK… I can’t help it. I must share my swap card with you too! The Island Indigo color makes the card “pop” and was chosen to coordinate with the “Soho Subway” Designer Series Paper. And don’t you just love that little bird!?
Let me just say … “the picture in the catalog does not do this paper justice”. I simply fell in love with the Soho Subway Designer Series Paper (130140), it’s great for scrapbooking… and any type of card!
And FYI … the “Sympathy” is included in the Simply Sketched stamp set. Just click on the “Shop Now” button to purchase any of the items you saw here today.
A little reminder that the “Simply Sketched” is an exclusive Hostess set, which you can get FREE when you host a stampin’ party, join one of my clubs, or place an order of $150 (order with a friend or two!)
When I got my hands on the New 2013-14 Idea Book & Catalog, I knew right away what I had to have! For those of you who come to my annual Kick-Off party, you know I have a “My Favorite Stamp Set Contest” … and I still will, but I couldn’t wait to share this product with you!
The BIGSHOT … just like the Lone Ranger, now has a side kick you can’t be without! Meet Tonto!
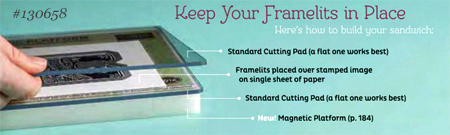
The newStampin’ Up! Magnetic Platform for Framelits & Edgelits (130658)
No more post-it notes since the magnet easily holds them in place! I can’t wait to get my hands on it, because you all know… I love my framelits!
Watch the video from Stampin’ Up! to see how easy it really works!
Now, you’ll need a cute idea to use with the new magnetic platform, here is a beautiful card that I received from one of my Star’s members Brenda Morateck! I just love the neutral color pallet on this card, it works well with the “COLLAGE” Technique she used.
The “Secret Garden” stamp set (page 94) and coordinating framelits (page 187) were used to create this card. Some of you will recognize the greeting as coming from the awesome stamp set “Lacy & Lovely” on page 117.
Hope you enjoyed today’s post, and my “Lone Ranger” reference …
You know I’ll be going to see Johnny Depp as Tonto!
Today I am sharing a simply beautiful card created with the “By the Tide” stamp set from the Spring Catalog.
I am excited to say that this versatile stamp set will carry over into the NEW 2013-14 Idea Book and Catalog!
I love to layer white on white, it sets up the card with a great foundation. Don’t forget to give the first layer of white a “lift” by using stampin’ dimensionals… they are definitely a necessity in any stampin’ kit!
The combination of a simple greeting “so kind of you” from the “Sweet Essentials” stamp set with the single shell from the “By the Tide” stamp set created this beautiful card.
The addition of texture to the card using the “Houndstooth Folder” really sets off the accent of the Midnight Muse 3/8″ Stitched Satin Ribbon. As you can see, I only partially embossed the card to create a more dramatic effect.
Every now and then we all look for an easy to make, yet beautiful card. I hope this fulfilled that need for you.
If you enjoyed this card, please leave a comment. I’d love to hear from you!
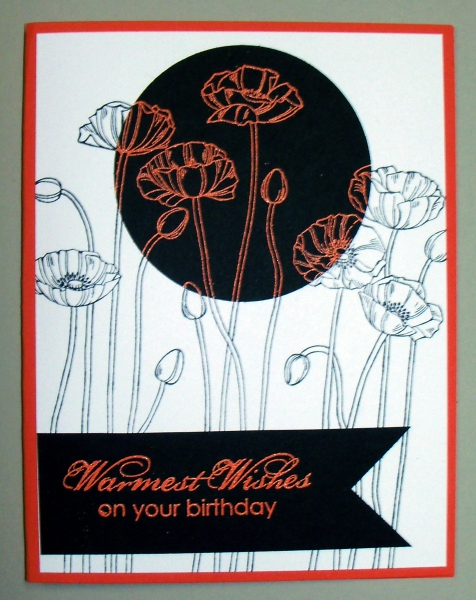
Today I’m sharing a quick and easy card made with the “Pleasant Poppies” stamp set (found in the Stampin’ Up! Idea Book & Catalog).
The technique used for this card is a “spotlighting” technique. Begin simply by stamping the image onto Whisper White cardstock. Then with VersaMark™ stamp the same image onto black cardstock… emboss. I used the “Tangerine Tango” embossing Powder.
Next, punch out your embossed poppies and layer them over the stamped one on the Whisper White.
Although this is a birthday card, I think it is quite fitting as today is Memorial Day. A special day set aside to remember, honor and thank those who have fought for our freedoms.
I hope you are enjoying this holiday weekend… and don’t forget to thank a veteran.
Today’s post is great “Man Card”… done by guest stamper and my upline Vicki Towell.
When I saw this fish in the “By the Tide” stamp set in the Spring Catalog, I just had to have it. I knew the fish would make great man cards, not to mention the rest of the set which would create an awesome scrapbook page.
The background is stamped with VersaMark™ onto Crumb Cake cardstock. The fish “popped” up with the Stampin’ Dimensionals are stamped in Chocolate Chip (with coordination cardstock used as card back). Just a touch from the White Gel Pen is what brought the eyes to life. Don’t forget to brush on some “Crystal Effects” onto the shell!
You’ll find the greetings from the “One in a Million” stamp set in the 2012-13 Idea Book & Catalog on page 135.
Back to the Spring Catalog for the beautiful embellishments added to the card … Basic Designer Buttons and Natural Trim Ribbon both found on page 20.
If you enjoyed today’s post, please feel free to leave a comment.