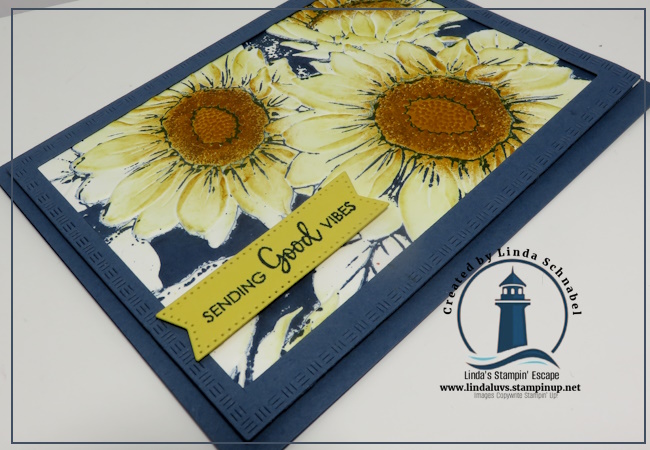
It feels so good to be back creating and sharing with you again—and today I’ve got two beautiful cards to show you, featuring the Sunflower 3-D Embossing Folder. I have to tell you, this folder is pure magic. My head is spinning with all the ideas and techniques I want to try using it—seriously, it’s a creative goldmine!
For both of today’s cards, I started with one of my favorite and super simple techniques: inking directly onto the embossing folder. Yep, you heard that right! I tapped my Misty Moonlight ink pad directly onto the side of the folder where the image is concave. Once your paper is inside and you run it through the Stampin’ Cut & Emboss Machine, the ink hugs all the right places and leaves you with the most amazing textured print. And that’s just the beginning!
My first card design takes that embossed and inked background and cuts it into three panels (from a 5″ x 3 3/4″ piece). I mounted the panels onto a Misty Moonlight mat cut to 5 1/4″ x 4″, creating a striking visual with just a bit of white space between the strips. Then, to add a touch of softness and extra texture, I tied a simple bow with linen ribbon. The greeting? It’s from the Full of Charm Paper Pumpkin Kit—a great reminder of why I love and keep subscribing to Paper Pumpkin each month. Those exclusive stamp sets are treasures I reach for again and again!
Now, the second card… is what happens when you stamp with a friend and she has colorful ideas!! Wow, and does it pop with color! After embossing the image, I used a sponge dauber to lightly apply Crushed Curry over the sunflower petals. Then I went a bit bolder, deepening the flower centers with more intense color. To really bring out the detail, I used a flat paintbrush to tap on a bit of Pecan Pie ink—and the result is absolutely gorgeous! I framed this beauty using the Textured Notes Dies (just trim your embossed panel slightly smaller than the frame), then mounted it to a Misty Moonlight card base.
To finish it off, I used one of my go-to greetings from The Right Words stamp set—perfect sentiments for just about any occasion. I die-cut it using the Stylish Shapes Dies, which always seem to give my cards that polished look.
These two cards are just a peek at what’s possible with this Sunflower 3-D folder—and trust me, you’re going to want it in your collection. It’s a staple for any season and pairs beautifully with your favorite inks and techniques. So go ahead—treat yourself to a little creative joy!
And if you’re not already subscribed to Paper Pumpkin, now’s the perfect time to jump in. The stamps alone are worth it, and the kits offer fresh ideas every month. (Not to mention, they coordinate beautifully with products you already love.)
As always, I hope today’s projects spark a little inspiration in your heart. If you need any of the supplies mentioned—or have questions—I’m here to help. Happy stamping, friends!
🎉 Don’t forget, Stampin’ Friends — there’s still time to get in on my Tote-lly Awesome July Giveaway! 🎒 With every $50 order (before shipping & tax), your name goes into the drawing to win this adorable Strawberry Slush Craft Tote—perfect for carrying your supplies in style. Whether you’re crafting at home or heading to a class, this tote is a must-have! 🥰 Get your order in by July 31st to be entered. You’re going to love it!
Today, we’re walking through the doors of the Beautiful Gallery Suite Collection—and let me just say, it’s gallery-worthy in every sense of the word. If you’ve ever wished you could bottle up the serenity of a painted landscape or the elegance of a hand-sketched bloom, this suite is your dream come true.
From the soft watercolored scenery to the striking floral motifs, every piece in this collection feels like it belongs on the wall of your favorite art museum—except we get to cut it, layer it, stamp it, and send it off to make someone’s day!
This bundle is more than just pretty paper (though the DSP is swoon-worthy). It’s a complete experience, perfect for cardmakers, scrapbookers, and tag-makers alike! You’ll find:
Painted landscapes and sketched floral patterns in the Designer Series Paper
All-occasion sentiments that are both warm and versatile
A beautifully detailed embossing folder to add texture and depth
And my personal favorite: coordinating dies that make your stamped images pop!
Whether you’re preserving a moment in a scrapbook or sending a little happy mail, this suite has everything you need to make it memorable.
In today’s video, I’ll walk you through two card designs using the Beautiful Gallery Bundle—and you’re going to love how quickly these come together. But wait… there’s a twist! I’m also showing you a fun new way to use your Stampin’ Blends Color Lifter. Hint: it’s not just for “fixing” anymore.
Think of it like adding brushstrokes to your own mini canvas. It’s a subtle but oh-so-artistic technique that gives your coloring a soft, watercolor-like effect.
✨ Ready to get inspired?
How did you like the new technique I shared using the Stampin’ Blends Color Lifter? Isn’t that such a fun and unexpected way to soften your color application? ✨
Instead of just correcting color “oopsies,” the Color Lifter becomes a true blending tool—giving your stamped images a soft, watercolor-like wash. It adds a dreamy, almost painted look that pairs beautifully with the hand-sketched elements in this suite.
If you’ve never tried this before, I highly recommend giving it a go. It’s one of those little tricks that makes a big impact!
With the Beautiful Gallery Suite Collection, you can create a whole world of creativity from your craft space. Add some ink, your favorite cardstock, and a bit of adhesive—and you’re ready to turn paper into art.
Thank you so much for joining me today …. Remember, I go LIVE with a FREE Class on Tuesday nights on my Facebook page. Join me HERE!
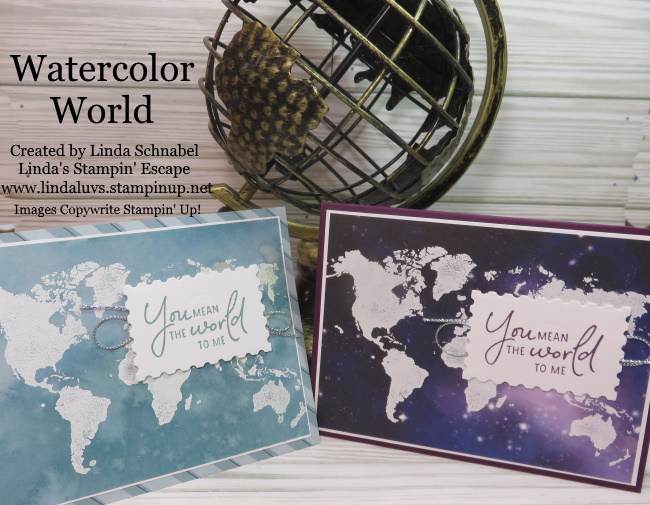
🌎 It’s time to color your world—before this beauty is gone for good! The Watercolor World stamp set is making its final journey, and you do not want to miss the chance to add it to your collection. This large, artistic stamp brings a relaxed watercolor style that looks stunning with just one impression—perfect for beginners and seasoned stampers alike. Whether you’re a globe-trotter at heart or simply love bold backgrounds, you’ll fall in love with how easy it is to create beautiful, meaningful cards in minutes. Let me show you just how magical it can be—watch the video where I walk you through step-by-step techniques using Sponge Daubers, Stampin’ Write Markers, and more!
Grab a coffee, tea or whatever you like and join me for a short video that brings these magical techniques to life. This is a replay of one of my past Facebook LIVE presentations. Just click on the image to view …
Let’s take a closer look at our cards …. Let’s delve into our basic stamping and embossing, accompanied by the Thoughtful Expressions Bundle. This technique marries simplicity with refinement, as we create timeless masterpieces with ease. Combined with embossing folders, the Watercolor World stamps transform into captivating works of art, ready to adorn any occasion.
Ready to immerse yourself in the magic of direct-to-rubber stamping technique? Then enhanced by the Sending Smiles stamp set which dances across the continents! This technique introduces a delightful twist to traditional stamping, infusing your creations with a watercolor-inspired allure. The Stitched with Whimsy dies also creates not only texture, but the feeling you are traveling with them.
Our third technique, emboss resist, is a testament to the versatility of the Watercolor World stamp set. Paired with the He’s All That stamp set, we embark on a journey of exploration and experimentation. As we apply layers of color over our heat embossing, intricate designs emerge, unveiling a world of possibilities. Witness as the stunning effects of emboss resist unveil intricate patterns (our continents) and textures, captivating the eye and igniting the imagination. So fun and so easy to do.
As we pair these techniques with complementary stamp sets, we unlock new dimensions of inspiration and innovation, transforming simple materials into works of art that delight the senses and nourish the soul. So, gather your supplies, unleash your imagination, and let the Watercolor World stamp set be your guide on a voyage of discovery and delight.
🌍🎨 Don’t let this global gem slip away! The Watercolor World stamp set is retiring, and once it’s gone, it’s gone. This is your chance to own a truly versatile background stamp that can be as simple or as detailed as you want it to be—your creativity sets the course.
Thanks for joining me today. Click add to cart and let your creativity take flight across the globe. Happy stamping and safe travels through your creative world! ✈️🎨💌
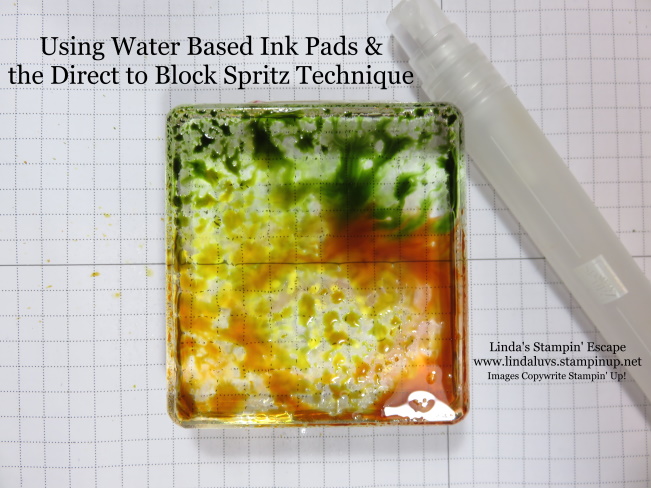
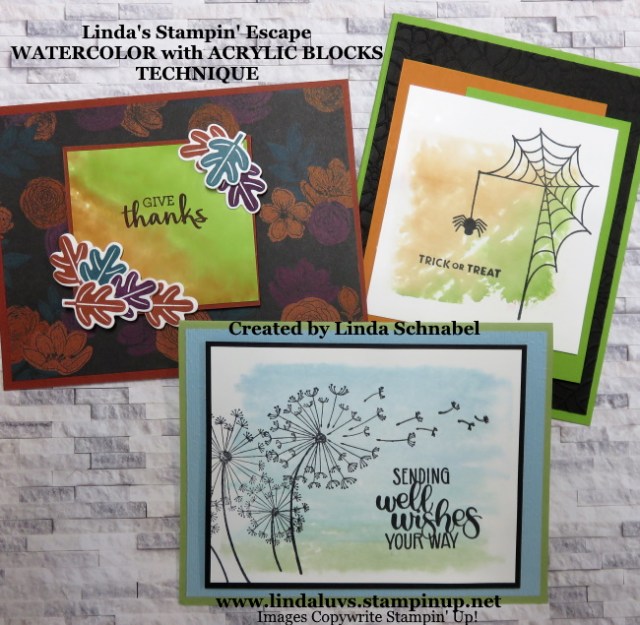
Welcome to September, a month filled with the promise of autumn’s vibrant colors and creative inspiration. I’m thrilled to introduce you to the “Direct-to-Block Spritz” technique using our water-based ink dyes. In this blog post, I will guide you through the process of creating this technique. So, grab your supplies and let’s dive into this innovative and fun crafting journey!
Step 1: Prepare Your Workspace
Set up a clean and well-lit workspace, protecting it with a craft mat or disposable tablecloth to avoid any ink stains.
Step 2: Choose Your Colors
Select the water-based ink dyes that you’d like to use for your background. I used Cajun Craze, Pumpkin Pie, Crushed Curry and Old Olive with worked wonderfully for this project.
Step 3: Apply Ink to Acrylic Blocks
Tap your ink pad of each chosen ink color directly onto separate acrylic blocks… I use a Sponge Dauber or my finger to blend the sharp lines. Don’t overlap colors too much… this will make it muddy. This will serve as your ink palette.
Step 4: Spritz with Water
Lightly mist the ink colors with your Stampin’ Spritz to activate the pigments and create a watercolor effect.
Step 5: Create Your Background
Gently press the inked acrylic blocks onto your Basic White, Very Vanilla or Watercolor paper. Experiment with different angles and color combinations to achieve the desired look. Then rinse the block and repeat … you can use larger blocks as well.
Step 6: Let it Dry
Allow your background to air dry completely. This might take some time, so patient. You can use a heat tool to speed up the drying process if you’re in a hurry.
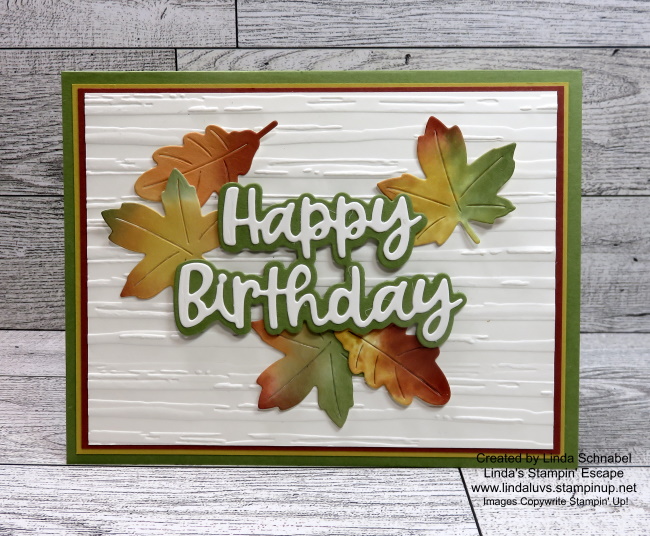
Now I’m going to die-cut leaves from our upcoming Autumn Leaves dies, and used the Stripes & Splatter Embossing Folder to add texture to this card as well (you must run it through twice to emboss the entire piece) but you can use the “Timber” embossing folder that is currently available if you don’t have the stripes. I love the simple & clean look of this card.
With the Direct-to-Block Spritz technique and our water-based ink pads, the possibilities for creativity are endless. Whether you’re crafting a stunning background or using the design to enhance your projects, this technique is a fantastic way to welcome the autumn season with a burst of color and style.
I hope this blog post has inspired you to experiment with this technique and explore new horizons in your crafting journey.
Get ready to be enchanted by our newest Online Exclusive, the “Frosted Forest Bundle.” This bundle is an absolute must-have for any card-making or scrapbook enthusiast looking to capture the magic of a wintery forest. The Frosted Forest Bundle includes three fantastic products: the Frosted Forest Stamp Set, Frosted Forest Dies, and Frosted Forest Decorative Masks. With these tools at your disposal, creating elegant, frosted cards with a beautiful forest feel has never been easier.
But don’t just take my word for it. I’ve created a special video showcasing a fun masking technique using this bundle, which I’m sharing with you today. This technique is perfect for adding depth and dimension to your cards, and it’s a great way to explore the full potential of the Frosted Forest Bundle.
Imagine stamping a majestic tree, then adding a die-cut tree trunk to bring it to life. Finish off with some embossed snow on the branches for that perfect wintery touch. The possibilities are endless with the versatility of this bundle. You can use the stamps, dies, and decorative masks together for a cohesive design, or mix and match them to create your unique masterpiece.
And it’s not just for winter scenes! Check out my second card where I combined the Thoughtful Journey patterned paper with some creative masking and highlighting. This bundle is truly versatile, allowing you to create beautiful cards for any occasion, not just the winter season.
Mark your calendars for July 9th and join me for my Facebook LIVE session, where I’ll share tips and tricks on how to enhance your stamps and papers using the Thoughtful Journey Patterned Paper. Don’t miss out on this opportunity to elevate your card-making skills and be inspired by the endless creative possibilities. See you there!
Here’s another look at today’s featured card … simple yet elegant, perfect for any occasion.
As I wrap up today’s post on the enchanting Frosted Forest Bundle, I hope you’re feeling inspired to create your own winter wonderland. Whether you’re crafting elegant seasonal cards or experimenting with year-round designs, this bundle has everything you need to bring your creative visions to life.
Happy crafting, and may your creative journey be filled with joy and inspiration!
Welcome to September, a month filled with the promise of autumn’s vibrant colors and creative inspiration. To kickstart this exciting month, I’m thrilled to introduce you to the “Direct-to-Block Spritz” technique using our water-based ink dyes. In this blog post, I will guide you through the process of creating two distinct looks with the same technique. So, grab your supplies and let’s dive into this innovative and fun crafting journey!
Step 1: Prepare Your Workspace
Set up a clean and well-lit workspace, protecting it with a craft mat or disposable tablecloth to avoid any ink stains.
Step 2: Choose Your Colors
Select the water-based ink dyes that you’d like to use for your background. I used Cajun Craze, Pumpkin Pie, Crushed Curry and Old Olive with worked wonderfully for this project.
Step 3: Apply Ink to Acrylic Blocks
Tap your ink pad of each chosen ink color directly onto separate acrylic blocks… I use a Sponge Dauber or my finger to blend the sharp lines. Don’t overlap colors too much… this will make it muddy. This will serve as your ink palette.
Step 4: Spritz with Water
Lightly mist the ink colors with your Stampin’ Spritz to activate the pigments and create a watercolor effect.
Step 5: Create Your Background
Gently press the inked acrylic blocks onto your Basic White, Very Vanilla or Watercolor paper. Experiment with different angles and color combinations to achieve the desired look.
Step 6: Let it Dry
Allow your background to air dry completely. This might take some time, so be patient. You can use a heat tool to speed up the drying process if you’re in a hurry.
Now we are ready to create our cards: The first card will showcase the mesmerizing background effect achieved using the Direct-to-Block technique. I added a stamped image to incorporate some additional design which comes from our Nature’s Prints stamp set (I also used this stamp set on yesterday’s card). This highlights our beautiful technique.
To create some extra dimension, I stamped the Old Olive background of my card base with the spatter stamp in the same set, and added texture by embossing the “Spatter” from the Stripes & Spatter Embossing Folder.
The second card will take the design a step further by using it to die-cut leaves from our upcoming Autumn Leaves Bundle, set to launch in our mini catalog on September 6th. I used the Stripes & Splatter Embossing Folder to add texture to this card as well (you must run it through twice to emboss the entire piece). I love the simple & clean look of this card.
With the Direct-to-Block Spritz technique and our water-based ink pads, the possibilities for creativity are endless. Whether you’re crafting a stunning background or using the design to enhance your projects, this technique is a fantastic way to welcome the autumn season with a burst of color and style.
Don’t forget to mark your calendars for September 6th when our Autumn Leaves Bundle becomes available in our mini catalog. I hope this blog post has inspired you to experiment with this technique and explore new horizons in your crafting journey.
Thanks for checking out today’s post. Happy September 1st!!
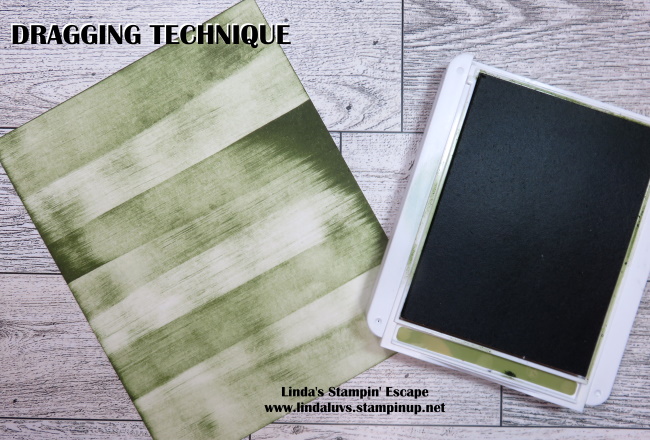
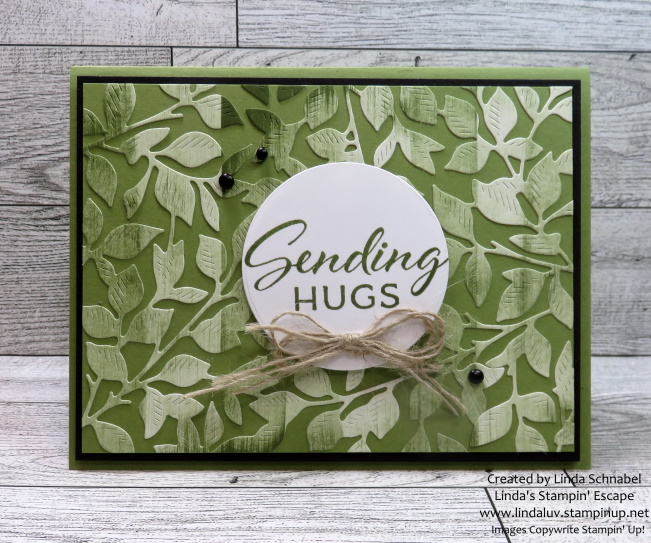
Today, we’re diving into the wonderful world of water-based ink and a technique that’s as fun as it is beautiful: the Dragging technique. We’ll be using the Gorgeous Garden dies to cut out our inked creations & add a touch of elegance. Get ready for some crafty goodness we explore the ease and creativity of this technique!
The dragging technique is a simple yet versatile method that involves dragging your water-based ink across the surface of your cardstock for a stunning effect. You can use a straight drag motion as shown above, or you can put your creative juices into it and drag is several different directions.
Once your inked background is dry, it’s time to break out the Gorgeous Garden dies. Carefully align them over your masterpiece and run them through your die-cutting machine. Voilà! You’ve just turned your inked creation into a work of art.
Next you’ll want to create that layered look by simply gluing your Gorgeous Garden die cut onto a piece of Old Olive cardstock … Let Dry and trim down to 5″ x 3-3/4″. Layer with a Basic Black mat measuring 5-1/4″ x 4″. Using dimensionals, attach to Old Olive cardbase.
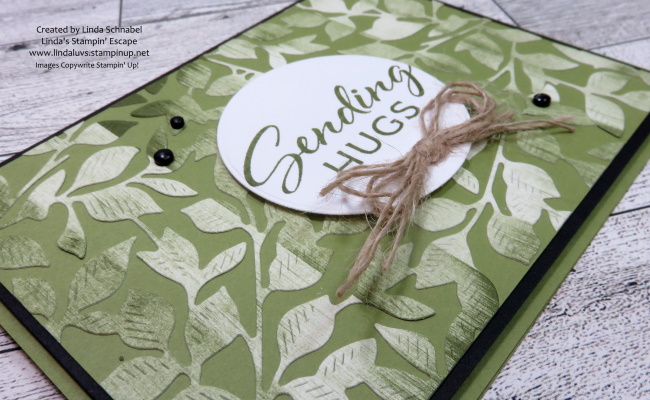
Let’s not forget the greeting! Use the Layer Leaves stamp set to stamp a heartfelt message, and then use the Stylish Shapes dies to give it shape. Time to use up the left over Threaded Twine that we used on our last card … It’s like giving your project a little bowtie – classy and fun!
The twine also reflects the “natural look” that blends well with the leaves, and adds so much texture and dimension to your card. Pop this up with our Stampin’ Dimensionals. Don’t forget to embellish … I used the Classic Matte Dots in Black to pull out the color of my mat. Clever!
Crafting should always be an adventure, and the dragging technique with water-based ink proves just that. Whether you’re a seasoned pro or a newbie in the crafting world, this technique offers endless possibilities for creativity. So, grab your supplies, unleash your inner artist, and let your imagination run wild with water-based ink and the Gorgeous Garden dies.
Thank you for hanging out with me today … have fun!
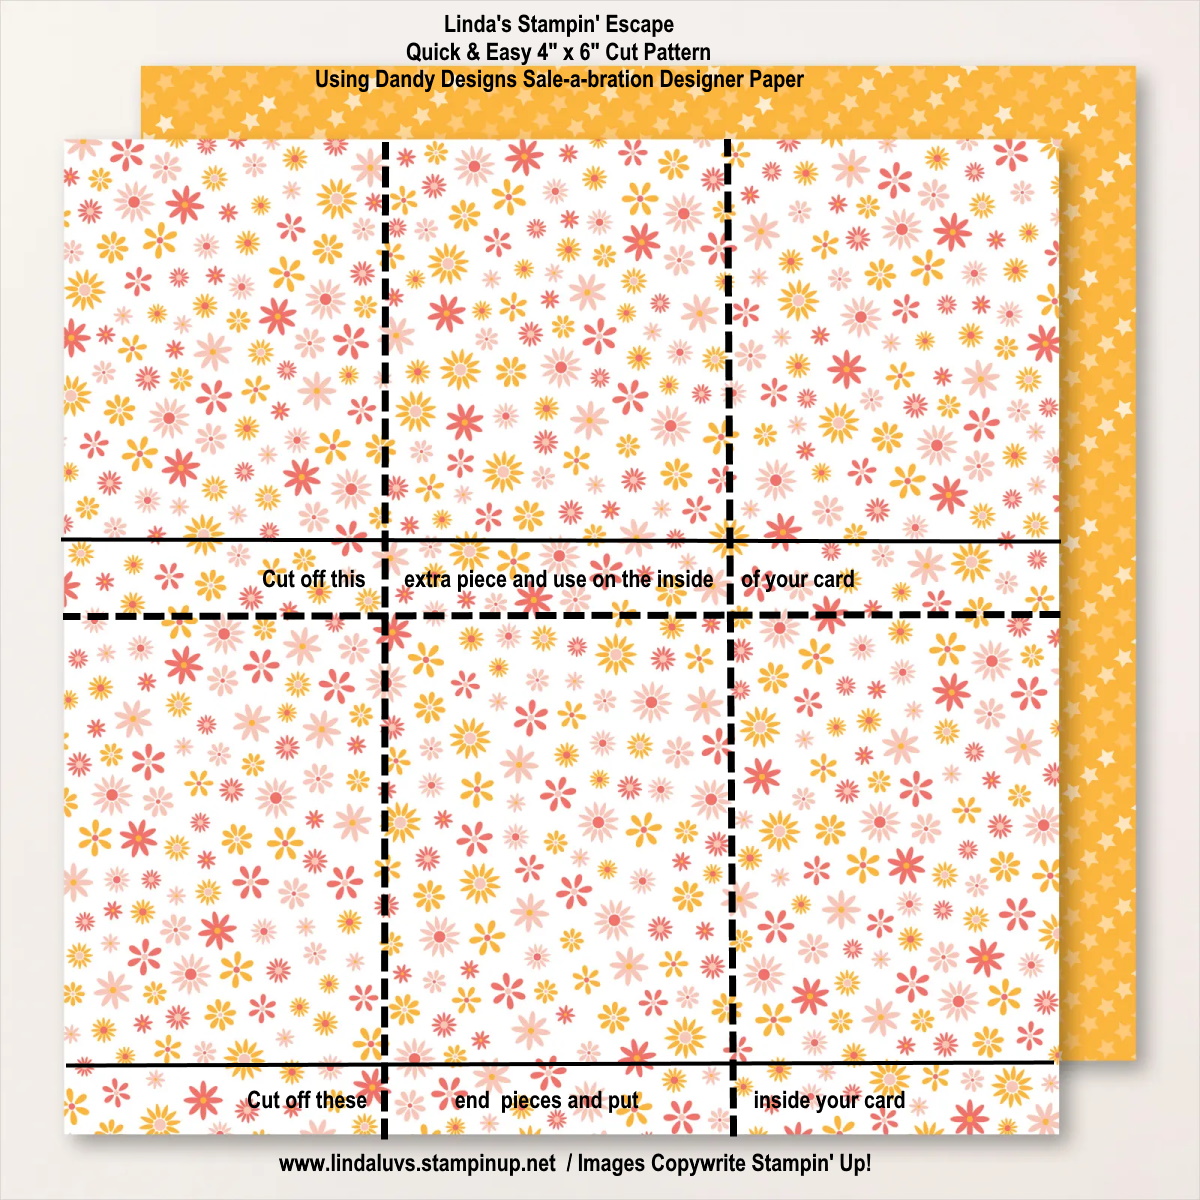
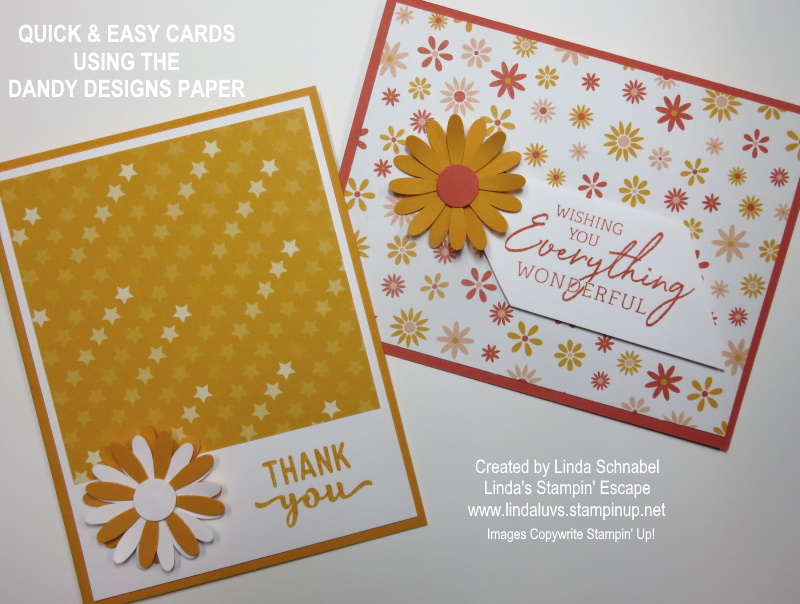
Today I’ll share a few Quick & Easy cards that I created with the Dandy Designs Designer paper in the Sale-a-bration Catalog. The idea behind these creations is to “cut” your designer paper and use it! lol
We begin by cutting 4″ strips from our 12 x 12 Designer paper … then cut it in half (6″). From there we trim it down to 5-1/4″. This gives us a nice border around our card base, and that little left over piece can be used to decorate the inside of your card.
All of my cards have been embellished with the Medium Daisy Punch ….
With this quick & easy cut pattern, you can create 6 cards per sheet ….
This is just a representation of the cut pattern and NOT “exact” measurements.
Next up we have a 4″ x 4″ cut pattern with results in 9 cards per sheet. There are more ways to use both of these cut patterns. I’m just sharing the most popular / simple card designs. Also note that the peek of paper behind the designs cut is the reverse side of the these designer paper sheets.
This is just a representation of the cut pattern and NOT “exact” measurements.
On this card we are creating a card with the 4″ x 4″ square with a twist … We cut the square piece of designer paper diagonally … from corner to corner. Then you attach to card at opposite ends to create the “Split Card Technique”. How cool is that!
You can use this fun and easy technique with any designer paper but with 48 sheets in the Dandy Designs package you will have an endless supply of fun, and so many card possibilities. Dandy Designs is one of the choices in FREE merchandise during Sale-a-bration.
My last card also uses the 4″ x 4″ piece, however we trimmed it down a 1/4″ off the top and side so we could have a nice border around it …..
These quick & easy cards were all created during my LIVE presentation yesterday for my Catalog Launch party. I go LIVE on Tuesday Nights at 6:30 with New Products, Fun Folds or Techniques … always a fun time and great projects! Hope to see you there.
Thank you for stopping by this Sunday. Have a wonderful day ~
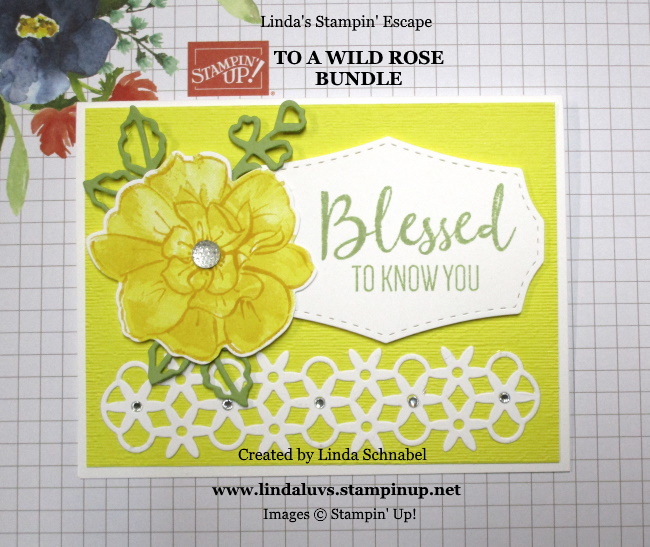
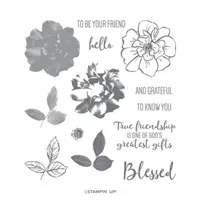
Hope you had a wonderful weekend! With the retirement list in full swing and my Catalog Retirement Party coming up this weekend, I will be focusing some of my favorite “retiring” products this week. Today I’d like to share the “To A Wild Rose” Stamp set.
There are so many different ways you can use this versatile stamp set, I thought I’d share 3 different techniques with you. The first is the “Three-step Stamping” technique …
You begin with the most solid of the three images … this one gets the lightest color, or in my case … I “stamped off” to lighten the Daffodil Delight. Then the second image is stamped with full color, and the last and most detailed stamp, I used Crushed Curry. You can see the three layers as it gives our flower highlights and lowlights!!
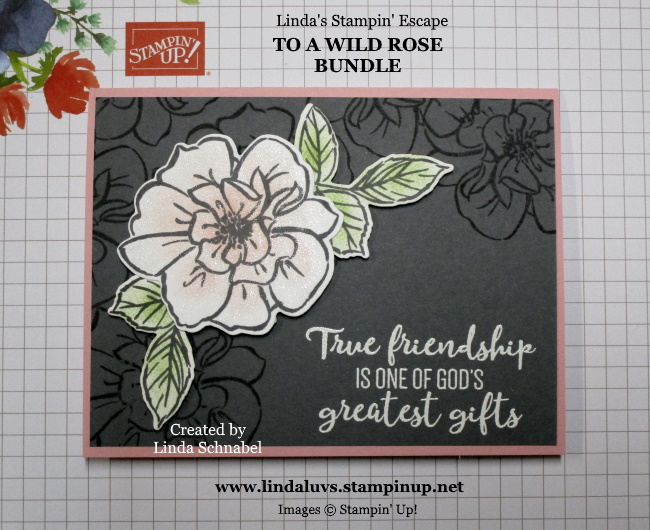
On my “True Friendship” card, I used the technique of sponging color onto the image ….
I used the detailed image not only to stamp my flower that was sponged, but my background! I love doing “color on color” and on this card I’m using the Basic Gray. I think that Gray and Pink are so pretty together.
My last of the three card features the “Coloring with Stampin’ Blends” technique …
Before I decided how my card would look, I chose my color pallet; Basic White and Highland Heather. I stamped the rose image with the Momento ink and began to color it with the Highland Heather Stampin’ Blends Duo. I begin by coloring a petal with the light marker, then add the dark marker at the part of the petal that is closest to the center and over the lines in the rose. Then I go back over the dark with the lighter marker to blend the colors … you can always add a little more dark again. I leave the edges of the petals as light as I can.
The center is colored with the Daffodil Delight Dark Stampin’ Marker and then the rose is die cut. The leaves cut from Pear Pizzazz cardstock. The lattice piece was cut in Whisper White and Highland Heather and then layered to create an added dimension to the card. The white base was stamped with the “Hello” from the stamp set and then the entire piece was embossed using the “Subtle” Folder.
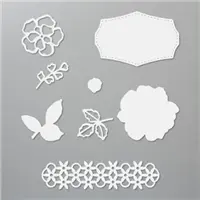
Have you fallen in love with this amazing stamp set yet? I find it so versatile and easy to use. Don’t forget that the “To A Wild Rose” coordinates with the Wild Rose Die Set.
Thank you for joining me today. Let me know if you have any questions on the cards shared today.
Hope your day is filled with beauty … pass it on.
TODAY’S STAMPIN’ SUPPLY LIST … Click on any image for details about the product or to begin your shopping experience. Clicking on it directs you to my website. Thank you!!
Today I’ll be sharing my Facebook Live presentation of Watercoloring with Acrylic Blocks and the three cards I created using this technique. Last night I shared two of the three cards. Kick back and watch the video, you’ll see how these cards found their beginnings …
The first was my quick -n- cute Halloween card from the Festive Corners stamp set. I used the Stampin’ Write markers to apply the ink to the block and then spritzed it with water.
I’m using the Festive Corners stamp set …. again!!
The second card I created using the markers on the Acrylic Blocks features the Dandelion Wishes stamp set and the markers to create a background.
My colors are Balmy Blue, Pool Party, Bermuda Bay and Pear Pizzazz …
I used my Stamparatus for my sentiment, it allows my to ink it several times so it’s nice and dark and becomes the focal point of the card.
The second way to use this “Watercolor” technique on the Acrylic Blocks is to put the ink from the ink pad directly onto the blocks. It is applied thicker so the image will be bolder …
I used the Arrange the Wreath bundle and the Magic in this Night Designer Series paper to create this card. The fall leaves surrounding the greeting creates the perfect focal point for this card. Leaf colors are Pretty Peacock, Blackberry Bliss and Cajun Craze which coordinates with the designer paper.
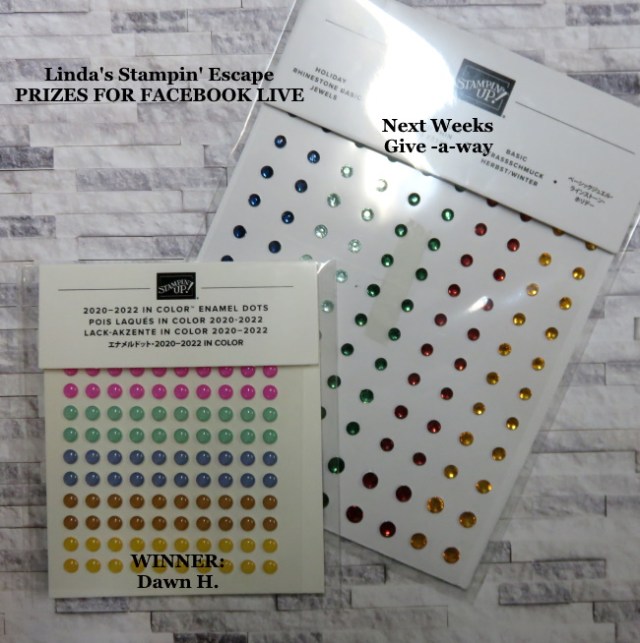
If you watched the video … you know that each week I do a drawing from all the people who watched and commented on the video … I invite you to join us next week Tuesday for another Technique! Here’s the prizes …
I miss meeting with all my stamping friends face to face, so the Facebook Live seems to get me a little closer to my friends!
Here is one last look at the three cards I created with this FUN technique …
The Watercolor technique using Acrylic Blocks can be used for any one, any stamp set … any holiday! Just look, we have a “Get Well”, a “Halloween” and a “Card of Thanks”.
Thank you for joining me today. I’d like to know how you enjoyed today’s cards…
Have a wonderful day!
TODAY’S STAMPIN’ SUPPLY LIST … If you liked the products used in today’s projects, I have links for you below. Just click on the item you would like more information on, or to begin your shopping. It will take you directly to my website. Thank you ♥
If you’re loving the “To A Wild Rose” bundle … I have a great offer for you! This has been posted before and I just wanted to remind everyone that if you purchase the “TO A WILD ROSE” bundle from me by August 31st, 2019, I will send you all 3 cards with directions and tips to recreate them yourself!! You will also receive a Virtual Rewards point!! You get a Rewards point for each $50 (before ship&taxes) USE HOSTESS CODE: ARQ3KZ9U and place your order by August. 31st. 2019. Cards are ready and will ship as soon as I get your order notification!
The “True Friendship” card is done with the basic stamping technique of “Color on Color” … I love going back to the basics sometimes, then the technique of sponging color onto the image really adds a soft beautiful touch to the card ….
Today, my “Hello” card features the “Coloring with Stampin’ Blends” technique …
Before I decided how my card would look, I chose my color pallet; Whisper White and Highland Heather. I stamped the rose image with the Momento ink and began to color it with the Highland Heather Stampin’ Blends Duo. I begin by coloring a petal with the light marker, then add the dark marker at the part of the petal that is closest to the center and over the lines in the rose. Then I go back over the dark with the lighter marker to blend the colors … you can always add a little more dark again. I leave the edges of the petals as light as I can.
The center is colored with the Daffodil Delight Dark Stampin’ Marker and then the rose is die cut. The leaves cut from Pear Pizzazz cardstock. The lattice piece was cut in Whisper White and Highland Heather and then layered to create an added dimension to the card. The white base was stamped with the “Hello” from the stamp set and then the entire piece was embossed using the “Subtle” Folder.
Have you fallen in love with this amazing bundle yet? I find it so versatile and easy to use. How would you like these cards?
I have a SPECIAL OFFER FOR YOU …
If you purchase the “TO A WILD ROSE” bundle from me by August 31st, 2019, I will send you all 3 cards with directions and tips to recreate them yourself!! You will also receive a Virtual Rewards point!! You get a Rewards point for each $50 (before ship&taxes) USE HOSTESS CODE: ARQ3KZ9U and place your order by August. 31st. 2019. I’ve been working on these cards all week so I’ll have them ready to ship as soon as I get your order notification! Wooo Hooo … they are prettier in person. The blog does not do them justice!
I have a special tip for my “HELLO” card that I will be sharing ONLY in the instructions sent with your cards when your purchase the bundle!
Thank you for joining me today and checking out my third To A Wild Rose Card Technique. Let me know if you have any questions on the cards shared today.
Hope your day is filled with beauty … pass it on.
TODAY’S STAMPIN’ SUPPLY LIST … Click on any image for details about the product or to begin your shopping experience. Clicking on it directs you to my website. Thank you!!
Well … we made it half way through the week and we are quickly heading into the weekend! I love Thursdays 🙂 Today I have the card I promised to share with you (from yesterdays post) with yet another technique using the To A Wild Rose Bundle.
On Monday I shared the “Blessed” card demonstrating the Three-step Stamping technique …
On Tuesday I showed you the “True Friendship” card and the technique of sponging color onto the image ….
Today, my “Hello” card features the “Coloring with Stampin’ Blends” technique …
Before I decided how my card would look, I chose my color pallet; Whisper White and Highland Heather. I stamped the rose image with the Momento ink and began to color it with the Highland Heather Stampin’ Blends Duo. I begin by coloring a petal with the light marker, then add the dark marker at the part of the petal that is closest to the center and over the lines in the rose. Then I go back over the dark with the lighter marker to blend the colors … you can always add a little more dark again. I leave the edges of the petals as light as I can.
The center is colored with the Daffodil Delight Dark Stampin’ Marker and then the rose is die cut. The leaves cut from Pear Pizzazz cardstock. The lattice piece was cut in Whisper White and Highland Heather and then layered to create an added dimension to the card. The white base was stamped with the “Hello” from the stamp set and then the entire piece was embossed using the “Subtle” Folder.
Have you fallen in love with this amazing bundle yet? I find it so versatile and easy to use. How would you like these cards?
I have a SPECIAL OFFER FOR YOU …
If you purchase the “TO A WILD ROSE” bundle from me by August 31st, 2019, I will send you all 3 cards with directions and tips to recreate them yourself!! You will also receive a Virtual Rewards point!! You get a Rewards point for each $50 (before ship&taxes) USE HOSTESS CODE: ARQ3KZ9U and place your order by August. 31st. 2019. I’ve been working on these cards all week so I’ll have them ready to ship as soon as I get your order notification! Wooo Hooo … they are prettier in person. The blog does not do them justice!
I have a special tip for my “HELLO” card that I will be sharing ONLY in the instructions sent with your cards when your purchase the bundle!
Thank you for joining me today and checking out my third To A Wild Rose Card Technique. Let me know if you have any questions on the cards shared today.
Hope your day is filled with beauty … pass it on.
TODAY’S STAMPIN’ SUPPLY LIST … Click on any image for details about the product or to begin your shopping experience. Clicking on it directs you to my website. Thank you!!
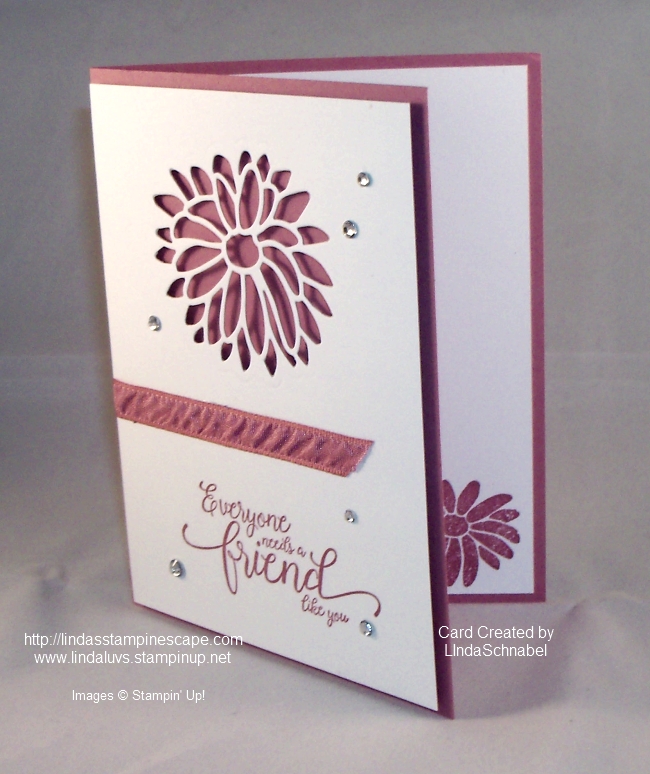
Today we’re pulling out the BigShot to create our Simply Sunday card, which features the Peek Through technique. This is the technique my Technique Clubs learned this month and this is one of their cards.
It’s a done in our Sweet Sugarplum and Whisper White, in fact, we are using the “thick” Whisper White for today’s technique card. Our base is in the Sweet Sugarplum and our Thick Whisper White is our 4″ x 5-1/4″ front.
We are using the Special Reasons bundle found on page 42 of the Occasions Catalog. These special dies create our “Peek Through” by cutting the flower without cutting the edge so it gives you an almost negative image and allows you to see through to the back ground. It also comes with an outline die that will cut out the same flower … so it gives you two uses!
We used the Precision plate with our flower die and placed it onto our thick cardstock and rolled it through. It cut out beautifully and easily releases the pieces, however if you have the die brush you can use that to hurry the process of removing the pieces.
You can see from this camera angle that the entire white front piece has been popped up which creates a wonderful dimension to the flower and the card.
The greeting comes from the Suite Sentiments stamp set found on page 54 of the Occasions catalog … you’ve seen me use this stamp set many times. Did you know that the fonts in this stamp set coordinate with fonts from some of the other Occasions stamp sets! Good to know 🙂
The ribbon is the coordinating Sweet Sugarplum Ruched Ribbon and is used as an anchor to the card. Then just a touch of bling was added to draw your eye around the entire card, and it really completes it.
Welcome to my Simpy Sunday series … this is one of my favorite days to post. I love being able to show you how beautiful a simple, easy to make card can be.
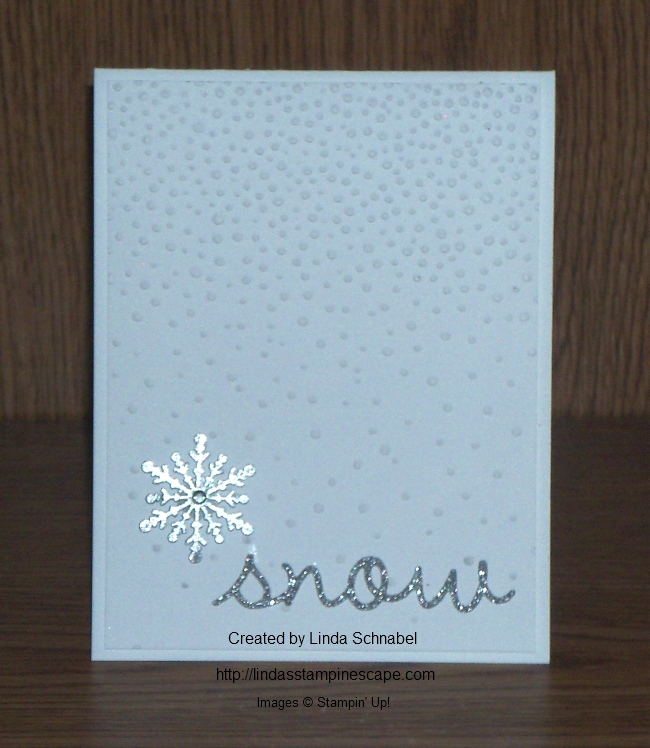
Today our card begins with the new “Thick” Whisper White cardstock… it’s just a bit sturdier than our regular Whisper White but still easy to use.
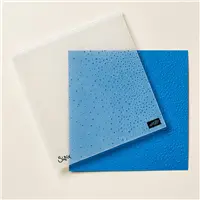
My card front is a embossed with the “Softly Falling” textured embossing folder that can be found on page 24 of the Holiday Catalog. I then popped it up with dimensionals … I like to do that when I make a card with white on white.
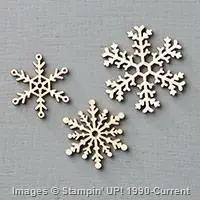
The pretty little snowflake is one of our “Snowflake Elements” embossed with Silver Embossing Powder. On Friday I share that this technique is the one our Technique clubs did this month … so much fun. It was topped off with a Rhinestone.
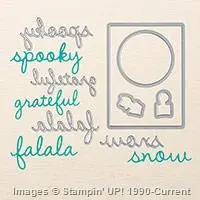
The title or greeting “snow” comes from the framelit set “Seasonal Frame” and was cut from the beautiful Silver Glimmer paper.
I hope you had a nice weekend, and I thank you for sharing part of it with me.