One Fun Fold: Done 3 Different Ways!

Hello Stampin’ Friends ~

Today I’m going to share the replay of last nights Facebook LIVE along with both of the cards I made, and another way to use the Basic Z-Fold Fun Fold!! Let’s begin with the finished cards!

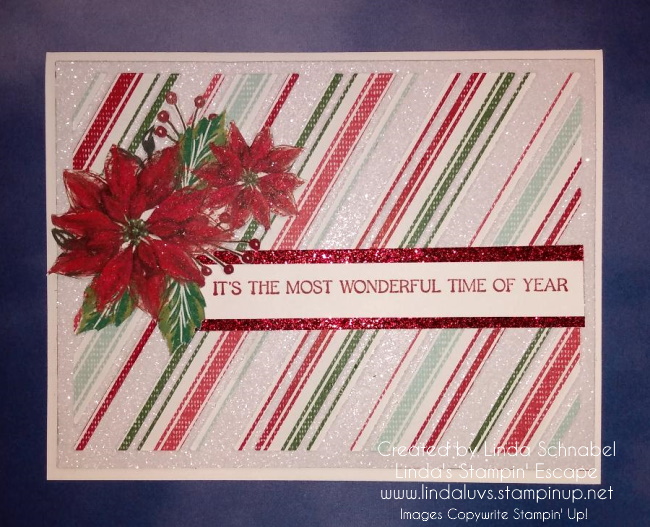
My first card was a “Full Front” so it looks like a regular card, but when you open it, you have that fun Z-Fold card ….

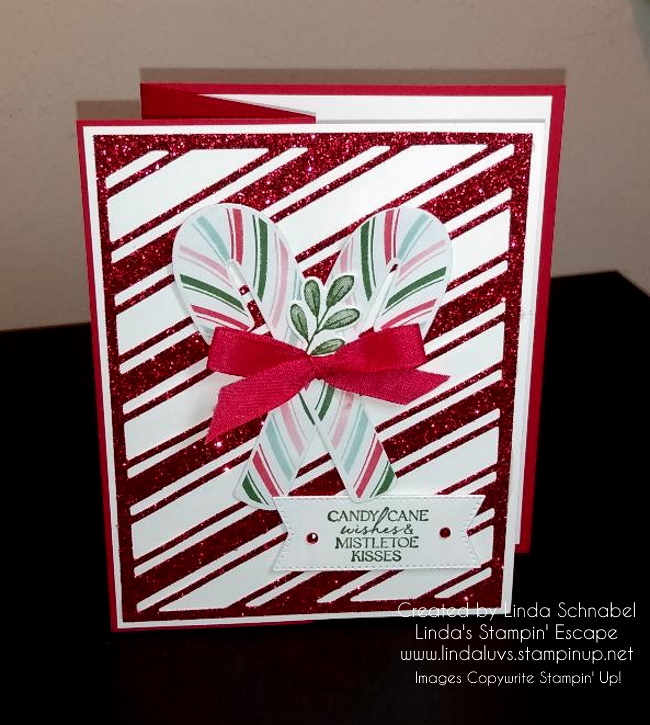
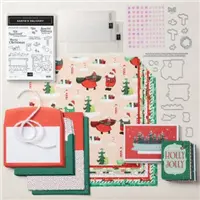
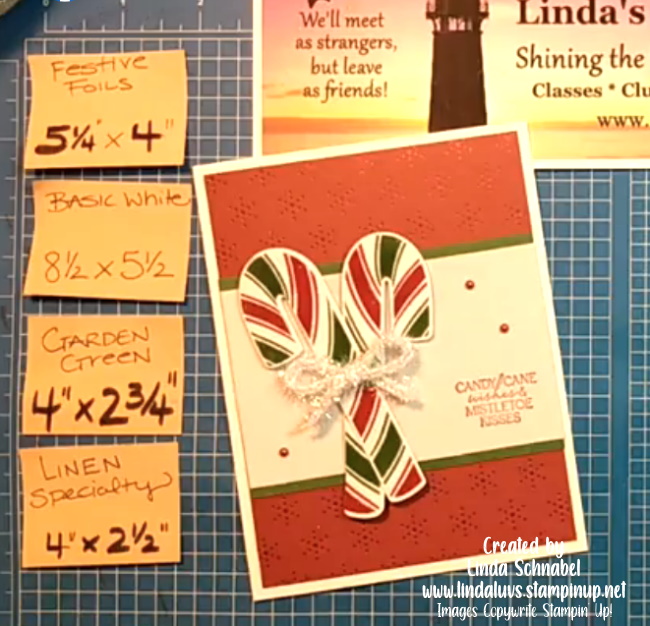
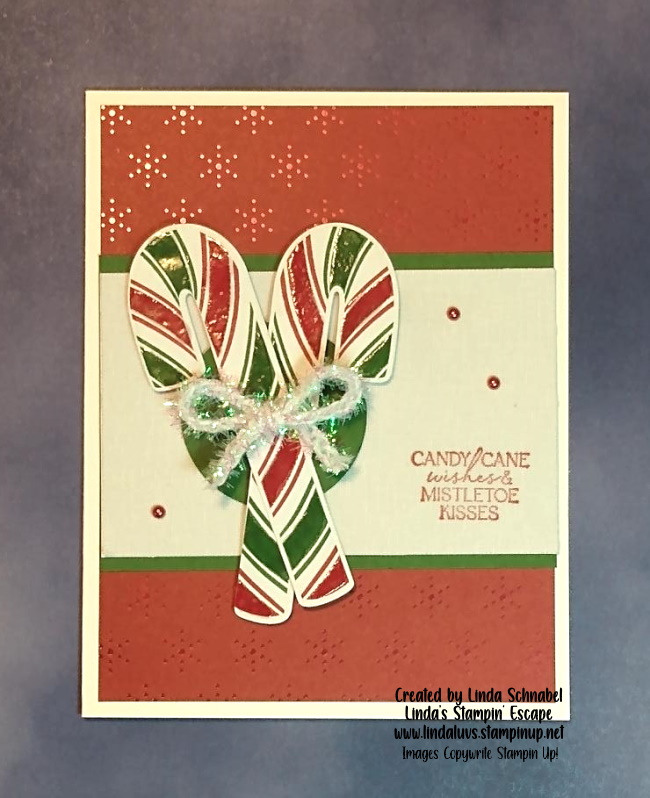
This card features items from the Sweetest Christmas Suite from the Mini Catalog. There is so much fun in this bundle, from the back ground die to the Red Glitter paper used, to the cute Candy Cane designer paper that are easily cut out with the coordinating dies. And who doesn’t love that cute sentiment that come from the bundled stamp set.

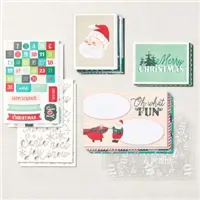
My next Z-Fold Fun card features the Santa Express Suite and a partial front…. If you’re looking at easy Christmas cards this year, but still want a Fun Fold … this is it!

The Z-Fold is super easy and when you add in the ease of the Santa Express Cards. They are so cute … just attach them to the front of your card and the fun coordinating designer paper brings it all together stress free!

OK … time to grab a cup of coffee (or whatever) and join me for my replay of last nights LIVE! You will get the dimensions you need during my demonstration … Enjoy!

Don’t you just love that these cards are so easy to create! You get a Fun Fold along with different ways to enhance that fun fold!!

Now … let’s check out one more way to play with your Fun Fold. I had a lot of fun with this one … you’ll see more layers and some embossing! We’re doing a Belly Band and playing the Gnomes!!

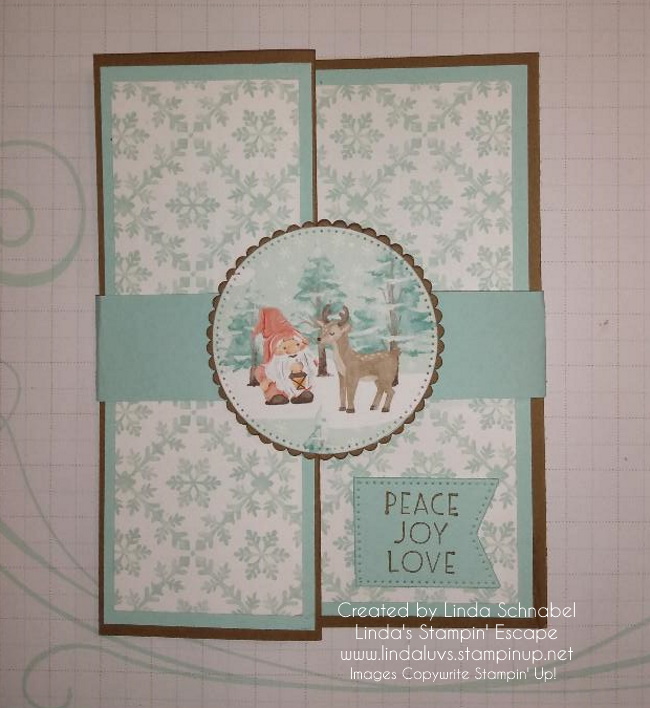
Belly Bands are simple … I use and 11″ x 1″ strip of paper, wrap it around and, trim off excess, then adhere it together (I don’t score … I fold) I used Soft Suede and Pool Party Cardstocks along with the Storybook Gnomes Designer paper.

To create my banner I used the Stylish Shapes dies, both the banner and the square! I used both so that I could create a banner to the size I needed …

Pretty cool tip right! I like that is still adds the texture and creates a second banner!

Now, let’s slide off our Belly Band and look at the inside of our card…

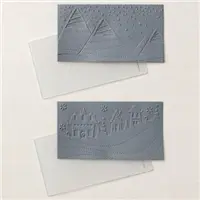
I used the Charming Landscapes Embossing folder from the Santa Express Suite to create some texture and interest but still leave room for you to write your sentiment. Again, a simple but oh so cute card (because who doesn’t love gnomes) and Fun Folds!!

Thank you for hanging out with me today, and I hope I inspired you to try out this easy Fun Fold and enhance it any of the 3 ways you’ve seen today.

Have an awesome day!!

Here is a full list of items used to create all the cards shown … from the entire suite to bundles and individual items. Shop your way! 🙂

Candy Cane

Hello Stampin’ Friends ~

From poinsettia’s to candy canes … I’m love sharing Christmas cards, and you can take a walk down candy cane lane with the Sweetest Christmas Suite! Use the playful variations of the candy cane stripe patterns to create delightful Christmas cards and tags for you family and friends.

I’ve actually used three different patterns from the designer paper … you’ll enjoy having the ability to die cut your candy canes from one of the patterns!! My cardbase is Real Red. I slipped a snowflake behind my candy cane to highlight it … then tied a pretty little bow using the Real Red and Garden Green Ribbon Combo pack. How sweet it is!

Thanks for popping in to check out my card today … Enjoy your week ahead.

A Sparkling Stunner!

Hello Stampin’ Friends,

I’m so excited to share today’s card with you, it is a sparkling stunner and the amazing part of it … these were all left-over pieces from other cards!! Let me begin with the Sweetest Christmas Designer paper with the diagonal stripes …. it was just sitting in a pile of cut paper when I noticed the White Glimmer Paper I had die cut using the die from the Sweet Candy Cane Bundle. Well, little did I know that they layered together really nice!

I knew that I wanted to use the pretty poinsettias from the Boughs of Holly Designer paper and had some left over, so I fussy cut one out and framed my greeting. My greeting comes from the Sweet Candy Cane bundle which is part of the Sweetest Christmas suite … I stamped that with Real Red on (you guessed it) a piece of scrap paper. Then I found the strip of Red Glimmer paper so I tucked it under my greeting … WOW.

I decided to pop up the poinsettias to give the card more dimension (the die cut gives it a lot of texture). If you didn’t think there was enough sparkle … I added Wink of Stella to the poinsettia flower. This is definitely a card for our glitter lovers, and those who desire the tradition red and green colors!!

I have more left overs … so you never know what you’ll see next!! Thank you so much for stopping by on this Saturday, I hope you have a good day!

Here is a list of the supplies that I used to create this card. You can click on any item to start shopping for you can CLICK HERE and use the monthly host code & get in the the drawing!

Monster Mash

Hello Stampin’ Friends ~

Are you ready for a Monster Mash? Monster Mash-up that is …. I’ve taken the die from the Sweet Candy Cane Bundle, the Punch from the Christmas Scottie Dog and the stamps from Scary Cute and created today’s adorable Halloween Card. What better colors to use than Pumpkin Pie and Basic Black? Then add a touch of Parakeet Party to give a boost!

How do you love the pop of the Washi tape between the spaces on the die? I think it makes our other colors pop and the sparkle brings our card to life. On the other hand … our puppy is seeing red!! He’s tired of being dressed up in those silly Halloween costumes!! lol … just kidding, our puppies love us no matter what. The love all the attention.

I dressed this little guy up with a Washi Tape bow … I just put a few strips onto my cardstock and then punched it out. Just think, you can use any designer paper to dress up your scottie. Placing my Scottie Dog on the Vellum cardstock, highlights this sweet doggie and draws you eye right to him. You can do this on any card where you want to highlight an image.

To create even more texture and dimension I stamped my greeting and bats from the Scary Cute stamp set and die cut them with the circle dies (Sizes 2, 3 and 5 for Vellum … with 1 being the smallest). These were all popped up with some Stampin’ Dimensionals.

To complete my card I added the Matte Dots from the 2022-24 In-Color Matte Dots in Parakeet Party. All of these colors compliment each other so nice … and I almost forgot to tell you that I punch my Scottie from the Metallic & Shimmer Specialty paper so he’s got a little sparkle too.

I hope you enjoyed this mash up and my Scottie Monster … I also hoped I inspired you to think outside of the box and don’t be afraid to mix up your Christmas with other holidays!! Just have fun!!

Thank you so much for joining me today … enjoy your Tuesday!!

Here is a list of supplies that I used to create today’s card … If you would to add one of these to your stamp collection, just click on the item as it will take you to my store. Thank you!

Candy Cane Wishes Embossing Tip

Hello Stampin’ Friends ~

Today I’m sharing the replay of last nights Facebook LIVE; a quick tip for Heat embossing your designer paper and taking it to another level … amazing! For those who watched last night, you will see a change to my card!!

Here is the video replay ….

Don’t those candy canes just look YUMMY!! Here is the original version of the card ….

I did put the dimensions for the card in the video but here they are again (above) for quick reference . I will list the ingredients for the card below … the Festive Foils Specialty paper and the Iridescent Trim are both on the Weekly Deals through midnight September 28th.

Now lets take a little peek at what I did to the card after the camera was turned off. Remember the punched circles I had as back up??

I used the Garden Green circle behind the candy canes to make them pop even more! It also really highlights our Iridescent bow. Even though the parts to my card belong with other “suites” doesn’t mean that they don’t look good together.

The quick tip to embossing our candy canes was made easy with the use of the “Embossing Additions Tool Kit’ … very handy!! You’ll want to add that to your wish list ❤ I think this is just a fun way to embellish your designer paper and take it to the next level.

Give this technique a try … enjoy your day!

Thank you for hanging out with me.

Here is a list of ingredients used to today’s card ….