Today I had a request to share how I created a cute little Gift Basket from the Pillow Box Die … You’ll be surprised at how easy this is to make! The designer paper being used is discontinued but if you have this die … you can create baskets for ANY occasion!
I have the dimensions for the inner box in the video but I thought I would share them again. Start with a 7-1/4″ x 5-1/2″ piece of cardstock and score at 2″ on all for sides. Then you will cut on the score lines on the 7-1/4″ length sides (ref. Video) You should have also seen the cute little baskets I made for the Mantle Gifts for my Holiday Stampin’ Retreat!
The ladies watching LIVE had plenty of ideas they could use these for … Baby Showers, Wedding Showers, Birthday Parties, on the table for the Holiday’s … a teachers Gift or a cute little gift for a co-worker. The possibilities are endless, and that cute little basket is priceless!
I have listed the ingredients below for your shopping convenience. Let me know if you have any questions.
Today I’ll be sharing my Facebook LIVE replay for you. We created a cute little Gift Basket from the Pillow Box Die (Retiring) … You’ll be surprised at how easy this is to make!
I have the dimensions for the inner box in the video but I thought I would share them again. Start with a 7-1/4″ x 5-1/2″ piece of cardstock and score at 2″ on all for sides. Then you will cut on the score lines on the 7-1/4″ length sides (ref. Video) You should have also seen the cute little baskets I made for the Mantle Gifts for my Holiday Stampin’ Retreat!
The ladies watching LIVE had plenty of ideas they could use these for … Baby Showers, Wedding Showers, Birthday Parties, on the table for the Holiday’s … a teachers Gift or a cute little gift for a co-worker. The possibilities are endless, and that cute little basket is priceless!
I have listed the ingredients below for your shopping convenience. Let me know if you have any questions.
Stop back tomorrow … I have something interesting to show you using this die!! Thank you so much for joining me today!
TODAY’S STAMPIN’ SUPPLY LIST … If you liked the products used in today’s projects, I have links for you below. Just click on the item you would like more information on, or to begin your shopping. It will take you directly to my website. Thank you ♥
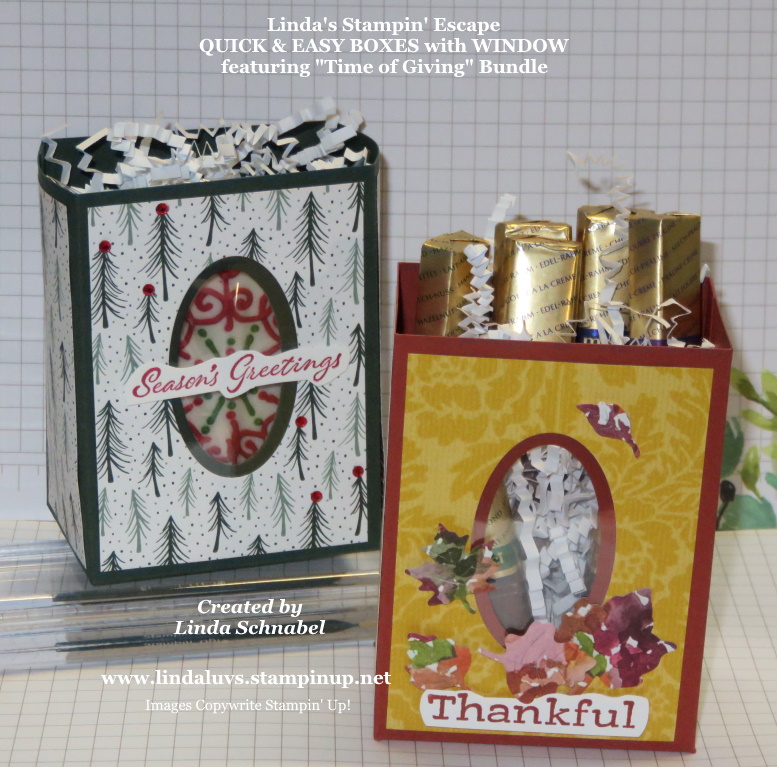
Today I’ll be sharing my Facebook LIVE replay for you. I created two cute little Gift Boxes featuring the Time of Giving Bundle … You’ll be surprised at how easy this is to make! Formally know as the 2-4-6-8 Boxes … I’ve done a little adjusting to make the box a little bigger so it could hold more goodies!!
And what would you put into these little cuties? Well … candy works great, or cookies!! But you could also put in little toys for a child, or how about a get well kit with hand sanitizer, tissues, maybe some tea … you could have so much fun with this.
Speaking of tea … grab a cup or some coffee and join me for the replay of my LIVE last night.
I have the dimensions for you so you can make some of these little cuties yourself! Let’s begin ….
Start with an 11″ x 5-1/2″ piece of cardstock (on sale thru Nov.18th, 2021)
On the 11″ lenght; Score at 2″ … 5″ … 7″ and 10″. Cut 1/2″ off end if prefered.
Turn cardstock 90 degrees and on the 5-1/2″ length; score at 1-1/2″.
Cut on score lines as shown in the video
Designer Series Paper: 2 pieces: 1-3/4″ x 3-3/4″ and 2 pieces: 2-3/4/” x 3-3/4″
Attach the designer paper onto box … except the front piece which you will cut to create window.
Use the smaller of the two dies and cut through both the designer paper and cardstock. Make sure it is aligned.
Remover designer paper and cut with larger of the two dies.
Attach window sheet … either onto inside of box or between the box and designer paper
Glue side flap (1/2″) and then bottom flaps as shown in video.
The first box was created with Shaded Spruce cardstock and the Tidings of Christmas Designer paper. The greeting comes from the Time of Giving Bundle and is stamped in Real Red … the box is embellished with the Red Rhinestones.
I used the Layering Oval dies to create window on both of the boxes …
The second box was created with Cajun Craze cardstock and the Pattern Party Designer Series paper from our exclusive Hostess Rewards. Greeting comes from the Time of Giving Bundle and is stamped with Cajun Craze!
I embellished this box using the die cut leaves from the bundle and the stunning Beauty of the Earth Designer Series paper. They are even cuter close up.
I hope I have inspired you to try these little cuties … it really is so simple to make, and you can fill it with anything you wish. A perfect gift for a friend, a co-worker, a child, someone who’s sick or anyone who you want to Thank you too.
I have listed the ingredients below for your shopping convenience…. just click on any item to begin. Let me know if you have any questions.
Thank you so much for joining me today!
TODAY’S STAMPIN’ SUPPLY LIST … If you liked the products used in today’s projects, I have links for you below. Just click on the item you would like more information on, or to begin your shopping. It will take you directly to my website. Thank you ♥
Today I’ll be sharing my Facebook LIVE replay for you. We created a cute little Gift Basket from the Pillow Box Die … You’ll be surprised at how easy this is to make!
I have the dimensions for the inner box in the video but I thought I would share them again. Start with a 7-1/4″ x 5-1/2″ piece of cardstock and score at 2″ on all for sides. Then you will cut on the score lines on the 7-1/4″ length sides (ref. Video) You should have also seen the cute little baskets I made for the Mantle Gifts for my Holiday Stampin’ Retreat!
The ladies watching LIVE had plenty of ideas they could use these for … Baby Showers, Wedding Showers, Birthday Parties, on the table for the Holiday’s … a teachers Gift or a cute little gift for a co-worker. The possibilities are endless, and that cute little basket is priceless!
I have listed the ingredients below for your shopping convenience. Let me know if you have any questions.
Thank you so much for joining me today!
TODAY’S STAMPIN’ SUPPLY LIST … If you liked the products used in today’s projects, I have links for you below. Just click on the item you would like more information on, or to begin your shopping. It will take you directly to my website. Thank you ♥
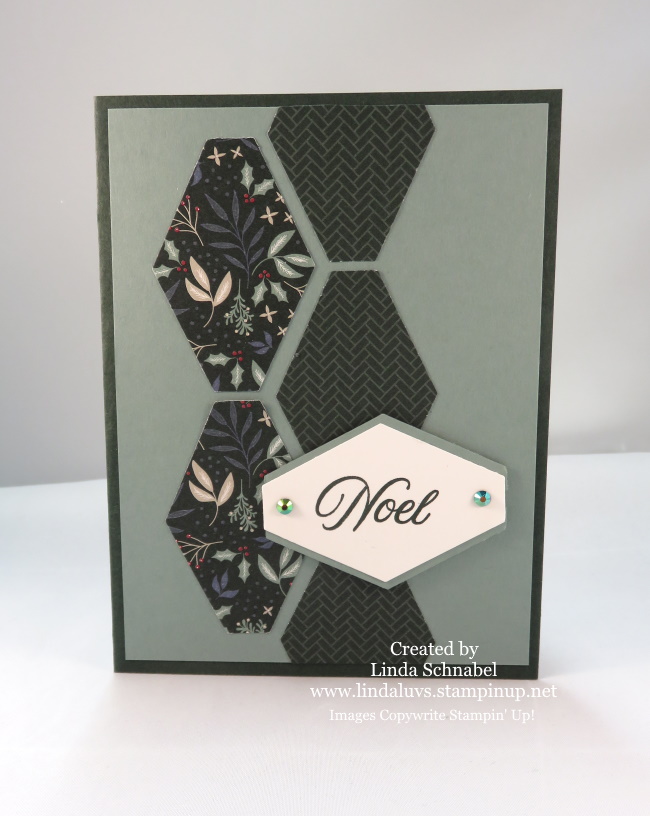
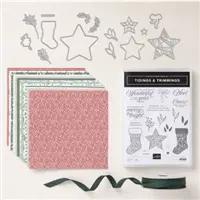
Wooo Hooo … I’m back up and running with a new modem!! Soooo … Today I’d like to share two cards that I created during World Card Making Day for a LIVE Demonstration … It highlights the Tailored Tag Punch and the wonderful products from the Tidings of Christmas Suite.
Using one of the sheets from the Tidings of Christmas Designer paper, I punched out 5 shapes, adhering two of one pattern, then flipping the punched shape over and aligning it between the center of the two already attached and then adhering the other two … trim off excess.
The greeting comes from the Tidings & Trimmings stamp set which is part of the Tidings of Christmas Suite. I stamped it in Evening Evergreen on White Cardstock and then punched out with the Tailored Tag Punch, I then punched out a piece from Soft Succulent to use as a mat behind it … it is cut in half and then placed behind the greeting and the entire piece is popped up. I finished it off with the 2020-23 In Color Gems.
On my second card I used two different sheets of the Tidings of Christmas Designer paper so I would have more variation in the paper. If you look closely, you will see two different patterns in the Sahara Sand and again on the white. They are then layered with alternating patterns and the edges trimmed off. This time the greeting was stamped in Soft Succulent and I used it to mat it as well … l love how easy it is to coordinate everything.
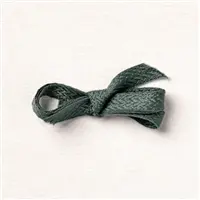
Instead of the gems, I used the beautiful Evening Evergreen Chevron Woven Ribbon … it brings out the Evergreen from the card mat and and from the designer paper. The card base is Soft Succulent.
You can create a multitude of patterns and color combinations when using the Tailored Tag Punch and the wonderful products from the Tidings of Christmas Suite. If you don’t have the items you need … I have a list of the supplies below for your convenience.
Thank you for stopping by today and spending some time with me. Enjoy the rest of your Sunday!
TODAY’S STAMPIN’ SUPPLY LIST … If you liked the products used in today’s projects, I have links for you below. Just click on the item you would like more information on, or to begin your shopping. It will take you directly to my website. Thank you ♥
Ready for some Friday Fun?? Last night I met with my Stamp Club and we were talking about “Pinterest” and I shared “what I thought” was my #1 “pinned” card … I was wrong, so I thought it would be cool to share my Top 3 with you today!! Let’s see if any of these are the ones YOU pinned!
Card #3 ….
It is the Cute Halloween Designer Series paper from the Stampin’ Up! Aug. – Dec. Mini Catalog!
This card was featured on my Simply Sunday series of cards … and you can view the entire post by CLICKING HERE!
Card #2 ….
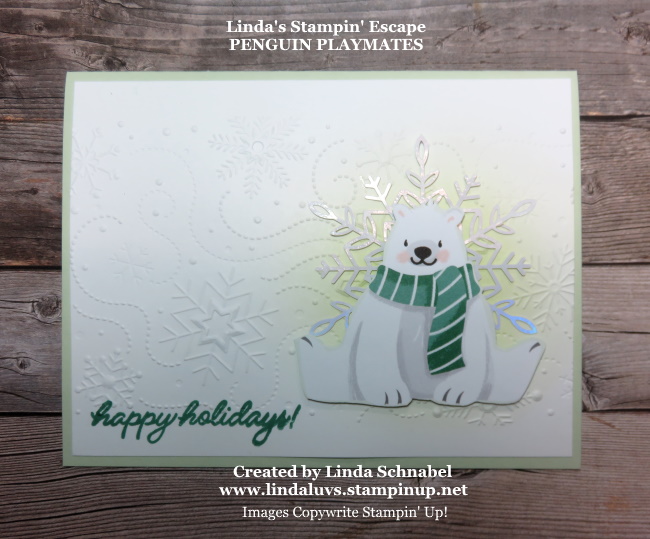
Well … this little cutie is going to look VERY familiar because it was just highlighted yesterday with the Penguin Playmates Designer Paper cards …
That Polar Bear is so cute and the card is so simple to make, (check out yesterday’s post for directions) it’s not a surprise this is in the Top 3, however … I thought it was the #1 Card!!
Hmmm … which one do you think it is?
CARD #1
This card BLEW all the others away with over 13K hits! Not bad considering it hasn’t been out there that long! Are you ready to see it??
It is the “Tidings of Christmas” in Misty Moonlight
A Merry & Bright card for sure coming from our Tidings of Christmas suite … these stocking are are quite lovely and the pretty paper makes this a perfect card to send to all your friends and family. To see the original post / how it was made just CLICK HERE.
I’ve put a list of ingredients at the bottom of my post so you can shop for what you need to make these popular cards! And you still have a little time left to grab those Sale-a-bration Freebies! Instructions can be found by clicking the links by the picture.
I thank you for following my blog and checking in today.
Have a nice weekend ~
TODAY’S STAMPIN’ SUPPLY LIST … If you liked the products used in today’s projects, I have links for you below. Just click on the item you would like more information on, or to begin your shopping. It will take you directly to my website. Thank you ♥
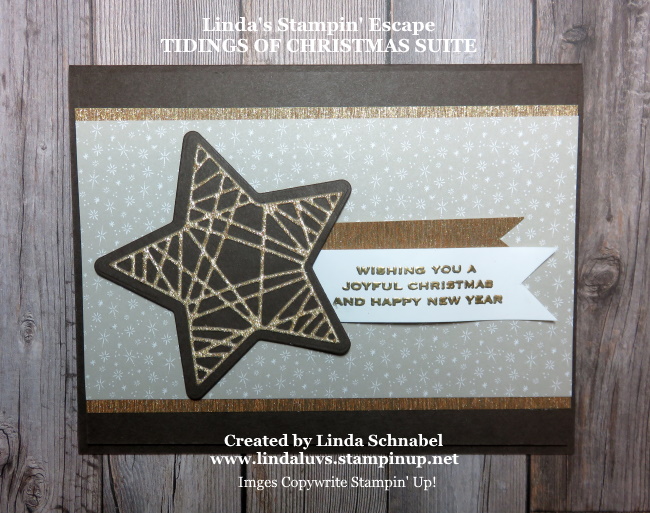
I’ve been bitten by the bug … blame it on Lifetime movies and their Christmas in July marathon!! lol Today I’m sharing a pretty card that I created using the Tidings of Christmas Suite… and will showcase non-traditional colors.
We begin with a Early Espresso card base … and back! I’m loving the layers on this card. I then chose the Sahara Sand pattern from the Tidings of Christmas 6″ x 6″ designer paper, it’s so cute with starry snowflakes.
The focal point of my card is the beautiful stars created with the coordinating dies from the Tidings & Trimmings bundle (part of the entire suite). The solid star is Early Espresso and the detailed star is cut from the “Gold” from the Gold & Rose Gold Metallic Specialty Paper.
Oh, the Metallic paper is so pretty so I used it to enhance the designer paper as well, and to jazz up my greeting …
I stamped my greeting with the VersaMark ink and then heat embossed it with our Gold Embossing powder. The raised verse in Gold looks great with the raised detailed star!
The stars were popped up to add dimension to the textured star … then I gave the banner a little wave to create some “action” to the card.
I hope you had a wonderful weekend. I spent mine trying out new techniques, so I hope you join me this Tuesday for my Facebook LIVE and a technique that is something special.
Thank you for stopping by my blog today.
Have a wonderful day ~
TODAY’S STAMPIN’ SUPPLY LIST … If you liked the products used in today’s projects, I have links for you below. Just click on the item you would like more information on, or to begin your shopping. It will take you directly to my website. Thankyou ♥