Simply Sunday: Hand-Penned

Hello Stampin’ Friends ~

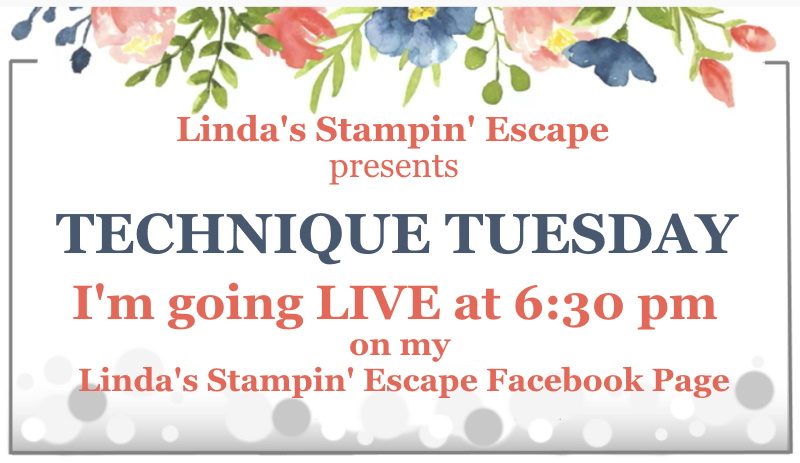
Sorry I missed you yesterday but I was head over heals in my Catalog Launch Party. It’s winding down but there will still be some activities today, including a LIVE Demonstration on the Tidings of Christmas Suite (pages 88 & 89) Here is the link: Just request to become a member: CLICK HERE TO JOIN IN

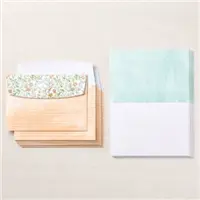
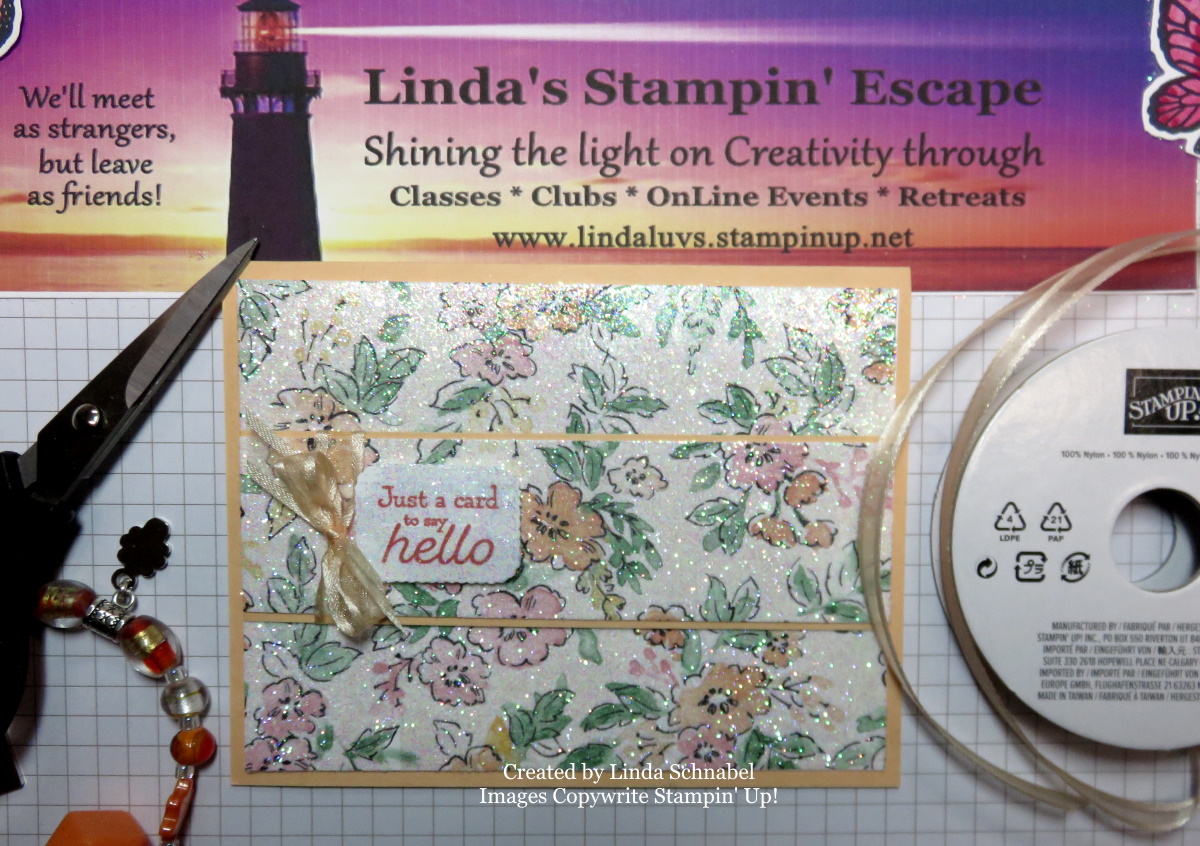
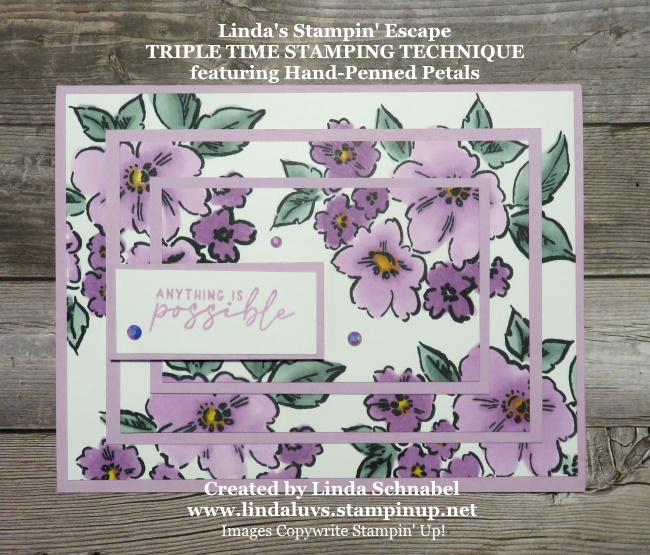
Today I would like to share just one of the cards that I created using the Hand-Penned family of products; the Hand-Penned Memories & More Card Kit and the Hand-Penned Cards & Envelopes … this pair is perfect for making your cards quick & easy! Let’s begin with the Cards & Envelopes …

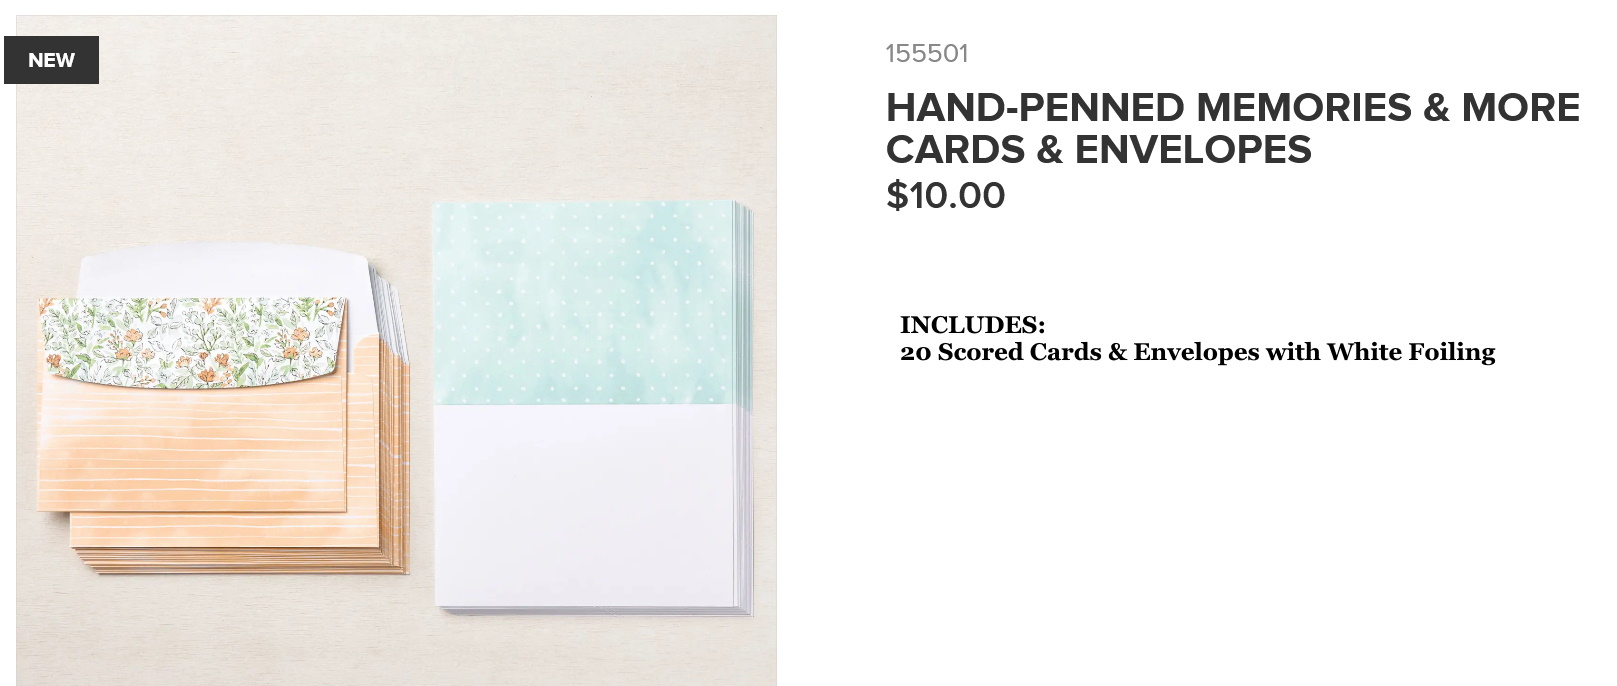
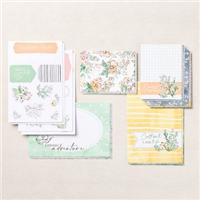
The Hand-Penned Memories & More Card Kit Isn’t just for scrapbooking, use the cards to create quick & easy cards that are simply beautiful!

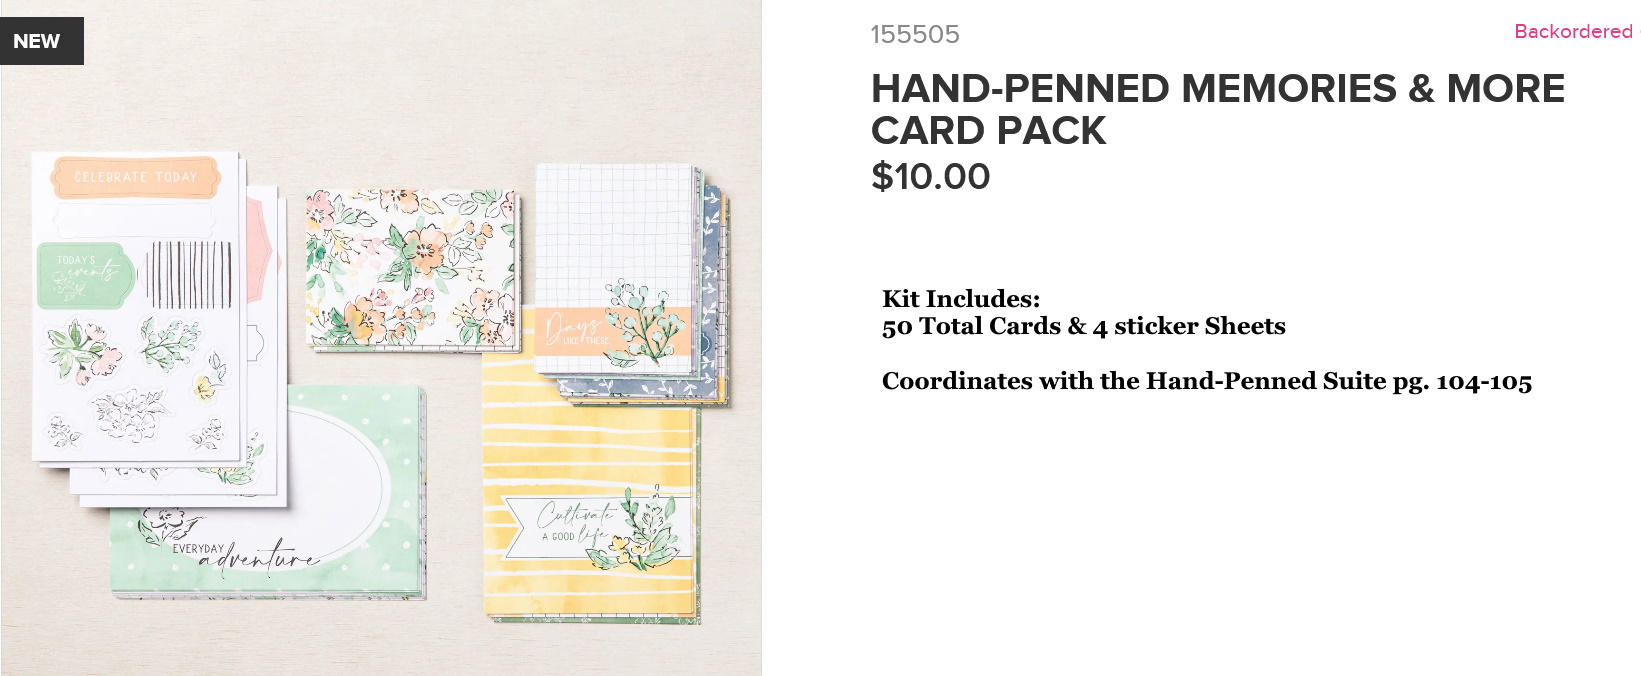
You will find beautiful “cards” that can be slipped into the pockets of your Memory Book along with 4 sheets of die cut stickers that embellish your scrapbook or cards so sweetly … I love the soft pastel colors, and the coordinate with the Hand-Penned suite so the possibilities for creating are endless.

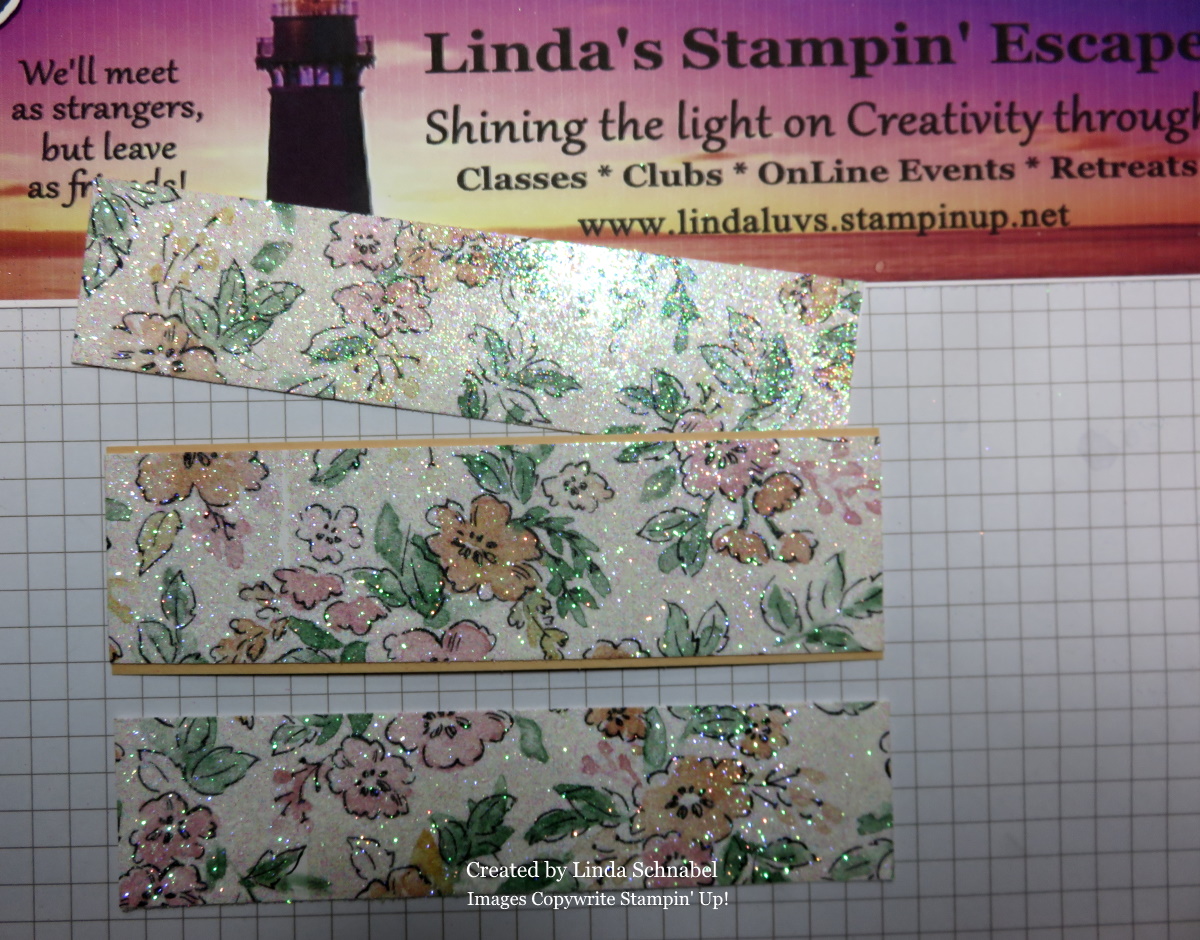
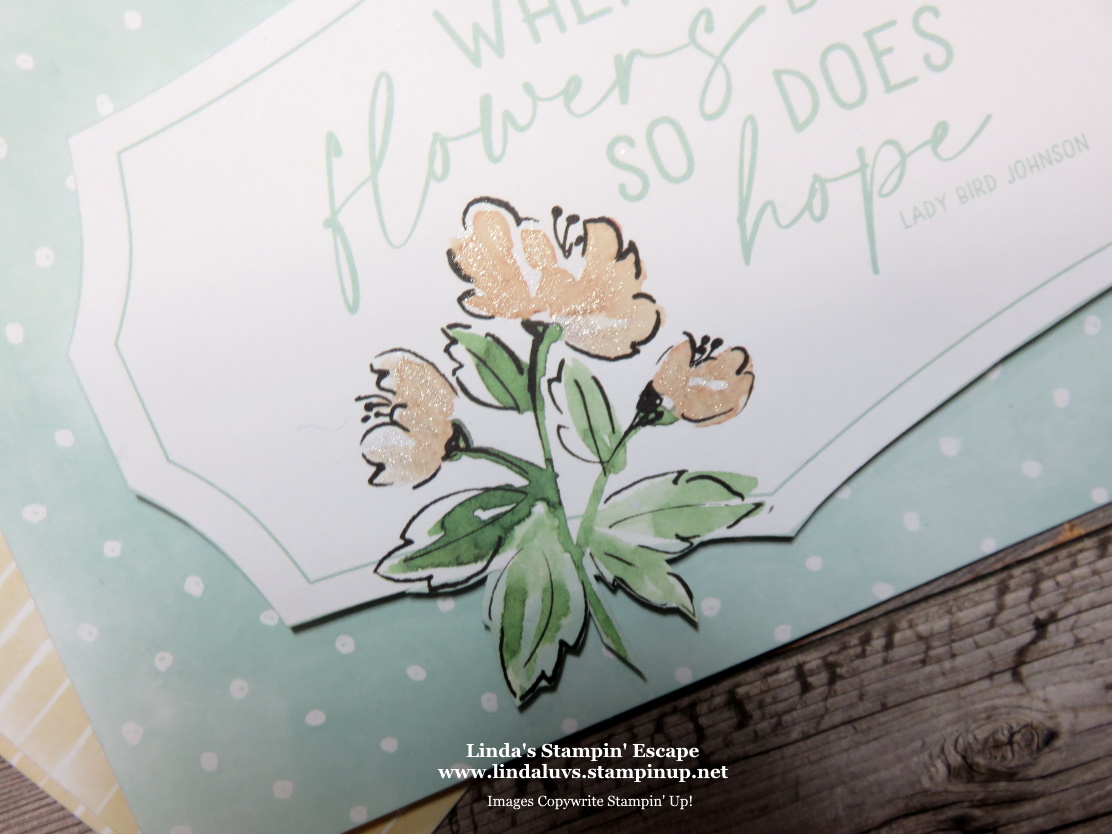
I chose one of the larger cards that works great with the cards & envelopes, and then I simply trimmed away the outside to highlight the shape, greeting and flower! All that was already there!! I just trimmed and popped it onto the card front …

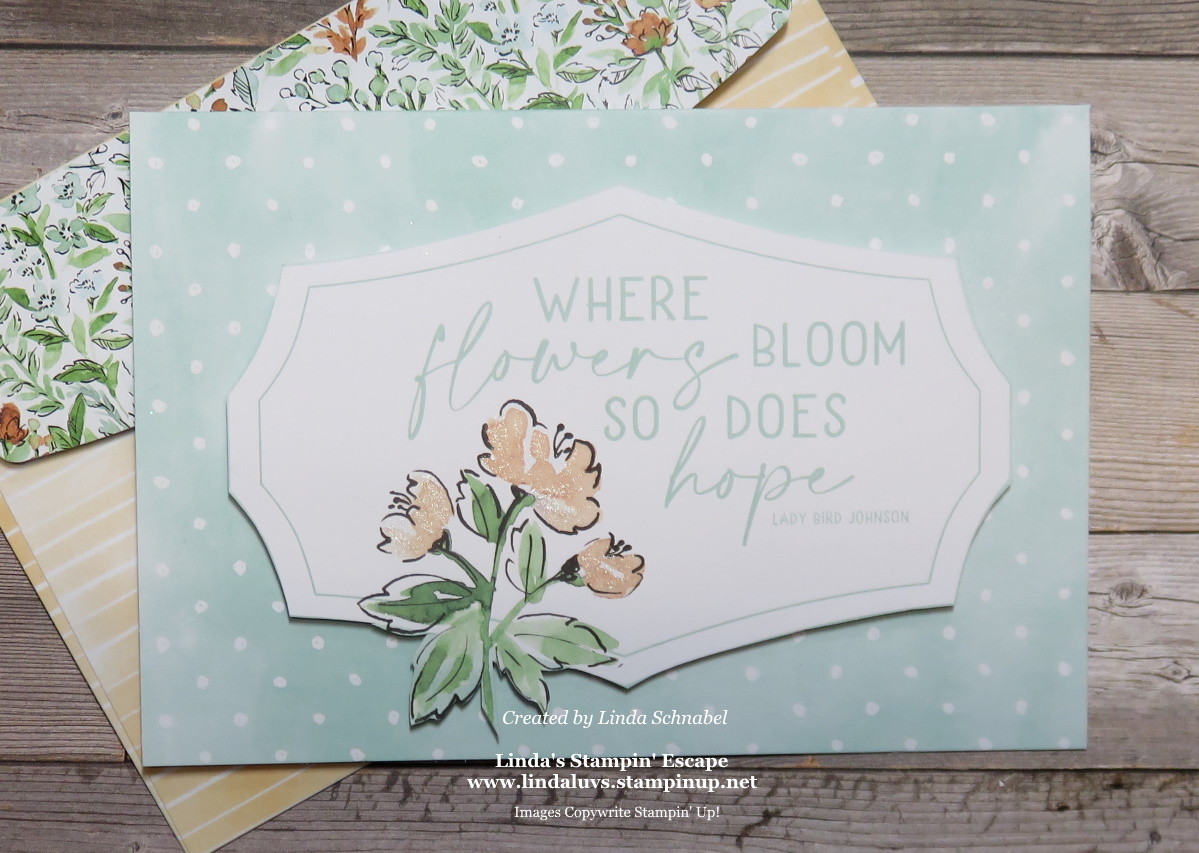
The card front is the pre-pattern polka-dots card and is already scored for you… and check out the coordinating envelope! The only other thing I did on this card was give my flowers a touch of the Wink of Stella …

When using these two products combined, you have so many options for creating pretty yet simple cards.

I hope you enjoyed my card share with you today, and that you were inspired to try this sometime.

Thank you for sharing a part of your Sunday with me.

Have a wonderful day ~

TODAY’S STAMPIN’ SUPPLY LIST … If you liked the products used in today’s projects, I have links for you below. Just click on the item you would like more information on, or to begin your shopping. It will take you directly to my website. Thank you

United Through Creativity FREE Digital Download

Hello Stampin’ Friends ~

I have something unique to share with you today! It’s Stampin’ Up!s “United Through Creativity” Digital Download … and it’s FREE!!

The first Stampin’ Up! value statement is this: we care about people first. In honor of this value—and in the spirit of World Diversity Day—we’d like to celebrate what makes us unique through what brings us together: creativity! The United Through Creativity Digital Download features inclusive, multicultural, and multilingual sentiments and illustrations that represent the multiple markets Stampin’ Up! engages with. And, it’s free for all!

CLICK HERE TO DOWNLOAD YOUR FREE DIGITAL COPY

  • The elements featured in the United Through Creativity Digital Download were created in the spirit of World Diversity Day—a day for each of us to join together and understand the value of cultural diversity throughout the world. And, to celebrate our unique community of crafters!
  • We celebrate the diversity of the Stampin’ Up! family every day! In the United Through Creativity Digital Download, you’ll see a variety of illustrations, sentiments, and other elements that represent each of our marvelous markets and more.
  • Print your favorite pieces and use them to create cards, scrapbook pages, and other paper projects! We hope you’ll enjoy celebrating diversity, connection, community, and creativity with this sweet selection of inclusive, multicultural, and multilingual elements.
  • Don’t be shy—share what you’ve made! When sharing to social media, use the hashtags #UnitedThroughCreativity and #DiversityDay. We can’t wait to see your creations!
  • Speaking of sharing, spread the word! Let customers—current and new—know about this free collection of crafting elements. Let’s celebrate what makes us unique through what brings us together: creativity!

Thank you for joining me today and feel free to share a copy of your creations to me … I’d love to have you as a Guest Stamper on my blog!!

Enjoy ~

I’m Back & ready to “Dazzle”

Hello Stampin’ Friends ~

First let me say thank you for waiting while I could discover what the “technical difficulties” were creating my laptop to shut down … all it was, was a loose battery!! Who knew?? But I’m back and I have a “Dazzling” and Fun technique to share with you today.

Let’s begin with my Technique Tuesday Facebook LIVE Video, and then I will follow up with a dazzling card that highlights a fun twist to the “Glitter Designer Paper” technique!

Now that you know all you need is Designer paper, the Adhesive Sheets and Glitter … you can create your own Designer Glitter paper too. Now … let me show you a little twist that is also simple but creates a dramatic effect.

I’ll take you step by step through the process. You begin just as you do in the video with the adhesive sheets, then I cut the the sheets in thirds. One side cut at 1-1/4″ … then turn 180 degrees and cut the other side 1-1/4″ … that leaves you with a center piece of 1-1/2″ … then you will mat the center piece …

When you preparing to adhere your strips to the card base … make sure your designer paper images align, it makes the card even prettier! I attach the bottom piece and the top piece first, waiting to place then center piece on last …

I tied a bow on first and then used our Liquid Glue on the back to attach to the first two pieces … because your mat is slightly larger than the center piece, it will lay nicely over the first two pieces and still the images will align … isn’t that cool?!!

Can you see how the images align even though you have cut it!! This also adds more texture and depth to your card. My little greeting comes from “Many Messages” Bundle which is still available through June at a 10% savings … it is in the new catalog but it’s not bundled so you would no longer receive the bundled savings.

I want to thank you for hanging out with me today. I hope you enjoyed the video and the second card design with a twist.

Have a wonderful day ~

TODAY’S STAMPIN’ SUPPLY LIST … If you liked the products used in today’s projects, I have links for you below. Just click on the item you would like more information on, or to begin your shopping. It will take you directly to my website. Thank you

CONNECT, CRAFT & COLLECT 

Stampin’ Up! is gifting an extra $25 in Stampin’ Rewards to all orders that reach the $250+ mark May 4 – June 14! This is the perfect perk for those who host parties or those who place large individual orders. Click here for more details.

JOIN+ STARTER KIT SPECIAL
An awesome Starter Kit special is being offered now through May 31st to help kick off of the new 2021-22 Annual Catalog! Choose up to $155 worth of product ($30 more than usual) and pay just $99. Click here for a few more details.

Please let me know if you have any questions about today’s card share, products you’ve seen or our promotions… I’m here to help you.

Thanks again for stopping by, Linda

Choose Love … True Love Designer Paper!

Hello Stampin’ Friends ~

For the past couple days I have been sharing some of the new designer papers in our just released annual catalog, however, I want to let you know that one of my favorites is still in the Mini Catalog and soon to retire … the True Love Designer paper.

Today I’m sharing some of my favorite cards created with this paper. The descriptions of my cards will be below them …

My first choice is a good representation of the True Love Designer Series Paper pack as it highlights so many of the different patterns … all in black and white so you can add a pop of color behind it, or add that pop of color directly to your designer paper. You’ll see samples of that below. You can view the video with instructions for the card above by CLICKING HERE!

On this card you see two patterns; the floral in which I colored with my Stampin’ Blends and the accent piece which really helps highlight not only our flowers but our greeting. A simple layout which can add so much to a card … don’t you think?

Here is another technique I used to color the True Love Designer paper; the Ombre Technique which I created with the Blending Brushes … I have a video to show how it’s done CLICK HERE!

LOVE this coloring technique … using the Stampin’ Blends to color the “background”!! You can create any look you want when you are in control of the coloring! Who knew that just a subtle bit of color would make our flowers pop off the page … and a little Wink of Stella never hurts!

The True Love designer paper also makes the perfect back drop when you are highlighting a fun technique, like we did here. CLICK HERE TO VIEW I have fallen in love with the paper and sad that it did not carry over into the new catalog.

Thank you for checking out my blog today … click on the LIKE button below if you like what you’ve seen. It helps other find me.

I wish you a wonderful day ~

TODAY’S STAMPIN’ SUPPLY LIST … If you liked the products used in today’s projects, I have links for you below. Just click on the item you would like more information on, or to begin your shopping. It will take you directly to my website. Thank you

CONNECT, CRAFT & COLLECT 

Stampin’ Up! is gifting an extra $25 in Stampin’ Rewards to all orders that reach the $250+ mark May 4 – June 14! This is the perfect perk for those who host parties or those who place large individual orders. Click here for more details.

JOIN+ STARTER KIT SPECIAL
An awesome Starter Kit special is being offered now through May 31st to help kick off of the new 2021-22 Annual Catalog! Choose up to $155 worth of product ($30 more than usual) and pay just $99. Click here for a few more details.

Please let me know if you have any questions about today’s card share, products you’ve seen or our promotions… I’m here to help you.

Thanks again for stopping by, Linda

Simply Sunday: Expressions In Ink

Hello Stampin’ Friends ~ I trust you are having a wonderful weekend. Today I’d like to add a splash of color with the stunning Expressions In Ink Designer Series Paper. This gorgeous paper is in tune with Simple Stamping but you are going to look like an artist!

You will recognize this paper as it adorns the front of our New 2021-22 Annual Catalog. I chose the floral pattern in Magenta Madness and also used that color as my cardbase. The paper is simply cut 6″ x 4″ and then trim it down to 5-1/4″ … this will fit the front of your card, leaving a nice border of Magenta Madness around it. You will use the 3/4″ piece that you cut off on the inside of your card … it fits nicely on the 5-1/4″ x 4″ piece of Basic White.

With the beautiful gold throughout this design, I felt using gold embossing powder for my greeting was perfect. I’m using the New Create with Friends stamp set and I embossed it on a 1-1/2″ strip of Vellum Cardstock. Making this card was super simple and yet looks so elegant. To complete the look, I used the Gilded Gems … the largest ones because they “hide” the small Stampin’ Dimensionals!!

I can’t wait to show you even more at my Catalog Launch Party … be sure to get connect with me. Here is the link: https://www.facebook.com/groups/296817105346109 Then just simply request membership! Fellow demonstrators are welcome to follow along, but are excluded from the prizes, as they are reserved for my customers and downline. I appreciate your understanding.

Thank you for taking time out of your Sunday to visit with me and my blog! I truly appreciate your time.

Enjoy the day ~

TODAY’S STAMPIN’ SUPPLY LIST … If you liked the products used in today’s projects, I have links for you below. Just click on the item you would like more information on, or to begin your shopping. It will take you directly to my website. Thank you

Creating with Friends

Hello Stampin’ Friends ~

Happy Friday!! I have two cards to share with you today featuring the “Pattern Party” Designer Series paper from our Hostess Collection and the fun and fabulous “Creating with Friends” stamp set! Well … I think it’s fun and fabulous!!

This stamp set has playful fonts and great sentiments to help you celebrate friendships in many ways and when it’s paired up with the Pattern Party designer paper, well … you have a winning combination!! Let’s begin …

I used my “split” technique for my cards today ~ super simple and a paper saver. Here is my video to show you how this technique works …

I love this technique, it is quick and simple yet can really make your card fun, plus it’s saves your designer paper because you are using 4″ x 4″ squares of paper … so no waste!!

My next card is using the same technique, with the same paper pack, just a different design. It comes with 48 sheets of designer paper, 4 each of 12 double-sided designer papers, so … 24 different patterns!!

Here’s the card …

So fun and so colorful, yet with 24 different patterns in this paper pack you’ll also find subtle designs, great textures and fun patterns! When it comes to the Create with Friends stamp set, you will find the same creative variety and ways to express your feelings … I simply had to have it! I love my greeting / sentiment sets!

I’ll be sharing more samples using these two products at my Catalog Launch Party … I hope you join me!! I’ll begin sharing on Tuesday and leading up to the LIVE events Friday & Saturday May 21st & 22nd. If you’re in need of a demonstrator and some fun, CLICK HERE & join us!!

Thank you for joining me today, please let me know if you have any questions on my cards, technique or the NEW Catalog Launch Party … I’d be happy to answer them.

Have a good day, and a wonderful weekend.

TODAY’S STAMPIN’ SUPPLY LIST … If you liked the products used in today’s projects, I have links for you below. Just click on the item you would like more information on, or to begin your shopping. It will take you directly to my website. Thank you

Connect, Craft and Collect …

Hello Stampin’ Friends ~

Today I’d like to share with you one of our promotions going on at Stampin’ Up! I wouldn’t be doing my job as a good demonstrator if I didn’t share this opportunity with you … especially when the New Catalog has arrived.

We’re all about connecting with other, and crafting together and from 4 May–14 June 2021, when you gather with your friends and host a qualifying party will receive our generous Stampin’ Rewards PLUS additional rewards! Hosts can earn Stampin’ Rewards based on order totals for an entire party.

Outside of the party setting, Stampin’ Rewards are available to those who place individual orders that meet the order totals shown here… so if that wish list is long now may be the time to begin your shopping.

Please let me know if you have any questions about this Host promotion … don’t forget that there are special HOST items too. Here is my favorite …

This designer paper is colored / patterned on one side and black & white patterns on the other side … and is a whoppin’ 48 sheets!! Stop back tomorrow and I’ll share a cute card with you using the fabulous paper!!

Thanks for stopping by today.

Enjoy the beautiful day ~

Triple Time Stamping Technique

Hello Stampin’ Friends ~

Today I’d like to share a great technique … step by step, and new stamp set and a refresher on a coloring technique. I actually shared this technique with you on Sunday, however one of my customers reached out to me and and asked if I would share a video … so I used this for my LIVE demonstration last night for Technique Tuesday!

Let me introduce you to the Hand-Penned Petals from the beautiful Hand-Penned Suite on pages 104 & 105 of our Annual Catalog this is highlighted using the Triple Time Stamping Technique ….

I invite you to watch the video so you can see step by step how I created the cards …

Pretty simple … don’t you think? Here are those dimensions again (I also added them to the video in the comment section) The colored cardstock I used was Fresh Freesia!

  • Basic White: 2 @ 5-1/4″ x 4″ … 4-1/4″ x 3″ …. 3-1/4″ x 2″
  • Colored Cardstock: 8-1/2″ x 5-1/2″ (fold in half) … 4-1/2″ x 3-1/4″ …. 3-1/2″ x 2-1/4″

I promised I would share a second card with you, one done in the Soft Succulent and I also created it in the portrait position and used the Dual Oval punch for my greeting …

I just love the softness of the flowers when you use the Stampin’ Blends … it almost looks as if it was water colored. I added touch of texture and softness around my greeting by added a ripple of ribbon behind it.

I thank you for stopping in for a visit today, I hope you enjoyed the video and the second sample, and that it inspires you to try one of these techniques.

Hope you have a wonderful day ~

TODAY’S STAMPIN’ SUPPLY LIST … If you liked the products used in today’s projects, I have links for you below. Just click on the item you would like more information on, or to begin your shopping. It will take you directly to my website. Thank you

Bloom Where You Are Planted …

Hello Stampin’ Friends ~

Today I would like to begin with introductions to the brand new product suites that have been included in the New 2021-22 Annual Catalog. There are so many cool ones, I wasn’t sure where to start so I’ll begin with the Bloom Where You are Planted suite …

The 2021–2022 Annual Catalog is packed with amazing products! Each time you open it to take a look, there’s something new that catches your eye…. If you’re like me, sometimes you miss the something so beautiful.

The stamps and the fonts were designed to create warmth and friendship, and in my opinion also gender neutral. The designer paper will help you create both feminine and masculine cards …

You’ll fall in love with the fun and fanciful greenery, and the natural elements papers you can add to your designs. You are going to have a ball creating with this suite. Here is a great example of …

Thanks for joining me today and I hope you join me again tonight for my Facebook LIVE.

Have an amazing day ~

Love Me Some In-Colors

Hello Stampin’ Friends ~

Now that I have introduced you to the 5 New 2021-23 In-Colors, I was wondering which one is “your” favorite?

Today I will share a recap of the colors plus you’ll also get a better look at how a different technique can change the entire card presentation even when you’re working with the same stamps. Interesting … right! Let’s begin with our first one; Pale Papaya …

If you got a chance to watch my video on the original post you may have heard that I got the idea right from the new Annual Catalog on page 68. I stamped color on color on the background and then stamped with White Craft ink and embossed in White.

My second In-Color is the Soft Succulent …

Here I just chose “basic stamping” … ink to cardstock while creating a beautiful background. The Soft Succulent is just as it says, a beautiful soft green. Simplicity can be beautiful.

The third In-Color I choose was the Fresh Freesia …

Another soft color works beautifully with this split color technique. Simple and elegant … the vellum adds a soft touch to the raw edges and the ribbon just “ties up” the finishing touches of the card.

My fourth card and a favorite new technique is done in Evening Evergreen …

Can you say “stunning”? That was my feeling when I finished this card … it combines the Emboss Resist with the Ombre technique and it turns out with a warmth, rich feeling. My favorite! The Evening Evergreen reminds me of the “Regal” colors of old.

My final card highlights the Polished Pink …

Here I used the Triple Time / Triple Layer technique … easy to make, fabulous results and it really does show off the new In-Color. Simple fun packed in this Polished Pink card, with a touch of Wink of Stella to add a little sparkle. 😉

Thank you for stopping by my blog today. Hope you enjoyed the recap of color … Which is your favorite? Is it the color … technique … or both? I’d love to hear from you.

Have a great day ~

TODAY’S STAMPIN’ SUPPLY LIST … If you liked the products used in today’s projects, I have links for you below. Just click on the item you would like more information on, or to begin your shopping. It will take you directly to my website. Thank you

Simply Sunday: Elegantly Said in Polished Pink

Hello Stampin’ Friends! Today is the fifth and final day of our 2021-23 In-Color Collection Showcase. Each card has showcased not only a new In-Color but a technique, and of course the Elegantly Said bundle.

Today I will showcase the Polished Pink with the Triple Time Technique. I am using the same stamp and greeting as I have the other four … not to worry, I will have plenty more samples from this amazing bundle in future posts, but lets take a look at today’s card …

Triple time is such a cool technique and very simple to do. Let’s begin with our Polished Pink cardstock … 8-1/2″ x 5-1/2″, 3-1/4″ x 4-1/2″, 2-1/4″ x 3-1/2″ and dimensions for the Basic White are: 4″ x 5-1/4″, 3″ x 4-1/4″, 2″ x 3-1/4″.

Layer the 3 pieces of white cardstock together and then stamp your images, then layer the Polished Pink cardstock behind it … align the stamped images so it looks like a continuous flow. It’s so easy and turns out so cool!

To highlight the continuation / flow of the stamped images, I used my trusty “Wink of Stella”. It really adds a fabulous touch to the card with that “sparkle”, and because of that I only added one of the In Color Gems to the card and that was on my punched greeting above the ribbon.

I hope I inspired you to try this technique, you can use any images you like, however if you’ve fallen for this bundle … I have it listed below.

I’d like to Thank you for joining me today….

Enjoy the rest of your weekend ~

TODAY’S STAMPIN’ SUPPLY LIST … If you liked the products used in today’s projects, I have links for you below. Just click on the item you would like more information on, or to begin your shopping. It will take you directly to my website. Thank you

Elegantly Said in Evening Evergreen

Hello Stampin’ Friends ~

The weekend is here and I’m a bit late with my post! Had a nice breakfast with my daughter and the 3 boys, and my AJ paid!! He treated us all … what a sweet young man.

Today I have a beautiful card to share with you today. I brought back the heat embossing but instead of the white, I embossed clear emboss powder on Basic White cardstock. Then it was time to pull out my Blending Brush and the Evening Evergreen ink and create the “Ombre” technique!!

This technique of light to dark, combined with this elegant stamp pair up beautifully and really makes a statement. I added my punched greeting off center … actually, right to the edge!

The In Color Gems were placed around the card to draw your eye to the punched greeting, and then the greeting was topped off with the coordination ribbon.

Thank you for hanging out to check out today’s card.

Enjoy your weekend ~

TODAY’S STAMPIN’ SUPPLY LIST … If you liked the products used in today’s projects, I have links for you below. Just click on the item you would like more information on, or to begin your shopping. It will take you directly to my website. Thank you

Elegantly Said in Fresh Freesia

Hello Stampin’ Friends ~ Happy Friday!!! I’m excited to share another of the NEW In-Colors with you … Fresh Freesia.

Today’s card is going to take a technique from each of the past two cards and combine them … Color on Color and Creating your own background! Here is what you get ….

On Wednesday we did the Color on Color technique which represents the bottom half, and yesterday we created our own back ground (designer paper) which represents the top half and it turned out beautifully.

I’m not one for exposed raw edges so I used a 3/4″ of Vellum cardstock to distract your eye from the harsh line … then I covered it in the beautiful Fresh Freesia ribbon!

To add a little twist to my card … I stamped and punched my greeting and turned it side ways!! This gives it a different look than the past two days … and adds an element of fun. Of course the pretty little In Color gems have been added as well.

I hope you enjoyed today’s twist on the past two cards … isn’t it amazing how the “same stamp” and the “same greeting” can look so different from day to day!

Thank you for joining me today … give me a “LIKE” if you have enjoyed today’s post.

Have a marvelous weekend !

TODAY’S STAMPIN’ SUPPLY LIST … If you liked the products used in today’s projects, I have links for you below. Just click on the item you would like more information on, or to begin your shopping. It will take you directly to my website. Thank you

Elegantly Said in Soft Succulent

Hello Stampin’ Friends,

Today I have my second card out of the 5 New In-Colors to share with you. I’ve decided to use the Elegantly Said bundle on all the cards to show you the easy and versatility of this bundle as well.

We’re going back to basics today, and in doing so we are creating our own designer paper with stamps! The Elegantly Said stamp set is perfect for that, let me show you ….

The shape of this beautiful detailed stamp lends itself to this technique so easily … you can see how it interlocks with itself (I demonstrated that in yesterday’s video) creating an elegant background to highlight any greeting.

The Soft Succulent looks amazing with this stamp … I’m going to have to try some additional techniques with this combination!! I used the punch and stamp as I did yesterday, but added a mat behind my greeting and a strip of ribbon.

I also decided to use my In Color Gems directly onto my tag today to really draw your eye to the focal point … your sentiment /greeting. Such a simple card to make, yet it is what the stamp title is … elegant.

Thank you so much for joining me today, can’t wait to share another with you tomorrow. Give me a “LIKE” at the bottom of the page if you enjoyed today’s post … it helps others like yourself, find me. Thank you.

Have a great day ~

TODAY’S STAMPIN’ SUPPLY LIST … If you liked the products used in today’s projects, I have links for you below. Just click on the item you would like more information on, or to begin your shopping. It will take you directly to my website. Thank you

Elegantly Said in Pale Papaya

Hello Stampin’ Friends ~

Yesterday Stampin’ Up! kicked off the New Annual Catalog so of course I followed suit with a presentation featuring the Elegantly Said Bundle done in the new Pale Papaya In Color.

In the next few days I will be highlighting the New 2021-23 In Colors, each day will feature a new color. Grab a cup of coffee and join me for a replay of my Facebook LIVE last night ….

It’s amazing how these two simple techniques can create so much depth and texture to your card … your results are simply elegant!

I’m liking that fun punch too and I’ll have more to share with you at my Catalog Launch Party! Notification / Invitations will be sent out soon. The Elegant Said bundle will be highlighted, but until then … let’s take another look at today’s card ~

A closer look is really shows the depth and texture on this card. The cute little tag really adds another element (and focal point) to the card … the Pale Papaya ribbon really adds a soft touch to the tag, and who doesn’t love those little In Color gems!

I want to “Thank You” for taking the time to sit with me today and check out my first “NEW” Catalog Card!!

Have yourself a great day and I’ll see you tomorrow with another amazing In Color.

TODAY’S STAMPIN’ SUPPLY LIST … If you liked the products used in today’s projects, I have links for you below. Just click on the item you would like more information on, or to begin your shopping. It will take you directly to my website. Thank you