You’re Wonderful …

Hello Stampin’ Friends,

I’m happy to announce the September photopolymer stamp set, You’re Wonderful—inspired by one of our Concept Artists; Melody’s carved stamps.


6a00d8354941d869e201a73e1250c6970d-500wi

3-youre-wonderful_crbwonderful-birthday

I love the whimsical feel of the scripted sentiment, the fun flow of the banners, and the pops of color from the gorgeous flowers. This card makes me happy.


4-youre-wonderful_crbsister

She used the flower stamps on this card to create her background. She stamped the flowers in sections using Crumb Cake ink, then quickly added Clear Stampin’ Emboss Powder over the damp ink to give the flowers a softer look.

Here is a cute little note card Melody created …

5-youre-wonderful_crbto-my-friend

I love how she framed the flowers –  All 3 cards are beautiful.  You will be able to purchase this new stamp set on my on-line store.

Have a wonderful day ~

blog-closing-small

Celebrate You …

Hello Stampin’ Friends,

Today’s card share comes from Vicki … the demonstrator who recruited me into the fabulous journey called Stampin’ Up!

Last night I held my team meeting and invited Vicki (my upline) and Jenny (my sideline) … we had many laughs, great swaps, and did a fun masking technique.  We even talked business! lol   I love gathering with my fellow demonstrators… aka / Stampin’ Sisters!

Vicki’s sweet and simple card begins with a White on White base, with the background being embossed with the beautiful new Lovely Lace embossing folder.  It’s fun and works perfect with her three little flowers!

000_1384

Vicki created those cute flowers with the Petite Petals punch (colors: Garden Green, Rose Red & Island Indigo) the little white flowers come from the Itty Bitty Accents Punch Pack… then topped off with a little bling!    The greeting is from Endless Birthday Wishes!

Love the card … Thank you Vicki!  I will also be sharing the others swap cards, and the card that I did with everyone.

While I’m talking about Stampin’ Sisters … Stampin’ Up! has a promotion for new demonstrators!  Sign up before August 28th and receive an additional $51 in FREE goodies!!  Plus, your kit is shipped FREE… another 10% savings!

6a00e54f95df92883401b7c6d00655970b-500wi

It’s a great deal, and no obligation to remain active … give it a try.  You always have me to coach you!

Thanks for stopping by today!

You all have a great weekend ~

blog-closing-small


Happy Blooming Birthday …

Hello Stampin’ Friends,

Today I would like to share a sweet and simple birthday card that will bring a smile to anyone who receives it.  I used the new “Flower Patch” stamp set!  This is one of our Photopolymer sets, and makes the two-step stamping super simple because of the clear images.

I have a video for you to view that highlights the “Flower Patch” stamp set …

My card base color is the new In-Color Mossy Meadow along with the Whisper White which truly highlights to ink colors we will be using on our card.

The flower was created by stamping our largest image first, in the lightest color: Crisp Cantaloupe.  I then layers the Calypso Coral next, and completed the flower with the Cajun Craze… and topped it off with a pearl.

000_1352

STAMPIN’ TIP:  The leaves were added behind the flower by creating a mask.  Stamp the largest flower image on a piece of scrap paper and cut it out.  I always cut inside the line.  Then place it over the flower and stamp your leaves … it gives the appearance they are behind the flower!

It’s been a while since I’ve used a two-step stamping set and forgot how fast you can create a beautifully layered, colorful card.  I added the Daffodil Delight flowers in the background to create another pop of color.

As the video states, the Flower Patch stamp set has a coordinating framelit; Flower Flair, and when bundled you get a 15% savings!

I hope you enjoyed today’s card and video!

Happy Birthday ~

blog-closing-small


Guest Stamper … Doris P.

Hello Stampin’ Friends,

Today I have a cute card I would like to share with you, that one of my downline members… Doris P.  stamped.  She used the “Life in the Forest” stamp set … which is cool because I don’t have that one, and the little fox is just too cute.

I love the way he is romping around in the grass!  It’s so easy to create now that we have the “Fringe Scissors”.

000_1344

The greeting comes from the Just Sayin’ stamp set which coordinates with the Word Bubbles Framelit Dies.  I do have those, and I love them!  The greetings are so much fun and with one roll of the BigShot … they are cut out for you.

I have listed the ingredients at the end of the post.  Thanks so much for stopping by.

Have an awesome day ~

blog-closing-small


Color Combination … put to the test!

Hello Stampin’ Friends,

How are you doing this fabulous day?  I’m feeling better every day, so I felt it was time to challenge my brain!   I decided to pick a color combination … then design the card.  What was I thinking?  In reality, it wasn’t that hard.  You’ll understand as you follow me through the steps.

It began with the Sweet Taffy designer paper and my choice of “Pumpkin Pie” …

000_1260

Once I had the designer paper color, I when through the Color Coach to get my color pallet for my card.  As you can see … Cherry Cobbler and Night of Navy completed my color combination.

For some fun and texture I embossed the base of my card with the new “Large Polka Dot”  embossing folder.  Oh boy … this one is going to get used a lot!

000_1266

With the base done, it was time to adhere the designer paper, I matted it with the Night of Navy and scalloped one edge with the Scallop Edge Border punch.  The combination of these two colors emit a burst of energy!

Next I wanted a focal point that really stood out, so I picked the Hostess stamp set: Bloom with Hope.  This is the perfect stamp set to play with your Blendabilities, and as you have seen if you follow me … I use it a lot.

I used the Pumpkin Collection of Blendabilities, then added the Cherry Cobbler.  These two combined created such a warm and beautiful flower.  The Old Olive collection was used for the greenery and ties in nicely with the color scheme.

000_1261

I used the Circle Framelit dies to cut out my flower image, then chose the 2-1/2″ punch to mat it because it is smaller & there was not as much of the Cherry Cobbler cardstock showing.   I used the Cherry Cobbler for the mat so it would pull out the cherry highlights out of the flower.

Finally my greeting … I must say, I have wanted to use the “Endless Birthday Wishes” stamp set for a long time, so I pulled the Happy Birthday from there!  This is the cutest stamp set and is Photopolymer.  If you like your stamps clear and stickin’ to your blocks … these are for you!

000_1265

The greeting was popped up with the Stampin’ Dimensionals.  I tried really hard to add a 3rd circle (in the flower shop, we always designed with odd numbers) but on this card … it just didn’t work!  Sometimes less is more.

Stay tuned because in the next few days I’ll tell you how you can get the Bloom with Hope Hostess set and a Free color collection of Blendabilities Markers!

Hope you enjoyed today’s card and it’s brightens your day a bit.

Take care ~

blog-closing-small


Dear Heart Photopolymer Stamp Set Samples!

Hello Stampin’ Friends,

From what I hear … boy stamps are almost as hard to come by as masculine ones.  Last week I shared a new stamp set “Dear Heart” with you, it’s the “boy” version of “Sweetie Pie”.  I saw these wonderful samples of cards and projects using the “Dear Heart” stamp set and knew I had to share them with you.

I give cudo’s to Cindy B. Stampin’ Up! Senior Staff Writer … not only did she design the stamp set, she created all the samples seen here today!  Thank you Cindy for sharing.


This companion to the Sweetie Pie Photopolymer Stamp Set has the cute boy images so many have been asking for! Recommended clear block sizes are A, B, C & G (not included in the set).

Don’t you just love the Green & Gold!  I wonder if Cindy is a Packer Fan 🙂

If you would like to purchase this stamp set, just click on the picture below.  You can use HOSTESS CODE –  AT22FGCR

Dear Heart stamp set

Remember all on-line orders totaling $50 (before shipping & handling) in the month of July will receive a surprise in your mailbox from me (something you can use in your cardmaking!).  Let me know if you have any questions.

Thank you for stopping by …

Have a good day!

blog-closing-small


It’s your birthday!

Hello Stampin’ Friends,

Today I continue with my Quick-n-Easy card series share with the designer paper.  I thought it would be fun to use the same designer paper and stamp set that I used yesterday!  I came up with a fun and colorful kids card for a birthday.

Our designer paper is the “Sweet Taffy” and I picked the stripped and polka dot patterns… that’s a whole lot of fun!  It’s the “Big News” stamp set,and I picked “It’s your birthday!” and yes, it’s suppose to have ink inside the letters 🙂

000_1229

My base card is Tempting Turquoise… I also matted the greeting with it.   I added the Daffodil Delight behind the designer paper to coordinate with the cotton ribbon and scallop punch behind the candle.  Whisper White was used for the greeting, the candle and the inside of the card.

I pulled out the Circle Collection Framelits to cut out my greeting and the mat.  I was tempted to do some paper piercing on the Turquoise mat some texture, but I said I would give you quick -n- easy! Feel free to step up any card with paper piercing.  It is easy and it adds a nice touch to the card.

I also did some punching, that’s always a quick and easy way to jazz up a card.  Today I used the 1-3/8″ Circle punch and teamed it up with the 1-3/4″ Scallop Circle punch.

000_1230

Yep … I did it, I broke out the glitter!  It’s been a while but I love the sparkle on the card.  I’m sure I’ll be sparkling for a few days too.  Even the shower doesn’t even get it all off, but it does look pretty going down the drain! LOL

Don’t forget that today is Tuesday and that means new Weekly Deals!  Click on the “WEEKLY DEALS”  picture below and check out what’s on sale today!

CM1634B

Thanks for stopping by today.  Not sure if I’ll be sharing this combination of  “Sweet Taffy” & “Big News” again tomorrow, but I will have another Quick -n- Easy card for you!

Have a great day ~

blog-closing-small


Happy 4th of July!

Hello Stampin’ Friends,

Today’s card share is to celebrate this great country of ours, and the men and women who risked it all to give us the freedoms we have.

Now … it may be a bit late for you to recreate this card, however I want to show you how fun and versatile the “Little Letters Framelit Dies” are!  So today I’m sharing 2 cute cards with you…

Let’s begin with the USA card… simple with a statement!  My base for both cards is Whisper White.

000_1204

I cut the U – S – A out of a 2″ x 4″ piece of Cherry Cobbler.  I used my “Paper Piercer” to gently push the alphabet pieces loose (fig. 1) , and then help pull them out (fig.2).  It’s not hard to do, just use a gentle touch.

000_1200  000_1202

I used the “negative” image on my card instead of the actual letters.  To get the center of the “A” attached … I rolled up a glue dot and stuck it on the back.  I popped the entire USA piece up with dimensionals.

000_1206

I backed the USA negative with a 2-1/4″ x 4-1/4″ piece of  “Silver” Glimmer Paper, and matted it with a 2-1/2″ x 4-1/2″ of Night of Navy.  I added a scallop to mimic those pretty Red, White, and Blue swags that I love!

To complete this card, a “Happy Birthday” wish was added from the NEW  “And Many More” stamp set.  This will be a must have stamp set with it’s 23 different greetings!

Image this card with your child’s or friend’s name … in their favorite colors!  The is no limit to the cards you can create!

My “firecracker” card was created to use the “U – S – A” letters.   Again, quite simple to make which is what we need as we prepare for holiday weekends!

000_1207

I created the firecrackers with the straws that were included in the June Paper Pumpkin Kit!  And the stars … well they come from the “Itty Bitty Accents” Punch!I created the firecrackers by placing a glue dot into the straw and the sticking a piece of bakers twine in it!!  Simple and… Oh so cute!!

Thank you for taking time out of your day to check out my blog.

I wish you a very safe and happy July 4th!

blog-closing-small

Birthday Bliss in Blackberry

Hello Stampin’ Friends,

I hope you are enjoying your weekend!  I held my summer party with my Star’s by Design group yesterday.  We had a great time!  I will be sharing some of our day with you throughout the next couple of days … I have some really cute cards to share!

Friday I shared a quick and easy card with you and said I wanted to show you another card using the “Park Lane” designer paper … I’ll show you that today too!

Each summer and Christmas I host a special party for my Star’s, and our group met yesterday.  We had a great time sharing ideas, stamping, laughing, more stamping, and then went out for lunch.

This is the cute gift bag that each of my Star’s received when they arrived.  The bags are from the February Paper Pumpkin kits … they are so cute!  I personalized everyone’s bag with their names.  Inside their bags they each got the NEW “Hearts & Star’s” decorative mats.   Ahhh …. what else would I give my Star’s but stars!  🙂

000_1179

We talked about the Paper Pumpkin and the girls got to make a treat bag with the June “Pinwheel” Paper Pumpkin.  They also created a couple cards using the “Reflection / Mirror Image” technique.  I’ll share more with you tomorrow.

Now I’d like to share with you a special birthday card I made with the “Park Lane” designer series paper.  I picked the Blackberry Bliss paper this time.  The floral pattern is the same as Friday’s card but the color “really” changes the look.

000_1180

I stamped the flower from the Hostess set “Bloom with Hope” and colored it in using the Blackberry Bliss ink pad and Blender pen.  Next, I used the Ovals collection framelits to cut out the flower and create a focal point.

To add a touch of texture … I pulled out my Occasions Paper Piercing mat, the Paper Piercing Tool and the mat and pierced the oval.  I love that mat …. Did you know you can use that as a mat as your stamp pad?  It gives you a crisp, beautifully stamped image!!  Try it 🙂

000_1184

The greeting comes from the Bloom with Hope stamp set too, and the banner came from the Paper Pumpkin kit … however, it would be easy enough to make.  I just put a couple of folds in it to make it stand up.  I added the butterflies just because I think they’re pretty, and a bit of designer paper on the inside to finish off the card.

So … what do you think?  Is the Quick -n- Easy card on Friday your favorite, or is it this tantalizing Blackberry Bliss?  I’d love to know 🙂

I thank you for stopping by today.

Enjoy the rest of your weekend ~

blog-closing-small

000_1180

The stamp set “Bloom with Hope” is a Hostess set, and cannot be purchased on a regular or on-line order.  A qualifying workshop (stampin’ party) of only $150 would give you enough hostess dollars to purchase this set.

You can put in a personal order, do a book show, or I’d be happy to put together a party for you and your friends!  Stamp a few cards, check out the new catalog, fun with friends, and before you know it … you’ve earned enough hostess rewards for this and maybe more!  Let me know 🙂

Blooming Fast to Blooming Beautiful

Hello Stampin’ Friends,

My card share today reflects my “Fast Friday” theme.  This beautiful birthday card is so easy to make, you could pump out a dozen in less than 1/2 hour!!  It’s a great way to create a stash of birthday cards and then get back to the fun in the sun!

I began with the beautiful “Park Lane” Designer Series paper.  This package has many unique designs and will work great for the ladies, the guys and even the kids!

000_1174

I chose the floral pattern in Whisper White and Old Olive, and cut the paper to use the large flower as the focal point of my card.

The greeting comes from the new “Flower Patch” stamp set … fitting, don’t you think!  The “Flower Patch” stamp set is in the new Photopolymer material.  I love it, it’s perfectly clear and sticks to the blocks fabulously!!

000_1175

I then cut my greeting and Old Olive mat from the “Apothecary Accents” framelits.  I did not want the greeting to overpower the card, but just added a bit of bling to draw your eye to it.

I hope you enjoyed today’s quick card.  Stop back tomorrow … I’ll be sharing another beautiful card using the “Park Lane” Designer paper.

Thanks much & have an awesome day!  It’s Friday 🙂

blog-closing-small


Happy Father’s Day …

Hello Stampin’ Friends,

Today I’d like to share with you; cards that I have created from my last Paper Pumpkin monthly kit.  This was one of my favorites because it was so simple to assemble but had just the right amount of layers … nice card!

Since my Dad is no longer with us, I created the cards in honor of my brothers.  This kit contains both the Fathers Day tamp and a Birthday stamp … so I made a sample with both and then a bit extra.

I will start with the Father’s Day card, because I followed the assembly instructions that were included in the kit.

000_1135

My second card, I adapted it a bit by turning it horizontally.  So easy … yet the card looks quite different.

000_1136

I wanted to share these samples of our Paper Pumpkin kit with you because Stampin’ Up! now has prepaid subscriptions!  Check out the subscriptions and let me know if you have any questions.

3-MONTH PRE-PAID PAPER PUMPKIN SUBSCRIPTION
Enjoy a prepaid three-month delivery of Stampin’ Up!’s subscription kit program. Each month a fully designed project kit arrives in an adorable box filled with stamps, ink, and paper–everything cut and ready to go.

6-MONTH PRE-PAID PAPER PUMPKIN SUBSCRIPTION
Enjoy a prepaid six-month delivery of Stampin’ Up!’s subscription kit program—and save $1 per month! If you purchase just a bit more, you would qualify as a Hostess and receive Free Hostess Dollars!

12-MONTH PRE-PAID PAPER PUMPKIN SUBSCRIPTION
Enjoy a prepaid 12-month delivery of Stampin’ Up!’s subscription kit program—and save $2 per month! Not only will you SAVE $24  & receive $30 FREE HOSTESS DOLLARS!

You may contact me to order @ lindaluvs2stamp@aol.com or shop directly from my website by clicking on any of the above links.

000_1139

Want to see more?  I am hosting a Paper Pumpkin Event on Tuesday, June 24th.  You will create 2 cards and 1 awesome project for only $5 … or FREE with the purchase of at 3-month or more pre-paid subscription!  Space is Limited to 8.  If I have additional demand, I will schedule another class.

Please feel free to contact me with any questions, and will send full details on class upon request.

Thank  you for stopping by.

Have a wonderful Sunday ~

blog-closing-small


Calling all Hero’s …

Hello my Stampin’ Friends,

Today I have two announcements and several project shares for you!  First let me start with the exciting new photopolymer stamp set that Stampin’ Up! just released … Calling all Hero’s!

This stamp set is perfect for kids, but you can also used it as encouragement to support a friend or loved one who is going through a personal struggle and fighting hard.  I know I have my hero’s … how about you?

000_1132

This is my sister Ruthie (right) who lost her battle with Pancreatic Cancer 3 years ago.  Her fight was more than any super hero had to go through.  Just think how a fun card could lift someones spirit.

Here are some fabulous samples and great idea’s that Stampin’ Up! created with our new Calling all Hero’s stamp set …

be45e84a1d76a08a923d129286bd7a89

51a4064dc2e61b6e8f7491b8355d6ad8

32933ea1261bfbd9ce8e7245544a86680d15d6b264ad2ff22d046a56ffb03026

2a58808f406050d435d448af9a65dfe2

Aren’t they just adorable?  Hand stamped cards and projects are a great way to show someone how much they mean to you… and everyone loves to get them 🙂

Second, I want to share with you the Weekly Deals.

CM1634B

I want to remind you that you don’t have to wait for my post to see the weekly deals … just go to the side bar on your right (some may have them on the bottom) and just click on the “Weekly Deals” logo… It looks just like the logo above and it will take you right to the deals!  How cool is that 🙂

Click either of the logo’s, or on the item description listed below to begin shopping.

Weekly Deals

We hope you enjoy this week’s Weekly Deals!

Afternoon Tea Ii Kit – Digital Download Item # 129928
Regular Price: $9.95
Discounted Price: $5.97
Hearts A Flutter Framelits Die Item # 130159
Regular Price: $24.95
Discounted Price: $18.71
Argyle Textured Impressions Embossing Folder Item # 127750
Regular Price: $7.95
Discounted Price: $5.96
Label Petite Curly Punch Item # 129405
Regular Price: $12.95
Discounted Price: $9.71
Chocolate Chip 3/4″ Chevron Ribbon Item # 130014
Regular Price: $8.95
Discounted Price: $6.71
Cherry Cobbler 3/4″ Chevron Ribbon Item # 130012
Regular Price: $8.95
Discounted Price: $6.71
Silver Basic Metal Buttons Item # 133319
Regular Price: $7.95
Discounted Price: $5.96
Blushing Bride 3/4″ Chevron Ribbon Item # 130013
Regular Price: $8.95
Discounted Price: $6.71


I hope you enjoyed today’s post … Please feel free to leave a comment.  I’d love to hear about your hero, we all have one, probably more.

Thank you for stopping by today.

Have a wonderful day ~

blog-closing-small

Introducing … Endless Birthday Wishes Stamp Set

Hello Stampin’ Friends,

Stampin’ Up! just released another Photopolymer Stamp Set … Endless Birthday Wishes.  I love the ability to “say it the way you want” by putting together these fun greetings.  The handwritten font is fun and easy to read!

6a00e54f95df92883401a3fd08a5aa970b-500wi

Today I am sharing a quick post from our “Inspired By” blog from Stampin’ Up! and Concept Artist: Jen C.

She has some really cute cards and projects that were just to precious not to share with you!

Endless Birthday Wishes

Working for Stampin’ Up! is an incredible experience. There are so many great opportunities—such as the chance to design stamp sets. Our employees and demonstrators have accepted me into the Stampin’ Up! family and have embraced my unique skills and abilities. I’m continually growing as a person and an artist. I feel blessed to be a part of something so amazing!

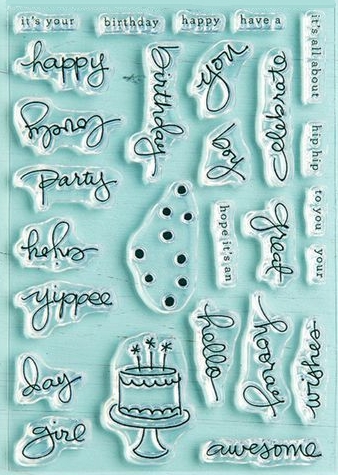
I’m excited to share our newest photopolymer set, Endless Birthday Wishes (Item# 137553), which includes some of my handwritten words and drawings. It’s similar to the set we offered for the holidays last year called Endless Wishes. The concept is that you can build lots of different birthday greetings (and more) by combining the handwritten words with typed words and phrases. And with photopolymer stamps (US/CA), grouping words and phrases together is simple.

Enjoy! I’m excited to see what you make with this new set.

Jen C.
Concept Artist

I loved her ideas!  Jen has totally sold me on this awesome new set, and I’m putting my order in today!  Here is the flyer with all the details …

CLICK HERE TO DOWNLOAD FLYER

If you would like to purchase this stamp set, just click on the picture below …

I hope you enjoyed Jen’s post … If you would like to follow the “Inspired By” blog, here is the link:

http://www.stampinup.com/home/get-inspired

Thanks for stopping by and ~

Have an awesome day!

blog-closing-small

My 2014 Annual Stampin’ Retreat Swaps …

Hello Stampin’ Friends,

Today I am sharing with you just some of the swap cards that were exchanged at my annual Spring Retreat.  I must say … there was a lot of talent in our group this retreat!   All of the cards were wonderful.

Our first guest stamper is: Karie K.   I love the beautiful color combination Karie used with the “Polka Dot Pieces” stamp set.  Love the fold and the use of the “Scallop Tag Topper Punch”!  What a wonderful way to express birthday wishes!

100_2379

Our next Guest Stamper is Linda K.  This beautiful card shimmers with delight!  Linda’s choice to team up the “Brushed Gold” cardstock and Striped Gold Vellum in matching envelope is brilliant.   The vellum and the stamp set “Happy Congratulations” can both be found in the “Celebrate the Everyday” catalog.

100_2382

My next guest stamper is:  KATHY C.   Another fun fold card.  Like Karie’s Scallop Punch, Kathy used the “Angled Tag Topper Punch”, and used one of my favorite designer papers – Quarterfancy Specialty paper.   The beautiful flower is from the “Love & Sympathy” stamp set.

100_2381

Our next Guest Stamper is: OLIVIA H.  I just love the colorful way Olivia  say’s she’s “Thinking of You” which comes from the stamp set “Kind & Cozy”.  And who doesn’t love the “Gingham Garden Washi Tape”!  Sad to see that leaving the catalog 😦  Olivia finishes off her beautiful card with the “Elegant Butterfly” and the “Pearls”.

100_2384

My last Guest Stamper is: BARB L.  It is also the WINNER of our card contest.  Each guest votes for their favorite and Barb won a $25 Gift Certificate for more Stampin’ Up! products of her choice!

100_2383

I hope you enjoyed the sneak peek at our our retreat swaps.  I love having all the wonderful ideas and samples.  Like I said earlier … a lot of talented ladies came to stamp.  Maybe someday I’ll post more.

I’ll post a list of the main ingredients below,  that were used in the swaps.  Just click on them for more information or to purchase.

Thank you for stopping by ~

blog-closing-small


Fast on Friday’s is back …

Hello Stampin’ Friends,

How are you today?  Fine I hope, and ready to spend some fun time with the family.

Today I have a quick and easy card share for you.  I’m not sure if you can get much simpler than this, but I would still be proud to send it to any of my friends.

I began with the Crisp Cantaloupe cardstock and the Watercolor Wonder Designer Series Paper.

000_1008

Then I took the birthday greeting from the fabulous stamp set “Another Great Year”.  I just love the fonts used on this stamp set and the cute little accessory stamps are fun to work with.  And for those that know me well …. know that I used the black StazOn™ to stamp with.

To finish off the card I used the Crisp Cantaloupe Ruffled Stretch Ribbon … I told you I was going to get some when they put this on the Weekly Deals list!  I adhered it with the sticky strip because I didn’t want it to pull off.

000_1009

That’s it … we’re done!  Wasn’t that quick and easy!  And cute … you must admit it’s cute!  I think it’s the polka dots, they are just so fun.

Thank you for stopping by my blog today.

Have yourself a fabulous Friday ~

blog-closing-small

Here is the list of ingredients… just click on the link to purchase or view more details.  Thank you.