Lovin’ what I do …

Hello Stampin’ Friends,

Man … I love being a Stampin’ Up! demonstrator!   If you read the blog yesterday you know I just met with my downline  (people I have recruited into my stampin’ family) and that I will be sharing those swaps with you.

Yesterday I spent the day finishing and packing up the Make & Takes for the Hostess / Customer Appreciation Party … Oh, I can’t wait for my stampers to arrive!  I’m so excited … we are going to have a blast!  I’ll post 🙂  It is amazing the lives you touch when you are in this business.

So today … I’m going to share the Make & Take I presented to the Star’s group…  A Masking Technique and a some stampin’ tips!

With summer coming to an end and fall right around the corner I wanted to share not only a new stamp set, but a something to really highlight it.

000_1386

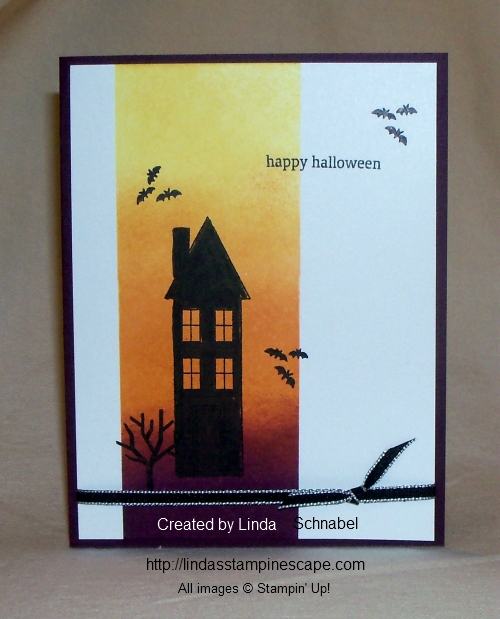
Lets begin with the masking, I used two post it notes together (if you don’t have the longer ones) … make sure the “sticky” edges are to the inside where you will be sponging.

I began with Daffodil Delight and started 1/3 of the way down the area to be sponged, this way the darker area is where you begin and you work your way up so the top is lighter.  You can always add more color but you can’t take it back off.

The Pumpkin Pie – start 2/3 of the way down so as you move up, it’s lighter and will blend beautifully with the Daffodil.  The Blackberry bliss will start at the bottom and again, work your way up.  STAMPIN’ TIP: I do this technique of sponging in a circular motion because that helps blend it nicely too.

The stamp set is the “HOLIDAY HOME” (135095) from the Holiday Catalog.  It is a photopolymer set so yo won’t have to worry about those smaller images falling off the blocks … they stick so nicely and being clear, it’s a breeze to align!

000_1387

We stamped the tallest of the 3 houses in this set (there is also fun stuff for Christmas… very versatile) then we colored the house in to create a silhouette!  Don’t you just love it!  We left the windows alone so the color from our sponging would come through.

I just have to let you know that this stamp set has coordinating framelits (135857) and you can purchase it as a bundle (137631) too!  Catalog orders can begin AUG.28th in !!  Please let me know if you did not get your catalog.
000_1386

Thanks so much for the visit … be sure to check back daily as I will be posting more of the Star’s gathering swaps and pics and samples from my Appreciation Party!

Here is a quick reminder of our current promotions … just click on anyone of them to get more details.  Thank you.

                       6a00e54f95df92883401b7c6d00655970b-500wi                    6a00e554f4a3a4883401a511ee0d9d970c-800wi

Header_PP50percent_July1614

Have a super Sunday~

blog-closing-small


Halloween Party Ideas …

Hello my stampin’ friends,

Today I’m going to share with you some of Stampin’ Up!s newest downloads available for the My Digital Studio.  You don’t need the My Digital Studio to download these items, but you may as well download the FREE Trial of My Digital Studio.  Just click on the “highlighted” descriptions … they will take you to the links on my Stampin’ Up! website.

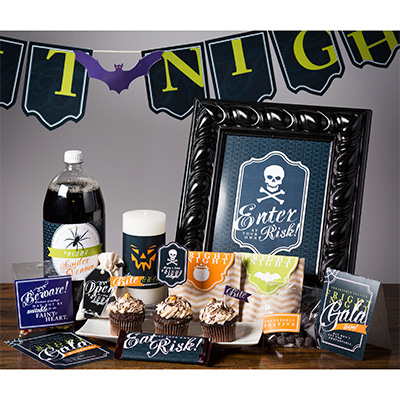
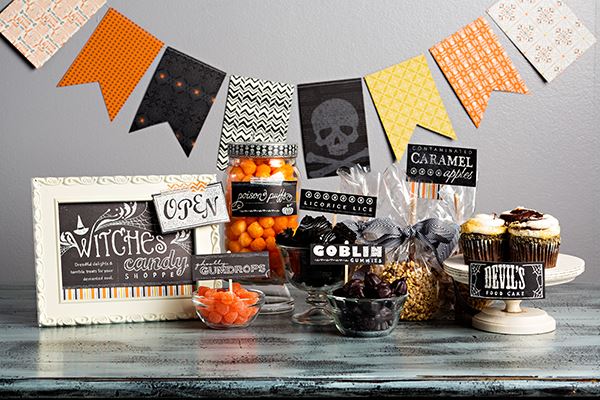
Halloween fans, I think this is one of the cutest set ups for a Halloween party…135642LThey are using the “Fright Night Ensemble” … the best thing is, you don’t have to wait to use these My Digital Studio products, because they are available to you at time of purchase (they’re sent via e-mail).  You can be working on those decorations minutes after you purchase!

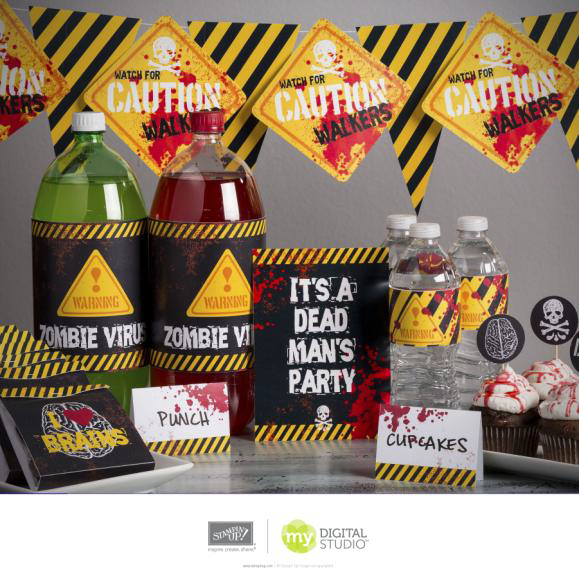
Now … really!  For those of you who know me, you know I love the “Walking Dead” series, and who would have thought someone at Stampin’ Up! does too!  Here is an AWESOME new download just in time for the Season 4 Premiere Tonight!

MDS_DWNLDA_ZOMBIE_PARTY_PRINTABLES

You know I’ve got mine!!  This is the “Zombie Party Printables” … I think this is just what all you “Walking Dead” fans need for your “Dead Head” and season premiere parties.  Or  just a whole lot of fun for Halloween, which is just around the corner.  You know there a plenty of zombies around, who would love to party with you.  I just love this (but I love Halloween and the Walking Dead)

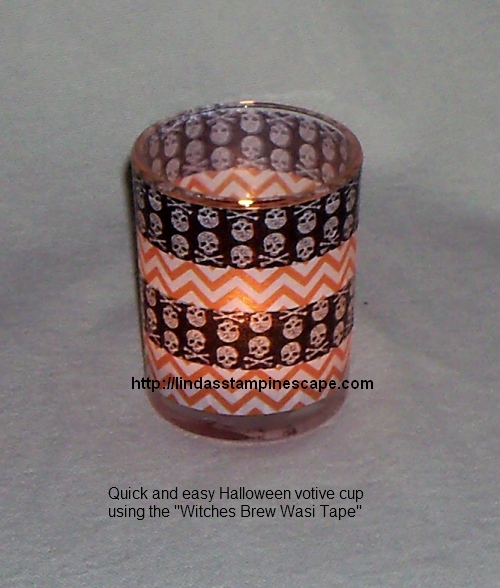
Well … I had to add my touch to all this too!  A fun and simple way to light up the party …

000_0270

Grab a couple votive cups and just wrap the “Witches Brew Designer Washi Tape” around them and you’re good to go!  So simple, yet so cute.  You can do this with any of our washi tapes!

You still have plenty of time to purchase either or both of these cute digital downloads and have the best decorated house on the block.

Just one more Halloween Party idea …

1375061_10151838510117512_1415373899_n

For those of you who have purchased (or will soon) these are some cute decorations you can make with the “Witches Brew Designer Series Paper”.  It’s as simple as cutting your Designer Series Paper!  You’ll be the hit of Halloween with any of these cute, fun decorations around your house!

Thanks for stopping by today …

Enjoy your day!

blog closing-small

Guest Stampers Card Share …

Hello Stampin’ Friends,

The weekend is here so I’ll make this post short and sweet.  Short with words … sweet with more card shares!

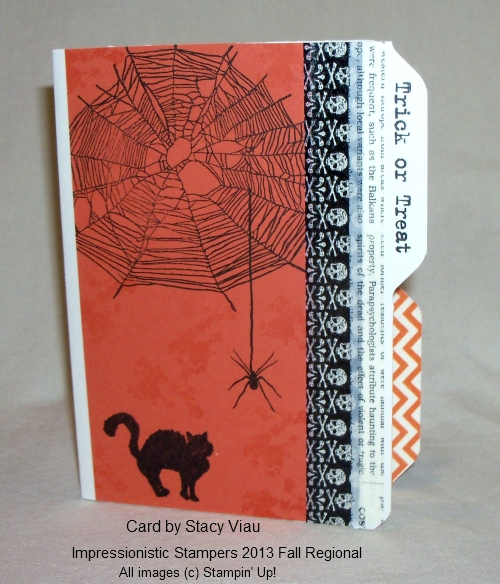
The first is a really cute Halloween card from Stacie Viau …

100_2213

I think this is such a neat card!  Stacy used the new Envelope Punch Board!  The also used the Bite Me Photopolymer Stamp Set and the “Witches Brew Designer Washi Tape”.

The new Envelope Punch Board is currently on back order, they sold out much quicker than they expected.

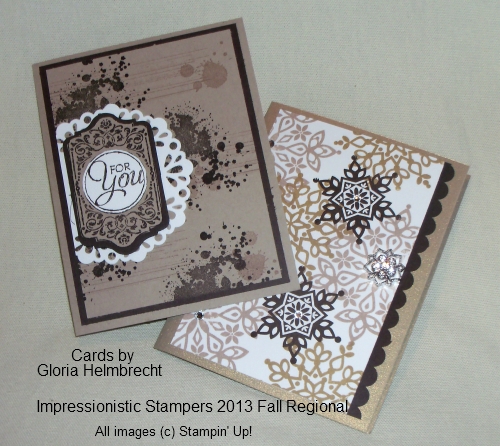
The second set of cards that we made during Gloria’s “Monochromatic” class…

000_0265

I had not used my “Gorgeous Grunge” stamp set because I wasn’t sure what to do (we got it FREE at Convention)  … I’m not really into grunge, but I truly love this card we made.  Oh … and there is another but I couldn’t show you because my “technique clubs” will be using this in the near future!  OK … so now I’m hooked on “Gorgeous Grunge”.

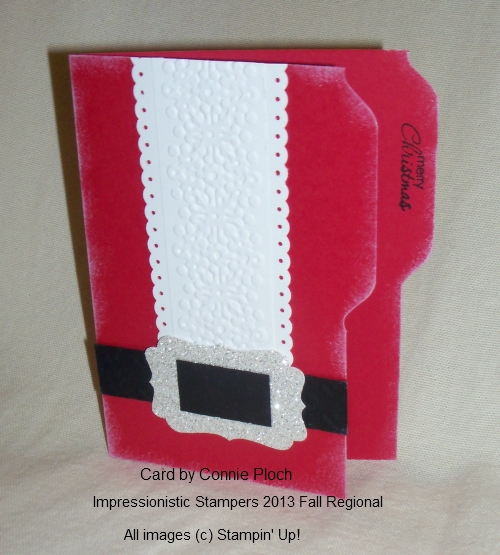
The last card share is from Connie Plout …

000_0268

Connie also used the Envelope Punch Board to create her card … Oh – I can’t wait to get mine!  This card is just too cute.

Hope you enjoyed the card share, and thanks for stopping by!

Have a wonderful day.

blog closing-small

Shake your Halloween Booty …

Hello Stampin’ Friends,

It’s Friday … and it’s time to shake some booty!

Today’s card share is a fun, whimsical Halloween card, and super simple to create.  I brought out the fabulous “Bootiful Occasions” Stamp Set found on page 24 of our main catalog.  To me, this was one of those “must have” stamp sets.  It’s fun, versatile … and who doesn’t love shoes.

Because we’re still on our Halloween themed week – I wanted to showcase fall colors, so I chose the Pumpkin Pie and Basic Black … and added the Elegant Eggplant to make the colors come alive!

000_0261

If you haven’t guessed by now … here’s another design from our Witches Brew Designer Series Paper.  I thought the swirlies (reminds me of the Twilight Zone) worked well with the witches boot.  The boot was stamped in Black StazOn (my favorite) and then colored in with our Pumpkin Pie and Elegant Eggplant marks.  You have to love that everything coordinates … doesn’t that make life easier.

Well I couldn’t stop there … I “HAD TO” add the beautiful Black Stampin’ Glitter (pg. 20) in the Holiday Catalog… easy to apply with our Two-way Glue pen.  I added the Pumpkin Pie 1/8″ Taffeta Ribbon, just because I wanted to “girl it up” a bit.  And to finish it off … Black Diamonds!  Also known as our Rhinestones colored with a black Sharpie!

I did a bit of stampin’ on the inside …

000_0260

The moon was created with the “Reverse Masking” Technique and a sponge, and my little witchy (who grabbed her boot and flew off) is from the “Halloween Hello” stamp set (pg. 21) in the Holiday Catalog.

I hope you have enjoyed my Halloween week, and have been inspired to create some fun projects with the Witches Brew Designer Series Paper, and the fun stamp sets shown.  You can purchase any of these items directly from my website … http://www.lindaluvs.stampinup.net or contact me: lindaluvs2stamp@aol.com … I’d be happy to help you.

000_0261

So have fun this weekend and don’t forget to shake your “booty”.

Thanks for stopping by.

blog closing-small

Simply Beware … Glitter Technique

Hello Stampin’ Friends,

We are over the hump and on our way to the weekend!  We are also half way through our Halloween week card share.

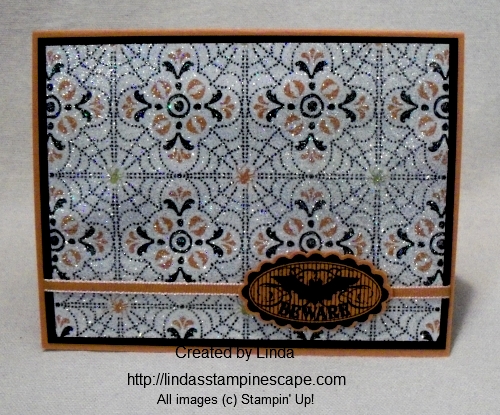
Today’s card is super simple and super glittery!  I began with one of my favorite patterns from the “Witches Brew” Designer Series Paper.  Cover the entire piece with the VersaMark™ … I actually just dab the pad right onto the paper.

000_0245

Then I dip it into my “Iridescent Ice” Embossing Powder.  When you heat this… watch closely to make sure it is melting properly.  That’s it!  I love the way this looks, and the technique has several names, but I call it the  “Dazzling Diamond Dust” technique.

I also embossed the “Beware” which comes from the “Halloween Bash” Stamp set located on page 21 of the Holiday catalog.  After embossing, I added the Black Stampin’ Glitter (132206) to just the bat, to tie in that “sparkle”.

I said it was simple … and you can do this to any Designer Series Paper.  So if you have someone that loves that “glitz”, just add this simple technique and they’ll be starry eyed, and think you are the bestest!

000_0248

Hope you are enjoying my Halloween card feast … only 2 days left!  So get your “booty” back here tomorrow because you won’t want to miss this quick -n- cute card either .

Have an awesome day!

blog closing-small

Celebrating a creepy Halloween …

Hello Stampin’ Friends,

How are you liking the Halloween card share so far?  Today I am going to show you the “Joseph’s Coat” technique, with a bit of a  twist.

The colors I have chosen to use today are: Basic Black, Pumpkin Pie, Summer Starfruit, and Whisper White.  I am also using the same Designer Paper I used yesterday, from the Witches Brew Designer Series Paper pack.

100_2191

First thing I did was measure my stamp so I could get the color effect I was looking for.  I used a 1 inch strip of white, starfruit and pumpkin and taped them (on backside) together.  Make sure they are butted up to each other very tight, with no gaps.

100_2173

Next, ink up the Halloween greeting stamp from the “Halloween Hello” stamp set with VersaMark™ and stamp it over the multi-color strip of cardstock … then heat emboss with clear embossing powder.

Then, using black ink … ink up your brayer and roll it back and forth over the image until covered evenly.  Take a paper towel and whip off excess ink from the embossed area … your greeting will “appear” but will have a “smudgy” look to it.  I think it gives it a bit of a “spooky” look, which is perfect for this time of year.

100_2193

I added the new Pumpkin Pie Chevron Ribbon (130015) to give the card a “pop” of color.  To balance out the card I added 3 rhinestones colored with a black Sharpie … then put a pop of Starfruit behind them so they would stand out more.

I’ll be back … tomorrow with another Halloween themed project.

Thanks for stopping by.

blog closing-small

Totally Batty …

Hello Stampin’ Friends,

Happy Tuesday!  I hope you enjoyed yesterday’s stampin’ tip / technique with glitter, but today we are going to put away the glitter, because it’s time to pull out the punches!

Yep, today’s card share is a sweet and simple punch card.  Punch art is one of my most popular stampin’ events… those classes always fill up fast.  Today we are using the 2-1/2″ and 1-3/4″ circle punches, the owl punch and the 1-3/4″ scallop punch.

000_0238

Again, I began with the “Witches Brew” Designer Series Paper (I’m trying to keep your supplies to a minimum, by using the items over and over).   I matted that with a piece of Pumpkin Pie and backed it with Basic Black.

The tree limb was cut (free handed that one) out of Chocolate Chip cardstock and then embossed with the “Woodgrain” embossing folder.

The moon is easy … punch a 2-1/2″ circle then sponge the edges to create some depth to the paper.

Next I punched out the owl.  To create his wings, I punched a 1-3/4″ circle and cut it in half.  Then I used the scallop punch to create the points on his wings … a small single circle punch would work too.  I just lined up the point where the straight edge meets the curved edge and punched 2 scallops…. then I line up 1 scallop and punch.  Yes, it’s a bit tedious but it looks cool.  If you have an easier way … I would really love to hear how to do it quicker.

000_0240

His little smile and teeth were hand cut … it was easy and again, it makes him look cute (not scary like real bats – but that’s a whole other story!)

To finish off the card I added a simple ribbon, the 1/8″ Pumpkin Pie Taffeta Ribbon.

Tomorrow I have another little stampin’ trick up my sleeve, so stop back and check it out.

Thanks for “hangin’ out” with me today!

blog closing-small

EEK … an awesome stampin’ technique!

Hello Stampin’ Friends,

Yesterday I kicked off a week-long Halloween project share.  Each day I will share with you some fun, frightening and creative projects.  I also have some new stampin’ techniques and tips for you.  My reason for sharing early … is it will give you time to order any supplies you need to create your own Halloween projects.

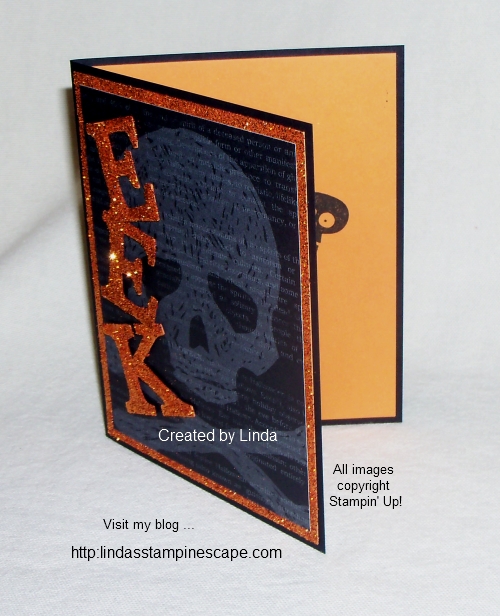
Today’s card is a bit more frightening, but not difficult to create at all.

100_2188

All you will need is our “Witches Brew” (132185) Designer Series paper, the Black & Orange Stampin’ Glitter (132206), and the “Typeset Alphabet” (127533) Bigz Dies… Oh, and don’t forget your favorite adhesive!

  134925LI prefer the “SNAIL” (104332) Adhesive, however, some of you like to use the Multipurpose Liquid Glue (110755) because it holds so well, and it will work great for this project too.  You will also want the “Silicone Craft Sheet” (127853) I think it’s a must have item for all your stampin’ projects.

You see …

The silicone sheet resists any of our adhesives and makes doing this project super simple!  I just run my Snail Adhesive over the cut out alphabet, then cover it with glitter.  Viola … that easy!  This will work great for you glue lovers too.

 100_2168  100_2170

Here’s a great stampin’ tip and cost saver, for those of you who make multiple cards… To create the “glitter paper” look underneath the Designer Series paper skull, I just ran my Snail adhesive around the edges, then covered it with our glitter.  No need to paint or die your Silver Glitter paper … just “snail” and stick your glitter!    Glitter lovers rejoice!

Now, for a peek inside …

100_2185

I used the “Halloween Hello” stamp set to wish my recipient a Halloween greeting  but it seems my little friend is a bit shy and isn’t going to show you at this time.  Just click on any of the “highlighted” stamp sets or accessories to view them.

Hope you enjoyed the card and stampin’ tips I’ve shared today.  Let me know what you think about them … I’d love to hear from you.  Sharing on a blog is much quieter than my classes … I miss the oooohs and aaaahs!  lol

Have a wonderful day,

blog closing-small

Halloween Kick-off …

Hello Stampin’ Friends,

Hope you are enjoying this beautiful Sunday.

Can you believe that September is almost over, where does the time go?!  The passing of September means one thing … Halloween is just around the corner.  Those of you, who know me, know that I love Halloween.  It appears I’m not the only one, as it is the second most celebrated / decorated holiday of the year (second only to Christmas).

On that note, I want to celebrate Halloween all this week with fun and frightening projects with you.  Since it is Sunday … nothing too scary.  In fact, it’s fun … you won’t believe where these cute little pumpkins came from!

100_2179

Get out your Holiday catalog and turn to page 25 … You got it!  I used the “Snow Day” stamp set to create my jack-o-lanterns!

131895L

Oh yes … you can see it now, can’t you!  Isn’t that awesome.  How cute is that!  I drew the faces and the vines onto my pumpkins … too easy.   Now … that is a versatile stamp set!

I also used the new Chalk Marker and some glitter to highlight the facial features (eyes, nose, & mouth) and the Argyle Embossing Folder to create some fun texture.

Did You Know?

The original jack-o’-lanterns were carved from turnips, potatoes or beets.     (From the History Channel)

100_2177

Every October, carved pumpkins peer out from porches and doorsteps in the United States and other parts of the world. Gourd-like orange fruits inscribed with ghoulish faces and illuminated by candles are a sure sign of the Halloween season. The practice of decorating “jack-o’-lanterns”—the name comes from an Irish folktale about a man named Stingy Jack—originated in Ireland, where large turnips and potatoes served as an early canvas. Irish immigrants brought the tradition to America, home of the pumpkin, and it became an integral part of Halloween festivities.

So just a little fun and trivia for you today.  Thanks for stopping by!

I’ll have some hauntingly fun cards for you this week, so make sure you stop back.

blog closing-small

Simple Holiday Layout …

Hello Stampin’ Friends,

I missed you yesterday!  I spent the day with my granddaughter, something we have not done in quite a while… it was a good day!

So … today I am going to share with you, two holiday cards created with the same template (or layout).  I have used this layout on another card and just love it!  I find most of my stampin’ audience loves simple but pretty cards.

Life is so busy now days, that simplicity seems to be the norm.  However, you will soon see that you do not have to give up beauty to create simple cards.

First is my “Celebrate Halloween” card …

000_0140

I used the “Halloween Bash” stamp set and the “Witches Brew” Designer Series paper (132185), both found on page 21 of the Holiday Catalog.

The pumpkins were created by punching 3 circles each of the 1″ circle punch (119869) and the 1/2″ circle punch (119868).  You will find both of the punches on page 182 of our Idea Book & Catalog.  Next, I sponged the edges of the circles to create dimension, then layered them.  I used “Tangerine Tango” ink and cardstock.  Then I just drew the little faces on the assembled pumpkins.

The greeting was created by using my markers directly onto the stamp – omitting the words I did not want to use, thus creating the simple greeting of “Celebrate Halloween”.  You can use this technique on any stamp.

The banner for both my cards today were created from a 4-1/2″ x 2-1/4″ piece of designer or glimmer paper.   I like the size fits well with this layout.

You will also notice that I have used the “Envelope Liner Framelit Dies” (132172) on both of my projects today.  These are found on page 37 of the Holiday catalog.

Here’s my second card “Joy to the World” …

000_0145

I used the stamp set “Joy to the World” which you can find on page 24 of the Holiday Catalog, I have used this set many times already and it’s just September!  I’m gearing up for my holiday classes!

Next I chose the beautiful “Champagne Glimmer” paper (127885) found in the Idea book & Catalog.  I think the glimmer papers add a touch of elegance to any card… I just simply cannot resist these beautiful papers (comes in three colors: Red, Silver and the Champagne).  I teamed it up with the Early Espresso and Very Vanilla cardstock … LOVE this combination of color.

To add some extra flair and texture to my card, I embossed the background with the “Petals of Plenty” (116824) Folder on page 191.  Then created little flowers with the “Boho Blossom” Punch (119858) on page 183.  I think they coordinate nicely together!  Then top it off with the beautiful “Pearls” (119247) on page 171.  They really do complete the card.

I hope you enjoyed today’s cards created with the simple layout of a banner, greeting, and a bit of embellishing!  I would love to see what you can create with this layout.

Enjoy the wonderful weekend.

blog closing-small

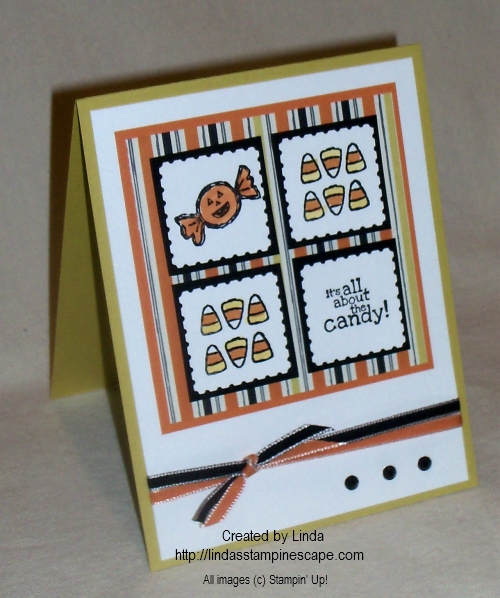
It’s All About the Candy!

Hello Stampin’ Friends,

It’s Monday again… and we start another week.  I spent the entire weekend creating and cutting Christmas cards for my upcoming Stamp Camp.  I know, it sounds crazy but now is the perfect time to get a sneak peek and your hands on all the new Christmas sets and accessories in the Holiday catalog.

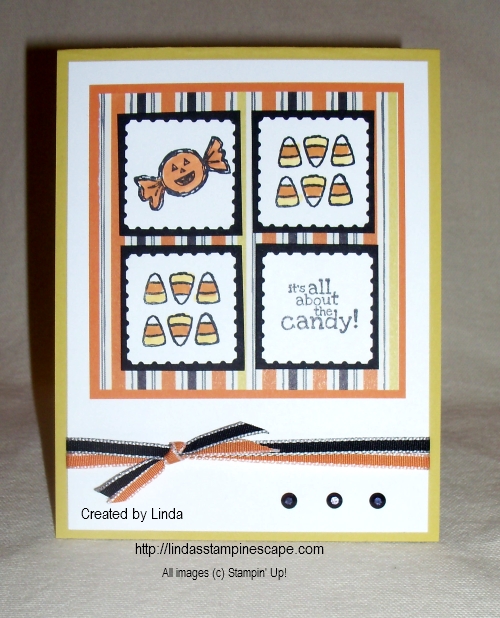
In keeping with the Holiday catalog, I created a cute card for you today.  It is not “Christmas” but yet another fun holiday …. Halloween!  I just have to share another Halloween idea, I enjoy it too much.

000_0095

Today’s card uses the stamp set “Halloween Hello” and the “Witches Brew” Designer Series Paper.  Love the paper … I think I’m going to frame this sheet and take it down to the candy store with me!  What do you think about that idea!

000_0098

I really was thinking about the candy shop when I was creating this card.  I just completed my first two weeks there.  The card was really simple to create, something that many of my stampin’ friends (customers) appreciate.  Everyone is so busy, quick and simple is always a good thing.  Don’t worry … I’ll share some “embellished” card samples too.

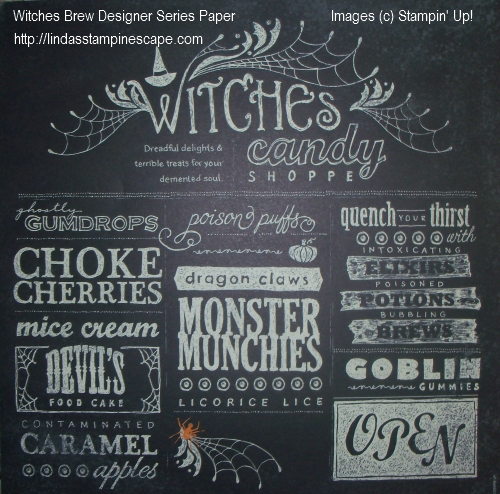
The color pallet came from the Witches Brew designer paper shown below: Summer Starfruit, Pumpkin Pie, Basic Black and I switched it from Very Vanilla to the Whisper White.  I wanted my candy to “pop”.134925LI have to share with you a fun technique that I love to do… “color” my rhinestones!  As long as you have a “Sharpie” … you can have any color rhinestones you want.  I must say, I really do like black rhinestones!  It’s a fun, inexpensive embellishment.  You can also color the pearls too!   I’m telling you – you will fall in love with this technique.

000_0097

Here is a list of the ingredients used for the card.  To make ordering easier, you can just click on the item number and it will take you to that page.  Or you may contact me, I would be happy to help you with your stampin’ needs.

131718

Halloween Hello Stamp Set – Wood / $18.95

131721

Halloween Hello Stamp Set – Clear / $14.95

132185

Witches Brew Designer Series Paper / $10.95
119246 Rhinestones – Basic Jewels / $4.95
119253 1/8” Taffeta Ribbon –  Pumpkin Pie / $5.95
119261 1/8” Taffeta Ribbon – Basic Black / $5.95
122344  Postage Stamp Punch / $15.95

Hope you had a wonderful weekend.  I’ll see you back here tomorrow for another fun card!

Have an awesome Monday!

blog closing-small

Great new product announcements …

Hello stampin’ friends,

Happy Sunday to you …

I am really excited to share with you the release of the new “Stampin’ Trimmer Rotary Addition and blades”.  You can find them on page 176 and 177 of the Idea book and Catalog or the Holiday catalog – pg. 24.

I watched the demonstration of the rotary additions at convention and new right then and there that I just had to have these … remember that “deckle” scissors we used to have, well the “tiny wave” cutting blade will be just as much fun, and easier!!

I have included the Stampin’ Up! training video for you to watch.  You’ll not only hear about the new rotary additions, but a few reasons why the new trimmer is a must have tool for your stampin’ and scrappin’ collection.

I have included the order numbers along with the descriptions.  To make your ordering easier … you can click on the order number in the table below to order these items or CLICK HERE to go to the Stampin’ Trimmer page of my on-line store.

129407

Stampin’ Trimmer Rotary Addition / $12.95
* Includes rotary track and handle and a straight-edge blade

129408 Straight Stampin’ Trimmer Rotary Cutting Blades / $5.95
129409 Tiny Wave Stampin’ Trimmer Rotary Cutting Blade / $3.95
129410 Small Scallop Stampin’ Trimmer Rotary Cutting Blade / $3.95
131375 Stampin’ Trimmer Replacement Cutting Mat / $3.95
132788

Perforating Stampin’ Trimmer Rotary Cutting Blade / $3.95

Yesterday I posted the adorable “Halloween Banner”… today I am sharing the Stampin’ Up! video showing you how you can make the banner.  It includes great tips (like the Silicone pad) for hot gluing your project.  I love the Silicone pad – I use it when I’m adhering thin strips of cardstock or ribbon to my projects, it keeps the “snail” off my workstation.

I have included the order numbers for the banner to make your ordering easier.  FYI … they also have a Christmas banner!

133507

Build a Banner Simply Created Kit / $19.95
132698 Halloween Banner Simply Created Accessory Kit / $9.95
132699  Banner Simply Created (Refill) Kit / $9.95

To view both kits and the accessory kits … CLICK HERE and it will take you directly to the page.  Thank you.

I hope you enjoyed today’s video tutorials and new product release.  There’s so much more to show you … keep coming back, I have more for you.

Have a great day!

blog closing-small

All it takes is one little stamp …

Happy Sunday Sampers!

So yesterday you may have noticed that my post was a bit late… I held back my post until after our Star’s team meeting (my downline – the ladies I have brought into Stampin’ Up!).  My Star’s team actually got to make the Christmas cards that I posted as a “sneak peek” on my blog yesterday.  (I will be sharing the swap cards from our meeting later in this post)

I had my team make the cards so they could take this “class” back to their stampin’ groups.  Besides business tips, my intention is to give my downline useful tools to build a successful business.   Success means different things to different members.  Some of my group are hobbiest and use their income to remain active and have fun stamping, others like a little extra spending money, and some (like me) are building a business while having fun!

This year, as we celebrate Stampin’ Up!s 25th anniversary, I always think of the reasons I have stayed in this business for over 13 years.  We all know they have the highest quality products, and great stamp sets, however … I’m still here because of the dedication Shelli (Co-founder and CEO of Stampin’ Up!) has for giving back and the friendships I have made.

Susan Miller said it best at convention this year; “Your customers become friends, your downline become your sisters, and your fellow demonstrators become your family!”  I can’t tell you how many wonderful people I have met, and building these relationships with all of you is just truly amazing and brings so much joy into my life.

I would like to introduce to you … my friend, Connie Sylvester.  I met Connie on “cruise” (our incentive trip).  It was funny, because we (Eileen and I) kept running into them everywhere we went!  Then at convention … then another cruise!  Now … we’re cruise buddies & friends!  Please take a moment and watch the video.  She will describe in this video how stamping is making a difference in her community.

It is amazing that something as simple as a single stamp and an ink pad can make a difference in someones life.  It’s made a difference in mine.  I love what this company represents, I love the friends that I’ve made.  If you are interested in seeing how Stampin’ Up! could fit in your life… contact me.  (lindaluvs2stamp@aol.com)

As promised … here are the swap cards that were shared at my Star’s meeting yesterday.  Enjoy.

000_0048

000_0040

000_0047

000_0045

000_0041

000_0044

I hope you enjoyed today’s post.  I can’t help but share all that Stampin’ Up! brings to my life.  How has it changed yours? Please share with a comment.

Just remember … All it takes is one little stamp 🙂

Have an awesome Sunday!

blog closing-small

August Best of 25 Stamp Set & Card

Hello Stampin’ Friends!

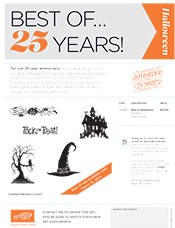
I was excited, as you can image, when I saw the Best of 25 flyer for August…   I’m a bit of a Halloween fanatic, but never really expected Stampin’ Up! to release the best of 25 Halloween!  But here it is, and it has some of my favorites too!

I love the house and the tree in this set, so today I’m going to share with you a card I created using the tree.

NA_25Year_Best-of-Stamps_flyers_best-of-halloween_NA_thCLICK ON THE IMAGE TO VIEW FLYER / PRINT

For our 25-year anniversary, Stampin’ Up! is bringing back some of their favorite stamp images from the last quarter century and combining them into 12 sets, which will release— one set per month—during 2013. Even better, along with some great classic images, each “Best of” set will also include a never-before-seen image!


Hang on to your 25-year proof of purchase sticker, and adhere it to your Stampin’ Up!® collectors card, which is included with each stamp set.  If you don’t have one, let me know … I will get one to you right away!

For every six Best Of sets you buy, you can send in your collectors card for a FREE set of your choice valued up to $14.95! Must be redeemed by April 30, 2014

blog insert - shop now

If you click on the “Shop Now” button, it will take you to the Halloween section.

When you get to the Halloween items, check out the banner … Isn’t that cool.  I just may have to create that for the Halloween party this year.

000_0034

I used the “masking” technique to create the moon…. then sponged the sky with Elegant Eggplant and Night of Navy ink.  I stamped all images with the black StazOn.

The greeting is from the stamp set “Halloween Bash” found on page 21 of the Holiday Catalog.  After stamping it, I cut off the “celebrate” then the “halloween” … leaving a bit of the “crawly” so I could adhere the “celebrate” over the top.  Hope that made sense!  lol

I don’t know what it is about Halloween, but I really do enjoy the holiday!  Must be the spooky movies I watched as a kid.  Feel free to share you thoughts about Halloween, or this card!  Thanks.

Have a wonderful day ~
blog closing-small

Gettin’ ready … Halloween is just around the corner!

Hello Stampin’ Friends ~

A bit of a chill in the air this morning in Wisconsin … almost feels like fall.  Which brings me to our card today – Halloween.

For those of you who have been stampin’ with me awhile, you know that Halloween is one of my favorite holidays!  I think it’s just fun, and I love seeing kids dressed up… makes for so many wonderful memories!

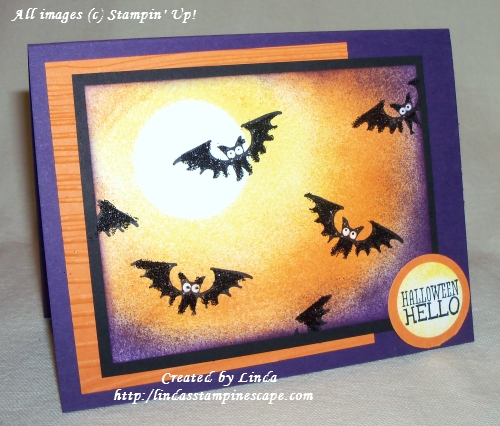
Today’s card is wishing you a Halloween Hello from the stamp set “Halloween Hello” found in the Holiday Catalog on page 21.  There a so many cute stamps included in this set, but I chose the bats for this one.  I’m OK with bats as long as they are on my cards and NOT in my house!  Ewwww… the stories I could tell.

100_1734

This card as quite easy to make, begin with the Masking Technique, then sponge on the color.  I used Daffodil Delight, Pumpkin Pie, Elegant Eggplant and Basic Black.  I did stamp the bats with the Black StazOn (my favorite black ink).

Hope you can see the “glitter” on the bats… Oh my, Stampin’ Up! has glitter for us Halloween fanatics!   You get both the Black and Orange Ultrafine Glitters!   I think my bats may have turned out better (glitter wise) if I had used the Heat & Stick powder … but, I actually stamped my bats first and then masked and sponged.

I stamped the Halloween Hello greeting from my mask… love the clear stamps for that!  Then put the mask in the 1″ circle punch and punched it smaller.  I used the 1-1/4 circle punch again (original mask size – for moon) and punched a Pumpkin Pie mat for the greeting.

Couldn’t make a card without some noticeable texture, so a added a touch of pumpkin pie under the stamped piece and embossed it with the Woodgrain folder.

Here is a list of ingredients that I used to create today’s card:  If you click on the item number, it will take you right to my store page, and you can get a better look at the product.

 ITEM

 PRICE

 DESCRIPTION

 131718

 $18.95

Halloween Hello – WOOD

 131721

 $14.95

Halloween Hello – CLEAR

 132206

 $7.95

Black / Orange Stampin’ Glitter

 100425

 $4.50

2-Way Glue Pen

 119868

 $12.95

1” Circle Punch

 109861

 $15.95

1-1/4” Circle Punch

 104199

 $99.95

BigShot

 127821

 $7.95

Woodgrain Embossing Folder

blog insert - shop nowYou may shop anytime, night or day (even in your jammies) with my on-line store.  Don’t forget the Designer Series Paper promotion … Buy 3 – Get 1 FREE!

6a00e54f95df92883401901e107e28970b-500wi

Do you love Halloween as much as I do?  Then keep your eye out for an upcoming “Halloween Party”.  We’ll be stampin’ cards & more!

100_1736

Enjoy the rest of your weekend and I will see you tomorrow!

blog closing-small