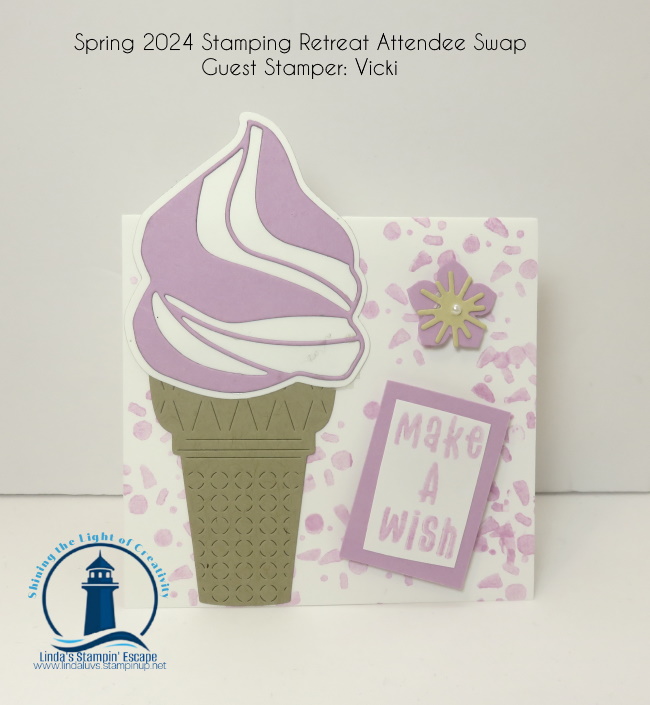
If you’re looking to add a touch of sweetness and a sprinkle of creativity to your card-making projects, look no further than the Ice Cream Swirl Stamp Set and coordinating dies. With this set, you can craft delightful ice cream treats that look good enough to eat, perfect for any occasion. Today’s card was created by one of my Spring Stamping Retreat Attendee’s Vicki for our annual card swap!
The Ice Cream Swirl Stamp Set offers endless possibilities. Start by pairing the ice cream top with a cone for a classic treat as Vicki did, or get creative by masking off the bottom of the cone to create an ice cream sundae in a bowl. Don’t forget to stamp the cherry on top for that finishing touch! With various colors at your disposal, you can change up the ice cream “flavor” to match your mood or the recipient’s favorite.
One of the most versatile features of this set is the cone die. It cuts a two-sided piece that folds at the top, allowing you to create a cone that opens. This can be used to craft an adorable shaped card or a charming gift tag that adds a personal touch to any present. For an extra dash of creativity, try cutting the ice cream swirl from different colors of paper, or use your favorite coloring techniques to create unique “flavors” that will make your projects stand out.
Adding a playful sentiment from this set, or mixing in phrases from other stamp sets in your collection, brings an extra layer of fun to your creations. Whether it’s a birthday card, a thank you note, or a just-because greeting, the Ice Cream Swirl Stamp Set helps you craft cards that will bring a smile to anyone’s face. Don’t you love the way Vicki extended the “ice cream” beyond the card base … so cute!
Found on page 77 of your annual catalog, the Ice Cream Swirl Stamp Set is a must-have for any card-making enthusiast. It’s perfect for crafting during summer or anytime you want to bring a bit of sweetness into someone’s life. So why wait? Everyone wants ice cream, and you’ll be screaming to get your hands on this delightful set. I’ve added the links before for your convenience!
Start creating your own ice cream treats today and watch as your cards and gift tags become the talk of the town!
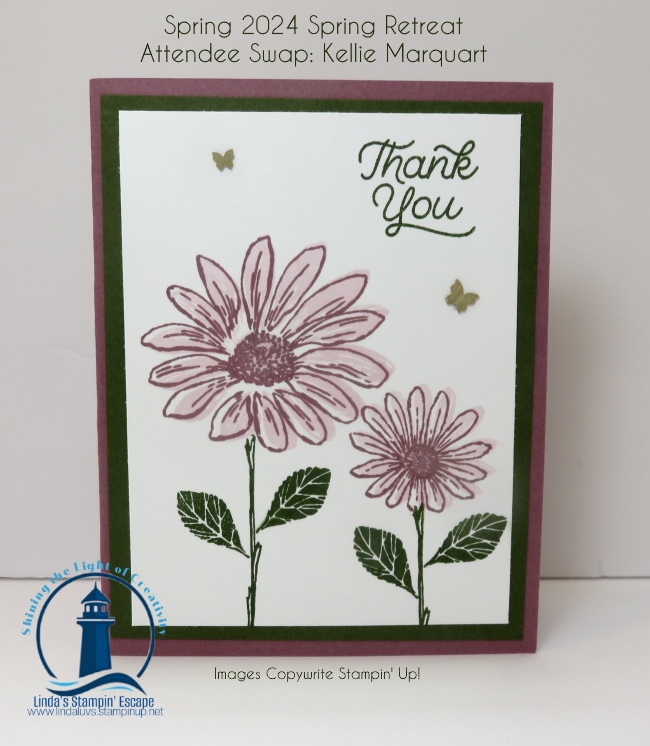
Today I’m thrilled to share three great cards from our recent Spring Stamping Retreat Attendee Card Swap. Our talented attendees have truly outdone themselves, creating beautiful designs that highlight the artistry and versatility of our favorite stamping products. Let’s dive into the details and celebrate their amazing work.
Card 1: Cheerful Daisies Card
The star of this card is undoubtedly the daisies, stamped in soft, cheerful hues of Moody Mauve, Bubble Bath and Mossy Meadow that evoke the freshness of a spring garden. The intricate detailing of the stamps brings each daisy to life, showcasing the versatility of the set.
Kellie attendee used a the “Two-Step” stamping technique to add depth and dimension to the daisies, seamlessly transitioning between pink and mauve. This technique enhances the realism of the flowers and adds a dynamic feel to the card.
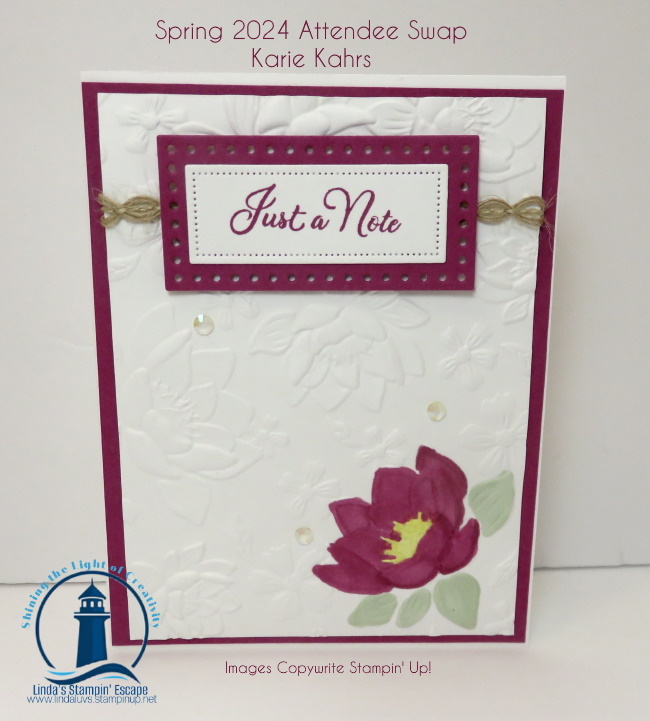
Card 2: Layered Florals Embossing Folder Card
Next, we have a stunning creation featuring the Layered Florals Embossing Folder. This card showcases the elegance and sophistication that embossing can bring to any project.
To accentuate the embossed details, Karie used a coloring technique, lightly coloring over the raised areas with the Stampin’ Blends markers. This not only highlights the intricate floral patterns but also adds a soft, vintage touch.
A simple, elegant sentiment is stamped and placed delicately at the top of the card. This minimalist approach allows the embossed florals to remain the focal point, creating a harmonious balance between the elements.
Card 3: Simply Zinnia Bundle and Embossing Folder Card
This card captures the essence of zinnias in full bloom, bursting with color and texture. This bundle includes both stamps and dies, allowing for beautifully stamped and precisely cut zinnias. Sandy then used a combination of bold, bright colors to reflect the natural beauty of zinnias, resulting in a card that is both eye-catching and joyful.
The coordinating embossing folder provides a detailed backdrop that complements the stamped and die-cut zinnias. The embossed background adds texture and interest without overwhelming the main floral elements. Sandy added a touch of bling with the 2024-2026 In Color Glimmer paper.
This was the WINNING card for our attendee Swap!! They all get to vote for their top 3 favorites … then the votes are tallied and a winner announced. Our Winner receives a Gift Certificates for … Stampin’ Up! products!!
I hope these beautiful creations inspire you to experiment with your stamping and embossing techniques. Our Spring Stamping Retreat attendees have truly showcased their talent and creativity, demonstrating how versatile and impactful these products can be. Whether you’re new to stamping or a seasoned pro, there’s always something new to discover and create. Happy stamping!
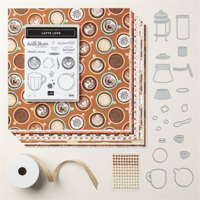
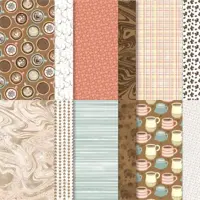
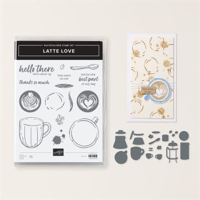
Are you a coffee lover or a crafting enthusiast, or perhaps both? Today, I’m thrilled to share with you the enchanting A Little Latte Suite Collection, a treasure trove of creative possibilities. This suite is designed to bring a touch of warmth and charm to your projects, making it an essential addition to your stamp collection.
Stamp Set and Coordinating Dies: The stamp set features delightful latte cups, coffee beans, and a variety of sentiments that are perfect for any occasion. The coordinating dies make it easy to cut out these intricate designs, saving you time and effort while adding a professional touch to your projects.
Today I have a guest stamper; Anne Tonsor. This was her swap card from our Spring Stamping Retreat. Anne truly utilize the designer paper on her card …. did you know that some of the dies coordinate with images on the designer paper!! How cute is this card!!
This suite’s designer paper is a standout feature. In neutral colors, it offers artistic elements that are both elegant and versatile. Whether you’re card making, gift packaging, memory keeping, or decorating your home, this paper is a fantastic choice. The neutral palette ensures it can be paired with a wide range of colors and styles, making it incredibly adaptable.
The A Little Latte Suite Collection is more than just a set of crafting supplies; it’s a gateway to endless creativity and heartfelt expression. Its unique designs, versatile elements, and coordinated components make it a must-have for every crafter. Don’t miss out on the opportunity to add this enchanting suite to your stamp collection. Start creating beautiful, coffee-inspired projects today and spread the warmth and joy of handmade crafts with those you love.
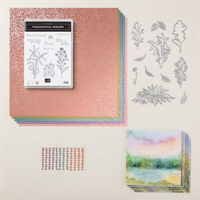
Today, I’m excited to share with you a special crafting project that showcases the beauty and versatility of the Thoughtful Journey Designer Series Paper and the Thoughtful Wishes bundle. In this tutorial, I’ll guide you through creating four unique and stunning cards, all from just one 6″ x 6″ sheet of the Thoughtful Journey Designer Series Paper. This project is a fantastic opportunity to explore the wonderful products from the Thoughtful Journey and Thoughtful Wishes collections. Here is the sheet I chose …
The Thoughtful Journey Designer Series Paper is a true gem in any crafter’s collection. Its vibrant colors and intricate patterns evoke a sense of adventure and warmth, making it ideal for creating heartfelt cards. This paper’s quality and design ensure that each card you make will be a standout piece, full of personality and charm. Whether you’re crafting for a loved one or adding to your personal stash, this paper provides the perfect backdrop for your sentiments.
To complement this beautiful paper, I’ll be using the Thoughtful Wishes bundle, which includes a stamp set and coordinating dies. The Thoughtful Wishes stamp set features a variety of uplifting and versatile sentiments, perfect for any occasion. Its high-quality photopolymer stamps ensure crisp, clean impressions every time, allowing you to convey your heartfelt messages with ease and elegance. The coordinating dies add an extra dimension to your projects, effortlessly cutting out intricate shapes and designs that perfectly match the stamped images.
Our first card features the floral design from the Thoughtful Journey paper, and comes from the lower left-hand side. I cut the paper into 4 – 3″ x 3″ squares. I added a Basic White mat to this piece of designer paper to add a delicate frame, adding depth and texture. The sentiment “Thinking of You” stamped in a Mossy Meadow was fussy cut. The background was also stamped with Mossy Meadow. The Adhesive-Backed Transparent Dots in white completes this elegant card, making it perfect for sending a thoughtful message to a friend or family member.
The second card showcases a softer, more subdued pattern from the lower right-hand side of the sheet of Designer Series Paper. Here, I repeated the mat effect as I did in the first card. The “You Make Life Better” sentiment from the stamp set is a perfect touch, and was die cut from the Spotlight on Nature Dies. To complete look, I embellished with the Lemon-Lime color from the Tinsel Gems 4 pack, making this card ideal for expressing your thoughts.
For the third card, I used the single tree section with a touch of color that captures the eye. This section comes from the upper right-hand corner of the designer paper. This was matted with NEW In-Color; Petunia Pop …. this really draws out the color from the designer paper. The background is another sheet of the Thoughtful Wishes Designer Series paper.
The Thoughtful Wishes bundle’s intricate dies were used to cut out beautiful floral accents (also in Petunia Pop) that frame the “Just Love Spending Time with You” sentiment perfectly. Also die cut from the Spotlight on Nature Dies. Again, I embellished with the Lemon-Lime color from the Tinsel Gems 4 pack. This card is a joyful and lively way to celebrate someone.
Lastly, the fourth card features a serene and calming pattern from the Upper left-hand corner of the Designer Series Paper. Using the Thoughtful Wishes stamps, I created a “Dearest Friend” card that is both comforting and uplifting. You could use this design to convey any message you wish, whether it be birthday, Thinking of You, or support for something they are going through. The coordinating die cut in Petunia Pop add a delicate touch, enhancing the overall design without overpowering the gentle sentiment.
Each of these cards demonstrates the versatility and creativity that the Thoughtful Journey Designer Series Paper and Thoughtful Wishes bundle can bring to your crafting projects. By using just one sheet of 6″ x 6″ paper and the coordinating stamp and die set, you can create a variety of beautiful and meaningful cards that are sure to brighten anyone’s day.
I hope this project inspires you to get creative with your own crafting supplies. The Thoughtful Journey Designer Series Paper and Thoughtful Wishes bundle are must-haves for any card maker, offering endless possibilities for beautiful, handmade cards. Don’t miss out on the chance to add these fantastic products to your collection and start creating your own thoughtful masterpieces today.
Happy crafting, and have a wonderful Memorial Day!
Are you a beginner eager to dive into the world of crafting? Or perhaps you’re a seasoned crafter with limited space, seeking a convenient and stress-free way to create beautiful cards on the spot? Look no further than the Hello Hollyhocks Card Kit by Stampin’ Up! This all-inclusive kit is designed to make your crafting experience both enjoyable and effortless.
Why You’ll Love the Hello Hollyhocks Card Kit:
Great for Beginners: The Hello Hollyhocks Card Kit is perfect for those just starting out. With everything you need in one box, it’s easy to create stunning cards without feeling overwhelmed. The kit includes a full-color sheet of directions that guides you step-by-step, right down to which pieces go where and where to place the adhesive. Say goodbye to guesswork and hello to creativity!
Ideal for Crafters with Limited Space: If you’re short on space, this compact kit is a dream come true. It’s neatly organized, ensuring that all your crafting materials are easily accessible and easy to store. You can craft anywhere, anytime, without the need for a dedicated crafting room.
Perfect for Quick and Easy Card Making: Whether you’re crafting on the go or need to whip up a card in a hurry, the Hello Hollyhocks Card Kit has you covered. This kit not only offers beautifully designed materials that inspire creativity but also evokes nostalgic memories with its charming floral theme. All the pieces are pre-cut and ready to assemble, so you can focus on the fun part – decorating and personalizing your cards!
Everything You Need in One Kit: This kit comes with everything you need to create gorgeous cards. From pre-designed card bases with coordinating envelopes and embellishments to adhesives and a full-color instruction sheet, it’s all included. You don’t need to hunt for additional supplies, making it an excellent choice for those who want a hassle-free crafting experience.
Ready to see the Hello Hollyhocks Card Kit in action? Watch the video below to get a closer look at the kit and learn how easy it is to create beautiful, handmade cards. Join us in discovering the joy of crafting with this delightful kit …
Embrace the ease and joy of card making with the Hello Hollyhocks Card Kit. Perfect for beginners, great for limited spaces, and ideal for quick, on-the-spot creativity – it’s the ultimate crafting solution!
Don’t wait! Get your Hello Hollyhocks Card Kit today and start crafting beautiful memories with ease and joy! CLICK HERE
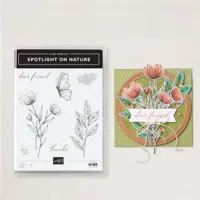
The other day, I shared a simple and fun project using the Basic White Notecards and Envelopes paired with the Spotlight on Nature stamp set, done in our NEW Peach Pie ink color.
Today, we’re going to elevate our card-making game with a new design that adds an extra pop of color and dimension.
Supplies You’ll Need:
Basic White Cardstock (8 1/2″ x 5 1/2″)
Basic White Stamping Piece (3 3/8″ x 4 7/8″)
Summer Splash Cardstock (3 1/2″ x 5″)
Spotlight on Nature Stamp Set
Layering Leaves Stamp Set
Ink Pads in Summer Splash
Scoring Tool
Bone Folder
Your Favorite Adhesive
2024-2026 In-Color Shimmer Gems
Steps to Create Your Card:
Prepare Your Base: Start with a piece of Basic White Cardstock, measuring 8 1/2″ x 5 1/2″. Score it at 4 1/4″ and fold it in half to create your card base. Use a bone folder to get a crisp fold.
Stamp Your Design: Take the Basic White stamping piece (3 3/8″ x 4 7/8″) and stamp the leaf image from the Spotlight on Nature stamp set in Summer Splash ink. The vibrant greenish blue will bring a fresh and lively touch to your card.
Add Your Sentiment: Choose a sentiment from the Layering Leaves stamp set and stamp it onto your design. This adds a heartfelt message to your beautiful card.
Create the Mat: Cut a piece of Summer Splash cardstock to 3 1/2″ x 5″. This new In-Color will provide a vibrant mat that coordinates and makes your stamped piece stand out.
Assemble the Card: Adhere your stamped piece onto the Summer Splash mat, ensuring you center it for an even border. Then, attach this layered piece to your card base.
Embellish with Shimmer Gems: Complete your card by adding the NEW In-Color Sparkle Gems. These gems add a touch of shimmer and elegance to your design.
Once your card is assembled, tuck it into an envelope and send it to a friend. It’s a quick and easy project that looks sophisticated and stylish, perfect for brightening someone’s day.
Happy crafting! I can’t wait to see what you create with this stepped-up design. Be sure to share your projects and let me know if you have any questions.
Today, I’m excited to share a quick and easy card design featuring the delightful Spotlight on Nature stamp set and the incredibly convenient Basic White Note Cards and Envelopes. What makes this project even more special is the introduction of our brand new 2024-2026 In-Color, Peach Pie. Just the name alone sounds delicious, doesn’t it? Let’s dive into how you can create a stunning card in no time with these fantastic products.
The Basic White Note Cards and Envelopes are a true staple for any card maker. They come pre-cut and scored, ready for you to jump right into the fun part – stamping and decorating! Each pack includes 20 cards and envelopes, making them perfect for creating a batch of cards quickly. These note cards are made of high-quality cardstock that takes ink beautifully, ensuring a crisp and clean image every time. Folded card: 5″ x 3-1/2″ perfect for gift giving.
The Spotlight on Nature stamp set is a versatile collection of beautifully detailed images inspired by … nature! It features a variety of flora and fauna, from a delicate flower to beautiful butterfly. This set is perfect for creating heartwarming cards for any occasion. Whether you are an experienced stamper or just starting, the images in this set make it easy to create stunning cards with minimal effort.
Now, let’s talk about the star of the show: the Peach Pie In-Color. This new hue is as delightful as it sounds, a warm and inviting shade that brings to mind the sweet and succulent peaches of summer. Peach Pie is a soft, pastel orange with a hint of pink undertone, making it incredibly versatile for various themes and seasons. It’s perfect for adding a touch of warmth and cheer to your projects. In fact, you could recreate this card in all our stunning In-Colors!!
Creating a card with these elements is a breeze. Start by folding one of the Basic White Note Cards along the pre-scored line. Next, choose an image from the Spotlight on Nature stamp set – today, our beautiful flower. Ink up your stamp with the Peach Pie ink pad and stamp it onto the front of your note card. The result is a beautifully crisp image that stands out brilliantly against the white background, showcasing the stunning detail of the stamp and the fresh, inviting color. And don’t forget to stamp your envelope!
For an added touch, you can stamp a coordinating sentiment from the Spotlight on Nature set, or as I did, the Layering Leaves on the front.” To finish, tie a beautiful coordinating bow onto your note card. The Peach Pie color ensures that your sentiment looks cohesive and elegantly tied into the overall design. The Color Theory (page 132-133) I’m using is called Monochromatic – the use of a single color!
In just a few minutes, you’ve created a beautiful handmade card that’s ready to send out and brighten someone’s day. The combination of the Basic White Note Cards and Envelopes, the Spotlight on Nature stamp set, and our NEW In-Colors makes for an effortlessly chic and charming card-making experience. Whether you’re making a single card or a whole set, these products ensure your creative process is smooth and satisfying.
Thanks for stopping by, I hope this has inspired you to go in your craft room and whip up some delightful quick & easy cards.
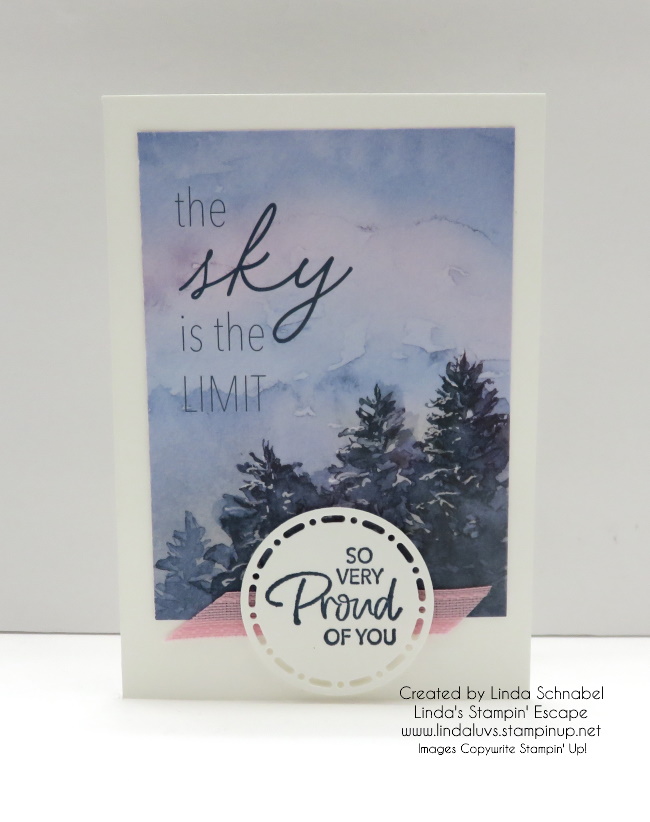
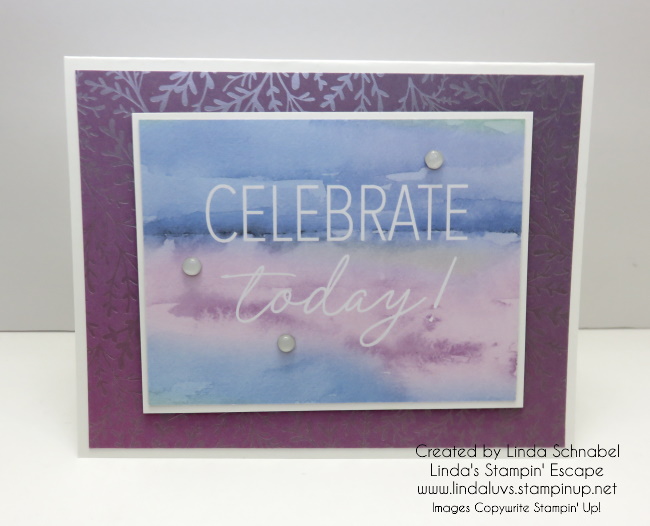
If you’re looking for an easy yet stunning way to elevate your card-making game, the Thoughtful Journey Memories & More card pack from our Annual Stampin’ Up! Catalog is your perfect companion. This collection is part of the Quick & Easy Options, designed to make your crafting sessions delightful and stress-free. Today, we’ll dive into two fabulous card projects that showcase the versatility and beauty of this card pack.
The Memories & More card packs are not just for scrapbooking, you can utilize them in so many ways … Today, cards!
For our first card, simplicity meets elegance. We’re using the Basic White Note Cards and Envelopes as the base, making this an ideal project for beginners and seasoned crafters alike. The greeting is stamped with Misty Moonlight and comes from the So Sincere stamp set … always good to have a great sentiment set! It was then die cut with the circular dies from the Spotlight On Nature bundle. Just a touch of Pretty in Pink ribbon to pull the pink hues from the card.
This card is perfect for my granddaughter in college. She finished her 2nd year, and I love to celebrate the small achievements as a stepping stone to her graduation!
Our second card takes a slightly different approach, showcasing the stunning patterns of the Thoughtful Journey Designs Specialty Paper. By cutting down a 4″ x 6″ card, we expose the beautiful specialty paper, creating a layered, intricate look.
The watercolor look on the card and greeting already done for us worked in perfect harmony with the two-tone colors on the Thoughtful Journey Designs Specialty Paper. I matted the card with Basic White to pull the greeting out and to coordinate with my card base. I used the Adhesive Backed Transparent Dots to pull the entire card together as it brings out the foil on the specialty paper.
This not only showcases the coordination within the Thoughtful Journey Suite but also adds depth and dimension to your card. The result is a stunning, intricate design that’s still incredibly easy to create.
With these two projects, you can see how the Thoughtful Journey Memories & More card pack offers endless possibilities. Whether you prefer quick and easy cards or more elaborate designs, this collection has you covered.
Each card you make is a small piece of art, a reflection of your thoughtfulness, and a joy to both give and receive. It’s time to let your creativity soar and make every card a thoughtful journey of its own.
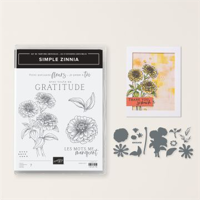
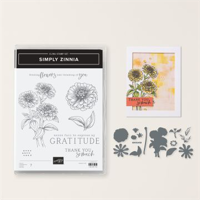
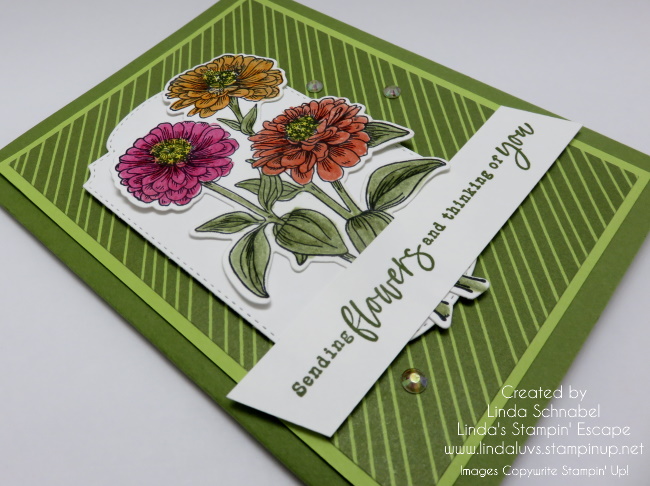
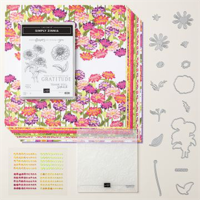
I’d like you to check out these Online Exclusive products that have been released, and let me tell you, it’s today’s product share you won’t want to miss. Today, I’m excited to share with you the dazzling and delightful Flowering Zinnias Suite Collection.
To give you an inside look at this stunning suite, Stampin’ Up! has prepared a special treat for you. Our amazing staff from the product and concept art departments have come together to create a captivating video, walking you through each component of the Flowering Zinnias Suite. From the intricate details of the stamp set to the coordinating dies and embellishments, you’ll get to see it all up close and personal.
At the heart of this collection lies the mesmerizing Simply Zinnia Stamp Set, which is bursting with lush florals and beautifully etched designs. But that’s not all – this set also includes sentiments of thanks, making it perfect for expressing gratitude and spreading joy in your papercrafting projects.
But let’s talk about what makes the Simply Zinnia Stamp Set truly special. These zinnia blooms are not your average florals – they exude elegance and grace with every stroke of the stamp. Whether you’re creating handmade cards, scrapbook layouts, or home décor pieces, these blooms will add a touch of beauty to your projects. (The difference in the color of the flowers indicates a coordinating die)
And let’s not forget about those sentiments of thanks. In a world where expressing gratitude is more important than ever, these heartfelt messages will serve as the perfect finishing touch to your projects. Whether you’re thanking a friend, a family member, or a frontline hero, these sentiments will convey your appreciation in the most heartfelt way possible.
So, if you’re ready to elevate your papercrafting game and infuse your projects with the beauty of zinnias, then look no further than the Flowering Zinnias Suite Collection. With its exquisite designs and endless creative possibilities, this collection is sure to inspire you to create something truly magical.
Head over to my Online Store now to get your hands on the Flowering Zinnias bundle and coordinating product before they’re gone. (The embellishments are currently unavailable) or you can shop by clicking the links below. Trust me, you won’t want to miss out on this blooming beauty!
Happy crafting, and may your days be filled with joy, creativity, and lots of zinnia-inspired magic!
I hope you enjoyed your Mother’s Day yesterday, whether with your Mom, or with your family. I had an enjoyable and quiet kind of day.
Today, we’re taking a delightful detour from the conventional with the Country Birdhouse Bundle. This versatile set, often associated with its namesake structure, offers endless creative possibilities beyond its primary motif. And what better way to showcase its adaptability than by crafting a sweet card without the birdhouse?
By deviating from the expected, we unlock a realm of imagination. Instead of relying on the obvious, we explore alternative elements within the bundle. I will be sharing the dimensions and step by step instructions as well ….
Measurements:
Bubble Bath Cardstock: 5 1/2” x 8 1/2”, scored at 4 ¼”
Bubble Bath Cardstock: 5 ¼” x 4”
Bubble Bath Cardstock: Scrap for flower trough
Daffodil Delight Cardstock: Scrap for sentiment
Basic White Cardstock: Scraps for flowers and scalloped edge
Instructions:
Stamp the Bubble Bath panel with the floral arrangement stamp using Bubble Bath ink. Using some more Bubble Bath ink, blend some ink to centre, where the flowers will go, to make it a little darker.
Cut the flower trough (actually the bottom of the birdhouse) from Bubble Bath cardstock and also the scalloped edge top.
Cut the scalloped edge top in half and glue them across the top of the trough.
Attach the trough to the card front using Stampin’ Dimensionals and add a linen thread bow over the join in the scalloped edge.
Stamp nine of the floral images in Memento ink on to Basic White cardstock and colour using Stampin’ Blends. Cut out.
Arrange the flowers in the pot. The back ones I stuck with Multipurpose glue the front ones are on Stampin’ Dimensionals.
Attach the card front to the card using Stampin’ Dimensionals.
Stamp the sentiment in Versamark ink on to Daffodil Delight cardstock and heat emboss with white embossing powder.
Cut the sentiment into a strip and adhere to the card front using Multipurpose Glue.
This departure from the norm not only showcases the breadth of possibilities within a single crafting set but also encourages us to think outside the box in our creative pursuits. It reminds us that limitations are merely invitations to innovate and reimagine.
In the end, it’s not about adhering to expectations but rather about unleashing the boundless creativity that resides within each of us. And with the Country Birdhouse Bundle, the journey is as delightful as the destination, whether you choose to include a birdhouse or not.
Welcome back to our Simply Zinnia journey! Yesterday, we embarked on a delightful exploration of this charming bundle, and sharing a quick and easy way to color the flowers. Today, we’re diving deeper into its versatility and charm. If you thought yesterday’s creation was stunning, get ready to be captivated once again!
Today’s layout is similar to yesterday’s yet unveils a new dimension of beauty. The designer paper was used as my backdrop with a Lemon Lime Twist mat, setting the perfect canvas for our floral masterpiece. Your eyes are effortlessly guided by the graceful diagonal stripe, leading you to the heart of the composition—the bouquet of vibrant zinnias.
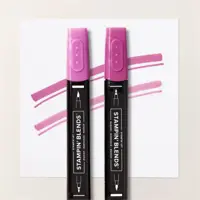
What truly sets today’s card apart is the meticulous coloring technique employed. The zinnias, oh, the zinnias! They have been meticulously colored with Berry Burst, Calypso Coral, Pumpkin Pie with the centers in Daffodil Delight and Old Olive Stampin’ Blends for the leaves, infusing them with a bold and layered allure. This technique elevates the stamped images to a whole new level, adding depth and dimension that simply mesmerizes the beholder.
Let’s delve a little deeper into the magic of Stampin’ Blends. These high-quality alcohol markers offer unparalleled control and blending capabilities, allowing you to achieve professional-grade results with ease. Whether you’re a seasoned crafter or a novice enthusiast, Stampin’ Blends empower you to effortlessly infuse your creations with rich, vibrant hues and seamless transitions.
As we admire today’s card, it’s hard not to feel a tug towards the Simply Zinnia bundle. With its coordinating dies and intricate designs, this bundle opens up a world of creative possibilities. Whether you’re crafting heartfelt greetings, elegant invitations, or stunning scrapbook layouts, the Simply Zinnia bundle is your ultimate companion in artistic expression.
The sentiment is stamped in Old Olive to harmonize with the designer paper and card base. It’s these thoughtful details that truly make a creation come to life, infusing it with warmth and personality.
To add the perfect finishing touch, the card was adorned with the subtle elegance of Iridescent Rhinestones. These shimmering gems add a touch of sparkle and sophistication, elevating your creations from beautiful to breathtaking.
I have fallen in love with the Simply Zinnia bundle… with its exquisite designs, versatile dies, and endless creative possibilities, it’s a must-have for any crafting enthusiast. So why wait? Embark on your own Simply Zinnia journey today and watch your creativity bloom!
Stay tuned for more enchanting creations in the future as I continue to explore the Simply Zinnia bundle. Until next time, happy crafting!
Are you looking for a way to create beautiful, handmade cards without spending hours in the craft room? Look no further than the Simply Zinnia bundle from our Online Exclusive collection. Today, I’m excited to share with you a quick tip for coloring that will help you achieve stunning results in no time.
If you’re short on time but still want to add vibrant color to your cards, try this simple technique: ink up one of our sponge daubers with your favorite color and apply the ink in a circular motion. This method ensures smooth application and allows you to control the intensity of the color. Whether you’re adding a pop of color to flowers or creating a gradient background, this technique is sure to impress.
The background of today’s featured card was created using the Zinnia 3-D embossing folder, adding depth and dimension to the design. To further enhance the focal point, I die cut the designer paper behind the floral bouquet using the Everyday Detail dies also found in our online exclusives. This layering technique gives the card a sophisticated look, as if it took hours to create, when in reality, it was quite easy thanks to the die cuts and coloring tip.
The “Thank You” and die for our sentiment comes from our Simply Zinnia bundle. Not only does the Simply Zinnia bundle make card making quick and easy, but it also offers endless creative possibilities. I’ll be sharing more with you tomorrow! This collection is sure to inspire your creativity and help you create stunning cards for any occasion.
So why wait? Head over to my website today and explore the Simply Zinnia bundle from our Online Exclusive collection. With its easy-to-use tools and versatile designs, you’ll be crafting beautiful cards in no time.
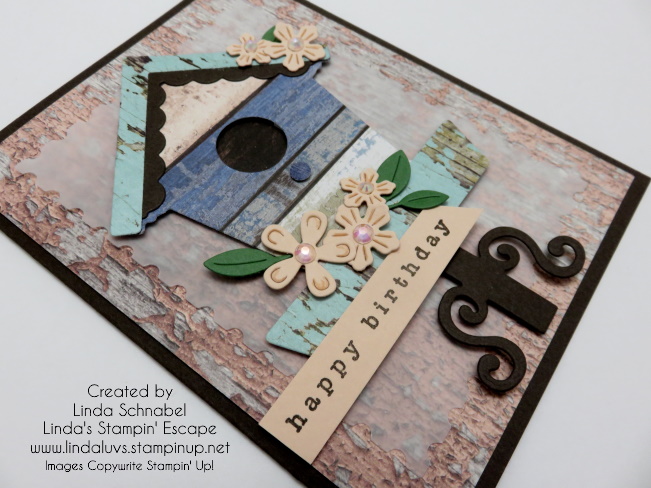
Welcome back, fellow stampers, to another delightful day with Stampin’ Up!’s Country Birdhouse bundle! Today’s adventure in crafting was inspired by the quaint charm of Anderson’s Dock in Door County and the captivating textures found in the Country Wood Designer Series paper.
One of the highlights of today’s card was the incorporation of delicate pink flowers, strategically placed to accentuate the soft hues present in the designer paper. This subtle touch added a pop of color and whimsy, further enhancing the overall appeal of our project.
Take a moment to watch the short video which shows you step by step tutorial which provides helpful hints and tips to ensure a seamless crafting experience.
Did you enjoy the video as we explored the charm and beauty of Stampin’ Up!’s Country Birdhouse bundle and Country Woods Designer paper.
Let your creativity soar as you immerse yourself in the rustic allure of country living. With each creation, may you find joy in the art of crafting and discover the endless possibilities that await within your fingertips.
Stay tuned for more adventures as we continue our exploration with Stampin’ Up!’s Country Birdhouse bundle in future posts and a class!
Step into a world where creativity takes flight … Today, I’m thrilled to unveil my first card made with the captivating Country Birdhouse Card Bundle, a harmonious blend of nature’s charm and artisanal craftsmanship, featuring the exquisite Country Woods Designer Series paper. Join me on a journey through the artistry of handmade cards, where every detail whispers of serenity and grace.
At the heart of this bundle lies the coordinating Country Birdhouse Dies, a collection crafted to transform ordinary cards into extraordinary works of art. Inspired by the timeless allure of countryside living, these dies allow you to create charming birdhouse-themed cards that capture the essence of pastoral beauty.
A perfect pairing to the bundle is the Country Woods Designer Series paper. With its rustic textures and earthy hues, this paper serves as the perfect canvas for your creative vision. Whether you’re crafting birthday greetings, heartfelt sentiments, or messages of appreciation, the Country Woods Designer Series paper adds a touch of rustic elegance that’s sure to delight any recipient.
I constructed this charming birdhouse-themed card adorned with the Country Woods Designer Series paper, using the coordinating dies. To infuse my creation with a burst of color and whimsy, I incorporated the enchanting “Pretty in Pink” hue from Stampin’ Up!’s color palette. This delicate shade of pink served as the perfect accent, adding a playful touch to every detail of my birdhouse card.
For the sentiment, I turned to the Nested Essentials Dies to die-cut the heartfelt greeting, “Hello Friend,” stamped in Pretty in Pink ink. This warm and welcoming message serves as the perfect invitation to linger a little longer in the cozy embrace of the birdhouse card.
My birdhouse-themed card would be complete without a flourish of florals, so I embellished my creation with blooms crafted from Pretty in Pink and Moody Mauve cardstocks. Adorned with delicate rhinestones, these flowers add a touch of sparkle and whimsy, evoking the beauty of a sun-dappled garden in full bloom.
You can purchase these supplies by clicking the links below, let your creativity take flight, and let the tranquil beauty of the Country Birdhouse Card Bundle inspire your next crafting masterpiece. Happy crafting!
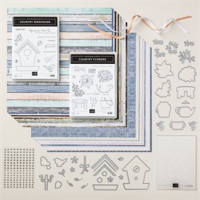
Calling all crafters and nature lovers alike! Prepare to be enchanted by the delightful charm of the Country Birdhouse Bundle, the latest addition to our crafting repertoire. Whether you’re an avid card maker, scrapbook enthusiast, or simply someone who loves to add a touch of whimsy to your projects, this bundle is sure to captivate your creative spirit.
The Country Birdhouse Bundle comprises two essential components: the Country Birdhouse Stamp Set and the Country Birdhouse Dies. Together, they form the perfect synergy for bringing to life enchanting birdhouse scenes filled with avian wonders and floral delights.
Imagine sending sweet greetings to your bird-loving friends adorned with charming birdhouses, delicate florals, and heartwarming sentiments. That’s precisely what the Country Birdhouse Stamp Set offers. With its intricate decorative details and versatile designs, this stamp set is not just limited to cards; it’s also perfect for embellishing gift tags, enhancing scrapbook pages, and adding a touch of whimsy to any crafting project.
Complementing the stamp set flawlessly, the Country Birdhouse Dies provide you with every essential element needed to construct adorable birdhouses of your own. From different roof designs to an array of blooming flowers, these dies allow for endless customization possibilities. Mix and match your favorite papers to create colorful card fronts or add dimension to your crafts with crisp, detailed cutouts that truly bring your birdhouses to life. You won’t get that with cheap imitations.
To elevate your crafting experience even further, the Country Birdhouse Bundle seamlessly coordinates with the Country Woods 12 x 12 Designer Series Paper. The vivid colors paired with charming wood designs evoke a nostalgic “there’s no place like home” feeling, adding an extra layer of warmth and coziness to your creations.
Ready to embark on a crafting adventure filled with whimsy and charm? Don’t miss out on the opportunity to add the Country Birdhouse Bundle to your crafting arsenal. With its irresistible designs and endless creative possibilities, it’s the perfect companion for every crafting enthusiast.
I’ll have plenty more samples to share with you, and I see a “Birdhouse Class” as well! Thanks for stopping by today!