It’s time to sit back, relax, and take family and friends to the beach from the comfort of your home with our latest kit: Boho Beach Kit! It comes with everything you need to make beach-inspired cards, evoking vacation and relaxation in minutes! Send a friendly note to the people you love and don’t miss the acrylic-poured paint art style used in this kit for a dazzling marbled color effect. This new kit is part of the Kits Collection and is now available as of June 7, 2023 (while supplies last).
Cost is $22 USD
Use item number 162418 when ordering
Click here to watch the unboxing video by Sara Douglass
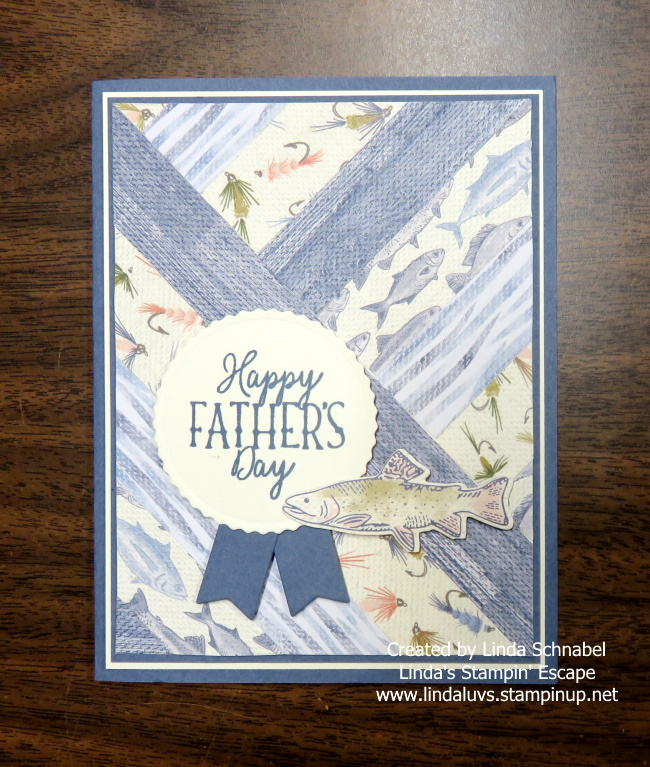
Today I’m going to share a Father’s Day Faux Step card using the Let’s Go Fishing Designer Series Paper. I also have a second card to share with you that uses the Countryside Inn Designer paper… each of these cards use the same dimensions I shared with you yesterday. Due to some difficulties filming yesterday, I’m hoping to get my video to you by tomorrow.
On this card I will be using a Boho Blue card base and the Let’s Go Fishing Designer paper …
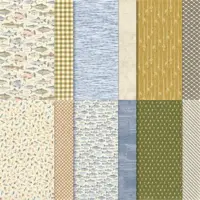
You are seeing 3 different patterns of cardstock … one with the flies, the second that looks like water and the third in which I fussy cut 3 fish from. I love the contrast on this card and of course it works so well together, plus it highlights the fish.
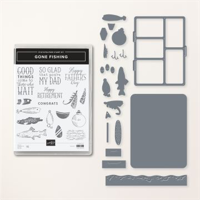
Two of the fish are popped up to add some dimension to our card and the other was secured directly to the front. The greeting comes from the Gone Fishing Bundle and was die cut with the Stylish Shapes Dies.
Card Base: 9″ x 4-1/4″ which is scored at 1-1/4″ … 2-1/2″ … and 5-3/4″.
Center step: 8-1/2″ x 2-1/4″ then score at 3″.
You need 3 pieces of designer paper; 4″ x 3″ … 4″ x 1″ (those will go on the base of the card). The 4″ x 1″ goes on the smallest panel to the front, then skip a panel, and then the 4″ x 3″ piece will go on the 3rd panel. The third measures 2″ x 5-1/4″ which goes on the step portion of your card.
My second card used the Countryside Inn Designer paper and is simply elegant ….
The greeting comes from the Layering Leaves stamp set and I used the Stylish Shapes dies to cut it out. I then embellished the card with the Iridescent Rhinestones … They are very subtle as they pick up the color that they are attached to!!
Thank you for taking time out of your day to join me … Which one of these Faux Step Cards is your favorite; the Fathers Day with Let’s Go Fishing or the Hello card using the Countryside Inn?
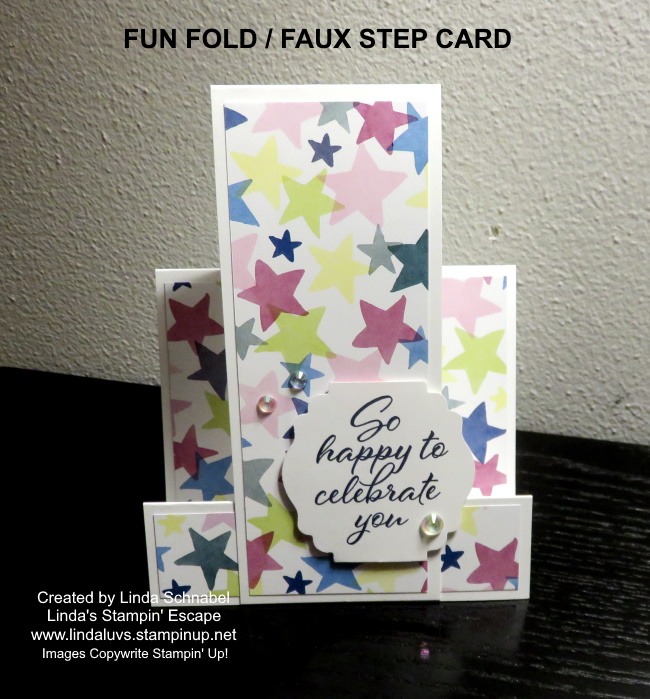
Today I have a FUN FOLD for you, the Faux Step Card … it’s a peek into my Facebook LIVE last night. I shared more cards, and will share them here tomorrow, along with an updated video showing you Step by Step HOW to make the Faux Step card.
On this card I will be using a Basic White card base and the Bright & Beautiful Designer Series Paper ….
The card used two sheets of cardstock to create the faux step …. begin with a piece of Basic White 9″ x 4-1/4″ which is scored at 1-1/4″ … 2-1/2″ … and 5-3/4″. To make the center step your Basic White piece measured 8-1/2″ x 2-1/4″ then score at 3″.
You need 3 pieces of designer paper; 4″ x 3″ … 4″ x 1″ (those will go on the base of the card). The 4″ x 1″ goes on the smallest panel to the front, then skip a panel, and then the 4″ x 3″ piece will go on the 3rd panel. The third measures 2″ x 5-1/4″ which goes on the step portion of your card.
The greeting comes from the Layering Leaves stamp set and I used the Lovely Label punch (retired) and embellished the card with the Iridescent Rhinestones … I love how they pick up the color that they are attached to!! Make sure to stop back tomorrow when I share a video and more cards using the FUN FOLD: Faux Step Card and our amazing Designer papers, now on sale!!
Thank you for joining me today, and I look forward to sharing more with you tomorrow.
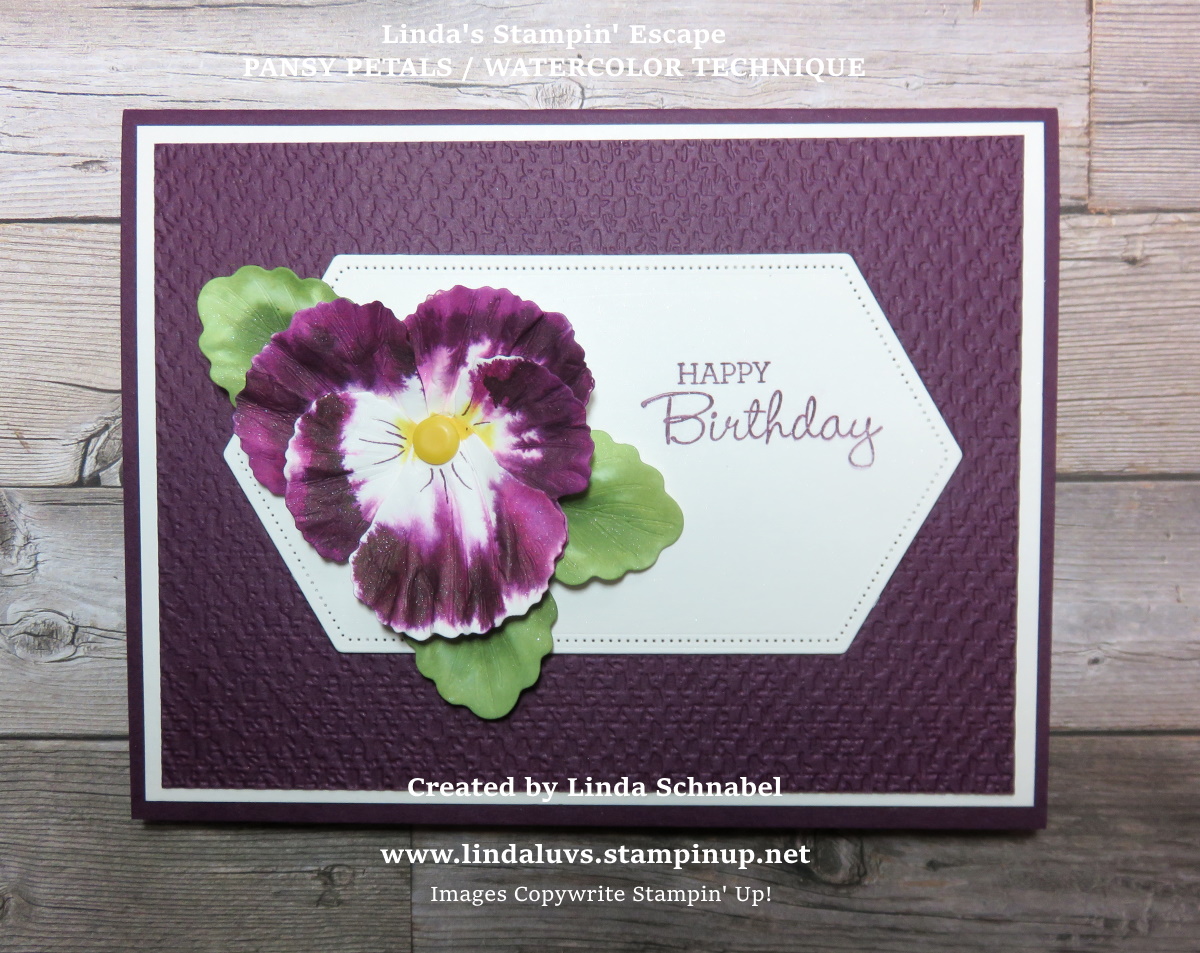
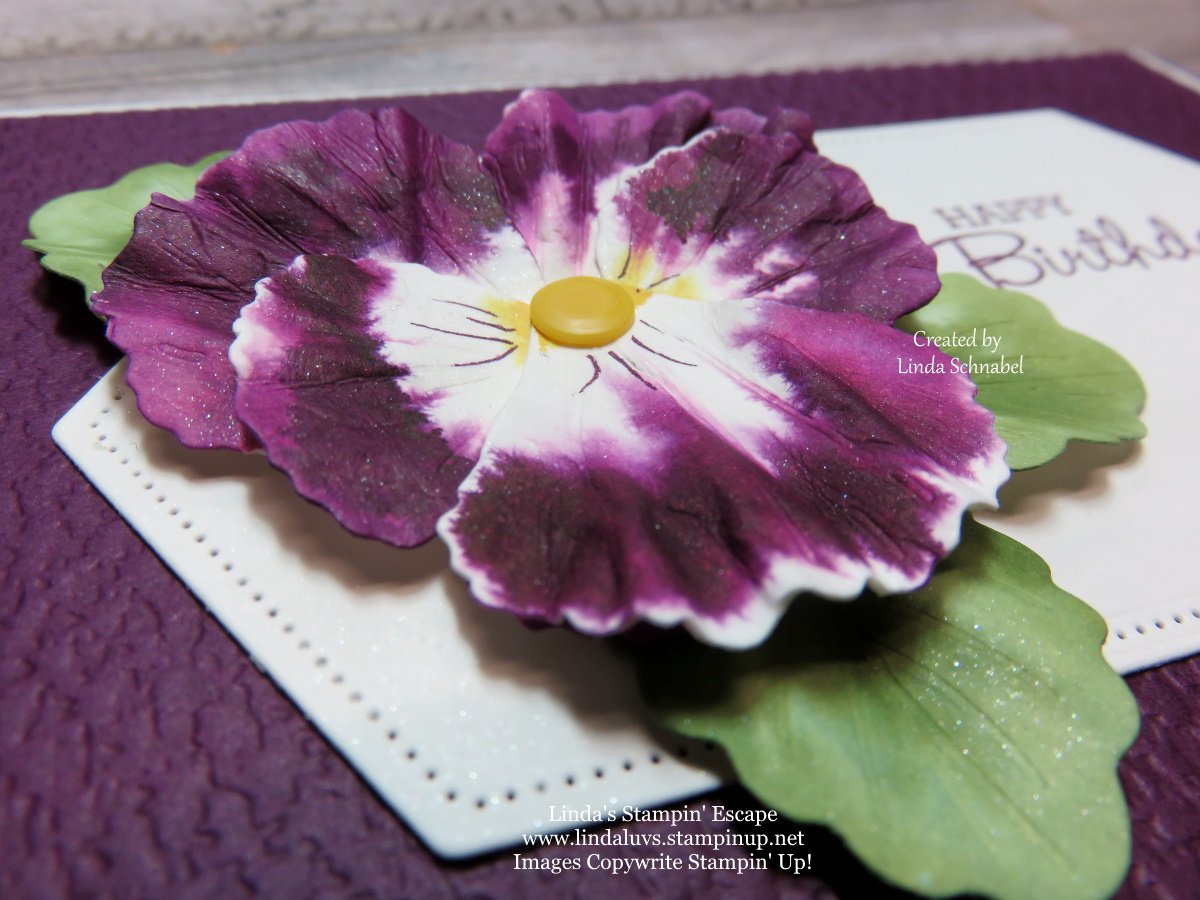
Have you ever wondered “how they did that”? Today’s video shows you how to Create Stunning Watercolor Pansies!! Sometimes it’s a good teacher to look back at some of the things we’ve done in the past. I am so excited these did not retire and are still in the catalog for us to create with. I have combined an old technique with our new Pansy Petals and the results are stunning!
I have created a video for you from my Facebook LIVE last night so you can watch step by step how easy it is to create these beautiful flowers …. They almost look real don’t they?
Isn’t that cool … I am in love with this technique! In the past I made pansies from the butterfly punch but this is more realistic!! It creates so much texture and depth when you “scrunch” your petals.
Those little white specs you see are actually the “shimmer” paper making a statement… now we have our Wink of Stella if you like that bling! It really is so pretty and you can do these in any color you’d like! Here is what I whipped up quickly last night after my LIVE demo ….
Not bad for a 2 minute card!! You can use any designer paper for your background and just added the flowers and my greeting … simple!
Thanks for joining me today! Hope your day is an awesome one ~
TODAY’S STAMPIN’ SUPPLY LIST … If you liked the products used in today’s projects, I have links for you below. Some maybe substitutes for original product used. Just click on the item you would like more information on, or to begin your shopping. It will take you directly to my website. Thank you ♥
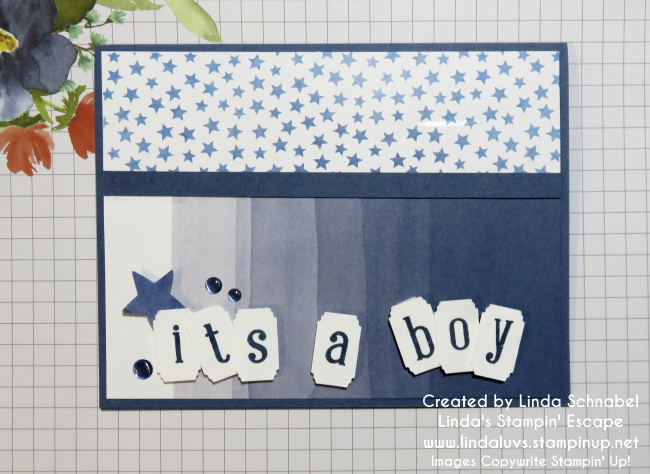
I shared my It’s a Girl… now It’s a Boy card is here for you today. I’m using the Bright & Beautiful Designer paper for my It’s a Boy, just like I did for my It’s a Girl card.
This designer paper has 48 – 6″ x 6″ sheets with 12 different patterns and is one of the select Designer Series papers that are currently ON SALE. With the watercolor washes, stripes, stars, confetti, and more, you will be able to create cards and more for any occasion.
I started with the Misty Moonlight base (8-1/2″ x 5-1/2″ scored and folded at 4-1/4″) and then chose my designer paper to match … I chose the ombre in the blues that I cut to 4″ x 5-1/5″ and the little blue stars to 5-1/4″ x 2″, all from the other side of the same sheet.
Once I secured those two pieces together, I added a strip of the Misty Moonlight cardstock to hid my edge and to create some texture. Now let’s attach the card front to the base, and I just did that with my Stampin’ Seal.
I created my greeting using the Alphabest stamp set and coordinating punch. I used Misty Moonlight ink to stamp the Its a Boy onto a piece of Thick White Cardstock and then punched out the each of the letters ….
I tilted the letters back and forth to create a fun sentiment and take the stress out of trying to align it perfectly!! I love it. Then I cut one of the blue stars from the patterned paper you see above and tucked it behind the greeting. I finished the card with the blue In Color Dots.
This cute It’s a Boy card is so easy to make … hope it inspires you to stamp something fun today. Thanks for taking a time out from your weekend to take a peek.
Have an amazing weekend.
Here is a list of ingredients that I used to create today’s card ….
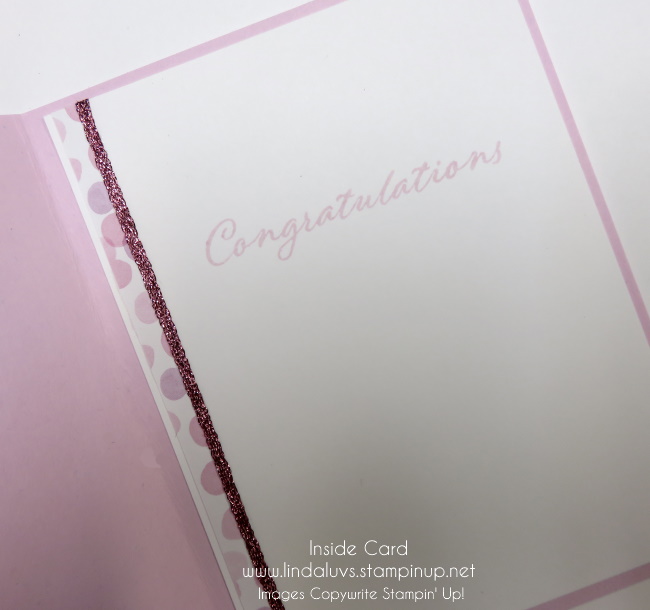
It’s so exciting when we are blessed with a grandchild or a “great” … they just fill our hearts. So today I made a quick & simple Congratulations … It’s a Girl card. It would be just as easy to make an It’s a Boy card too because I’m using the Bright & Beautiful Designer paper!
This is the same designer paper I used yesterday and WOW, this pack has 48 – 6″ x 6″ sheets with 12 different patterns. This is the perfect party pack with the watercolor washes, stripes, stars, confetti, and more, you will be able to create cards and more for any occasion.
I started with the Bubble Bath base (8-1/2″ x 5-1/2″ scored and folded at 4-1/4″) and then chose my designer paper to match … I thought the one with the little pink bubbles/dots would be cute, and on the other side is the ombre pattern you see. I did cut one piece to 4″ x 5-1/5″ and the other to 4″ x 1-3/4″, all from the same sheet.
Once I secured those two pieces together, I added a strip of the Sweet Sorbet Metallic ribbon to hid my edge and to create some texture and a little bling for our new princess. (No … the are no new little girls blessing our family, but there will be a little boy in the near future ❤ ) Now let’s attach the card front to the base, and I just did that with my Stampin’ Seal. I used the Liquid Glue to attach the ribbon.
I created my greeting using the Alphabest stamp set, and then die cut it using the Stylish Shapes dies. I used the circle because of the little circles in the paper but because of the ombre style paper. I added a little bow to that with a Mini Glue dot and popped it up with the Stampin’ Dimensionals. To finish the front, I added 3 of the Berry Burst Tinsel Gems/4 pack.
On the inside, I used a piece of scrap designer paper and then ran the ribbon on the inside to. This was layered onto a 4″ x 5-1/4″ piece of Basic White cardstock. The “Congratulations” stamped in Bubble Bath comes from the Wonderful Thoughts stamp set.
This cute It’s a Girl card is so easy to make, I just hope that delivery will be just as easy … we’ve been there!! lol Thanks for taking a time out from your holiday weekend to take a peek.
Have an amazing rest of your weekend.
Here is a list of ingredients that I used to create today’s card ….
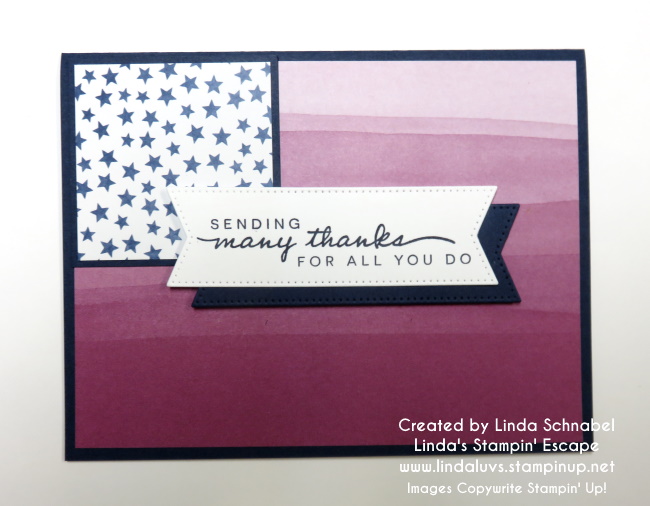
I could not let this weekend slip by without Sending Thanks in a card to pay homage to those brave men and women who paid the ultimate price defending our country. I created this card using the Bright & Beautiful Designer Series paper ….
The Berry Burst Ombre paper represents the stripes of our flag, and the stars … well, they have that covered with this designer paper as well. My apologies for picking up a “retired” greeting when I made today’s card, but I know many of you have your favorite greetings stashed as well.
I die cut the greeting and the Night of Navy banner with the Stylish Shapes… these are a must have in anyone’s stash in there craft room too!
I layered my banners to create an eye catching focal point … the greeting was stamped in Night of Navy that coordinates with the card base and mats. Sure makes life easy when your products all coordinate.
When making cards, it’s fun to think outside the box and create something you can use to pay homage from a bundle that was initially created for celebrations… birthdays, graduations and more.
Thank you for taking time out of your holiday weekend to stop by and check out my blog post, Sending Thanks the Memorial Day weekend. Enjoy the rest of your weekend.
Yesterday I shared a fun background layout using our designer papers, today I am using the Bright & Beautiful designer series paper. If that doesn’t say party … not sure what does! This would make a fun Graduation card…. tis’ the season.
The dimensions are the same as yesterday and I popped my pattern today with the fabulous, returning “Berry Burst”. I’m teaming today’s card with the Beautiful Balloons Bundle …
I stamped the larger of the balloons and then die cut it as my focal point of the card. Then I die cut two stars and stamped my sentiment onto the larger one … then I dazzled them with my Wink of Stella. It looks so good and really pops off the card. To finish off my card I added the Lemon Lime Twist Tinsel Gems … they are so cute.
The Bright & Beautiful is another one of the designer papers which will go on sale June 1st. Hope you enjoyed this little change up. Its always fun to see what just changing out designer paper can do to a card.
Today I have and cards for you showcasing a FUN Background using the Gone Fishing Bundle and the Lets Go Fishing Designer Series paper. You’ll see though watching the video how easy it is to create this fun background, along with some tips and I share my “discovery” of what other bundle works GREAT with the NEW Gone Fishing Bundle.
Let’s watch, then I’ll share the cards again with you …
So easy to make this fun background with scrap paper … and just think of all the different occasions you can create for!! The dimensions are in the video and I leave them up for a while so you can easily write them down as well.
This is the one that I create during the video … don’t forget, there is a coordinating die for that fish!! lol I have just fallen in love with this suite. Watch for more!!
Background is the same on this next card … a little different as far as paper strips but I used the dies from the “All That” dies to create an award ribbon to show Dad that he’s the best.
So … who is going to try this out? Or have you already. I do have another card with this pattern but with different designer paper .. WOW! It’s a whole different look. I will share that with you tomorrow.
Thank you for stopping in and sittin’ a spell. Enjoy your Wednesday!!
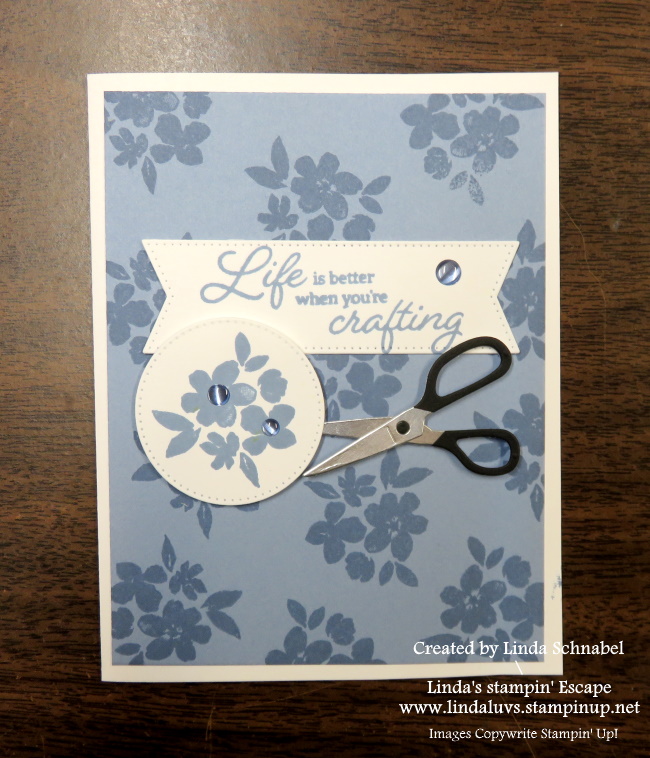
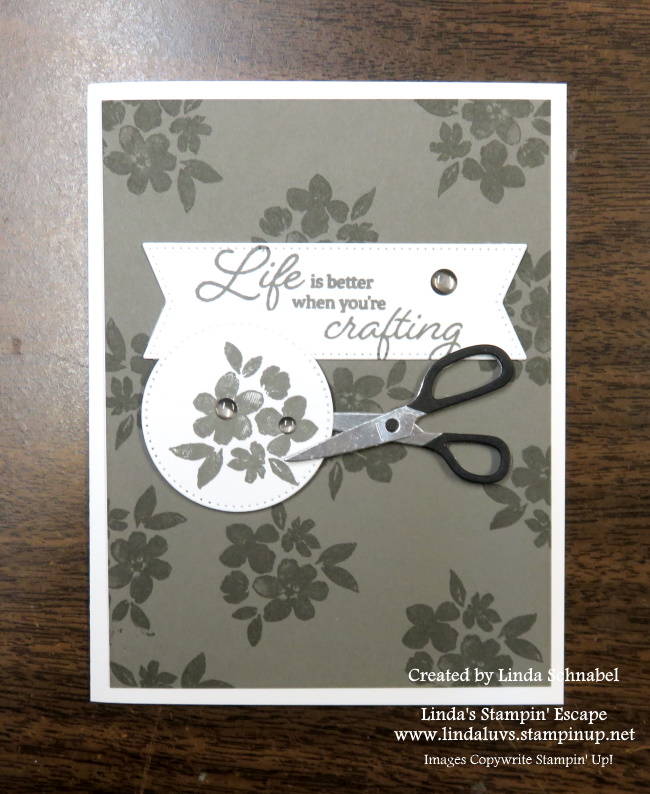
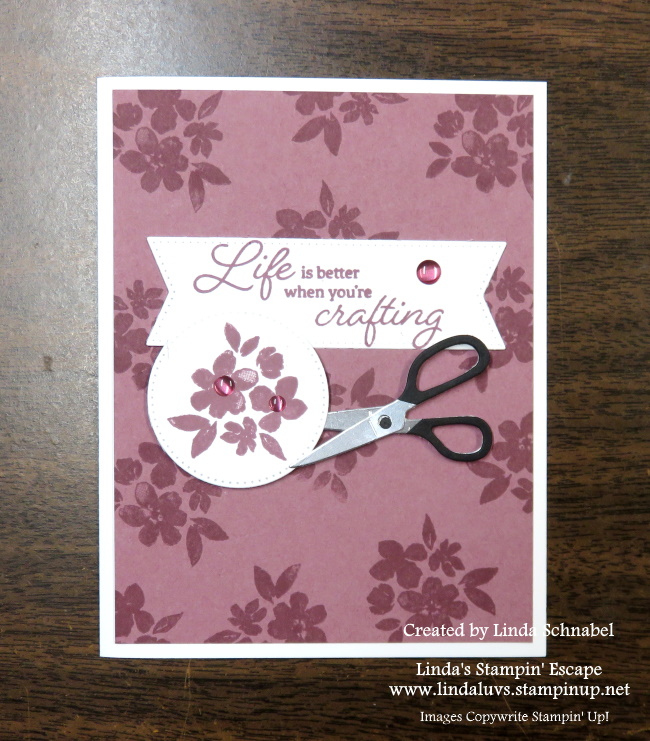
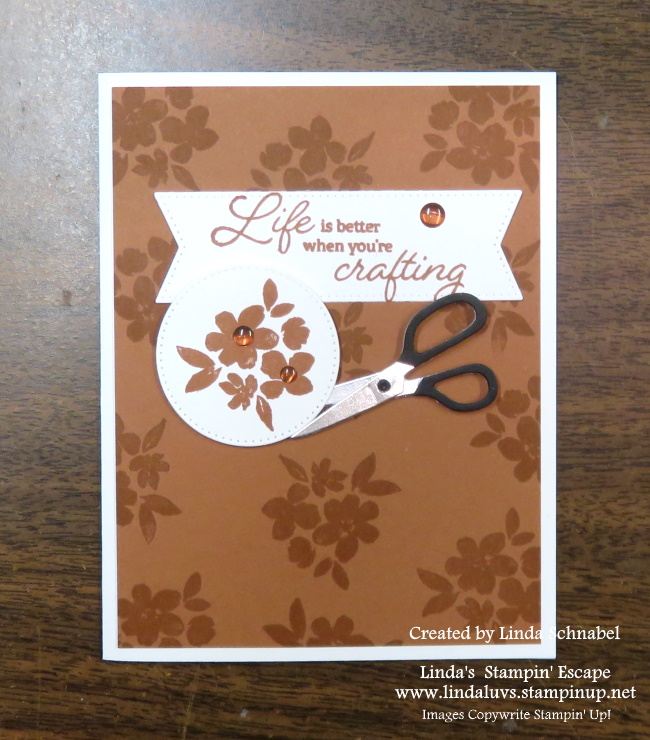
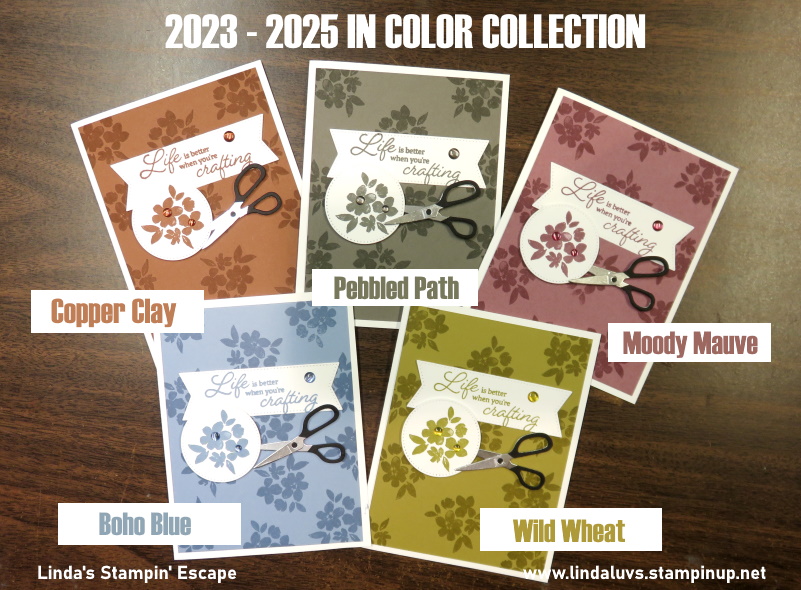
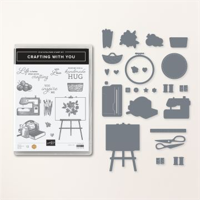
Today I am highlighting the NEW 2023-2024 In Colors. Here you can get a close up look at them. I am using the New “Crafting with You” bundle … wow, this is fun to play with. I have much more playing to do!! lol
Let’s begin with the Boho Blue …
Each of my cards are made exactly the same so you can get the “real” effect of the color! I began with a Basic White base and then I stamped onto my In Color card front (Boho Blue) with the coordinating In Color ink.
The next card is the Pebbled Path ….
After stamping the “color on color” (which is an old technique I still use a lot) I stamped the In Color floral piece and greeting, both of which are from the “Crafting with You” bundle.
Next up is the Moody Mauve ….
Once I had the greeting and flowers stamped onto the white in the coordinating ink, I die cut them using the Stylish Shapes dies. These dies are so versatile and a must have in your stamping supplies.
Speaking of die cuts, let’s take a look at that adorable scissors ….
This little cutie is pretty easy to make. I die cut one out of Silver Foil and a second set out of Basic Black. Using my Paper Snips as an example, I cut the black handle part to look like my Paper Snips!! I then used the Liquid Glue to attach the black scissor tops .
A Glue Dot was used to hold the two pieces of the scissors together and then I popped the little black circle into the circle area of the scissors. Easy peasy!
Next up is the Wild Wheat ….
Not one of my favorites to start with, but I appreciated it much better when using it with the Designer Papers that coordinate with this color! Who knew!!
The last of my 2023-2024 In Colors is the Copper Clay …
I love this color, it’s so pretty and we were in need of a rich earth tone! Now, to finish off my cards, I used the 2023-2024 In Color Dots … I wanted to show you how beautifully they coordinate with the cardstock and ink.
Which of the NEW 2023-2024 In Colors is YOUR favorite. I’d like to know, and you can just leave your answer in the comments below. Thank you.
I have a list of supplies for you below, including the “Multi-packs” of the In Colors for your convenience.
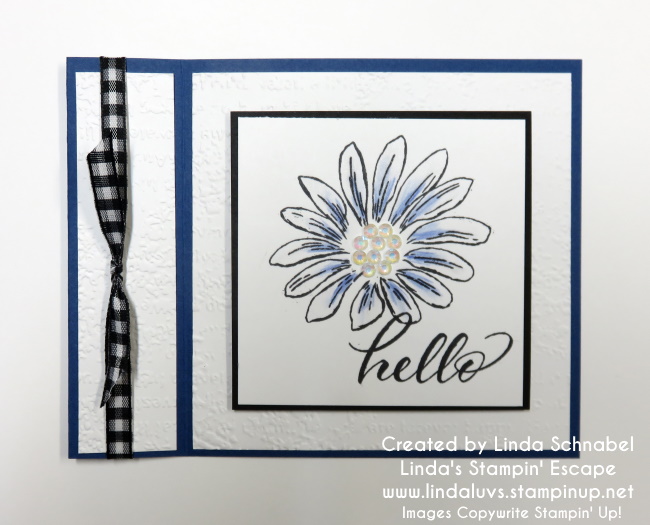
Happy Sunday! Today I have a fun fold for you with our “Cheerful Daisy” … perfect day for it today, it’s beautiful here in Wisconsin!!
I am repurposing some “cut” cardstock from my retreat (I always take a few extra … just in case) so I was on a mission to start using these up. This was one of our Fun Folds that we made, the “Book Binder” technique/fun fold. They are so simple to make and add a little fun to your card.
We begin with the card base; Starry Sky measuring 11″ x 4 1/4″ and then on the 11″ length; score at 4 – 1/4″ and 5 – 1/2″. Now you’ll fold your card in half on the 5 – 1/2″ score line, then fold the front flap “back over” … like you are opening the card but on the 4 – 1/4″ score line.
Now we are ready to add some cardstock and create the Binder effect …. You’ll need Basic White measuring 1″ x 4″ and 4″ x 4″ embossed with the Timeworn Type 3-D embossing folder. Once you’ve attached your textured pieces, you can add your bow. I’m using the Black & White Gingham ribbon using 2 pieces. Cut one piece at 6″ … add your adhesive to the “inside / back of that piece and secure your ribbon edges down.
Now, put adhesive on that area “between” the two score lines and secure it … this creates your “Book Binder” fold. Now you can slide the second piece of ribbon under your secure piece on front and tie. This creates a bow that will not fall off or slide around.
OK … We are ready for the focal point of our card ….
Our Basic White square measures 3″ x 3″ and we begin by stamping our “hello” first. I am using the beautiful Layering Leaves stamp set. I then stamped my large daisy … both are stamped with our Tuxedo Black Memento Ink.
Using the Night of Navy in the Assortment 2 Watercolor Pencils, I added a touch of color and then softened it by blending it with the Blender Pen. I finished it off by filling the center with the Iridescent Rhinestones (they are so versatile)!
That’s it! It really is so simple to make and the Book Binder fun fold adds a great touch to your card. Hope this inspired YOU to try out this Fun Fold. Until next time … Have a great day.
Thanks for stopping by today ~
Here is the list of supplies that I used to create today’s card. Just click on the image for more details and to add it to your stampin’ collection.
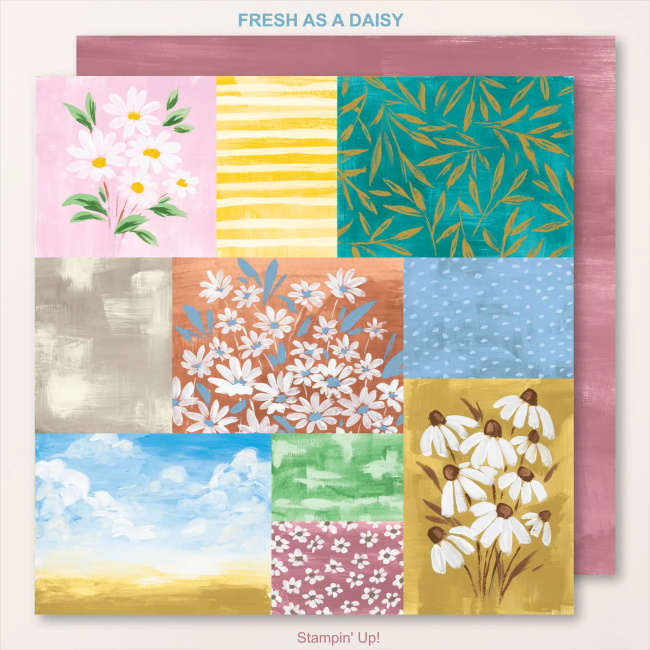
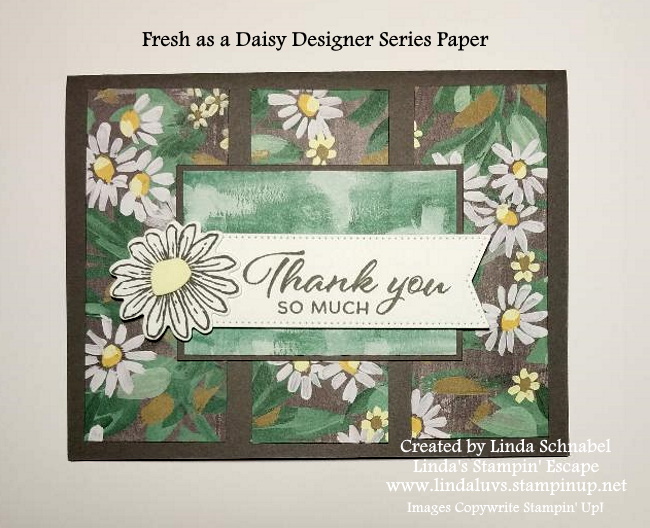
Today I have 2 additional cards from the beautiful Fresh As A Daisy Designer Series Paper. These are two of the smaller 3″ x 2″ designs that I cut from this sheet of designer paper.
My first card today highlights the “NEW” Moody Mauve… it’s prettier in person, not the best lighting on this photo and I appologize. I am also using the NEW Layering Leaves stamp set on both cards today.
The designer paper piece cuts to 3″ x 2″ and has a Basic White mat that measures 3-1/8″ x 2-1/8″ … The card front has a strip of Moody Mauve that I stamped the floral images in the coordinating Moody Mauve ink. This piece measures 5-1/2″ x 1-1/2″ then matted with Basic White measuring 5-1/2″ x 1-5/8″.
Using a piece of scrap, I stamped my greeting in Moody Mauve and die cut it using the Stylish Shapes. Dies. I’m thinking I should have added some bling to this card! What do you think?
My second card for today highlights the NEW Pebbled Path and another design from our Fresh as a Daisy Designer paper.
The “green” designer paper designer paper piece cuts to 3″ x 2″ and has a Pebbled Path mat that measures 3-1/8″ x 2-1/8″. The three strips of designer paper are cut to 4″ x 1-1/2″ and are leftovers from my stamping retreat … I can’t let that pretty paper go to waste!
I stamped my greeting and daisy in Pebbled Path and die cut both … the greeting dies come from the Stylish Shapes. I use them a lot! Super simple cards to make, but that is the point right!? I want to inspire you to use up these little pieces from this sheet of designer paper.
I would like to invite you to join me tonight for my Facebook LIVE … I will be sharing how to cut this sheet of the Fresh as a Daisy designer paper that I’ve been sharing samples with you the past few days! Plus … I’ll also be sharing MORE cards.
I hope you are enjoying all the samples of cards created from the pieces cut from that 12″ x 12″ sheet of Fresh As A Daisy Designer Series paper. Hope to see you tonight … Here’s the link to my Facebook page / CLICK HERE!!
Today I have 2 additional cards from the beautiful Fresh As A Daisy Designer Series Paper. I have more of the NEW Colors share with you today too.
Let me start with the Designer paper as a reminder of how I’m getting all of these cute patterns …
My first card today highlights the “returning” Pretty Peacock and the New Wild Wheat. I am also highlighting the NEW Layering Leaves stamp set (I LOVE this set!!) on both cards today, yesterday I used the greetings from the Cheerful Daisy stamp set.
The designer paper piece cuts to 4″ x 5-1/4″ and has a Wild Wheat mat that measures 4-1/8″ x 5-3/8″ … The card front was then layered onto the returning color; Pretty Peacock that measures 5-1/2″ x 8-1/2″ then scored and folded at 4-1/4″.
Using a piece of scrap, I stamped my greeting in Pretty Peacock and die cut it using the NEW Nested Essentials Dies, then I used the small banner die from the same set and cut two Wild Wheat and two Pretty Peacock banners to create the layering behind the greeting … it creates and nice focal point to the card. I then embellished the card with the Wild Wheat dots from the 2023-25 In Color Dots.
My last card for the day highlights the NEW Bubble Bath and Pebbled Path … I love pink and grey together and this card turned out stunning!
The designer paper that looks like it was painted in Pebbled Path measures 3″ x 4″ and is not matted, instead I used 3 Bubble Bath squares that were die cut from Stylish Shapes and were just “left overs” from my retreat. I also stamped my greeting in Pebbled Path directly onto one of the blocks.
The Pebbled Path base measures 5-1/2″ x 8-1/2″ then scored and folded at 4-1/4″ was stamped with the Daisy image in Pebbled Path to create dimension and a cute background. I really like using the “Color on Color” technique! My daisy and center was stamped in Moody Mauve and then highlighted with a hint of Bubble Bath in the center by using the Sponge Dauber … both were die cut along with extra leaves and they layered onto the front of the card. I then embellished the card with the Pebbled Path dots from the 2023-25 In Color Dots.
I hope you are enjoying all the samples of cards created from the pieces cut from that 12″ x 12″ sheet of Fresh As A Daisy Designer Series paper. I have more in store!!
Today I have 3 cards I’d like to share with you from the beautiful Fresh As A Daisy Designer Series Paper. The sheet that I am using was designed for you to create many different cards!! You’ll see how easy it is to create the pretty cards in no time at all … plus you’ll be introduced to some of the NEW colors.
Let me start with the new Bubble Bath (pink) …
The daisies cut to 4″ x 4″ from the sheet and was adhered to a piece of 4-1/8″ x 5-3/8″ Basic White. Our base is 11″ x 4-1/4″ then scored and folded at 5-1/2″. I used a piece of Garden Green scrap for a pop of color and tied a pretty little bow from White Bakers twine. I then stamped my greeting in Crushed Curry to pull that color from the flowers, and added 3 Tinsel Gems (4 pack) that are “Berry Burst” color but looked great on my card. I finished it off with some Wink of Stella on the White daisy petals.
My second card highlights the new Wild Wheat ….
The flower piece cuts to 3-3/4″ x 5-1/4″ and has an Early Espresso mat that measures 3-7/8″ x 5-3/8″ … I then added a strip of Wild Wheat to each side so it stretched out to 4-1/8″ inch. The card front was then layered onto the Basic White base that measures 5-1/2″ x 8-1/2″ then scored and folded at 4-1/4″. Using a piece of scrap, I stamped my greeting in Early Espresso and snipped the ends off at an angle to create a different look.
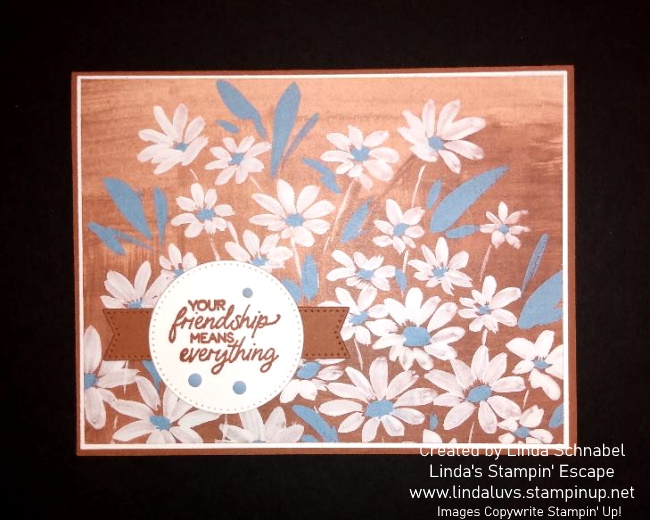
My third and last card for the day highlights the NEW Copper Clay and Boho Blue…
The daisies cut from our designer paper measure 4″ x 5-1/4″ and matted with Basic White measuring 4-1/8″ x 5-3/8″ … this is secured to the Copper Clay base that measures 5-1/2″ x 8-1/2″ then scored and folded at 4-1/4″. I used the Stylish Shapes to cut out my circle for the greeting (stamped in Copper Clay) and the Copper Clay cardstock to die cut the banner. I embellised with the Adhesive Backed Solid Gems in Boho Blue.
Tomorrow I will be back with the other pieces cut from that 12″ x 12″ sheet of Fresh As A Daisy Designer Series paper.
Thank you for taking time out of your Mother’s Day to visit my blog.