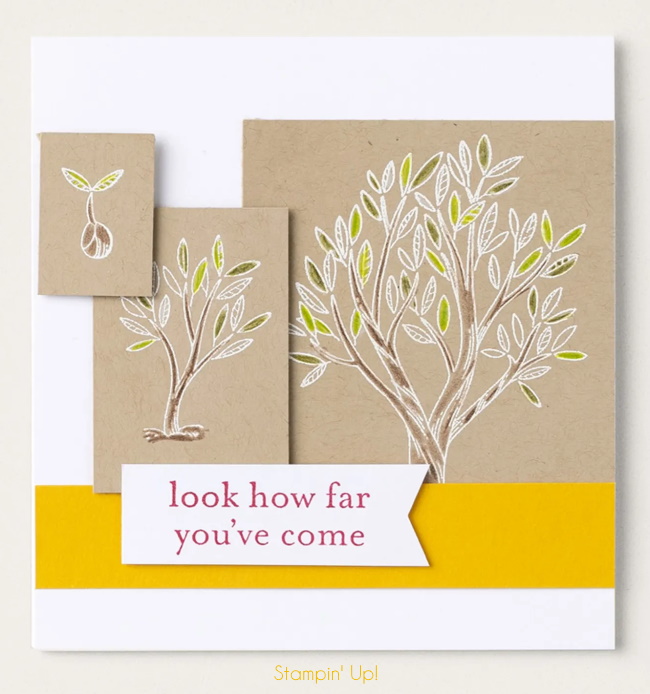
Today I’ll be sharing another one of our NEW On-Line Exclusive Stamp Sets. Let me introduce you to the “Growth Takes Time”.
Show someone you are there for them through sunshine and rain with the Growth Takes Time Stamp Set! This set comes with four sentiments that remind all of us that progress takes time. It also comes with three different tree sizes that show the development of a plant becoming something beautiful.
You can color these trees to match any season of the year by using any coloring technique you want! Then top it off with some extra leaves or put the sweet watering can off to the side. It’s time to nurture and care for our loved ones the same way we do a garden by sending them a card today!
Thank you for joining me today. You can see all the On-Line Exclusives by CLICKING HERE
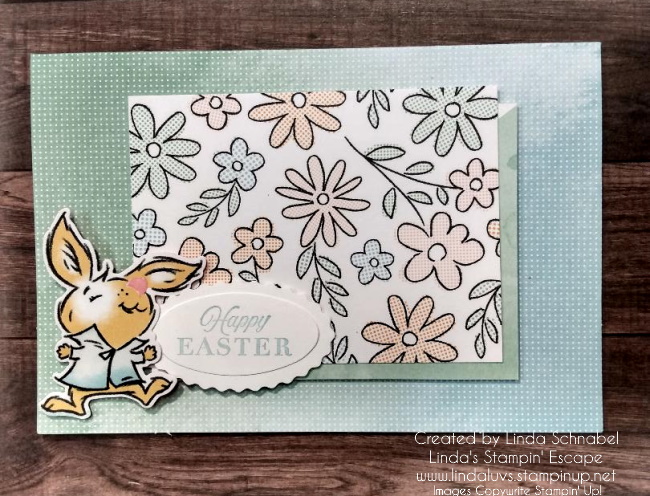
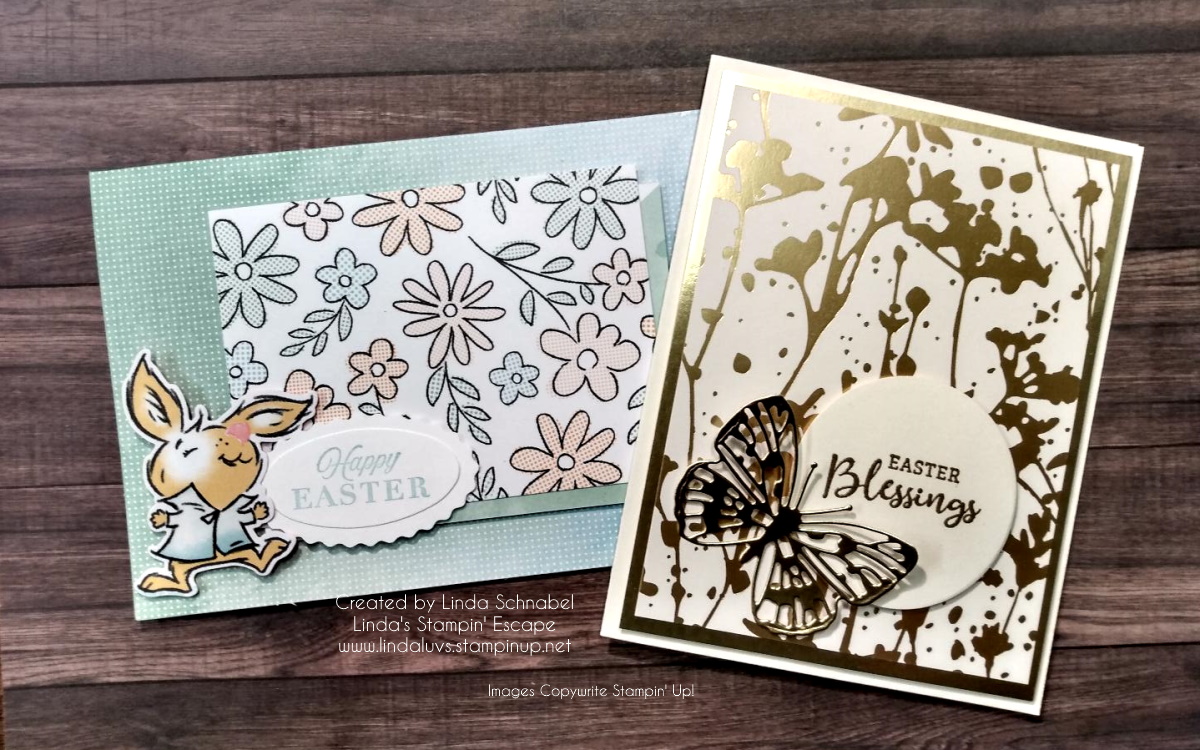
Today I’m sharing two quick & easy Easter Cards; a Cute and a Classy!! You can enjoy watching the replay of last nights Facebook LIVE and then I’ll share the cards close-up and personal!! lol
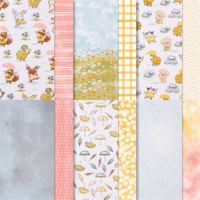
I started with the Quick & Cute Easter Card and the Enjoy the Adventure Memories and More card kit and envelopes and paired it up with the Rain or Shine Specialty Designer paper.
I did tuck a small Stampin’ Dimensional under my bunnies foot so he is popped up pretty good. There is a lot of texture and dimension on this card, even though it is a simple layout.
I forgot to mention in the video that the Rain or Shine is a “Specialty” paper, and it’s easy to see the embossed areas of my bunny. This paper is so cute and can be used for so much more than a “rainy” card … Easter!! Who knew!
If you would like to see more card samples from the Enjoy the Adventure then just CLICK HERE
Now let’s move on to our Quick -n- Classy card!
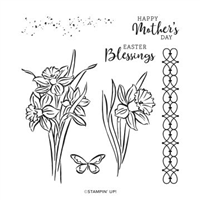
You have simplicity of this design and a great paper saving tip by cutting out your butterfly from the gold foil piece underneath the designer paper. I used the “Easter Blessings” stamp from the Daffodil Daydream stamp set … you can always use what you have in your stash!!
Another simple layout but with so much beautiful dimension and a bit of added texture from embossing our greeting in gold.
So glad you decided to stop on by today and take a look … hey, invite your friends to check out my blog as well. Love to share my creations and inspire as many as I can.
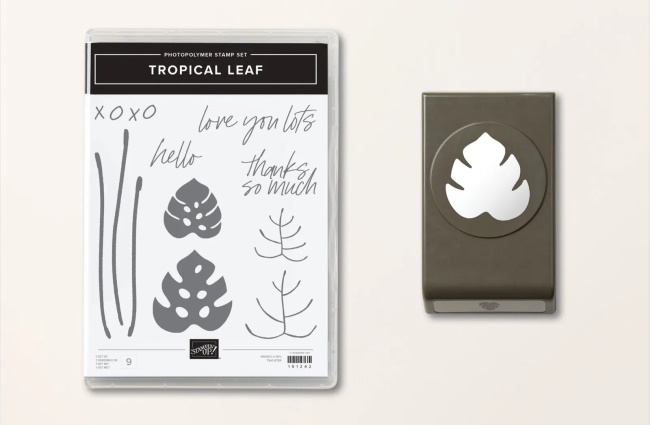
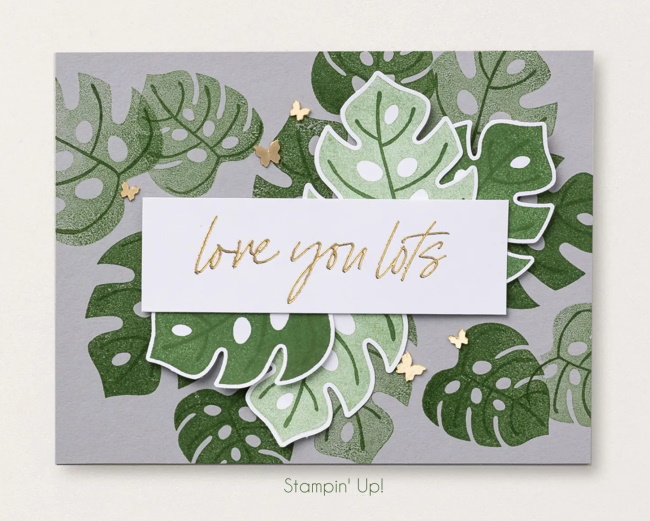
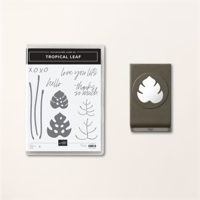
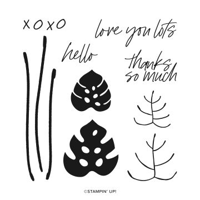
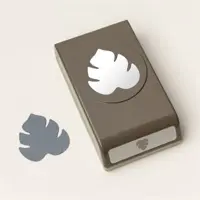
Today I’m going to share another one of our amazing On-Line Exclusives … You’ve seen the Hello, Irresistible, now let me show you the Tropical Leaf Bundle. The Tropical Leaf Bundle includes the Tropical Leaf Stamp Set and the Tropical Leaf Punch.
You can send a relaxed island greeting to someone special using this Tropical Leaf Stamp Set. The set contains two tropical leaf stamps in different sizes, plus one additional stamp with three stem images you can use as a texture piece. The tropical leaf stamps come with a coordinating vein stamp you can use to add even more detail. Create a single tropical leaf or layer a bunch, then finish off your handmade card with one of four greetings to say hello, thanks, or love you to someone special today.
Create handmade cards with an island theme using this Tropical Leaf Punch. The large punch gives you perfect cutouts of a tropical leaf you can use as the focal point or background for all your card making and scrapbooking projects. Try punching out your own leaf, then add veins and shading to the image using your favorite coloring technique.
You’ll stamp then punch out your own tropical paradise for quick card making, scrapbooking, and more! This bundle includes sentiments you can use year round for multiple occasions. Use this chill set to tell someone how much they mean to you.
Thanks for stopping by today … I’d love to know what you think of this NEW bundle; the Tropical Leaf.
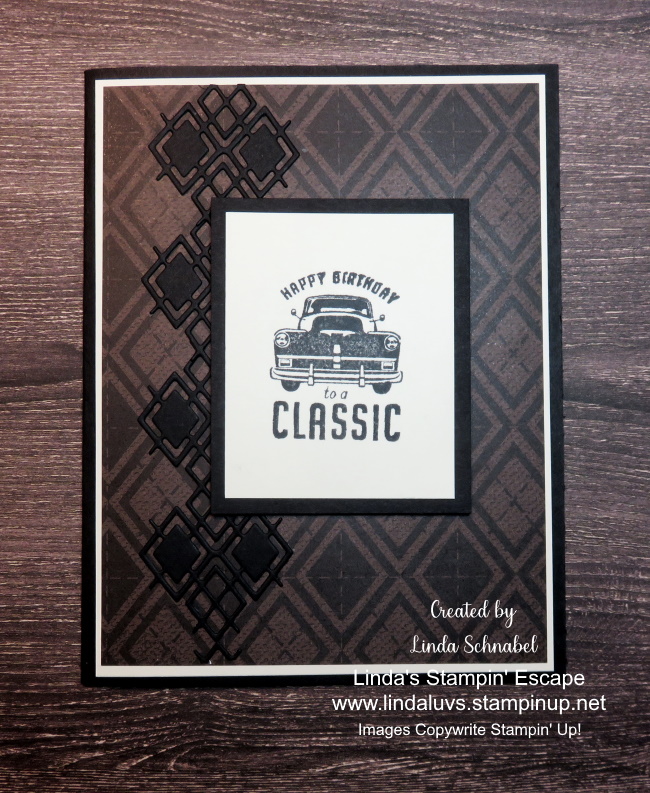
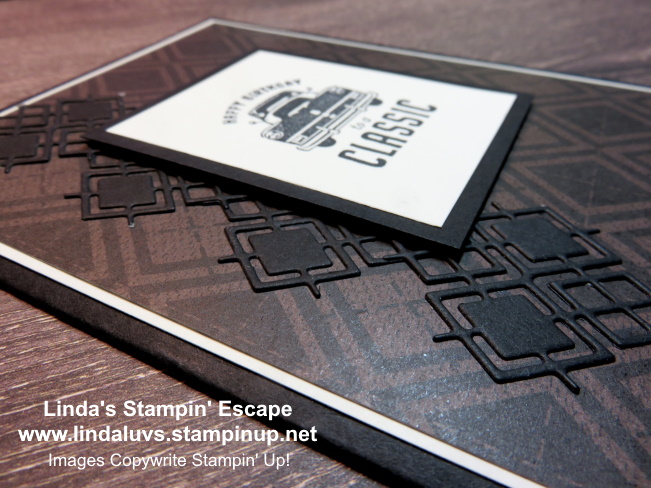
Need inspiration for a Masculine Birthday Card? We are all looking for masculine inspiration so I have another card for you today. This one I’ve pulled out the dies to create something stunning!
It’s a classic in every way … from the argyle pattern of designer paper to the classic car. What I love is the die cut pieces that actually aligned with the designer paper, creating a stunning pop of texture.
I began with a basic size card base of 5-1/2 x 8-1/2″ then scored and folded at 4-1/4″. The Very Vanilla mat is 4″ x 5-1/4″ and the designer paper is 3-7/8″ x 5-1/8″ …. I just wanted to tie in the greeting colors, plus it really made the designer series paper pop.
This card was fun and easy to make! With a simple layout and the patterned paper, adding the die cut argyle pieces just added some great texture to the card. I also popped up the birthday greeting to give this card even more dimension.
I think you will find the “He’s the Man” Suite very versatile … I’ll be sharing even more cards with this one for sure! Thank you for stopping by today.
With the NEW Catalog due out in May, I always get nervous about one of my favorites retiring … so, if you are liking this bundle, or the entire suite, you might want to grab it up before it is gone. I don’t know if it’s retiring but I know when that list comes … thing SELL OUT fast.
Have a great day!! I have the supply list of items listed below for your convenience.
TODAY’S STAMPIN’ SUPPLY LIST … If you liked the products used in today’s projects, I have links for you below. Just click on the item you would like more information on, or to begin your shopping. It will take you directly to my website. Thank you ❤
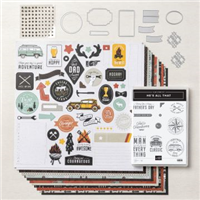
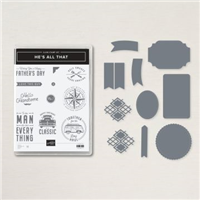
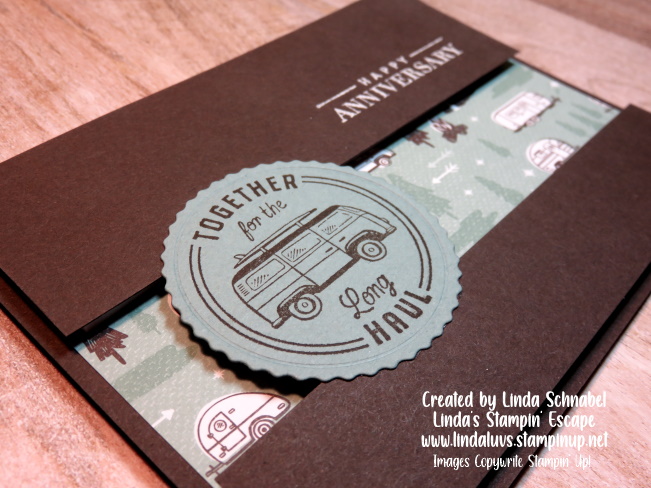
Are you In Search of a Masculine Anniversary Card? I have the answer for you … the He’s All That Bundle. I know that my stampin’ friends who camp and travel are going to love this next card. I’ve shared cards for Father Day … Birthdays … why not Anniversaries!!
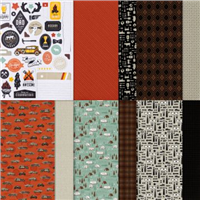
I’m using a fun pattern from the designer paper that highlights campers and trees in the colors of Soft Succulent and Early Espresso. I borrowed the “Happy Anniversary” from the Celebrating You stamp set. I heat embossed the greeting with Basic White embossing powder.
My Early Espresso card base is 5-1/2 x 8-1/2″ then scored and folded at 4-1/4″. Then I used a “split panel” … the top one measuring 5-1/4″ x 2-1/2″ and the bottom measures 5-1/4″ x 1″. Both panels are popped up using the Foam Adhesive Strips … this allows our designer paper to be highlighted and gives are card a fun dimension!
The badge was stamped in Early Espresso on Soft Succulent and die cut using one of the dies included in the He’s All That Bundle include in the He’s the Man Suite! It was attached to the two panels to create a bridge and it looks cool! lol
I hope you are enjoying all the different styles I’ve shown using this suite … and hopefully I covered most of the color pallets included in the suite. I also wanted to share several different layouts with you … all of which you can easily recreate!
With the Annual Catalog retiring at the end of April, I wanted to showcase some of my favorite “Masculine” bundles …. a change up from all the flowers!!
Thank you for visiting my blog today … if you like the content, please click the LIKE button below. Enjoy today!
TODAY’S STAMPIN’ SUPPLY LIST … If you liked the products used in today’s projects, I have links for you below. Just click on the item you would like more information on, or to begin your shopping. It will take you directly to my website. Thank you ❤
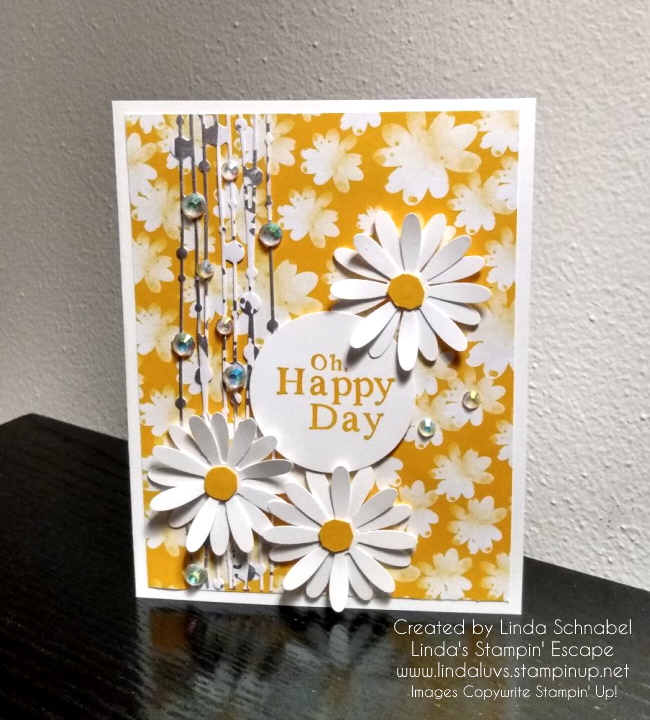
Today I’ve got a Friday Fun Mash-Up Card. Now days they call it “Mash Up” but you and I know that we’ve been creating cards using multiple different stamp sets, dies and papers … it’s just what we do!
I have been wanting to use that cute Pale Papaya paper from the “Rain of Shine” Designer paper since I saw it … it is bright and makes me happy!! You can click on the link to view all patterns.
Isn’t it pretty!? It’s such happy paper, so it will be my card front because I want to highlight it. Next I have a leftover piece over die cut piece that I used on yesterday’s card that came from the Irresistible Blooms Bundle. I die cut that piece from the Naturally Gilded Specialty paper. Click to view!
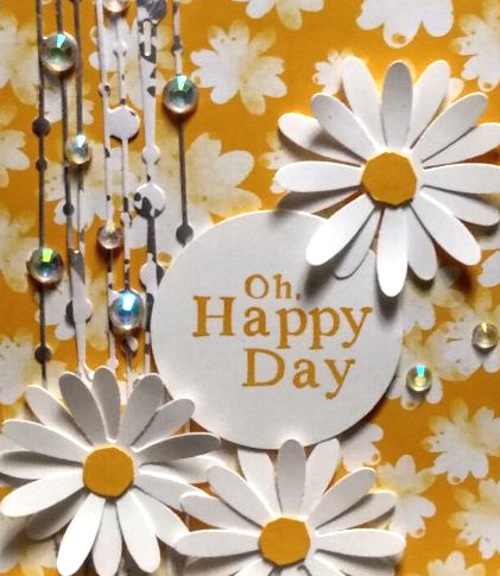
And since the piece had silver in it and all those little dots … I draped it in Rhinestones! Because friends, you’re worth it!!
I decided to use the Daisy Punch because it is similar to the flowers on my paper and to me … they are happy flowers! For my centers … I punched out the daisy in Mango Melody and snipped off the petals, so if you look closely, they are not perfect circles.
The greeting comes from the Playing in the Rain stamp set and “punched” … yes, punched! If you go to my online store, you will find that the 1-3/4″ and 2″ punches are back. Check it out here.
It’s just been a bit gloomy here in Wisconsin so I thought this would be the perfect card to brighten someones day. And …. isn’t that why we send the cards we make?
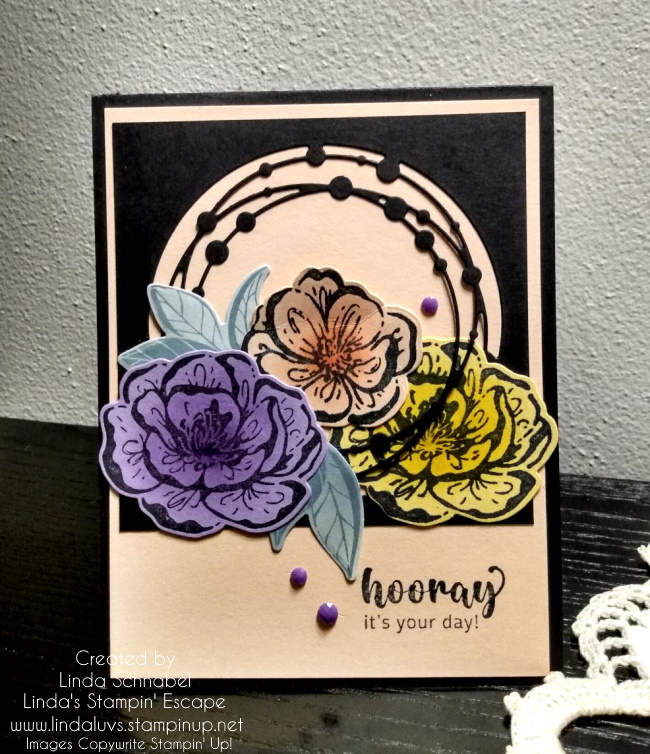
Hello Stampin’ Friends ~ Today I’m sharing the video replay of my Facebook LIVE and I’m highlighting the Hello, Irresistible suite and a FUN and Easy Embossing Technique. Then I’ll share an alternative design using Black Ink verses the White Embossed flowers you see in the video …
This suite is so fun to work with and the flowers … well, they are perfect for so many techniques. Embossing is one of my all time favorite techniques because it adds an elegance and texture to your cards, and when you combine it with a touch of ink … you get depth too.
I used the designer paper for the background and to cut out the leaves, so if you are used to embossing or die cutting, you will find this card pretty easy to recreate. Overall, I would give it a medium rating.
Now for the “Black” ink card. I used a lot of the same materials and the dauber technique as well. I cut the leaves out as I did on the first card but used the “other” awesome die in the bundle. Check this out …
The card base is Basic Black and cut 11″ x 4-1/4″, scored and folded at 5-1/2″, and the second black piece is cut to 3-3/4″ x 3-3/4″ and then die cut with the circular die. The card front is Petal Pink (same as the small flower) and measures 4″ x 5-1/4″.
And this time I added the “purple” adhesive dots for my purple fans! Both card were fun to make and somewhat similar but they really look different! I love it 🙂
Hope you enjoyed today’s cards, and thanks to those who came over to my blog from Facebook to check it out.
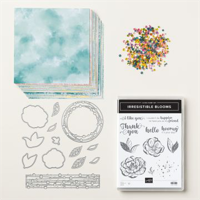
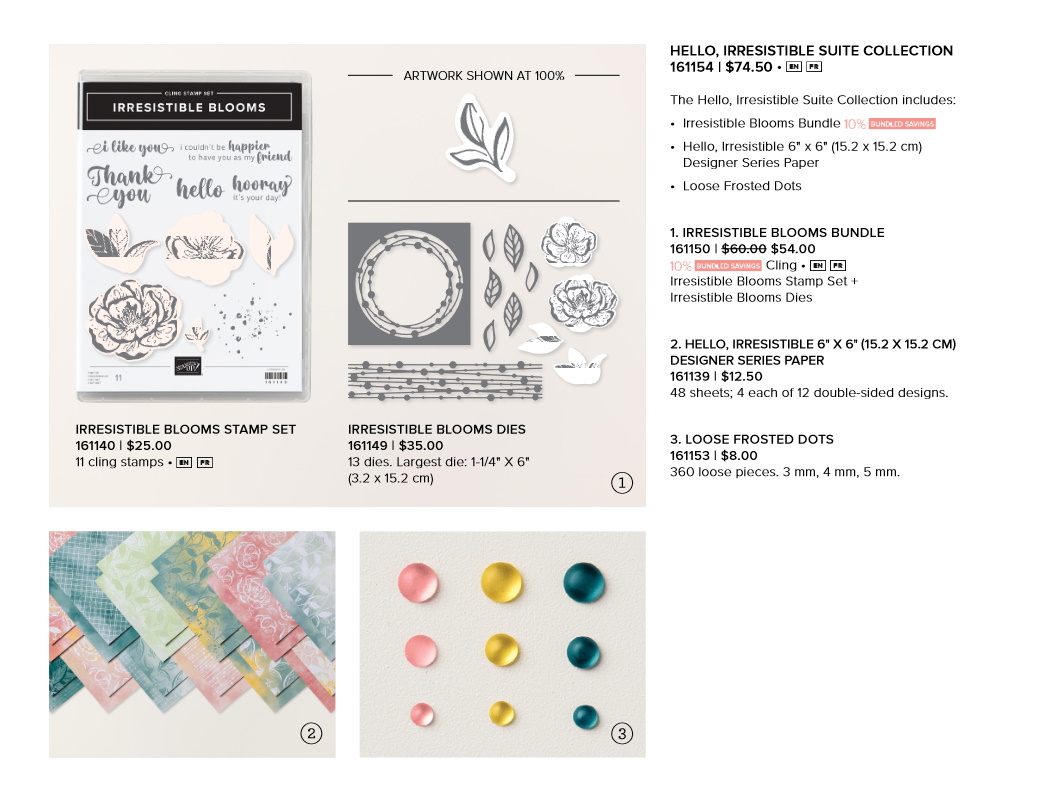
Are you ready for a beautiful new suite? Let me introduce you to our new OnLine Collection; Hello, Irresistible Suite Collection ….
Today I’d like to share the two cards that I created during my Facebook LIVE on Tuesday, unfortunately there will not be a video but I do have the cutting pattern for these two cards. I used one of the 6″ x 6″ sheets of designer paper from the Hello, Irresistible paper and cut it to create my new cards.
You will be able to CLICK on this photo and download the pattern for your personal use.
I used the 5-1/4″ x 4″ piece of designer paper to create my first card. This layout I’m sharing is very easy yet the designer paper makes your card look stunning ….
The background “is” the designer paper, you don’t have to do anything but choose one of the sentiments from the Stamp Set! I used the Dual Oval punch to highlight the sentiment and stamped it in Flirt Flamingo … same color as my card base.
I used the Daffodil Delight Loose Frosted Dots … HINT: they really pop when you put them over “white”. I’m really liking these dots!
The second card uses the 5-1/4″ x 2″ piece … remember the 3/8″ strips are to be used on the inside of the card.
The second half of the Flirty Flamingo cardstock was used to this card base as well. I used Timeworn Type embossing folder to add texture behind our designer paper, there is also a pop of color – I used So Saffron cardstock behind it.
I popped up the designer paper piece with Stampin’ Dimensionals. I then stamped my sentiment in Flirty Flamingo ink and punched it out using the Lovely Me Punch.
Thanks for checking in with me today. This amazing Hello, Irresistible Suite Collection will be available March 1st, 2023.
Today I’m sharing a fun “Faker Shaker” card … Last week I shared the cards from the Saying Thanks Card Kit and during my demonstration (will share the video replay below) that I would create a card using those left over hearts that came off of one of the cards in the kit.
If you’ve seen the video, just bypass it because you know exactly what I’m talking about … If you haven’t grab a cup of coffee, sit back and enjoy.
I really love this kit … as it states, it’s perfect for NEW Crafters / Cardmakers, Busy Moms or Grandmas! Great to craft with your kids (thanks Barb) and they are nice to have on hand when you need a quick card!!
OK … Let’s get to this cutie! I used a “clear” medium envelope to create my shaker card, and all those hearts you see below, they will now be “inside” as the “shaker” for my card.
I cut the front of the cardbase used for the “heart” card down to 4″ x 5-1/4″ … it’s so colorful and coordinates with the envelopes from the KIT perfectly. Then I tucked it inside the “CLEAR” envelope … make sure that the adhesive flap goes towards the back.
You can save the back that was cut off for another card. Next I tucked all them hearts inside the envelope “in front of” the card front. The fact that they are white, really makes them stand out from the watercolor background.
You will need to wrap the excess of the envelope to the back. I use the Stampin’ Seal Plus as it lays nicely on the clear envelope and really holds it in place. Now you can remove the backing from the adhesive flap and pull that around the back as well. This encloses your hearts.
I wanted to add a ribbon behind my greeting so I used the Fresh Freesia Open Weave Ribbon. I attached the ends to the back of my “shaker” and then tied a bow and attached it with a Mini Glue Dot. I chose the Merci as my “thank you” … the greetings in the “Saying Thanks” Kit come in four different languages so it’s fun to find a way to use them as well. I attached the greeting over my ribbon using the Stampin’ Dimensionals.
Then I stamped the “FOR ALL YOU DO” from the Happiness Abounds stamp set … I used my Stampin’ Write Marker to lay color only on those words as it is a larger sentiment. Once inked up, I stamped it on Basic White and cut it out myself. Using the edge of my stampin’ dimensionals I popped it up to match the greeting height.
Now that the “shaker” card front is done, you can mount it onto your card base … I used a Basic Black card base to pull the black out of the greeting and creating a focal point. It draws your eye to it even though it is mounted onto such a colorful background. Interesting!! To finish off my card, I added 3 Fresh Freesia embellishments from the Opaque Adhesive Backed Gems.
Even though the kits were designed for NEW stampers, those of us who are avid stampers also like to have quick & easy cards on hand … and if we want, we can JAZZ them up a bit!!
I have the links listed below so you may add these products to your stamp collection. We only have 1 week left to qualify for our FREE / Exclusive Sale-a-bration items, so if you need some adhesive, cardstock or embellishments now would be a good time to pick them up, and grab a FREEBIE!!
I want to “Thank You” for joining me today. I hope you have a wonderful day.
Here are those links that I promised …. Feel free to contact me if you have any questions.
Make sure to join me LIVE tonight (Tuesday, Feb.21st) on myFacebook Linda’s Stampin’ Escape Page… I will be showcasing the NEW Hello, Irresistible Suite Collection
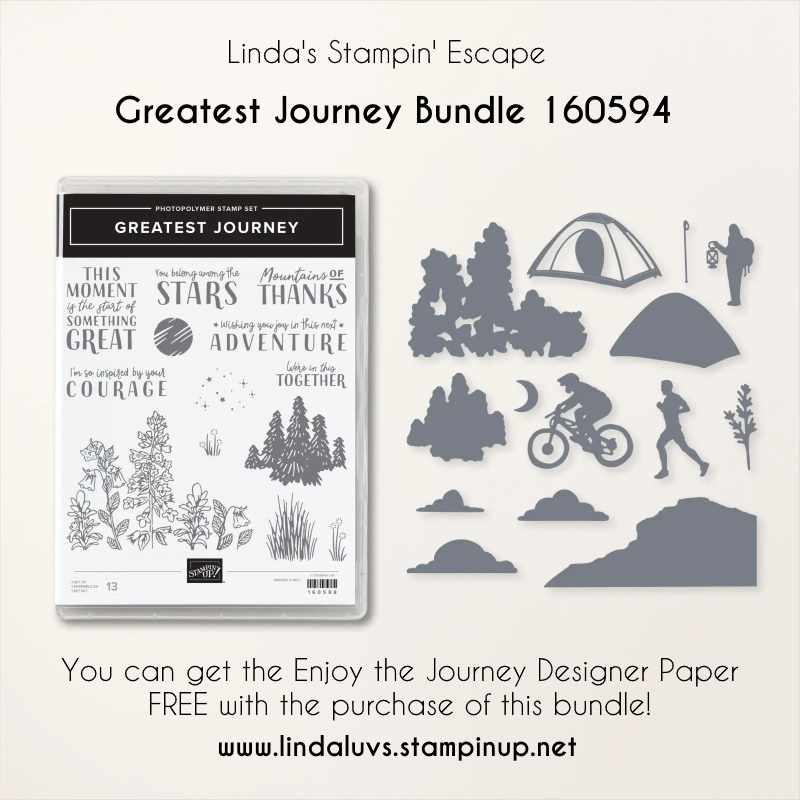
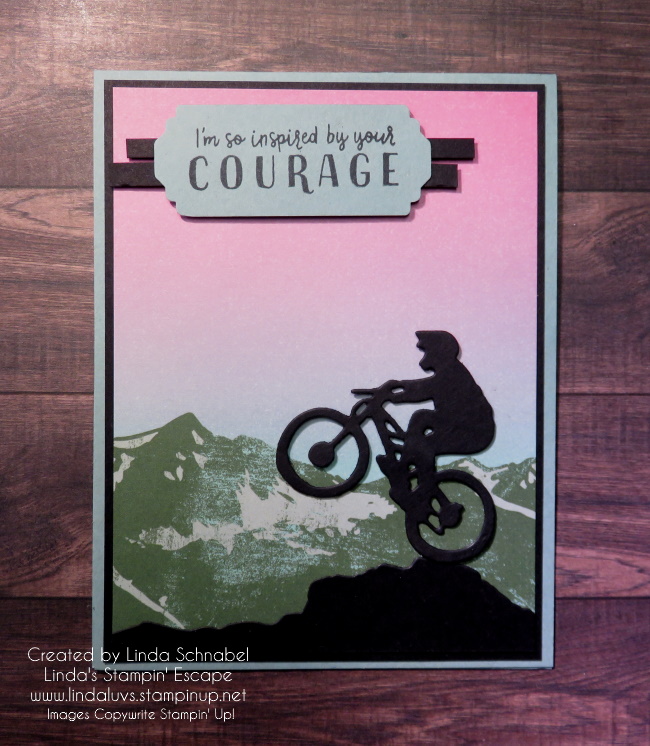
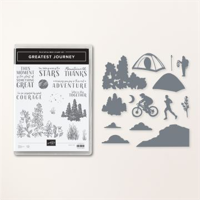
Today I’d like to share a card of inspiration. My card today was inspired by the amazing courage of my neice … Samantha Rose. I’m using the Greatest Journey Bundle … this was on my Wish List from the moment I saw it, and for very personal reasons. I love the sentiments and they are inspirational, yet there is one that is “inspiring” and that is the one I’m using today. I’m also using the dies, specifically the “rider on the bike”.
She was just a little girl, a baby when they discovered that Sammy had CF / Cystic Fibrosis. It affects their lungs and we were told to prepare that she would not have a long life expectancy (things are better now for children) and her health was critical so many times … but this girl persevered.
Approximately 14 years ago she went through her first “double” lung transplant, and has since has another. She is so grateful for her new chance at life (and her donors) that she is not wasting a second … she experiences all she can in life. She has journaled her experiences and connected with others suffering from CF. She has joined in to raise awareness as well …
She continues to amaze all of us .. family and friends, she is a true inspiration. But I have to share the pictures of HOW she celebrates her life that inspired my card today ….
She’s on that bike …
So my card today has the biker in the mountains ….
And I am truly inspired by her courage, the way she chooses to live her life and honor those who gave that second chance to her.
And if she’s nice biking in those mountains, she’s climbing them! Yep … this photo still makes me hold my breath!! Oh Lord, look how high she is!! I could go on for hours about how proud I am of her and the way she honors the life she was given… she is an inspiration. Love this girl …
And flowery foo foo cards are just not her style (that doesn’t mean she doesn’t like flowers) but I just felt this was so fitting for Sammy. The designer paper is so pretty and coordinates perfectly with this bundle, so with some paper and a couple die cuts the card was ready for the sentiment … Inspired by your courage!
Oh yes, and my oldest grandson, well a picture is worth a thousand words! And video’s … oh my, they can be hard to watch LOL.
More power to those who follow their dreams and inspire others by living their best life. I’ll stick to my passion of card making and sharing that!!
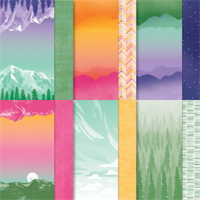
I hope today’s card inspired you. Just so you know, there’s also a tent and a hiker in that bundle, and I have something floating around my mind for one of the designs in that Enjoy your Journey designer paper. Can’t wait to share that one with you!
I think you will agree that this bundle and coordinating designer paper will be an adventure to stamp with as well. Thank you for sharing your time with me today. Have a beautiful day ~
Here is a list of ingredients that I used on today’s card …. Click on the image for more information or to begin shopping. Thank you. ❤
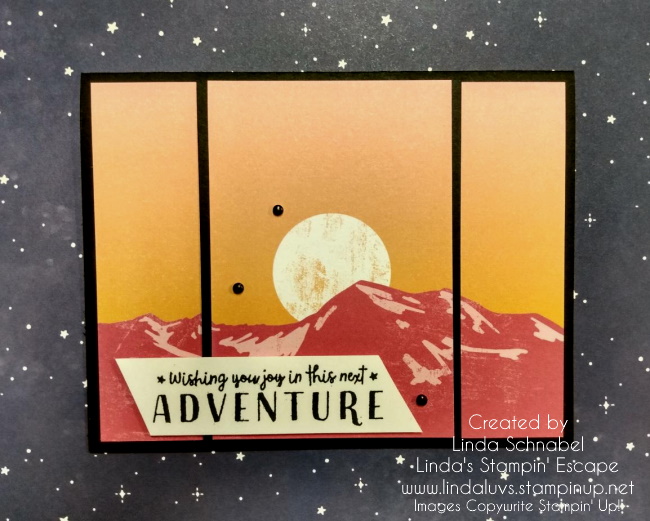
Today I’d like to share a simple and pretty card created with the Greatest Journey stamp and the Enjoy the Journey Designer Paper (which you can get FREE during Sale-a-bration). This card takes it a step up from just simply using designer paper and a greeting.
We begin our usual 8-1/2″ x 5-1/2″ card base; I’m chose Basic Black, scored and folded at 4-1/4. Then cut a a 4″ x 5-1/4 piece of designer paper, then cut off 1-1/4″ off each side leaving a 2-3/4″ center.
Next cut a 4″ x 3″ piece of Basic Black cardstock which will be mat the 2-3/4″ center piece of designer paper.
I attached the two end pieces on first, then I secured the center piece of designer paper onto the black mat. You can still see the flow of the card but you have the interesting design element by layering it … I did not use dimensionals on the center piece.
I stamped the greeting and just cut the ends off at a slant… then I popped it up. The final touch was to add the black dots from the Classic Mat Dots.
Super simple but with an interesting twist … great for when you need a quick card. Thank you for spending time with me today.
Here is a list of ingredients that were used in today’s card …
Hot off my craft table is today’s quick card created with the Rain or Shine Specialty Designer paper and the Sentimental Park bundle. I created this card for the Design Team I am on, so I combined two of my Mini Catalog favorites (well, there are so many awesome things in the mini it’s hard to pick favorites!)
Message me below in the comment section and I will send you the Tutorial that includes the full color photo, list of ingredients, measurements and step by step instructions! Print it out or Save it in your files.
Today I will be sharing the replay of my Facebook LIVE last night where I highlighted the Saying Thanks Card Kit and will show you making them is Easy Breezy! These kits include everything you need to create the cards and even include coordinating envelopes. Then I’m going to use one of the card bases and add some stamping to it!! Oh … I can’t wait to show this to you!
First, lets take a look at the video …
I really love this kit … as it states, it’s perfect for NEW Crafters / Cardmakers, Busy Moms or Grandmas! Great to craft with your kids (thanks Barb) and they are nice to have on hand when you need a quick card!!
As you look at these three cards, you could change up the “occasion” with just a little simple stamping! Turn the polka dots into a “birthday” or the hearts into “I Love You” or “I’m Here For You” card … anything you can imagine!
Now … let’s talk about that rainbow card. The minute I saw it, a stamp set came to mind and I know I had to try it out. I normally don’t really change up my “Kit” cards but I didn’t think swapping out a greeting / sentiment would hurt.
When I saw the Covered in Sunshine stamp set, well … I had to have it. Look at the samples in the Mini Catalog (page 37/ below) and you can see why I was tempted to purchase this one… It’s different! It’s happy and encouraging and fun! Stampin’ Up! did a great job on these samples.
So … look at the rainbow card above, and you’ll see where I got my inspiration from for my Saying Thanks Kit card. I thought it was the perfect time to do a “Mash Up” of products and see how it turns out.
Here you go ….
I love the way it turned out! It almost looks hand written, cool right, and perfect to send to a friend. And I told you in the video that I would be using up those hearts, and this is just the beginning. Let me share with you how I got the sentiment so perfect.
Oh, those of you who own the Stamparatus already knew where I was going with this ….
Using the Stamparatus allows you to align your sentiment perfectly and then “repeatedly” stamp it until you get the depth of color you want. I do believe I stamped my greeting 4 times to get it nice and dark so that it really showed up on such a colorful background.
They really do go together nicely … don’t they? Those cute little confetti embellishments that come in the kit are shiny so I thought I would add my Wink of Stella to my heart so that it sparkled too!!
I have the links listed below so you may add these products to your stamp collection. The Saying Thanks Kit, Covered in Sunshine Stamp Set and Wink of Stella “almost” gets you to a FREE Sale-a-bration item, so if you need some adhesive, cardstock or embellishments now would be a good time.
I want to “Thank You” for joining me today. I hope you have a wonderful day.
Here are those links that I promised …. Feel free to contact me if you have any questions.
Today I’d like to share a beautiful card created with the Favored Flowers Designer Series paper that comes from our Sale-a-bration catalog so you can earn it for FREE!
Starting with a Fresh Freesia card base and adhere the Petal Pink designer paper to the bottom part of the card base. Stamp the Fresh Freesia cardstock with the flower stamp randomly using the Fresh Freesia ink pad. Rub the edges of the cardstock with the Fresh Freesia ink pad. Adhere the layer to the card.
Adhere the flowered designer paper to the Basic Black cardstock, the place a piece of White Twine on top of the Designer Paper and adhere the ends to the back of the Basic Black cardstock. Tie a smaller piece of Twine in a knot, then make a bow. Adhere this layer to the card.
Stamp the greeting on a scrap Petal Pink cardstock using its matching ink pad. Cut out the greeting using the label die. Add it to the card using Dimensionals.
What a lovely way to say thank you! Do you have this designer paper yet? There’s still time, but it will be gone in two weeks … Sale-a-bration ends February 28th!
Thank you for joining me today. Happy Galentines Day!!
Ready for Spring? I’m thrilled to revisit the No Line Watercolor Technique with you today. Daffodils always remind me of spring and with the temperature hitting 40 degrees today, it will feel like spring for many of us.
I love this watercoloring technique and it is much easier that you think. It’s not a quick card but it is very relaxing and you will fall in love with the No Line Watercolor technique as well.
I’m using the Daffodil Daydream stamp set, it is such a beautiful flower to illustrate and do this technique with.
I invite you to watch the video along with me … I can’t wait to show you the simple steps it takes to create such a gorgeous card. You are going to fall in love with this technique because it’s going to make you look like a real artist! I’m no paint pro, but I sure like the way this looks.
As simple tip is too keep your darker colors in the recesses of your image. I also kept my water painter on the dryer side … it still has water but it easier to control your color when it’s not over wet, and the results are amazing. The dimensions for this card are also simple; Old Olive Card base is 8-1/2″ x 5-1/2″ … the front is a piece of watercolor paper measuring 4-3/4″ x 3-1/2″. The watercolor piece I stamped on measures 3-1/2″ x 2-1/4″ so my Old Olive mat was 3-3/4″ x 2-1/2″. I just used scrap pieces for my greeting.
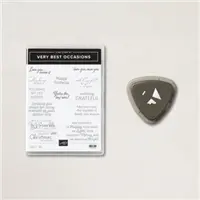
The greeting comes from a brand new bundle … the Very Best Occasions Bundle! That is also where the triple edge punch comes from that I decked out my daffodil with. It’s a great addition to my stamp & punch collection – I’ll be using them both many, many times.
I hope you enjoyed this beautiful card, and the video will inspire you to try out this No Line Watercoloring technique.
Have a wonderful day! Thank you
Here is a list of the supplies I used in creating this card …