Hello Stampin’ Friends ~
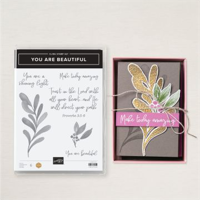
Today, I am thrilled to share one of my favorite stamp sets that is on sale … It’s a beautiful way to send love, support, faith, and encouragement through your handmade cards. The “You Are Beautiful” Stamp Set is an exquisite collection that features positive sentiments in a contemporary font, perfect for uplifting those around you. I’ve created 3 cards and an engaging video tutorial, to showcase the versatility and elegance of this stamp set.
The “You Are Beautiful” Stamp Set isn’t just any stamp set; it’s designed to make a statement. The sentiments are heartfelt and motivating, ideal for any occasion where you want to make someone feel special. The set includes a variety of uplifting messages, from “You Are Beautiful” to “You Are a Shining Light,” making it perfect for creating cards that convey your heartfelt emotions. The modern and stylish font ensures your cards look professional and trendy, adding a touch of elegance to your handmade creations.

This stamp set features a special texture that adds depth and dimension to your stamped images. With Distinktive stamps, you can achieve photo-realistic images with just one stamp, making your cards stand out effortlessly. Additionally, the greenery sprig stamp adds a pop of color and a natural element to your cards, complementing the sentiments beautifully and adding a fresh, vibrant touch.
For the first card, I chose the simplest of the Color Theory – Monochromatic. Just basic stamping … Shaded Spruce on white.

The second card also highlights the Monochromatic color theory. I love the look of “color on color” … it just adds so much dimension without layering! Again, I am using Shaded Spruce cardstock and ink.

My third and last card highlights the Analogous style in the color theory … taking 3 colors that are side-by-side on the color wheel. I choose Shy Shamrock, Pretty Peacock and Lost Lagoon. Oh my … I think it turned out so pretty and I used it as my background. I stamped the greeting in Shy Shamrock and highlighted it with the Rhinestones.

I’m also excited to share a video tutorial where you can watch these cards come to life. In the video, I’ll walk you through the process of creating each card, from selecting the right colors to stamping the perfect image. Whether you’re a seasoned crafter or new to stamping, this tutorial will provide you with tips and inspiration to make your own stunning cards using the “You Are Beautiful” Stamp Set.
The “You Are Beautiful” Stamp Set is more than just a tool for card-making; it’s a way to connect with others and share positivity. Whether you’re creating cards for friends, family, or even yourself, this stamp set helps you craft messages that are heartfelt and sincere. I hope these cards and the accompanying video inspire you to spread love, support, faith, and encouragement with your handmade creations.
Thank you for joining me today! Happy crafting, and remember, you are beautiful!