Hello Sweet Friend and Goodbye …

Hello Stampin’ Friends,

We are nearing the end of an old friendship – the 2013-14 Catalog.  There’s only a few days left, and some of the items on today’s card with be gone forever.

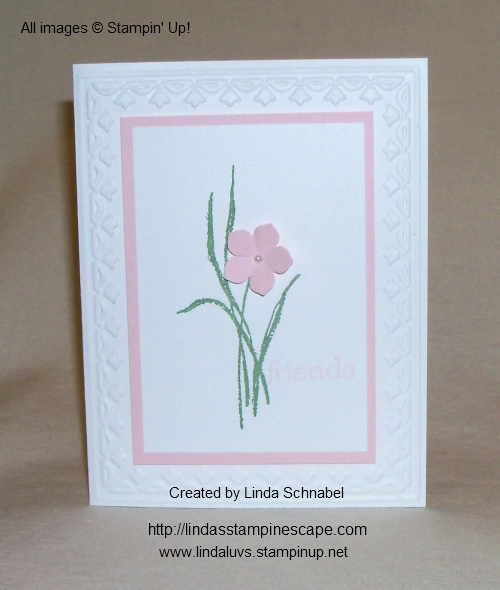
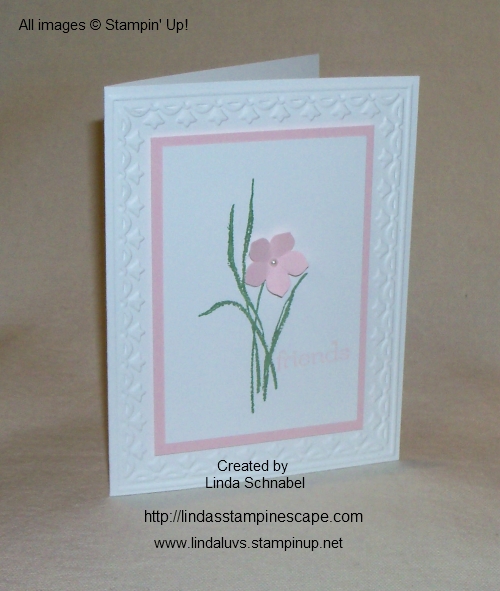
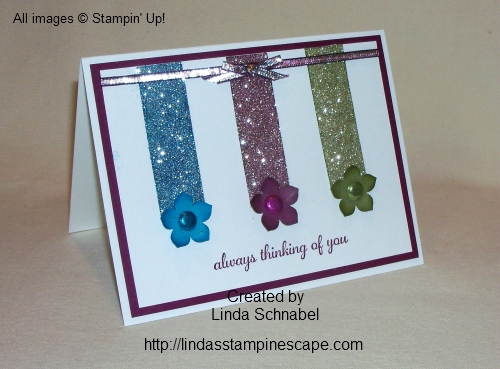
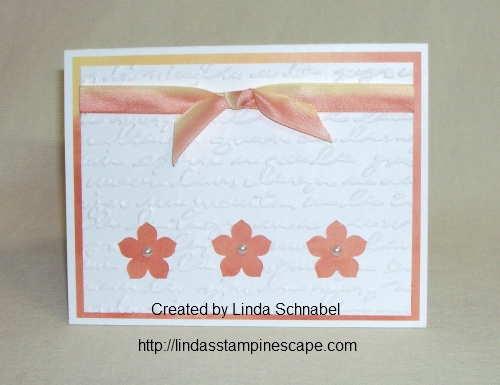
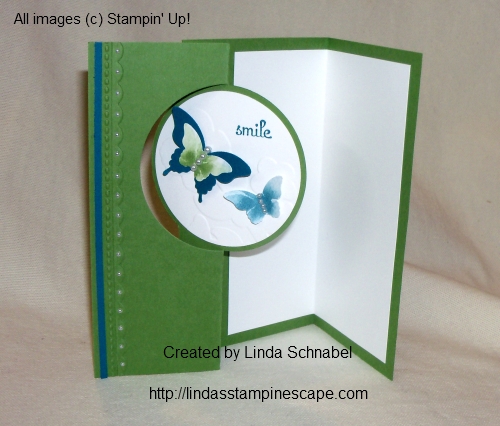
Today I want to share a card with you that I created for some special friends.  This is one of my favorite cards that I have ever made and thought it was time to share.

000_1109

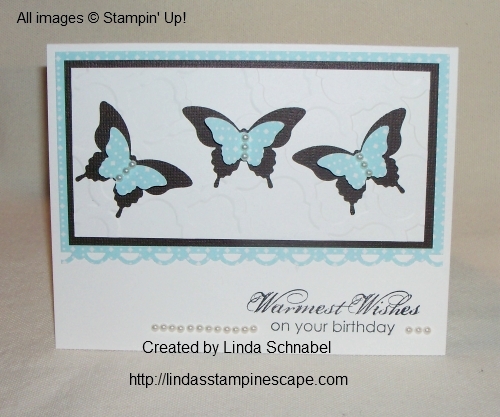
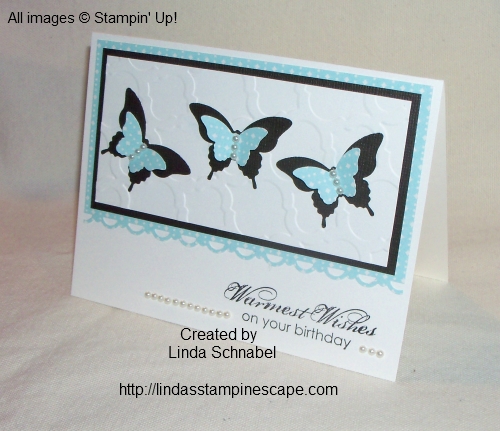
I wanted something special and different so I came up with my color pallet first; Basic Black, Basic Gray, Smoky Slate and Pink Pirouette.  I used the black as my base and then only to stamp the greeting.  It created an elegant look.

Next, I inked up the stamp  “En Francias” in Smoky Slate and stamped it onto the Smoky Slate cardstock.  This is my depth (extra texture) for the card.  Unfortunately, the “En Francias” stamp is sold out in both the clear and wood mount.

I choose the “Six Sided Sampler” and paired it with the “Hexagon” punch.  I needed to recreate this card several times, so I created a “punch template”.  I figured out where I wanted to place my stamped images, and where I wanted to punch and then made the template.

101_1434

Once the template was created, I held the Basic Gray cardstock with it, and punched out the area’s punched on the template.  After that was done I ran the cardstock through the BigShot with the Perfect Polka Dot folder…. adding a bit more texture.  The entire background was mounted using the Stampin’ Dimensionals to lift it off the base.

Using the Six-Sided Sampler stamp set, I stamped a couple of images and my greetings onto the Smoky Slate.  Then used the Hexagon punch to punch them out.  The punched images were placed around the punched areas on the Basic Gray… the greeting was popped up with Stampin’ Dimensionals.

000_1111

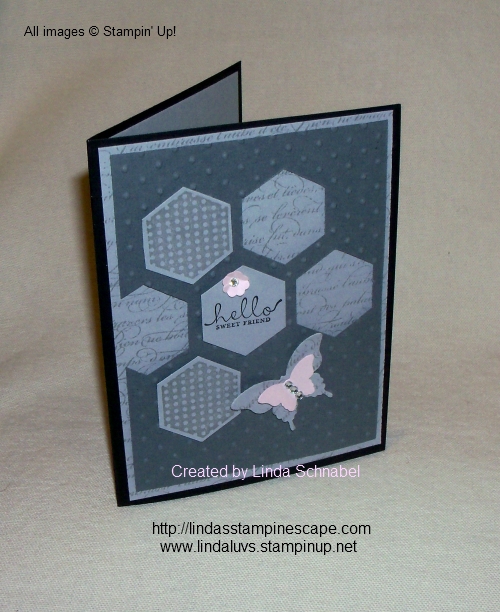
For an accent, I created a layered butterfly, Elegant Butterfly in Smoky Slate and stamped with “En Francias” and then topped with the Bitty Butterfly in Pink Pirouette.

To balance the color and draw your eye to the greeting, I punched out a small flower from the “Itty Bitty Shapes” trio punches (On the retirement list) also in Pink Pirouette.  Both of these items were embellished with the beautiful Rhinestones.  I hope they NEVER retire those … I love them and use them all the time!

000_1109

I hope you enjoyed my card creation and that you’ve learned how to create a template for punching multiple cards.  I only with the photographs showed the full dimension of this card.  I will have the ingredients listed below for you.

I love sharing ideas, and with the new catalog coming out … it will be a joy to share these fabulous new stamp sets and accessories with you.  You can begin ordering from the New 2014-15 Catalog today at NOON … Mountain time!

Thank you so much for stopping by today.

blog-closing-small

ITK_RetiredList_demo_April2114_NA intheknow_PaperPumpkin_2.23.2014_NA intheknow_sign-save-US

Click on the photo for more details

Here is the list of ingredients for today’s card share.  Just click on it for more information or to begin shopping. Thank you.


Ode to Friends …

Hello Stampin’ Friends,

Today I want to share with you a beautiful card made especially for a friend, because some day’s we just want to drop a quick note to say hi.

I began with Whisper White cardstock and embossed a border using the “Framed Tulips” embossing folder.  I chose Pink Pirouette because it speaks softly … like a friend.

000_1108

I then chose the flower from the “Love & Sympathy” stamp set because I love the way the leaves flow.  I inked up the leaves only with the “Wild Wasabi” marker and stamped my image.

Using the “Petite Petals” punch from the Occasions catalog, I punched my flower.  To get the pretty petals …. place the punched flower in the palm of your hand and press the tip of a pen into the center.  I creates not only the petals, but a perfect center to place your pearl or rhinestone in.  I picked the pearl today.

000_1105

My “friends” greeting comes from the “Sweet Essentials” stamp set which is now on the retired list, and only the wood mount is still available (Clear is Sold Out).

I hope you enjoyed today’s simple but elegant card, and that it inspired you to connect with a friend.

Have a wonderful day ~

blog-closing-small


Happy Easter to you and your family …

Hello Stampin’ Friends,

Today will be a quick post, but first I want to wish you all a very Happy Easter.

000_1003

You will recognize my little bunny from my scrapbook page that I posted on Thursday … “Some Bunnies Hidin’ the Eggs”.  I have always believed that you can just shrink down a scrapbook page that you like… into a card!

I followed the same pattern for my bunny … the oval framelit for the bunny butt, Boho Blossom for the tail, the 1-3/8″ for the head, the large oval punch for the bunny ears, and the Extra-large oval punch for the eggs.

The “Happy Easter” greeting comes from the “Delightful Dozen” stamp set.

I hope you have a wonderful day with your family.  Here is a quick pic of what I did last night with my granddaughter Shayla, in preparation for today’s gathering.

000_1011

Happy Easter to you and your family!

blog-closing-small


Some Bunnies Hidin’ the Eggs!

Hello my Stampin’ Friends,

Today I am going to share with you my 2014 version of the “Easter Egg Hunt” scrapbook page I shared a couple days ago.  I didn’t realize that some of those punches had retired… but I love the way this page turned out!  What I did realize is I’m really missin’ my scrapbooking group … I’m on a mission to get another club together for next year.  Let’s scrap ladies!!

I began my page with “Marina Mist” cardstock as my base.  Then I cut two 1-1/2″ x 12″ strips and created my finely mowed lawn with the new “Fringe Scissors”.  You can find it in the Celebrate the Everyday catalog.

000_0997

My eggs were punched out of our Silver Glimmer paper with the Extra Large Oval Punch.  Then I went a little crazy coloring the eggs.  I started out with the colors I used on my card a few days ago … the Old Olive, Rich Razzelberry, and the Tempting Turquoise.

000_0977

Oh but you must have many different colored eggs … so I grabbed the Melon Mambo and Marina Mist … they looked good too so I also tried the Crushed Curry and Tangerine Tango!  I did find that you can “spritz” the glimmer paper and sponge dauber your color on … it went fast!

000_0999

While my eggs were drying, I created my bunny.  I used the Oval Framelit for the bunny butt, and the Boho Blossom punch for his tail.  His head was created with the 1-3/8″ circle punch.  The ears (2) were punched with the Large Oval.

The bunny tail and ears were fluffed with the bone folder (just give the cardstock a bit of a curl).  It adds some additional dimension that works well with the layers of grass.

I did size him up … and he will fit onto a card front!  Wouldn’t that make the cutest Easter card!?

I created the little chick also from the extra large oval, cut out his beak from a piece of scrap, and created his eye by coloring a pearl with a Sharpie™.

000_0997

Hope you enjoyed my scrapbook page today and that it inspired you to do a bit of scrapbooking!

Have an awesome day!

blog-closing-small

Here are the supplies I used to create today’s scrapbook page … You can click on them for more details on the products and / or to purchase.  Thank you 🙂


Easter Egg Hunt …

Hello Stampin’ Friends,

Today is going to be a quick post.  I will share with you a cute scrapbook page that I made a couple years back with one of my Scrapbook clubs….

You will notice he’s just in time for the season!

100_3580

You will have to stop back, as I will be posting a 2014 version!  I will also include “HOW TO” make that cute little bunny.

Hope this inspires you to do a bit of scrapbooking!

Have a Super Sunday!

blog-closing-small

Star’s Swap Share ….

Hello Stampin’ Friends,

Today’s share are swap cards from the members of my Star’s by Design group.  I’m going to keep this post short and sweet, especially since I talked your ears off yesterday!

Guest Stamper and Star member: Debi

Debi created these cute little milk cartons for her club members and grandchildren … and now, to share with all of us.  You gotta love that cute little owl with happy wishes.  He was created using the “Owl Builder” punch!

000_0988

Guest Stamper and Star member: Doris

I just fell in love with this card!  Doris used the “Life in the Forest” and “Just Sayin'” stamp sets and the “Word Bubble Framelit Dies”.  The grass was created with the new “Fringe Scissors”.  All of these products can be found in the “Celebrate the Everyday” catalog.

000_0980

Guest Stamper and Star member: Brenda

Brenda’s card was created with punches and one of our Sale-a-bration stamp sets.  This card really can make you happy when skies are gray!  Brenda told us that her card was “cased” … totally OK.  We all case cards 🙂

000_0982

Guest Stamper and Star member: Eileen

Eileen’s pretty card is sure to brighten someone’s day.  She used the “Gingham Garden” designer series paper and paired it with the doilies.  The greeting comes from the “Wetlands” stamp set and the butterfly from the “Papillon Potpourri”.

000_0985

Hope you enjoyed today’s swap shares from my Star’s group.

Have a wonderful day ~

blog-closing-small


Technique Tuesday: Layered Flowers with Punches

Hello my Stampin’ Friends,

While searching for a card for a friend, I came along a card that I had made a while back and wanted to share it with you.

I remember when I first saw how a fellow demonstrator made this flower and thought how cool is that!  I personally wouldn’t have thought about putting these two punches together, but I’m glad she did!

Blossom Get Well Card

You begin with the “Blossom Punch” … I think most of you have that one already.  Then you will use another popular punch the “Modern Label” punch.  Most of us pair this one up with word window.  Don’t worry if you do not have these punches,  I will have the links at the bottom of my post for you.

OK… as I started before, you begin with the Blossom punch.  I punched my flower out of Old Olive on this card.  Then I chose Strawberry Slush (same as background) and punched 3 pieces from the Modern Label punch.  I cut those pieces in half and layered them over my Blossom punched flower.  It layers so beautifully.

You can choose any design for the center, the one used here is retired.  The center is just a piece of designer paper with a nice coating of the Crystal Effects.

The border around the Strawberry Slush cardstock was created with the “Framed Tulips” embossing folder.

And last by not least … one of my favorite greetings “Perfectly Penned”.  I hope this one does not retire for a long time!  I love it, love it, love it!

Blossom Get Well Card

Hope you enjoyed this fun technique and try it for yourself.  Get creative and pair it with some really fun colors!  I’d love to see them 🙂

Thanks for dropping in and …

Have a wonderful day ~

blog-closing-small


Tag Topper Punches

Hello Stampin’ Friends,

I can’t believe the crazy weather going on all over the country.  Today we were told it may actually hit 50 degrees … finally.  Looking forward to a bit warmer weather.

Today I want to share a quick video on our Tag Topper Punches ….

Here is a little tag I created …

101_2318

Thank you for stopping by to visit me today.

Have a great weekend,

blog-closing-small


Birthday Butterflies …

Hello Stampin’ Friends, and a happy Saturday to you!

Today’s blog post is a simple but beautiful birthday card that you can easily recreate.  Let’s begin with my base of Very Vanilla.  I chose the vanilla because I had already picked out the designer paper I wanted to use, the “Retro Fresh” from the “Celebrate the Everyday” catalog.

The base is simply a half sheet of cardstock – 8-1/2″ x 5-1/2″.  Next is the Retro Fresh Designer Series Paper, which is 5-1/4″ x 3″.  I used the Scallop Trim Border Punch to create the beautiful edge.

000_0914B

Next … I wanted to create a bit of a “wow” factor, and knew that the contrast between the Early Espresso cardstock from the Core’dinations package, against the lightened Coastal Cabana of the Retro Fresh would give me just what I was looking for!  The Espresso is 5″ x 2-1/2″ and leaves a nice border of designer paper.

The vanilla that will be punched with the “Elegant Butterfly” punch is cut to 4-3/4″ x 2-1/4″.  I also embossed it to give it some dimension … I used the “Modern Mosaic” folder and placed the cardstock in crooked to give it the appearance of “flutter” lines.   Keep your butterflies … you can use them on another card 🙂

Using the “Bitty Butterfly” punch … I punched out 3 butterflies from a scrap piece of the same Retro Fresh designer paper.  Each butterfly is popped up with a tiny piece of the Stampin’ Dimensionals and then centered in the Elegant Butterflies negative space.

My greeting comes from the stamp set “Blooming with Kindness”, and is stamped in Early Espresso.  This is a simple flower stamp with beautiful verses and I find I use it quite a bit.   A good stamp set to have in your collection.

I finished off my card by embellishing my butterflies with 3 pearls each, from the pearl strands.  I felt a strand of pearls by the greeting would be the “cherry on top” and would truly complete this card.

000_0916

Shhhhhhhh … this is my Mom’s birthday card.  She loves butterflies and I know she’ll love this card.  Her birthday is 4 days after mine, she actually brought me home from the hospital on her birthday.  Great little present … don’t you think!?  tee hee!

Again, I will post the list of ingredients below, that I used to create today’s card share.  For more details on these products or to purchase, just click on the item.  Don’t forget … you still have time to get in on the FREE Sale-a-bration items, but it does end March 31st.

Thank you so much for spending a part of your Saturday with me.

Have a wonderful day ~

blog-closing-small


Thinkin’ Spring …

Hello Stampin’ Friends,

Whew … didn’t think it would take me this long to get back to my computer today!  Sorry for the late post, too many chores last night.  Once I sat down … I was out for the count and woke up around 3:30 this morning!  We’ve all had those days, and now I’m back down in my stampin’ studio!

Today’s card is to inspire you to Think Spring!  I was happy to hear that our forecast of 5 to 8″ of snow has now turned into only 1 t0 3 inches!  I can deal with that.

000_0837

I chose the “Watercolor Wonder” designer series paper.  The design is the Daffodil Delight and Tangerine Tango watercolor sheet.  Those colors are so warming, and that is just what we need right now!

The designer paper is cut to 5-1/4″ x 4″ … that will leave a 1/4″ border when you adhere it to the Whisper White card.

The front of the card is also Whisper White and cut to 5″ x 3-3/4″ … then emboss it using one of your favorite embossing folders and the Bigshot.  My apologies for grabbing the one that was from the Holiday catalog … let’s hope they put it back in the new 2014-15 Catalog!  It’s not on the Clearance Rack so let’s keep our fingers crossed!

000_0839

I used the cute little “Petite Petals” punch found on page 33 of the Occasions catalog.  Center your punch in the middle of your card front that you just embossed and punch.  Then punch out additional flowers on each side of the center flower.

Now … for the ribbon.  You may remember this technique from my February 22nd post (Faux Dipping) where I colored it with marks and spritzed it.  If not, your in luck because this time I took pictures to help explain how I did it.

000_0832

I began with the 3/8″ Whisper White Taffeta Ribbon and colored it with my Daffodil Delight and Tangerine Tango Markers.  Just slide your “brush end” (it also has a writing end) across the ribbon, don’t be afraid to go darker.

Once your finished inking up your ribbon, place it on some paper towel.  The paper towel will absorb some of the ink, that is why it’s OK to go darker when coloring it.  Fill your Stampin’ Spritzer with water and spritz over your ribbon… the more water you spritz on, the lighter your ribbon will become.  Set aside to dry.

000_0834

Tip:  You can the new Heat Tool to dry your ribbon because it actually has a low setting for drying!

I love this technique and it looks so nice with the Watercolor Wonder Designer Series Paper.  Give it a try… it really is quite easy and can add a stunning look to your card.

Thanks for stopping by today.

blog-closing-small

Here is the list of ingredients I used today …

132994

 Watercolor Wonder Designer Series Paper  / $10.95

133322

 Petite Petals Punch / $12.95

109070

 Taffeta Ribbon – Whisper White / $6.95

126185

 Stampin’ Spritzer / $2.95 – Set of 2

119247

 Pearls Basic Jewels / $4.95

 You may view or purchase any of these items just by clicking on the item number.  It will take you directly to my stampin’ store.  Shop 24/7 – 365

Thank you.

Smile Flip Card …

Hello my Stampin’ Friends,

Hope you are having a nice weekend.  I have been working in my Stampin’ room, cleaning, purging, tossing … you know how things build up.  I came upon a packet of pre-cut cards, so I decided to use what was already cut to make my card share today.

000_0814

I began with a circle flip card that was cut out of Gumball Green.  It must have been left over from when I was experimenting with the “extending” of the card.  This is where you place the end of the cardstock over the end of the circle framelit so it does not cut it off.

000_0630

I like to use Designer Series Paper with the flip cards because it just adds a nice splash of color.  I chose the “Watercolor Wonder” because it has Gumball Green in it’s color pallet.  Next I wanted a contrast color in the circle flip area, tried “Smokey Slate, but ended up punching the 2-1/2” circle from the Whisper White because it just looked better.

000_0815

I wanted to have some added dimension to the card so I embossed the front with the “Needlepoint Border” folder and the white circle with the “Wildflower Meadow” folder.  I knew I was going to add butterflies and wanted it to look as if they were sitting on the flowers.

To create the butterflies I used “Island Indigo for the “Elegant Butterfly” which is the larger of the two, and then punched out the inner (smaller) butterfly “Bitty Butterfly” out of the gumball green area of the “Watercolor Wonder” designer paper.  I then punched another Bitty Butterfly out of the indigo on the Watercolor Wonder paper.

000_0817

I used the row of pearls for the body of the large butterfly and the smallest pearls to create the body of the smaller butterfly.

I embellished the card by placing the smallest pearls onto the scallop of the embossing.  I then added a fine strip of the island indigo to complete the card.  This brings the indigo color all throughout the card.

My greeting “smile” comes from the stamp set “Fabulous Phrases” … you can find that on page 70 of the idea book and catalog.  It’s a fabulous stamp set!  You can use it in small areas like I did here, or you can combine the words to make up a phrase!

000_0819

Hope you enjoyed the card share.  I think I will challenge myself to complete all the cards I have pre-cut … and if I can’t do them all, maybe I’ll sell them!  Like I said, it’s time to purge.  I’m getting prepared for a huge retired sale this summer.  Don’t worry … I will send out an invitation when the time comes.

Thank you so much for stopping by my blog.

Enjoy the day ~

blog-closing-small

Here is the list of ingredients I used today …

128577

 Fabulous Phrases Stamp Set – Wood / $37.95

120501

 Fabulous Phrases Stamp Set – Clear / $26.95

133480

 Circle Card Framelit Die – Whisper White / $32.95

120906

 2-1/2” Circle Punch / $16.95

132994

 Watercolor Wonder Designer Series Paper / $10.95

129383

 Needlepoint Border Embossing Folder / $7.95

129376

 Wildflower Meadow Embossing Folder / $7.95

You may view or purchase any of these items just by clicking on the item number.  It will take you directly to my stampin’ store.  Shop 24/7 – 365

Remember the purchase of $50 before shipping and taxes will get you a FREE Sale-a-bration item.  Thank you.

Thinking of You …

Hello Stampin’ Friends,

Hope today finds you well.  I was a bit under the weather yesterday and had to cancel my Stampin’ Club meeting.  I don’t do that very often, but found we had 3 members not feeling well either … so a big “Get Well Soon” to all my club members and any of you who are not feeling well either.

My card share today is a simple & pretty card … Thinking of You.  You don’t need a lot of supplies to create this cute card!  I began with my basic “Whisper White” for a base, added another layer of Whisper White – 5″ x 3-3/4″… this is the piece I will stamp my greeting on.

000_0755

For my square mat (I used Island Indigo) 3″ x 3″ and the Whisper White piece that is punched with the “Pansy” punch measures 2-3/4″ x 2-3/4″.  I centered the white piece in the punch – making sure the white on the sides was even, and then lining the top of the cardstock to the top of the “Patent Pending” on the punch.

000_0764

I stamped my greeting “thinking of you” in Island Indigo to match my mat.  The greeting comes from the stamp set “Kind and Cozy”.  I find this stamp set very versatile … just ask my club members, we have used it several times.  In fact, we used it last month on our circle flip card, the circle in the set fits so nicely!

Now we can layer and embellish.  I popped up the stamped piece onto the base, the Island Indigo onto the stamped piece, and the punched piece onto the Island Indigo mat.  Yes … I popped them all up!  It looks so cool 🙂

000_0757

Once I had it all assembled, I added my embellishment.  Today I used the new “Basic Metal Buttons” found in the Occasions Catalog.  Then I threaded the Island Indigo bakers twine through the button and tied a bow (it is double threaded).  And yes, I popped that up with a Stampin’ Dimensional too.

Don’t you just love how simple this pretty little card is?  And you can do it in any color!  Just see for yourself ….

000_0758

I did this card in Melon Mambo.  I still used the “Basic Metal Buttons” but this time I embellished them a bit more with the medium size pearls.  I also added the smallest pearls to the greeting!

You really could do this in a variety of colors or … Designer Series Paper!  Go experiment and have some fun.

Thanks for stopping by today, and know I’m “Thinking of You”.

Have an awesome day!

blog-closing-small

Here is a list of supplies used for today’s card …

 ITEM

 PRICE

 DESCRIPTION

129123

$23.95

 Kind and Cozy Stamp Set – WOOD

129126

$17.95

 Kind and Cozy Stamp Set – CLEAR

130698

$15.95

 Pansy Punch

133319

$7.95

 Basic Metal Buttons

125575

$2.95

 Island Indigo Bakers Twine

Clicking on the item number will link you to my on-line store.  Thank YOU!

Simply Wonderful …

Hello Stampin’ Friends,

Wooo Hooo … we are above zero this morning!!  I think that’s wonderful 🙂

Today’s card share is a card that I cased (Copy And Share Everything) from a swap I received at my Star’s downline meeting.  I believe it’s from my sister Eileen.

I used the “Retro Fresh” Washi Tape, and based on the color pallet used I stamped my greeting and center flower in Baked Brown Sugar.  The flower was stamped with So Saffron.

000_0751

Wow … it’s that easy.  The washi tape piece of cardstock measures 5-1/4″ x 4″.  I then started on the left side and began to apply my washi tape.  Next, I moved to the right side and applied the washi tape in the same pattern as the left … I finished the middle section last.  This helped me space out my washi tape easier.

The flower comes from the “Mixed Bunch” stamp set and was stamped in So Saffron.  I then punched it out using the “Blossoms” punch.  I know many of my club stampers have these two coordinating items, so if you have your washi tape … you are ready to make cards.

The center was stamped with another flower from the Mixed Bunch set and punched out using the 1″ circle punch.  The pop of color in the center is “Coastal Cabana”.

My apologies for the greeting, I did not realize that “Friendly Phrases” was retired until after I had my pictures taken and was ready for the blog.  My suggestion would be to use the beautiful “just because” from the stamp set “A Dozen Thoughts”.   I’ve used that several times already … the “just because” is one of my favorites.

000_0753

Don’t forget your Stampin’ Dimensionals because I “popped up” the washi tape section, the flower and both centers.  You gotta love how fun and simple this card is!

Thank you so much for stopping by today.

Have a wonderful day ~

blog-closing-small

Here is the list of ingredients I used today …

128442

 Mixed Bunch – Wood / $27.95

125537

 Mixed Bunch – Clear / $21.95

133001

 Retro Fresh Washi Tape / $4.95

131056

 A Dozen Thoughts – Wood / $26.95

131059

 A Dozen Thoughts – Clear / $18.95

119869

 ½” Circle Punch / $5.95

119873

 ¾” Circle Punch / $12.95

125603

 Blossoms Punch / $16.95

You may view or purchase any of these items just by clicking on the item number.  It will take you directly to my stampin’ store.  Shop 24/7 – 365 … Thank you.

So Happy Together …

Hello my Stampin’ Friends,

It’s finally Friday!!  Wooooooooooo Hooooooooooooo!  I’m not complaining … my work week went very fast, and we closed the candy store on Tuesday because of the bitter cold, so it was a short week too.

Today’s card share will warm your heart.  A sweet and simple card created with heart … and with punches!  You can use it for Valentine’s Day or an Anniversary.

000_0691

I knew I wanted to use our Red Glimmer Paper for the card, in fact, the entire card was designed in my head (now you know it won’t be hard to make – lol)

I simply punched out the red glimmer paper with the “Postage Stamp Punch”.  I then punched 3 hearts out of a strip of Whisper White using the Small Heart Punch.  Then I centered the 1″ Square Punch over the heart and punched out the square.  It is so much easier to center the hearts that way, instead of trying to punch the heart out of the square.

I mounted the white heart squares onto the red glimmer paper using the Stampin’ Dimensionals.  I then mounted each of the completed squares using the Glue Dots onto the Whisper White mat.

The mat is 5″ x 3-3/4″ and is mounted onto the card front using Stampin’ Dimensionals.

Since my “A Dozen Thoughts” stamp set was still on my table from yesterday’s card … I chose the “happy together” for my greeting.

000_0688

Not to waste the hearts … I stamped the greeting onto one of them, and then layered it over the stamped greeting to add a bit of dimension onto the bottom half of the card.  The other two hearts are on the inside of the card.

You will notice that the main part of the stamping in the heart is “to”… for the two of you together!

000_0690

Thanks for stopping by!

Have a “happy” weekend ~

blog-closing-small

Here is a list of supplies used for today’s card …

 ITEM

 PRICE

 DESCRIPTION

131056

$26.95

 A Dozen Thoughts Stamp Set – WOOD

131059

$18.95

 A Dozen Thoughts Stamp Set – CLEAR

122344

$15.95

 Postage Stamp Punch

117193

$5.95

 Small Heart Punch

124094

$15.95

 1” Square Punch

Clicking on the item number will link you to my on-line store.  THANK YOU!

Guest Stamper … Connie H.

Hello Stampin’ Friends,

The weekend is here, and looking at the weather reports for Wisconsin … it maybe a three day weekend!  They’re predicting lows of 30 degree’s below zero for Monday afternoon. Burrrrrrrrrrrrrrrr.

If they close the store again … I’m hoping to get some extra stamping done.  Sweet!

Today I have a guest stamper … my friend and Star member Connie.  Each year I host a demonstrator retreat where the girls from my group, the Star’s, get together and swap cards, stamp, chat, laugh, and have a whole bunch of fun.

This is Connie’s swap …

000_0651

She used the Sketched Birthday stamp set, that we received at the Stampin’ Up! Leadership Conference last year.  She teamed that up with the “Epic Day This and That” Designer Series Paper.

The greeting was punched out using the 1-3/4″ scallop and backed with Gumball Green Core’dinations Paper.  Connie used the Window Frame Collections die to cut it out and embellished it with the cute little 1/8″ mini brads.

You will also see the “Needlepoint Border” Embossing folder was used to create additional texture to the card.

Now … if the front of this card isn’t cute enough, check out the surprise inside …

000_0654

Isn’t that sweet!  What a nice surprise for your birthday!  The cupcake was made with the “Cupcake Builder Punch.

I must say, our demonstrator retreats are a lot of fun, and I always come home with fabulous cards from the girls.  I thank Connie for this one.

000_0653

Thanks so much for joining me today.

Have an awesome weekend ~

blog-closing-small

Here is a list of supplies used for today’s card …

 ITEM

 PRICE

 DESCRIPTION

130423

$24.95

 Sketched Birthday Stamp Set – WOOD

130426

$17.95

 Sketched Birthday Stamp Set – CLEAR

130814

$10.95

 Epic Day This and That Designer Series Paper

124005

$4.95

 Silver Glimmer Paper

129021

$26.95

 Window Frame Collection Dies

119854

$16.95

 1-3/4”” Scallop Circle Punch

129957

$11.95

 2012-14 in-Color Core’dinations Paper

129383

$7.95

 Needlepoint Border Embossing Folder

121807

$16.95

Cupcake Builder Punch

122941

$5.50

 1/8” Mini Brads

Clicking on the item number will link you to my on-line store.