Simply Sunday Flowers ….

Hello Stampin’ Friends,

Today I’d like to share with you a quick and simple card with a touch of elegance. The elegance is brought into the card with the use of the “Painted Blooms” Designer Series Paper that will be available with the kick-off of the Occasions catalog on January 6th.

000_1849

I can’t wait for the Occasions catalog to go live … it’s full of amazing stamp sets and accessories. This paper is just one of them. It works beautifully if you are in need of a quick yet pretty card!

I chose the blue flower pattern for today’s card and highlighted the yellow centers by adding the button and ribbon from the Sale-a-bration bundle!! The base of the card and mat on the greeting is Wild Wasabi.

My sentiment (or greeting) comes from the Main catalog and can be found in our hostess section on page 238. I could not resist getting the “Let Your Hair Down” stamp set for my hostess dollars … it just reminded me of my friends!

000_1854

So that is my card share today … I get requests all of the time to post quick and easy cards.  Why not, don’t we all need a card in a pinch!

Thank you so much for stopping by today …

Have a great one!

blog-closing-small

Just a reminder … There are only 4 days left of my “Sweet End of Year Deal”

CLICK HERE FOR DETAILS


Feels Like Christmas …

Hello Stampin’ Friends,

Did you ever have one of those days? Yep, mine was yesterday! Busy season at work, employees who don’t show … yikes! I was happy to get home, get my mail and ….

000_1794

Oh what a sweet surprise in my mailbox! I love getting my Paper Pumpkin, always a treat …

Stampin’ Up! wraps it so nicely … just like opening a Christmas present!

000_1795

And what a wonderful surprise inside!! Not only did we get our stampin’ kit for the month, but a gift … it really was like Christmas! Stampin’ Up! has included the “Essentials” paper piercing kit!

000_1796

Oh my … and the stamps are fabulous, I will be using them a lot, hard for you to see with that silly flash!

000_1798

The “cherry on top” was the stamp kit … Everything we need to make “9” Shaker Cards!!  Woo hooo!

000_1799

I must tell you … that “one of those days mood” was totally gone, and I was stampin’ happy.

Wanna stamp happy? Join me and my Pumpkin Pals … Sign Up for Paper Pumpkin…. While your at it, sign up a friend, parent or grandchild. Paper Pumpkin makes the PERFECT Christmas Gift! Just click on the link above.

Stop back tomorrow because I will be sharing these adorable cards with you.

Have an awesome day ~

blog-closing-small

Simply Thankful Sunday …

Hello Stampin’ Friends,

A happy Sunday to you! Today I am going to share another transformation of Motley Monsters to a pretty card of “thanks”.

000_1665

I began with a Tangerine Tango base and the Tango stripped Motley Monsters Designer Paper. I used the “thanks” from Seasonally Scattered … the multiple colors come from the Baby Wipe Technique. The “thanks” was highlighted by adding a touch of glitter.

I used the “Apothecary Accents” framelits to highlight our stamped design and was matted with Old Olive. I actually “fussy cut” the mat.

I added a sweet button from the “Very Vintage” buttons… it was colored with the Old Olive blendabilities and topped off with a pumpkin bow. The results are a cute, simple card of thanks.

000_1666

Have a fabulous Sunday ~

blog-closing-small


Marvelous Monday Card Share …

Hello Stampin’ Friends,

It’s the start of a new week and I have some great cards to share with you today.  These cards were created by the Stampin’ Up! Concept team … aren’t they just “marvelous!”

world-card-making-day-(2)blooming-birthday-card

This sweet birthday card was created with the Flower Patch stamp set.


world-card-making-day-(2)hello-card

Wouldn’t you just love to find this bright and fun “hello” in your mailbox?  They used the “Draw the Line” and “Borderettes” stamp sets.

world-card-making-day-(2)autumn-thanks-card

Last but not least … is our Thanks card from the stamp set “Another Thank You” … the “many” was omitted from this stamp to simply say “THANKS”.

Thanks for stopping by!

Hope you have a marvelous Monday!

blog-closing-small


Simply Saturday: Grateful

Hello Stampin’ Friends,

Yesterday I shared a card using the “Motley Monsters” Designer Series paper and said that I would be sharing more. So today I have used the a piece of the leftovers from yesterday to create a fall card … a card of Gratitude.

My base colors are Tangerine Tango and Crushed Curry which comes from the designer paper, and then I turned the designer paper (yes … this is from Motley Monsters) and turned it so the leaves appear to be falling to the bottom.

000_1512

I used the new “Merry Everything” stamp set and the coordinating “Note Tag” punch, then topped it off with the “Tangelo Twist” ribbon.  You can save 15% if you bundle the two on your purchase.

I tipped the greeting so it also appeared to by gently falling with the leaves.  Don’t you just love autumn!?

The greeting was of course “popped” up with our Stampin’ Up! Stampin’ Dimensionals. The inside was completed with a piece of Whisper White for your note, and a touch of the designer paper at the bottom.

000_1513

Such a sweet and simple card that can be created in just minutes!

Thank you so much for stopping by Linda’s Stampin’ Escape today … I am truly grateful.

Have a wonderful day ~

blog-closing-small

Oh yes … I was going to tell you which of the “Motley Monsters” on yesterdays card was my favorite … It’s that cute little skeleton!  Here’s a list of ingredients for today’s card.


Holiday Catalog Sneak Peak … Simply Grateful

Hello Stampin’ Friends,

Last week I teased with my Holiday Catalog order arrival, so today I thought I would share a little sneak peek into that catalog!

Today I’ll begin with my favorite of the four seasons … FALL.  I just love those warm days and cool nights, and the wonderful smell of Autumn.  It’s just fun and colorful, like a celebration that kicks off our holiday season.  Hmmm… makes sense, doesn’t it!

OK … enough chit – chat!  Grab a piece of paper and a pencil, because you are going to want to write down all these scrumptious new products ….

000_1323

My base is “Baked Brown Sugar” and I teamed it up with the new “Under the Tree” Specialty Designer Paper.  It is double sided and a bit thicker than our regular cardstock, so it’s going to be great for your cards, and your holiday projects.

The “Grateful for You” comes from the stamp set “Merry Everything”.   I liked the way the lines from “YOU” on my greeting, plays off the lines of my designer paper!

The greeting was punched out with the new “Note Tag Punch”.  I stamped a second tag to add a touch of color.  I topped off the greeting with the Mossy Meadow Stitched Satin Ribbon which is found in the annual catalog with the In-Colors.

The precious little leaves come from our new “Fun Fall” Framelit Dies.  I gave them a crease in the middle for some added dimension and then sponged the edges to soften them up a bit.  My leaves are Mossy Meadow, Tangerine Tango, and Cherry Cobbler.  All are popped up with the Stampin’ Dimensionals.

000_1325

The colors of fall really warm this sweet card, and it is a simple card to recreate.  I hope it inspired you today.

The items from the Holiday Catalog will not be available until the 28th, so I will only list the items from the Annual Catalog.  Please let me know if you will be needing a Holiday Catalog!

Have yourself a warm and wonderful day ~

blog-closing-small


Simply Sunny Saturday’s …

Hello Stampin’ Friends,

What say’s summer more than a beautiful sunny day?  We’ve had a few in a row and it seems to lighten everyone’s spirits.

So today I would like to share a sunny card that will make you smile and warm your heart.  I’m using the “Kinda Eclectic” stamp set.  Didn’t this stamp set just catch your eye the minute you saw it in the catalog?  It was one of the first sets I ordered.

My core colors are Whisper White and the new Mossy Meadow, with a pop of Daffodil Delight and Bermuda Bay.

000_1316

Stampin’ Tips:

To highlight the sun – I punched a coordinating piece of Daffodil Delight cardstock with the 1-3/8″ circle punch and then sponged the circle and my sun.

To create the butterfly – I stamped two of the large butterfly’s (Bermuda Bay on Bermuda Bay) then punched one with the Elegant Butterfly and the other with Bitty Butterfly.  This way I have the same pattern on both sizes!  Clever 🙂

The “THANKS” comes from the 2014 July Paper Pumpkin Kit.  Not only do you get the fun and fabulous projects to make BUT … you get to keep all the wonderful stamps!!  Here’s the kicker … they are exclusive to Paper Pumpkin, so as a Paper Pumpkin subscriber, you get exclusive sets that will not be available anywhere else.  Now that’s a perk!

Don’t forget the 50% off your first two months to new Paper Pumpkin subscribers!

000_1314

Don’t forget to stamp the inside and your envelope when you are creating your card… just image the smile this will bring to your friends face when they open the mail box!  Warm and wonderful …. like a beautiful summer day.

000_1315

Have a wonderful weekend ~

blog-closing-small


A Little Kindness …

Hello Stampin’ Friends,

Wooo Hooo …. it’s Wednesday already!  Time just seems to be flying by.   On that note, I wanted to share a card that’s fun and easy to create!  And … I’m using one of the fabulous folders that was introduced on our Weekly Deals yesterday.

Today, you’ll get step by step instructions;

I wanted to showcase the Delicate Designs Embossing Folder, so I actually started my card from the inside out!  My inner piece of Whisper White is cut to 5-1/4″ x 4″ and then embossed.  I then took my 1/2 sheet of the NEW Mossy Meadow cardstock … inserted the inner piece and made a “tick mark” on each side at the top of the embossed area.

000_1298

Then … using my tick marks, I cut off the the Mossy Meadow so the pretty embossed area would be exposed!  Before I adhered the inner piece, I stamped it with the amazing “Kinda Eclectic” stamp set.

000_1304

Next I wanted to add some color without all the work – Designer Paper … that’s the answer!  I chose “Park Lane”.  I thought the Old Olive on the designer paper really pops when teamed with the Mossy Meadow.

000_1300

My greeting, also from “Kinda Eclectic” was highlighted with the use of the “Oval Framelits” and the beautiful Mossy Meadow ribbon finished off the card.  When sending such a beautiful card you will definitely want to coordinate your envelope with the envelope liner die and leftover designer paper.

000_1302

I hope you enjoyed today’s stampin’ session!  Don’t forget that not only is the Delicate Designs folder on sale, but Stampin’ Up! also has an awesome BigShot promotion.  I will have all the links for you.

Please let me know if you have any questions, concerns, or comments on today’s post.

Have a “kind” day ~

blog-closing-small

6a00e554f4a3a4883401a511ee0d9d970c-800wi          CM1634B


A Sweet Thank You and Weekly Deals …

Hello Stampin’ Friends,

Today I have a fun “Thank You” card to share with you.  This cute card starts out with the color pallet.  This will give you a great pallet to work with for you future cards and projects!  I also have the Weekly Deals listed with links for your convenience.

SU Thanks Card - Color Pallet

Right off the bat… you would not think these colors really go together, at least not all of them, but when you see the card, you will be pleasantly surprised how nice they all blend.

SU Thanks Card

Just take a look outside someday … nature supplies us with the most wonderful color pallets of all.


CM1634B

Every Tuesday, Stampin’ Up! brings you a new set of deals on a selection of fantastic products. Come see what’s on sale and remember to take advantage of these great deals before they’re gone!

You can order as much as you want of the weekly deal products–but the deals are only good for that week, so don’t wait to order!

Each week’s deals will be a surprise–that’s part of the fun!  You can expect 6-12 new deals each week, including one digital download.


Weekly Deals

We hope you enjoy this week’s Weekly Deals!

Large Triangle Punch Item # 133375
Regular Price: $15.95
Discounted Price: $11.96
Little Labels Punch Pack Item # 126881
Regular Price: $16.95
Discounted Price: $12.71
Scallop Edge Border Punch Item # 119882
Regular Price: $15.95
Discounted Price: $11.96
Mini Metallic Clothespins Item # 133320
Regular Price: $3.95
Discounted Price: $2.96
1″ Square Punch Item # 124094
Regular Price: $15.95
Discounted Price: $11.96
Melon Mambo 1/8″ Taffeta Ribbon Item # 131207
Regular Price: $5.95
Discounted Price: $4.46
Gold Baker’S Twine Item # 132975
Regular Price: $3.50
Discounted Price: $2.63
Summer Smooches Kit – Digital Download Item # 129601
Regular Price: $9.95
Discounted Price: $5.97

Just click on any of the products descriptions for more details or to purchase.

Thank you for stopping by!

Have yourself a wonderful day!

blog-closing-small


Fast -n- Furious Friday – Fancy Floral Punch

Hello Stampin’ Friends,

Well it’s “Fast -n- Furious” Friday again and I have a quick card for you.  I incorporated the “Fancy Floral” punch this is included in the Weekly Deals.

I grabbed the leftovers from my Paper Pumpkin kit that I used a few days back and stamped my arrows.  Then I took the “Thank You” wooden element and covered it in glue with the 2-way glue pen.  Then I sprinkled it with the Silver Glitter that can be found in the “Celebrate the Everyday” catalog.  I just had to share one more technique you can do with the Wooden Elements.

000_0959

I then took the Fancy Floral punch and punched 3 flowers out of Island Indigo cardstock.  I sponged all three on the edges of the petals, then I curled the petals with my bone folder.

To create a more dramatic look … I cut into the flower between the petals and then glued one over the other to create a smaller flower.  The center is punched from the Silver Glimmer paper.

000_0953

Thanks for dropping in.

Have a Fab Friday ~

blog-closing-small

Inspiration comes in many forms …

Hello Stampin’ Friends,

Today I want to share with you the wonderful ideas created by our Concept Team, taken from the Be Inspired Blog.

Be Inspired!

Do you ever struggle to find inspiration? Do you need something to jumpstart your creativity? You’re not alone. As concept artists, staying inspired can be challenging at times. We look to various places for inspiration.

We recently made some projects based on a mood board. A mood board illustrates visual direction and conveys a look and feel. We loved the look of this board from http://virrrrrr.blogspot.it. It has soft colors and textures, a spring look and feel—with a fun touch of gold.  Here are the projects that this mood board inspired:

Jen

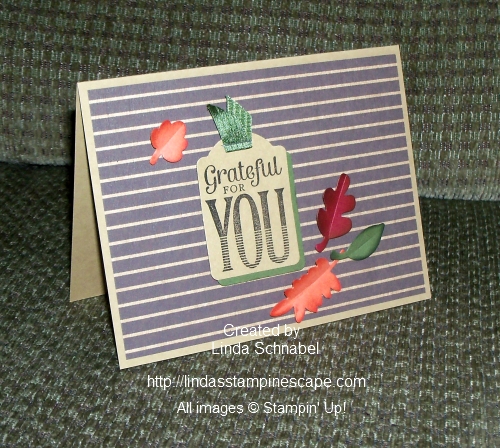
One of my favorite elements on this board is the tufted suitcase chair. I was inspired by the fun colors and pops of gold. I made this mini pinboard to mimic the tufted chair and added colorful elements to it. I love the color blocking on the eggs and created a color-blocked tag to hang on my mini board. It’s the perfect little piece to keep by my computer.

Chrissy

There’s nothing to get your creative juices flowing like a mood board. If you’re finding yourself in a rut, just looking at one is a great creative exercise. It pushes you out of your comfort zone and inspires you to try new things.

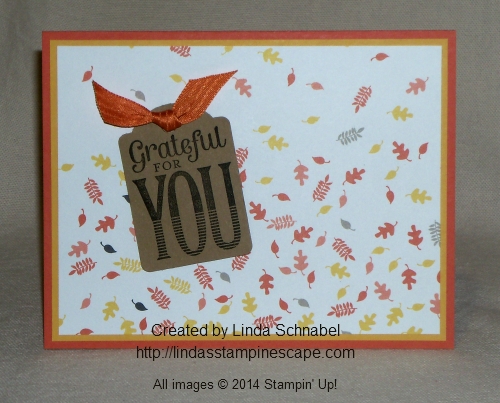
The gold polka dots were the first thing that jumped out at me. I love polka dots, and the fact that they are gold just makes them that much more fantastic!

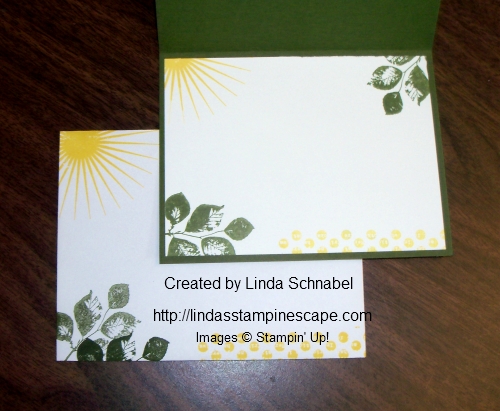
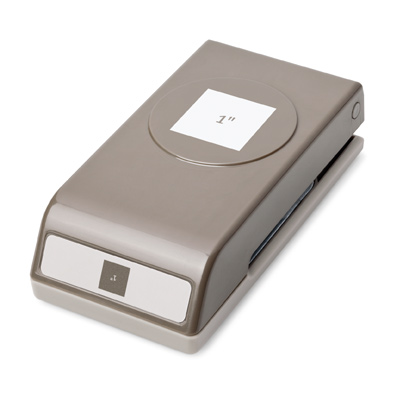
I began my project by putting together a pretty, bright color scheme, then noticed that most of the mood board was pastel. I thought the overall feel of pastel with a few fun, bright pops was so inspiring. That’s when I decided to make my project pastel with bright pink stitching. It added just enough “pop.” I created more polka dots using circle punches (US/CA), then layered the circles in the corner (as you see on the mood board).

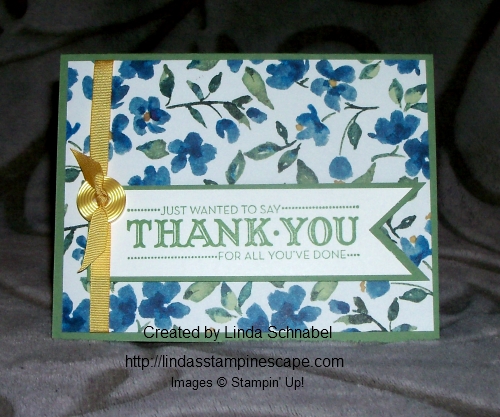
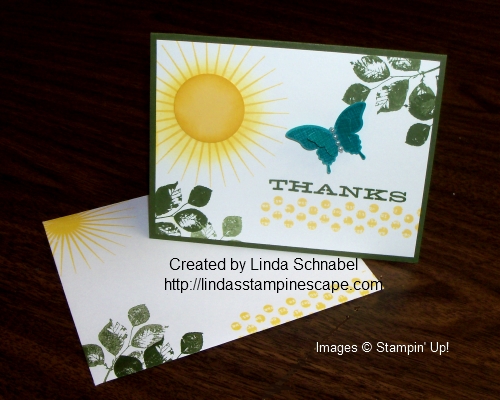
I love the handwritten descriptions next to the macarons. There’s something very charming about something that looks handwritten. The So Very Grateful Stamp Set has some awesome greetings. They look handwritten and are perfect for the look I was going for. I’m in love with the finished project. It’s something I’m not sure I would have done on my own—in a good kind of way. It feels new and different, and I think that’s my favorite part about it.

Arika

When creating my card, I tried to mimic some of the elements from the board. The balloons have the same overlapping colors as the mood board. The colors in the chevron stripes also come from the mood board. And I added just a small bit of gold with the Gold Baker’s Twine.

Melody

I was inspired by the colors and patterns on this mood board. The woodgrain background and the Pool Party Designer Series Paper stripes were inspired by the different hangers. The center circle came from the colored eggs—and I couldn’t pass up an opportunity to have some gold dots on my project. The macarons and spoonfuls of ice cream made me think of a celebration, so I picked my “Hooray for today” sentiment from the Geometrical Stamp Set.

Kasia

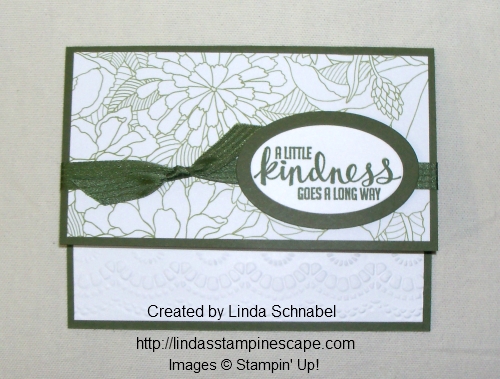
I was inspired by the bottom row of the mood board. The transparent circles reminded me of the hanging lanterns in the Happy Congratulations Stamp Set. I first embossed the image and the greeting on vellum, then turned it around and stamped the colors on the back. By stamping on the back I was able to create a more subtle look and also reduce smearing of the colors. I stuck with the same color pattern and finished it off with the “scoops of ice cream” colors.

Hope you feel inspired to go create something, too!

Concept Art Team

Hope you enjoyed, aren’t they great?  I love the “Thank You” card!  Which is your favorite?

Be sure to stop back tomorrow … I have a neat card to share with you.

Have an awesome Friday!!

blog-closing-small

Faux Dipping Technique + Mono Chromatic Coloring = Beautiful!

Hello Stampin’ Friends,

I am really excited to share my card with you today!  You didn’t think I was going to show you a technique without following it up with a card did you?  I thought the way Stampin’ Up! colored the ribbon was really cool … so I had to try it out.

I didn’t have the ribbon they used, so I used the Taffeta Ribbon in Whisper White.  I then ran my markers across the length of the ribbon (as Stampin’ Up! did) starting with the lightest color … Pink Pirouette and finishing with Melon Mambo.

000_0808

I did however change up the next step… I laid my ribbon across a layer of paper toweling and spritzed it with water.  You can find the Stampin’ Spritzers on page 164 of the Idea Book & Catalog.  It blended nicely!  Once the water absorbed into the ribbon, and excess in the paper towel, I moved the ribbon off to the side to dry.  I love the way it looks!  I’ll be trying out some additional color combinations this weekend.

I tried to do the same technique on paper, but it did not work the same as it did on the ribbon.  You can however create the watercolor look with the Shimmery White paper and the Aqua Pens … but that’s another day, and another card.

For my flower, I tried a technique that I will be showing my Technique clubs in the upcoming month.  It is embossed in white embossing powder, and colored in with the Stampin’ Write marker.  Both my card stock and my marker are Pink Pirouette.  It is unbelievable that you can get that much variation … using the same color marker!

To get the darker color, you simply keep coloring over the same area.  To create the light / highlighting … leave it blank or only go over that area once.  I did however add a touch of Melon Mambo right around the center of the flower so it matched the ribbon better.

000_0812

The white card stock you see, is the Shimmery White … it’s so pretty!  I wish my camera would capture it better.  I embossed the bottom area with the “Needlepoint Border” embossing folder.

The flower was cut out, popped up with Stampin’ Dimensionals, and framed with the “Oval Collection” framelits.

I hope you enjoyed seeing the “Faux Dipping” technique on today’s card share.  I’d like to hear from you, are you going to try this technique??

Have a wonderful weekend ~

blog-closing-small

Here is the list of ingredients I used today …

133104

 Peaceful Petals Stamp Set – Wood / $28.95

133107

 Peaceful Petals Stamp Set – Clear / $20.95

109070

 Taffeta Ribbon – Whisper White / $6.95

126185

 Stampin’ Spritzer / $2.95 – Set of 2

101910

 Shimmery White Cardstock / $7.95

129383

 Needlepoint Border Embossing Folder / $7.95

129381

 Ovals Collection Framelits / $26.95

 You may view or purchase any of these items just by clicking on the item number.  It will take you directly to my stampin’ store.  Shop 24/7 – 365 … Thank you.

THANKS … Big Time!

Hello Stampin’ Friends,

Burrrrrrrrrr… mighty cold again this week.  Time to hibernate and stay warm … go into your craft room and get some stampin’ done too!

Today I’m going to share with you a simple to make and great to give either a man or a women.  It will also transform you back into time … you guessed it, I’m using the Timeless Talk Stamp Set and the Modern Medley Designer Series Paper.

000_0633

I love the way these too products go together, it seems as if they were made for each other.  Today I used the bicycle!

This sweet stamp set should be a must have in everyone’s collection … I appreciate that the greetings are included in this set.  It includes a “Thanks” … a “Hello” … and a “Happy Birthday”.  Seems to me that rounds it out pretty good.

This card is so simple to make, I don’t have a lot of instructions.  Just grab your paper cutter and stamps.  I must say that I do use the Black StazOn ink pad whenever I stamp black images.  I think it works the best.

000_0634

I added a few pearls just to jazz up the card a bit.  If you think that is too much for a “man card”, you could simply leave them off.

Have a great day!

blog-closing-small

Here the list of supplies that were used to create this card … Just click on the link to view or order.

126605

Timeless Talk Stamp Set – Wood / $22.95

126607

Timeless Talk Stamp Set – Clear / $16.95

126926

Modern Medley Designer Series Paper / $10.95

126889

 Stampin’ Trimmer / $29.95

119247

 Pearls Basic Jewels / $4.95

Thanks… Love ya! Card

Hello Stampin’ Friends,

How are you today?  I am feeling pretty darn good, hope you are too.

I am excited to share today’s card with you.  I have been “piggy-backing” my cards for the past couple days … and today is no exception.  Yesterday I shared a card using the “Hip Notes” stamp set, so today I will share another design using that same set!

So my first task was to decide which image I would use this time, so I chose the “Thanks”.  Well those little arrows took me to the “Retro Fresh Designer Series Paper”.  I chose the pattern with “arrows” on it!

000_0602

You got it … it was the little circles on the designer paper that made me think of the “Circle Card Thinlits Die”.  I love working with this die!  It is so easy to use, and the recipient of the card just “flips” over it!  Ok … bad pun, I’m sorry!  Back to the card.

Well, with all these little arrow going on … I thought I would pull out my “Chevron Border Punch”.  I bought this a while ago and never used it yet!  Whew … I was really happy when Stampin’ Up! carried it over into the Occasions catalog!!

000_0600

Of course you can see that my color pallet was supplied by my designer paper … so I went with the Baked Brown Sugar, the Coastal Cabana, and Very Vanilla.

After cutting out the “circle flip card base” … I punched out at Baked Brown Sugar mat, using the 2-1/2″ circle punch.  For my greeting, that was stamped in the Baked Brown Sugar onto Very Vanilla, and then cut out with one of the circles from the “Circle Collection Framelits”.  Just as I said yesterday, I also used my “Magnetic Platform”.

As you can see, one little image can take you on a journey through an entire creation!  Another cute and simple card … what did we ever do before that “Big Shot” came to town!  I’ll tell ya, it was mighty boring around here.  LOL

Oh yes, and when you “flip” that card … you will get a sweet little greeting from the Just Sayin’ stamp set that I used a couple days ago.

000_0601

Thanks for stopping by and following along on my card making journey today.

blog closing-small

Here is a list of supplies used for today’s card …

 ITEM

 PRICE

 DESCRIPTION

133501

$14.95

 Hip Notes Stamp Set – WOOD

133504

$11.95

 Hip Notes Stamp Set – CLEAR

133480

$32.95

 Circle Card Thinlets Die

132154

$21.95

 Chevron Border Punch

130911

$26.95

 Circle Collection Framelit Dies

120906

$26.95

 2-1/2” Circle Punch

130685

$39.95

 Magnetic Plateform

132172

$20.21

 Envelope Liner Framelit Die (ON SALE)

Clicking on the item number will link you to my on-line store.

“Thank You” includes Weekly Deals & More …

Hello Stampin’ Friends,

Today I am going to share a card with you, that I created using some of the items on the just released “Weekly Deals” list. First the card, and then I will follow with the entire “Weekly Deals” list for you.

Today’s card will highlight the Houndstooth embossing folder, the Finishing Touched Edgelits Die, and the Envelope Liner framelit dies.  Get ready for a “SNEAK PEEK” at an upcoming Sale-a-bration item!

000_0595

I began by choosing the “Sweet Sorbet Designer Series Paper” … the Sale-a-bration item!  The paper actually helped me chose my color pallet for the card.

I started with Crisp Cantaloupe (2013-15 in-Color) and embossed it with the Houndstooth embossing folder.  I picked “Pistachio Pudding ” as my contrasting color and used the “Finishing Touched Edgelit Die” to create a border.

I also added the “Stitched Grosgrain Ribbon in Whisper White” to soften the line between the designer paper and embossed cardstock.  It pulls they eye to the center of the card as your focal point and brings your right to our greeting.

000_0594

I chose the Basic Black for my card base because it tied all the colors together, and it gave the other colors a real “pop”.

I chose the “Thank You” for my greeting which comes from the “Another Thank You” photopolymer stamp set.

000_0589

I finished off my project by using the “Envelope Liner Die” to cut the “Sweet Sorbet Designer Paper” and tuck it into my envelope to perfectly match the card.

000_0595

Here are your ….

Weekly Deals

Borders Scoring Plate Simply Scored

Item # 126192 

Regular Price $14.95

Discounted Price: $11.21

Classic Pad Soft Sky Item #131181

Regular Price: $5.95

Discounted Price: $4.46

Finishing Touches Edgelit Die

Item # 127010

Regular Price: $9.95

Discounted Price: $7.46

Houndstooth Textured Impressions Embossing Folder Die

Item # 123134

Regular Price: $7.95

Discounted Price: $5.96

Marina Mist 3/4″ Chevron Ribbon

Item # 130016

Regular Price: $8.95

Discounted Price: $6.71

Envelope Liners Framelits Item # 132172

Regular Price: $26.95

Discounted Price: $20.21

Frosty Day II Digital Download Kit

Item # 128875

Regular Price: $9.95

Discounted Price: $5.97

You can view any of the items that are not listed in the “Weekly Deals” by clicking onto the links (highlighted in pink) in the blog.  Enjoy.

Thanks for stopping by today!

blog closing-small