And H-E-L-L-O-O-O April! I think spring is finally here 🙂
Yesterday I showed you the March Paper Pumpkin and how much fun I had creating different looks with the supplies they sent. What I didn’t know was that Paper Pumpkin actually turned one yesterday! And in true Stampin’ Up! fashion, they threw a party …
Paper Pumpkin Turns One!
Even more amazing is the incredible year Paper Pumpkin has had.
We’ve sent out 229,000 Paper Pumpkin projects (say that three times fast!) to our friends.
We’ve helped over 45,000 women bring out their creative sides—(and we know that they were just waiting to break out)!
We even had 13,000 take advantage of our Free Marker offer—ended yesterday!
Yep. Not bad for something that is only ONE-year old!
To celebrate, we held a birthday party at our Riverton Campus, complete with yummy cake, festive balloons, and even party hats.
I told you it was a fun company to be associated with! Well hang in there because my 15th anniversary is next year, and in Stampin’ Up! fashion … I will be hosting parties, specials and more all year long. Don’t worry, you will be invited to them all!
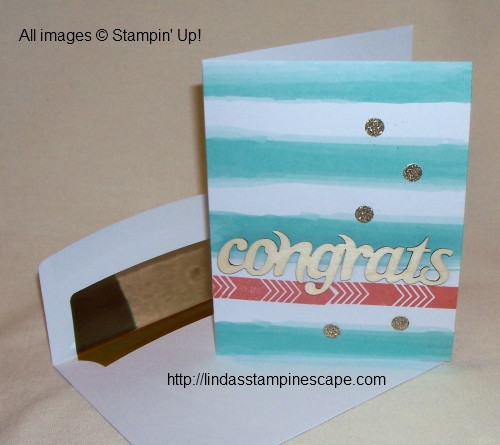
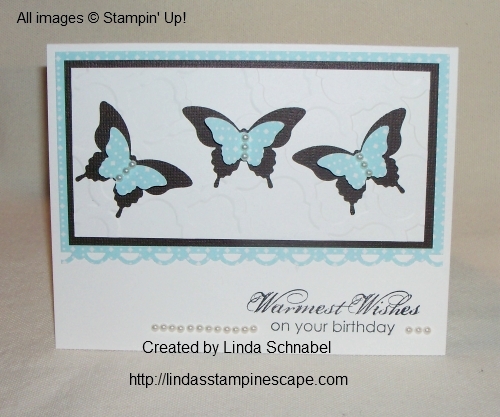
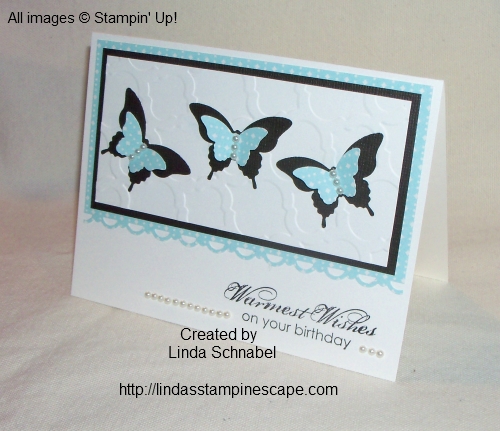
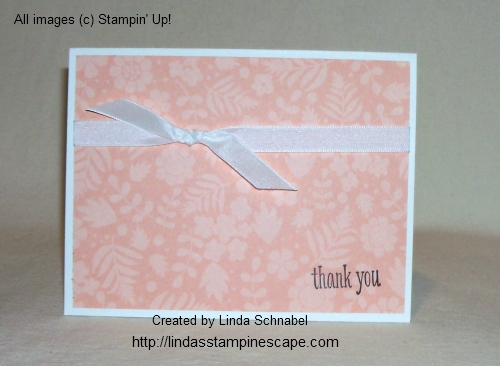
I also told you yesterday that I would show you some fabulous products that we have in our “Celebrate the Everyday” catalog that you could use to recreate the techniques I showed you. We will be using the “Essentials Wooden Elements” and the “Watercolor Wonder Designer Note Cards”.
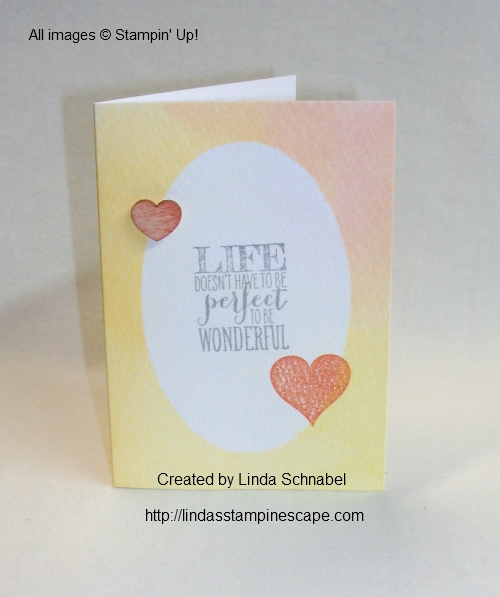
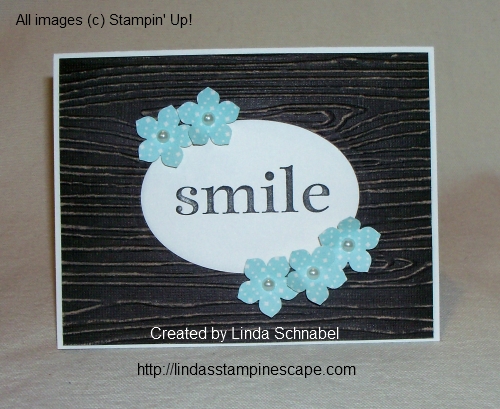
On my “Life Doesn’t Have to Be Perfect” card … I used the “Direct to” technique in which we applied the Ink Pad directly to our wood element, the heart. You can see I dragged the ink pad across the heart for a streaked look, as compared to yesterdays card when I fully inked up the wood greeting.
I teamed this card up with the Perfect Pennant Bundle, which includes the Perfect Pennant stamp set and the Banners Framelit Dies.
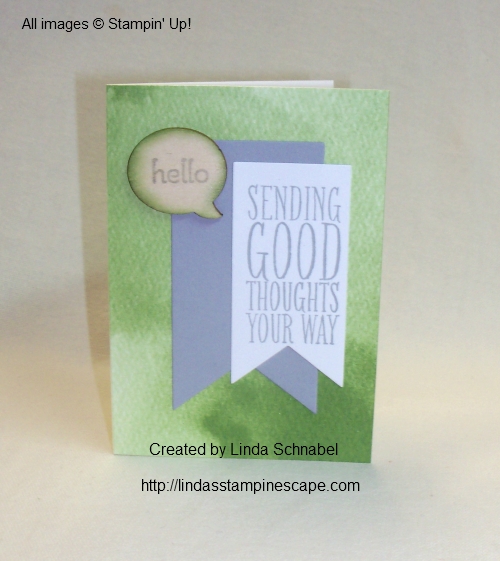
Yesterday’s card I stamped a pattern onto the wood, today I actually stamped a greeting onto the wood element. I also sponged the edges.
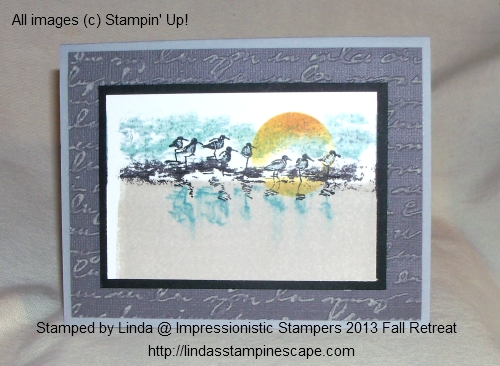
As you can see, the Wooden Elements are very versatile and you can use many techniques on these fun embellishments!
These two cards were also very quick and easy to create, with this combination of note cards, elements and the bundle … the possibilities are endless!
Here are the items that I used to create these cards…
Oh my… It’s March 31st already! It’s been cold for so long that I don’t think we realized that we really are heading into April (and Spring).
I have created a bunch of cards using my March Paper Pumpkin that I wanted to share with you. I also want to remind you that the offer for the FREE Markers (when you sign up for the Paper Pumpkin) ends today. CLICK HERE TO TRY IT OUT
I don’t want you to miss out on the FREE markers if you have been thinking about trying out our Paper Pumpkin. It really is a fun treat that comes to you each month.
Here is my first sample, which represents how Stampin’ Up! pictures the design for you. You will see as we go on, that there are 4 each of the two different greetings in wood, the base cards, two different stamps, and two different ink colors. The cute little glitter dots, envelopes and gold envelope liners are also included in the kit. Oh yes, and they even have “glue dots” included to adhere your wooden greetings!
My second card for you is simply adding a flower created with the “Petite Petal” punch from the “Celebrate the Everyday” catalog. I put one of the little glitter dots into the center … did I mention that they are “self-adhesive”!
For my 3rd card, I found left-over oval from another project, and added it to my card. The fun part is … I stamped the arrow image directly onto my wooden greeting! You could stamp any design on these wooden pieces. How fun is that!
For my 4th and final card share, I stamped the patterned image on my card several times to create a wide border. I have to say that using these clear photopolymer stamps … it’s really easy to align it!
Then I used the ink pad (spot) that was included in the kit, to “die” my wooden greeting. I punched a circle out of the envelope liner, and used it to highlight my greeting. The envelope liners are long enough that you can still use the liner for your envelope after punching … as shown below.
I understand that you cannot get this Paper Pumpkin any more, but I did want to show you how neat, and how versatile they really are. If you really like the wooden elements – you can find the “Essential Wooden Elements” on page 18 of the “Celebrate the Everyday” catalog.
Pair it up with the Watercolor Wonder Designer Note cards and try some of the same techniques I’ve shown you here. I will have the links at the bottom of my blog for you view these products.
REMINDER –
SALE A BRATION 2014 ENDS TODAY!
The amazing annual promotion by Stampin’ Up! will end on Monday, March 31!
You can see the choices of FREE PRODUCTS below…
Orders of $100 receive 2 free Sale a Bration gifts from the list below
Orders of $150 and up receive 3 or more free Sale a Bration gifts PLUS HOSTESS BENEFITS (spend hostess dollars ANY way you want in the catalog!)
Extra $30 free hostess merchandise with your order of $300 or more ($300 order = $80 free merchandise + 6 Sale a Bration Gifts!)
Thank you so much for stopping by today. I will not forget to post the links of the products that are similar to the paper pumpkin cards I shared with you.
Tomorrow I will show you a few samples using these two products! I believe that will fit right in with my “Technique Tuesday”!
I have a fun post for you today! I have a cute card and will be sharing some fun upcoming events and opportunities.
Introducing an all-new event brought to you by Stampin’ Up!:
The 2014 Catalog Premiere!
Be the first to see the 2014-2015 annual catalog . . . just as if you were at a star-studded Hollywood movie premiere! You’ll get a sneak peak at upcoming new releases (AKA pre-sale products) AND–what would a premiere party be without a bit of SWAG (sealed with a gift)? No one will go home from this party empty-handed!
And here’s more exciting news: unlike Hollywood premieres, you won’t have to be in Hollywood to see it first! Why? Because the 2014 Catalog Premiere will be simulcast to a theater near you at the following locations!
Doesn’t that sound like fun??
Stampin’ Up! is consistently working on making their demonstrators happy, and to surprise us with fabulously fun events! Join me, and fellow demonstrators …
YES, you will have to join the Stampin’ Up! family to attend and I’d be honored to have you in my Star’s family. May I say … I suggest joining before the end of March (the 31st to be exact) and you will receive additional money, $150 worth of the products you already love for only $99.
Plus … you get me!
I will help guide you in creating a business that fits the needs of you and your family, teach you stampin’ and business tips, and support & encourage you in your goals. You can also join for the discount! I did, and found there was so much more than saving money on my stampin’ orders!
Any way you look at it … I’d say “give it a try” – there is nothing to loose, but everything to gain (friendships, creative outlet, additional money, and FUN!).
Oh … and one more thing if you’re sitting on the fence … Stampin’ Up! will waive your registration fee for Convention this year! Holy cow, that’s a $290 Savings! I’m going … are YOU coming with me?
Let’s do it! The premier, Convention, and a whole lot of FUN!
Now for my card … it was designed specially for our catalog premier night, because I am inviting you.
You could use this layout for any black tie event that you are hosting … or a prom, a wedding (change the dress color to white and the greeting to Congratulations). You could also use just the dress for a Sweet 16 … the uses are endless.
The dress was created using the “Dress Up” framelits and “Red Glimmer” paper, and then I trimmed it down for a sleeker look. The tux … well, that was free hand.
The greeting comes from the “Make a Wish” stamp set and stamped on Whisper White. I wanted to add that “Hollywood” touch, so I added the “Silver Glimmer” paper behind the white. The Basic Black base ties the entire card together and gives it that “Black Tie” look.
Hope you enjoyed today’s post. I really do think you should grab your glittery little clutch and join us for the premier, and Convention 2014. What a blast we will have…. it’s all about inspiring, creating, and sharing.
List of ingredients are below, just click on them for more information or to purchase.
Hello Stampin’ Friends, and a happy Saturday to you!
Today’s blog post is a simple but beautiful birthday card that you can easily recreate. Let’s begin with my base of Very Vanilla. I chose the vanilla because I had already picked out the designer paper I wanted to use, the “Retro Fresh” from the “Celebrate the Everyday” catalog.
The base is simply a half sheet of cardstock – 8-1/2″ x 5-1/2″. Next is the Retro Fresh Designer Series Paper, which is 5-1/4″ x 3″. I used the Scallop Trim Border Punch to create the beautiful edge.
Next … I wanted to create a bit of a “wow” factor, and knew that the contrast between the Early Espresso cardstock from the Core’dinations package, against the lightened Coastal Cabana of the Retro Fresh would give me just what I was looking for! The Espresso is 5″ x 2-1/2″ and leaves a nice border of designer paper.
The vanilla that will be punched with the “Elegant Butterfly” punch is cut to 4-3/4″ x 2-1/4″. I also embossed it to give it some dimension … I used the “Modern Mosaic” folder and placed the cardstock in crooked to give it the appearance of “flutter” lines. Keep your butterflies … you can use them on another card 🙂
Using the “Bitty Butterfly” punch … I punched out 3 butterflies from a scrap piece of the same Retro Fresh designer paper. Each butterfly is popped up with a tiny piece of the Stampin’ Dimensionals and then centered in the Elegant Butterflies negative space.
My greeting comes from the stamp set “Blooming with Kindness”, and is stamped in Early Espresso. This is a simple flower stamp with beautiful verses and I find I use it quite a bit. A good stamp set to have in your collection.
I finished off my card by embellishing my butterflies with 3 pearls each, from the pearl strands. I felt a strand of pearls by the greeting would be the “cherry on top” and would truly complete this card.
Shhhhhhhh … this is my Mom’s birthday card. She loves butterflies and I know she’ll love this card. Her birthday is 4 days after mine, she actually brought me home from the hospital on her birthday. Great little present … don’t you think!? tee hee!
Again, I will post the list of ingredients below, that I used to create today’s card share. For more details on these products or to purchase, just click on the item. Don’t forget … you still have time to get in on the FREE Sale-a-bration items, but it does end March 31st.
Thank you so much for spending a part of your Saturday with me.
Holy cow, I can’t believe it is Friday again! Don’t get me wrong, I love Fridays … especially when I have off of work until Tuesday! Wooo hooo. I’ll be busy in my stampin’ studio working on my upcoming retreat.
Fridays mean “Fast -n- Furious” cards, and what better way to make a quick card than to grab a bunch of scraps. First let me say that I got my inspiration from “Pinterest”.
I was looking at a few boards and this object caught my eye … it was a board full of “quilting” designs … that’s when the light bulb above my head went on!
What a wonderful way to use up my scraps. This card was super simple to make … I simply cut some scrap pieces of designer paper – 1-1/4″ x 4″. I used the “Gingham Garden” Designer Series Paper.
Since my designer paper had 4″ length … I cut my Whisper White base into a 4″ x 4″ square.
A simple trick to make sure you pieces are centered is to place your base onto your Stampin’ Up! Grid Paper. I love this not just because it’s your stamp pad, but the grid make aligning your projects easy peasy … there’s room for notes, and you’ll always have a ruler handy!
I added a bit of adhesive at the 2″ mark and then aligned my strips of scrap. Did the same for the bottom section. When your laying down the strips, one goes over … one goes under. Super Simple. Then you just adhere the ends.
I picked the Perfectly Penned stamp set because I thought it works well with the feel of the card. Besides, who doesn’t love that font!! It’s done using the Craft White ink and the White embossing powder.
So today’s fast -n- furious card is just a bit of cutting, aligning, and then embossing your greeting. Items used to create this card will be found at the end of my blog. Clicking on the item will direct you to my website where you can view the product more closely or to make a purchase.
Just a note:
If you’ve never subscribed to Paper Pumpkin™ and have been eyeing the subscription kit program, I want to let you know that now’s the time to give it a shot. Our current subscribers have been giving rave reviews of our kits the last few months—every month that goes by is a month you’re missing out on Paper Pumpkin! With our creative kits better than ever AND a set of FREE markers for you if you sign up by March 31, you’ll want to subscribe ASAP. You still have five days to take advantage of this great offer!
I was having so much fun with the “Kissing Technique, that I almost forgot to share the Weekly Deals with you. Oh my, can’t let that happen – You’re going to flip for this weeks deal … PAPER!
The beautiful Glimmer paper in Silver and Champagne, the delectable designer papers: This and That Epic Day – which coordinates with the hexagon stamps, punches and framelits, and Soho Subway – which is great for man cards and scrapbooking your travels, and the awesome Core’dinations in Brights and Subtles.
Love it … Love it …. Love it! Oh, and there’s more… Take a look!
Weekly Deals
I hope you enjoy this week’s Weekly Deals! Just click on the description for more details and to shop my on-line store anytime.
As this month comes to an end, so do some wonderful Stampin’ Up! promotions that could land you some FREE product… Sale-a-bration and our Paper Pumpkin offer. Here are the details …
“Paper Pumpkin” … try it for a couple of months. They are bigger and better than ever. As a Paper Pumpkin member, can stop at any time, take off for a while, or just keep it comin’ …. It’s a bundle of fun delivered right to your door each month (well … mailbox, it comes to in the mailbox) LOL
Don’t forget … If you sign up before March 31st, You will receive the FREE Markers…a $14.95 Value! Here is a glimpse of the Paper Pumpkin Starter Kit.
I also want to remind you that there are only a couple days left of Sale-a-bration … There are several ways to earn FREE product, let me know if I can help you.
Click on any of the links (banners) for more information.
Remember these offers expire on March 31st, so don’t delay.
Yesterday I shared the “Kissing Technique” for my Technique Tuesday post … today I want to show you another card using this fun technique.
Now to keep it simple … I used some of the same items that I did yesterday. I did however switch out the cupcake set for the Kind & Cozy stamp set… I took the center out of the checkered circle stamp… never throw anything away that you may use later!
I inked up the circle and “kissed” it to the center of the Doily stamp… I love the cool pattern you get from centering it! I offset the center circle when I punched out each of the different colors, don’t you love it!! I will post a list of what punches I used at the end of the blog.
I stayed with the same color pallet as I used yesterday, but I switched out the Very Vanilla for Whisper White, since I was not using the designer paper… but I kept the ribbon!!
I stamped two verses from the Starburst Sayings stamp set, and cut them out using the coordinating Starburst framelits. I love that Stampin’ Up! bundles these coordinating items because we save money!! We all know, we’re going to get them both anyway… right?!
Last but not least … I tied all the images together by embossing the background with the “Decorative Dots” embossing folder from the Sale-a-bration catalog. Yes, this is a FREE item with a $50 purchase (before shipping & taxes). It really does add to the feel of the card … not to mention texture.
So what do you think? Do you like the kissing technique? I’m excited to hear about your experience using the technique.
I have listed the items that I used to create the card … just click on the pic for more information or to make a purchase.
Thank you for visiting me today~
Have yourself a wonderful Wednesday!
I like to add both the wood and clear mount stamp sets so you can choose the one that you prefer to use 🙂
Today is my second post for Technique Tuesday. I will be sharing a Stampin’ Up! video tutorial along with my card share… yes, I will have a card for you too. I thought it would be a great way to for you to see how the technique is actually done… almost like being a member of my Technique Club.
I’m going to start with a Stampin’ Up! video that introduces you to the “Kissing Technique”. Enjoy!
Kissing
with Emily Montoya
Have you ever heard of the kissing technique?We’re not talking about the technique with your sweetie-we’re talking about the one with stamps! Check out this sample featured in this video, see how the butterflies have an extra texture? It’s the beautiful product of two stamps getting together!
Wasn’t that fun! How did you like the finished cards … so cute. Here is the card that I created using the “Kissing” Technique:
Now for my card …
I thought it would be fun to add a little “kiss” to the frosting on the cupcakes from the “Build a Cupcake” stamp set and kissed it to the “Hello Doily” stamp. I inked up the the frosting of the cupcake and kissed it to the Doily to create the neat pattern you see.
Of course I then had to pull out the coordinating punch “Cupcake Builder”. Ahhh, so much easier than cutting them out. My color pallet for today comes from the Retro Fresh Designer Series Paper: Very Vanilla, So Saffron, Coastal Cabana and Baked Brown Sugar … with a touch of Strawberry Slush added in!
I added a touch of the Retro Fresh DSP and topped it off with the Coastal Cabana Ruffled Stretch Ribbon. Speaking of “topping” things off… I colored 3 of the larger pearls with a red Sharpie, and the put them on my cupcakes.
Finally, my greeting comes from the Perfectly Penned stamp set. I don’t know what I will do when they retire that set… I use it all the time!
Hope you take the time out of your busy day for a little kissing 🙂
Thanks for checking out my blog today! Check out below for a list of today’s ingredients.
Today I want to share with you, an invitation from Stampin’ Up! Those that know me … know this is where my heart lies – with the fun, the friendships and the creativity outlet that Stampin’ Up! provides. Oh, and the money isn’t bad either … and let’s not forget the traveling to beautiful places.
Enough about what I love, let’s get to the invitation!! Watch the video too … so much fun!
You’re Invited!
If you were to guess what 6000 feet of theatrical truss, 20 miles of cable, and 218 one-ton chain motors had to do with Stampin’ Up!, what would you say?
Go ahead . . . take a guess!
Give up?
They are just a few of the many things that go into making Inspire. Create. Share. (our annual convention) a success.
You’d think that bringing enough chain motors to suspend 16–1/2 city busses would be exciting enough, but trust us: it would be absolutely no fun without you!
We want you to join us this year for Inspire. Create Share. and experience one of our biggest parties of the year. Just think—you could spend three epic days and two nights learning new techniques, swap with several thousand brand-new stamping buddies, and take home more free goodies than you could shake a stick at. (No chain motors—we promise!)
But wait . . . there’s more! If you join Stampin’ Up! now, we’ll waive your Inspire. Create. Share. registration fee (an almost $300 USD value). That’s right . . . you can attend for FREE. You just pay your hotel and travel expenses.
And if that isn’t sweet enough, get this: if you join before the end of March, you’ll be eligible for Sale-A-Bration benefits. That means you’ll receive an extra $25 USD worth of products in your Starter Kit! So act now and join us for Inspire. Create. Share. 2014.
Still not sure you want to come? Just check out highlights from last year’s Inspire. Create. Share. We bet that will change your mind!
It’s me again ….
I just want to say I watch this video when life gets a bit overwhelming, which it does for all of us … it reinforces why I am a demonstrator, and reminds me that becoming a full time demonstrator is my goal. I would like to share the words with you …
Look at how far we’ve traveled
look at how much we’ve done
truth is one person can matter
just look at what yours can become
The journey to our destination, is what we remember today
Oh, Oh, Oh, celebrate … the difference that we make
Thinking back at were we’ve started
we can see just how far we have come
with what each of us has created
we see there’s a power in one
The journey is not always easy
but with every step along the way …
Oh, Oh, Oh, celebrate … the difference that we make
Be the Difference (6x)
The beauty of every solution,
is knowing that someone believes
their impact does not go unnoticed,
just look around and see
The journey to our destination, is what we remember today
Oh, Oh, Oh, celebrate … the difference that we make
Be the Difference
I love that song! Each year we have an inspiring theme song, this is one of my favorites. Someday I will share with you the many ways Stampin’ Up! makes a difference. Here’s one …
I earned the incentive trip to Fiji, thanks to my wonderful customers and downline the Star’s by Design. My regret … was opting out and not being able to experience this beautiful opportunity.
Thanks for taking the time to stop by today and check out the invitation. I really hope you consider joining me and this fantastic company … please let me know if you have any questions (contact me @ lindaluvs2stamp@aol.com) I am here to support your decision and to help guide you to the style of business that’s best for you.
How is your weekend so far? Good I hope! I have been busy in my Stampin’ room creating and putting together our annual Spring Retreat. Eileen, my sister and stampin’ side-kick … helps me a lot on these big events, and was here with me. We enjoy doing these so much!
While I was in my studio creating, I came up with today’s card share. I wanted this card to reflect our upcoming spring season (finally)! I knew I wanted to begin with brown – Early Espresso to be exact, because spring is a bit bare of color. Then I thought … why not emboss it with the Woodgrain Embossing Folder. That’s when I decided to use the Core’dinations cardstock!
Once embossed, I used our sanding system to sand off the Early Espresso and reveal the lighter color underneath. You can find the entire Core’dination papers and sanding system on page 157 our our Stampin’ Up! catalog.
I decided to create even more texture by cutting out the center of my card front with the Ovals Collection framelit. Now I needed a base for my card, so I chose the Very Vanilla because it coordinated with the color revealed from the Core’dinations cardstock.
It all flowed so easily… it made me smile! Hmmm … funny how I came up with that one! The greeting “Smile” comes from the stamp set “Happy Day” – which is how this day was turning out.
That’s when I decided to add the flowers. I punched them from the Retro Fresh Designer Series Paper, with the Petite Petals Punch. Both of these items can be found in our Occasions catalog. That’s the one that says… “Celebrate the Everyday”. Oh yes, the punch has a coordinating stamp set and can be purchased as a bundle.
Now … I popped up the entire woodgrain cardstock onto the Very Vanilla, and then popped up each of the 5 pretty Coastal Cabana flowers. I love the color contrast between my flowers and the espresso background. Spectacular!
To complete the look, I added the largest of the pearls to the center of my flower. So … don’t you think my card bloomed into a beautiful spring card?
Below I have the links to the products used here today. Just click on them for more details or to purchase any of the items.
Today is a bit different type of post than my usual … I have a couple of stamping projects to show you today, but I want to share a bit more of me.
Most of you know the main reason I have stayed with Stampin’ Up! for 14 years… it’s the beautiful friendships I have built. Today I’m going to share another reason I love Stampin’ Up!… traveling!
The idea began with my Technique Club and our discussion of traveling and where we all have gone. Some one had brought up the subject of people on the docks handing you animals, which brought me to my story…
I couldn’t remember what I was holding before they put the iguana on my head …. but this will explain it!!
I was trying to get a picture with Flat Stanley. That smile … was me gritting my teeth and asking them to take that thing off my head! LOL
This is the Mexican Riviera cruise that I had earned through Stampin’ Up! I love to cruise! I never thought that I would enjoy being “stuck” on a ship, but let me just say … it is a wonderful experience. Just think, each night you go to bed, and the next day you wake up some place new. And the food … yum!
My date for the evening was of course, Flat Stanley. He went on all our excursions with us. I could make a whole scrapbook of Flat Stanley on this trip!! Oh, and by the way, he never did come home with us … I think the stayed there because we never did find him after that!!
Well … you can’t go to any Stampin’ Up! event without either stamping or having samples every where! It’s so much fun! Here are just a couple of samples…
Some of you know … I love “boots”! They have a very special meaning for me. Here are some cute scrapbook pages. These would work well in our 8 x 8 inch albums.
I still go back and view some of the pictures I have taken to get some inspiration, and that is how I found all these photos. Don’t forget … You can take a layout, or a style of card and create something new using the items you already have.
I hope you enjoyed traveling along with me today. I ask you, if you have ever thought of becoming a demonstrator, we should talk. I have a wonderful group … the Star’s by Design, and we would love to welcome “you” into our group.
Whether it’s a need for additional money, the traveling, some well deserved recognition or the wonderful friendships you build … it’s a great company to work with. Remember, you’re the boss – you set your work schedule around your family, and as little or as often as you’d like.
During Sale-a-bration … Stampin’ Up! is offering additional $$ to the starter kit you design (I’ll help you if you’d like) but it’s still only $99. Talk to me or click on the “join” link for more information or to sign up. There is amazing support … and it starts with me.
Thanks for coming along on my journey today … I would be honored to help you navigate your new adventure.
Today is my second installment of Fast -n- Furious Fridays! Quick and easy cards for when we need a card fast!
I’m not sure if you can get any simpler than today’s card share, except to stamp a greeting onto a piece of cardstock. However, I choose to use the beautiful “Sweet Sorbet” Designer Series paper, which I got free with my Sale-a-bration order. There is still a week left for you to get yours too.
I love using designer paper when I’m in a hurry to make a card because the color and design is already there. My base card is Whisper White … so I added a simple but pretty bow using the white taffeta ribbon.
My greeting comes from the stamp set “Peaceful Petals” which I have been using in my Technique clubs and my Star’s (downline) meetings. You could use any greeting … thus “Fast -n- Furious!”
I hope you enjoyed today’s quick and easy card. Remember, you can use any designer paper, and any greeting to make a lot of cards in no time at all.
Today’s card share is one that I had the opportunity to make at a Stampin’ event hosted by one of my upline – Gloria Helmbrecht. As demonstrators, we look forward to getting together to share ideas and business tips. I generally host a meeting for my Star’s each month … there is a lot of support when you join the Stampin’ Up! and Star’s family.
I’m not real sure where to start on this card as it is packed full of techniques. The background is embossed using the Core’dinations paper… and sanded to create a two-tone look, which adds even more to the dimension.
We used the brayer to create the sandy beach, and then stamped our sand pipers with the Black StazOn ink.
To create the ocean waves … we colored on a block with our markers, and then dragged it across our cardstock.
There was a lot going on with this card, but it turned out beautiful and I learned some new techniques. I will be passing on these and more technique to my Technique Club members within the next year.
My clubs start in September and run through June … we generally have 10 members, and each member gets to be the “Hostess” for a month and receives all benefits just as if she hosted a home party. I cut and prepare all our projects … you can relax and enjoy learning a new technique and creating new friendships.
Let me know if you are interested in either joining one of my stamping groups or joining my family of Star’s!
I have created a list of supplies for this card … just click on the link for details or to make your purchase.
Please remember that items are available while supplies last, or through March 24th… which ever comes first. I know I have the Crisp Cantaloupe ribbon on my list! What is your favorite?
Also … orders of $50+ (before shipping & handling) qualify for a free Sale-a-bration item!
Hope you all had a wonderful weekend. I have an awesome project to share with you today … it is the March Paper Pumpkin Kit, and it is so cool!
Have YOU seen the March Paper Pumpkin kit yet? Watch to see how fun and simple this kit is to put together. Wonder what the surprise will be next month?
“Paper Pumpkin” … try it for a couple of months. They are bigger and better than ever. As a Paper Pumpkin member, can stop at any time, take off for a while, or just keep it comin’ …. It’s a bundle of fun delivered right to your door each month (well … mailbox, it comes to in the mailbox) LOL
Don’t forget … If you sign up before March 31st, You will receive the FREE Markers…a $14.95 Value! Here is a glimpse of the Paper Pumpkin Starter Kit.
I also want to remind you that there are only a couple weeks left of Sale-a-bration … There are several ways to earn FREE product, let me know if I can help you.
Click on any of the links (banners) for more information.