Simply Sunday: Expressions In Ink

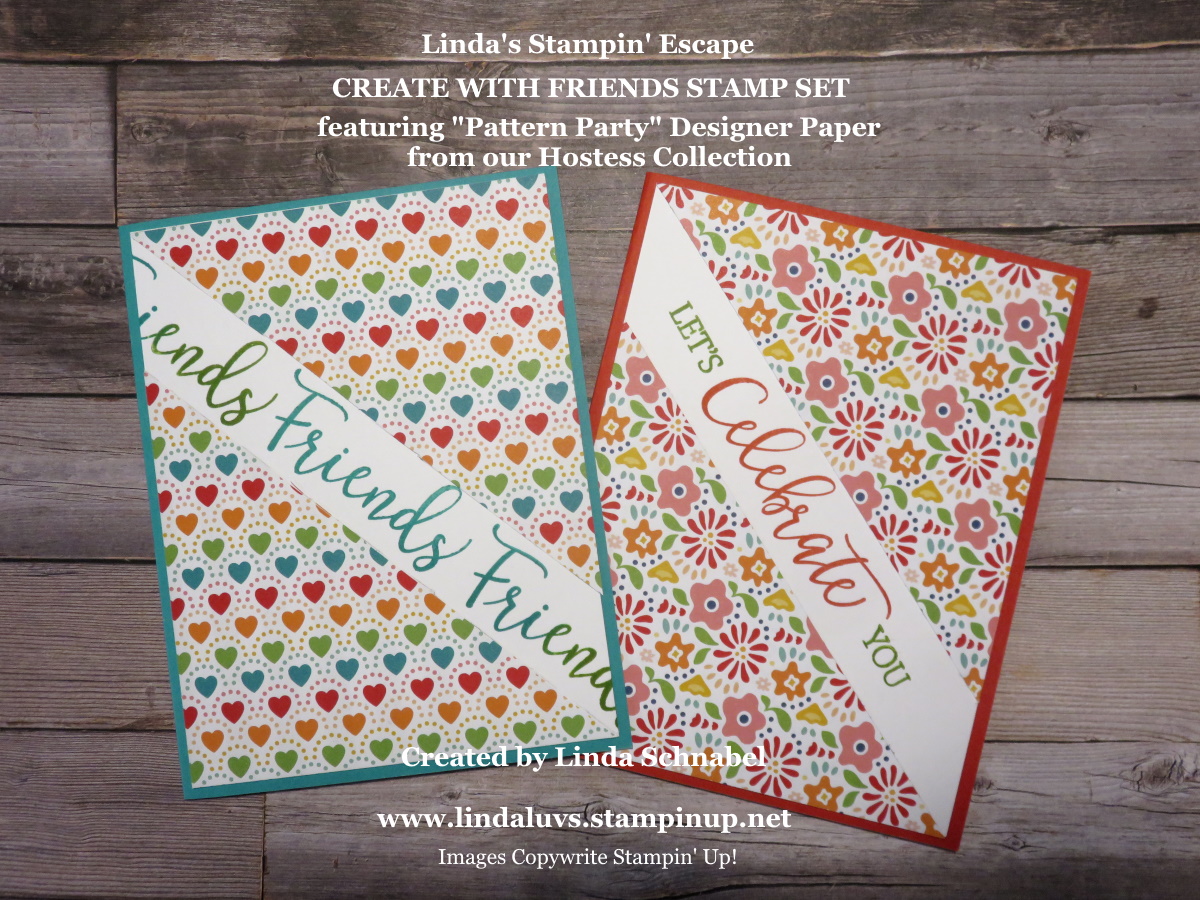
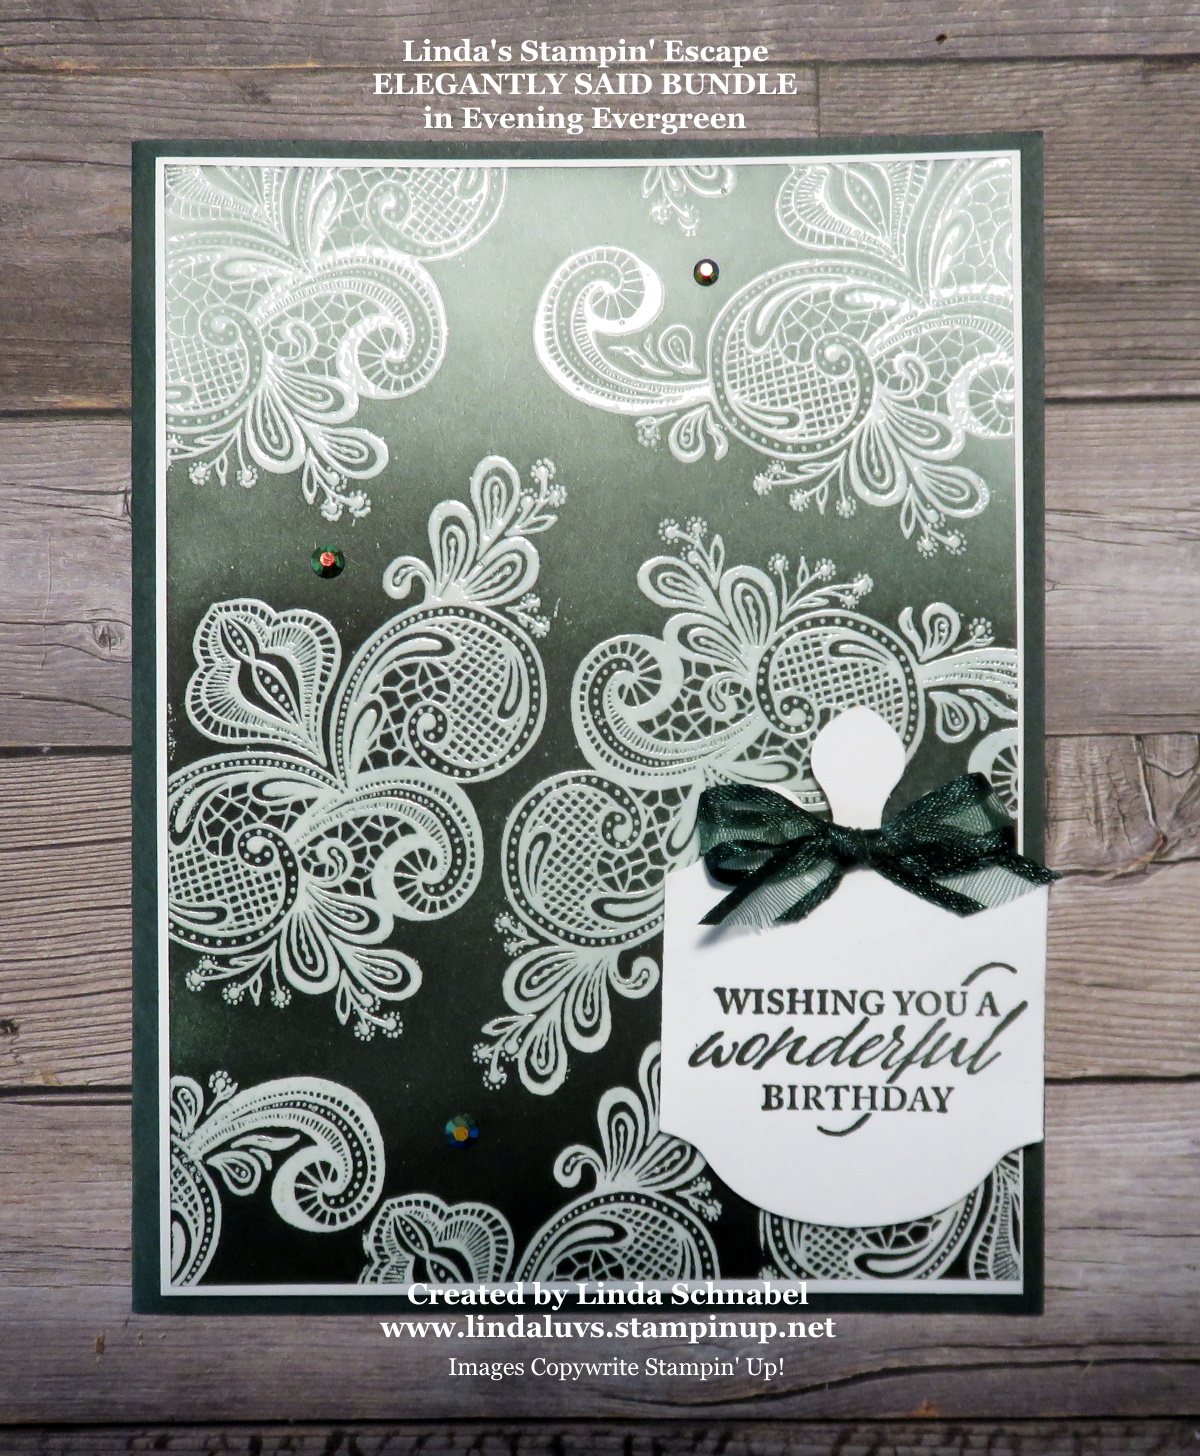
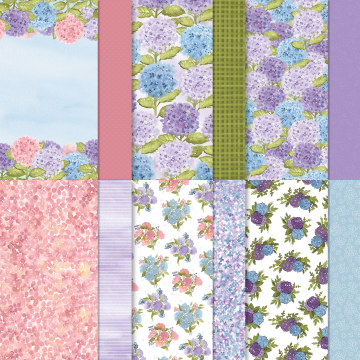
Hello Stampin’ Friends ~ I trust you are having a wonderful weekend. Today I’d like to add a splash of color with the stunning Expressions In Ink Designer Series Paper. This gorgeous paper is in tune with Simple Stamping but you are going to look like an artist!

You will recognize this paper as it adorns the front of our New 2021-22 Annual Catalog. I chose the floral pattern in Magenta Madness and also used that color as my cardbase. The paper is simply cut 6″ x 4″ and then trim it down to 5-1/4″ … this will fit the front of your card, leaving a nice border of Magenta Madness around it. You will use the 3/4″ piece that you cut off on the inside of your card … it fits nicely on the 5-1/4″ x 4″ piece of Basic White.

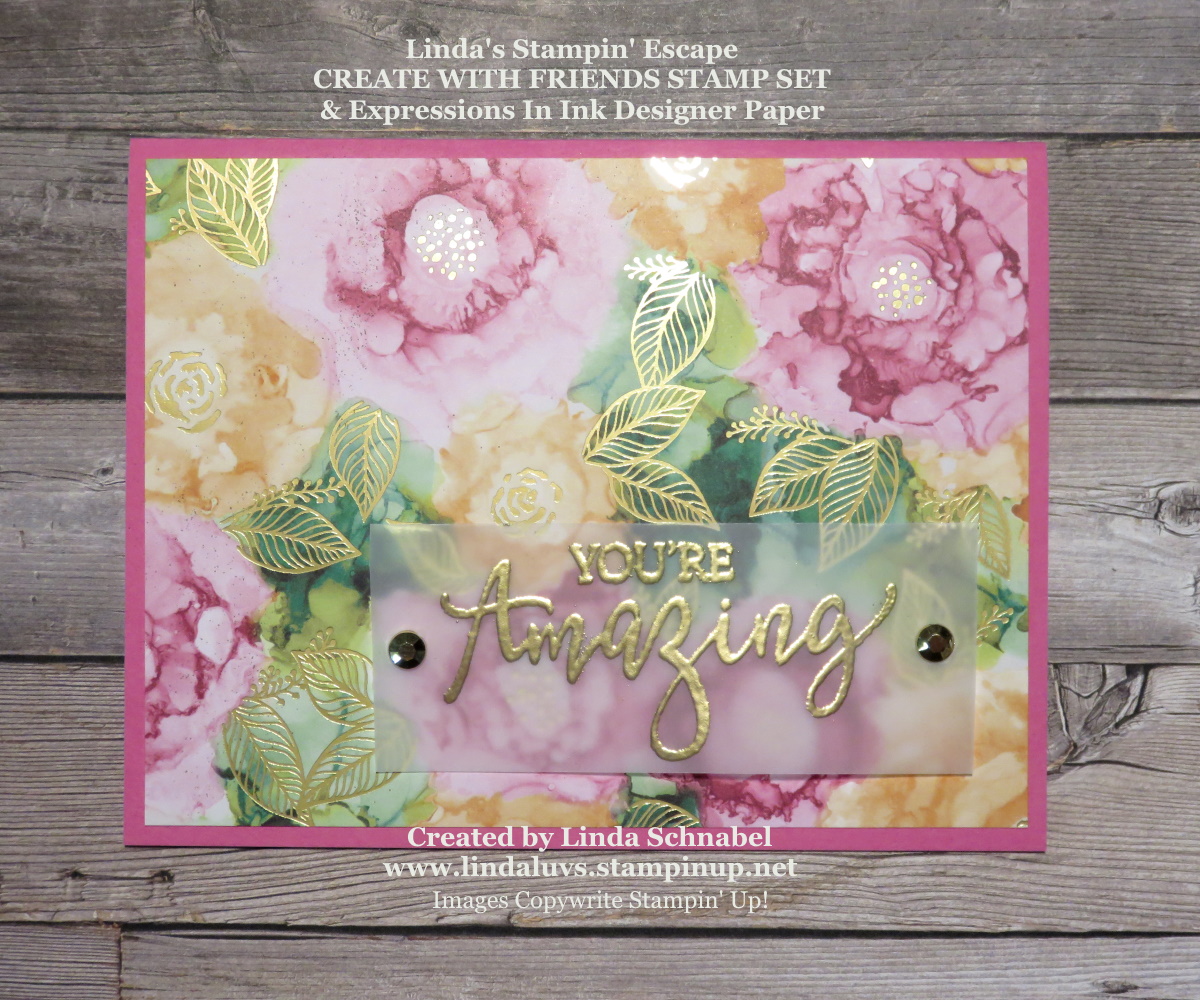
With the beautiful gold throughout this design, I felt using gold embossing powder for my greeting was perfect. I’m using the New Create with Friends stamp set and I embossed it on a 1-1/2″ strip of Vellum Cardstock. Making this card was super simple and yet looks so elegant. To complete the look, I used the Gilded Gems … the largest ones because they “hide” the small Stampin’ Dimensionals!!

I can’t wait to show you even more at my Catalog Launch Party … be sure to get connect with me. Here is the link: https://www.facebook.com/groups/296817105346109 Then just simply request membership! Fellow demonstrators are welcome to follow along, but are excluded from the prizes, as they are reserved for my customers and downline. I appreciate your understanding.

Thank you for taking time out of your Sunday to visit with me and my blog! I truly appreciate your time.

Enjoy the day ~

TODAY’S STAMPIN’ SUPPLY LIST … If you liked the products used in today’s projects, I have links for you below. Just click on the item you would like more information on, or to begin your shopping. It will take you directly to my website. Thank you

Creating with Friends

Hello Stampin’ Friends ~

Happy Friday!! I have two cards to share with you today featuring the “Pattern Party” Designer Series paper from our Hostess Collection and the fun and fabulous “Creating with Friends” stamp set! Well … I think it’s fun and fabulous!!

This stamp set has playful fonts and great sentiments to help you celebrate friendships in many ways and when it’s paired up with the Pattern Party designer paper, well … you have a winning combination!! Let’s begin …

I used my “split” technique for my cards today ~ super simple and a paper saver. Here is my video to show you how this technique works …

I love this technique, it is quick and simple yet can really make your card fun, plus it’s saves your designer paper because you are using 4″ x 4″ squares of paper … so no waste!!

My next card is using the same technique, with the same paper pack, just a different design. It comes with 48 sheets of designer paper, 4 each of 12 double-sided designer papers, so … 24 different patterns!!

Here’s the card …

So fun and so colorful, yet with 24 different patterns in this paper pack you’ll also find subtle designs, great textures and fun patterns! When it comes to the Create with Friends stamp set, you will find the same creative variety and ways to express your feelings … I simply had to have it! I love my greeting / sentiment sets!

I’ll be sharing more samples using these two products at my Catalog Launch Party … I hope you join me!! I’ll begin sharing on Tuesday and leading up to the LIVE events Friday & Saturday May 21st & 22nd. If you’re in need of a demonstrator and some fun, CLICK HERE & join us!!

Thank you for joining me today, please let me know if you have any questions on my cards, technique or the NEW Catalog Launch Party … I’d be happy to answer them.

Have a good day, and a wonderful weekend.

TODAY’S STAMPIN’ SUPPLY LIST … If you liked the products used in today’s projects, I have links for you below. Just click on the item you would like more information on, or to begin your shopping. It will take you directly to my website. Thank you

Triple Time Stamping Technique

Hello Stampin’ Friends ~

Today I’d like to share a great technique … step by step, and new stamp set and a refresher on a coloring technique. I actually shared this technique with you on Sunday, however one of my customers reached out to me and and asked if I would share a video … so I used this for my LIVE demonstration last night for Technique Tuesday!

Let me introduce you to the Hand-Penned Petals from the beautiful Hand-Penned Suite on pages 104 & 105 of our Annual Catalog this is highlighted using the Triple Time Stamping Technique ….

I invite you to watch the video so you can see step by step how I created the cards …

Pretty simple … don’t you think? Here are those dimensions again (I also added them to the video in the comment section) The colored cardstock I used was Fresh Freesia!

  • Basic White: 2 @ 5-1/4″ x 4″ … 4-1/4″ x 3″ …. 3-1/4″ x 2″
  • Colored Cardstock: 8-1/2″ x 5-1/2″ (fold in half) … 4-1/2″ x 3-1/4″ …. 3-1/2″ x 2-1/4″

I promised I would share a second card with you, one done in the Soft Succulent and I also created it in the portrait position and used the Dual Oval punch for my greeting …

I just love the softness of the flowers when you use the Stampin’ Blends … it almost looks as if it was water colored. I added touch of texture and softness around my greeting by added a ripple of ribbon behind it.

I thank you for stopping in for a visit today, I hope you enjoyed the video and the second sample, and that it inspires you to try one of these techniques.

Hope you have a wonderful day ~

TODAY’S STAMPIN’ SUPPLY LIST … If you liked the products used in today’s projects, I have links for you below. Just click on the item you would like more information on, or to begin your shopping. It will take you directly to my website. Thank you

Bloom Where You Are Planted …

Hello Stampin’ Friends ~

Today I would like to begin with introductions to the brand new product suites that have been included in the New 2021-22 Annual Catalog. There are so many cool ones, I wasn’t sure where to start so I’ll begin with the Bloom Where You are Planted suite …

The 2021–2022 Annual Catalog is packed with amazing products! Each time you open it to take a look, there’s something new that catches your eye…. If you’re like me, sometimes you miss the something so beautiful.

The stamps and the fonts were designed to create warmth and friendship, and in my opinion also gender neutral. The designer paper will help you create both feminine and masculine cards …

You’ll fall in love with the fun and fanciful greenery, and the natural elements papers you can add to your designs. You are going to have a ball creating with this suite. Here is a great example of …

Thanks for joining me today and I hope you join me again tonight for my Facebook LIVE.

Have an amazing day ~

Simply Sunday: Elegantly Said in Polished Pink

Hello Stampin’ Friends! Today is the fifth and final day of our 2021-23 In-Color Collection Showcase. Each card has showcased not only a new In-Color but a technique, and of course the Elegantly Said bundle.

Today I will showcase the Polished Pink with the Triple Time Technique. I am using the same stamp and greeting as I have the other four … not to worry, I will have plenty more samples from this amazing bundle in future posts, but lets take a look at today’s card …

Triple time is such a cool technique and very simple to do. Let’s begin with our Polished Pink cardstock … 8-1/2″ x 5-1/2″, 3-1/4″ x 4-1/2″, 2-1/4″ x 3-1/2″ and dimensions for the Basic White are: 4″ x 5-1/4″, 3″ x 4-1/4″, 2″ x 3-1/4″.

Layer the 3 pieces of white cardstock together and then stamp your images, then layer the Polished Pink cardstock behind it … align the stamped images so it looks like a continuous flow. It’s so easy and turns out so cool!

To highlight the continuation / flow of the stamped images, I used my trusty “Wink of Stella”. It really adds a fabulous touch to the card with that “sparkle”, and because of that I only added one of the In Color Gems to the card and that was on my punched greeting above the ribbon.

I hope I inspired you to try this technique, you can use any images you like, however if you’ve fallen for this bundle … I have it listed below.

I’d like to Thank you for joining me today….

Enjoy the rest of your weekend ~

TODAY’S STAMPIN’ SUPPLY LIST … If you liked the products used in today’s projects, I have links for you below. Just click on the item you would like more information on, or to begin your shopping. It will take you directly to my website. Thank you

Elegantly Said in Evening Evergreen

Hello Stampin’ Friends ~

The weekend is here and I’m a bit late with my post! Had a nice breakfast with my daughter and the 3 boys, and my AJ paid!! He treated us all … what a sweet young man.

Today I have a beautiful card to share with you today. I brought back the heat embossing but instead of the white, I embossed clear emboss powder on Basic White cardstock. Then it was time to pull out my Blending Brush and the Evening Evergreen ink and create the “Ombre” technique!!

This technique of light to dark, combined with this elegant stamp pair up beautifully and really makes a statement. I added my punched greeting off center … actually, right to the edge!

The In Color Gems were placed around the card to draw your eye to the punched greeting, and then the greeting was topped off with the coordination ribbon.

Thank you for hanging out to check out today’s card.

Enjoy your weekend ~

TODAY’S STAMPIN’ SUPPLY LIST … If you liked the products used in today’s projects, I have links for you below. Just click on the item you would like more information on, or to begin your shopping. It will take you directly to my website. Thank you

Elegantly Said in Fresh Freesia

Hello Stampin’ Friends ~ Happy Friday!!! I’m excited to share another of the NEW In-Colors with you … Fresh Freesia.

Today’s card is going to take a technique from each of the past two cards and combine them … Color on Color and Creating your own background! Here is what you get ….

On Wednesday we did the Color on Color technique which represents the bottom half, and yesterday we created our own back ground (designer paper) which represents the top half and it turned out beautifully.

I’m not one for exposed raw edges so I used a 3/4″ of Vellum cardstock to distract your eye from the harsh line … then I covered it in the beautiful Fresh Freesia ribbon!

To add a little twist to my card … I stamped and punched my greeting and turned it side ways!! This gives it a different look than the past two days … and adds an element of fun. Of course the pretty little In Color gems have been added as well.

I hope you enjoyed today’s twist on the past two cards … isn’t it amazing how the “same stamp” and the “same greeting” can look so different from day to day!

Thank you for joining me today … give me a “LIKE” if you have enjoyed today’s post.

Have a marvelous weekend !

TODAY’S STAMPIN’ SUPPLY LIST … If you liked the products used in today’s projects, I have links for you below. Just click on the item you would like more information on, or to begin your shopping. It will take you directly to my website. Thank you

Elegantly Said in Soft Succulent

Hello Stampin’ Friends,

Today I have my second card out of the 5 New In-Colors to share with you. I’ve decided to use the Elegantly Said bundle on all the cards to show you the easy and versatility of this bundle as well.

We’re going back to basics today, and in doing so we are creating our own designer paper with stamps! The Elegantly Said stamp set is perfect for that, let me show you ….

The shape of this beautiful detailed stamp lends itself to this technique so easily … you can see how it interlocks with itself (I demonstrated that in yesterday’s video) creating an elegant background to highlight any greeting.

The Soft Succulent looks amazing with this stamp … I’m going to have to try some additional techniques with this combination!! I used the punch and stamp as I did yesterday, but added a mat behind my greeting and a strip of ribbon.

I also decided to use my In Color Gems directly onto my tag today to really draw your eye to the focal point … your sentiment /greeting. Such a simple card to make, yet it is what the stamp title is … elegant.

Thank you so much for joining me today, can’t wait to share another with you tomorrow. Give me a “LIKE” at the bottom of the page if you enjoyed today’s post … it helps others like yourself, find me. Thank you.

Have a great day ~

TODAY’S STAMPIN’ SUPPLY LIST … If you liked the products used in today’s projects, I have links for you below. Just click on the item you would like more information on, or to begin your shopping. It will take you directly to my website. Thank you

Elegantly Said in Pale Papaya

Hello Stampin’ Friends ~

Yesterday Stampin’ Up! kicked off the New Annual Catalog so of course I followed suit with a presentation featuring the Elegantly Said Bundle done in the new Pale Papaya In Color.

In the next few days I will be highlighting the New 2021-23 In Colors, each day will feature a new color. Grab a cup of coffee and join me for a replay of my Facebook LIVE last night ….

It’s amazing how these two simple techniques can create so much depth and texture to your card … your results are simply elegant!

I’m liking that fun punch too and I’ll have more to share with you at my Catalog Launch Party! Notification / Invitations will be sent out soon. The Elegant Said bundle will be highlighted, but until then … let’s take another look at today’s card ~

A closer look is really shows the depth and texture on this card. The cute little tag really adds another element (and focal point) to the card … the Pale Papaya ribbon really adds a soft touch to the tag, and who doesn’t love those little In Color gems!

I want to “Thank You” for taking the time to sit with me today and check out my first “NEW” Catalog Card!!

Have yourself a great day and I’ll see you tomorrow with another amazing In Color.

TODAY’S STAMPIN’ SUPPLY LIST … If you liked the products used in today’s projects, I have links for you below. Just click on the item you would like more information on, or to begin your shopping. It will take you directly to my website. Thank you

Cool Birthday Cards ….

Hello Stampin’ Friends ~

Wow … If you’re looking for a way to make quick, colorful and fun birthday cards for the kids in your family (or friend circle) then the April 2021 Paper Pumpkin has just what you’re looking for!! Today I have three cute samples from the kit … two with a simple twist, and one that I have turned into a full card.

Let’s watch the video to see how easy these are to put together …. Grab yourself a cool popsicle and take a look at how you can craft with this refreshing, summery kit!

With shaped cards, shimmery elements, and two sticker sheets, this kit is perfect for crafting with loved ones across the generations! Can’t wait to see what sweet treats you make with our So Cool kit! Here’s mine ….

My first card is the Rainbow … I followed this card per the directions and love how cute it is!!

The next card is the rainbow Popsicle, the only thing I changed was the silver glitter embellishment … instead of the long banner, I used the circular banner!

Next up is another Popsicle card … this one is the Kiwi (how cute is that!) Love the greens so I wanted them to pop so I used Early Espresso as my card base … this also pulls that color out of the design.

I used the Ice Cream Designer paper as my background … the circles add to the fun of a Popsicle card!! I simply cut the pre-made Popsicle card in have … now I’m going to use the other have of my card to create a second card!! No waste.

I hope you enjoyed today’s fun and simple cards. I have listed options below so you can join us in discovering the fun and excitement of our Paper Pumpkin kits.

PLUS … I have a Private Paper Pumpkin page on Facebook that I am building with samples and videos for you to enjoy and see additional ways to use your kits. My “Pals Page” is reserved for “my” Paper Pumpkin subscribers. Come join us … subscribe by clicking HERE or purchase a subscription below.

Thank you for stopping by and checking out my blog today!

Enjoy this beautiful day ~

TODAY’S STAMPIN’ SUPPLY LIST … If you liked the products used in today’s projects, I have links for you below. Just click on the item you would like more information on, or to begin your shopping. It will take you directly to my website. Thank you

Hydrangea Hill Suite

Hello Stampin’ Friends ~

I’m delivering flowers to you today … May Day! Happy May 1st to you and have a wonderful day. Join me tomorrow for my Simply Sunday post.

The Annual Catalog Inspiration

Hydrangea Hill Suite

Hydrangeas represent gratitude, grace, abundance, and beauty. The Hydrangea Hill Suite makes it simple to add the beauty and grace of hydrangea flowers to your Spring projects of all kinds.

The two-step style of this set makes it quick and easy to create simple stamped cards that wow. Add in the coordinating dies, paper, and embellishments from this suite and you can step it up and let your creative style bloom abundantly!

Have a beautiful day ~
Stampin’ Hugs, Linda


————————————————–

Hydrangea Hill Card/Gift Box

Hydrangea Hill Card/Gift Box

Join my Email Newsletter List and receive my tutorials by email. With each mailing you will receive a picture of the finished project, a supply list, card layout, and a step-by-step tutorial.

SUPPLIES:


BUNDLE
Hydrangea Haven stamp & dies bundle (#156251)

STAMPS
Hydrangea Haven Photopolymer Stamp Set (#154470)

PAPER
Hydrangea Hill Designer Series Paper (#154570), Hydrangea Hill Mercury Glass Designer Acetate (#154574), Basic White (#159276)

INK
Tuxedo Black Memento (#132708), Old Olive (# 147090), Highland Heather (#147103), Rococo Rose (#150080), Seaside Spray (#150085)

TOOLS
Hydrangea Dies (#154326), Stamping Sponges (#141337) or Sponge Daubers (#133773)

ADHESIVES
Glue Dots (#103683), Stampin’ Dimensionals (#104430), Tear & Tape Adhesive (#138995) or Stampin’ SEAL+ (#149699)

EMBELLISHMENTS
Acetate Card Boxes (#144628), Snail Mail Twine Combo Pack (#154579)

Coordinating Products


January-June Mini Catalog - Hydrangea Hill Suite

January-June Mini Catalog - Hydrangea Hill Suite

January-June Mini Catalog - Hydrangea Hill Suite

January-June Mini Catalog - Hydrangea Hill Suite

January-June Mini Catalog - Hydrangea Hill Suite

January-June Mini Catalog - Hydrangea Hill Suite

January-June Mini Catalog - Hydrangea Hill Suite


Hydrangea Hill Suite

VIEW THE SUITE ONLINE

DOWNLOAD OUR LATEST CATALOG

January - June Mini Catalog

Dazzling Dinosaurs …

Hello Stampin’ Friends,

Today I’m just compiling a few of my favorite samples is the DINOROAR … Why is it going 😦  I’m so sad, this is such a cute stamp set and coordinating dies!

Although the designer paper has retired last year … I wanted to share the idea of creating “Welcome Baby” with this stamp and die set.  Totally unique and oh so cute!!

What better way to give a gift than to dress it up with dinosaurs~

I tucked gift cards inside the box … hidden in the packing material. YES … it was a bit messy but oh so much fun!  They loved it.

Probably my favorite dino out of this set, the little guy with his arms wide open because I love you this much ❤  Above and below are two samples using the same dinosaur but totally different look.

And we’ll finish off with a grand showcase of several samples…

I hope you enjoyed sitting with me and looking through a few samples from the amazing Dinoroar set and coordinating dies.

Thank you for joining me!

Mirror Image Technique

Hello Stampin’ Friends ~

I could not get my Facebook LIVE video from last night to upload so while I work on that I’d like to share my Facebook Live video and card that I created using the Stampartus and highlighting the Mirror Image Technique. You will discover the “secret” or simple trick to creating the Mirror Image.

Sit back, grab your coffee and enjoy the short video …

The video explains the steps that I took to come up with the size and layout of the stamped area… and also explains the background I’ve used. It is actually one of the backgrounds I demonstrated the Embossing Paste with last week!

Let’s get a closer look at the card …

Our cute giraffes come from the Zoo Globe stamp set, and our verbiage come from the Well Said stamp sets.

The background was created with the Shimmery White Embossing paste and the masks … you can watch the video HERE.

Now before we go … lets take a look at the layering and see how amazing a few Stampin’ Dimensionals can change up a card! Besides the beautiful texture you get from the Embossing paste, you ‘ll get great dimension and height.

I hope you enjoyed today’s card and are inspired to try this fun technique. Please don’t forget that all of the items used in today’s card are available in the Online Extravaganza (with the exception of the Memento Ink) …

Thank you for hanging out with me today. I hope your day is a good one.

TODAY’S STAMPIN’ SUPPLY LIST … If you liked the products used in today’s projects, I have links for you below. Just click on the item you would like more information on, or to begin your shopping. It will take you directly to my website. Thank you ♥ PLEASE NOTE: SOME ITEMS MAY NO LONGER BE AVAILABLE or AT THE PRICE LISTED.

Join me for Ice Cream …

Hello Stampin’ Friends ~

There is nothing better than sprinkles on ice cream or inside your “Shaker Cards” … and that is what I have for you today along with several other Ice Cream cards that highlight the Ice Cream Corner Designer Series paper. This tasty treat of a designer paper will be disappearing as fast as ice cream at my house! Let’s begin with our Shaker card …

The background is from the Ice Cream Corner Designer Paper … I picked the sprinkle design. I cut my window out of the Bermuda Bay using the Rectangle Layered Dies, and then attached the window sheet to the back. Once the window sheet is attached I used the Adhesive Strips to create the height needed for the “shaker”.

You have the greeting stamped … I used the “Happy Birthday” from the bundle and then sprinkled my “Ice Cream Corner Sprinkles” onto the greeting and laid the window sheet assembly on top. With a little adhesive, I attached the “shaker” to the card.

I punched out the Ice Cream and the Cone from the Designer paper!! It was designed to make creating your cones easier!! It also works for quick and easy backgrounds …

I love using designer paper for backgrounds, especially when they are so cute!! All I had to do for this card was add a greeting!! I also used some of the cute sprinkles from the shaker card and the Polka Dot Tulle (sold out) because of the dots … it all coordinates so nicely!!

Let’s look at a few more cards made with different patterns from the Ice Cream Corner Designer Series paper …

The one in the back has the same as our last card but the greeting makes it look so different. On the card in front … I used the Popsicle paper … too cute, and the Opal Rounds were colored to coordinate with the flavor!! lol The pretty ribbon that is embellishing both cards is also on the retiring list 😦

Thanks much for hanging out with me today, I hope you have a good one!

TODAY’S STAMPIN’ SUPPLY LIST … If you liked the products used in today’s projects, I have links for you below. Just click on the item you would like more information on, or to begin your shopping. It will take you directly to my website. Thank you

A Seaside View

Hello Stampin’ Friends,

I am back! I have put my total attention into my 2020-21 Catalog Retirement Party this weekend, and WOW … did we have fun! It’s amazing how even in a Facebook party, stampers make friends with those they are hanging out with over a weekend! So much fun, so many prizes and a whole lot of happy!!

Today, I’m in the mood for a Seaside View! The card is not only simple to create but brings you back to simpler times on a warm sunny day …

I used the Seaside view stamp set for both my cards today. I used the “watercoloring” technique for my card … it’s quick and easy and the sublte color is perfect for this card. Can’t you image yourself relaxing in the chair with a cool lemonade?

My grandma and grandpa had white adirondack chairs, so mine had to be white … memories! So I got my pop of colors come from the Bermuda Bay table and the lemonade … thus the So Saffron banner!

Yesterday’s card is a bit more detailed!! I applied the sponging technique along with the Stampin’ Blends Alcohol markers. It’s my vision of the perfect summer night …

I stamped my image with the Black Momento ink and then added the black horizon line. Then I used a Rhinestone for my sun … and sponged Daffodil Delight around it (then pulled it back off) I also used Calypso Coral, Bermuda Bay and Night of Navy for my sky and water. I then highlighted the water with the Markers.

The plants, chairs and deck were all done with the Stampin’ Blends markers. Oh yes, and a touch of Real Red for the sail on the boat!

I hope you enjoyed today’s cards and this delightful stamp set. With a few fun techniques you can take this set from simple to spectacular … and everything in between.

Thank you for stopping back again today. I’d love to hear your thoughts on today’s cards… If you really love this stamp set, I must tell you it is on the retirement list and we only have about a week before it’s gone for good.

Happy Sunday!

Here are the items I used to create today’s cards … Click on any image for more information on the product or to begin shopping from my online store.