It’s Weekly Deals time …

Hello Stampin’ Friends,

Hope you all enjoyed your holiday weekend.  I’ll admit, I enjoyed having an extra day off of work!

Today is back to school, back to work and time for a new group of great products to go on sale in our Weekly Deals!

CM1634B

Hope you enjoy this week’s Weekly Deals!

131272L Buttons & Blossoms Simply Pressed Molds Item # 131272
Regular Price: $7.95
Discounted Price: $5.96
White Simply Pressed Clay Item # 130685
Regular Price: $6.95
Discounted Price: $5.21
Strawberry Slush Classic In Color Stampin’ Ink Refill Item # 131167
Regular Price: $2.95
Discounted Price: $2.21
Soft Sky Classic Stampin’ Ink Refill Item # 131161
Regular Price: $2.95
Discounted Price: $2.21
Pool Party Classic Stampin’ Ink Refill Item # 122933
Regular Price: $2.95
Discounted Price: $2.21
Island Indigo Classic Stampin’ Ink Refill Item # 122932
Regular Price: $2.95
Discounted Price: $2.21
Back To School Ensemble – Digital Download Item # 130980
Regular Price: $17.95
Discounted Price: $10.77

To get more details on the products listed in the Weekly Deals, just click on the items description … that link will take you directly to my stampin’ store.

Here is a list of our current Stampin’ Up! promotions …

contact me hostess special  PP - 50 off

Just click on the picture (link) for full details or CLICK HERE to view the all.

Please let me know if you have any questions with the promotions or sale items, or if you need help with an order.

If you’d like to begin shopping the Weekly Deals …  CLICK HERE!

Thanks for dropping by today ~

Have a great week!

blog-closing-small


Guest Stamper … Cindy S.

Hello Stampin’ Friends,

Happy September! Today I have a fun card to share with you, created by one of my Star’s group members … Cindy S.  I believe this may be the last of our swap cards, but not to worry … we meet monthly!

Cindy used our exclusive RMHC stamp set, Flamingo Lingo.  I was not much of a Flamingo person before, but I am totally falling in love with this stamp set.  Besides … for each stamp set we sell – $3.00 is donated to the Ronald McDonald House Charities.

            134306G                 38462c7375ca777e506fb182285a0f54


Click directly onto the Ronald McDonald House to learn more about this amazing charity.  See the houses that host families so that they may be close to their seriously ill or injured children.

Cindy used the Melon Mambo and Basic Black markers to bring her Flamingo to life, and created a focal point by using the Ovals Collection Framelit dies. The background is the Decorative Dots embossing folder.

000_1399

The pretty flowers that draw your eye from the focal point to the greeting can be found in the Flamingo Lingo stamp set, and coordinate with the Petite Petals punch.

Cindy used the “And Many More” stamp set for her greeting and used the fun combination of the Word Window and Modern Label punch… they look great together!

I think Cindy did a great job and I thank her for sharing.

Thank you for dropping by today.

Hope you are having a safe and Happy Holiday weekend,

blog-closing-small

You may click on any of the items to view details or to start shopping.  Thank you.


To my Stampin’ Friends … I Heart You

Hello Stampin’ Friends,

Today I am sharing with you a little peek into my Appreciation Party and a new card I designed to say “Thank You”!  Make sure you go all the way to the end … I don’t want you to miss a thing!

Let me start with one of the cards my Hostesses stamped.  We had a stamp camp after the dinner, but my hostesses were treated to two additional cards … my way of saying “Thanks” for stampin’ with me this past year.

The card was inspired by a fellow demonstrators card … the talent pool within our demonstrator circle is endless and very inspiring!

000_1402

Because I will be sharing several samples with you … I will be listing the ingredients after each project, this will make it easier for you to pick out the items you want on your wish list.

The stamp set used is of course, a hostess set … I Like You, found on page 237.  The greeting comes from the Photopolymer stamp set; Endless Birthday Wishes.  My favorite thing about this stamp set is that you can create your own phrases!  Such as … have a lovely day!

000_1405

I used different Designer Series Paper for the belly bands, but this one comes from the Park Lane packet.  The flowers were fun to make and topped off the box so nicely.

The door prizes contained samples of our newest embellishments from the annual catalog.  One of the goodies enclose was a yard of each of the 5 “Thick Bakers Twine” … which will bring me to my next sample!

I wanted to share a card that showcased at least one of the door prize goodies, and this is what I thought of …  All of the 5 thick bakers twine are present with hearts streaming down.  I want my stampin’ friends to know exactly what they mean to me, and how much I really do appreciate their loyalty and friendship.  I really do “HEART YOU”.

000_1406

Hope you got a little taste of the fun that we had at the Appreciation party.  You can be there next year … I’m taking bookings right now for fall and Christmas stampin’ parties!

Contact me, ( lindaluvs2stamp@aol.com) I’d love to share the exciting new products with you and your friends.

Here is a quick reminder of our current promotions … just click on anyone of them to get more details.  Thank you.

                       6a00e54f95df92883401b7c6d00655970b-500wi                    6a00e554f4a3a4883401a511ee0d9d970c-800wi

Header_PP50percent_July1614

Thanks for stopping by …

Hope you have a wonderful day!

blog-closing-small


“Hello” to another Sneak Peak!

Hello Stampin’ Friends,

Today I am sharing with you Eileen’s swap card from our Star’s group meeting on Friday.  It’s a sneak peek as this set is not available until Thursday!

Eileen used the “Four Feathers” Bundle (W-137629 / C – 137630) you can purchase the stamp set or framelits separately but a 15% savings sounds good to me!

Love the colors on this card… reminds me of a warm fall day!  Eileen used Crushed Curry and Cajun Craze.  She used the “Arrows” textured folder to create the background.

Eileen Swap

I love how Eileen used the Scalloped Tag Topper punch with the “Four Feathers” bundle to create the focal point of the card.  She topped off the tag with the Gold Metallic Bakers Twine.

Also highlighted on the tag is the new “Color me Autumn” Washi Tape … coming in the Holiday catalog.

Eileen used the “Gorgeous Grunge” stamp set to add a bit more color to the Crushed Curry feather … I think it turned out spectacular!

Eileen Swap-close up

It’s amazing that adding that little bit of color makes the feather really “pop”.

I appreciate the visit today.  I’m sure you’ve enjoyed Eileen’s card as much as I have.

Here is a quick reminder of our current promotions … just click on anyone of them to get more details.  Thank you.

                       6a00e54f95df92883401b7c6d00655970b-500wi                    6a00e554f4a3a4883401a511ee0d9d970c-800wi

Header_PP50percent_July1614

Hope you have a fabulous week ~

blog-closing-small


Lovin’ what I do …

Hello Stampin’ Friends,

Man … I love being a Stampin’ Up! demonstrator!   If you read the blog yesterday you know I just met with my downline  (people I have recruited into my stampin’ family) and that I will be sharing those swaps with you.

Yesterday I spent the day finishing and packing up the Make & Takes for the Hostess / Customer Appreciation Party … Oh, I can’t wait for my stampers to arrive!  I’m so excited … we are going to have a blast!  I’ll post 🙂  It is amazing the lives you touch when you are in this business.

So today … I’m going to share the Make & Take I presented to the Star’s group…  A Masking Technique and a some stampin’ tips!

With summer coming to an end and fall right around the corner I wanted to share not only a new stamp set, but a something to really highlight it.

000_1386

Lets begin with the masking, I used two post it notes together (if you don’t have the longer ones) … make sure the “sticky” edges are to the inside where you will be sponging.

I began with Daffodil Delight and started 1/3 of the way down the area to be sponged, this way the darker area is where you begin and you work your way up so the top is lighter.  You can always add more color but you can’t take it back off.

The Pumpkin Pie – start 2/3 of the way down so as you move up, it’s lighter and will blend beautifully with the Daffodil.  The Blackberry bliss will start at the bottom and again, work your way up.  STAMPIN’ TIP: I do this technique of sponging in a circular motion because that helps blend it nicely too.

The stamp set is the “HOLIDAY HOME” (135095) from the Holiday Catalog.  It is a photopolymer set so yo won’t have to worry about those smaller images falling off the blocks … they stick so nicely and being clear, it’s a breeze to align!

000_1387

We stamped the tallest of the 3 houses in this set (there is also fun stuff for Christmas… very versatile) then we colored the house in to create a silhouette!  Don’t you just love it!  We left the windows alone so the color from our sponging would come through.

I just have to let you know that this stamp set has coordinating framelits (135857) and you can purchase it as a bundle (137631) too!  Catalog orders can begin AUG.28th in !!  Please let me know if you did not get your catalog.

000_1386

Thanks so much for the visit … be sure to check back daily as I will be posting more of the Star’s gathering swaps and pics and samples from my Appreciation Party!

Here is a quick reminder of our current promotions … just click on anyone of them to get more details.  Thank you.

                       6a00e54f95df92883401b7c6d00655970b-500wi                    6a00e554f4a3a4883401a511ee0d9d970c-800wi

Header_PP50percent_July1614

Have a super Sunday~

blog-closing-small


Yee Haw … New Stamp Set!

Hello Stampin’ Friends,

Today I would like to share with you a new Photopolymer Stamp Set … “Yee Haw”.  This is a great stamp sets for the cowboy (or girl) in us all.

6a0120a5bac552970c01a511f62c50970c-500wi

6a0120a5bac552970c01a511f62c4c970c-500wi

The awesome card samples were created by Stampin’ Up! Concept artist Melody H.

There are so many cute stamps in this set.  The lasso was designed to fit around Howdy, Rootin’ Tootin’, and Yee-Haw.

2-yee-haw-card

5-howdy-cowgirl-card

Here we have a sweet card for the cowgirl in the family.  Of course, my oldest daughter, even though she loves flowers, would probably prefer something a bit more like this one below …

7-mighty-kind-card

I must say … I love the star’s and the barbed wire on this card.  I have one more sample for you …


4-sheriff-bag

What a fun little birthday gift this little bag would make!  I think I’d stuff it with those Chocolate Gold Covered Coins you can buy at the Candyman on Main!

So … have you fallen in love with this cute set?  Me too … Now mosey on over to the online store and buy yourself one . . . and one for a friend, too!

shopnow

 Thank you for stopping by…

Have an awesome day!

blog-closing-small

Guest Stamper: Stampin’ Up!

Hello Stampin’ Friends,

Today I want to share with you a wonderful surprise that I received in the mail yesterday … yes, it’s a card.  Actually I got two cards (Thank You Alice!).

My card came from Stampin’ Up! so I was very curious as to what was inside.  Being a Stampin’ Up! demonstrator has many rewards, let’s just say they know how to treat their demonstrators.   Here’s what I saw …

000_1327

How cute is that!  First of all, you know I love stars!!  That is my groups team name (Star’s by Design) and banners are “hot” right now.  What melted my heart was what was inside …

000_1332

Amazing!  Rich Jutkins is the President and COO of Stampin’ Up! so I am very proud of my card (and achievements).

I do however have to THANK YOU … my stampin’ friends, club members and on-line shoppers.  We did this together … I wouldn’t have been here for 15 years if it hadn’t been for you!  I look forward to another 15 years!  Wooo Hooooooooooooo!

Know I’m thinking about you today, and hoping you have the best day ever!

Stop back tomorrow as I will be sharing a fabulous card using product from the Big Shot Special … and it’s also a “Sneak Peek” at the upcoming Holiday Catalog!

Thanks again, and ~

blog-closing-small

FREE BigShot Bundles …

Hello Stampin’ Friends,

If you’re anything like me, you absolutely love when BIG opportunities come your way.  That’s why we’ve brought you the chance to receive one of five free stamp set/framelit bundles (your choice!) with purchase of a Big Shot.   And if you get a Big Shot now, you’ll be ready for all the new Big Shot accessories in the holiday catalog being released August 28th!

If you already own a Big Shot, you can still purchase these discounted bundles at an amazing 15% off! This is one deal you won’t want to miss-only available from August 1-31-as these bundles are one-time only exclusives.  Bundles are listed below …BS_US


This video is to show you the “Magnetic Platform” with is the perfect tool for the BigShot while working with framelits and edgelits.


Just in case you can’t read the small print (like me) … I’ve added them below for easy viewing:

Two Choices:

1) Buy a Big Shot and get a free bundle below.

  and/or

2) Buy a discounted bundle below at a 15% discount.

Bundle

Item Number

Stamp Set

Framelits

Discounted Price

Sumthin’ with Bubbly Words Bundle WM

138923

Sumthin’ Sumthin’

Word Bubbles

$33.75

Sumthin’ with Bubbly Words Bundle CM

138920

Sumthin’ Sumthin’

Word Bubbles

$31.25

Decorative Goodies Bundle WM

138924

Oh My Goodies

Deco Labels Collection

$42.25

Decorative Goodies Bundle CM

138921

Oh My Goodies

Deco Labels Collection

$35.95

Celebrating Chalk Talk Bundle WM

138925

Day of Celebration

Chalk Talk

$43.25

Celebrating Chalk Talk Bundle CM

138922

Day of Celebration

Chalk Talk

$37.25

Flowery Daydream Bundle WM

138911

Daydream Medallions

Floral Collection

$54.25

Flowery Daydream Bundle CM

138910

Daydream Medallions

Floral Collection

$45.75

Bright & Beautiful Stars Bundle WM

138644

Bright & Beautiful

Star

$50.75

Bright & Beautiful Stars Bundle CM

138200

Bright & Beautiful

Star

$43.95


Which one are you going to pick?  CLICK HERE TO CHECK IT OUT!

Have yourself a great day ~

blog-closing-small

Sweet Treats in a Fry Box …

Hello Stampin’ Friends,

Today I have a cute project share for you.  It’s a tasty little treat using the  “Fry Box” from Stampin’ Up!  I pulled this project from my website under the Stampin’ Up! creations … I’ll tell you more about that later.

The color of our treat holder is the yummy Pistachio Pudding… one of our In-colors.  It’s teamed up with the “Amazing Birthday Stamp Set” … I’m excited because mine just arrived via UPS yesterday!  I can’t wait to start playing with this set and sharing more samples with you!

CreativeProject_DBWS_June0214_NA

The inside is lined with the “All Abloom” Designer Series paper, and our sweet treat has been secured inside the Gusseted Cellophane Bag and decorated with a pretty bow tied with the coordinating Pistachio Pudding Thick Bakers Twine.   You can see this and more great cards and projects from my collection and Stampin’ Up!s creations…

Click here to view more projects and card samples!

I have posted the list of ingredients at the bottom of my post for your convenience … as for the candy, come see me at the Candyman on Main!

If you like this cute project, you may be interested in the “Hamburger Box Die” … watch the video to see how fun and easy this is to use.

Hope you enjoyed today’s share … Thanks for stopping by.

Have a wonderful weekend ~

blog-closing-small


Artisan Design Gift Giving Solution Day 2 …

Hello Stampin’ Friends,

Tuesday I shared with you the first of 2 gift giving ideas from our Artisan team, today’s project share has got it in the bag!  A beautiful and elegant gift bag your friends would love to get.

Today’s guest Artisan team member is Connie Collins …

Connie Collins

  Created by Connie Collins  www.constantlystamping.com

Connie say’s … “If you can wrap a present, then you can make tis vintage inspired mini gift bag.  It’s simple – just find a small box the same size as the bag you want to make.  Then, wrap one end of the box with light weight Designer Series Paper just like you would if you were wrapping a present.  Then just slip it off, and you’re ready to fill it with something special to give to a friend.


I don’t know about you … but I’m going to try this!  Just think of all the fun holidays you could “bag up” in an instant!

Thank you so much for stopping by.

Have yourself a wonderful day!

blog-closing-small


Artisan Design Gift Giving Solution 1 …

Hello Stampin’ Friends,

Stampin’ Up! recently shared some beautiful projects created by our Artisan Team.  Talented demonstrators submit their artwork to Stampin’ Up! and each year a new team is chosen… it is a honor to be picked from so many entries.

Today I want to share with you the first of 2 gift giving ideas!  Come back tomorrow to see my second pick for a great gifting solution!

Today’s guest Artisian team member is Cindy Shuster

Cindy Schuster

 Created by Cindy Schuster  www.metmegcreations.blogspot.com

Cindy say’s … “Have you seen the designs in the Playground Project Life Card Collection yet?  They are awesome bold and fun patterns and have the neatest sayings!  Just pair them with some yummy ribbon and they’re perfect for some gift boxes to give to anyone special at any age!  Who knew Project Life® by Stampin’ Up! could be more than memory keeping.


Wow … I love her cute gift boxes.  You’ve seen me use the Project Life® by Stampin’ Up! for cardmaking, now you have another great idea to use them!!   MY card …

000_1257


Being a Stampin’ Up! demonstrator is a wonderful family to belong to.  It really is all about sharing & caring.

Thank you so much for stopping by.

Have a great day!

blog-closing-small


Gold goes Fast to Fabulous …

Hello Stampin’ Friends,

Put away your BigShot because today we’re punching!  I’m also going to show you a great tip to create some fun on your cards … works great when you’re creating with the kids.  Our color pallet today is Gold and Vanilla with a pop of Cherry Cobbler.

You will need our Transfer Adhesive sheet because we are making stickers!!  I pulled back the top piece and carefully laid my Gold Foil Sheet onto the sticky side.  I like to put a scrap paper over the top and then apply even pressure to the entire foil sheet to ensure it’s evenly attached.

000_1269

Now just pull the foil sheet off and you have a sticker sheet!  You can do this with your cardstock, designer paper or any of the specialty paper.  Makes application of multiple items quicker, and it’s great for little fingers that aren’t so good with the snail adhesives.

Next I cut my gold foil down to 4″ x 5-1/4″ then punched out my circles.  I used that piece as my mat for my card front… no one will see where you punched so, NO WASTE!

My vanilla card front is 3-3/4″ x 5″.  I just peeled off the backing and placed the dots were I wanted them …  No fuss … No muss!

000_1276

The “For You” comes from the Hostess stamp set, “Hello There”.  I inked up the stamp with the Gold Metallic Encore ink, sprinkled my gold embossing powder on, tapped off the excess, and heat embossed.

I punched it out with the 1-1/4″ circle punch and I added one pop of color … Cherry Cobbler with the 1-3/4″ circle punch.  My greeting was popped up with the Stampin’ Dimensionals.

To finish, I added a strip of the Fast Fuse adhesive to the back side and wrapped the card front with Metallic Gold Bakers Twine.  H-O-L-Y Cow … that Fast Fuse really holds!  The entire card front was popped up  … I love layers and dimension.

000_1275

And that’s it … fast to make, fabulous to look at!  Besides, who doesn’t love Polka Dots!

Thanks for stopping by today.

Have yourself a Fabulous Friday ~

blog-closing-small


Color Combination … put to the test!

Hello Stampin’ Friends,

How are you doing this fabulous day?  I’m feeling better every day, so I felt it was time to challenge my brain!   I decided to pick a color combination … then design the card.  What was I thinking?  In reality, it wasn’t that hard.  You’ll understand as you follow me through the steps.

It began with the Sweet Taffy designer paper and my choice of “Pumpkin Pie” …

000_1260

Once I had the designer paper color, I when through the Color Coach to get my color pallet for my card.  As you can see … Cherry Cobbler and Night of Navy completed my color combination.

For some fun and texture I embossed the base of my card with the new “Large Polka Dot”  embossing folder.  Oh boy … this one is going to get used a lot!

000_1266

With the base done, it was time to adhere the designer paper, I matted it with the Night of Navy and scalloped one edge with the Scallop Edge Border punch.  The combination of these two colors emit a burst of energy!

Next I wanted a focal point that really stood out, so I picked the Hostess stamp set: Bloom with Hope.  This is the perfect stamp set to play with your Blendabilities, and as you have seen if you follow me … I use it a lot.

I used the Pumpkin Collection of Blendabilities, then added the Cherry Cobbler.  These two combined created such a warm and beautiful flower.  The Old Olive collection was used for the greenery and ties in nicely with the color scheme.

000_1261

I used the Circle Framelit dies to cut out my flower image, then chose the 2-1/2″ punch to mat it because it is smaller & there was not as much of the Cherry Cobbler cardstock showing.   I used the Cherry Cobbler for the mat so it would pull out the cherry highlights out of the flower.

Finally my greeting … I must say, I have wanted to use the “Endless Birthday Wishes” stamp set for a long time, so I pulled the Happy Birthday from there!  This is the cutest stamp set and is Photopolymer.  If you like your stamps clear and stickin’ to your blocks … these are for you!

000_1265

The greeting was popped up with the Stampin’ Dimensionals.  I tried really hard to add a 3rd circle (in the flower shop, we always designed with odd numbers) but on this card … it just didn’t work!  Sometimes less is more.

Stay tuned because in the next few days I’ll tell you how you can get the Bloom with Hope Hostess set and a Free color collection of Blendabilities Markers!

Hope you enjoyed today’s card and it’s brightens your day a bit.

Take care ~

blog-closing-small


DSP’s Little Black Dress in full color!

Hello Stampin’ Friends,

I have a great card share for you today!  It comes from our Stampin’ Up! blog and Artisan Connie Collins …. I “LOVE” her card samples and so will you.

Last week Wednesday, I shared a card showing you how to color our “Back to Black” designer series paper on my “Just Add Color & Surprise” post.  Just click the link to view again.

I hope you read her full post, because she has some great tips for us too!

Now I would like to share Connie Collins’ post …

Designer Series Paper’s Little Black Dress

Most women have one hanging in their closet—a little black dress that can be accessorized up or down for almost any occasion. It’s totally indispensable when it comes to your fashion wardrobe. Now there’s a little black dress for your paper crafting, too! It’s called Back to Black Designer Series Paper and it is so incredibly versatile that you can use it on practically everything.

Black and white look great together all by themselves, but if you add some of the new Blendabilities alcohol-based markers, you can customize this great Designer Series Paper for endless possibilities. On this card I shaded the white areas from right to left using the Coastal Cabana Assortment for a great look that gives the feeling of depth. Then I punched some flowers from Hello Honey and Melon Mambo Cardstock to add to the sentiment from the Hello There Hostess Stamp Set.


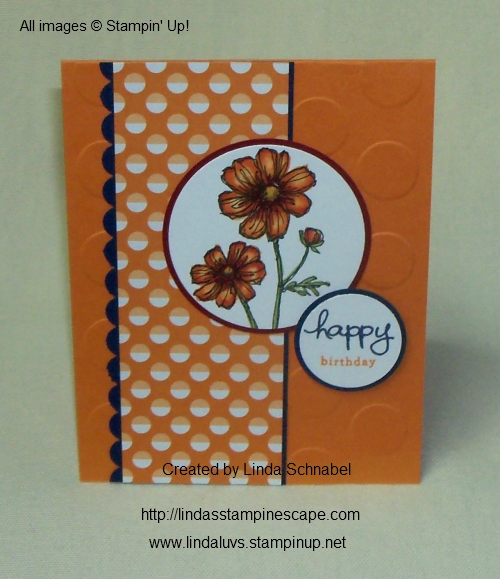
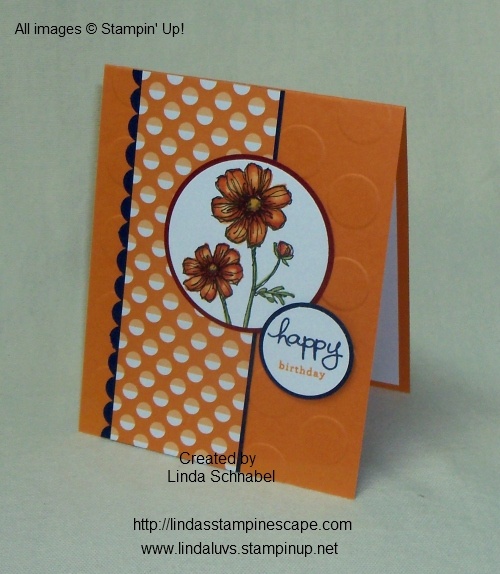
Coloring the small white hexagons on this card really brings this background to life. I used the medium Pumpkin Pie and Daffodil Delight Blendabilities markers to add random areas of color. I love how these particular markers work so well with the Tangerine Tango Designer Series Paper and the Hello Honey Cardstock. As a matter of fact, probably one of the best things about the new Blendabilities markers is that they work perfectly with your other Stampin’ Up! inks and accessories.


For this final card I used the medium Pumpkin Pie and Daffodil Delight markers to color the flowers on the left panel along with the lightest Old Olive marker to color the leaves. You may not know this, but you don’t always need to shade with your Blendabilites markers. As a matter of fact, they look great when used individually. Another great thing about coloring on this particular Designer Series Paper is this: on several of the designs it doesn’t show if your color accidentally bleeds outside the lines.

The sentiment of this card is from one of my favorite new stamp sets, Hello Darling. The flowers on all three cards were made using the Petite Petals Punch and Itty Bitty Accents Punch Pack. The leaves were made with the Bird Punch and Old Olive Cardstock.

So what are you waiting for? During the month of July, Stampin’ Up! is having a Buy 3 Get 1 Free on Designer Series Paper—so it’s a great time to stock up on all of your favorites!  Be sure to add Back to Black Designer Series Paper along with Blendabilities markers to your order. After all, everyone needs a little black dress in their paper crafting closet!

Connie Collins
2013–2014 Artisan Design Team

Now … aren’t her cards just beautiful!  I love the color combinations and the fact the she used the same stamp set and “Back to Black” DSP … our little black dress of designer series paper on all the cards!

I will post a list of ingredients for your convenience, and the current promotions highlighted today.

Thanks for stopping by ~

blog-closing-small

Here is a quick link to the “Buy 3 Get 1 Free” Promotion … just click on the picture. 

buy3dsp_NA

Also … don’t forget to check out the “NEW” Weekly Deals!

CM1634B

LIST OF CARD INGREDIENTS …

I’m back ….

Hello Stampin’ Friends,

So sorry I missed you yesterday.  My “feelin’ under the weather” turned out to be full blown Strep!  So I haven’t moved much at all.  I did walk out to get my mail, only to find a wonderful surprise … My Paper Pumpkin!  That made me feel a bit better, especially when I opened it to see the cute projects!

Here is a video for you to see …

For those of you who are my Paper Pumpkin subscribers … don’t make all your projects yet.  I’m inviting you over to my house (when I’m healthy and the germs are gone) for a….

BYOBox Party! 

YEP, Bring Your Own Pumpkin Box.  We’ll make our projects together plus … I have some other designs to share with you.

I’ll send out the date shortly … but it will be before the end of this miss.  Can you wait????

Hope you all had a wonderful weekend,

blog-closing-small