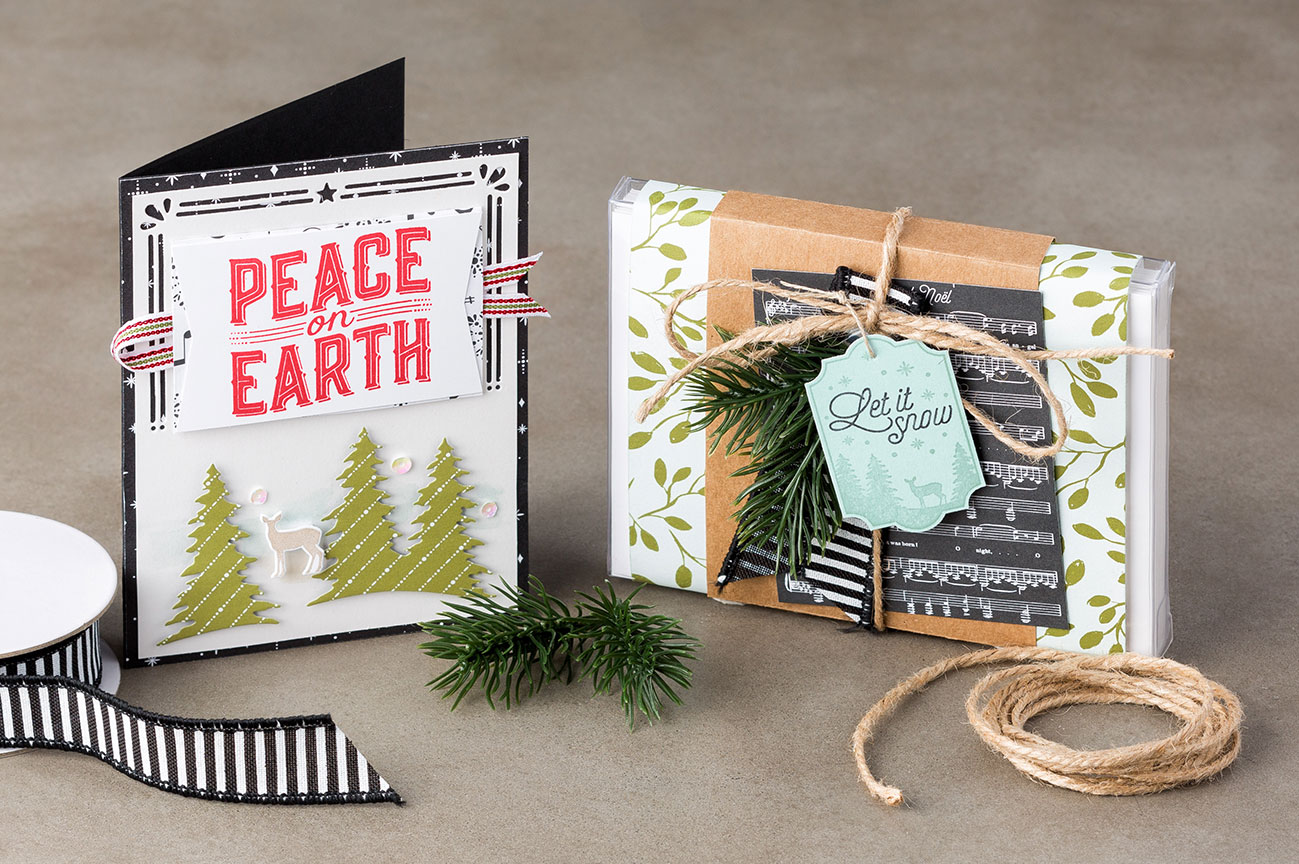
Today I’m sharing a card and project ideas straight from Stampin’ Up! It’s from our Merry Little Christmas product suite! You can view the suite on pages 10-13 of the Holiday catalog … I just can’t get enough of this product suite!
This product suite fills up four glorious pages of the holiday catalog, the Merry Little Christmas suite is packed with festive stamps, Designer Series Paper, accessories, and tools.
Our Merry Little Christmas (Mega) Suite contains products for all your holiday crafting needs: gift packaging, cardmaking, memory keeping, decor, and more! Stampin’ Up! trainer, Donna, shows you products from the suite, as well as some fun ideas for your Christmas crafting.
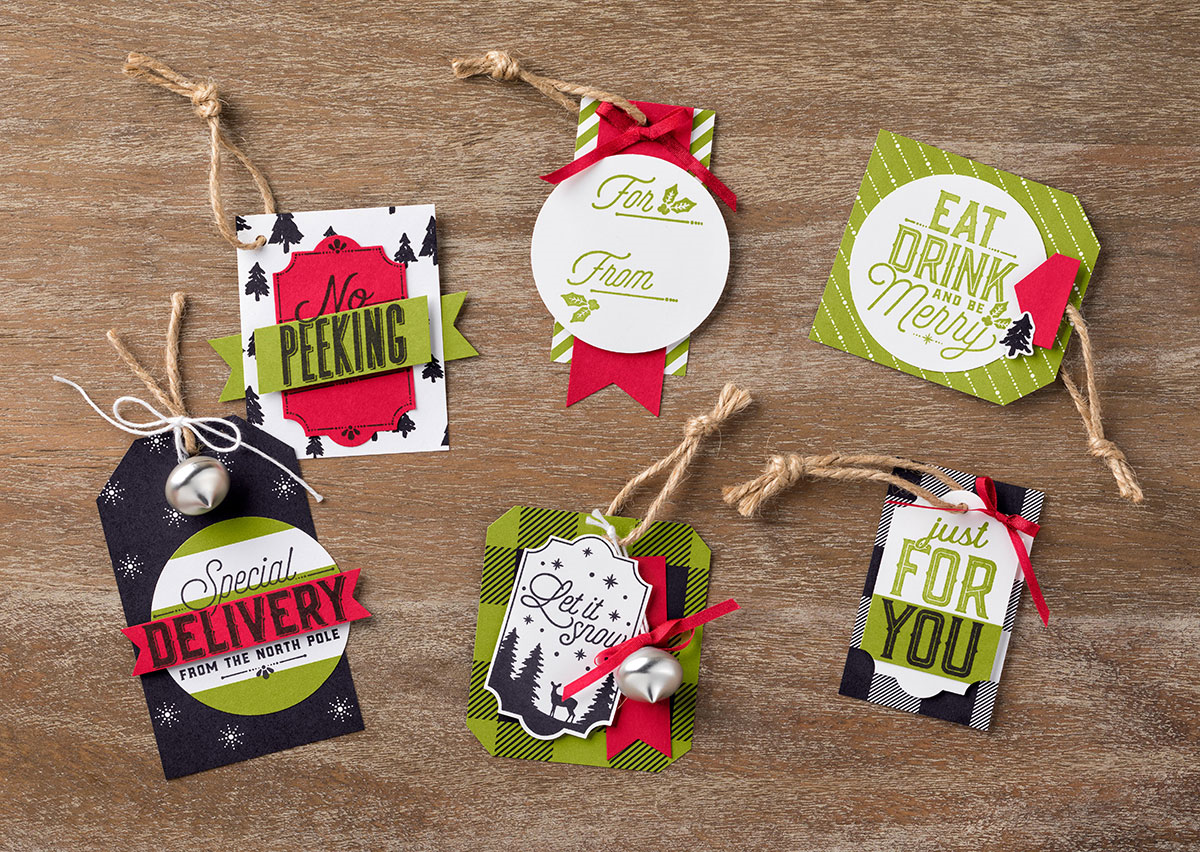
What is the perfect craft for this giving time of year: gift tags! Gather your friends and make these tags using the Merry Little Labels Bundle. What a great evening of fun …
Let me know if you have any questions on this amazing product “mega” suit, or if you would like to purchase any of these items.
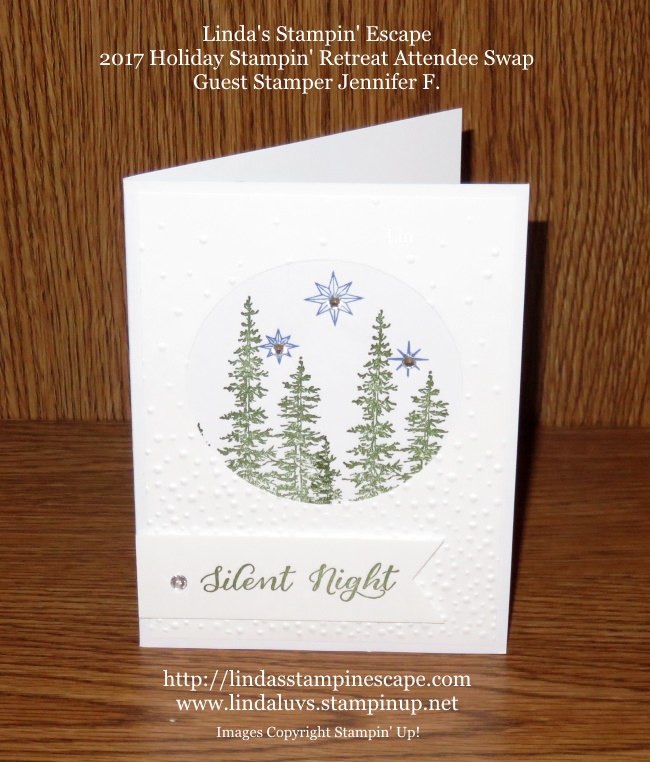
Today I’ve got double the fun for you! I’m going to share a beautiful card that one of my Holiday Retreat Attendee’s made for the card swap, and I have a super simple way to deck out your Holiday Paper Pumpkin Stocking.
I am thrilled to share a pretty card from my Guest Stamper: Jennifer F. What I love about this card is that Jen took a staple from her stamp collection and created this a fresh new holiday look …
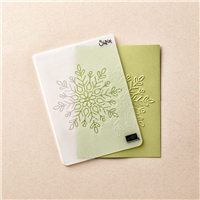
Lovely as a Tree just received a lovely update … I love how it is framed with the use of the Circle Framelits Dies and the Softly Falling Textured Embossing Folder.
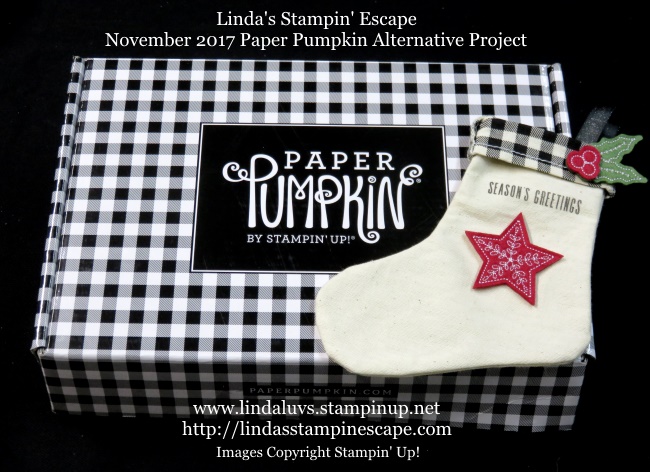
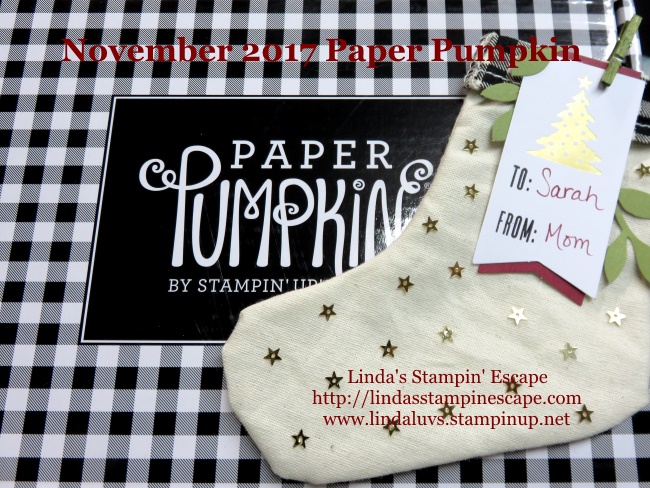
The “two” on this Tuesday is an Alternative Project to the November 2017 Paper Pumpkin kit. These little stockings are so easy to work with and a Gift Card tucks nicely inside … so hang them on the tree or use them on the gift.
I teamed up my Paper Pumpkin with the fun and amazing Stitched Felt Embellishments from the Quilted Christmas Product Suite. Just a quick dab on All Purpose Glue and your stockings are ready to hang… and I added some pretty ribbon so you can do that!
I see some of you took part in our 24-hour Sale (THANK YOU!!) There are plenty of items on the shopping list, so just click the link below. Don’t forget the Clearance Rack too.
Don’t forget our FaceBook Live event … join me and the rest of the Paper Pumpkin family …
Today I’ve got a cute project to share and some stampin’ tips that can be used on any projects!!
Stampin’ Up! has produced yet ANOTHER fabulous Paper Pumpkin kit! This November’s kit is filled with adorable mini Christmas stockings. And they are super fast and easy to assemble for gifting as is.
I didn’t change much on this little stocking at all … Basically I extended the Cherry Cobble part of the tag so it shows at the top and bottom, wrapped the leaves around the tag, and ….
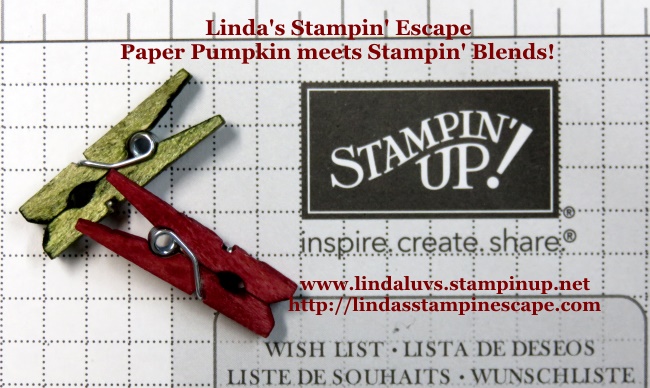
… used my new Stampin’ Blends to color the clothes pins that were included in the kit! That’s right, you can color any of our wood elements, rhinestones, pearls, accents or enamel shapes with the Stampin’ Blends.
Next… I jazzed up the stocking a bit by using the Gold Star Sequins from my October Paper Pumpkin kit, just add a touch of Multipurpose Liquid glue.
I choose the stars because of the gold tree and the star at the top… it just ties it all together.
Ready for one more awesome idea? Oh yea … Here it is ~
You can use the Stampin’ Blends on the stocking to die it to match the October card … how awesome is that!! I love this, and you can make it any color.
If you can’t get enough … join me and the rest of the Paper Pumpkin family on a FACEBOOK LIVE event …
Today I’d like to share with you a simple way to make cards & projects … Paper Pumpkin! Nothing can be simpler than these marvelous monthly kits that are shipped directly to you.
Season of Style #2 has arrived! Back in Plaid projects are perfect for stuffing with treats and giving away to very special friends. You might even say that projects like these are the thing Christmas memories are made of.
Check out the video …
Thank you so much for joining me this Sunday and watching this fun little video. Stop back tomorrow and I will share some cute ideas for these little stockings.
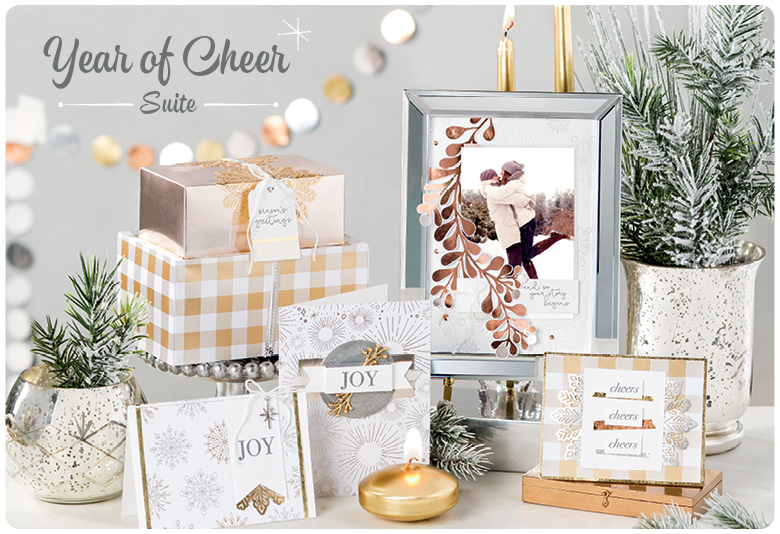
I’m back today with another of my retreat cards! The Year of Cheer product suite was a great way to send off our stampers on our final stamping session … our grand finale!
Today’s card features the beautiful sparkly pattern from the Year of Cheer Designer Paper and the Champagne Foil paper… add a piece of Window Sheet and you have a spectacular card.
The designer paper and foil was layered to hid the window sheet, but my true trick for this card was to stamp your greeting before assembling the card! The sweet sentiment comes from the “Add a Little Glitz” stamp set found on page 21 of the Holiday Catalog.
I also barrowed the die cut snowflake from the “Swirly Snowflake Thinlets Dies”. This is one of the bundles I have highlighted earlier so go back through my posts and discover even more great cards.
Thanks from sharing a part of your day with me today, and I’ll see you again tomorrow 🙂
Hope you enjoyed yesterday’s video … Today I have a stunning card created with the Year of Cheer Product Suite.
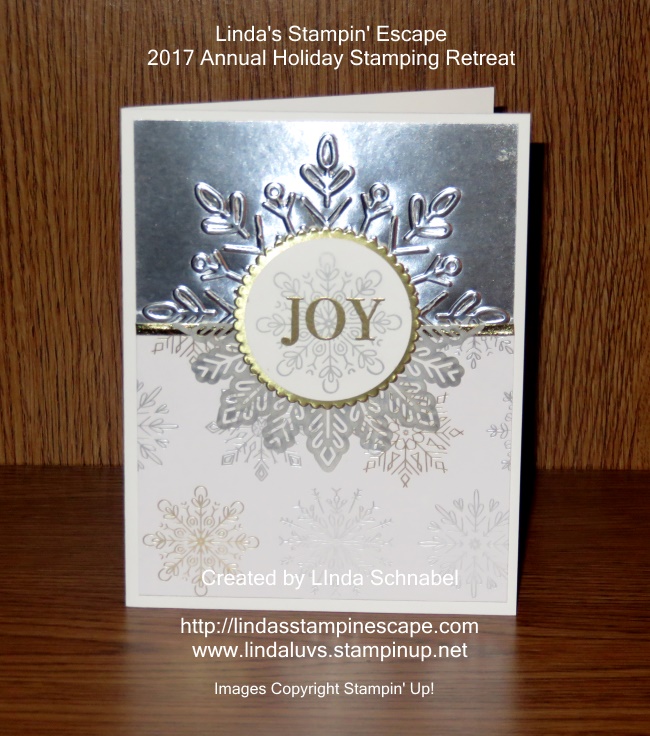
I created this card for our 2017 Annual Holiday Stampin’ Retreat … it truly highlights many of the wonderful products from the suite.
Done is Silver and Gold this card is sure to add glitz to the holiday. The pretty pattern from the designer paper was the basis of the card. I also wanted to showcase the Snowflake folder so we embossed it in silver. A strip of gold washi tape ties the two pieces together.
Next, I wanted to create a focal point for the card … the greeting! I stamped a snowflake in silver and set aside to dry. (You can heat set to dry as well) Once dry, I stamped the greeting in gold (or VersaMark) and then heat embossed it with gold embossing powder.
I used the Circle Framelit dies to cut out my greeting and then cut a scalloped edge circle in gold to mat the greeting and tie it all together with the other silver and gold.
To complete the card, we cut one of the beautiful Foil Snowflakes in half and adhered it over the washi tape … yet it allowed that touch of gold to still be seen. I cased portions of this card from one I found on Pinterest.
Hope you enjoyed the card and got a glimpse of how all these products go together so beautifully. I have another for you tomorrow… we’ll celebrate in Champagne!
I’m back today with a quick video that highlights an amazing bundle!
Intricate designs, elegant foil–the Year of Cheer suite by Stampin’ Up! is perfect for metallic, wintry projects. Stampin’ Up! trainer, Holly, shows you the products that make up the Year of Cheer suite, as well as several festive and fun project ideas.
If you like what you see here, wait to you see the cute projects I’ve come up with using the great product from this suite! Stop back tomorrow for your first glance!
Thanks from sharing a part of your day with me today, and I’ll see you again tomorrow 🙂
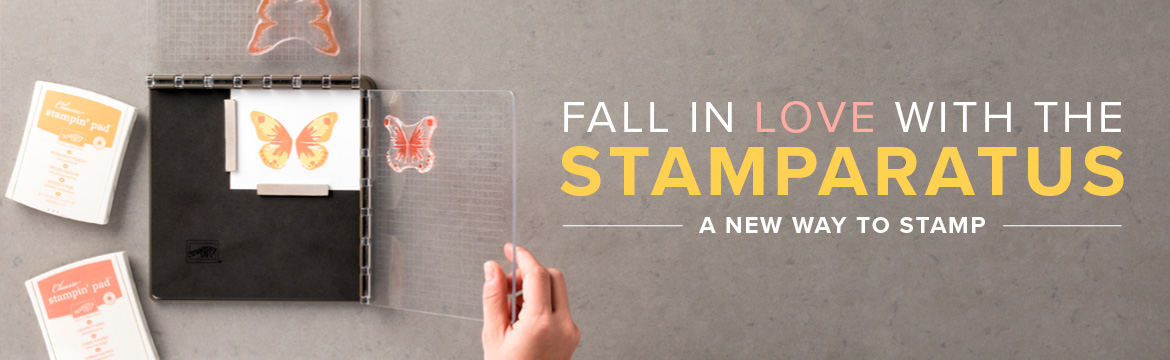
Today I want to share a fantastic announcement and video that will introduce an amazing new product …
What the video to see the fascinating things that the “Stamparatus” can do for you …
Here is a Q & A … Should answer any questions you may have. If not, contact me!
Customer Stamparatus Launch Q & A
Q: How do I reserve my Stamparatus?
A: Normally you order Stampin’ Up! products through the online store; in this case, you will click the
RESERVE link on the Stamparatus page which will take you to the reservation page. For step-by-step
instructions, please see the How to Reserve Your Stamparatus Tutorial for Customers.
Q: What if I do not have a Stampin’ Up! customer account?
A: To reserve a Stamparatus, you must have a customer account. To create one, click Create Account on the online store.
Q: Why does it take so long for the Stamparatus to ship?
A: We will place an order with the manufacturer based on how many reservations are made during any
given reservation window. Shipping dates depend on how long it takes the order to arrive in our
warehouse after the tools have been manufactured.
Q: Will the available-to-ship dates be the same for all markets?
A: Yes.
Q: Am I billed at the time I reserve my Stamparatus?
A: No. However, a credit card is required to reserve the product.
Q: When will I be charged for the Stamparatus?
A: When inventory arrives in the warehouse, we will add your reservation to a shopping cart. We will
then send you an email notifying you that your Stamparatus order is ready. Once you finalize payment
and close your order, the system will charge your credit card.
Q: Will I be able to add other products to my Stamparatus reservation?
A: No. However, once your reservation is transferred to your shopping cart, you will then be able to add other items to your order. Important note: Please do not delete the Stamparatus from your order. We
will not be able to add it back and you will lose your reservation.
Q: Will I be able to update my address and credit card information when I open my shopping bag to
complete my order?
A: Yes.
Q: What if I change my mind and want to cancel my reservation?
A: You can cancel your reservation at any time. To cancel, please see the How to Reserve Your Stamparatus Tutorial for Customers PDF.
Q: Will the tool be available in the 2018–2019 annual catalog?
A: Yes. Once the annual catalog ordering period begins, you will be able to order the Stamparatus as you
would any other product. Reservations will no longer be required, and there will be no limit on the
number of tools you can order.
Q: Once the Stamparatus has been added to my shopping cart, how long will it stay there?
A: Indefinitely. As with all products, it will be subject to temporary interruptions in availability
depending on demand.
Q: When I close my order, can I take advantage of current Stampin’ Up! promotions?
A: Yes.
Q: Can I participate in all three reservation periods?
A: Yes.
Q: How many stamp placement tools can I reserve per reservation window?
A: For customers, there is a limit of 1 per reservation window.
Q: How did we come up with the name Stamparatus?
A: We landed on an innovative name by combining two words that speak to the end use of the tool as well as Stampin’ Up! branding.
Stampē: To impress a pattern or mark (especially an official one) on
a surface, object, or document using an engraved or inked
block or die or other instrument
Apparatus: The technical equipment or machinery needed for a
particular activity or purpose
Stamp + Apparatus = Stamparatus
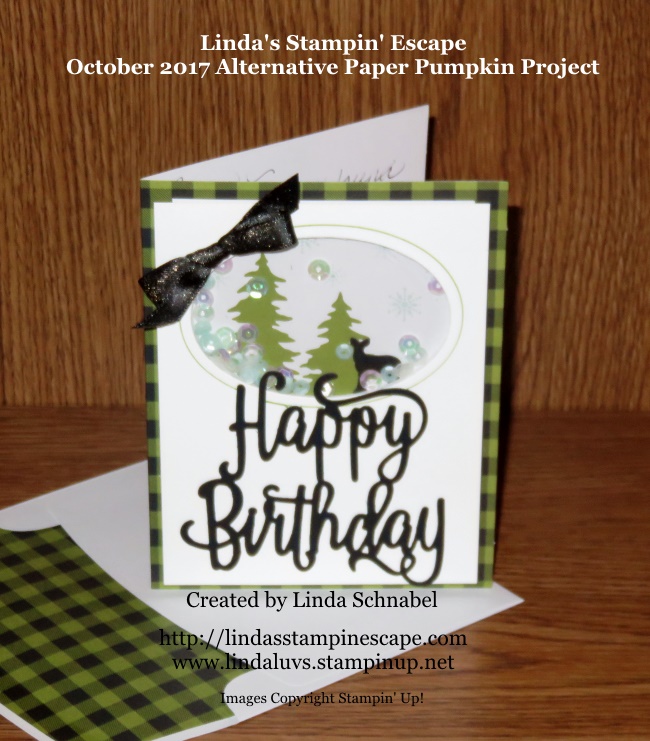
Today I want to share with you a special birthday card … my sister Eileen’s. I could not share this card earlier because we just celebrated her birthday yesterday.
I used the October 2017 Paper Pumpkin as my base … and then I changed it up to create a unique birthday card. I wanted to use the beautiful “Happy Birthday” on my card and to do so, I had to change out the top layer of my card … this is where I decided to use the Oval Dies to create my opening for a shaker card.
When I cut out my oval, I used the outside of my die as a template to draw an “Old Olive” line around the oval … this was to add a bit more of the Olive color to my card. I used the background, window sheet, sequins and foam strips from the kit for my card.
I added the deer and I did that because I wanted to add a touch of black to pull the color from the greeting and the plaid background. At this point the card was a little masculine so I added the pretty “sparkly” black bow because it tied into the color theme and added a feminine touch to the card. Now … don’t you think that did the trick!
Hope you enjoyed my Paper Pumpkin alternative … a great base to create a very special birthday card.
Thank you for joining me today, I hope your day is a good one.
Another quick post today … Yesterday Mom was admitted back into the hospital because she was not feeling good at all. We are still waiting for official word of what may have caused this again.
She looked better when I left last night than she did in the morning when my daughter took her in. So our hopes are high…. next we schedule a biopsy.
I know I’ve been busy but I still have a lot of Holiday Cards ready to share … gather your friends and let’s get together to see these products in action. I would love to be a part of your holiday preparations!
We can do an in-home party where you invite your friends over to stamp and see all the Holiday supplies, or you can host a book or On-line party. Contact me at lindaluvs2stamp@aol.com or call 262-334-1009 to schedule some fun!
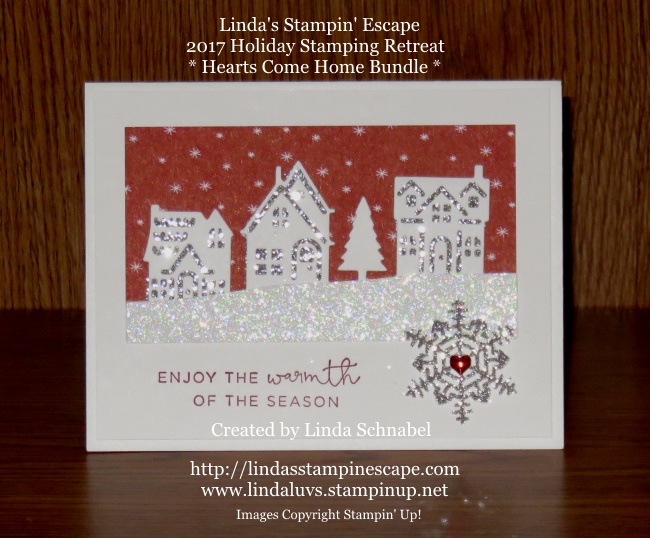
Hearts Come Home for Christmas bundle … one of my favorites in the Holiday Catalog. You’ve seen the video, you saw Kris’s swap and now I have one of our Retreat cards to share with you.
My color pallet was simple; Whisper White, Cherry Cobbler and Silver…
I also used Dazzling Diamonds glimmer paper to create the snow effect. The silver glimmer paper was used behind the houses and in our snowflake.
The ink coordinates (Cherry Cobbler) with our designer paper … and the greeting comes from the stamp set that is included in our bundle.
Simple layout with stunning results! Stop back tomorrow and see what I’ve done with this bundle… it will really shake things up!
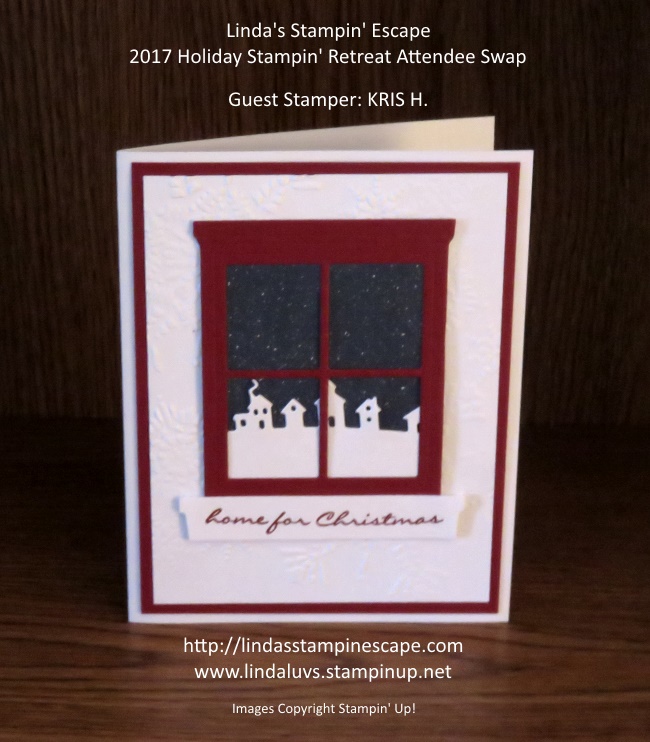
Yesterday I shared a beautiful card created from the Hearts Come Home bundle by Guest Stamper: Kris H. so today I’d like to share a video!
Check out the video and then stop back tomorrow as I share one of the cards we created at retreat, you’ll fall in love!
Stampin’ Up! trainer shows some of the adorable projects you can create with this exclusive bundle
All hearts come home at Christmas! Share the warmth of the season when you create cards, gift tags, and more with the Hearts Come Home Stamp Set and the Hometown Greetings Edgelits Dies (save 10% when you buy them together in a bundle!).
Let me know if you have any questions, if not, be sure to stop back so I can share with you a special card I created for our Holiday Stamping Retreat.
Thank you for sharing a part of your Thursday with me!
Today I’d like to share another one of the cards that my Retreat Attendee’s made for their swap. I’m so glad that I did not have to vote, because these cards were awesome.
My guest stamper today is Kris H. She used the “Hearts Come Home” bundle and teamed it with the “Hearth and Home” dies! Clever … right!!
I love the look of this card and the warmth of the season that it that it illuminates.
I think I’ll have to pull out my Hearth and Home die and create a few of these myself. Can you image using the Santa stamp from the “Hearts Come Home” stamp set and having him soaring through the sky while looking out your window!
The possibilities are endless!
Thanks for stopping by and checking out my blog today.
Today I’m going to share a video with you that shows different heat embossing techniques … You’re going to want to watch, because they’re showing one I’ve NEVER seen before!
Embossing is one of our favorite techniques! But did you know there are many ways to emboss? Watch as Andrea demonstrates three additional embossing techniques: water embossing, embossing in any color, and faux metal embossing.
So … what did you think? Are you going to try the “Water Drops”??
I’d love to hear what you think! Thanks for checking in today …