Weekly Deals and Card Share …

Hello Stampin’ Friends,

Today I am going to share the Weekly Deals with you, along with two cards that I made using the “Make a Cake” stamp set that is on our Weekly Deals list!  I’m not sure if we’ve ever had a stamp set before … that is so cool!

CM1634BWe hope you enjoy this week’s Weekly Deals!

Make A Cake Clear-Mount Stamp Set Item # 126742
Regular Price: $11.95
Discounted Price: $8.96

Punch Pack Item # 118309
Regular Price: $16.95
Discounted Price: $12.71

Secret Garden Framelits Dies Item # 129372
Regular Price: $24.95
Discounted Price: $18.71

Summer Starfruit 1-1/4″ Striped Grosgrain Ribbon Item # 132980
Regular Price: $8.95
Discounted Price: $6.71

Island Indigo Baker’S Twine Item # 125575
Regular Price: $2.95
Discounted Price: $2.21

Brights Glimmer Brads Item # 121006
Regular Price: $4.95
Discounted Price: $3.71

Gingham Standard Stampin’ Around Wheel Item # 130110
Regular Price: $6.50
Discounted Price: $4.88

Recipes By Design Digital Kit – Digital Download Item # 118869
Regular Price: $9.95
Discounted Price: $5.97

Today’s card share is a couple of cards that I had made using the Make a Cake stamp set …

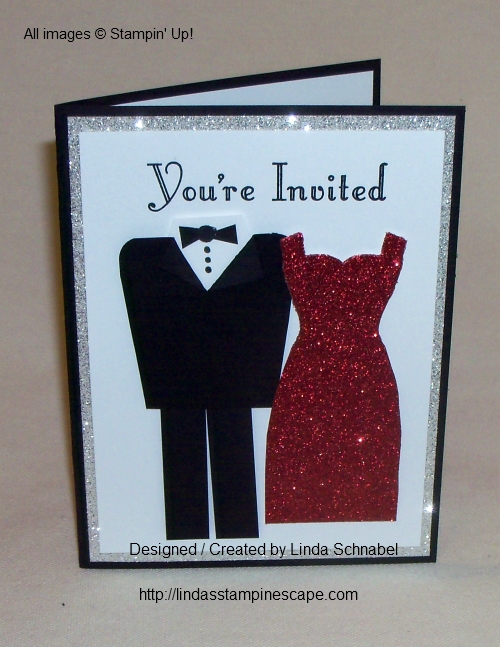
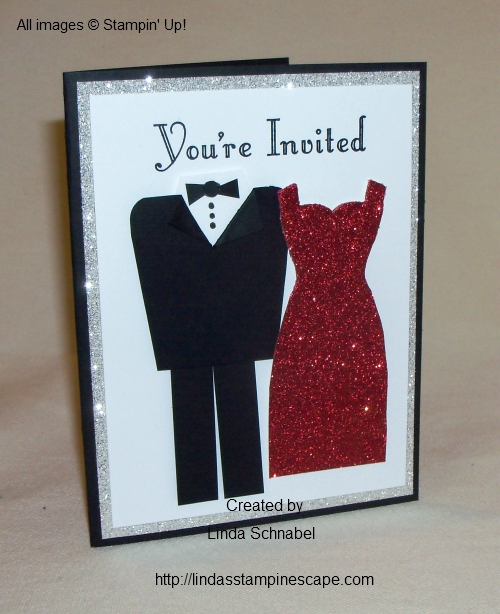
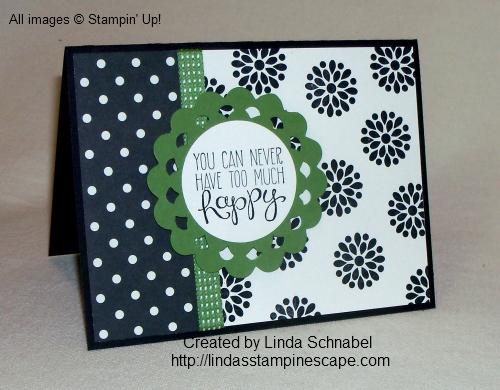
My “Bride & Groom” card was created in 2012 and not only uses the “Make a Cake” stamp set, but the flower punch from the “Punch Pack” which is also included in the Weekly Deals.  The layering look is created by “scrunching” the flower until the cardstock peels into layers (only then ends).  Just give it a try … it is quite easy.

This designer paper is no longer available, but there are so many lovely papers you could use and match up to the color scheme of the wedding.  The ribbon is the White Organza, and I love this because you can dye it any color simply by adding a few drops of re-inker fluid into some water, then dip your ribbon.  Easier yet … just color it with your marker!

The greeting comes from the “Sweet Essentials” stamp set.  Also used on this card is the Polka Dot embossing folder and the Basic Jewels – Pearls.

000_1209

As always, I will put the ingredients with links at the very end of my blog for your convenience.

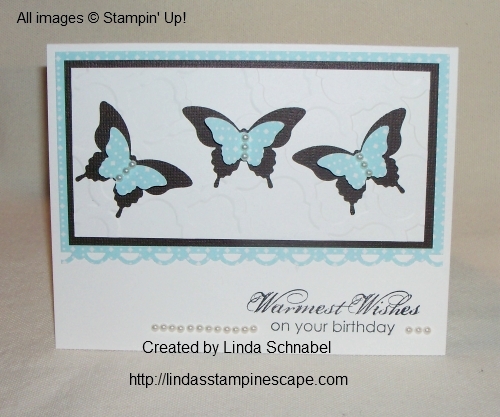
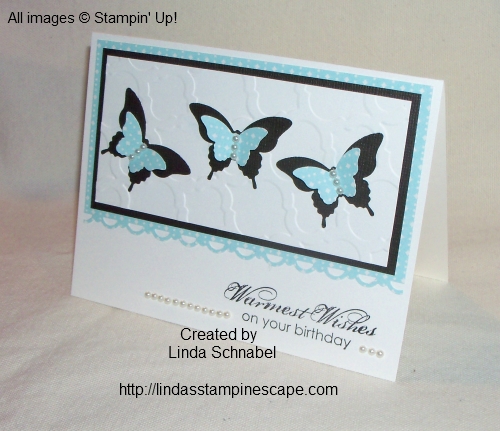
My second card was created in 2013 as one of the first cards I shared when this blog was created.  I used the “Make a Cake” stamp set and combined it with the fun technique of “weaving”.

You simply weave together scrap pieces of designer paper or cardstock to create a fun and interesting mat or background.

On this card, I stamped my cake image directly onto the designer paper and then cut it out to fit into the cake piece.  This makes cake decorating so easy!

The “Make a Wish” greeting also comes from the very versatile “Sweet Essentials” stamp set.  The embossed background was created with the “Square Lattice” embossing Folder.

100_1763

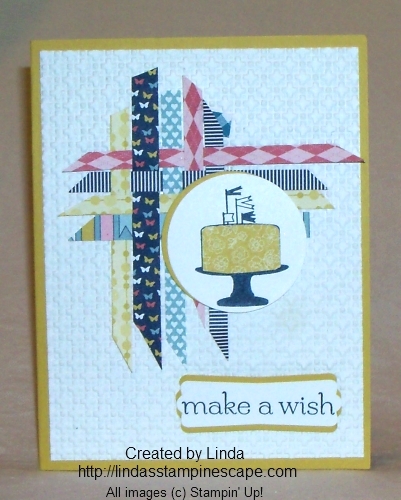
The punches used for this card are the 1-3/4″ Circle punch, and the “Modern Label” punch that I also used on yesterday’s card.

Thank you for taking time out to visit me today.

blog-closing-small


Technique Tuesday: Layered Flowers with Punches

Hello my Stampin’ Friends,

While searching for a card for a friend, I came along a card that I had made a while back and wanted to share it with you.

I remember when I first saw how a fellow demonstrator made this flower and thought how cool is that!  I personally wouldn’t have thought about putting these two punches together, but I’m glad she did!

Blossom Get Well Card

You begin with the “Blossom Punch” … I think most of you have that one already.  Then you will use another popular punch the “Modern Label” punch.  Most of us pair this one up with word window.  Don’t worry if you do not have these punches,  I will have the links at the bottom of my post for you.

OK… as I started before, you begin with the Blossom punch.  I punched my flower out of Old Olive on this card.  Then I chose Strawberry Slush (same as background) and punched 3 pieces from the Modern Label punch.  I cut those pieces in half and layered them over my Blossom punched flower.  It layers so beautifully.

You can choose any design for the center, the one used here is retired.  The center is just a piece of designer paper with a nice coating of the Crystal Effects.

The border around the Strawberry Slush cardstock was created with the “Framed Tulips” embossing folder.

And last by not least … one of my favorite greetings “Perfectly Penned”.  I hope this one does not retire for a long time!  I love it, love it, love it!

Blossom Get Well Card

Hope you enjoyed this fun technique and try it for yourself.  Get creative and pair it with some really fun colors!  I’d love to see them 🙂

Thanks for dropping in and …

Have a wonderful day ~

blog-closing-small


Video Inspirations … Watercoloring -n- Spritzers!

Hello Stampin’ Friends,

Today I thought I would share with you some videos to inspire you to create something a little outside of the box.

The first video is creating a watercolor background …


The next video is watercoloring using rubber stamps…


I hope today inspired you to create something fun and new.

Thank you so much for stopping by.

Please leave me a comment …. I would love to hear what you think.

blog-closing-small

Too Much Happy?

Hello My Stampin’ Friends,

My, my … You can never have too much happy!  Such is the thought of my card share today.  As promised, I will share with you a sample created with the “Weekly Deals”.  Today’s card features the Perfect Pennants Bigz Die… on sale now, through Monday 4/7/14.

Perfect Pennants Bigz Die

Perfect Pennants Bigz Die 123126
Price: $32.95 NOW $24.71
Create trendy pennants and banners with our Perfect Pennants Bigz L Die! The innovative designs in these longer Bigz dies give you new and interesting creative options. Ideal for cutting thicker materials and multiple layers. Use with Standard Cutting Pads. Measures 6″ x 8-3/4″.

I figured that you could make a banner using that die.   The little decor embellishments work great on your pennants / banners and I wanted to show you how to put them onto a card.  Here it will mat and highlight my greeting!

000_0963

The greeting comes from the stamp set “Yippee Skippee” in our main catalog.  I stamped it onto vanilla cardstock, using the black StazOn™ ink.

My patterned paper comes from (some of you already know) the Modern Medley Designer Series paper.  Who doesn’t love polka dots!

I teamed it up with this cute little flower from the “Mixed Bunch” stamp set.  You can find that on page 89 of the Stampin’ Up! catalog.  Many of my club members have this set, so I thought you would enjoy another use for this stamp set.  The circles (dots) in the flowers work well with the designer paper.

To create the “pop” on the card I used the Gumball Green stitched satin ribbon and my die cut piece in the coordinating cardstock.

000_0962

A quick and simple card to make that anyone would love to receive… very cheery.

I’m posting the ingredients below- just click on the link for more details or to purchase.  Don’t forget the “Perfect Pennants” Bigz die is on sale through Monday.

Thank you for sharing part of your day with me …

Have a “HAPPY” Sunday ~

blog-closing-small


Tag Topper Punches

Hello Stampin’ Friends,

I can’t believe the crazy weather going on all over the country.  Today we were told it may actually hit 50 degrees … finally.  Looking forward to a bit warmer weather.

Today I want to share a quick video on our Tag Topper Punches ….

Here is a little tag I created …

101_2318

Thank you for stopping by to visit me today.

Have a great weekend,

blog-closing-small


Fast -n- Furious Friday – Fancy Floral Punch

Hello Stampin’ Friends,

Well it’s “Fast -n- Furious” Friday again and I have a quick card for you.  I incorporated the “Fancy Floral” punch this is included in the Weekly Deals.

I grabbed the leftovers from my Paper Pumpkin kit that I used a few days back and stamped my arrows.  Then I took the “Thank You” wooden element and covered it in glue with the 2-way glue pen.  Then I sprinkled it with the Silver Glitter that can be found in the “Celebrate the Everyday” catalog.  I just had to share one more technique you can do with the Wooden Elements.

000_0959

I then took the Fancy Floral punch and punched 3 flowers out of Island Indigo cardstock.  I sponged all three on the edges of the petals, then I curled the petals with my bone folder.

To create a more dramatic look … I cut into the flower between the petals and then glued one over the other to create a smaller flower.  The center is punched from the Silver Glimmer paper.

000_0953

Thanks for dropping in.

Have a Fab Friday ~

blog-closing-small

Throwback Thursday … with “Tag It”

Hello Stampin’ Friends,

With all the social media buzz going on now days, I thought I’d share something fun with you.  No … I’m not posting a “selfie” but I thought it would be fun to do a “Throwback Thursday”.  So today I’m going to share with you some cards that I had made a while back.

I’m actually going to share a “set sampler” with you.  This is a group of cards made from the same stamp set…. today’s set is the “Tag It” stamp set.   Some of these you have seen before, and some will be new to you.  On that note … let’s get on with the sharing!

My first card is a Get Well card that I paired up with the “Quarterfancy Specialty” Designer Paper.  I created it with Daffodil Delight cardstock because I thought it was bright and cheery!  I also used the Polka Dot embossing folder and Daffodil Delight seam binding.

101_1385

This cute birthday card below, is a fun card for the kid of any age … 9 to 92!  I love all the bold colors by using the brights collection: Pacific Point and Real Red.  I teamed it with the In-Color; Gumball Green (this will be retiring this year!)

The “Tag It” stamp set coordinates with the “Chalk Talk Framelits” found on page 187.  I used the tag framelit to create a focal point for my stamped image.

You will also see the cute little “Candy Dots” … I used them to anchor the red banners.  All mounted on the Pacific Point background that was embossed with the “Fancy Fan” folder.

101_1399


The “Tag It” stamp set our Ronald McDonald House Charities stamp set.  Each year Stampin’ Up! designs a new stamp set to raise funds to help families who have children with serious illnesses.  When you buy the “Tag It” stamp set …. Stampin’ Up! will donated $3 to the RMHC.  It’s the best kind of gift.

My next card is a fun and bright way of saying … Congratulations!  Who wouldn’t want this star spangled beauty to celebrate their accomplishments.  Again I used the Chalk Talk Framelits and Candy Dots.  I did however team up my stars with the stripes embossing folder.

101_1379


Oh yes, there is more!   Why … because “I DIG YOU”!!   Oh my gosh … I love this card (I love them all) but this one is just a neat way to tell someone you care about them.

I used the “Epic Day This and That” Designer Series Paper.  The earthy colors work so well with our “digging” tool!  LOL    Oh my … it’s just too cute!

101_1397Oops … I forgot to tell you that I used the “Honeycomb” embossing folder and the fabulously fun to use “This and That” Washi Tape.


I have one last card for you… my “Christmas Around the World” card.  OK … I love this one too!

100_1779

I used the “I Am Me” Designer Series Paper because of this pattern.  I just thought “how can you not use that for a Santa card!”  Right?  Again, I used the Chalk Talk Framelits to cut out Santa.  He was actually stamped twice, once in Gumball Green and the other in Real Red.  The green greeting were cut out and popped up on the tag.

If you don’t already have this stamp set … think about it.  With each set sold – $3.00 goes to the Ronald McDonald House Charities.  To date we have donated over $1,000,000 … because we all care.  Kinda makes you feel all warm and fuzzy inside!

I hope you enjoyed today’s card share … this one really touches my heart. I have listed the ingredients for these cards along with the link to view or purchase.

I wish you a warm and wonderful day today.

blog-closing-small


New Weekly Deals …

Hello Stampin’ Friends,

Today I’d like to share with you the WEEKLY DEALS.  I’m excited to say that I have almost all of these items and happy that you can get them at a discount!

Be sure to stop back during the week, as I am hoping to share with you some cute projects using these fabulous items.  Now, without further ado …

CM1634B

We hope you enjoy this week’s Weekly Deals!

Blue 3/8 Inch Denim Jean Ribbon Item # 125053
Regular Price: $6.95
Discounted Price: $5.21

Delicate Details Lace Tape Item # 130966
Regular Price: $9.95
Discounted Price: $7.46

Polka Stampin’ Around Builder Wheel Item # 130109
Regular Price: $4.50
Discounted Price: $3.38

Perfect Pennants Bigz Die Item # 123126
Regular Price: $32.95
Discounted Price: $24.71

Fancy Flower Punch Item # 118073
Regular Price: $16.95
Discounted Price: $12.71

Fun Flowers Bigz L Die Item # 121812
Regular Price: $32.95
Discounted Price: $24.71

7/16″ Natural Trim Ribbon Item # 129287
Regular Price: $6.95
Discounted Price: $5.21

Mom, I Love You Ensemble – Digital Download Item # 129872
Regular Price: $9.95
Discounted Price: $5.97


These items are available through April 7th (or while supplies last).

Remember, just a click on the item description and it will take you to my website for more details and/or to purchase.

Thanks for stopping by.

Have a Wonderful Wednesday!

blog-closing-small

Technique Tuesday: Wooden Elements

Hello Stampin’ Friends,

And H-E-L-L-O-O-O April!  I think spring is finally here 🙂

Yesterday I showed you the March Paper Pumpkin and how much fun I had creating different looks with the supplies they sent.  What I didn’t know was that Paper Pumpkin actually turned one yesterday!  And in true Stampin’ Up! fashion, they threw a party …

Paper Pumpkin Turns One!

Even more amazing is the incredible year Paper Pumpkin has had.

  • We’ve sent out 229,000 Paper Pumpkin projects (say that three times fast!) to our friends.
  • We’ve helped over 45,000 women bring out their creative sides—(and we know that they were just waiting to break out)!
  • We even had 13,000 take advantage of our Free Marker offer—ended yesterday!

Yep. Not bad for something that is only ONE-year old!

To celebrate, we held a birthday party at our Riverton Campus, complete with yummy cake, festive balloons, and even party hats.

I told you it was a fun company to be associated with!  Well hang in there because my 15th anniversary is next year, and in Stampin’ Up! fashion … I will be hosting parties, specials and more all year long.  Don’t worry, you will be invited to them all!

I also told you yesterday that I would show you some fabulous products that we have in our “Celebrate the Everyday” catalog that you could use to recreate the techniques I showed you.  We will be using the “Essentials Wooden Elements” and the “Watercolor Wonder Designer Note Cards”.

000_0519

On my “Life Doesn’t Have to Be Perfect” card … I used the “Direct to” technique in which we applied the Ink Pad directly to our wood element, the heart.  You can see I dragged the ink pad across the heart for a streaked look, as compared to yesterdays card when I fully inked up the wood greeting.

I teamed this card up with the Perfect Pennant Bundle, which includes the Perfect Pennant stamp set and the Banners Framelit Dies.

000_0518

Yesterday’s card I stamped a pattern onto the wood, today I actually stamped a greeting onto the wood element.  I also sponged the edges.

As you can see, the Wooden Elements are very versatile and you can use many techniques on these fun embellishments!

These two cards were also very quick and easy to create, with this combination of note cards, elements and the bundle … the possibilities are endless!

Here are the items that I used to create these cards…

I hope you were inspired to try out some of these fabulous products and / or the techniques I used on the Wooden Elements.

I thank you for dropping by today!

Have yourself a terrific Tuesday ~

blog-closing-small

Pumpkin Card Share …

Hello my Stampin’ Friends,

Oh my… It’s March 31st already!  It’s been cold for so long that I don’t think we realized that we really are heading into April (and Spring).

I have created a bunch of cards using my March Paper Pumpkin that I wanted to share with you.  I also want to remind you that the offer for the FREE Markers (when you sign up for the Paper Pumpkin) ends today.  CLICK HERE TO TRY IT OUT

I don’t want you to miss out on the FREE markers if you have been thinking about trying out our Paper Pumpkin.  It really is a fun treat that comes to you each month.

demoheader_paperpumpkin_demo_1.11-1.27.2014_US_CA

Here is my first sample, which represents how Stampin’ Up! pictures the design for you.  You will see as we go on, that there are 4 each of the two different greetings in wood, the base cards, two different stamps, and two different ink colors.  The cute little glitter dots, envelopes and gold envelope liners are also included in the kit.  Oh yes, and they even have “glue dots” included to adhere your wooden greetings!

000_0943

My second card for you is simply adding a flower created with the “Petite Petal” punch from the “Celebrate the Everyday” catalog.  I put one of the little glitter dots into the center … did I mention that they are “self-adhesive”!

000_0944

For my 3rd card, I found left-over oval from another project, and added it to my card.  The fun part is … I stamped the arrow image directly onto my wooden greeting!  You could stamp any design on these wooden pieces.  How fun is that!

000_0948

For my 4th and final card share, I stamped the patterned image on my card several times to create a wide border.  I have to say that using these clear photopolymer stamps … it’s really easy to align it!

Then I used the ink pad (spot) that was included in the kit, to “die” my wooden greeting.   I punched a circle out of the envelope liner, and used it to highlight my greeting.  The envelope liners are long enough that you can still use the liner for your envelope after punching … as shown below.

000_0950

I understand that you cannot get this Paper Pumpkin any more, but I did want to show you how neat, and how versatile they really are.  If you really like the wooden elements – you can find the “Essential Wooden Elements” on page 18 of the “Celebrate the Everyday” catalog.

Pair it up with the Watercolor Wonder Designer Note cards and try some of the same techniques I’ve shown you here.  I will have the links at the bottom of my blog for you view these products.

REMINDER –

SALE A BRATION 2014 ENDS TODAY!
The amazing annual promotion by Stampin’ Up! will end on Monday, March 31!
You can see the choices of FREE PRODUCTS below…6a00d8354941d869e201a3fc82472b970b-350wi

  • Orders of $100 receive 2 free Sale a Bration gifts from the list below

  • Orders of $150 and up receive 3 or more free Sale a Bration gifts PLUS HOSTESS BENEFITS (spend hostess dollars ANY way you want in the catalog!)

  •  Extra $30 free hostess merchandise with your order of $300 or more ($300 order = $80 free merchandise + 6 Sale a Bration Gifts!)

CLICK HERE TO PLACE YOUR ORDER in my online store anytime

Also Ending on March 31:
• Select an extra $25 in merchandise in your Stampin’ Up! Starter kit when you join the Star’s by Design Group and the Stampin’ Up! family!
Free Markers when you subscribe to My Paper Pumpkin
• Best of 25 years collector stamp sets << last day to order 3/31/14

Thank you so much for stopping by today.  I will not forget to post the links of the products that are similar to the paper pumpkin cards I shared with you.

Tomorrow I will show you a few samples using these two products!  I believe that will fit right in with my “Technique Tuesday”!

Again, thanks for stopping by and have a great day ~

blog-closing-small


Red Carpet ~ Red Dress …

Hello Stampin’ Friends,

I have a fun post for you today!  I have a cute card and will be sharing some fun upcoming events and opportunities.

catalog_reveal_fb - 500 PIXELS

Introducing an all-new event brought to you by Stampin’ Up!:

The 2014 Catalog Premiere!

Be the first to see the 2014-2015 annual catalog . . . just as if you were at a star-studded Hollywood movie premiere! You’ll get a sneak peak at upcoming new releases (AKA pre-sale products) AND–what would a premiere party be without a bit of SWAG (sealed with a gift)? No one will go home from this party empty-handed!

And here’s more exciting news: unlike Hollywood premieres, you won’t have to be in Hollywood to see it first! Why? Because the 2014 Catalog Premiere will be simulcast to a theater near you at the following locations!

Doesn’t that sound like fun??

Stampin’ Up! is consistently working on making their demonstrators happy, and to surprise us with fabulously fun events!   Join me, and fellow demonstrators …

YES, you will have to join the Stampin’ Up! family to attend and I’d be honored to have you in my Star’s family.   May I say … I suggest joining before the end of March (the 31st to be exact) and you will receive additional money, $150 worth of the products you already love for only $99.

joinLP_SAB_demo_Dec0113_US

Plus … you get me!

I will help guide you in creating a business that fits the needs of you and your family, teach you stampin’ and business tips, and support & encourage you in your goals. You can also join for the discount!  I did, and found there was so much more than saving money on my stampin’ orders!

Any way you look at it … I’d say “give it a try” – there is nothing to loose, but everything to gain (friendships, creative outlet, additional money, and FUN!).

Oh … and one more thing if you’re sitting on the fence … Stampin’ Up! will waive your registration fee for Convention this year!  Holy cow, that’s a $290 Savings!  I’m going … are YOU coming with me?

Let’s do it! The premier, Convention, and a whole lot of FUN!

  CLICK HERE NOW 🙂

Now for my card … it was designed specially for our catalog premier night, because I am inviting you.

You could use this layout for any black tie event that you are hosting … or a prom, a wedding (change the dress color to white and the greeting to Congratulations).  You could also use just the dress for a Sweet 16 … the uses are endless.

000_0935

The dress was created using the “Dress Up” framelits and “Red Glimmer” paper,  and then I trimmed it down for a sleeker look.  The tux … well, that was free hand.

The greeting comes from the “Make a Wish” stamp set and stamped on Whisper White.  I wanted to add that “Hollywood” touch, so I added the “Silver Glimmer” paper behind the white.  The Basic Black base ties the entire card together and gives it that “Black Tie” look.

000_0940

Hope you enjoyed today’s post.  I really do think you should grab your glittery little clutch and join us for the premier, and Convention 2014.  What a blast we will have…. it’s all about inspiring, creating, and sharing.

List of ingredients are below, just click on them for more information or to purchase.

Thank you for stopping by …

Have a beautiful Sunday!

blog-closing-small

http://


Birthday Butterflies …

Hello Stampin’ Friends, and a happy Saturday to you!

Today’s blog post is a simple but beautiful birthday card that you can easily recreate.  Let’s begin with my base of Very Vanilla.  I chose the vanilla because I had already picked out the designer paper I wanted to use, the “Retro Fresh” from the “Celebrate the Everyday” catalog.

The base is simply a half sheet of cardstock – 8-1/2″ x 5-1/2″.  Next is the Retro Fresh Designer Series Paper, which is 5-1/4″ x 3″.  I used the Scallop Trim Border Punch to create the beautiful edge.

000_0914B

Next … I wanted to create a bit of a “wow” factor, and knew that the contrast between the Early Espresso cardstock from the Core’dinations package, against the lightened Coastal Cabana of the Retro Fresh would give me just what I was looking for!  The Espresso is 5″ x 2-1/2″ and leaves a nice border of designer paper.

The vanilla that will be punched with the “Elegant Butterfly” punch is cut to 4-3/4″ x 2-1/4″.  I also embossed it to give it some dimension … I used the “Modern Mosaic” folder and placed the cardstock in crooked to give it the appearance of “flutter” lines.   Keep your butterflies … you can use them on another card 🙂

Using the “Bitty Butterfly” punch … I punched out 3 butterflies from a scrap piece of the same Retro Fresh designer paper.  Each butterfly is popped up with a tiny piece of the Stampin’ Dimensionals and then centered in the Elegant Butterflies negative space.

My greeting comes from the stamp set “Blooming with Kindness”, and is stamped in Early Espresso.  This is a simple flower stamp with beautiful verses and I find I use it quite a bit.   A good stamp set to have in your collection.

I finished off my card by embellishing my butterflies with 3 pearls each, from the pearl strands.  I felt a strand of pearls by the greeting would be the “cherry on top” and would truly complete this card.

000_0916

Shhhhhhhh … this is my Mom’s birthday card.  She loves butterflies and I know she’ll love this card.  Her birthday is 4 days after mine, she actually brought me home from the hospital on her birthday.  Great little present … don’t you think!?  tee hee!

Again, I will post the list of ingredients below, that I used to create today’s card share.  For more details on these products or to purchase, just click on the item.  Don’t forget … you still have time to get in on the FREE Sale-a-bration items, but it does end March 31st.

Thank you so much for spending a part of your Saturday with me.

Have a wonderful day ~

blog-closing-small


Fast -n- Furious Friday: Using Scraps!

Hello Stampin’ Friends ….

Holy cow, I can’t believe it is Friday again!  Don’t get me wrong, I love Fridays … especially when I have off of work until Tuesday!  Wooo hooo.  I’ll be busy in my stampin’ studio working on my upcoming retreat.

Fridays mean “Fast -n- Furious” cards, and what better way to make a quick card than to grab a bunch of scraps.  First let me say that I got my inspiration from “Pinterest”.

I was looking at a few boards and this object caught my eye … it was a board full of “quilting” designs … that’s when the light bulb above my head went on!

9454cbccd509c42b247a7c2d49e820a8

What a wonderful way to use up my scraps.  This card was super simple to make … I simply cut some scrap pieces of designer paper – 1-1/4″ x 4″.    I used the  “Gingham Garden” Designer Series Paper.

Since my designer paper had 4″ length … I cut my Whisper White base into a 4″ x 4″ square.

A simple trick to make sure you pieces are centered is to place your base onto your Stampin’ Up! Grid Paper.  I love this not just because it’s your stamp pad, but the grid make aligning your projects easy peasy … there’s room for notes, and you’ll always have a ruler handy!

000_0922

I added a bit of adhesive at the 2″ mark and then aligned my strips of scrap.  Did the same for the bottom section.  When your laying down the strips, one goes over … one goes under.  Super Simple.  Then you just adhere the ends.

000_0925

I picked the Perfectly Penned stamp set because I thought it works well with the feel of the card.  Besides, who doesn’t love that font!!  It’s done using the Craft White ink and the White embossing powder.

So today’s fast -n- furious card is just a bit of cutting, aligning, and then embossing your greeting.  Items used to create this card will be found at the end of my blog.  Clicking on the item will direct you to my website where you can view the product more closely or to make a purchase.

Just a note:

If you’ve never subscribed to Paper Pumpkin™ and have been eyeing the subscription kit program, I want to let you know that now’s the time to give it a shot. Our current subscribers have been giving rave reviews of our kits the last few months—every month that goes by is a month you’re missing out on Paper Pumpkin! With our creative kits better than ever AND a set of FREE markers for you if you sign up by March 31, you’ll want to subscribe ASAP. You still have five days to take advantage of this great offer!

Visit www.mypaperpumpkin.com today to get started.

demoheader_paperpumpkin_demo_1.11-1.27.2014_US_CA

Thanks so much for stopping by … I’d love to hear what you thought on today’s quilt card.

000_0924

Have a “Fabulous Friday” my friends!

blog-closing-small


Weekly Deals and more …

Hello Stampin’ Friends,

I was having so much fun with the “Kissing Technique, that I almost forgot to share the Weekly Deals with you.  Oh my, can’t let that happen – You’re going to flip for this weeks deal … PAPER!

The beautiful Glimmer paper in Silver and Champagne, the delectable designer papers: This and That Epic Day – which coordinates with the hexagon stamps, punches and framelits, and Soho Subway – which is great for man cards and scrapbooking your travels, and the awesome  Core’dinations in Brights and Subtles.

Love it … Love it …. Love it!   Oh, and there’s more…  Take a look!

Weekly Deals

I hope you enjoy this week’s Weekly Deals!   Just click on the description for more details and to shop my on-line store anytime.

Silver Glimmer Paper Item # 124005
Regular Price: $4.95

Discounted Price: $3.71

Champagne Glimmer Paper Item # 127885
Regular Price: $4.95

Discounted Price: $3.71

This And That Epic Day Designer Series Paper Item # 130814
Regular Price: $10.95

Discounted Price: $8.21

Soho Subway Designer Series Paper Item # 130140
Regular Price: $10.95

Discounted Price: $8.21

Cajun Craze 8-1/2X11 Card Stock Item # 119684
Regular Price: $6.95

Discounted Price: $5.21

Brights Core’Dinations Cardstock Item # 129953
Regular Price: $23.95

Discounted Price: $17.96

Subtles Core’Dinations Item # 129954
Regular Price: $23.95

Discounted Price: $17.96

Wonderful You Board Book Template – Digital Download Item # 130130
Regular Price: $14.95

Discounted Price: $8.97

As this month comes to an end, so do some wonderful Stampin’ Up! promotions that could land you some FREE product… Sale-a-bration and our Paper Pumpkin offer.  Here are the details …

“Paper Pumpkin” … try it for a couple of months.  They are bigger and better than ever.  As a Paper Pumpkin member, can stop at any time, take off for a while, or just keep it comin’ …. It’s a bundle of fun delivered right to your door each month (well … mailbox, it comes to in the mailbox) LOL

CLICK HERE FOR MORE INFORMATION or TO SIGN UP

Don’t forget … If you sign up before March 31st, You will receive the FREE Markers…a $14.95 Value!  Here is a glimpse of the Paper Pumpkin Starter Kit.

demoheader_paperpumpkin_demo_1.11-1.27.2014_US_CA

I also want to remind you that there are only a couple days left of Sale-a-bration … There are several ways to earn FREE product, let me know if I can help you.

SAB_Promo_US_01

SAB_Promo_US_03

SAB_Promo_US_07

SAB_Promo_US_08

Click on any of the links (banners) for more information.

Remember these offers expire on March 31st, so don’t delay.

Thank you for stopping by today ~

blog-closing-small


One more Kiss …

Hello Stampin’ Friends,

Yesterday I shared the “Kissing Technique” for my Technique Tuesday post … today I want to show you another card using this fun technique.

Now to keep it simple … I used some of the same items that I did yesterday.  I did however switch out the cupcake set for the Kind & Cozy stamp set… I took the center out of the checkered circle stamp… never throw anything away that you may use later!

000_0909

I inked up the circle and “kissed” it to the center of the Doily stamp… I love the cool pattern you get from centering it!  I offset the center circle when I punched out each of the different colors, don’t you love it!!  I will post a list of what punches I used at the end of the blog.

I stayed with the same color pallet as I used yesterday, but I switched out the Very Vanilla for Whisper White, since I was not using the designer paper… but I kept the ribbon!!

I stamped two verses from the Starburst Sayings stamp set, and cut them out using the coordinating Starburst framelits.  I love that Stampin’ Up! bundles these coordinating items because we save money!!  We all know, we’re going to get them both anyway… right?!

Last but not least … I tied all the images together by embossing the background with the “Decorative Dots” embossing folder from the Sale-a-bration catalog.  Yes, this is a FREE item with a $50 purchase (before shipping & taxes).  It really does add to the feel of the card … not to mention texture.

000_0912

So what do you think?  Do you like the kissing technique?  I’m excited to hear about your experience using the technique.

I have listed the items that I used to create the card … just click on the pic for more information or to make a purchase.

Thank you for visiting me today~

Have yourself a wonderful Wednesday!

blog-closing-small
I like to add both the wood and clear mount stamp sets so you can choose the one that you prefer to use 🙂