Today I have yet another card from the He’s the Man suite!! This one is super easy, super quick and super cute! Perfect for your Super Man!
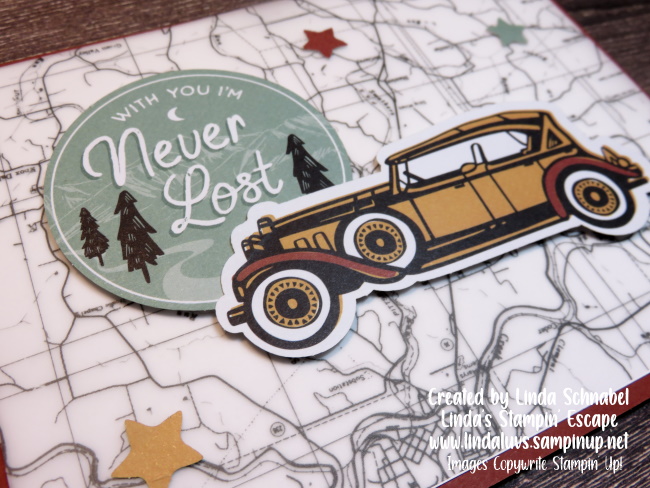
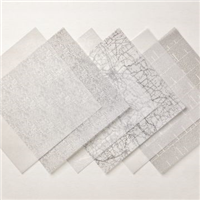
I’m using the die cuts that are included in the He’s the Man designer paper. These make creating your cards or scrapbook pages quick & easy. I just had to use the Layering Designs Vellum with the road map on it… it goes perfect with my card today.
I’m using Cajun Craze for the card base of 5-1/2 x 8-1/2″ then scored and folded at 4-1/4″. The Basic White mat is 4″ x 5-1/4″ and the He’s the Man designer paper is cut the same at 4″ x 5-1/4″ …. I wanted a bright visual to highlight the map.
The “Never Lost” die cut actually had a tent on it which I covered up with my car. Then I used dimensionals to pop up both the sentiment and the car. I used Mini Glue dots to attach my stars. For the stars I picked the three different colors to tie in all the colors of the main images… Crushed Curry, Cajun Craze and Soft Succulent.
I just fell in love with this card the minute those dies cut pieces landed on that map! This card would not only work for a birthday or Father’s Day but also a great “Thank You” card for that special someone who “goes out of their way” to help!
Thank you so much for going on this mini journey with me today …
Have a wonderful Sunday!!
I have the supply list of items listed below for your convenience.
TODAY’S STAMPIN’ SUPPLY LIST … If you liked the products used in today’s projects, I have links for you below. Just click on the item you would like more information on, or to begin your shopping. It will take you directly to my website. Thank you ❤
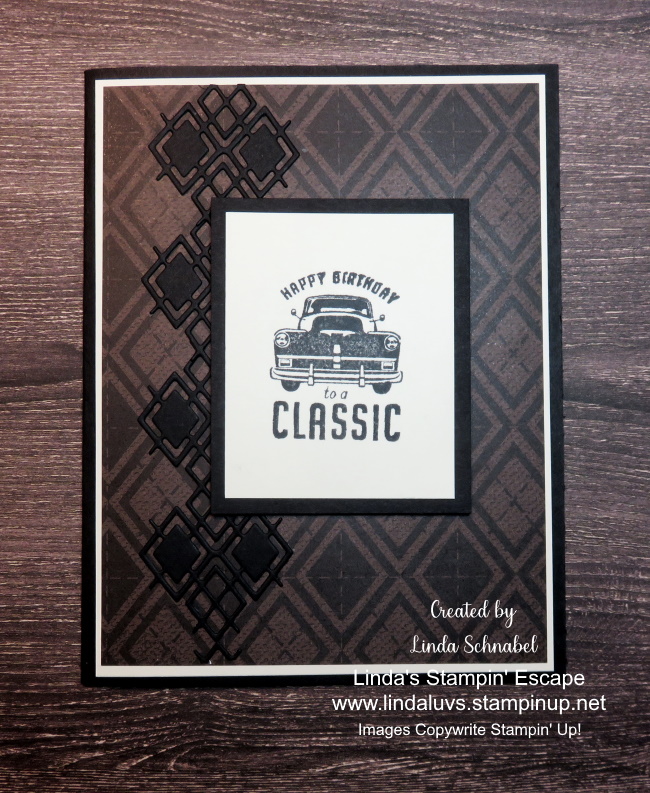
So … what did you think about the He’s the Man Suite? We are all looking for masculine inspiration so I have another card for you today. This one I’ve pulled out the dies to create something stunning!
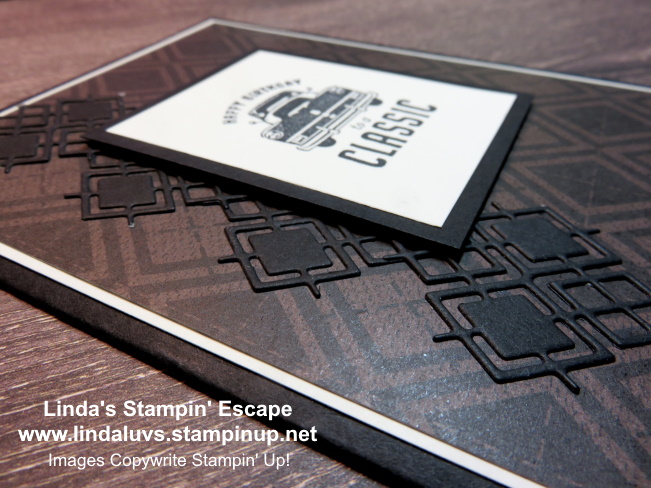
It’s a classic in every way … from the argyle pattern of designer paper to the classic car. What I love is the die cut pieces that actually aligned with the designer paper, creating a stunning pop of texture.
I began with a basic size card base of 5-1/2 x 8-1/2″ then scored and folded at 4-1/4″. The Very Vanilla mat is 4″ x 5-1/4″ and the designer paper is 3-7/8″ x 5-1/8″ …. I just wanted to tie in the greeting colors, plus it really made the designer series paper pop.
This card was fun and easy to make! With a simple layout and the patterned paper, adding the die cut argyle pieces just added some great texture to the card. I also popped up the birthday greeting to give this card even more dimension.
I think you will find the “He’s the Man” Suite very versatile … I’ll be sharing even more cards with this one for sure! Thank you for stopping by today.
Have a great day!! I have the supply list of items listed below for your convenience.
TODAY’S STAMPIN’ SUPPLY LIST … If you liked the products used in today’s projects, I have links for you below. Just click on the item you would like more information on, or to begin your shopping. It will take you directly to my website. Thank you ❤
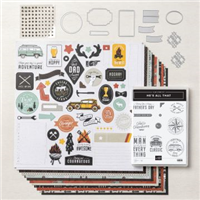
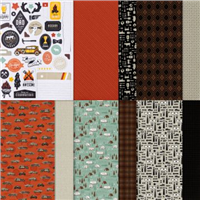
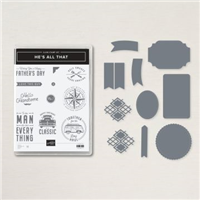
With Father’s Day just around the corner, I have the perfect suite for the man in your life. I am thrilled to share the NEW “He’s the Man” product suite with you today. This suite includes the He’s All That bundle, the He’s The Man Specialty Designer Paper and the Rustic Metallic Adhesive-Backed Dots!
You can use these products together to make creative projects, cards, scrapbook pages and more. You can also make labels and tags in a variety of shapes and sizes.
Let’s learn a little more about this suite. Join me and let’s check out the video now …
Vintage style gets a fresh look with the wonderful images in the He’s the Man Suite. The eclectic range of imagery has something for everyone in your life! Whether you know a car enthusiast, a dapper dude, or a great backyard cook, you can create throwback cards with the images designed in a modern-vintage style.
Let’s take a look at the replay of a Facebook Live I did with the He’s the Man Suite …
Making cards is easy when the designer paper is has coordinating die cuts included … I already have another pack on order!!
Here is the card we made with the He’s the Man Specialty Designer paper with Die Cuts ….
I have a STAMPIN’ TIP to share with you … The more I moved around the die cut sheets, some of the images began to come off, so I took the clear cellophane jacket that the dies are enclosed in and tucked all my die cuts and embellishments in there so I don’t loose any.
The card was just tooooo simple to create … I need to play with the stamp set and dies next. How about a class??
Thank you for stopping by today. Have a great day!! I have the supply list of items listed below for your convenience.
TODAY’S STAMPIN’ SUPPLY LIST … If you liked the products used in today’s projects, I have links for you below. Just click on the item you would like more information on, or to begin your shopping. It will take you directly to my website. Thank you ❤
I’m so happy to share last night’s LIVE with you and my two “finished” cards! lol I did find all my adhesive … under my laptop! Who put that there … LOL!! Oh my gosh, sometimes I can’t believe myself.
I’ll be sharing a simple layout that you can use as inspiration to create beautiful cards using the Hues of Happiness Suite … it’s time to cut into that designer paper!
Let’s watch the video first, ready? Let’s Get Started ….
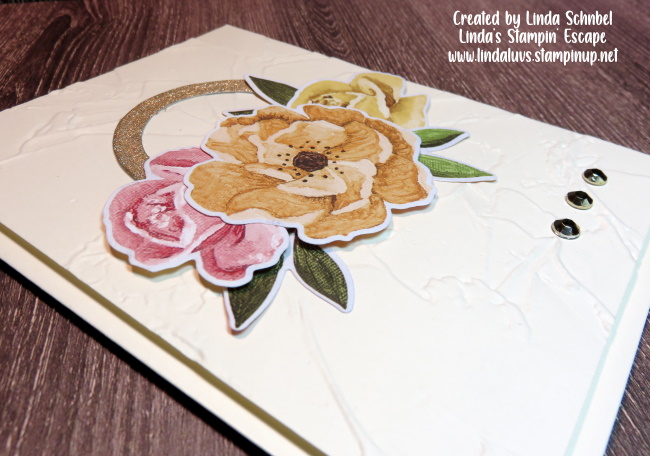
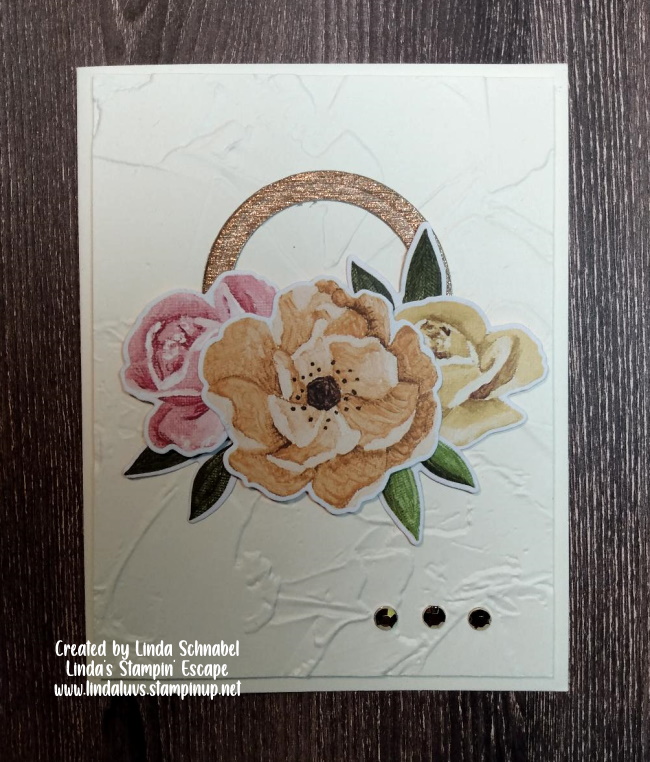
My Very Vanilla card has a card base of 8-1/2″ x 5-1/2″ then scored and folded at 4-1/4″ and we are creating in the vertical / portrait orientation. The card front is 4″ x 5-1/4″ and embossed with the Painted Texture 3D Embossing Folder. I did pop the entire card front up to create a little drama! You’re going to love it …
You can see I also layered the die cut flowers around our “Brushed Gold” specialty paper that I cut into a ring using the Layering Circle Dies. You can use any combination of colors with this layout … and the Hues of Happiness designer paper gives you many choices!
I finished off the card be embellishing it with the Gilded Gems …
The next card has the same dimensions as the first card … the Basic White card front of designer paper was also cut the same, and so was our gold ring. For this card we are using the horizontal / landscape orientation. I did this just to show you that the orientation does not have to change your layout …
I embellished with the Brass Butterflies this time and aligned them in my “triangle” layout … remember, that draws your eye around the card. I also decided to add a greeting as the white ties into the card base and balances it out. The greeting was stamped in Coastal Cabana which coordinates with the darker of the two flowers.
I love all the texture this card has … so pretty! Take a peek at the inside of the card, that is where I used that “partial” rose, remember to die cut them too and keep them to use inside the card or on your envelope.
I hope you enjoyed today’s cards and video … please feel free to share these with your friends. That is the best form of flattery!
Thank you for hangin’ out with me. Have a beautiful day.
TODAY’S STAMPIN’ SUPPLY LIST … If you liked the products used in today’s projects, I have links for you below. Just click on the item you would like more information on, or to begin your shopping. It will take you directly to my website. Thank you ❤
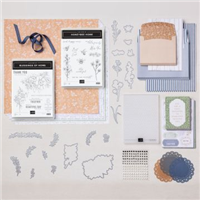
Today we are going to revisit the Hues of Happiness … this suite is so gorgeous and is designed so that we can create using a multitude of techniques and fun folds. I will be sharing more with you this week, and will be announcing a class during my Tuesday Night LIVE on my Facebook page!
I’m highlight the designer paper again today (You can see more HERE) with a great layout you can use at any time.
With some layering and two different patterns of designer paper, you can create this beautiful card with ease. The first layer is embossed with the Painted Texture 3D Embossing Folder … I love this background as this designer paper is worthy of a painting!!
I chose the floral pattern and a “brushstroke” pattern … now you know why I embossed the back drop with the Painted Texture embossing folder. The play so well together! Each piece of designer paper is matted in black to really make it pop.
The greeting comes from the stamp set included in the bundle and I used the Everyday Label punch to trim the ends and give the mat a little twist to it. I embellished the tag and card with the Classic Mat Dots in black. Try this simple layout using the amazing Hues of Happiness Designer paper or one of your favorite papers, you’ll love how easy it is, and how good it looks.
Thank you for joining me today, and I hope you join me tonight on my Linda’s Stampin’ Escape Facebook page for a LIVE demonstration!
Have a great day ~
TODAY’S STAMPIN’ SUPPLY LIST … If you liked the products used in today’s projects, I have links for you below. Just click on the item you would like more information on, or to begin your shopping. It will take you directly to my website. Thank You ❤
Hello Stampin’ Friends ~ First, I would like to wish all the Mom’s out there (Mom’s, Grandma’s, Greats, and mama’s to fur babies) a very Happy Mother’s Day!
Today, I’d like to introduce you to a very special card kit (as kits are just about as easy as paper crafting can get) … the A Million Thanks Card Kit. Say “thank you” in style and dazzle with layers of dimensions with the versatile A Million Thanks Kit!
This kit has everything you need to create beautiful, all-occasion cards to express your gratitude. Mix & match card bases, sentiments, pre-cut die pieces, and embellishments to create expertly crafted cards with ease. This kit is just what your collection needs …
Kit Includes:
A Million Thanks Photopolymer Stamp Set
Acrylic Stamp Block
Classic Stampin’ Spot: Evening Evergreen
Pre-designed projects
Step-by-step instructions
Pre-cut pieces (No prep work! Get right to crafting)
Makes 9 cards: 3 each of 3 designs
UV coating on card bases (looks like clear embossing)
Folded card size: 5-1/2″ x 4-1/4″ (14 x 10.8 cm)
9 pre-printed envelopes
Enough adhesive to complete projects
Printed die-cut sheets
1 sheet of adhesive-backed black dot embellishments
A 9-7/8″ x 6-1/2″ x 2-3/4″ (25.1 x 16.5 x 7 cm) printed designer box for storage or crafting on the go
And here is a glimpse of your exclusive stamp set …
If you are new to stamping / paper crafting, kits are perfect for beginners because they have pretty much all you need to start … they also make perfect gifts! Kit’s are also great for those of us who do not a lot of space to craft in, or for the rest of us who just need some quick cards on hand … and Thank You cards are always needed.
Here is the link if your ready to get crafting with this amazing kit CLICK HERE!
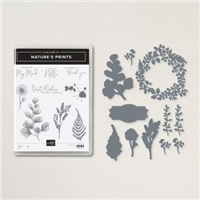
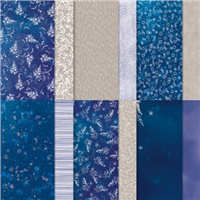
I am thrilled to share the NEW “Sun Prints” product suite with you today. This suite includes the Nature’s Prints bundle, the Sun Prints Designer Paper and the Fern 3D Embossing Folder!
Let’s take a look at the video now …
Here is a card a made with the products from the Sun Prints suite of products ….
You begin by using the Sun Prints Designer Paper and the beautiful embossing on the Basic White cardstock using the Fern using the 3D embossing folder. Then we have a few more layers of designer paper. The fern and greeting were stamped in Starry Sky one of our newest In Colors and then adorned with the Glossy Dots Assortment.
I hope you enjoyed a Peek into the new Sun Prints Suite with you… can’t wait to share even more or host a class!
TODAY’S STAMPIN’ SUPPLIES … If you liked the products , I have links for you below. Just click on the item you would like more information on, or to begin your shopping. It will take you directly to my website.Thank you ❤
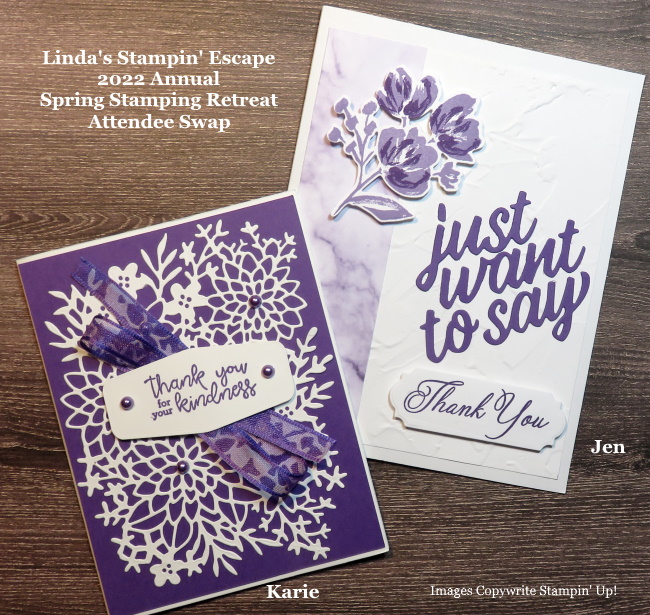
I’ve got my video back and the top three Swap Cards … My guests who participate in the Attendee Swap are entered into a contest to WIN a Gift Certificate you shop the Stampin’ Up! catalogs!! Win Win 🙂 They make enough cards for everyone participating … one for the board (me) and one for our helper. We all go home with more great cards. They also do the voting … but cards are placed in a paper bag so no one can see who made which card. It’s so fun!!
I have the replay of the FACEBOOK LIVE that will show you the other Attendee Swap Cards (in no particular order).
Let’s take a look at the video now …
We had a tie for third place … our two purple cards. Oh my, they are both so beautiful. I’m not sharing supplies / dimensions and such for any of the cards. Just sharing the beauty.
The cards were made my Jennifer (right) and Karie (left). These cards are both stunning!! Now you will see why I don’t vote ….
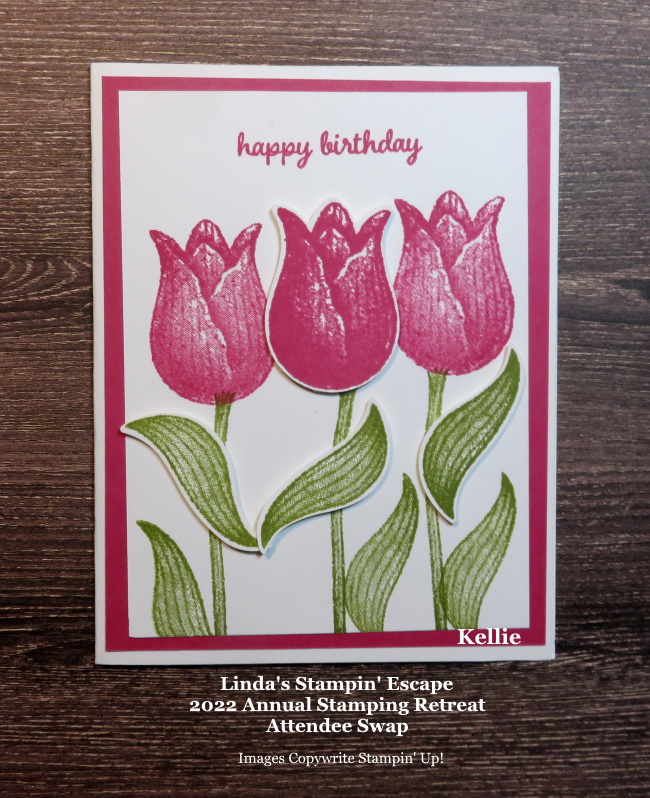
Second place was Kellie and her tulip card … Who wouldn’t want to receive this beautiful tulip card for your birthday.
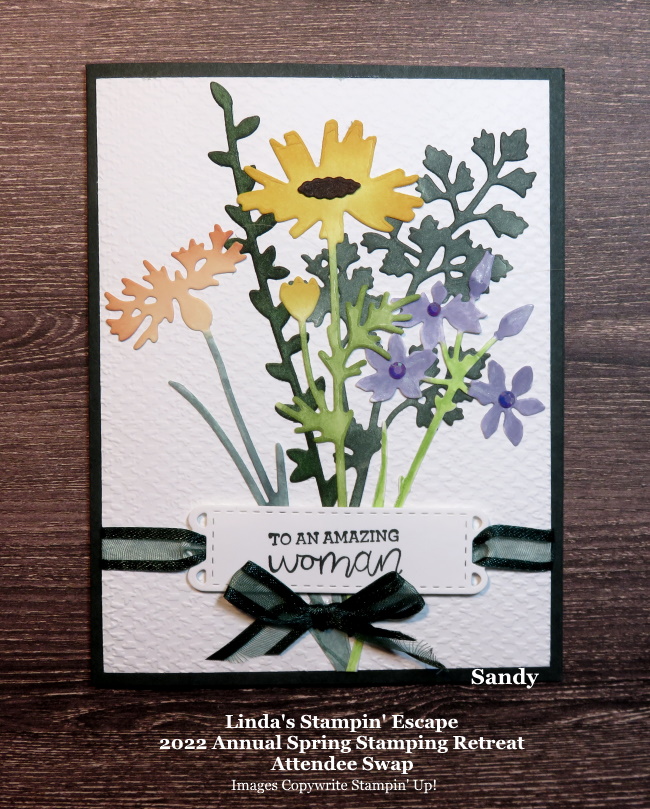
Hang on to your hat … this card is going to blow you away. This card was created by Sandy and it is absolutely stunning!
I hope you enjoyed my little PEEK into my Annual Stamping Retreat … and the exciting new products and the amazing Starter Kit promotion. Please let me know if you have questions about anything you saw on my post.
Have a wonderful day ~
TODAY’S STAMPIN’ SUPPLIES … If you liked the products , I have links for you below. Just click on the item you would like more information on, or to begin your shopping. It will take you directly to my website. Thank you ❤
A bit of some technical difficulty with my video last night so I will share that along with the Attendee Swap cards from my Stampin’ Retreat with you tomorrow! Today I’d like to share what new & happening at Stampin’ Up!
This post is not complete and I apologize … The format is not letting me add pictures or video’s at this time and I have to go to work! lol I promise to share more once I get this all figured out.
In Color Starter Kit
Promotion Dates: 3–31 May 2022
New demonstrators can select any standard eligible Stampin’ Up! products up to the $125 value for just $99!!
The Starter Kit includes business resources like catalogues, brochures, order forms, and postcards (business supplies)
The Starter Kit also includes $66.50 of FREE 2022–2024 In Color products: the In-Color Grid Paper, In-color Cardstock Collection, In-Color Ink Pad Collection and In-Color 6 x 6 Designer Series Assortment.
New team members who join Stampin’ Up! get to be a part of our amazing community of crafters. Plus, they get to enjoy sharing simple and fun crafting experiences with others, early access to products, and exclusive access to training events.
PLUS … A FREE Paper Pumpkin is included in your kit!
That’s a total of over $210 worth of product for ONLY $99!!! Whether you are looking for a discount on your purchases, making a little extra money, or are looking to build something more … Now is a great time to join Stampin’ Up! and MY Team of Stars!! Contact me or CLICK HERE if you’re ready!
I will contact you as soon as I am notified that you have joined my team! Then we can chat about how you want to explore Stampin’ Up! … the benefits, the opportunities, and more.
Once my guests settled into their rooms and meet the other guests, we sit down to dinner. This Friday we did something different … A Picnic Style dinner! Brats and Hamburgers with buns and fixin’s, Potato Salad, Seafood Salad and Chips.
Once we are done eating … we head to the stamp room. The table is set up with all their projects, dimensionals and embellishments! And a “treat” is a must. I used the Mini Jam Jars (now retired) and filled them with Old Fashioned Lemon Drops.
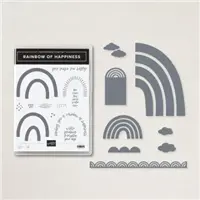
I will share one card from each of our stamp sessions, as I believe the rest should be only for my retreat guests. We’d love for you to join us, because the pictures do not do the retreat justice! The Friday Night stamp session highlighted the “RAINBOW OF HAPPINESS” Bundle.
This card pays homage to the song “You are my Sunshine” …. Thus the Merrry Melody 3-D Embossing Folder. The Rainbow was stamped with Flirty Flamingo, Highland Heather, Pool Party, and Daffodil Delight … they were inked up, stamped off and then stamped onto the Basic White front. Then fully inked, the “rays” were inked up with Pool Party and stamped over the Pool Party band that was stamped off. Add a little Wink of Stella for a bit of sparkle.
The sun was created using the “Sharing Sunshine” stamp set (now retired) using the same “stamping off the ink” technique. How cute is this! So much fun and texture on one card.
When our stamping session is over, we head back into the house for some treats, but first a stop into their room to find a special gift ….
I want my guests to feel special … I want to give them the same feeling I get when I am on an Incentive Trip, because, if it’s wasn’t for them, I wouldn’t be on those trips. They are so special to me … I wish everyone could come!
Thank you for joining me today, I appreciate your time. Have a wonderful day.
I’ll be going LIVE on my Facebook page tonight at 6:30 pm Central Time… Hope to see you there.
I am so full of gratitude for the amazing weekend we had for our Annual Spring Stamping Retreat! The weather was windy and rainy but it always seemed to clear when we had to go outside … a true sign if you ask me!
I have a peek into our stamping retreat for you … I will share a bit more in the coming days as well. I will begin with the door tags … Each guest has a name tag on their door so they know which room the will be staying in and they are free to take it home with them. They can easily pop the name off and turn it into a card!
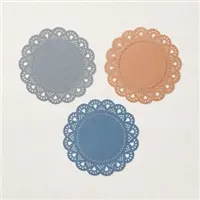
This was created using the Heart and Home Suite of products … The “theme” for our retreat. The Heart and Home designer paper, Flowers Of Home Dies, Heart & Home Doilies in Basic Grey, the White 3/4″ Frayed Ribbon which comes from the Artfully Composed suite (pg.32 in Mini), the 1/8″ Cotton Ribbon in Petal Pink which is layered over and the Petal Pink cardstock embossed with the Thanks & Hello Embossing Folders all layered onto a Basic Grey base. I printed each guest’s name onto Basic White Cardtock (from my computer) and punched it out using the Tailored Tag Punch (retiring today).
The cup is a food safe cup that has retired from the Stampin’ Up! catalog … I decorated it with the Heart and Home Designer Series paper … to do this, I took apart one of the cups, and traced the outside onto designer paper and cut it out to make my wrap!! They were so cute!
The cover was created using Evening Evergreen cardstock, die cut with the Layering Circle Dies and embossed with the NEW 3-D Fern Embossing Folder. My “greeting” to my guests comes from the NEW Nature’s Prints Stamp set from our Sun Prints Suite … pg. 90 & 91. WOW!!
As my guests come into the dining room, over the fireplace …. they find what I call my Mantle Gifts! Each retreat I decorate the mantle with a hand crafted gift that they get to take home at the end of the retreat. These are actual “pocket cards” and a seed packet was tucked inside to they have a “living” remembrance of our retreat. Each seed packet is adorned with a flower … which is actual chocolate! We all know how good chocolate and stamping go together!
Here is a closer look ….
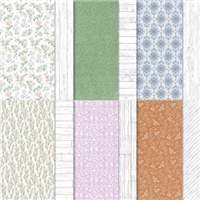
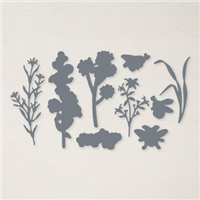
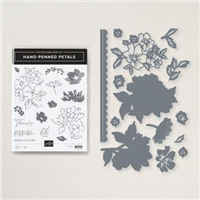
The card was created from one sheet of Very Vanilla … I created my own pattern for this. From the left over piece of vanilla, I stamped and punched (Label Me Lovely Punch) my greeting which come from one of my favorite sentiment stamp sets: Peaceful Moments. The pretty die cut flowers come from the Hand-Penned Petals bundle.
The “sentiments” on my gifts are carefully picked to show my thoughts and gratitude to my guests for choosing to spend their time with me at my Annual Retreats … I want to create an atmosphere of fun, relaxation and camaraderie. (noun: camaraderie: mutual trust and friendship among people who spend a lot of time together.)
I hope you enjoyed my PEEK into my Annual Spring Stamping Retreat … can’t wait to share even more with you!
Today I’m heading up to meet my Stampin’ Friends for our Annual Spring Stamping Retreat. I’ve got beautiful cards planned … which includes a “FUN FOLD” during each Stampin’ Session! I’m excited to meet our new stampers and can’t wait to welcome back some of the regulars.
Here is a look at our beautiful house and grounds ….
I’m hoping to share part of our retreat LIVE on my Facebook page … CLICK HERE to get to the page, and make sure you like and follow! We are in “another” new stamping room so I’ll try to share it with you.
Our stamp session is full of fun, giggles, catching up, making new friends, snackin’ and of course some amazing stamping projects!
Thank you for checking out my blog today … Have a great day!
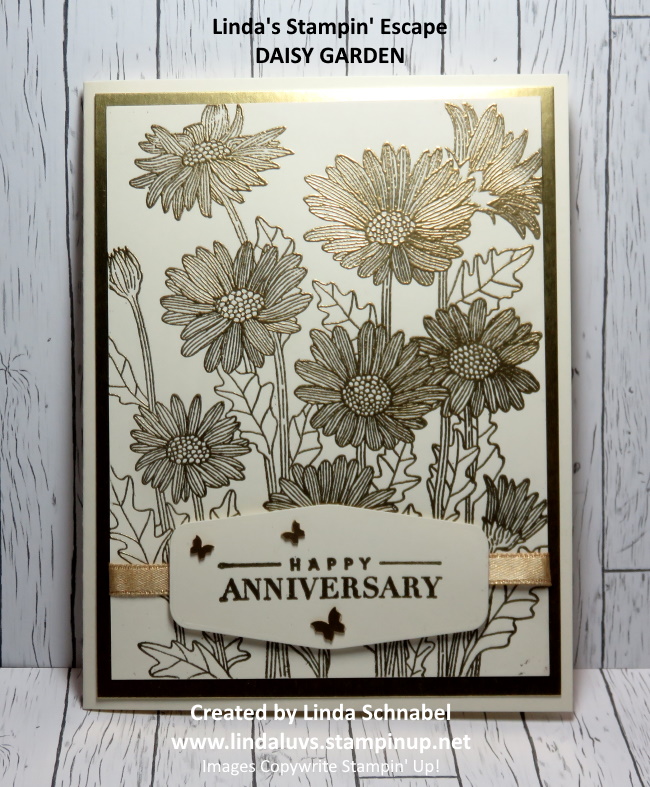
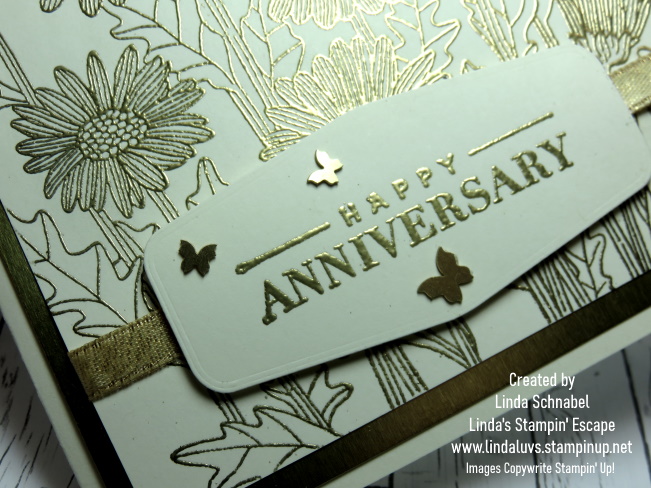
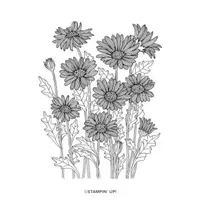
Today I have a card from the Daisy Garden stamp set, and it’s stunning in gold! I embossed the Daisy Garden in Gold on Very Vanilla cardstock. Let me just say, sometimes simplicity can be stunning …
I matted the embossed image with the Gold Foil paper (4″ x 5-1/5″) which really highlights the gold daisies. This front is attached to the Very Vanilla Base (8-1/2″ x 5-1/2″ and scored at 4-1/4″). Heat embossing is the technique that attracted me into stamping!
The greeting comes from the upcoming “Celebrating You” stamp set … it will be available January 4th in the Mini Catalog, as will the beautiful Brushed Brass Butterflies! I die cut the greeting with the Tasteful Labels dies …
I added a strip of the beautiful Gold Shimmer Ribbon that can be found in the current Mini that expires on January 3rd. So today … you got to see something new, with something in our annual catalog. I like utilizing my stamps and accessories from both catalogs.
Thank you for joining me today. Enjoy your day ~
TODAY’S STAMPIN’ SUPPLY LIST … If you liked the products used in today’s projects, I have links for you below. Just click on the item you would like more information on, or to begin your shopping. It will take you directly to my website. Thank you ♥
I am thrilled to share the NEW “He’s the Man” product suite with you today. This suite includes the He’s All That bundle, the He’s The Man Specialty Designer Paper and the Rustic Metallic Adhesive-Backed Dots!
I have the replay of last nights FACEBOOK LIVE that will show you the entire suite including each sheet of the handsome “He’s the Man” Specialty Designer Paper.
Let’s take a look at the video now …
We had so much fun last night creating the card together! It’s easy when the designer paper is has coordinating die cuts included … I already have another pack on order!! You will be able to order any of these products when the catalog goes LIVE on May 3rd.
Here is the card we made with the He’s the Man Specialty Designer paper with Die Cuts ….
I have a STAMPIN’ TIP to share with you … The more I moved around the die cut sheets, some of the images began to come off, so I took the clear cellophane jacket that the dies are enclosed in and tucked all my die cuts and embellishments in there so I don’t loose any.
The card was just tooooo simple to create … I need to play with the stamp set and dies next. How about a class?? Would you be interested in that … I could do an in home for sure, and virtual for those interested.
I hope you enjoyed my SNEAK PEEK into the He’s the Man Suite … can’t wait to share even more with you!
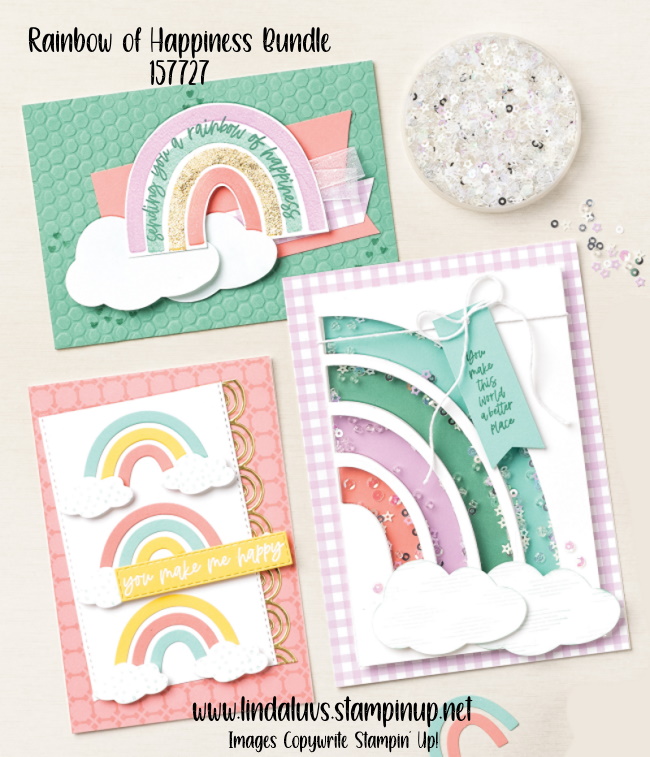
Are you one of those people who runs for the camera or grab your phone when you see a rainbow? Me too!! Who doesn’t like rainbows … they portray happiness and good luck, so doesn’t that sound like the perfect card to send someone.
Add a little sunshine and rainbows to your life with this beautiful set of products, but don’t delay … this bundle is “RETIRING” and will be gone soon.
I fell in love with all the different ways you can make cards with this bundle. Look at all they layers, fun and bling!! It’s just a bundle of smiles and happiness 🙂
Thank you for the visit today!! Hope to see you tonight for my FACEBOOK LIVE … I will be giving you a SNEAK PEEK of the “HE’S THE MAN” Product Suite.CLICK HERE TO VIEW