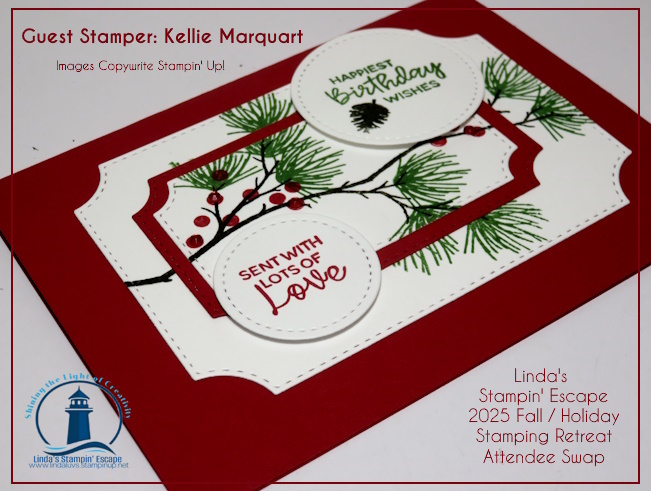
I’m so excited to share that the winning card from our Fall/Holiday Stamping Retreat Attendee Swap was created by the talented Kellie Marquart! Her beautiful card stole the show with its elegance, detail, and creativity — all featuring the Branching Out Bundle.
This bundle is a true gem for nature lovers and those who enjoy crafting projects with warmth and meaning. The Branching Out Stamp Set lets you build lifelike pine branches by layering delicate images of needles, berries, and pinecones — or use them individually for a more subtle look. Whether you’re creating a cozy Christmas card, celebrating friendship, or simply sharing love and gratitude, this set delivers timeless beauty and versatility.
Kellie’s design perfectly showcased the bundle’s potential — and what made it even more special was how she turned this Christmas-themed set into a delightful Birthday card! With natural tones, subtle textures, and a heartfelt sentiment, she proved that a little creativity can stretch your seasonal sets far beyond the holidays. Her card truly captured the spirit of the season and the joy of handmade giving.
Congratulations, Kellie, on a well-deserved win! 🌿✨ Your card was a true work of art.
If you love seeing (and creating!) beautiful cards like Kellie’s, be sure to join us for our next Stamping Retreat! You’ll enjoy creative inspiration, hands-on projects, and the chance to connect with fellow crafters who share your passion — plus, you might even be our next card swap winner! 🌟
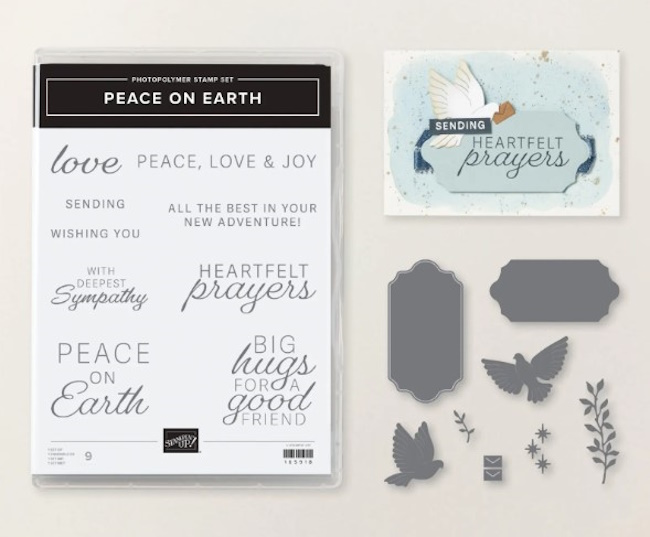
Today I’m sharing an oh-so-pretty card that’s just as easy to make as it is beautiful! This one features the Peace on Earth Bundle, and let me tell you—it’s an absolute must-have. The stamp sentiments are perfectly sized to fit the die-cut labels, which takes all the guesswork out of coordination (don’t you just love when Stampin’ Up! makes it easy for us?). Even better, the sentiments go beyond Christmas! You’ll find greetings that work for thinking of you, sympathy, and encouragement, making this a bundle you’ll reach for all year long.
The coordinating dies are full of thoughtful details—graceful doves, delicate branches, and even tiny envelopes for your doves to carry! I paired this amazing bundle with the Spotlight on Nature Dies and the Thoughtful Designs Specialty Designer Paper for a soft, elegant look. The designer paper I used is not longer available but not to worry, you can easily use any of your favorite patterned papers with this fun and versatile layout.
To create the card, start with a base that’s 8-1/2″ x 4-1/4″, then score and fold it at 4-1/4″ to form a perfect square card. The designer paper is then cut into an easy 4″ x 4″ piece which leaves NO waste of your designer paper. When attaching your circle dies with the greeting, use a ruler or template to keep the total height at 5-1/2″—that way, your masterpiece fits neatly into a standard envelope.
The die-cut dove adds such a lovely touch that you really don’t need any extra embellishments… unless, of course, you love that little bit of sparkle like I do! I added just a hint of silver ribbon for shimmer and shine. The result? A simple, elegant card that works for the holidays—or any time you want to send peace and comfort.
The Peace on Earth Bundle truly delivers on its name—it’s peaceful, versatile, and oh-so-pretty! Once you start creating with it, you’ll wonder how you ever crafted without it. ✨
Thanks for stopping by and check out my card today … hope this layout inspires you to try one of your own. Happy Stampin’! Linda
Create quick, heartfelt notes for every season—from first-day jitters to everyday encouragement with the Just a Note Bundle!
Back-to-school season is here, and what better way to send your favorite students off with a smile than with a handmade note? The Just a Note Bundle is perfect for creating those little surprises that tuck easily into a backpack or lunch bag. Whether you want to brighten their first day back or add a sweet touch to their school routine, this bundle makes it simple and oh-so-cute. And if school days aren’t on your calendar, these notes are just as perfect for encouragement, support, or a “thinking of you” message any time of year.
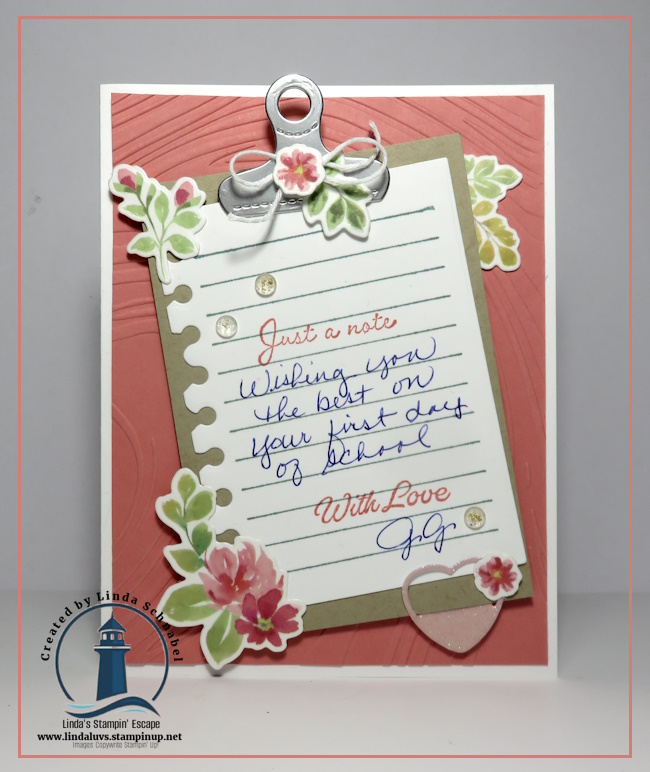
For my first card, I paired the Just a Note Bundle with the Timeless Plaid Designer Paper as the backdrop, then added a pop of fun with the On the Go Designer Paper and a fussy-cut backpack. I stamped the notebook lines, die-cut the ripped paper edge, and added those oh-so-realistic clips and little arrows pointing straight to the backpack—so playful and perfectly on theme!
My second card takes a softer, more feminine approach with the help of Extraordinary Washi Tape and coordinating dies. I couldn’t resist using that adorable stamped paper and die again (it’s just too cute!) and this time I created a mini clipboard. All of the dies to create all the stationary stuff is in the bundle. I stamped “Just a Note” at the top and left space to handwrite a personal message—because a heartfelt note never goes out of style!
Whether you’re crafting for the first day of school, a midweek pick-me-up, or a just-because moment, the Just a Note Bundle will help you deliver smiles in the sweetest way. Add them to scrapbooking pages to capture those once-a-year moments. Not back-to-school time? These little notes make wonderful gestures of encouragement and support all year long.
Which card inspired you to try first—the playful backpack or the cute clipboard? Grab your bundle, pick your papers, and start sending those little notes that make a big difference!
Thank you for hopping on the bus with me today, and heading back to school.
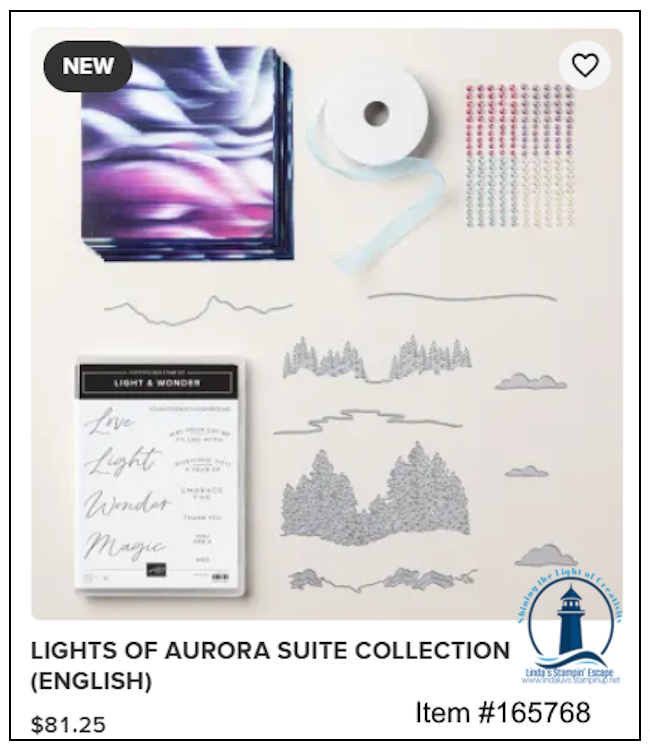
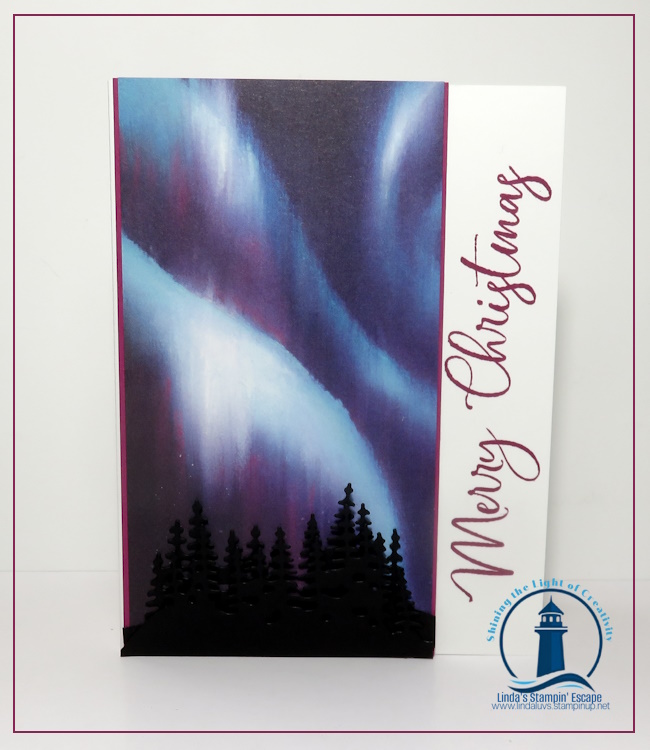
Have you ever sat beneath a starry sky, watching the Northern Lights dance across the horizon? That same sense of wonder comes alive with the Lights of Aurora Suite. This stunning collection was designed to capture the magic of the aurora borealis and bring it right to your craft table. Today, I want to share not only the beauty of this suite, but also a few different ways you can create with it, so you can see just how versatile and inspiring it can be.
Inside this suite, you’ll find designer paper that swirls with cosmic color, dies that create breathtaking natural landscapes, and all-occasion sentiment stamps that make your handmade cards shine for any moment worth celebrating. Add in the frosted iridescent gems and a touch of sheer blue ribbon, and suddenly your creations feel as if they’re glowing beneath a winter sky.
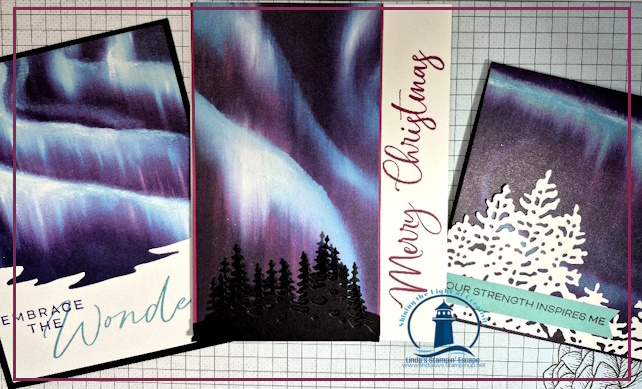
The first of my cards is a simple combination of the stunning paper, a die and a hand stamped greeting in Berry Burst …. Don’t you love the look of stamping your greeting sideways? Different & fun!!
The palette is rich and dreamy—Azure Afternoon, Balmy Blue, Basic Black, Berry Burst, Blackberry Bliss, Gorgeous Grape, Highland Heather, Lost Lagoon, Petunia Pop, Pool Party, and Very Vanilla—perfect for creating depth, drama, and soft blends that mirror the night sky. With just a little ink, some cardstock, and your favorite adhesive, you can make truly magical projects.
The second card again used the pretty patterned paper and a unique die (I can’t wait to play with this more) and a combination of stamps to create our greeting.
Join me in today’s video, where I’ll share how I used this suite to craft cards that feel like they’re kissed by the lights themselves. Let’s explore the possibilities together and bring that celestial beauty into your hands and onto your paper!
The Lights of Aurora Suite isn’t just about making cards—it’s about capturing a moment of wonder and sharing it with someone else. Each swirl of color, each delicate gem, and every shimmering ribbon can turn an ordinary card into a keepsake that feels like a little piece of the night sky.
If you’ve ever dreamed of creating something truly magical, this is your invitation to start. With its rich palette and versatile designs, this suite will take your crafting to new heights—whether you’re making a card for a special occasion or simply letting your creativity dance across the paper like the aurora itself.
The last card I’m sharing is a twist to the usual “black” die cut that represents a silhouette, I chose “white” to give you another option … to me it’s like a snowy scene. So fresh and pretty!
I hope this inspired you to see all the different ways you can bring that magical glow into your own crafting. Whether you create a simple card or a stunning layered masterpiece, this suite is ready to help your projects shine.
If it’s calling your name, now is the perfect time to add it to your collection—because every card you make with it will feel like a little piece of the night sky, ready to share.
Thank you so much for stopping by and sharing a moment under the “northern lights” with me today.
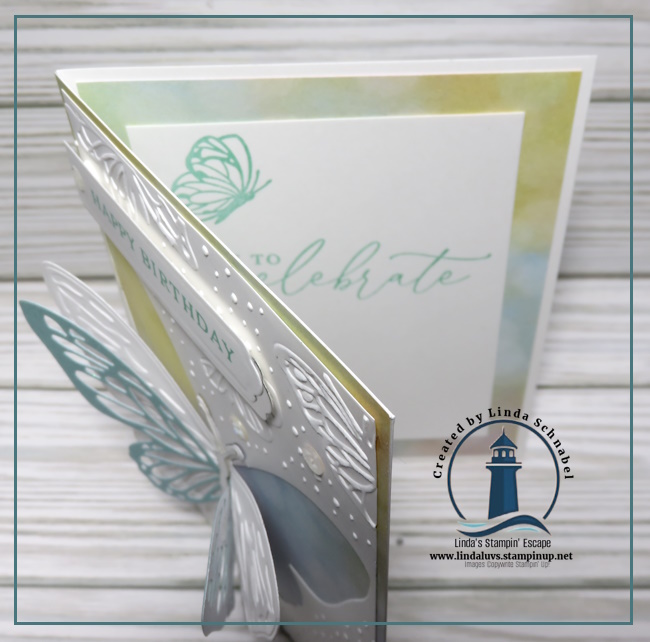
I’m so excited to share today’s creative project with you—a gorgeous Fun Fold card using the Inked Occasions Paper Pumpkin Kit paired with the delicate and detailed Beautiful Butterfly Dies. This combination is an absolute showstopper! The striking Gold and abstract patterns of the Paper Pumpkin kit blend perfectly with the soft elegance of the butterfly die cuts.
In this tutorial, I’ll take you step by step through the process of creating this unique card. Don’t worry—I’ve included the dimensions below so you can follow along easily and recreate this card yourself. Whether you’re crafting for a birthday, thinking of you, or just because, this card design can be customized to fit any occasion.
📏 Card Dimensions:
Cardstock: BASE 8” x 5 ½” and 4” x 2 ¾” / Score at 2 1/8″ and 4 1/4″
Cardstock 3: Basic White 2 – pieces 3 ¾” x 2 ½” and plus 3” x 2 ¼” – Score at 3/4″ – 1 1/2″ and 1 3/4″ – this is your “pop up” piece.
Paper Pumpkin: 5 ¼” x 4” and 2 – panels 5 ¼” x 1 7/8”
Beautiful Butterfly Dies(Item #165365) These dies are part of the Online Exclusives collection and add a graceful touch to your cards and scrapbook pages. They coordinate beautifully with any floral or patterned background.
💡 Tip:
This Fun Fold layout is versatile—once you learn the base technique, try it with different papers and dies for a whole new look each time!
🛍️ Don’t Have These Supplies Yet?
You can shop the Beautiful Butterfly Dies[CLICK HERE], and if you’re not subscribed to Paper Pumpkin, now is a great time to join! Each kit brings creativity right to your door.
If you enjoyed today’s tutorial, be sure to leave a comment, give the video a thumbs up, and subscribe to my YouTube channel for more card-making fun. And don’t forget to pin or save this post so you can come back to the project anytime!
If you loved my last post featuring the Storybook Friends Bundle, then you’re in for a treat today! I have two more enchanting cards to share, along with some quick tips and techniques that will make your card-making even easier.
This enchanting suite is perfect for bringing charming characters and whimsical scenes to life. The best part? You can create stunning cards in less time by using the coordinating Designer Series Paper and die cuts—no fussy cutting required on today’s cards!
💡 Technique Highlight: It’s an oldie but a goodie! To create a background that appears to have texture, just “scrunch” up some wax paper, dab it onto your ink pad and pounce it onto your cardstock! This little touch makes a big difference!
Time to let the designer paper do all the work … layering different patterns makes it easy to craft a complete scene. You’ll see I used the Everyday Arches when adding the blue patterned paper … I showcased this in my last post. (Seen Here) With just a simple die cut and layering, this card comes together in minutes!
The greeting wishing you a Happy Easter, comes from the Greetings for All Ephemera pack. This set features a wide range of precut sentiments in a variety of styles, perfect for saying thanks, hello, congratulations, and more. The simple black and white colors ensure you’ll have a perfect fit for any design style.
My second card encompasses more of our suite as I highlight the coordinating die cut frame and stamp set.
The second card features one of my favorite “simple” techniques—layering die-cut elements. By combining the stamped images with pre-printed die cuts, you create depth and interest without a lot of extra work. I began with this adorable designer paper pattern – it gives us the framework for our creation – the strawberries!
So many stampers are already falling in love with the Storybook Friends Bundle, and it’s easy to see why! Whether you’re crafting for Easter, birthdays, or just because, this suite makes it simple to create charming, heartfelt cards in no time.
With Easter just around the corner, now is the perfect time to add this bundle to your collection and start crafting something truly special. Don’t miss out on the chance to create with these sweet characters!
Are you as enchanted by this suite as I am? I’d love to hear which card is your favorite! 💕
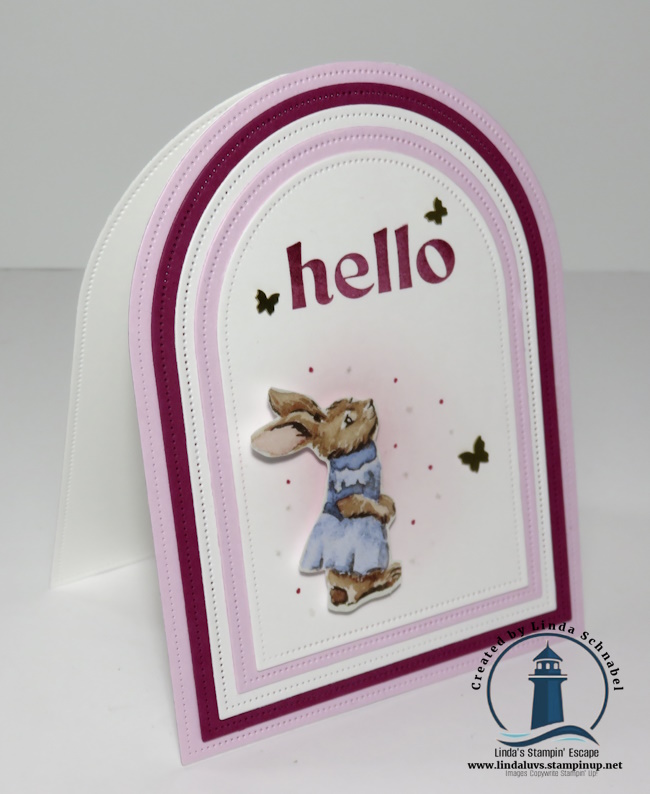
I’m so excited to share today’s creative inspiration with you—three adorable cards featuring the Everyday Arches Bundle, paired beautifully with the Storybook Friends collection. These two work seamlessly together, and I can’t wait to show you how! To make things even better, I’ve included a video replay of my recent Facebook LIVE, where I walk you through each project step by step, sharing helpful tips along the way.
The first card is simple but so sweet! In the video, I share a key tip on how to align your stamp image onto the block so that it fits perfectly around the arched die cuts. This little trick ensures a flawless look every time! If you’ve ever struggled with getting your stamped image to frame your die-cut piece just right, this technique will be a game-changer.
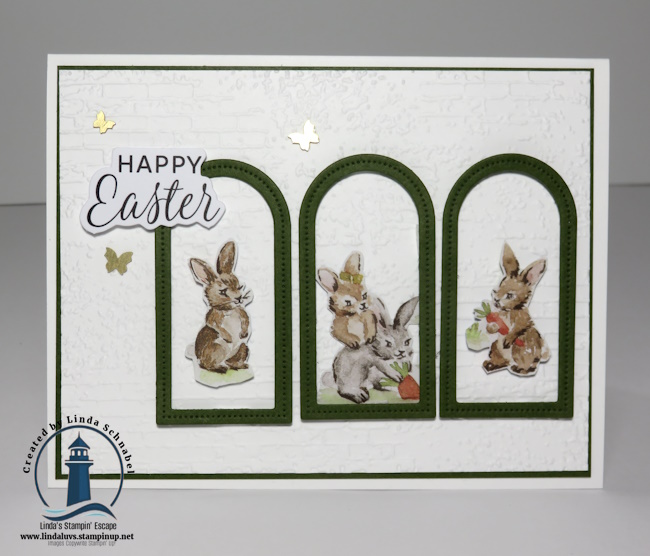
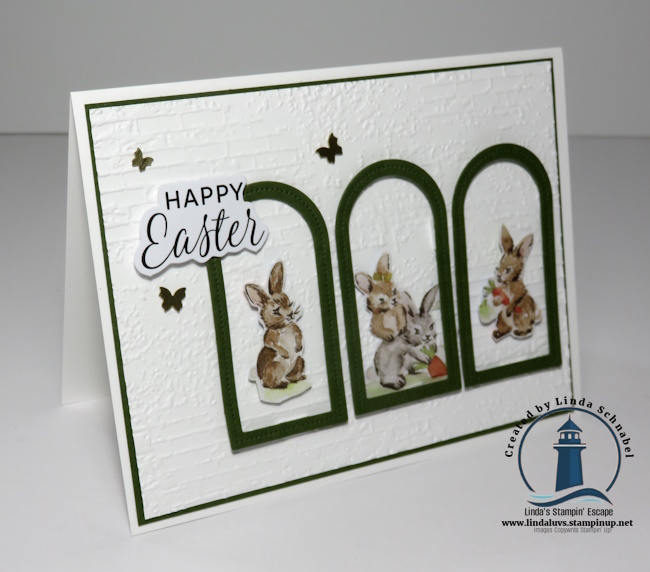
For the second card, I took the Arches Dies to the next level by using them to create frames. These frames provided the perfect spotlight for some of the adorable bunnies from the Storybook Friends Designer Series Paper. It’s a fun and easy way to make those sweet images stand out while adding dimension to your project.
I used the Exposed Brick 3D Embossing folder create texture behind my arched frames. Each little bunny was fussy cut from the designer paper … they look so playful. The greeting comes from the Greetings for All Mix & Match Ephemera Pack. This set features a wide range of precut sentiments in a variety of styles. You’ll be happy to know, at least I am, that it is carrying over into the NEW Annual Catalog.
And last but not least, I demonstrated how to use the largest dies to create a unique card base! This technique opens up a whole new world of card designs, and I explain it fully in the video. If you love shaped cards or want to try something different, you won’t want to miss this tip.
Again, this little bunny was fussy cut and the goal was to highlight her … make her really stand out, so I added a soft layer of color using the Blending Brushes. Then added a touch of Wink of Stella and Berry Burst Dots … simple yet impactful. The Bubble Bath and Berry Burst lends itself to really make a statement on this card.
I hope you have enjoyed these adorable card ideas and find the video helpful!
Let me know in the comments which tip you liked best or if you give any of these techniques a try. I love hearing from you and seeing your creative take on these projects.
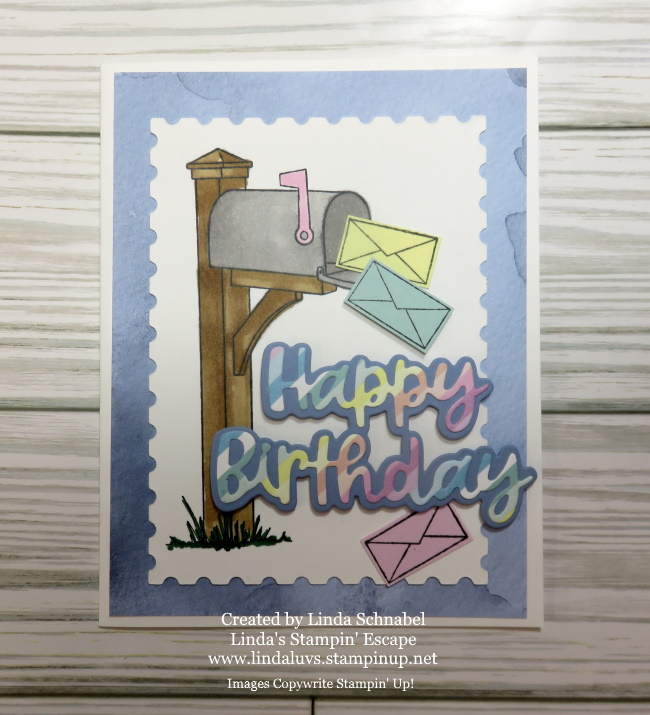
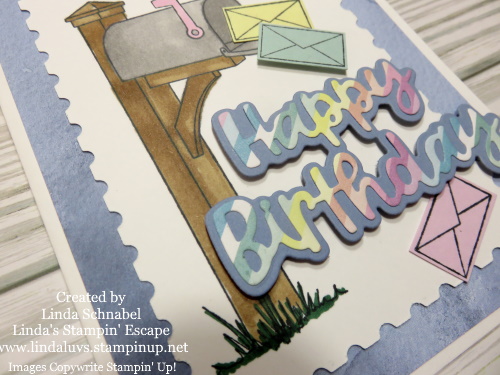
Today, I’m excited to share a perfect pairing that takes your handmade cards to new heights – the Perennial Postage Dies and Sending Love Stamp Set and Dies. These products seamlessly come together, allowing you to craft beautiful greetings that will surely warm the hearts of your loved ones.
Birthdays are special occasions, and what better way to celebrate than with a personalized touch? The Wanted to Say Dies offer a versatile and elegant way to express your birthday wishes. These dies beautifully complement the Perennial Postage set, creating a harmonious blend of sophistication and sentiment.
This watercolor look of the designer paper brings a whimsical and dreamy element to your cards, creating a perfect backdrop for the Perennial Postage Dies and the Wanted to Say sentiment.
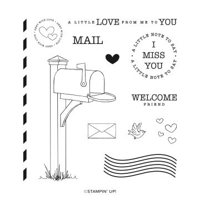
Now, let’s talk about the Sending Love stamp set and dies, which is the ideal companion for the Perennial Postage Dies. The coordinating stamps and dies, allow you to create intricate and charming mailboxes & envelopes to accompany your cards. (Today’s mailbox was stamped). The attention to detail in both sets ensures that your creations are not just cards but expressions of love and thoughtfulness.
With the Perennial Postage Dies, Sending Love stamps and dies, you have the perfect recipe for creating heartfelt and visually stunning cards. Whether it’s a birthday celebration or any other special occasion, let your creativity soar with this perfect pairing. Create Card, send, and spread love with every handmade creation!
Thank you for spending part of your Saturday with me!
Butterflies are a timeless symbol of transformation and beauty, making them the perfect addition to any handmade card or paper craft. With the Beautiful Butterflies Bundle, you can effortlessly create stunning butterfly-themed projects with intricate details and dimension. Whether you’re stamping and die-cutting large focal-point butterflies or embossing mesmerizing patterns onto card backgrounds and gift tags, this bundle offers endless creative possibilities.
One of the standout features of this bundle is the Hybrid Embossing Folder and Dies, which allow you to emboss and cut in one simple step! It’s a game-changer for adding texture and depth to your projects. Pair it with the all-occasion sentiments and label pieces included in the bundle, and you’ll have everything you need to craft elegant, heartfelt designs for any occasion.
Want to see it in action? Watch the replay of my Facebook LIVE video, where I demonstrate how to use the Hybrid folder and dies to create stunning butterfly designs with ease. Whether you’re a seasoned stamper or just starting out, you’ll love how this bundle makes adding detailed butterfly accents so simple.
Let your creativity take flight—add the Beautiful Butterflies Bundle to your craft collection today and bring delicate, breathtaking butterfly details to all your paper crafting projects! 🦋✨
Thank you for taking time out of your day and sharing it with me! Enjoy.
Imagine the magic of bokeh light, fluttering butterfly wings, and soft, dreamy colors coming together to elevate your paper crafting projects. The Beautiful Bokeh Suite Collection is a stunning new addition that’s perfect for creating gratitude, birthday, and all-occasion cards, scrapbook pages, gift tags, and more. If you’re looking to take your crafting from ordinary to extraordinary, this suite is exactly what you need—and I’ve got a video to prove it!
This collection features the Beautiful Butterfly Bundle, which includes a gorgeous stamp set, coordinating dies, and the game-changing Beautiful Butterfly Hybrid Embossing Folder. The hybrid folder embosses while cutting intricate butterfly designs, giving you stunning textured details with minimal effort. The suite also includes the Beautiful Bokeh Designer Paper—a 6″ x 6″ collection of dreamy patterns in a soft color palette of Balmy Blue, Berry Burst, Calypso Coral, Daffodil Delight, and Fresh Freesia. And let’s not forget the Itty Bitty Bokeh Mix! These adorable embellishments add the perfect finishing touch, with their light-catching sparkle and playful variety.
In my latest video, I share three unique card designs that showcase the versatility of this suite. Whether you’re new to stamping or a seasoned crafter, you’ll find inspiration in these projects. Each card highlights a different way to use the products:
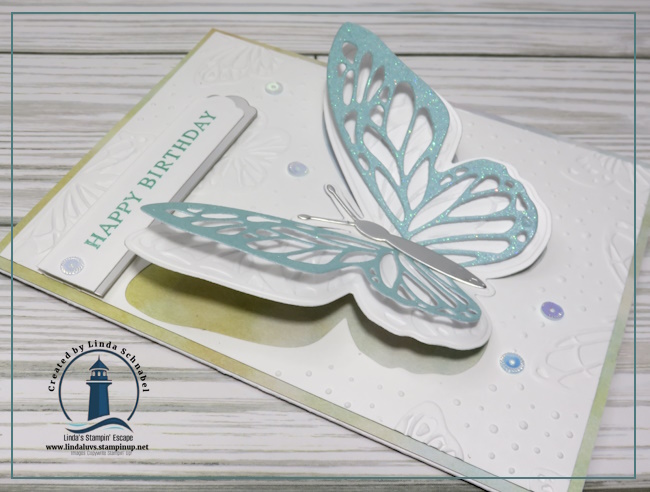
Card 1: A clean and simple design that lets the butterflies shine as the focal point, using the detailed butterfly die. The hybrid folder creates breathtaking dimensional accents, perfect for expressing my gratitude. The half dome elements in the Itty Bitty Bokeh mix match perfectly with the Fresh Freesia Bokeh paper and mat.
Card 2: A layered card that incorporates the soft, bokeh-patterned paper and vibrant embellishments to add depth and interest. I used the die in combination with the Embossing Folder to expose the Bokeh paper and the detailed butterfly shines adding texture and dimension!
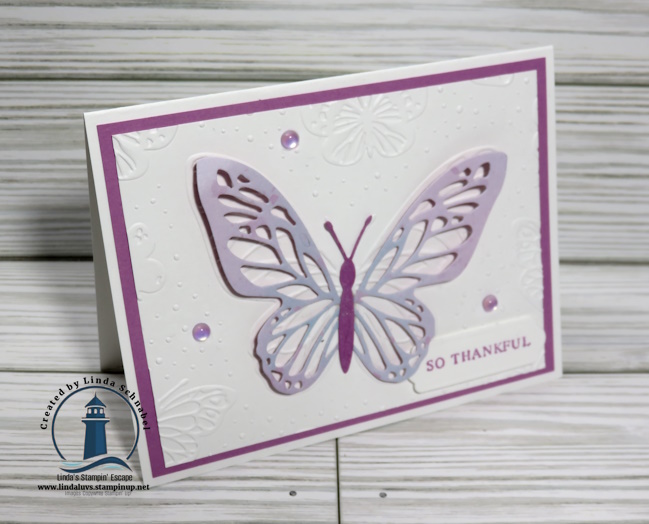
Card 3: Simple elegance, layered white on white and the butterfly cut from our card shown above, was used to added dimension to our card … just a little hello!
These projects demonstrate just how versatile and captivating the Beautiful Bokeh Suite is. You’ll love how effortlessly the elements coordinate, giving you polished, professional results every time.
Ready to bring the magic of butterflies and bokeh into your crafting? If you’d like to purchase the Beautiful Bokeh Suite or any individual items, click the links below or visit my shop today. The Beautiful Bokeh Suite Collection is your ultimate tool for creating elegant, light-filled designs that will leave a lasting impression on any project!
Thank you for joining me today… and join me LIVE tomorrow on my Facebook page where I will show you another stunning card (and the magic of the Hybrid folder). CLICK HERE!
First, let me welcome my NEW Subscribers; welcome to our creative community! I’m excited to have you …. and excited to share today’s card with all of you!! It’s simply stunning and so simple to recreate … let’s begin!
This project proves that sometimes, less is more, and simplicity can absolutely shine! Using a rich palette of Very Vanilla and Gold, this card exudes elegance and warmth—perfect for my “thank you” … the upcoming season or any occasion that calls for a touch of class.
The card starts with a classic A2 card base in Very Vanilla. The magic begins with a 4” x 5-1/4” piece of Very Vanilla cardstock embossed using the Changing Leaves Hybrid Embossing Folder. This will be attached directly to the base. If you haven’t used a hybrid folder before, you’re in for a treat! It’s called “hybrid” because it embosses and cuts images with the coordinating dies—such a clever and time-saving design.
To add dimension and interest, I die-cut some delicate leaves using the coordinating dies from the bundle. These layered onto the embossed background create a look that’s both understated and elegant. For the sentiment, I turned to the Changing Leaves Stamp Set. Everything in this bundle works seamlessly together—the stamps, the dies, and the embossing folder! Using VersaMark Ink, I stamped the sentiment onto Very Vanilla cardstock and heat-embossed it with our new Gold Embossing Powder. The metallic finish adds such a stunning and cohesive touch to the design.
The sentiment was die cut —you guessed it— using the coordinating die from the bundle! A few of the Woven Golden leaves and gold Opal Rounds were added around it to draw the eye and provide just the right amount of embellishment. I kept the card simple to let the embossed details and gold accents shine, proving that with the right tools, you can create something truly exquisite without spending hours at your craft table.
You can order the Changing Leaves Bundle directly from me—just click here to shop. And don’t forget to grab the Gold Embossing Powder while you’re at it! Remember, the “embossing folder” is included in the bundle. If you have any questions or need help placing your order, I’m always here to assist you. I’d love to see what you create with this bundle, so feel free to share your projects or tag me on social media.
Happy stamping, and remember: with the right tools, anything is possible!
As we embrace the changing seasons, I’m excited to share one of the most versatile suites from the new Holiday Mini Catalog: the Nests of Winter Suite, featuring the Winterly Tree Top Bundle. Whether you’re a cardmaker, scrapbooker, or simply someone who loves creating with paper, this suite offers a beautiful array of elements to enhance your projects for any occasion, all year long.
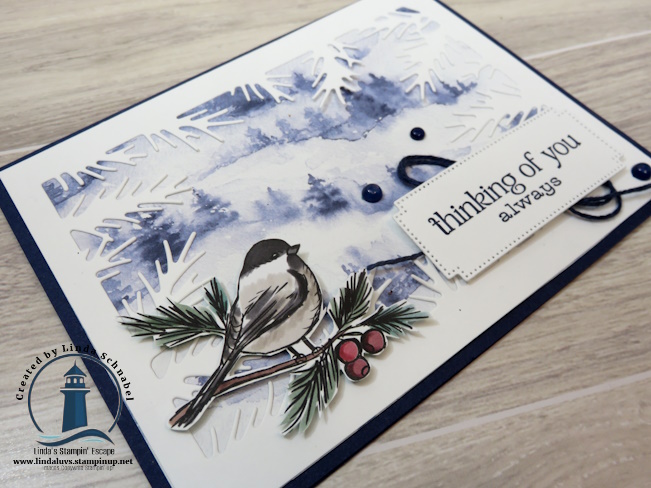
One of the standout features of the Winterly Tree Top Bundle is the intricately designed pine frame die. This die adds an elegant and natural touch to your creations, perfect for highlighting winter scenery or framing your favorite photos. On today’s card, we paired this frame with the stunning Winter Meadow Designer Paper, showcasing how it beautifully accents the serene winter landscape.
Imagine using this pine frame in your scrapbooking layouts—framing those cozy winter memories like family gatherings, snow days, or holiday celebrations. It’s an effortless way to draw attention to the heart of your project; your photos. The frame adds just the right amount of detail, enhancing without overwhelming.
While the Nests of Winter Designer Paper features gorgeous images of birds with coordinating dies, I decided to “fussy cut” the bird used on today’s card. There’s something soothing about the process of cutting out these delicate images by hand—it’s a creative ritual that many of us enjoy. Fussy cutting allows for precise placement, adding a personal touch that makes each card feel truly special.
What I love most about the Nests of Winter Suite is its versatility. While it’s perfect for creating stunning winter scenes and holiday cards, the suite can easily transition to any time of year. The elements within the Winterly Tree Top Bundle, such as the pine frame and bird images, can be used for birthday cards, thinking-of-you notes, and even nature-inspired projects.
The Nests of Winter Suite satisfies every creative need, offering you endless possibilities for cardmaking, scrapbooking, and beyond. Whether you love the calming process of fussy cutting or prefer the quick efficiency of coordinating dies, this suite gives you the tools to create meaningful projects with ease.
If you’re ready to elevate your crafting experience and bring your winter (and year-round!) creations to life, I encourage you to add the Nests of Winter Suite to your collection. Discover the Versatility of the Nests of Winter Suite: A Year-Round Creative Must-Have! Let the pine frames highlight your favorite moments, and allow the delicate bird images to inspire your next project.
If this is a “must have” for you … leave a comment and let me know if I have inspired you with this beautiful card.
As I will soon be celebrating my 25th anniversary as a Stampin’ Up! demonstrator and your creative coach, I’m thrilled to kick off this exciting year with three incredible opportunities that will help you have fun, learn new stamping techniques, and take your creativity to the next level! Whether you’re looking to escape into a world of creativity, learn some new skills, or simply connect with others who share your passion, I’ve got you covered. Let’s dive into the fun!
1. My Fall / Holiday Stamping Retreat
Have you ever dreamed of a creative escape where you can leave the hustle and bustle behind and immerse yourself in crafting? Then join us this fall, from November 1st to 3rd, for our Fall / Holiday Stamping Retreat!
It’s the perfect blend of creativity, relaxation, and a whole lot of fun. Imagine spending an entire weekend creating beautiful cards, sharing laughs with new friends, and being pampered in a way that only our retreats can offer. This retreat is more than just a getaway; it’s an experience you won’t want to miss! And it’s all inclusive! CLICK HERE FOR FULL DETAILS
2. Join one of my Stamp Clubs
Looking for a way to inject some regular creative joy into your life? Our Stamp Club is just the thing! Once a month, you’ll get the chance to escape into a world of creativity, learn new stamping techniques, and explore fun folds that will take your cardmaking skills to new heights. It’s not just about the projects (although they’re pretty fabulous); it’s about the friendships, the fun, and the sense of community that comes with gathering together to create. Whether you’re a seasoned stamper or just starting out, our Stamp Club is the perfect place to nurture your creativity. We have a private Facebook page to share even more!
My clubs are the core of my business and I love to share and treat you as well … all you need to bring is your adhesive and a smile! CLICK HERE FOR DETAILS
3. NEW This Fall: My VIP Group
I’m so excited to announce the launch of my exclusive VIP group this fall! This group is designed to spoil those of you who have supported me by placing orders within the past 6 months. As a VIP, you’ll receive additional coaching, personalized guidance, and instruction with even more samples to inspire you. If you’re already in my Stamp Club, you’ll automatically be included—because you’re already part of the inner circle! This group is my way of saying ‘thank you’ for your continued support, and I can’t wait to share even more creative inspiration with you.
Don’t miss out on these amazing opportunities to be part of our stamping community, learn new techniques, and have a blast while doing it. Whether you’re joining us for the retreat, becoming a member of our Stamp Club, or stepping into the VIP world, or better yet, all three, I promise you’re in for an unforgettable experience.
Here’s to a year of creativity, fun, and friendship—let’s rock the 2024-2025 stamping year together! 🎨✂️
Ready to join in? Sign up today (using the links above) and let’s make this year our most creative one yet! 🌟
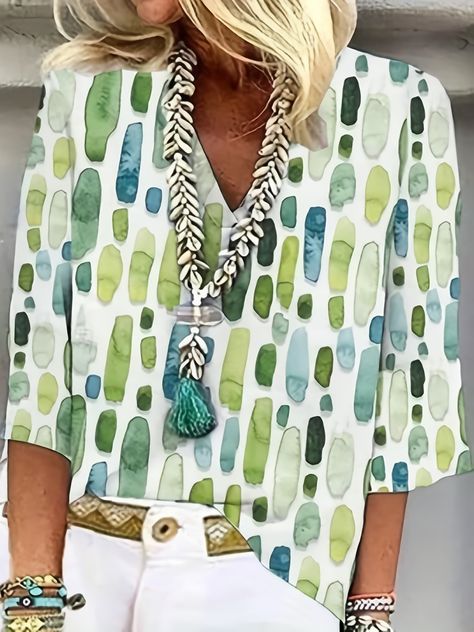
I’m thrilled to share a delightful find that brought a burst of joy to my crafting studio. While browsing through some fashion trends, I stumbled upon clothing patterns that beautifully mirrored the designs in our Full of Life Designer Series Paper! It’s a perfect reminder of how art transcends boundaries and finds its way into our everyday lives.
Full of Life Designer Series Paper is a stunning collection of 6″ x 6″ sheets, each featuring unique, hand-painted watercolor designs created by our talented in-house artisans. This set is a treasure trove of vibrant colors and playful patterns, including organic squares, circles, color wheels, and brushstroke designs. It’s perfect for adding a touch of artistry to your card fronts, accents, lovely layers, and more! Can YOU find the pattern??
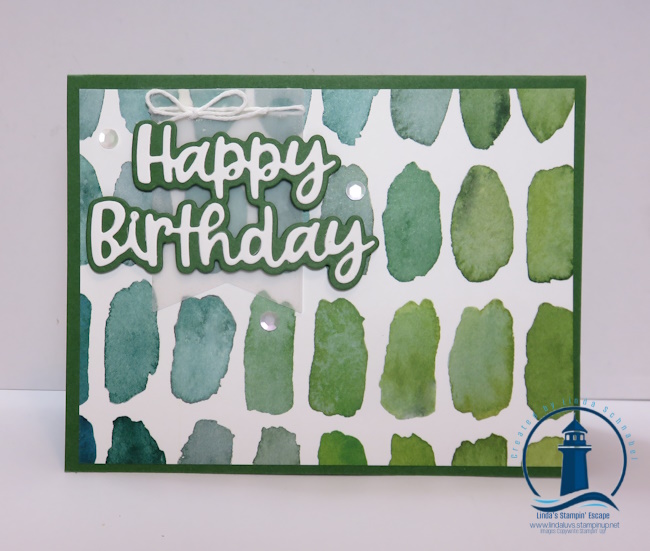
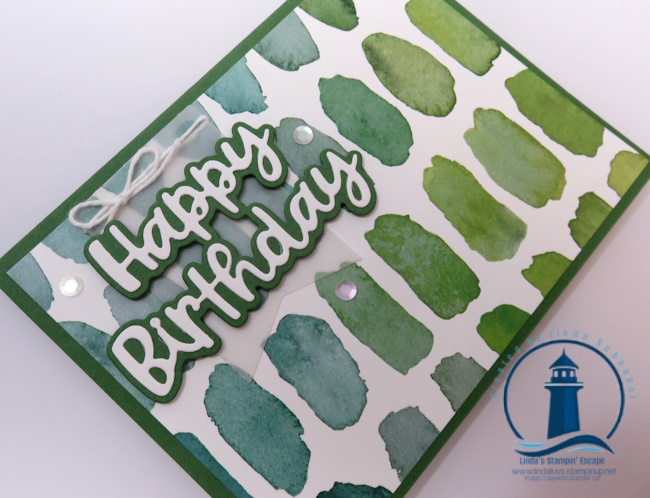
Today, I’m showcasing a card that lets this beautiful paper take center stage. The design is simple yet intentional, allowing the bold and fun patterns to shine through. I’ve used the Full of Life paper as the focal point, complemented by a die-cut greeting from the Wanted to Say Dies. The result is a card that is both eye-catching and effortlessly stylish—perfect for any occasion.
The combination of the watercolor effects and the vibrant colors truly makes this card stand out. It’s a great example of how the right paper can transform a simple layout into something extraordinary. Whether you’re a seasoned crafter or just starting out, this paper is a fantastic addition to your collection. It opens up endless possibilities for creative expression, and I’d love to see what you all come up with!
Don’t forget, you only have a few more days to benefit from the Bonus Days promotion! For every $50 you spend, you’ll receive a $5 Bonus Coupon to use in August. It’s the perfect opportunity to stock up on the Full of Life Designer Series Paper and other favorites from the catalog.
Happy crafting, and I can’t wait to see the beautiful creations you make with this fabulous paper!
P.S. If you’re inspired by today’s project, be sure to share your creations on our Facebook page, Linda’s Stampin’ Escape. Let’s spread the joy of crafting together!
Welcome back to another Simply Sunday post, where we explore easy yet stunning crafting projects to inspire your creativity. Today, we’re diving into the beautiful Pretty Petals Paper Pumpkin Kit from July 2024. This kit is truly a floral masterpiece, filled with vibrant colors and elegant designs perfect for any occasion.
Pretty Petals Paper Pumpkin Kit is a bouquet of creativity, offering everything you need to create gorgeous floral-themed cards. The kit features intricate floral pieces, delicate sentiments, and a stunning array of coordinating elements. The color palette is a joyful mix of bright and cheerful hues, including Lemon Lime Twist and Melon Mambo, which bring a fresh, modern twist to traditional floral designs.
For today’s card, I’ve taken the beautiful floral piece from the kit and layered it on coordinating cardstock: Lemon Lime Twist, Melon Mambo, Basic Black, and Basic White. These layers create a striking contrast, making the vibrant florals pop. To add texture and dimension, I used the Painted Texture Embossing Folder. This subtle yet impactful detail perfectly complements the floral theme of the Pretty Petals kit, giving the card a rich, tactile feel.
I hope this pretty card inspires you to step outside the kit directions and create your own masterpiece. Paper Pumpkin kits are a fantastic way to jumpstart your creativity with curated supplies and easy-to-follow instructions. If you haven’t subscribed yet, now is the perfect time! Our August 2024 kit is all about celebrating birthdays, packed with festive designs and cheerful sentiments. It’s perfect for making birthday cards that will brighten anyone’s special day.
Don’t miss out—subscribe to Paper Pumpkin today and enjoy the joy of crafting delivered right to your door. For more information and to sign up, check out the links below.