Simply Sunday: Simply Beautiful Traditions of Christmas

Hello Stampin’ Friends ~

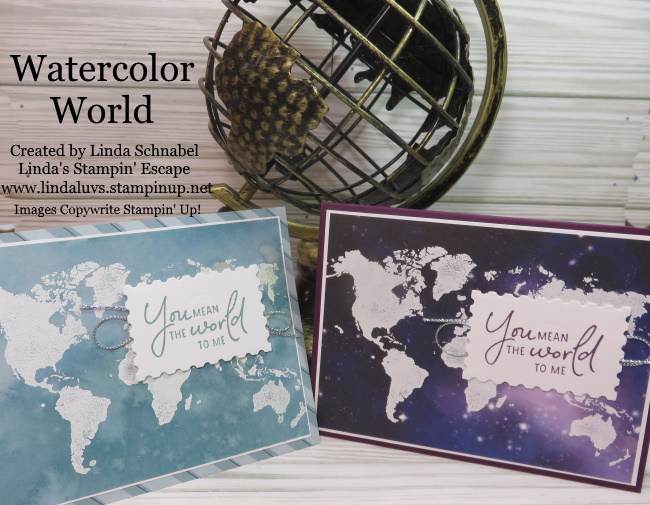
There’s something magical about crafting on a Sunday morning—especially when we blend the classic beauty of Christmas with a fresh, modern twist. Today’s project is all about celebrating the Simply Beautiful Traditions of Christmas using the gorgeous Traditions of Christmas Suite, but with a little unexpected flair… PINK! Yes, pink is everywhere this year—Halloween, fall décor, and now Christmas cards. And honestly? I’m here for it!

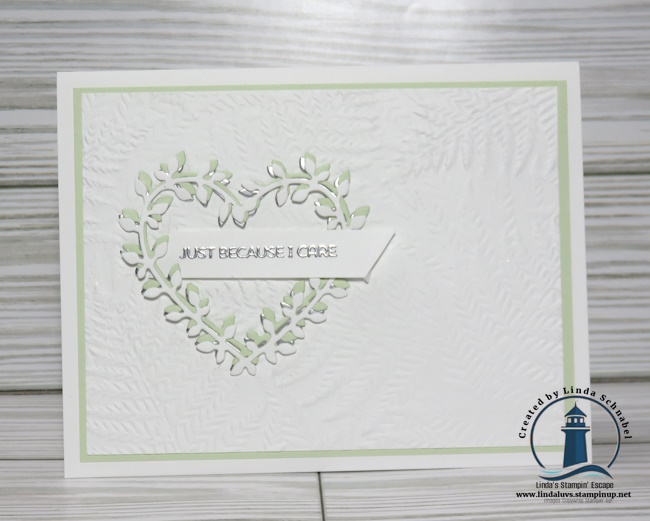
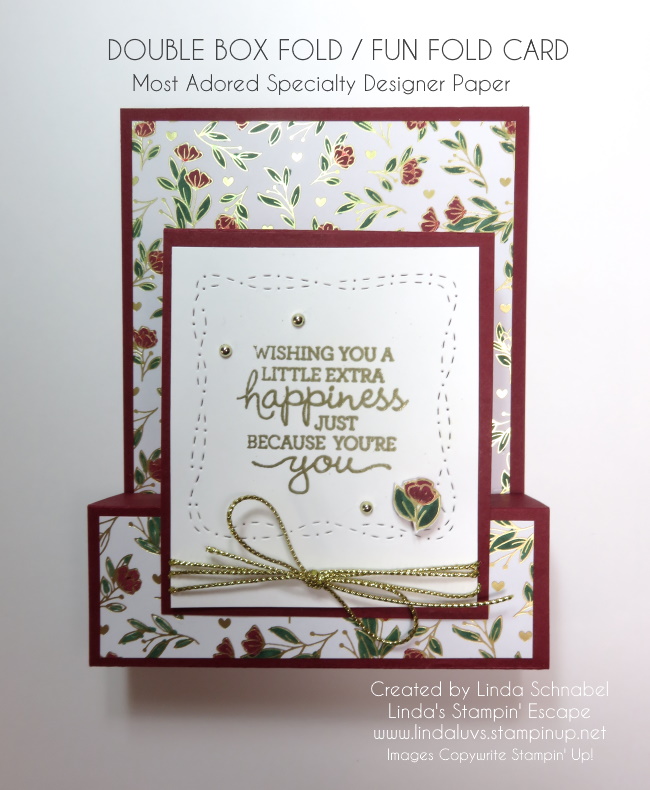
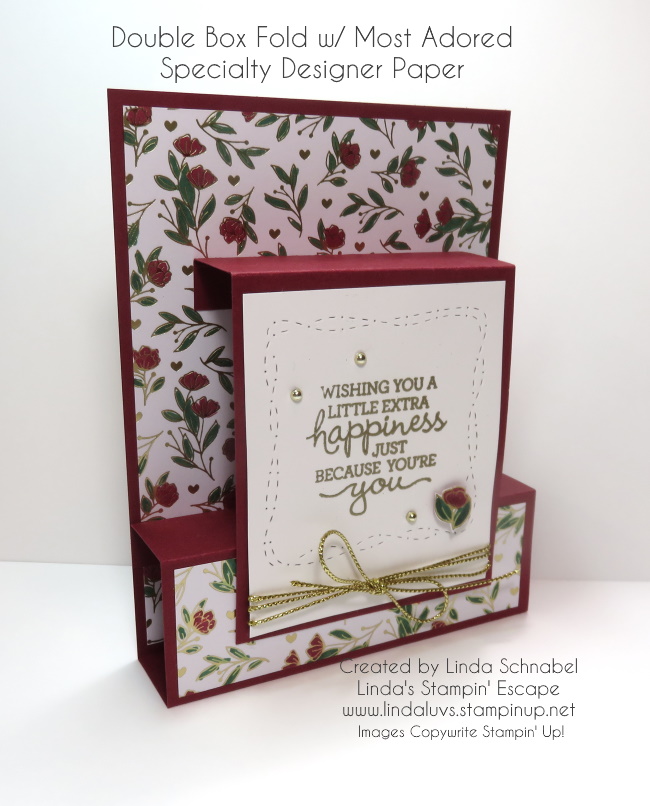
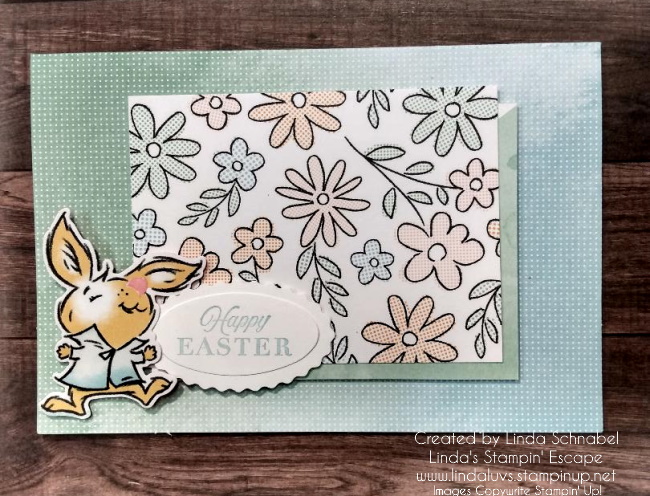
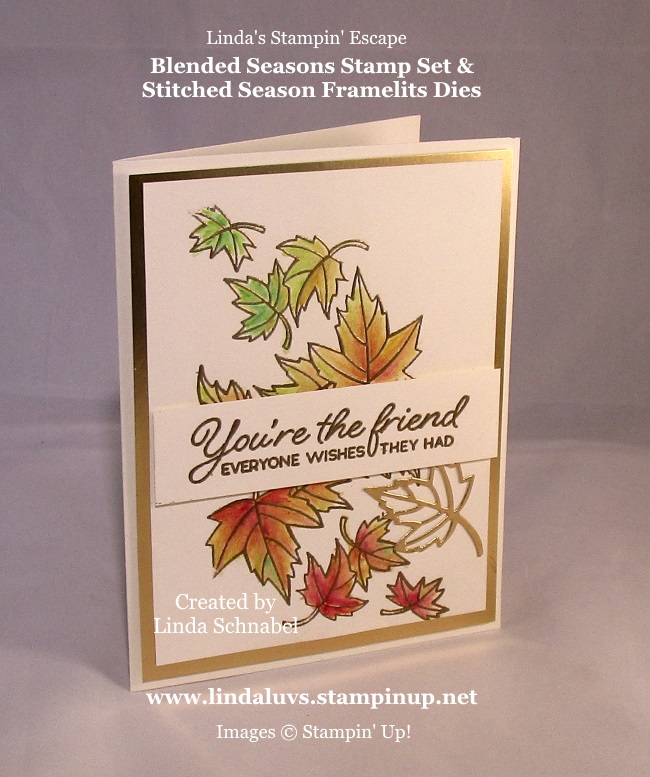
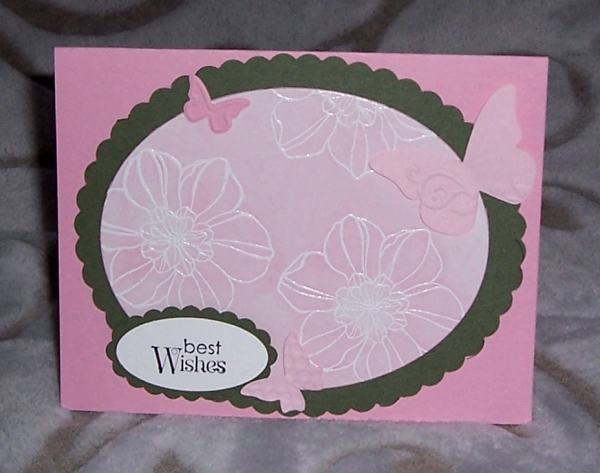
I began with a soft Bubble Bath card base measuring 8-1/2″ x 5-1/2″, scored at 4-1/4″. Clean, simple, perfect. For the card front, I trimmed a piece to 4″ x 5-1/4″ and ran it through the Peaceful Greenery Embossing Folder. This embossed frame is everything—delicate leaves, soft texture, and a beautiful focal point that sets the stage for the entire card.

Inside that embossed frame, I heat embossed the sentiment in gold embossing powder, using the “Just for You” from the Traditional Labels Stamp Set. Even though this suite leans into Christmas, this sentiment gives the card wonderful versatility. With just one phrase, this becomes an all-occasion card wrapped in festive elegance. Perfect for my daughters December 23rd birthday!

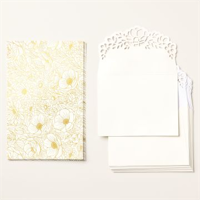
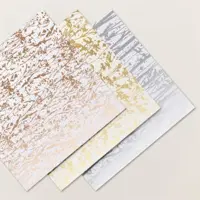
For the finishing touch, I die cut one of the stunning floral sprays from the Traditions of Christmas Specialty Designer Paper. The gold foiling on this collection is absolutely breathtaking, and layering that spray along the embossed frame instantly elevated the card—no stamping required!

As I look at the finished card, I’m thinking it could use just a sprinkle more sparkle… maybe a few of the Traditional Sparkling Sequins to catch the light and add that extra holiday charm.

If you’re loving today’s Simply Sunday project, imagine the endless combinations you can create with the Traditions of Christmas Suite. From quick & elegant cards like this one to rich, traditional holiday creations—it’s truly a suite that does it all, without overwhelm.

Wishing you a creative and peaceful Sunday, my friends. 💗✨

Autumn Toile Magic: Create a Showstopping Background

Hello Stampin’ Friends ~

I hope you enjoyed my Simply Sunday cards! Today, we’re stepping things up a notch and highlighting one of the real gems in the Autumn Toile Suite—the ornate background die found in the Amber Autumn Bundle. Honestly, this die was the first thing that caught my eye when I opened the suite, and once you see it in action, you’ll understand why. It’s a showstopper!

This intricate background die creates a stunning, leaf-patterned backdrop that instantly elevates your card designs. The beauty of it is you don’t need to fuss with multiple layers or complicated layouts—just one pass through your die-cutting machine and you’ve got a card front that looks elegant, rich, and detailed.

For today’s card, I started with a Very Vanilla card base to keep things simple. The magic happens when you pair it with the Earthen Toned Metallic Specialty Paper, included right in the suite. I ran the background die through with this paper, and the result is an absolutely gorgeous metallic leaf layer that shimmers and shines. To finish it off, I heat-embossed my greeting in Bronze Metallic Embossing Powder—and die cut with the Textured Notes Dies—so everything ties together beautifully.

Imagine this same design layered over a patterned background from the Autumn Toile Designer Series Paper—wow! The possibilities are endless, and the die does all the heavy lifting for you. That’s the brilliance of this suite: simple stamping and die-cutting turn into cards that look intricate and professional.

If you’re looking to add elegance and ease to your fall crafting, the Autumn Toile Suite is a must-have. With the Amber Autumn Bundle, metallic specialty papers, and coordinating accessories, you’ll have everything you need to create cards that impress without stress. Today’s card is just the beginning—I have more to share with you soon, so stay tuned!

Let me know what you think … comment below, and thanks for stopping by today!


“Stamp Your Passport Before It’s Gone!”

Hello Stampin’ Friends ~

🌎 It’s time to color your world—before this beauty is gone for good! The Watercolor World stamp set is making its final journey, and you do not want to miss the chance to add it to your collection. This large, artistic stamp brings a relaxed watercolor style that looks stunning with just one impression—perfect for beginners and seasoned stampers alike. Whether you’re a globe-trotter at heart or simply love bold backgrounds, you’ll fall in love with how easy it is to create beautiful, meaningful cards in minutes. Let me show you just how magical it can be—watch the video where I walk you through step-by-step techniques using Sponge Daubers, Stampin’ Write Markers, and more!

Grab a coffee, tea or whatever you like and join me for a short video that brings these magical techniques to life. This is a replay of one of my past Facebook LIVE presentations. Just click on the image to view …

Let’s take a closer look at our cards …. Let’s delve into our basic stamping and embossing, accompanied by the Thoughtful Expressions Bundle. This technique marries simplicity with refinement, as we create timeless masterpieces with ease. Combined with embossing folders, the Watercolor World stamps transform into captivating works of art, ready to adorn any occasion.

Ready to immerse yourself in the magic of direct-to-rubber stamping technique? Then enhanced by the Sending Smiles stamp set which dances across the continents! This technique introduces a delightful twist to traditional stamping, infusing your creations with a watercolor-inspired allure. The Stitched with Whimsy dies also creates not only texture, but the feeling you are traveling with them.

Our third technique, emboss resist, is a testament to the versatility of the Watercolor World stamp set. Paired with the He’s All That stamp set, we embark on a journey of exploration and experimentation. As we apply layers of color over our heat embossing, intricate designs emerge, unveiling a world of possibilities. Witness as the stunning effects of emboss resist unveil intricate patterns (our continents) and textures, captivating the eye and igniting the imagination. So fun and so easy to do.

As we pair these techniques with complementary stamp sets, we unlock new dimensions of inspiration and innovation, transforming simple materials into works of art that delight the senses and nourish the soul. So, gather your supplies, unleash your imagination, and let the Watercolor World stamp set be your guide on a voyage of discovery and delight. 

🌍🎨 Don’t let this global gem slip away! The Watercolor World stamp set is retiring, and once it’s gone, it’s gone. This is your chance to own a truly versatile background stamp that can be as simple or as detailed as you want it to be—your creativity sets the course.

Thanks for joining me today. Click add to cart and let your creativity take flight across the globe. Happy stamping and safe travels through your creative world! ✈️🎨💌

Heartfelt Creations: Exploring the Heart Shaped Bundle / Day 2

Hello Stampin’ Friends ~

Yesterday, I shared my video and one of the three beautiful cards I created using the Heart Shaped Bundle. Today, I am excited to share the other two designs with you and highlight just how versatile and stunning this bundle is. This item is an absolute must-have, and during Sale-a-bration, you can earn it for FREE! However … I just heard it’s been marked “Low Inventory”.

The Heart Shaped Stamp Set is a heartfelt and creative tool that lets you send messages of love and gratitude in style. This set features sentiments like “My Thoughts of You,” “Thank You,” and “Hello,” making it perfect for Valentine’s Day, friendships, thank-you notes, or any occasion where a little extra love is needed. The floral heart stamp is beautifully detailed and can stand alone as a focal point or complement your sentiments perfectly. Coordinating dies make it easy to highlight the stamped images, add dimension, and create stunning focal points by layering the delicate heart for an eye-catching finish.

Today’s card is layers of the beautiful Floral Delight Designer Series paper which is covered with cheerful flowers in yellow and a nice textured piece with a checked pattern across them both to give the card a warm and welcoming feel.

The floral heart image was stamped using a Old Olive ink and the die cut heart was done in the same color. I chose the “My Heart Loves Your Heart” sentiment, stamping it in Old Olive making everything coordinate, and tie it all together.

The flower was die cut from the same checkered strip of designer paper to make it pop against the green. To elevate that warm and welcoming fell, I added a few of the new Antique Pearls. This card is perfect for sending heartfelt thoughts to a loved one, especially when paired with a handwritten note inside.

For the last card, I wanted to highlight the coordinating dies to add texture and dimension. I started with the Basic White color for the card base. The intricate heart shape was die-cut in three different colors; Basic White, Silver Foil and Soft Sea Foam, and layered creating a stunning 3D effect.

The background was embossed with the Fern 3-D Embossing Folder to create a soft texture. The “Just Because I Care” sentiment fit was tucked inside the heart, and I heat-embossed it in Silver for a touch of shine. The layered hearts and embossed sentiment creates a simply elegant card brimming with texture.

This beautiful card could easily be sent as a Wedding, Anniversary, Birthday … any occasion really, just by swapping out the sentiment.

The Heart Shaped Bundle is one of the most versatile tools you can add to your crafting collection. Whether you’re making Valentine’s Day cards, thank-you notes, or just sending a simple hello, this bundle has everything you need to create heartfelt, handmade projects. The mix of detailed florals and timeless sentiments ensures you’ll use it over and over again. And the best part? You can earn this bundle for FREE during Sale-a-bration with a qualifying purchase! Don’t miss your chance to own this beautiful set and start creating your own masterpieces. But remember … it’s Low Inventory right now!

Thank you for stopping by today. I hope you feel inspired to create something special with the Heart Shaped Bundle.

Happy crafting! Linda

Simply Sunday: Sending Love with Stampin’ Up’s Gold Foiled Flowers Cards & Envelopes

Hello Stampin’ Friends,

Welcome to Simply Sunday, where we celebrate the beauty of simplicity in crafting. Today, we’re diving into the exquisite world of cardmaking with Stampin’ Up’s Gold Foiled Flowers Cards & Envelopes. Whether you’re a seasoned crafter or just starting out, these pre-designed cards and ornate envelopes are bound to captivate your creativity.

Our cardmaking doesn’t have to be complicated to be beautiful. With these cards and envelopes, the hard work is already done for you. Each card features stunning gold foiled flower designs, adding a touch of elegance to your creations without the need for intricate stamping or embellishing.

Whether you’re celebrating a birthday, sending a thank-you note, or just spreading some love, these cards are perfect for any occasion. The neutral design allows you to customize each card with your own personal touch, making them suitable for recipients of all ages and tastes.

While these cards are stunning on their own, you can easily customize them to suit your style and occasion. For example, you can add a heartfelt greeting using the Layering Leaves stamp set paired with the Everyday Details Dies as I did on today’s card. Whether you opt for a simple “thank you” or a more elaborate sentiment, the possibilities are endless.

Stampin’ Up’s Gold Foiled Flowers Cards & Envelopes are a testament to the beauty of simplicity in crafting. With their timeless design, high-quality materials, and endless customization options, these cards are sure to become a staple in your crafting repertoire. So why wait? Let your creativity bloom and spread some joy with these exquisite cards today.

Happy stamping, and happy Simply Sunday!

Most Adored Double Box Fun Fold Card

Hello Stampin’ Friends ~ As we continue our journey through the enchanting world of crafting with the Most Adored Specialty Designer Paper, today marks the 4th day of exploration. In this blog post, my spotlight hues for the day are the rich Cherry Cobbler and Shaded Spruce. The floral patterns of the paper come to life as we unleash the magic of Stampin’ Blends. The Pansy Patch stamp set takes center stage for a heartfelt sentiment, while the Stitched with Whimsy Dies add a touch of whimsical charm. Let’s take a look at today’s creation! 

I thought it would add some excitement by highlighting my paper with the Double Box Fold, a fun fold that lays flat in the envelope for mailing. The Most Adored Specialty Designer Paper, in the pretty floral pattern, becomes a canvas for creativity. Using Stampin’ Blends in Cherry Cobbler and Shaded Spruce, infuse vibrant hues into the delicate blooms. The seamless blending of colors adds depth and dimension, transforming the paper into a work of art that harmonizes perfectly with the regal touch of gold. 

For the sentiment, I chose the Pansy Patch stamp set, which offers a perfect blend of grace and sentimentality. Stamp a heartfelt message onto the card, and then use the Stitched with Whimsy Dies to frame and highlight the sentiment. The intricate stitching adds a touch of sophistication, making the sentiment a visual focal point on the card.

What do you think of my version of this fancy fold card?

Here are the Measurements:

Colored Base: 4 1/4″ x 9 1/2″. Score at 6″, 6 1/2″, 8″ and 9″
Colored Front Panel: 3″ x 5″. Score at ½″ x 1 1/2
Designer Series Paper: TOP: 4″ x 5 1/4″ BOTTOM: 4″ x 1 1/4″
White Backing: 4″ x 5 1/4″ (This area is for you to write)  White Card Front: 2¾″ x 3 1/4″

On the Flip Side

We continue the fun with project #2: Our Scallop Gift Card Box found on page 126 of your Annual Catalog. The Scallop Gift Card Box, enhanced by the captivating “flip side” of today’s featured Most Adored Specialty Designer Paper; the Flirty Flamingo Swirl, exemplifies the art of playful gift presentation.

When you flip open the top, your recipient will discover their favorite Gift Card, you could even create your own!! Elevate your gift-giving experiences with this charming creation that combines style, surprise, and the timeless allure of handmade craftsmanship.

As we continue this crafting journey, the potential for inspiration and creativity remains boundless. Stay tuned for more enchanting discoveries with the Most Adored Specialty Designer Paper. 

Thank you for checking out my blog today, hope your day is a good one!

Here is the list of supplies used for today’s projects. Clicking on any image will take you directly to my Online Store. Thank you!

A Beary Cute Christmas Together

Hello Stampin’ Friends ~

Today I have a “Beary Cute” card for you from a fellow design artist from the Tutorial Group I am part of. You will get the measurement and instructions to recreate this card yourself. If you don’t have these supplies yet, I will have everything listed at the end of the tutorial. Enjoy ….

Measurements:

  • Real Red : 5 ½ x 8 ½
  • Basic White: 4” x 5 ¼”

Instructions:

  • Score and fold the Real Red cardstock at 4 ¼.
  • Stamp the bears using Memento Black ink.
  • Use the Versamark ink pad to stamp the snowflakes randomly on the Basic White cardstock.
  • Sprinkle White Embossing Powder on cardstock and tap off excess.
  • Heat until totally melted using the Heat Tool. Adhere the layer to the card.
  • Stamp the greeting on Real Red cardstock using Memento black ink. Cut each line using a Paper Trimmer. Adhere the greeting using Dimensionals.
  • Stamp the scarf and hat on a piece of Basic White cardstock. Cut them out using Paper Snips. Add them to the card using Dimensionals.

So cute and so simple to make!! I hope you enjoyed today’s card share and felt inspired to pull out your stamps and start creating.

Thank you for stopping by today ~

Beautiful Thistle using Stampin’ Blends 3 Ways

Hello Stampin’ Friends ~

Today I’m sharing a video “replay” of last nights Facebook LIVE where I shared tips on coloring the Beautiful Thistle bundle with Stampin’ Blends. Then see how I took these tips and colored on 2 more stamping mediums – Heat embossed and the Fine Shimmer paper.

The results are stunning, so grab a coffee and join me ….

I got rave reviews from those who watched LIVE last night, and I am offering the same deal to you. When you purchase the Beautiful Thistle bundle before it retires (or sells out) I will send you the PDFs for these beautiful cards.

Here is a SHOPPING LINK for your convenience:  https://www.stampinup.com?hostcode=BAPEANG2

Thank you for joining me today and I hope you find something beautiful in every day.

I’m covering Cute and Classy Easter Cards today!

Hello Stampin’ Friends,

Today I’m sharing two quick & easy Easter Cards; a Cute and a Classy!! You can enjoy watching the replay of last nights Facebook LIVE and then I’ll share the cards close-up and personal!! lol

I started with the Quick & Cute Easter Card and the Enjoy the Adventure Memories and More card kit and envelopes and paired it up with the Rain or Shine Specialty Designer paper.

I did tuck a small Stampin’ Dimensional under my bunnies foot so he is popped up pretty good. There is a lot of texture and dimension on this card, even though it is a simple layout.

I forgot to mention in the video that the Rain or Shine is a “Specialty” paper, and it’s easy to see the embossed areas of my bunny. This paper is so cute and can be used for so much more than a “rainy” card … Easter!! Who knew!

If you would like to see more card samples from the Enjoy the Adventure then just CLICK HERE

Now let’s move on to our Quick -n- Classy card!

You have simplicity of this design and a great paper saving tip by cutting out your butterfly from the gold foil piece underneath the designer paper. I used the “Easter Blessings” stamp from the Daffodil Daydream stamp set … you can always use what you have in your stash!!

Another simple layout but with so much beautiful dimension and a bit of added texture from embossing our greeting in gold.

So glad you decided to stop on by today and take a look … hey, invite your friends to check out my blog as well. Love to share my creations and inspire as many as I can.

Have a great day ~

Easy Heat Embossed Birthday Card

Hello Stampin’ Friends ~

Today I have a beautiful card for you! It’s an easy heat embossed birthday card that will WOW your friends and family. I created this with the Artfully Composed Suite. Yes, the same stamp set and dies that I just announced a New Class with.

This stunning beauty was done in Evening Evergreen (one of our in colors) and embossed in Gold. I took the basic card base cut at 8-1/2″ x 5-1/2″ the scored and folded at 4-1/4″ and stamped the front of it with the leaves using the Evening Evergreen ink. I love color on color as it adds a nice richness to the card, and gives it dimension by just stamping.

Next, I used the VersaMark ink to stamp the leaves all over the Evening Evergreen front (5″ x 3-3/4″) and then covered it with Gold Embossing powder, tapped off the excess and heat embossed until it was a beautiful, shiny gold!!

Once embossed, I layered it onto a 5-1/4″ x 4″ piece of Gold Foil paper. I usually cut out leaves or the mat for my greeting out of the center of the gold as not to waste any (can’t see that part anyway!!

Then I stamped my greeting in Evening Evergreen on a piece of scrap and then cut it out. You can use dies or punches if you prefer. I layered it with a piece of Evening Evergreen and cut to match and then popped it up using Stampin’ Dimensionals.

To finish off the card, I added some of the beautiful Gold dots from the Brushed Metallic Dots. I appreciate you stopping by my blog!

I hope I inspired you to pull out your heat gun again and do some embossing, or better yet … join my class on June 16th (Find Details Here) and discover all you can do with this amazing suite of products. Today we just touched the surface with our Easy Heat Embossed Birthday Card!

Thanks again for stopping by! Linda

I have a list of the products used below for your convenience so you may add this to your stamping collection.

Color Your Season Wishes …

Hello Stampin’ Friends ~

Today I have a beautiful autumn card filled with color and a touch of Gold … oh so pretty.  This is just one of the cards that we created in my Color Your Season Class. I am head over heels with this bundle because there is so much possibility and so many occasions you can create.

This amazing bundle will cover every season and is perfect for Birthday’s, Christmas, Thank You, and even Weddings!

My card today brings on the warmth of the Autumn season and is the perfect card to share with “your” person, the friend that is always there for you …

The leaves were stamped with the VersaMark pad and heat embossed with Gold Embossing powder.  The amazing color in the leaves comes from the new Watercolor Pencils and a Blender Pen… simple yet stunning!  You could also use your Aqua Painter with the Watercolor Pencils and create a “softer” look.

The Watercolor Pencils and the Color Your Season bundle are only available through August 31st, 2018 or while supplies last! Tomorrow I will be sharing a “Reflection of the Seasons” which will highlight all of the cards that I’ve shared so far and another NEW Creation for you!

Today’s card was done on Very Vanilla, embossed with Gold and backed with Gold Foil Paper.  The beautiful greeting comes with this amazing stamp set and was also heat embossed in Gold …

As the leaves gently fall you will notice that we began with our greens and slowly adding Crushed Curry … then Cajun Craze and finally the Cherry Cobbler – just like the color changes in the fall. I wanted to add a gold leaf just to highlight the gold and pull everything together (plus it’s really pretty).

It really didn’t take long to color and blend on the card and it was very relaxing … brings you back to the days when you were a kid and your Mom gave you a coloring book to keep you busy on a rainy day. We don’t seem to take advantage of that type of downtime … now you can relax and create beautiful cards that will bring joy to a friend. Life doesn’t get better than that.

I thank you for stopping by today and spending some time with me. Stop back tomorrow for a “Reflection of the Seasons” which will highlight all of the “Color Your Seasons” cards that I’ve shared so far and another NEW Creation for you!

Have a beautiful day and share a smile with a friend.

TODAY’S STAMPIN’ SUPPLY LIST … Click on any image to view details or to begin your shopping at my Stampin’ Store. Thank you for choosing me as your demonstrator when you purchase from me.


Butterfly, Blooms & Birthdays …

Hello Stampin’ Friends ~

Today I’d like to share one of the cards that our attendee’s made at our 2016 Annual Spring Retreat. My goal for our projects is to share different ways that you can use your stamp sets and accessories so they create a better value for you.

Today’s card truly demonstrates that goal …

000_3325

The Bloomin’ Love bundle was one of the stamp sets and accessories that we highlighted at this retreat and we used the Bloomin’ Heart Thinlits Die in a very different way! We used it as a pattern behind our butterfly!

Using the beautiful Wisteria Wonder cardstock for our card front, we cut out our butterfly shape from the Bold Butterfly Framelits, and then tucked the beautiful lace heart behind it.

(Don’t forget what I told you about bundles … current bundles will not be bundled in the upcoming catalog. Save 15% by purchasing your bundles before May 31st) Please use Hostess Code: HEESBTSZ

We embossed our birthday greeting from the stunning Rose Wonder stamp set (also has a bundle)

We also embossed the flowers which come from the Grateful Bunch stamp set (another bundle) and added them to our card. The flowers were attached at different heights by popping some up with Stampin’ Dimensionals.

000_3330

Oh yes we did … we added a strip of the rhinestones to create our butterfly! Each of our flower centers also got a rhinestones! In fact, our attendee’s could add as much as they wanted because they each got a full package of rhinestones included in there projects bag.

So … did we inspire you to become creative with your framelits and thinlits? They are so much fun to play with.

Thank you for stopping by ~

Have a beautiful day!

blog-closing-small

TODAY’S STAMPIN’ SUPPLY LIST …


Simply Sunday: Happy Birthday

Hello Stampin’ Friends ~

Today we will keep it short and simple … I know many of you are preparing for your Super Bowl parties!

So let’s begin with our beautiful stamp set “Helping Me Grow” and the hyacinth flower. I chose Perfect Plum and Whisper White for my color combination … simple.

000_3114

I heat embossed the hyacinth with the White Emboss powder then highlighted the flower by sponging some ink over the flower. It also creates a bit of a shadow around the blooms. Wipe off any excess ink with a tissue so it does not smear.

The greeting was stamped from the Rose Wonder stamp set … you will also notice that I used the die from the Rose Garden Thinlits Dies. I love that Stampin’ Up! creates their stamp sets to coordinate with each other.

000_3112

Sweet and Simple … don’t we all love cards like this! Thank you for stopping in.

Enjoy your game day, no matter what you are doing!

blog-closing-small

TODAY’S STAMPIN’ SUPPLY LIST …

000_3114

White Christmas …

Hello my Stampin’ Friends,

OK … it is officially winter here!  Snow, slippery roads, and cold … I’m ready for spring!  However, I do love Thanksgiving and Christmas so I’ll hold out for those.

My card share today is a beautiful card that we made at our Holiday Retreat this year.   I think it’s my favorite of all the cards and projects we did (I love the look and the bling).

000_0409

As you can see there are many layers here, but all done in Whisper White, which gives it that special look.  We used the “Beautifully Baroque” embossing folder to create some texture.

The “silver” embossed snowflake comes from the “Festive Flurry” stamp set found in the Holiday Catalog and can also be purchased in a bundle with the coordinating framelits.  The snowflake was centered on the stunning “Silver Glimmer” Paper which in now on sale!  Click on any of the highlighted items to see what is included in that stamp set.

Our greeting “Christmas Cheer” comes from the stamp set “Sweet Essentials” found on page 41 of our catalog.  I decides to create a banner for the greeting so it would stand out more.

000_0410

Quite simple and very elegant with some holiday bling, you can see why I love this card.  Hope you enjoyed it as well.

Thanks for stopping by and stay warm.

blog closing-small

Here is a list of supplies used for today’s card …

 ITEM

 PRICE

 DESCRIPTION

 131778

$39.95

 Festive Flurry – WOOD

 131781

$29.95

 Festive Flurry – CLEAR

 132085

$19.95

 Sweet Essentials – WOOD

 126457

$14.95

 Sweet Essentials – CLEAR

 130917

$7.95

 Beautifully Baroque Embossing Folder

 119246

$4.95

 Rhinestones (Basic) Jewels

 129053

$29.95

 Heat Tool (Embossing Gun)

 109131

$4.75

 Silver Embossing Powder

Clicking on the item number will link you to my on-line store.

Best Wishes …. for savings!

Hello Stampers ~

Today I am sharing two cards…  Stampin’ Up! is having a sale on some of our most popular stamp sets.  Two of mine, the “Petite Pairs” and “Sweet Essentials” are featured today!

First, is a card that I received as a “swap” from my Star’s team member, Cindy Schneider.   Our Star’s group meets once a month to stamp, swap, share ideas and business tips!  Not to mention … we have fun too.

000_1317

To create this card, we embossed in white, the flower from ” Secret Garden” (pg. 94) and then sponged with “Pretty in Pink” ink.  Although that is one of the discontinued colors … there are plenty of pretty pinks you can use.  The “Oval Collection” framelits (129381 / pg. 186) was used to cut the flower pattern out and frame it with the scallop mat.

Oh  yes, I need to mention the contrasting cardstock is “Early Espresso”… I love the way espresso looks with the pastel colors (try it with Pool Party!)

The card was embellished with the butterflies from the “Beautiful Wings” Embosslit die… these dies emboss onto the butterfly and cut them out for us!  We also have buttons and heart embosslit dies, all are found on page 188 of the NEW Catalog.

000_1316

I’m thrilled to tell you that the fabulous “Petite Pairs” stamp set, one of three that is currently ON SALE!

You can save 25% when you purchase one, two or all three of the stamp sets!

Now I’d like to share a card that I made a while back that features the “Sweet Essentials” (pg. 41) stamp set!  ON SALE.  And y0u’ll recognize the cake from yesterdays post … Make a Cake stamp set.

000_1209

Little stampin’ tip …

If your making a special card for a wedding or special friend, embellish the inside of the card too!

It’s doesn’t take much, but it will leave a lasting impression.

000_1216_0001

Feel free to leave a comment about today’s post, I’d love to hear from you.

Have a great weekend and Happy Stampin’

Linda

B1_Grab-Your-Greetings

Sale: 25 percent off three of our greeting sets!
No limits and get them on any order type (workshop, customer, demonstrator, or online).

Dates: May 31-June 30, 2013

Sale Price Retail Price Description Item
$17.96 $23.95 Sassy Salutations Wood-Mount Stamp Set 132070
$13.46 $17.95 Sassy Salutations Clear-Mount Stamp Set 126707
$14.96 $19.95 Sweet Essentials Wood-Mount Stamp Set 132085
$11.21 $14.95 Sweet Essentials Clear-Mount Stamp Set 126457
$21.71 $28.95 Petite Pairs Wood-Mount Stamp Set 128706
$15.71 $20.95 Petite Pairs Clear-Mount Stamp Set 122497