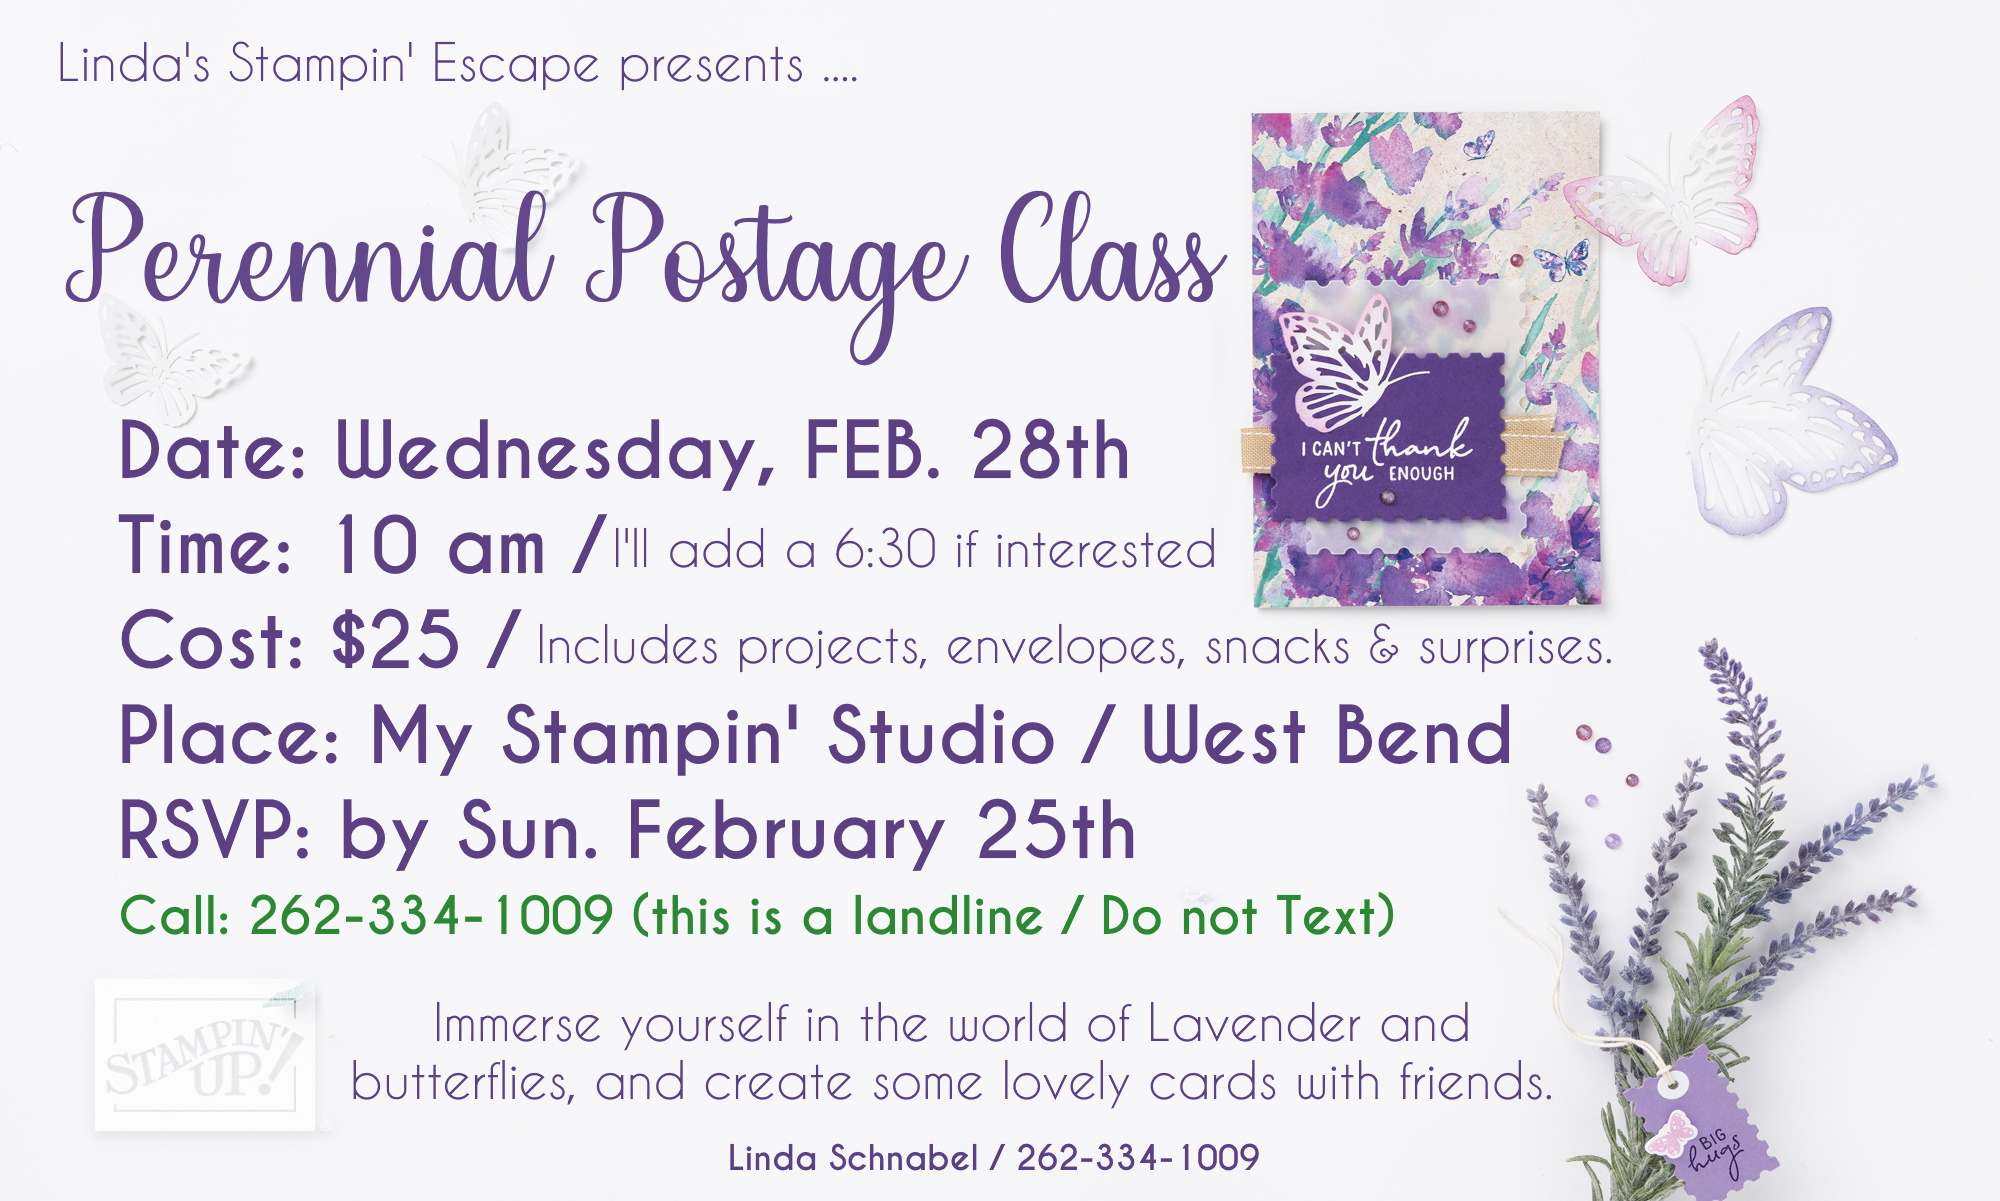
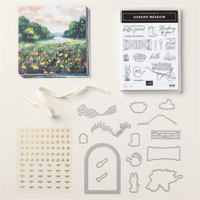
Are you ready to embark on a creative journey filled with beautiful lavender florals, butterflies, postage dies and sparkling embellishments? Then look no further because I am thrilled to invite you to my Perennial Postage Class, where we’ll explore the art of blending these essential elements of stamping.
In the Perennial Postage Class, we will explore the numerous possibilities of coordinating our die-cutting, stamps, and designer paper to create lovely cards. This class is designed to inspire and elevate your crafting, whether you are new, or a seasoned pro. From mastering fun techniques to discovering innovative ways to combine patterns and textures, every card promises to be a delight to the eye.
Prepare to be immersed in a world of creativity and fun! Our Perennial Postage Class is not just about learning—it’s about enjoying the process, unleashing your imagination, and embracing the joy of crafting together. With laughter, camaraderie, and plenty of exciting projects to work on, every session promises to be a memorable experience you won’t soon forget.
—it’s time to let your creativity bloom in the Perennial Postage Class!
Date: Wednesday, February 28th
Time: 10 am / I will add a 6:30 pm Class if I have enough interest.
Cost: $25 / Includes all projects, envelopes, snacks & more!
Location: My Stampin’ Studio / West Bend
RSVP: By Sunday, February 25th
Don’t miss out on this fantastic opportunity to elevate your stamping skills and connect with fellow crafting enthusiasts. Reserve your spot today and get ready for an unforgettable journey in the world of Perennial Postage!
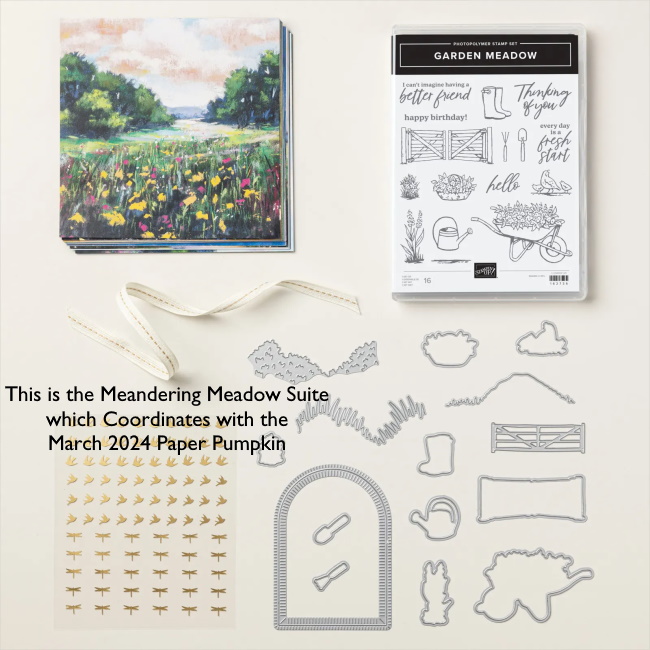
Spring is just around the corner, and what better way to welcome the season of renewal and freshness than with our latest Paper Pumpkin Kit? This March, we’re thrilled to present a kit that embodies all that nature has to offer, and this kit coordinates with the with the Meandering Meadows Suite Collection (item 162745).
The Paper Pumpkin kits by Stampin’ Up! offer a delightful crafting experience with a plethora of benefits. Firstly, these all inclusive crafting kits provide convenience and simplicity, as they come with pre-designed projects and all the necessary materials, saving time and hassle for you no matter what level of crafter you are… just beginning or totally experienced! I’ve been doing this for 24 years, and I love to discover new products and techniques. This makes it easy.
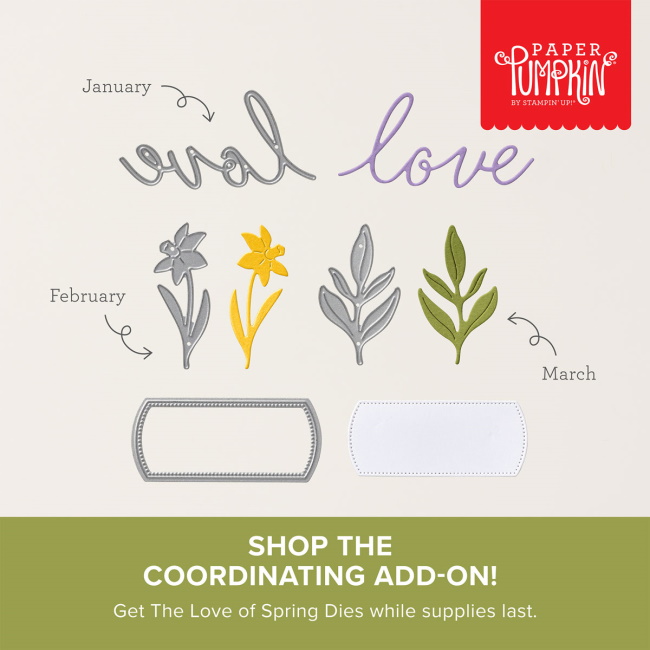
Secondly, the March kit’s coordination with the Meandering Meadow Suite ensures a seamless crafting experience, allowing you to easily expand your creative possibilities and match our projects with other coordinating products. You also have the option to purchase our exclusive “add on” dies! You must be a Paper Pumpkin subscriber to order these.
Moreover, these kits foster creativity and inspiration, offering a platform for crafters to explore new techniques and experiment with different designs. Did I mention that a FREE Gift is included in the March Kit?
What I love about Paper Pumpkin is that the subscription model offers flexibility, allowing you to easily manage your crafting schedule and receive exciting new projects every month. It makes our crafting an enjoyable and stress-free experience. Overall, Paper Pumpkin kits bring joy, creativity, and convenience to crafting enthusiasts, making them a beloved choice for creative expression.
Thanks for dropping in and checking out my blog today.
Have a great Valentines Day!! ❤
One more thing!! During Sale-a-bration you can choose FREE Exclusive Sale-a-bration Items when you purchase one of the subscriptions below. Win / Win!! We’ve also added on some of our Favorite Items from the catalog you can choose from. I’ll post that picture below ….
Hello Stampin’ Friends ~ Well the party is over but I’d like to share one of the beauties that was highlighted during one of the LIVE demonstrations ….
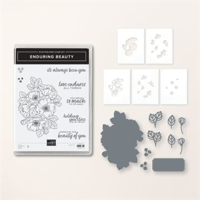
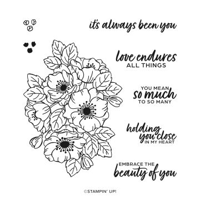
Enter Stampin’ Up’s “Enduring Beauty” bundle—a captivating collection designed to ignite the imagination and elevate the art of card making and scrapbooking to new heights.
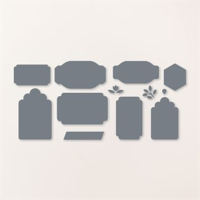
Crafted with meticulous attention to detail, the Enduring Beauty bundle seamlessly blends elegance with versatility, offering a plethora of options for seasoned crafters and beginners alike. At its heart lies the exquisite stamp set, adorned with intricate floral motifs and heartfelt sentiments, ready to breathe life into any project it graces.
What sets the Enduring Beauty bundle apart is its adaptability. You’ll have the flexibility to utilize the stamp set with or without the coordinating dies, allowing for a myriad of design possibilities. Whether you prefer the simplicity of stamped images or the dimensionality of die-cut elements, this bundle has you covered.
But the magic doesn’t stop there. The Enduring Beauty bundle also features a set of masks, a secret weapon for enhancing stamped designs and adding depth to your creations. These masks serve as stencils, allowing you to layer colors and patterns with precision, resulting in stunning multi-dimensional effects that are sure to impress. You can see how it adds that dimension … stunning.
I have a growing list of techniques that come to mind with this versatile stamp set, coordinating dies, and innovative masks. Discover the possibilities for yourself … I have the links to purchase yours listed below.
In my last blog post I shared the “Double Box Fold” Card with you, but what do you do with the leftovers? You repurpose your leftover materials to craft a charming shaker card. If you’re a fan of recycling and getting creative with what you have on hand, this project is perfect for you! Are you ready to add an extra touch of love to your Valentine’s Day greetings?
Cut a piece of clear acetate sheet slightly larger than the opening of the leftover piece. Adhere it to the backside of the die-cut piece using adhesive, ensuring it covers the entire opening securely.
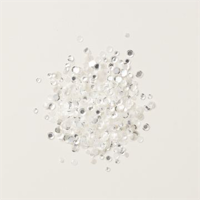
Carefully apply foam adhesive strips around the edges of the die-cut piece, creating a border around the acetate window. Make sure there are no gaps where the sequins could escape. Pour a generous amount of Loose Silver Sequins onto the center of your card base. Sprinkle in some hearts from the Sending Love Dies to add a romantic touch to your shaker card.
Now, carefully place the acetate-covered die-cut piece over the card base (centering it), and ensuring the sequins and hearts are securely trapped inside. Press down firmly on the edges to seal the shaker element.
Once your shaker portion is complete, it’s ready to add a greeting and embellish. Greeting comes from the Throughout the Year stamp set and die cut with the Everyday Details Dies. I glued a few of my sequins on the card front to embellish, and then embellished my embellishments by adding the Iridescent Rhinestones inside of them. I also add a couple hearts at the top for a pop of color and interest.
Now it’s ready to spread love and joy to your friends and family. Whether you’re mailing it to a loved one or hand-delivering it with a hug, this handmade creation is sure to bring a smile to their face. PS. Swap out the greeting for an All Occasion / Just Because I Care card!!
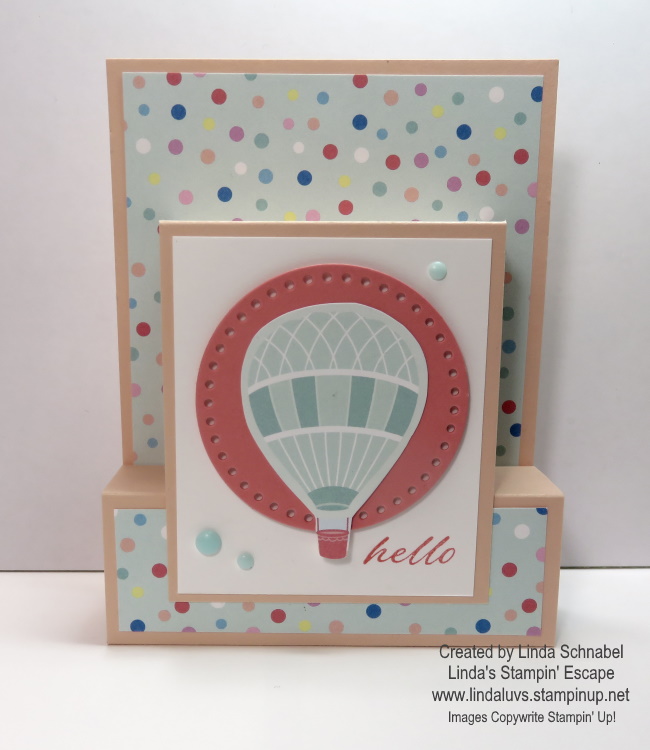
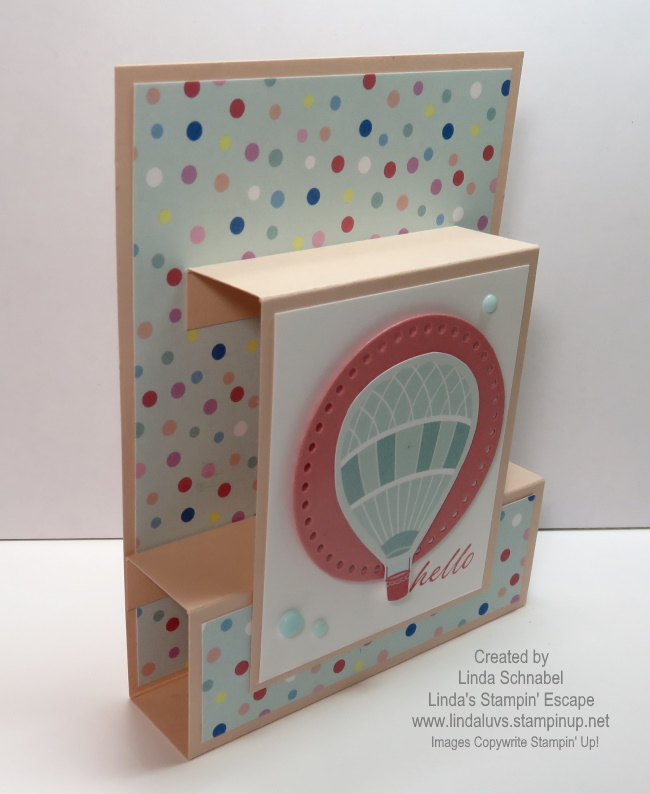
Are you ready to take your card-making skills to new heights? Look no further than the Double Box Fun Fold technique! This delightful fold adds an extra dimension to your handmade cards, creating a unique and eye-catching design that is sure to impress.
The Double Box Fun Fold is a creative card-making technique that adds depth and interest to your projects. Unlike traditional flat cards, this fold features two box-like structures that pop up when the card is pulled from the envelope, allowing it to stand on it’s own creating a fun and interactive element.
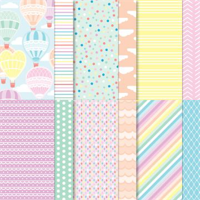
I selected the Lighter than Air 6 x 6 Designer Paper. This paper collection features whimsical designs and vibrant and pastel colors, perfect for creating cheerful and uplifting cards. Choose a fun pattern to create an “elevating” look for your card… it is lighter than air! lol
I fussy cut an Air Balloon from the designer paper. For an extra special touch, I mounted the Air Balloon onto some Flirty Flamingo circle cut from the Everyday Details Die to create a focal point for my card. This adds dimension and visual interest to your design.
To add a pop of color and texture to your card, embellish with Rainbow Adhesive Backed Dots. These self-adhesive dots are perfect for adding a playful touch to your projects and come in a variety of pastel colors.
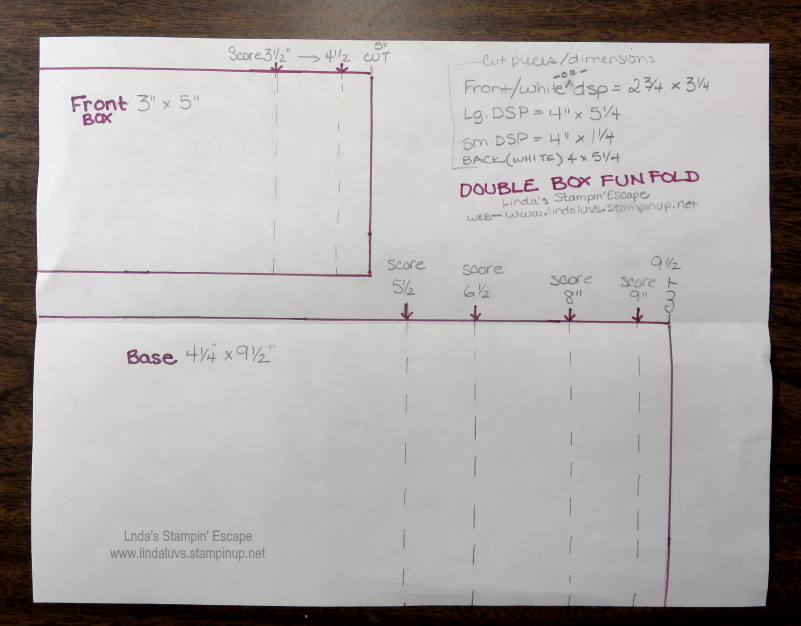
Here are the dimensions to start creating your own Double Box Fun Fold card ….
The Double Box Fun Fold is a fantastic technique for adding excitement and dimension to your handmade cards. By combining colorful designer paper, intricate die cuts, and fun embellishments, you can create cards that are sure to delight your friends and family.
So why not give the Double Box Fun Fold a try? Experiment with different paper patterns, embellishments, and die cuts to create custom cards that reflect your unique style and creativity. Your recipients will love receiving a handmade card that is as fun to open as it is to admire! Thanks for stopping by.
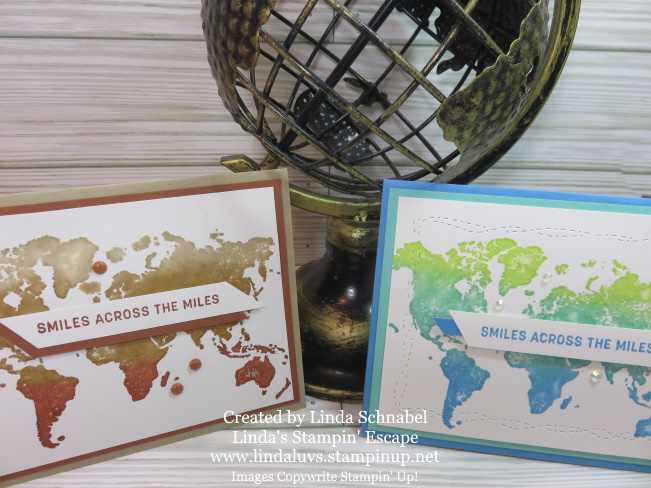
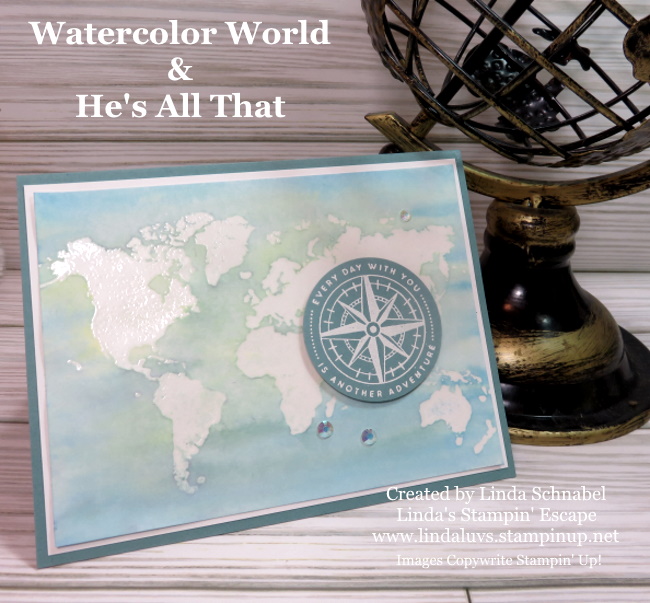
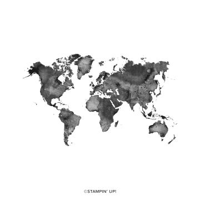
Today, we embark on a journey through the vibrant realm of watercolors, highlighting the Watercolor World stamp set. This stamp can handle a treasure trove of possibilities, inviting us to unleash our creativity. Today I’ll share just four unique stamping techniques. Alongside, I’m pairing it with complementary stamp sets to elevate our creations to new heights with the right sentiments.
Grab a coffee, tea or whatever you like and join me for a short video that brings these magical techniques to life. This is a replay of my Facebook LIVE last Tuesday. Just click on the image to view …
The Watercolor World stamp set invites us to embark on a journey of boundless creativity, where every brushstroke tells a story and every impression leaves a lasting impression. From heat embossing to emboss resist, each technique offers a glimpse into the endless possibilities that lie within our grasp.
Let’s take a closer look at our cards ….
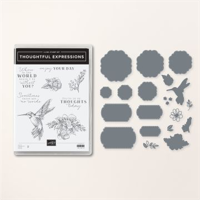
Let’s delve into our basic stamping and embossing, accompanied by the Thoughtful Expressions Bundle. This technique marries simplicity with refinement, as we create timeless masterpieces with ease. Combined with embossing folders, the Watercolor World stamps transform into captivating works of art, ready to adorn any occasion.
Ready to immerse yourself in the magic of direct-to-rubber stamping technique? Then enhanced by the Sending Smiles stamp set which dances across the continents! This technique introduces a delightful twist to traditional stamping, infusing your creations with a watercolor-inspired allure. The Stitched with Whimsy dies also creates not only texture, but the feeling you are traveling with them.
Our third technique, emboss resist, is a testament to the versatility of the Watercolor World stamp set. Paired with the He’s All That stamp set, we embark on a journey of exploration and experimentation. As we apply layers of color over our heat embossing, intricate designs emerge, unveiling a world of possibilities. Witness as the stunning effects of emboss resist unveil intricate patterns (our continents) and textures, captivating the eye and igniting the imagination. So fun and so easy to do.
Our final technique is a blend of elegance and charm. With the Perennial Postage Bundle by our side, we’ll embark on a journey of heat embossing on designer paper. This method infuses sophistication into our projects, adding depth and dimension effortlessly. Watch as the intricate designs of the Watercolor World stamp set come to life against a backdrop of luxurious patterns.
As we pair these techniques with complementary stamp sets, we unlock new dimensions of inspiration and innovation, transforming simple materials into works of art that delight the senses and nourish the soul. So, gather your supplies, unleash your imagination, and let the Watercolor World stamp set be your guide on a voyage of discovery and delight.
Thank you for hanging out with me today. And remember … I’ll be going LIVE again tonight with a beautiful FUN FOLD Card you won’t want to miss. Join me on my Facebook page.
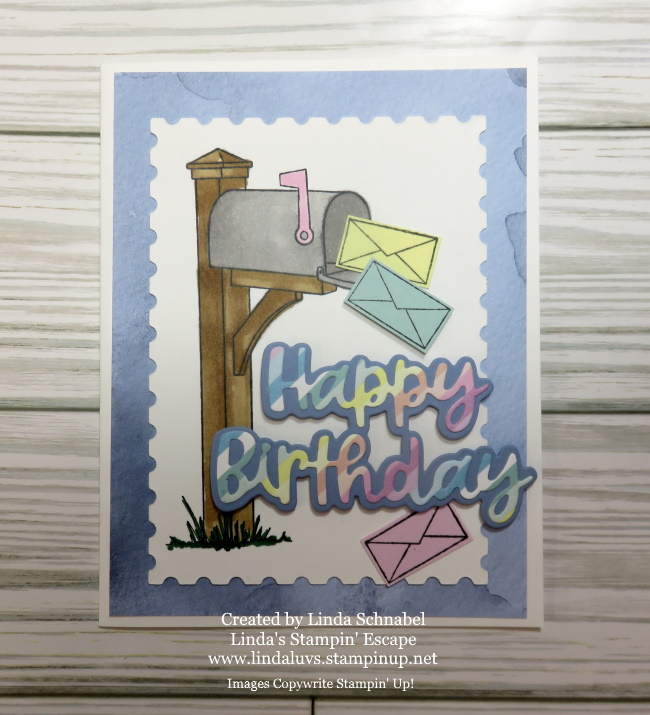
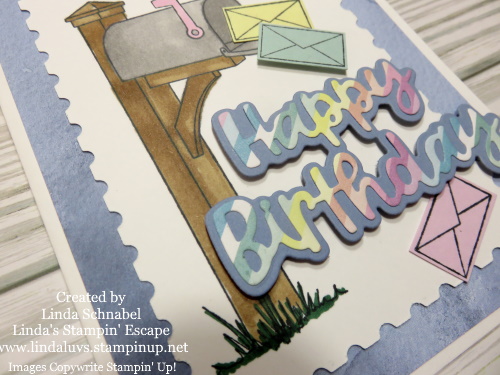
Hello Stampin’ Friends ~ Today, I’m excited to introduce a perfect pairing that takes your handmade cards to new heights – the Perennial Postage Dies and Sending Love Bundle. These two sets seamlessly come together, allowing you to craft beautiful greetings that will surely warm the hearts of your loved ones. I don’t normally share cards from my classes, but today I will. Keep an eye out for my upcoming classes!
Birthdays are special occasions, and what better way to celebrate than with a personalized touch? The Wanted to Say Dies offer a versatile and elegant way to express your birthday wishes. These dies beautifully complement the Perennial Postage set, creating a harmonious blend of sophistication and sentiment.
Adding the right background to your cards can elevate the entire aesthetic. For our featured creation, we’ve chosen the Flight & Airy Watercolor design from the FREE Sale-a-bration item collection. This exquisite designer paper brings a whimsical and dreamy element to your cards, creating a perfect backdrop for the Perennial Postage Dies and the Wanted to Say sentiment.
Additionally, the 6 x 6 Lighter than Air Designer Paper from the Spring Mini Catalog adds a touch of elegance to our Happy Birthday Greeting. The delicate patterns and soft color palette of this paper create a visually stunning contrast, making your card a true work of art.
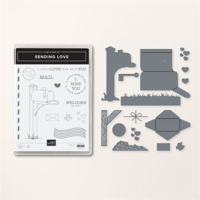
Now, let’s talk about the Sending Love Bundle, which is the ideal companion for the Perennial Postage Dies. This bundle includes a set of coordinating stamps and dies, allowing you to create intricate and charming mailboxes & envelopes to accompany your cards. The attention to detail in both sets ensures that your creations are not just cards but expressions of love and thoughtfulness.
With the Perennial Postage Dies, Sending Love Bundle, and the carefully chosen designer papers, you have the perfect recipe for creating heartfelt and visually stunning cards. Whether it’s a birthday celebration or any other special occasion, let your creativity soar with this perfect pairing. Create Card, send, and spread love with every handmade creation!
Thank you for spending part of your Sunday with me!
Brace yourselves for a wave of excitement as we unveil the newest additions to our Sale-a-bration promotion. I’m thrilled to share some irresistibly delightful items. Today I’ll be showcasing the enchanting Delightfully Eclectic Designer Series Paper. Get ready to embark on a creative journey that promises a fusion of whimsy and elegance, all while enjoying an exclusive fun fold tutorial with a video that will spark your imagination and set your crafting heart aflutter!
Let’s begin with my Sending Smiles Fun Fold card. Today I will be sharing a video of my replay from a Facebook LIVE. It features the Delightfully Eclectic Designer paper that has just been added to the list of Sale-a-bration items… Wooo Hooo!
Let’s take a look at our video …
DIMENSIONS:
Cardbase: 11″ x 4-1/4″ then Scored at 2-1/8″ and 5-1/2″
Basic White for (Diamond) Front Flap: 2-3/4″ x 2-3/4″
Colored Cardstock or Designer Paper for Front Flap: 2-1/2″ x 2-1/2″
Designer Paper for front (3-1/8″) & inside(2-1/4″): You can use 4″ x 5-1/2″ … just make sure your 3-1/8″ piece is on the front, then you can attach the remainder to the inside.
I hope this cutie inspires you to try this fun fold, it is pretty quick and easy to make and doesn’t require a lot of layers or designer paper so have fun! Here’s another with the Delightfully Eclectic Designer Paper.
Our latest offering, the Delightfully Eclectic Designer Series Paper, is a celebration of vibrant colors, eclectic patterns, and endless creative possibilities. Imagine a kaleidoscope of hues and designs, ready to breathe life into your paper crafts. Whether you’re a seasoned crafter or a novice looking to infuse some energy into your creations, this paper is a game-changer.
Let’s see what else I’ve created with this fun paper pack ….
This is the split card technique … you will find step by step directions to create this card by Clicking HERE.
Now I want to share one of my favorite patterns in this pack ….
With such a fun and whimsical pattern, I chose the Alphabest stamp set and coordinating Best Label punch. I first stamped the outer design in Tuxedo Black Memento Ink and then stamped my greeting in the Fresh Freesia ink. To learn more CLICK HERE!
Here’s a little cutie that is soooo simple to make!
With patterns ranging from bold geometrics to delicate watercolor florals, the Delightfully Eclectic Designer Series Paper opens the door to a world of versatility. Elevate your projects with this dynamic paper that effortlessly blends contemporary chic with classic charm.
Here’s another cute pattern that I teamed up with the Circle Sayings bundle ….
There is another card and video that go along with this. Check them both out HERE.
Now, let’s talk about why you shouldn’t delay in indulging your creative cravings. Our Sale-a-bration promotion is all about giving back to our amazing crafting community. For every qualifying purchase, you can choose exclusive free items from our Sale-a-bration catalog. And yes, that includes the stunning Delightfully Eclectic Designer Series Paper!
Thanks so much for dropping in today for a visit … Don’t miss out on this crafting fiesta! Head to my online store, explore the wonders of Sale-a-bration, and let the joy of crafting fill your creative space.
Here is a list of highlighted products from today’s card parade ….
As we bid adieu to our week-long exploration of exquisite gold color combinations, we reserve the grand finale for a pair that not only complements gold but elevates it to new heights – Petal Pink and Basic Gray. These two hues, when intertwined with the shimmering brilliance of gold, create a symphony of elegance and sophistication.
For our concluding showcase with the Most Adored designer paper, I chose the design adorned with delicate gold hearts. Armed with blending brushes and the soft blush of Petal Pink, I embarked on a journey to craft a gradient effect that would serve as the perfect backdrop for our design.
The stars of the show, the adorable bees, were meticulously fussy cut from the Bee Mine Designer paper. I incorporated the Bee Mine bundle, utilizing both the sentiment and die cut from this delightful collection. The result was a seamless integration of elements, each contributing to the overall allure of the project. And a touch of the Wink of Stella on their wings.
What truly sets this card apart is the attention to detail… I think it’s my favorite! The bees, with their intricate patterns, add a touch of whimsy, while the sentiment and die cut from the Bee Mine bundle infuse a heartfelt message into the design. It’s not just a crafting project; it’s a visual story, told through carefully chosen elements that weave together seamlessly.
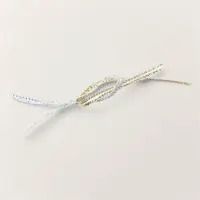
To add the finishing touches, I reached for gold cord and Petal Pink Foil Gems. The gold cord, with its understated glamour, brought a sense of unity to the composition, tying together the gold highlights from the Most Adored designer paper. Meanwhile, the Petal Pink Foil Gems introduced a subtle shimmer, echoing the softness of the Petal Pink gradient.
This final card encapsulates the essence of what we’ve discovered… It’s not just about colors; it’s about the stories they tell, the emotions they evoke, and the artistry that unfolds when they come together.
On the Flip Side …
When we turn the page on our Most Adored Designer paper, it reveals a charming transformation from shimmering gold hearts to a delightful pink and red plaid. Where our first card was all about the glitz and whimsy, this card is bold and to the point.
I cut three 1 1/4″ x 4″ pieces of the plaid pattern and matted them in Real Red. This not only accentuates the boldness of the red and pink hues but also adds a touch of sophistication to the overall design.
For the backdrop, I opted for a Basic White mat, which was embossed with the timeless Timeworn Type pattern. This embossing detail introduces a subtle texture, elevating the visual appeal and adding a vintage touch to the composition. It’s a nod to the past, seamlessly integrated into the contemporary vibrancy of the plaid pattern.
The sentiment, borrowed from the Bee Mine bundle featured in our initial card, takes center stage once again. However, this time, it undergoes a transformation of its own, being die-cut with the versatile Everyday Details Dies. This alteration not only reinforces the adaptability of the Bee Mine bundle but also infuses a fresh perspective into the sentiment, making it a perfect fit for this design.
To add a final touch of sweetness, small red hearts were delicately die-cut using the Sending Love Dies. These whimsical embellishments scatter across the card, tying together the theme of love and warmth.
If you’ve been following the past 4 days, you’ll note the Most Adored Designer paper has proven to be a canvas of endless opportunities, and there’s joy in every discovery. Thanks for hanging out with me during this discovery of color and techniques!
Here is a list of supplies I used for today’s cards ….
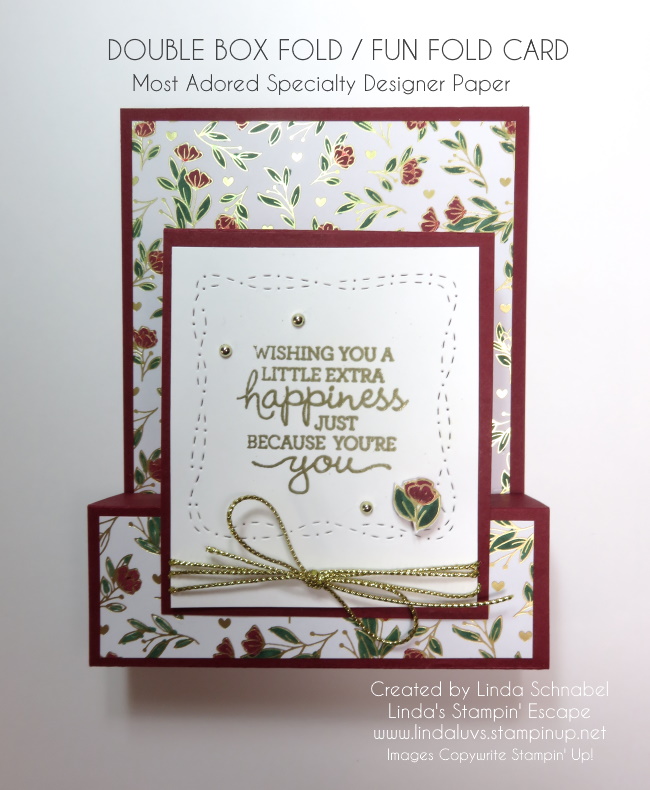
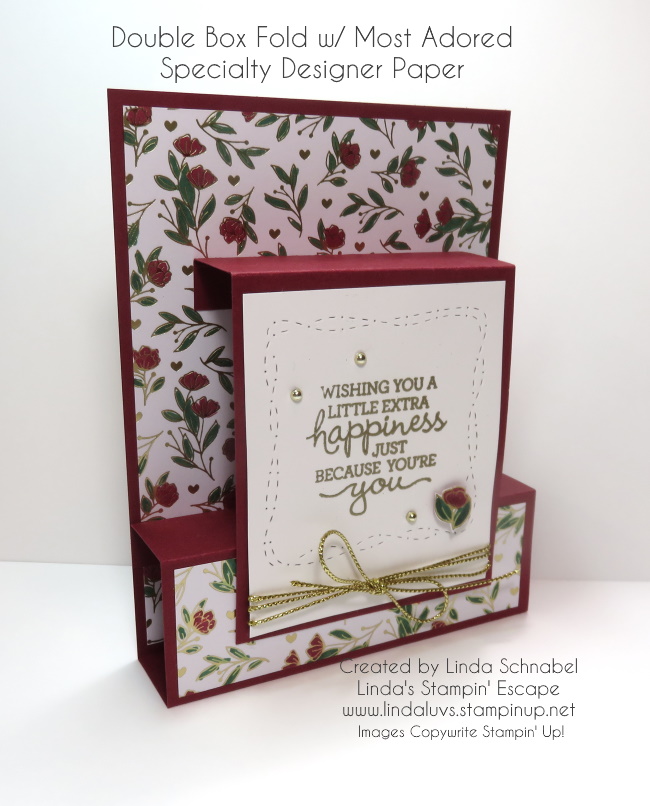
Hello Stampin’ Friends ~ As we continue our journey through the enchanting world of crafting with the Most Adored Specialty Designer Paper, today marks the 4th day of exploration. In this blog post, my spotlight hues for the day are the rich Cherry Cobbler and Shaded Spruce. The floral patterns of the paper come to life as we unleash the magic of Stampin’ Blends. The Pansy Patch stamp set takes center stage for a heartfelt sentiment, while the Stitched with Whimsy Dies add a touch of whimsical charm. Let’s take a look at today’s creation!
I thought it would add some excitement by highlighting my paper with the Double Box Fold, a fun fold that lays flat in the envelope for mailing. The Most Adored Specialty Designer Paper, in the pretty floral pattern, becomes a canvas for creativity. Using Stampin’ Blends in Cherry Cobbler and Shaded Spruce, infuse vibrant hues into the delicate blooms. The seamless blending of colors adds depth and dimension, transforming the paper into a work of art that harmonizes perfectly with the regal touch of gold.
For the sentiment, I chose the Pansy Patch stamp set, which offers a perfect blend of grace and sentimentality. Stamp a heartfelt message onto the card, and then use the Stitched with Whimsy Dies to frame and highlight the sentiment. The intricate stitching adds a touch of sophistication, making the sentiment a visual focal point on the card.
What do you think of my version of this fancy fold card?
Here are the Measurements:
Colored Base: 4 1/4″ x 9 1/2″. Score at 6″, 6 1/2″, 8″ and 9″ Colored Front Panel: 3″ x 5″. Score at ½″ x 1 1/2 Designer Series Paper: TOP: 4″ x 5 1/4″ BOTTOM: 4″ x 1 1/4″ White Backing: 4″ x 5 1/4″ (This area is for you to write) White Card Front: 2¾″ x 3 1/4″
On the Flip Side …
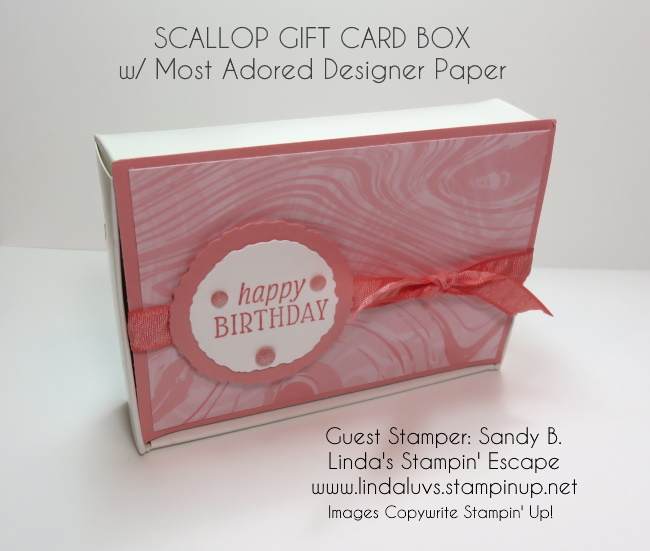
We continue the fun with project #2: Our Scallop Gift Card Box found on page 126 of your Annual Catalog. The Scallop Gift Card Box, enhanced by the captivating “flip side” of today’s featured Most Adored Specialty Designer Paper; the Flirty Flamingo Swirl, exemplifies the art of playful gift presentation.
When you flip open the top, your recipient will discover their favorite Gift Card, you could even create your own!! Elevate your gift-giving experiences with this charming creation that combines style, surprise, and the timeless allure of handmade craftsmanship.
As we continue this crafting journey, the potential for inspiration and creativity remains boundless. Stay tuned for more enchanting discoveries with the Most Adored Specialty Designer Paper.
Thank you for checking out my blog today, hope your day is a good one!
Here is the list of supplies used for today’s projects. Clicking on any image will take you directly to my Online Store. Thank you!
In this blog post, we’ll explore the creation of a stunning card using the Most Adored Specialty paper and incorporating the captivating “Ink Dragging Technique.” The result is a visually striking combination of Shaded Spruce and Gold, enhanced further by the use of Gold Foil sheets and a touch of sentiment from the “He’s All That” stamp set.
To begin, select the Most Adored Specialty Paper as the canvas for your card. To add depth and dimension, employ the Ink Dragging Technique using Shaded Spruce ink. The gentle strokes of color will create a captivating visual effect, giving the paper an alluring quality.
Next, I introduced the Gold Foil Sheet to complement the rich Shaded Spruce tones. Cut and layer the foil strategically / cutting diagonally allowing it to bring out the luxurious gold accents on the card. For a heartfelt touch, use the “He’s All That” stamp set to heat emboss your sentiment in gold. Once embossed, utilize the Heartfelt Hexagon Punch to give the sentiment a distinctive shape, adding a touch of sophistication to the card.
On The Flip Side:
When you turn over the Most Adored gold pattern it reveals a delightful surprise on the flip side. Against a backdrop of flirty flamingo, white floral hearts bloom, creating a charming contrast. This pretty design adds an element of playfulness to our overall card design.
For the greeting, I used the “Sending Smiles” stamp set and coordinating Sending dies. Cut out the delicate elements and arrange them onto your card front. To accentuate the design, embellish with silver pearls from the Festive Pearls package. These pearls add a touch of elegance to our card.
Crafting a handmade greeting card is an art form that allows for the expression of creativity and thoughtfulness. By showcasing the allure of the Most Adored Specialty Paper, either card is sure to leave a lasting impression on its recipient.
Thanks for taking time out of your Sunday to check out my cards today.
Continuing my highlights of Color Combinations; today, we delve into the enchanting realm of gold and white, a pairing that exudes opulence and sophistication. Our spotlight shines on the Most Adored specialty designer paper adorned with this stunning duo.
At the heart of this masterpiece lies the Gold and White Specialty Designer Paper, that whispers of elegance and luxury. The intricate rose pattern in shimmering gold elevate this paper from ordinary to extraordinary. Each petal brushed with a touch of magic – the Wink of Stella glitter brush. This subtle yet enchanting addition brings the roses to life, creating a mesmerizing sparkle that captures the essence of sophistication.
The sentiments come from the “Enduring Beauty” stamp set, embossed in gold and die-cut using the Scallop Contours Dies, adding a touch of intricacy to the overall design. The marriage of elegant script and the golden-white palette creates a sentiment that resonates with enduring charm, making it perfect for an anniversary or wedding card.
On the Flip Side: A Playful Contrast
As we flip over the designer paper, a delightful surprise awaits – a Real Red background adorned with small white hearts! I wanted to add a playful touch and die cut it with the Scallop Contours Dies.
The sentiment on this side hails from the “Bee Mine” stamp set, mirroring the whimsical charm of the small white hearts. The “Happy Valentines Day” sentiment with the hand stamped hearts are die-cut with the Something Fancy Dies, creating a harmonious connection between the elements. This playful touch evokes feelings of joy and warmth, making it ideal for projects celebrating love and friendship.
Today, we’ve explored more creative options using the Most Adored Specialty Designer Paper, where gold and white weave a tale of timeless elegance, and its flip side, adorned with playful Valentine patterns, which adds a touch of whimsy to the mix. What makes this experience even more delightful is the opportunity to acquire it for free with a $50 purchase during Sale-a-bration.
With every stroke of the brush, and every heartfelt sentiment, the Most Adored Specialty Designer Paper in gold and white becomes a canvas for your imagination. I have more color and techniques to share so be sure to pop in everyday. Better yet, Click the “Follow Me” button at the top right side of my blog!
Thank you for joining me today. Happy Saturday!
I’ve added the links to the products used for your shopping convenience …
In the world of crafting and creative expression, certain elements stand out as timeless and beloved. Gold is undoubtedly one such element, radiating opulence and sophistication. Today, our product spotlight revolves around the Most Adored, and we’re going to explore how Night of Navy, a rich and deep hue, beautifully complements the regality of gold.
The Most Adored Designer paper has captured the hearts of stampers worldwide with its premium quality and versatile appeal. Along with the Gold Foil designs and cute Valentine designs on the “flip side”, what makes it so popular is that you can get it for FREE during our Sale-a-bration promotion, with a qualifying purchase.
For today’s creative adventure, we turn our attention to Night of Navy. This deep, dark blue is synonymous with elegance and pairs seamlessly with the richness of gold. I used the swirl pattern and infused it with Night of Navy ink and my Water Painter. It appears to be dancing harmoniously with the golden accents, creating a mesmerizing effect.
I used the Watercolor Wash Technique over the Most Adored Designer paper, as it dries it lightens, so I went back over some areas with more ink to get the true Night of Navy color too. The die cut circles with a border of circles comes from the Everyday Detail Dies. And to take it over the top … I embossed the Paper Butterfly in Gold and embellished it with gold pearls from the Festive Pearls collection.
On the flip side, we delve into the romantic realm with Card #2. Here, I used both sides of this sheet of designer paper with punched Hearts, and die cut the little hearts from our Sending Love Dies. As we approach the season of love, this creation becomes the perfect canvas for a heartfelt Valentine’s Day card. The Basic White background adds a sense of stability, making the hearts pop with warmth and affection.
My greeting comes from the Throughout the Year stamp set. You all know I love my sentiment sets, especially when they provide so much versatility as this one does. This was highlighted by die cutting the greeting from the Something Fancy Dies.
I’ll conclude the Most Adored collection, with its resplendent gold and Valentine themed flip side takes center stage in the world of crafting. The Night of Navy emerges as the perfect companion, adding depth and elegance to our project. So, whether you’re crafting a mesmerizing swirl pattern or crafting a heartfelt Valentine’s Day card with punched gold hearts, embrace the magic of Most Adored Designer Series paper.
Thank you for joining me today, I’ll meet you back here tomorrow featuring yet another color combination, and flip side card!
Gold is a timeless and luxurious color that exudes opulence and sophistication. When it comes to pairing gold with other colors, the possibilities are vast, allowing you to create stunning and harmonious combinations that elevate your style. Our Mostly Adored 12 x 12 Designer Paper has beautiful patterns of Gold. Here are some color choices that go exceptionally well with gold, along with reasons why these combinations work:
Navy Blue: (Night of Navy) Card Share Below
Sophistication and Contrast: Navy blue provides a classic and sophisticated contrast to gold. The deep, rich tones of navy complement the brilliance of gold, creating a balanced and elegant look. This pairing is perfect for formal events and adds a touch of refinement to any setting.
Emerald Green: (Shaded Spruce)
Bold Elegance: The deep green hues of emerald create a bold and regal contrast with gold. This combination is visually striking and conveys a sense of opulence. Whether in fashion or interior design, emerald green and gold make a statement that is both luxurious and daring.
Burgundy: (Cherry Cobbler)
Warmth and Depth: Burgundy, a deep red with hints of purple, adds warmth and depth to gold. This combination is ideal for creating a cozy and inviting atmosphere. Whether used in home decor or fashion, burgundy and gold create a sense of richness and comfort.
White: (Basic White)
Clean Elegance: Pairing gold with white results in a clean and timeless elegance. White allows the gold to stand out prominently, creating a fresh and sophisticated look. This combination is versatile and works well in weddings, fashion ensembles, and interior design.
Charcoal Gray: (Basic Gray)
Modern Contrast: Charcoal gray provides a modern and subtle contrast to gold. The muted tones of gray allow the gold to shine without being overpowering. This combination is perfect for achieving a contemporary and stylish aesthetic.
Royal Blue: (Starry Sky)
Vibrancy and Royalty: Royal blue, with its vibrant and deep tones, complements gold to create a look that exudes royalty. This combination is often seen in royal ceremonies and is a favorite for creating a bold and majestic ambiance.
Blush Pink: (Petal Pink)
Soft Femininity: For a softer and more feminine touch, pair gold with blush pink. This combination is gentle on the eyes and adds a touch of romance to any setting. Whether in fashion or home decor, blush pink and gold create a dreamy and sophisticated look.
In conclusion, gold is a versatile color that can be paired with a range of shades to create stunning and impactful combinations. Whether you’re aiming for a classic, modern, or romantic look, experimenting with different color combinations allows you to express your style in a unique and personalized way. So, go ahead and play with these color palettes to add a touch of glamour and sophistication to your life.
In the next few days, I will be highlighting each color with a beautifully designed card and I’ll have a second card from the “flip side” of the Mostly Adored 12 x 12 designer paper … You won’t want to miss it!