Sweet Dreams Designer Series Paper

Hello Stampin’ Friends,

Have you seen the incredible papers in the Sweet Dreams Designer Series Paper pack? They’re so cute and so versatile. The paper was designed for our occasions catalog’s suite of baby-themed products, but it could be used in so many ways. Here are a few that we had fun making!

Sweet Dreams DSP

What have you been making with the Sweet Dreams Designer Series Paper?

I have to thank ….Melody H. and Chrissy N. – Stampin’ Up! Concept Artists for their fabulous projects.

Retired List …

As we get closer to the end of the Stampin’ Up! year, they’re getting ready to retire stamps and accessories from the 2014-2015 annual catalog. Don’t worry, though! You will have the opportunity to order retiring products at discounted prices (up to 50 percent off retail) before they’re gone. Start evaluating your wish list and be ready when the list goes live on April 21st!

I suggest you get your 2013-15 In-color cardstock and refills before that list hits!! They go fast.

Stop back tomorrow to see what I have created for you!

Thanks for dropping by ~

blog-closing-small

Sweet Treats Gift Idea …

Hello Stampin’ Friends,

Today I have a cute little project for you … a different twist using the “Petite Purse Bigz Die”. What a cute way to present a little treat to cheer up a friend or to say “Thank You”… just trim off the top!

CreativeProj2_DBWS_USCA_Apr0112

Choose one of your favorite patterns from a designer paper and with the Boho Blossom punch, create a cute little flower for the front. A pretty little bow made from our Daffodil Delight 1/2″ seam binding ribbon.

I love this little alternative to the “standard” purse … so have fun with your die!  Don’t have one? Now’s a great time to order … Free Shipping from Stampin’ Up! and I will pay the tax for you!!

Thanks for stopping by, and thanks to all of you who wished me a Happy Birthday yesterday. I had a nice day!

blog-closing-small                            email_FreeShipping_4.06.15_ENG

Today’s Stampin’ Supply List …


Big Brothers / Big Sisters Organization Stamp Camp

Hello Stampin’ Friends,

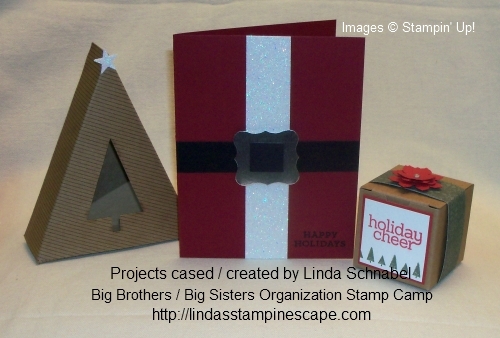
Yesterday afternoon I had the pleasure of working with the Big Brothers / Big Sisters Organization. The local Volunteer Center donated the facility for us … it was a wonderful collaboration by all so the “Big Sisters” and their “littles” could spend an afternoon together stamping.

000_1753

The theme for the stamp camp was Christmas… the season of giving. The projects everyone made reflected a “giving theme” and I elaborated that the beauty of stamping is much like Christmas … a gathering of friends.

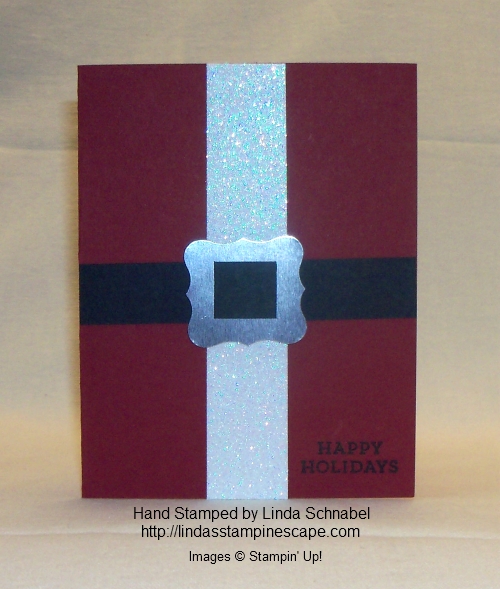
Our first project we did was the “Santa Card” … so easy but so stinkin’ cute!

000_1757

We used the Real Red cardstock as our base and Basic Black for the belt. The buckle was created with the Silver Foil paper and the Curvy Label punch.

We used the beautiful new “Dazzling Diamonds Glimmer Paper” for the fur on the jacket, and finished it off with the “Happy Holidays” greeting I borrowed from my November Paper Pumpkin Kit.

Our next project was the Christmas Treat Tree Box … this comes from the October Paper Pumpkin Kit. The adhesive is already on the cardstock … all we did was punch out the tree and add a window sheet … Ta Da!

000_1755

I should have put candy in it for you … it really is cute, and who wouldn’t want a cute treat box filled with candy!

Our last project was the sweet little treat box … remember, our theme was “the season of giving”.

000_1754

Create a belly band with any designer paper, the one shown here is retired. My poinsettia flower was created using the “Petite Petals” punch. It takes a bit of layering to get it to look this full but our group did an awesome job!

The front tag was created using the “Cheerful Tags” stamp set … just wanted to add a greeting to our gift box.  These “Tiny Treat Boxes” can be found in the Holiday catalog.

I hope you enjoyed viewing our Stamp Camp projects … I had a wonderful time with the Big Sisters and their littles. I also want to Thank the Volunteer Center for letting us all gather together for the afternoon in their facility.

Wishing you all a fabulous day today ~

blog-closing-small

STAMPIN’ SUPPLY LIST ….

Sweet -n- Sassy Gift Boxes …

Hello Stampin’ Friends ~

Why wait till Black Friday for great deals? Stampin’ Up! is rocking the stampin’ world with the Online Extravaganza and Door Buster Deals tomorrow and next Monday! Just click on the logo to view the entire list …

6a00e54ef32691883401b8d095ed7b970c-800wi

Today I want to share with you some sweet and sassy projects using the “Gift Box” Punch Board. It’s one of the Doorbuster Deals on Monday, November 24th … Save a whoppin’ 30% Off tomorrow .

I will be happy to send a Free Project Tutorial of today’s projects to anyone who orders the Gift Box Punch Board on Monday. If, however, you click “no contact” when placing your order, I will not be able to send this to you so be sure to fill out all the information and allow me to contact you so I can pass on the Free Tutorial. Thank you!!

Let’s begin with the sweet …

000_1717

I used the “Under the Tree” Specialty Designer Paper, the Cheerful Tags stamp set, and the beautiful Cherry Cobbler 1″ Sheer Linen Ribbon.

Once you get started it’s so easy … you’ll find yourself making several at a time. And why not!

Now for the sassy …

000_1722

So what category do you fall into … Naughty or Nice, or like the tag says: Naughty and Nice!

I know there is someone on your Christmas list that would love the Gift Box Punch Board, or put it on your Christmas wish list! Just tell them it’s on sale Monday only.

Here is a video from Stampin’ Up! Show how to use this Gift Box Punch Board, it makes 15 sizes boxes. Before I watched this video I felt a bit overwhelmed, but it is TOTALLY easy and I have made many boxes now.

Remember … I will send you the Free Project Tutorial to you when you purchase your very own Gift Box Punch Board from me. Then I’ll direct you to even more projects!

I will be posting projects from some of my favorite items that are now on sale during the week, so make sure you stop back! Feel free to share my blog site with your friends 🙂

See List … Click HERE.

Thanks so much for joining me today ~

blog-closing-small

STAMPIN’ SUPPLY LIST …


A Simple Tool to Mangage Your Schedule…

Hello Stampin’ Friends,

Happy Friday to you … I don’t know about you, but I’m looking forward to the weekend!

We are all locked into times and dates and such and what better way to manage your busy schedule than a calender. According to Wikipedia; A calendar is a system of organizing days for social, religious, commercial or administrative purposes.

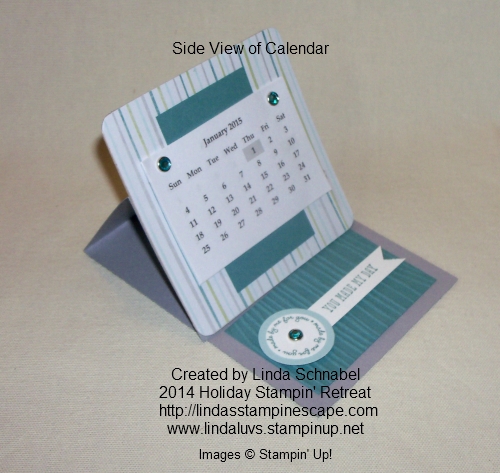
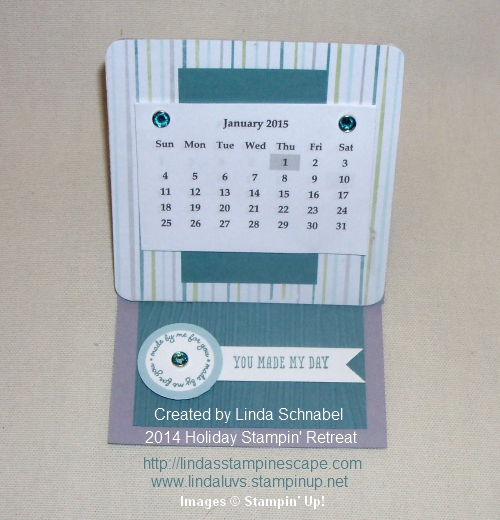
And that’s what I have for you today! I normally don’t share my retreat projects but I had many requests, so here is the calendar our group made at the 2014 Holiday Stampin’ Retreat.

000_1716

This cute little calendar was designed to sit on your desk, kitchen counter or where ever it’s handy for you. I began by choosing my color pallet, and I started with the “All is Calm” Designer Series Paper.

The base is Smokey Slate and the pop of color is the Lost Lagoon. I created the monthly template myself and cut it out for my guests. They were held together by the Candy Dots Brad Bases. We added a Rhinestone and colored it with the Coastal Cabana Blendabilities marker.

000_1714

The piece that holds up the calendar was embossed with the Woodgrain Embossing folder. Since were making calendars, and calendars are about occasions … I chose the “A Fitting Occasion” and stamped the “made by me for you” stamp, and punched it out with the 1″ circle punch. The Soft Sky mat was punched with the 1-1/4″ circle punch.

I finished off the calendar with a banner stating “You Made My Day” … from the “And Many More” stamp set! The calendar was designed to lay flat so it could be mailed … what a cute gift that would be to get in the mail 🙂

000_1715

Hope you enjoyed my project share today. If you are interested in attending an upcoming stampin’ retreat, send me your information and I will gladly add you to my mailing list. We host a Spring (All Occasions) and Fall (Holiday) Retreat.

Our retreats are loads of fun and you not only make cards & projects … you make friends.

Thank you for stopping by Linda’s Stampin’ Escape today.

God Bless and …

blog-closing-small            000_1716

STAMPIN’ SUPPLY LIST … 


The Star’s are Shining Brightly …

Hello Stampin’ Friends,

Yesterday I told you that I was going to share with you another idea from my scraps, today it’s a 3-D project using the flip side of the paper.

First I will tell you that I cut the “Under the Tree” Designer Specialty Paper into 4 x 4 inch squares … it made cutting the star’s for my retreat projects easier.

Today I turned my scrap into luminaries …

000_1630

Such a quick and easy project! Cut some vellum into 4 x 4 squares and tape them to the inside of the cardstock. Then I taped my sides together with …. washi tape! That way if I made a bit of a mistake (crooked) I could lift it up, reposition and attach the side.

000_1632

Tomorrow I will have one more product share for you using my scrap pieces. How’s that for saving money! Then we can spend it on more fun stampin’ stuff! LOL

Have a fabulous week ~

blog-closing-small

Stampin’ Supply List …

Holiday Sweet Treats …

Happy Friday Stampin’ Friends,

And Happy Halloween! Today I have a quick -n- quick sweet treat to share with you. I’m using the “Tiny Treat Boxes” from the Holiday Catalog – page 10 to be exact.

These cute little boxes are quick and easy to pop up and have 25 in the package for only $6.95… perfect for passing along a sweet treat.

000_1617

To decorate I used designer paper to create a belly band … just think, you can do this for birthdays, Halloween, wedding favors – the possibilities are endless!

My flower was created with the (yes, it’s retired) 5 petal punch stamp set, but I know many of you have this punch, and I wanted a poinsettia as my flower. The center petals comes from the Boho Blossom punch.

We colored the pearls with the Blendabilities marker … and they turned out so cute.

These cute little boxes were made for my retreat attendees as a pillow gift on Friday night. Each box contained two Christmas truffles …. yum!

It’s that time of year again … and here in Wisconsin, we woke up to snow on the car!

Have a wonderful day ~

blog-closing-small

Our retreat stamping was in the bag …

Hello Stampin’ Friends,

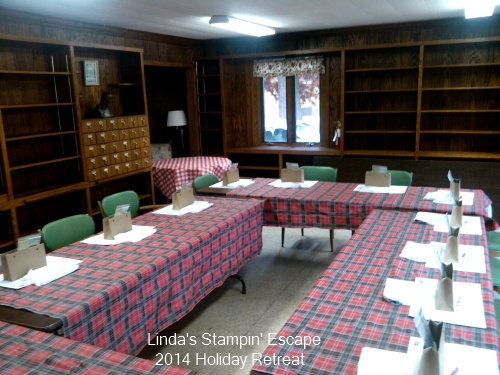
Today is Day 2 of my “Holiday Retreat” series and I would like to take you along to our first stamping session on Friday evening.  After a dinner of hot turkey sandwiches, fruit salad, taco dip & chips and more, we retreated to our stamping area …

Stamp room - blog post

I set up the area before my guests arrive so they can just come in and begin the fun. The projects are pre-cut for them but they still get to do some of the BigShotting, embossing and punching.  On Friday we began with a project, an awesome bag they could take their cards home in and pass on for a gift.

I’m sure some of you recognize the “Paper Pumpkin” bag … One of the benefits of being a Paper Pumpkin supscriber is that you can order “past kits” when available … and this is one of my favorites!  I’ve personally used them many times.   Click Link for more information …

DemoHeader_PastKits_Demo_Feb18_NA

I jazzed it up with our beautiful “Under the Tree” Specialty Designer Series paper found on page 5 of the Holiday catalog. A touch of Old Olive behind it really highlights the snowflake pattern.

000_1613

The precious snowflake comes from the “Snowflake Card Thinlit Dies” and is done in the stunning Champagne Glimmer Paper. I will admit that the large Rhinestones used for the center are now discontinued, but my guests learned how easy it is to color any of their Rhinestones and Pearls with our Blendabilities … we used the “Skin Tone Assortment”.

I swapped out the ribbon from the kit and used the “Natural & Old Olive” Two-Tone Trim for the handles … they look so cool! All the colors came together so nicely to create a beautiful holiday bag that could be given to a man or women.

Tomorrow I’ll be sharing a few of the swap cards that my ladies created … we did an all occasion swap! There was a lot of talent in out stamping group!

The Stampin’ Supply List for today’s project is listed below.

Thanks for stopping by ~

blog-closing-small

Just click on the “Weekly Deals” to view.

Main_weeklydeals_olo_10.7-31.2014_SP_UK


STAMPIN’ SUPPLY LIST ….


Road to the Holiday Stampin’ Retreat …

Hello Stampin’ Friends,

Today I will be sharing a part of our Holiday Retreat with you. Follow me for wonderful trip on our road to the Holiday Retreat ….

10409707_10203171091703724_8630962295075691698_n

Photo was taken by Kris H.

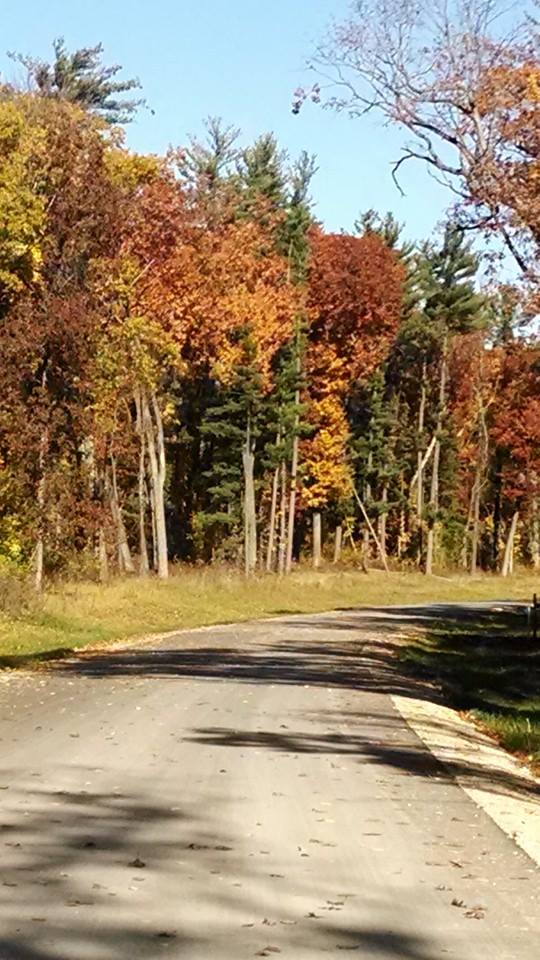
We stay at the beautiful Green Lake Conference Center in Green Lake, WI.  Our house is a 1930 English Manor and nestled beautifully on the lake. This photo was taken during our lunch break … a time set aside so our guests can dine and then explore these beautiful grounds.

63934_740939272609550_6715905335555713241_n

This is the view  inside that greets our stampin’ friends as they arrive…

IMG_20141024_104027

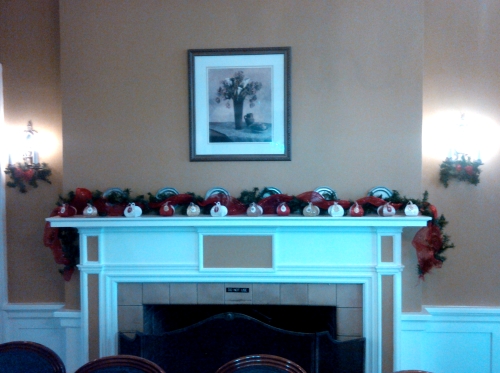
The fireplace is adorned with a touch of Christmas Cheer and the dazzling little Curvy Keepsake boxes. Each guest got to take one home with them. We treat them to many little surprises throughout their retreat stay.

IMG_20141024_103758

Close up shot of our shimmery delights ….

IMG_20141024_103846

We added contrasting tags on our boxes to highlight the snowflake embellishment, and then embellished the snowflake with a rhinestone in the center!

One of the projects our guests made was this cute little Santa box also created with the Curvy Keepsakes die. Both of the boxes were inspired by a collection of boxes I have found on Pinterest.

000_1612

Click here to view my “Curvy Keepsakes” Pinterest Collection

I also have for you, a quick video on how easy it is to create these fabulously fun boxes…

I hope you have enjoyed the journey so far, I will be back tomorrow with more of our Holiday Retreat.

Thanks for stopping by ~

blog-closing-small

STAMPING SUPPLY LIST …

Sweet Treat Halloween Keepsake Box

Hello Stampin’ Friends,

I’m back with my Halloween series of cards and projects … Today a project! I saw so many fabulous boxes created with the “Curvy Keepsake Box” that I had to order one for myself, and my first endeavor highlights Halloween and the “Motley Monsters” Designer Paper …

000_1579

Isn’t that cute!  The box is so simple to create … just cut 2 pieces from the die (I slide the designer paper in too, to create the two tone look) I like using the 12 x 12 cardstock sheets cut in half for my boxes.

I plan on adding treats inside so I wanted to make a tag… and what better set is there to use than the new ” Merry Everything” stamp set.  I love a stamp set that you can use all year long! I love a great value too, an you can save 15% by bundling it with the coordinating “Note Tag” punch.

000_1572

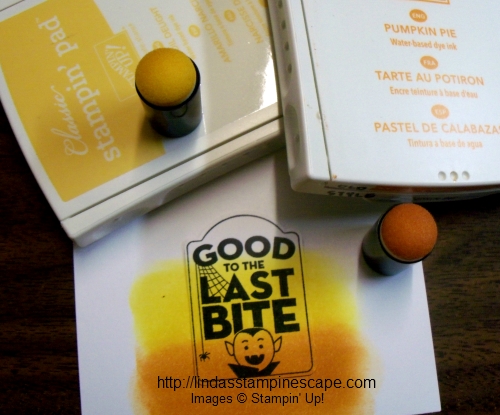
I wanted to recreate the candy color on the designer paper, so I sponged the Daffodil Delight and Pumpkin Pie onto my Whisper White, and then stamped my “Good to the Last Bite” stamp. I used the new Memento pad … love it, love it, love it!

Let’s grab the “Sticky Strip” and put our little treat box together, and celebrate our sweet treat box. The ribbon is the new “Tangelo Twist” Satin Stitched ribbon … it’s even prettier in your hands!

000_1576_0001

Let’s not forget the yummies … Oh yes, and the little clothes pin came from one of my “Paper Pumpkin” kits!

000_1577

Thanks for stopping by today and checking out my creations… it’s truly appreciated.

If you would like to purchase any of the materials I used to create today’s projects, just click on the link below.  I will send you a Step-by-Step Instruction Sheet with tips on how I created today’s project.

Have an most awesome day ~

blog-closing-small

STAMPIN’ SUPPLY LIST …


NEW Weekly Deals & Halloween Treats …

Hello Stampin’ Friends,

There is so much to share with you… exciting new products coming and great deals right now. Keep reading to the end as I have a cute little Halloween treat for you!

Let me begin with some wonderful ways to save …

Main_weeklydeals_olo_10.7-31.2014_SP_UK

 Just click directly onto the weekly deals logo above or on the side bar to view this weeks deals!


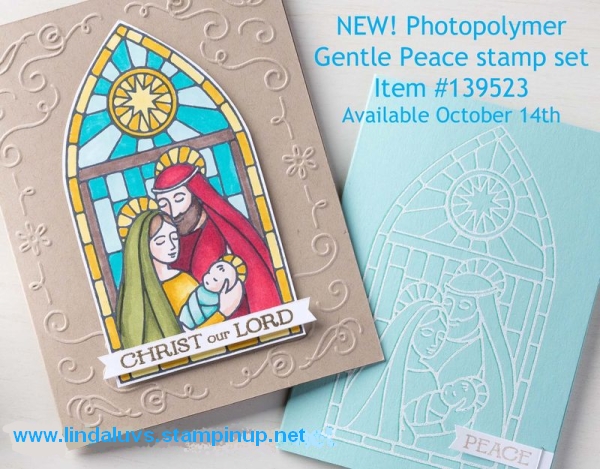
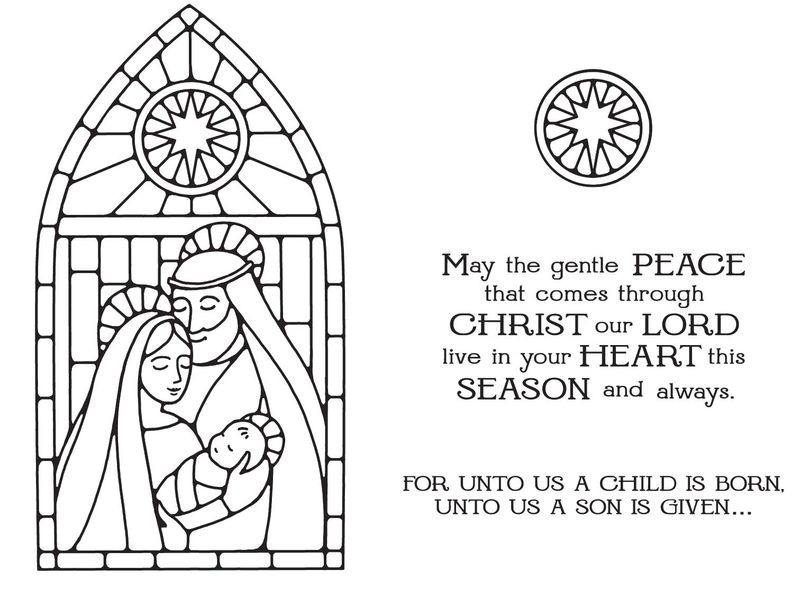
Released for sale today “Gentle Peace” stamp set … This may go quickly so contact me to order or click on the link below to shop directly from my website.

6a00e554f4a3a4883401bb0794c762970d-800wi6a00e554f4a3a4883401b8d0799282970c-800wi


Here are some exciting new “My Digital Studio” products …

mds-ribbon

Freaky Friends Stamp Brush Set - Digital Download
Freaky Friends Stamp Brush Set – Digital Download

Price: $8.95
Mingle All The Way Stamp Brush Set - Digital Download
Mingle All The Way Stamp Brush Set – Digital Download

Price: $4.95
Motley Monsters Designer Series Paper - Digital Download
Motley Monsters Designer Series Paper – Digital Download

Price: $4.95


Now, let’s get you ready for Halloween.  Using the jack-o-lantern faces from the “Fall Fest” Stamp set, add a face to create the little ghost using Tuxedo Black Memento Ink on the large White Filter Paper circle.  (No cutting required!) Finish it off with a little bit of Basic Black Baker’s Twine—so simple and so cute. This would make a fun classroom project or Halloween treat.

Fall Fest_crbGhostly treats

Thank you for dropping by today, please let me know if I can help you in any way.

Have a wonderful day ~

blog-closing-small

STAMPIN’ SUPPLY LIST ….


Frightful Wreath Simply Created Kit

Hello Stampin’ Friends,

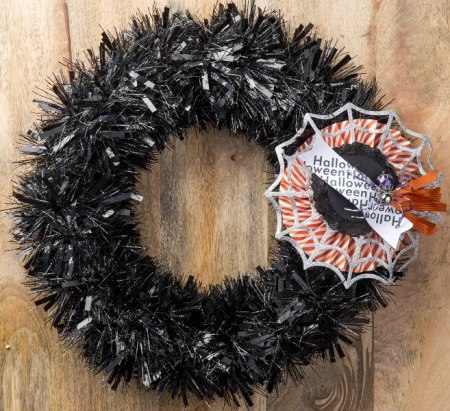
Today I’d like to share with you the Frightful Wreath Simply Created Kit video.  It’s such a cute wreath to decorate with for the upcoming Halloween season.

Here are some additional samples that were shared at our Stampin’ Up! National Convention …

Sara_convention14_samples_20It is so cute, and a bit of a twist from the original wreath, just by cutting down the silver spider web.


Sara_convention14_samples_7 Oh my … this is the sweetest Halloween treat bag I’ve ever seen.  I love the partial spider web (or you could turn then into bat wings!)


Sara_convention14_samples_6Here is a cute Halloween card using the wreath kit supplies.  You choose how you want to decorate your wreath and have FUN with it!  Make sure you use us those left overs to create something cool.

Thanks for checking it out …

Have a fabulous day!

blog-closing-small


Hello, Fall

Hello Stampin’ Friends,

Today I would like to share 2 projects from our Concept Artist Jen C. and to be honest, I couldn’t say it better myself so I’m sharing her post …

Fall is my favorite season. There are so many reasons why: football, hoodies, vibrant leaves, crisp air, and pumpkin spice everything! In honor of the changing of the seasons, I’ve made a couple of fall projects to share.

This first card uses the Four Feathers Stamp Set with the coordinating Feather Framelits Dies. One of my favorite techniques is to “faux watercolor.” To achieve this look, ink your stamp and mist the surface of the inked stamp with water in a Stampin’ Spritzer. Mist a few times, or until you can see small puddles forming.  Then stamp on Watercolor Paper. If you want more bleed, you can mist the paper directly. This is such a simple way to achieve an artistic, watercolor look.

Hello fall_crbFall Feathers Card


The second project I created is a little fall wreath stamped on a Mini Muslin bag.  To darken the Hello Honey ink, it was necessary to stamp the wreath image more than once. Thankfully, this part is easy with photopolymer stamps. I added the second wreath image using Cajun Craze ink. To prevent the ink from smearing, I heat set it using an iron. (When ironing, I always use a piece of copy paper or fabric over my stamped bag to protect it.)

Hello fall_crbFall Wreath Muslin Bag

To add a little sparkle to this treat bag, add a tiny amount of Crystal Effects to a few of the leaves and sprinkle gold glitter on the bag. Shake to remove excess.  This bag is a fun and easy way to give a small gift or treat for fall.

What inspires you this fall season?

Jen C.

Thanks so much for stopping by ~

blog-closing-small


To my Stampin’ Friends … I Heart You

Hello Stampin’ Friends,

Today I am sharing with you a little peek into my Appreciation Party and a new card I designed to say “Thank You”!  Make sure you go all the way to the end … I don’t want you to miss a thing!

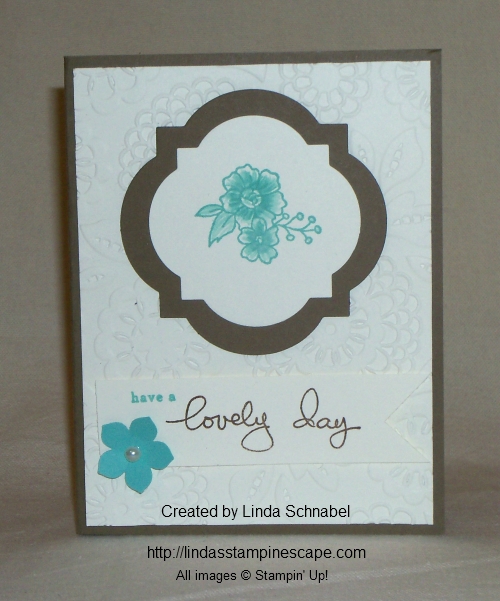
Let me start with one of the cards my Hostesses stamped.  We had a stamp camp after the dinner, but my hostesses were treated to two additional cards … my way of saying “Thanks” for stampin’ with me this past year.

The card was inspired by a fellow demonstrators card … the talent pool within our demonstrator circle is endless and very inspiring!

000_1402

Because I will be sharing several samples with you … I will be listing the ingredients after each project, this will make it easier for you to pick out the items you want on your wish list.

The stamp set used is of course, a hostess set … I Like You, found on page 237.  The greeting comes from the Photopolymer stamp set; Endless Birthday Wishes.  My favorite thing about this stamp set is that you can create your own phrases!  Such as … have a lovely day!

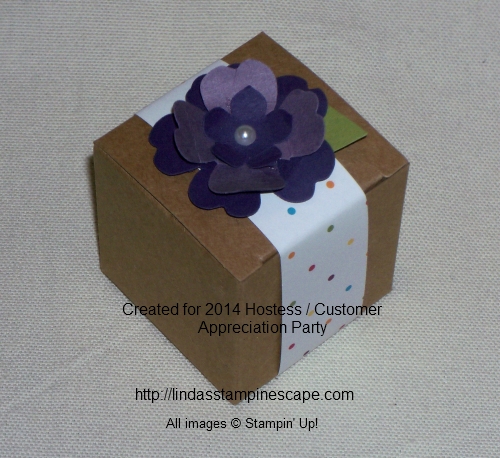
000_1405

I used different Designer Series Paper for the belly bands, but this one comes from the Park Lane packet.  The flowers were fun to make and topped off the box so nicely.

The door prizes contained samples of our newest embellishments from the annual catalog.  One of the goodies enclose was a yard of each of the 5 “Thick Bakers Twine” … which will bring me to my next sample!

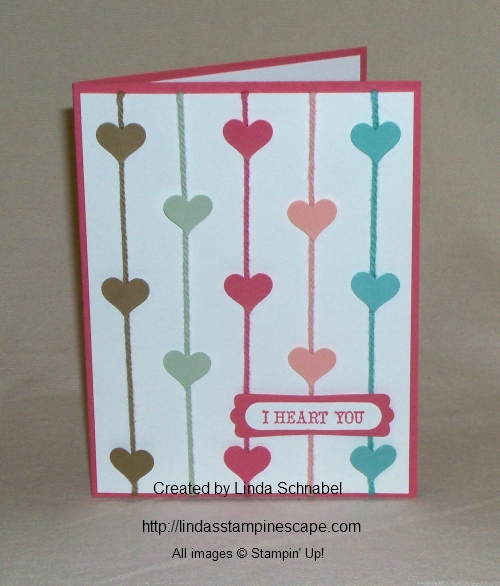
I wanted to share a card that showcased at least one of the door prize goodies, and this is what I thought of …  All of the 5 thick bakers twine are present with hearts streaming down.  I want my stampin’ friends to know exactly what they mean to me, and how much I really do appreciate their loyalty and friendship.  I really do “HEART YOU”.

000_1406

Hope you got a little taste of the fun that we had at the Appreciation party.  You can be there next year … I’m taking bookings right now for fall and Christmas stampin’ parties!

Contact me, ( lindaluvs2stamp@aol.com) I’d love to share the exciting new products with you and your friends.

Here is a quick reminder of our current promotions … just click on anyone of them to get more details.  Thank you.

                       6a00e54f95df92883401b7c6d00655970b-500wi                    6a00e554f4a3a4883401a511ee0d9d970c-800wi

Header_PP50percent_July1614

Thanks for stopping by …

Hope you have a wonderful day!

blog-closing-small


Sweet Treats in a Fry Box …

Hello Stampin’ Friends,

Today I have a cute project share for you.  It’s a tasty little treat using the  “Fry Box” from Stampin’ Up!  I pulled this project from my website under the Stampin’ Up! creations … I’ll tell you more about that later.

The color of our treat holder is the yummy Pistachio Pudding… one of our In-colors.  It’s teamed up with the “Amazing Birthday Stamp Set” … I’m excited because mine just arrived via UPS yesterday!  I can’t wait to start playing with this set and sharing more samples with you!

CreativeProject_DBWS_June0214_NA

The inside is lined with the “All Abloom” Designer Series paper, and our sweet treat has been secured inside the Gusseted Cellophane Bag and decorated with a pretty bow tied with the coordinating Pistachio Pudding Thick Bakers Twine.   You can see this and more great cards and projects from my collection and Stampin’ Up!s creations…

Click here to view more projects and card samples!

I have posted the list of ingredients at the bottom of my post for your convenience … as for the candy, come see me at the Candyman on Main!

If you like this cute project, you may be interested in the “Hamburger Box Die” … watch the video to see how fun and easy this is to use.

Hope you enjoyed today’s share … Thanks for stopping by.

Have a wonderful weekend ~
blog-closing-small