Easter Treats for Some Bunny ….

Hello Stampin’ Friends ~

Sometimes things are too good to pass up, like a fine glass of wine or decadent chocolates! Today I have such a blog post to share with you. This is not me … this is from our Stampin’ Up! “Get Inspired Blog” and the talented Paula Dobson from our 2017 Artisan Design Team!

Here is Paula’s post and beautiful creations …

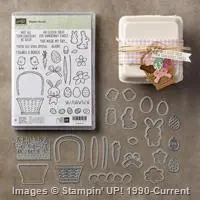
With Easter only a couple of short weeks away, I’ve decided to make a cute Easter project for my daughter using the Basket Bunch Stamp Set (item 143186). I travel two-and-a-half hours once a month to stay with her while I teach classes, so it will be hand-delivered just in time for Easter!

1

One of my passions (besides stamping, of course) is coloring—and this super-cute stamp set is full of line art images to satisfy that need. I stamped a heap of Easter egg images and the cute little bunny rabbit on Shimmery White Cardstock (item 101910) in Basic Black Archival ink (item 140931). Shimmery White Cardstock is perfect for coloring, particularly if you want to watercolor your images without the texture of Watercolor Paper (item 122959), as it can stand up to a fair amount of moisture without pilling.

I used the Watercolor Pencils (item 141709) to color my images and then blended the colors using a Blender Pen (item 102845) to create the shade and fade on each image. I die cut all the images with my Big Shot (item 143263) and Magnetic Platform (item 130658) using the coordinating Basket Builder Framelits Dies (item 143228). P.S. Stampin’ Up! bundled together the stamps and dies as the Basket Bunch Bundle (item 144731), saving you 10% on your purchase of these great products! (I love a bargain!)

2

I added a strip of Designer Series Paper from the Pop of Pink Specialty Designer Series Paper (141648). I love the stark contrast of the black and white zig zag design against all the white. I added color to my background using Sponge Daubers (item 133773), Sahara Sand ink (item 126976), and Soft Sky ink (item 131181). I popped the die cut Easter images up with Stampin’ Dimensionals (item 104430), and the whole piece was finished with the gorgeous Gold 1/8″ Ribbon (item 134583). I love to carry themes to the inside of my cards, as well.

3

No Easter card is complete without chocolate to go with it and I wanted to create my own packaging to tie the whole gift together. I don’t often make 3D items and it can be a bit of a trial for me! I found these cute little chocolate bunnies and wanted to make a simple crate to put them in, using a Window Sheet (item 142314) sleeve to slide over the top so you can still see the bunnies.

4

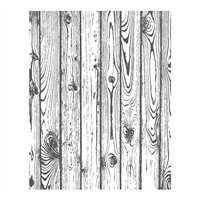
I designed a template for my crate and used the Stampin’ Trimmer (126889) to cut and score my Sahara Sand Cardstock (item 121043) card. I stamped the card in Sahara Sand ink using the Hardwood Stamp (item 133032) to get a woodgrain effect for the crate.

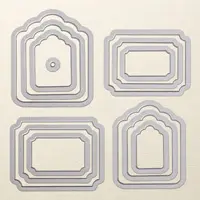
Then I discovered a wee bit of a problem—my crate template was too big to go through the Big Shot no matter which way I turned it! I fixed that by folding one side of the crate and used that edge as a guide for my square Stitched Shapes Framelits Dies (item 145372) so I didn’t cut too low on the front of the crate.

I used the same design elements from the card to decorate the box sleeve, adding just a few strands of Melon Mambo Thick Baker’s Twine (item 141689) as well. Then I used the Tags & Labels Framelits Dies (item 138282) to die cut the tag topper. Here are a few photos of the process I have described in this post (which I hope you’ll find helpful)!

5

So if YOU are looking for a fun way to create an Easter treat for somebunny sweet—try the Basket Bunch Stamp Set and coordinating accessories! It has everything you need.

Paula Dobson
2017 Artisan Design Team

So … what do you think? Did you not fall in love with this bundle and the cute projects that Paula Dobson created!! I also grateful that she shared her “how to’s” with us. That simple sponging technique that creates the barrier between sky and ground add so much dimension to the the card.

Thank you for checking out my blog today, and I’m happy you got to see Paula’s beautiful projects.

Have a Happy Day!


TODAY’S HIGHLIGHTED PROJECT INGREDIENTS:


March Madness: Card #3

Hello Stampin’ Friends ~

Today I’m going to do a little something different by request. I have been asked to place a card that I had previously posted, into my March Madness Sale-a-bration Celebration cards …

This card was designed for one of my stamping retreats and actually folds down so you can mail it!! My attendee’s where the only ones who got to make this card and get instructions. It is also one of the most handled and asked about cards when I’m showing my work at craft fairs. So by request … this card will now be available to choose from!!

Please note that the designer paper may not be the same since that is from last year, yours may have current designer paper.  The dies and stamp set are still in the catalog and full instructions along with tips will come along with this card.

Here’s the deal …

$50 Order: Choose 5 of your favorite cards featured plus a FREE Sale-a-bration Item!

$100 Order: Get ALL 10 Cards plus 2 FREE Sale-a-bration items!!

$150 Order: Get ALL 10 Cards plus 3 FREE Sale-a-bration items AND Hostess Dollars!!!

Each card comes with full instructions and dimensions to make the cards you have chosen.

Now is the best time to order, before Sale-a-bration is over!  Get those items you need and want plus get the awesome cards and the Sale-a-bration items!!

You may place your order on-line or directly through me … either way will work for this great promotion.  Don’t let March Madness pass you by, get your goodies now!   You will have until March 30th to place your order and let me know which cards you want.

Thank you for joining me today and please feel free to ask me any questions you may have.

Enjoy your day ~


Simply Sunday: Easter Gifting Ideas

Hello Stampin’ Friends ~

How are you on this fine day? I’m hoping happy and healthy!

Today I’ve got some fun projects for you and a card! Yesterday I shared the March 2017 Paper Pumpkin with you … today I’m sharing alternative projects. If you haven’t received this kit, or are not a Paper Pumpkin subscriber yet, you can sign up at any time, and when you do, you can purchase “past” kits!

I will tell you this, if you purchase the 3 month subscription by March 31st, you will save $4 and receive a FREE Sale-a-bration item!!  Make sure you activate your subscription before April 10th because we’re all excited that Sara Douglass – Stampin’ Up!s CEO has created the April 2017 kit!!

Ok … let’s get on with the goodies! Here I wanted to show you “my” little bunny as followed by kit instructions. These are so easy … so fun and too cute! As soon as they add the refill kit – I’m ordering more so my grandkids and I can make these up!

Here is a photo of all my projects put together! Did you know that the little 3 x 3 note cards fit nicely into the little bag … How cute is that!! A little gift bag with the little bunny cards.  You could make these into “Thank You” cards and give to the host of your Easter dinner. What a cute little gift.

Next, I know many of my customer love their “full size” cards … so here is my alternative to the kit, a full sized card.  The cute stamps used to create that bag … come in this kit! I love the little eggs and the “I’m glad your my friend can be used all year long!

I used the inside bunny ears to create a flower! These pieces are die-cut and already have the adhesive on them so they are super simple to create with.

The flower is adhered to the front of the gift card … the back half is tucked away so I can use that on another card. This section is popped up from the card front.  I used a “splatter” stamp to add a little color to the vanilla and then added a banner greeting. I cut the little bunny tail in half and glued it to the center of my flower.

I must say, this was a very fun kit to play with! If you want to try out Paper Pumpkin, now is a good time.  Just click on the links below for more information or to begin your purchase, or you can contact me and I will help you out.

Thank you so much for spending a part of your Sunday with me. 

STOP BACK TOMORROW TO SEE MY MARCH MADNESS SPECIAL!!

Have a wonderful day ~


Click on any of the items below to view / more information or to begin your purchase. Don’t forget to select your FREE Sale-a-bration items.

Price: $59.00

NOW $55.00

Plus 1 FREE

Sale-a-bration item

Price: $114.00

Two (2) FREE

Sale-a-bration items

Price: $215.00

Four (4) FREE

Sale-a-bration Items

and

Hostess Benefits!

BUNNY BUDDIES!

Hello Stampin’ Friends ~

Oh my gosh … I got home from work yesterday and found the best thing in my mail box! No bills … just my Paper Pumpkin.  It is so stinkin’ cute!

Check it out, watch the video ~

Our Paper Pumpkin Bunny Buddies are bursting onto the scene just in time for spring! Every March kit comes with nine bunny cards and bags. Watch their personalities emerge as you customize each one with a face, ears, accessories, and a pompom cottontail. They are simply “ear”-resistible!

Stop back tomorrow and check out my alternative to the kits projects … not sure how I’m going to top these cute bunny bags!

Till then … Have a great day!


Simply Sunday: Pull out the Paper Pumpkin

Hello Stampin’ Friends,

Let me say “there is nothing easier than your Paper Pumpkin kits”.  Today I’m here to share some cute alternative projects that I made using the 2017 January Paper Pumpkin kit.

The first project I have to share is similar to the little Hostess Gift that I gave to Kathie for hosting an at home Stampin’ Party. I like to spoil my hostesses because they introduce me to some awesome people and we get to stamp!

000_4020

This cute gift box was easy to create … Simply use a punch, I used the heart punch, secure a piece of window sheet on the inside to create a window and so the treats don’t fall out. The little white heart is included in the kit as is the heart stamp that I used to put a little color around the edge of my heart, before stamping the greeting (also included in the kit).

The only thing that I added to my gift box that are not included in the kit was the “heart” from the Metallic embellishments.  It really ties all the gold together and looks cute!

My second project is a card.  Super simple … the base is Whisper White and the front is Blushing Bride – it matched the stripped vellum banner that came in the kit.  I used the round Metallic embellishments this time to anchor my banner. I created a background by stamping hearts all over the front… You could “step it up” and emboss the front with the “Happy Heart” embossing folder, that will add more texture.

000_4021

Next, I used a white heart from the kit but this time I used VersaMark to stamp on the heart and embossed it with Gold – coordinating the gold embossing on the banner (it comes that way in the kit)

The hardest part of creating this card was “where” to place the heart … by the banner, or near the bottom!  Which do you like better?

000_4016

Both of these cute projects were created in just a few minutes. Don’t forget, you can always just make your Paper Pumpkin kit per the instructions … I just want you to know there are many other options out there for you.  If you order your Paper Pumpkin before the 10th of the month … You will receive that month’s kit.

Hope you enjoyed today’s projects, and please let me know which way you like the card best.

000_4025

Here’s the video in case you missed it …


* Paper Pumpkin is on sale during Sale-a-bration!! Now is a great time to try out Paper Pumpkin and to get FREE Sale-a-bration items!

3-Month Prepaid Subscription (137859) $59 $55  Save on a  3-month prepaid subscription and instantly qualify for a FREE Sale-A-Bration item!
12-Month Prepaid Subscription (137861) $215  Take it to the next level with a 12-month prepaid subscription. Save over $2/month with the everyday awesome price, earn Stampin’ Rewards, and get 4 FREE Sale-A-Bration items!
This offer will end on March 31, 2017 at 11:50 PM (MT).

Let me know if you have any questions on the Paper Pumpkin kits @ lindaluvs2stamp@aol.com  or just click one of the links below and start your Paper Pumpkin adventure!

Thanks for taking time out of your Sunday to share it with me.

Have a wonderful day!

blog-closing-small        jan2017-hostess-code

PAPER PUMPKIN KITS ON SALE …

Price: $59.00

NOW: $55.00

plus a Sale-a-bration item

Price: $215.00

Saves you $2 mo.

plus you’ll get 4 Sale-a-bration items


Holiday Crafting Fun …

Happy Saturday Stampin’ Friends ~

I’m really getting in the mood for the Holidays! I’m planning my projects for our December Technique Clubs and a little something special because each group is having a Christmas Party as well. That’s means a little decorating too …

One of the items I’m decking out my table with is the “Forever Evergreen” project kit. While we were at our Holiday Retreat, two lovely ladies, Kris and Tatjana put them together for me!! This was Tatjana’s first retreat … she is an exchange student from Belgium.

These two ladies have never met before but stamping & the retreat brought them together – and that is my core reason for being a Stampin’ Up Demonstrator! If you took away my stampin’ friends and the only way I could get sales was on-line … I wouldn’t stay.  I treasure the friendships I have built and the friendships built between my ladies because we gathered around a table to stamp!! Love all you ladies ❤  The past 16 years have been awesome and I’m looking forward to another 16 years!


142994g

I invite you to grab a cup of coffee and watch this video with me … See for yourself how kits make for easy creativity! 


The “Forever Evergreen” project Kit is ON SALE during our OnLine Extravaganza!

Decorate your mantelpiece or table with festive trees and seasonal decorations. This kit makes three trees in two sizes—one 13″ (33 cm) tall, two 11″ (27.9 cm) tall—each individually trimmed with handmade ornaments.

Thanks for stopping by, I hope you have a lovely day.


blog-closing-small                 november-2016-hostess-code

small-business-saturday

TODAY’S PROJECT KIT …


Pretty Little Pumpkins

Hello Stampin’ Friends ~

I just saw the cutest little pumpkins and thought I would share the following post with you.  They would be so cute for Thanksgiving.  This is from our Stampin’ Up! “Get Inspired” blob and written by Steffi Helmschrott.  You can click on the link and follow the blog yourself if you like.

*Steffi Helmschrott, from Germany, is one of our talented Artisan Design Team members.

For my second “wow” project as a Stampin’ Up! Artisan Design Team member, I decided to do something seasonal—and thought I’d go with pumpkins! They’re easy to make, are quite versatile, and they can be used for many occasions. Think: fall, Halloween, or all year round if the color matches your décor.

1

Here’s how to make them: Just cut eight identical circles using the Big Shot (item 143263) and one of the circle dies from the Layering Circles Framelits Dies (item 141705).

step-1

Now fold them in half and adhere them together using Multipurpose Liquid Glue (item 110755).

step-2

To make it look like a pumpkin, cut the bottom of the circles.

step-3

For the stem, cut a small strip from Kraft Cardstock (item 133674).

step-4

Coil the strip from the wide side, twist it, then push it into the top of the pumpkin.

step-5

Next, make the curly vine. Cut a small strip from Whisper White Cardstock (item 100730) and wrap it around a pen to curl it.

step-6

Now adhere the vine to the stem using Mini Glue Dots (item 103683). Our pumpkin is done!

2

You can, of course, create this pumpkin in different sizes or shapes—such as ovals, for example, using the Layering Ovals Framelits dies (item 141706). You could also make apples; just use small leaves instead of a curly vine.

I hope you liked this little tutorial and that you’ll have fun using it!

Steffi Helmschrott
Artisan Design Team 2015–2016

*Steffi Helmschrott, from Germany, is one of our talented Artisan Design Team members.

Can we get a round of applause for Steffi … I love these and think they are so cute.  I have a lot of the Pumpkin Glimmer Paper left over from Halloween so I’ll be sure to make some of these for my Thanksgiving festivities.

Thanks for stopping by today ~

Hope your day is a good one.

blog-closing-small

Christmas Pines Bundle

Hello Stampin’ Friends ~

Today I’m going to share 3 projects from the Christmas Pines Bundle.

Enjoy the sights and smells of the season with the Christmas Pines Photopolymer Bundle. These pieces invite images of warmth and comfort in every creation—from tags to packaging to cards. Plus, when you buy the stamp set and dies as a bundle you’ll save 10%!

sw_christmaspines_create_oct2516

This is one bundle from the Holiday Catalog that I don’t have yet so I wanted to be sure to share these projects with you because they are so cute. With just a little stamping, a quick run the the BigShot … add some designer paper and your done.

Check out the bundle here …

I don’t know which is my favorite, but if I had to pick, I think I would pick the box.  I love the color combination and of course … it has stars on it!!

Thanks for the visit, it is truly appreciated.

Have a joyous day!

blog-closing-small

Stampin’ Supply List …

Tags for Christmas … Holiday Retreat Style

Hello Stampin’ Friends ~

Today I’m going to share a little piece of our Holiday Retreat with you.  Much of our time is carved out for stamping, but we also reserve a little time to explore the beautiful grounds around the lake.

Yesterday I shared one of our cute little houses from the “Sweet Home” bundle … today I want to show you what they looked like adorning the fireplace in the dining room. I think they would look so cute as ornaments on a Christmas tree!

img_1602blog

Friday night we made some really cute “Christmas Tags” and we decked out a tin to hold all our tags in. The card was actually made on Saturday, but all the projects shown were created from our “Candy Cane Lane” product suite.

img_1668-blog

Our Saturday morning began with a stunning sunrise … Wow. 

10-22-16am-blog

The color was to vivid that is reflected onto the window of our house and turn everything a pretty shade of pink! We couldn’t of asked for a nicer weekend.

img_1615-blog

This fall our Holiday Stampin’ Retreat not only “Sold Out” but we had to turn some away. We limit the number of guests at our retreats so we can take care of and pamper our guests better. Quality over quantity… We would be open to offering an additional retreat for your group. Our next retreat will be our 2017 Spring Retreat.

Here are a few of our stampin’ guests …

img_1622-blog

Here is one guests comment …

Thank You again Linda for a wonderful weekend!! Everything turned out absolutely perfect. The cards are beautiful. Roger really likes them and commented on how talented you are. I thought the deer one would be his favorite but nope, his favorite was the star with the music designer paper! Shows what I know….. all the cards are just gorgeous! The food was also excellent! And the stamping group….what a nice group of ladies. As I said, everything was perfect!!!!! Please tell Eileen Thank You also! What a great team you make! Can’t wait until the spring retreat……
Many Blessings,
Kathie

Kathie is right, we were also blessed with a wonderful group of ladies. We have met some awesome people through our stamping retreats… and stamping in general!

I will be back again tomorrow with a few more pics for you.

Thanks for joining me today! Hope yours is beautiful.

blog-closing-small

Stamping Supply List …


“Forever Evergreen” project kit

Hello Stampin’ Friends ~

Hope you had a nice weekend … I spent much of my time creating cards & projects for my upcoming Holiday Stampin’ Retreat. I’m really getting in the mood for the Holidays!

One of the items that I have not purchased yet from the Holiday Catalog is the “Forever Evergreen” project kit, but it has me very intrigued!  I think these trees are just lovely and because we rent a home for our retreat … it does not have a tree! These just might be what I’m looking for …

142994g

What do you think? I invite you to grab a cup of coffee and watch this video with me … See for yourself how kits make for easy creativity! 

I think these pretty trees are perfect for our Holiday stamping Retreat. What about you?

Decorate your mantelpiece or table with festive trees and seasonal decorations. This kit makes three trees in two sizes—one 13″ (33 cm) tall, two 11″ (27.9 cm) tall—each individually trimmed with handmade ornaments.

I will be sure to let you know how they turned out, and share how the “Forever Evergreen” project kit added to the festivities.

Thanks for stopping by, I hope you have a marvelous Monday.

blog-closing-small     starry-purple-background-vector

TODAY’S PROJECT KIT …


A Few Spare Parts

Hello Stampin’ Friends ~

How are you on this Friday? I am excited to share this totally cute card with you today!!

Have you ever just looked at a stamp set or a crafting item and this “IDEA” pops into your head? Well that is exactly what happened to me when I opened my September Paper Pumpkin kit! Right away my thoughts went to our Cookie Cutter Halloween stamp set and a little item I had in my kitchen cupboards … Intrigued??

Well wait no more because here it is …

000_3691

I’m just in love with the Cookie Cutter stamp sets (Halloween and Christmas) they are just the cutest! But when my Paper Pumpkin kit came and I saw the little test tubes, something just clicked!! I remembered I had some little candy bones left over from last Halloween’s cupcake decorating, so I put it all together!

Seriously, aren’t there days when we all could use a “few spare parts”! I couldn’t resist. Hmmm … if we didn’t have the “Halloween Nights” designer paper in our background, you might be able to send this off to someone going into a surgery … they would need to have a good sense of humor though!

I hope you had as much fun with this card as I did creating it! Thanks for checking in on me today.

I think from now until Halloween … I will reserve my Friday posts for Halloween and we’ll call it Friday Frights! You may see a few in between as well 😉

 Have a Frightfully Fabulous Friday!

blog-closing-small          starry-purple-background-vector

TODAY’S PRODUCT LIST …


Something Good to Eat!

Hello Stampin’ Friends ~

I have the cutest little 3-D projects to share with you today! Whether you’re planning for Thanksgiving, Halloween, or just autumn in general, Paper Pumpkin has you covered with Something Good to Eat! Fill up those trendy treat tubes and dress them up for any occasion. The designs and stamps are flexible for all your fall festivities!

000_3678

You must watch this cute video …

Don’t think it’s too late! In fact, if you Sign up before the 10th of October, you’ll get your October kit and the November kit for FREE!!  Plus … as a subscriber, you can purchase any past kits Ta-da … that’s how you get any of the past kits you choose!!

pp_bogo_demo-header

Use promo code “BOGO” at PaperPumpkin.com, you’ll pay the regular price of $19.95 and get you second month for FREE!

I’d love to have you join my Paper Pumpkin Pals!

Thanks so much for joining me today, let me know if you have any questions about being a Paper Pumpkin subscriber or Paper Pumpkin pal.

Be sure to stop back tomorrow to see what I have created with this cute little kit!! It’s always fun to see the different ways to use your kits.

Have yourself a wonderful day!

blog-closing-small

“Merriest Wishes” …

Hello Stampin’ Friends ~

Quick post today but cool ideas to share! Meet the “Merriest Wishes” bundle…

Merriest Wishes Clear-Mount Stamp Set
Share your joyful wishes and glad tidings with tags you make yourself with the Merriest Wishes Stamp Set. You won’t be fumbling around for the right look when you’re using this set of round stamps.
* Quantity: 11 rubber stamps
* Suggested clear blocks (sold separately): a, c, d

Merry Tags Framelits Dies
* 7 dies
* Largest image: 2-1/2″ x 2-1/4″ (6.4 x 5.7 cm)
* Use with Big Shot
* Use Precision Base Plate with detailed images

Now let’s look at some cute projects that you can create with this bundle …

holiday16_p20c-108

Homemade gifts are all the rage these days, and why? Because they are gifts from the heart, and what better way to jazz up your gift than to make your own gift tags … and I love this simple tag with the die cut tree!

holiday16_p20a-107

OK … who doesn’t love a gift, yet these are so cute you may not want to open them! I just fell in love with the Merriest Wishes tag with the deer and tress – perfect for anyone’s gift.

Hope you enjoyed today’s showcase. Thanks for checkin’ in on me.

Have a wonderful day ~

blog-closing-small

TODAY’S SHOWCASED PRODUCTS …

Forever Evergreen …

Hello Stampin’ Friends ~

Do you like stampin’ kits? Here’s a cute one that is included in the Holiday Catalog … Forever Evergreen Project Kit!

Decorate your mantlepiece with festive trees and seasonal decorations. This kit makes three trees in two sizes—one 13″ (33 cm) tall, two 11″ (27.9 cm) tall—each individually trimmed with handmade ornaments. Complete the kit using the Forever Evergreen Stamp Set (item 142184). Stamps, ink, and adhesive sold separately. Instructions included.

Watch the video about this kit …

Kit includes
* Garden Green and Wild Wasabi die-cut cardstock tree pieces
* Cardstock ornaments
* Kraft, vanilla, and printed gold foil die-cut ornaments
* Gold foil and glitter die-cut stars
* Gold 1/8″ (3.2 mm) Ribbon
* Cherry Cobbler 1/4″ (6.4 mm) Natural Trim
* Cherry Cobbler Pompom Trim
* Linen Thread
* Cherry Cobbler honeycomb balls
* Gold faceted sequin garland
* Die-cut wood snowflakes
* Ornament hooks
* Plastic dowels

Coordinating colors: Cherry Cobbler, Early Espresso, Garden Green, gold, Soft Suede, Very Vanilla, Wild Wasabi

Thank you for taking time out of your holiday to check out my blog today.

Have a safe and happy Holiday ~

blog-closing-small

STAMPIN’ SUPPLY LIST …

Not Just Christmas …

Hello Stampin’ Friends ~

Hope you had a wonderful weekend! Did you get your Holiday Catalog? Did you get time to savor all the delectable new products? If you did, then you know that it’s not just Christmas!! There is so much more.

Do you love Halloween? Ohhh … I do, and I have the cutest little gift bag to share with you today, straight out of the Holiday catalog.

Holiday16_p52a-8

Wouldn’t this make the cutest card!!  I don’t have many trick -or- treaters down my street so for those special kids that stop by will get this cute little bag filled with goodies!

If you want to play with some of those awesome stamp sets, dies and embellishments you see in the catalog, then please join me …

Holiday Launch Party

You must RSVP by Friday, September 9th as I will begin cutting all the cards for you.  All you need to bring is your basic stamp kit: scissors and your favorite adhesive. I’ll have everything cut for you and tucked into your envelope, ready to stamp!

RSVP by e-mail: lindaluvs2stamp@aol.com  or  by leaving a comment below.  It’s an all occasion card night using the goodies from the Holiday Catalog.

Thank you for coming over today and for those close to me, I hope to see you at the “Holiday Catalog Reveal Party”.

Have an awesome day ~

blog-closing-small