A Perfect Wedding / Anniversary Card ….

Hello Stampin’ Friends ~

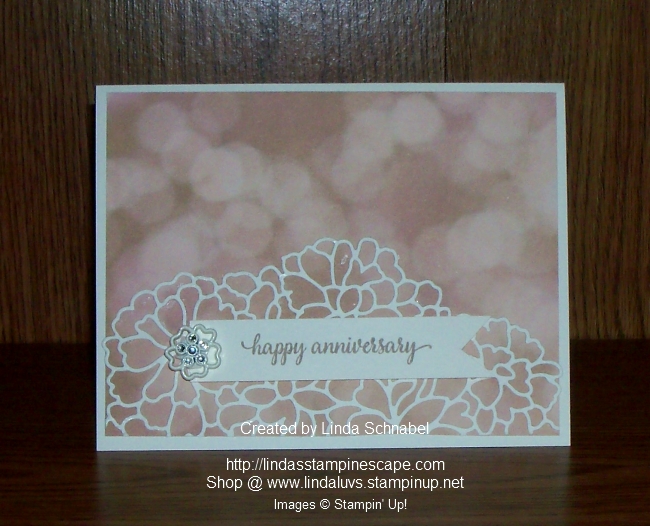
I’m excited to share a special card I created for my design team challenge. The theme was Wedding or Anniversary cards, and I decided to go for a modern and elegant look. This card is done in classic white and silver, making it perfect for a wedding or a 25th anniversary celebration.

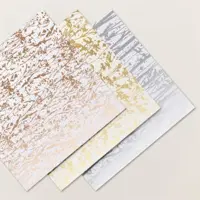
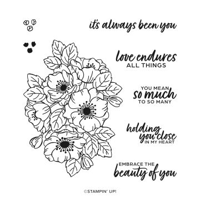
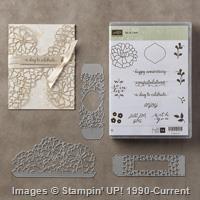
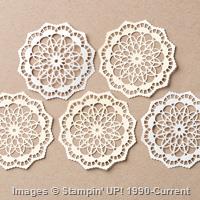
The Layering Leaves stamp set with the Naturally Gilded Specialty paper, was the star of the show. This sets beautiful fonts make it perfect for adding a touch of elegance to any project.

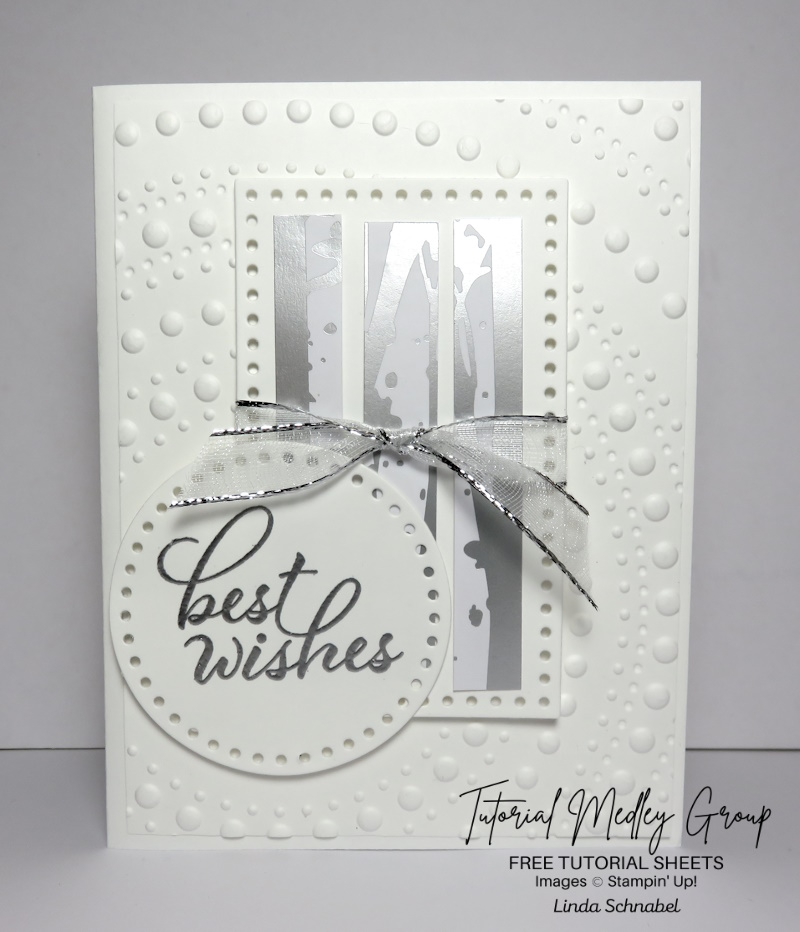
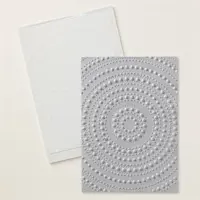
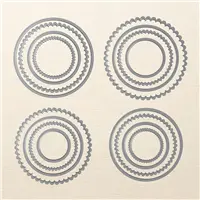
To give my card a modern twist, I used the Dotted Circles 3D embossing folder. This folder adds a unique and contemporary texture that really makes the card stand out. The embossed circles create a stunning backdrop for the other elements on the card, adding interest without overwhelming the design.

This card is one of my favorites because it combines several different elements and techniques to create a cohesive and elegant design. The white and silver color scheme is timeless and perfect for special occasions like weddings and anniversaries. The modern texture of the Circles 3D embossing folder, the natural beauty of the Layering Leaves stamp set, and the shimmer of the Naturally Gilded Specialty paper all work together to create a card that is both sophisticated and contemporary.

If you would like the PDF for this card and another beautiful wedding design, place an order during the month of July and I will send them both to your email address.

Thanks for joining me today.

“Most Adored: A Glittering Affair in Gold and White”

Hello Stampin’ Friends ~ 

Continuing my highlights of Color Combinations; today, we delve into the enchanting realm of gold and white, a pairing that exudes opulence and sophistication. Our spotlight shines on the Most Adored specialty designer paper adorned with this stunning duo. 

At the heart of this masterpiece lies the Gold and White Specialty Designer Paper, that whispers of elegance and luxury. The intricate rose pattern in shimmering gold elevate this paper from ordinary to extraordinary. Each petal brushed with a touch of magic – the Wink of Stella glitter brush. This subtle yet enchanting addition brings the roses to life, creating a mesmerizing sparkle that captures the essence of sophistication. 

The sentiments come from the “Enduring Beauty” stamp set, embossed in gold and die-cut using the Scallop Contours Dies, adding a touch of intricacy to the overall design. The marriage of elegant script and the golden-white palette creates a sentiment that resonates with enduring charm, making it perfect for an anniversary or wedding card.

On the Flip Side: A Playful Contrast

As we flip over the designer paper, a delightful surprise awaits – a Real Red background adorned with small white hearts! I wanted to add a playful touch and die cut it with the Scallop Contours Dies.

The sentiment on this side hails from the “Bee Mine” stamp set, mirroring the whimsical charm of the small white hearts. The “Happy Valentines Day” sentiment with the hand stamped hearts are die-cut with the Something Fancy Dies, creating a harmonious connection between the elements. This playful touch evokes feelings of joy and warmth, making it ideal for projects celebrating love and friendship.

Today, we’ve explored more creative options using the Most Adored Specialty Designer Paper, where gold and white weave a tale of timeless elegance, and its flip side, adorned with playful Valentine patterns, which adds a touch of whimsy to the mix. What makes this experience even more delightful is the opportunity to acquire it for free with a $50 purchase during Sale-a-bration.

With every stroke of the brush, and every heartfelt sentiment, the Most Adored Specialty Designer Paper in gold and white becomes a canvas for your imagination. I have more color and techniques to share so be sure to pop in everyday. Better yet, Click the “Follow Me” button at the top right side of my blog! 

Thank you for joining me today. Happy Saturday!

I’ve added the links to the products used for your shopping convenience …

So In Love … Happy Anniversary

Hello Stampin’ Friends ~

Yesterday I shared with you the “So In Love” bundle, what did you think? Pretty right!

Well today I’m going to share a simply beautiful card that I created using the “So In Love” bundle. I began with with the largest of the dies and knew I just wanted it to highlight my designer paper.

000_4031

I knew I was going to use the Falling in Love Designer Series Paper so I chose the Very Vanilla cardstock as my base and cardstock to be die cut. I used the Precision Base Plate and die brush to cut and discard of the inner pieces with ease.

Next, I layered my designer paper onto my base, and then my die cut piece onto the designer paper.  I then added my “Happy Anniversary” greeting which I stamped in Crumb Cake on my banner.  I added the pretty little “Falling in Love” embellishment to anchor my banner and create and eye catching effect.

000_4029

How simple, and how pretty is this.  You could use this card layout with so many of our pretty designer papers, and there are plenty more greetings to use in this stamp set.

Hope you enjoyed … Thanks so much for stopping by today.

Have an awesome day!

blog-closing-small    jan2017-hostess-code

TODAY’S STAMPIN’ SUPPLY LIST …


So In Love …

Hello Stampin’ Friends ~

Today I have a quick post but it’s packed full of stampin’ tips and samples from the So In Love bundle. We’re going to start with a video …

Carrie, from the training team at Stampin’ Up!, shares some beautiful project ideas and tips for using the So in Love Stamp Set and So Detailed Thinlits Dies from the 2017 occasions catalog.

I also want to share some additional projects that were created with this fabulous bundle …

so-in-love-2

Here you can see the foliage stamp was used to create the background, then the flower was added to compliment the foliage and add some dimension.  A pretty bow and an banner with the “just for you” greeting completes this card. 

Look at the jar in the background … it was wrapped with one of the delicate bands created from the dies. Below the die cut band was used again to turn this simple bag into a beautiful gift bag.

so-in-love-1

If you love pretty, delicate items … this is the bundle for you.  I can image all sorts of beautiful cards and gift packages that you could make for Wedding’s, Anniversaries, Mother’s Day … or a special friend.

Let me know what you think!

Thanks so much for checking my blog out today ~

I hope your day is a good one.

blog-closing-small    jan2017-hostess-code

TODAY’S STAMPIN’ SUPPLY LIST …


Great Sale-a-bration News!

Hello Stampin’ Friends,

Today I just have to share this great deal with you. It’s Sale-a-bration which Pumpkinmeans that for every $50 (before ship&hdlg) you get to pick an exclusive Limited time Sale-a-bration item, that is awesome but I also have to say …

GREAT NEWS! Paper Pumpkin is on sale during Sale-a-bration!! Now is a great time to try out Paper Pumpkin and to get FREE Sale-a-bration items!

3-Month Prepaid Subscription (137859) $59 $55  Save on a  3-month prepaid subscription and instantly qualify for a FREE Sale-A-Bration item!
12-Month Prepaid Subscription (137861) $215  Take it to the next level with a 12-month prepaid subscription. Save over $2/month with the everyday awesome price, earn Stampin’ Rewards, and get 4 FREE Sale-A-Bration items!
This offer will end on March 31, 2017 at 11:50 PM (MT).

SPOILER ALERT …

Here is the January kit!  Did you know once you are a subscriber you may purchase past kits… that is awesome, plus refill kits are also available.

Aren’t they cute!  Can’t wait to put mine together and fill them up! I have 12 grandchildren and this kit gives me enough for everyone and then some!!!

Let me know if you have any questions on the Paper Pumpkin kits @ lindaluvs2stamp@aol.com  or just click one of the links below and start your Paper Pumpkin adventure!

Thanks for stopping by today, I hope yours is a great one.

blog-closing-small

PAPER PUMPKIN KITS ON SALE …


Watercolor Wash Resist …

Hello Stampin’ Friends ~

Today I’d like to share a beautiful card that I created using the Flourishing Phrases stamp set and coordinating Flourish Framelits … these can be bundled to save you 10%. Love that!! I’m also using an easy Watercolor Wash technique.

My color pallet consists of So Saffron, Peekaboo Peach and Whisper White. I heat embossed the flourish image onto our Watercolor paper using clear embossing powder. I used my ink pads and Aqua Painter to waterwash my So Saffron & Peekaboo Peach onto the watercolor paper. The embossed area resists the color and your image emerges.

000_3538

Once dry, I mounted it onto the So Saffron mat and mounted that onto the Peekaboo Peach base.  I then stamped my greeting from the Flourishing Phrases stamp set onto Whisper White and used the new “Layering Circles” Framelits to cut it out and mat with Peekabook Peach.

I then cut out two of the different flower shapes and backed them with the Dazzling Diamonds Glimmer paper so the “sparkle” would show through, and it does … and it’s so pretty! I added a rhinestone to the center of each of the flowers to complete the look. The greeting and the flowers were all popped up with Stampin’ Dimensionals.

Simple yet stunning … that is how I would describe this card. Hope you enjoyed!

Thank you for dropping by today.

Have yourself a wonderful Wednesday ~

blog-closing-small

STAMPING SUPPLY LIST …


New In Colors & Better Together …

Hello Stampin’ Friends ~

Yesterday I shared some sweet -n- simple cards that you can make with the new 2016-18 Stampin’ Up! In Colors and the Floral Affection Embossing Folder (set of 2), so today I thought I would “step it up” and create another set of cards using the other image in that set!

I also decided to feature the cardstock more on this card and use it for the base!

000_3443

Yesterday’s cards were all made without a greeting, so today I have incorporated the “Better Together” stamp set! 

I love this stamp set because it not only has your greeting but it has verses for the inside as well! On the card below I used the verse that would normally be on the inside and used it at my “greeting” …

000_3444

000_3442

Then, I took the greeting and stamped it on the inside of my card.  There are no rules in stamping so you can do it however you choose!

Now … have you noticed that I have been changing up the ribbon as well? I used it differently on each of the 5 cards!

000_3447

000_3446

Oh yes … all of these greetings come from the same stamp set (and includes the verse for the inside as well). The Sugarplum is the last of my cards … one in each of the new 5 In Colors and each with their own greeting!!

000_3448

I hope you enjoyed today’s showcase of cards and that it inspires you create. If you are looking for quick -n- easy cards to create that have a clean, pretty style, than today’s and yesterdays cards are for you.

I’d love to hear what “YOU” think about our new In Colors!  Just comment below 🙂

Thank you so much for stopping by today.

Have a simply wonderful day!

blog-closing-small

TODAY’S STAMPIN’ SUPPLY LIST …


Something Borrowed …

Hello Stampin’ Friends,

Today I have a beautiful card for you that is sweet and simple. Spring seems to bring about wedding plans, so we to must plan … our cards!

000_2122

I began with the beautiful “Something Borrowed” Designer Series paper, and teamed it with a Sahara Sand base and a pop of Pink Pirouette.

The pretty little trim was created with the “Dotted Scallop Ribbon Border” punch, and was topped off with a Whisper White strip. The simple greeting comes from the Stampin’ Up! “Your Perfect Day” stamp set.

000_2125

I love the new “Something Borrowed” embellishments and had to add it to this card. It ties in so well with the Designer Paper! I also added some Rhinestones and colored them all (including the Something Borrowed embellishment) with a pink sharpie.

Just because a card is simple in it’s design, does not mean it cannot be elegant!

000_2122

Today is the last day to take advantage of our FREE SHIPPING promotion….

and I’ll pay the tax!

FREE SHIPPING ENDS TODAY

Let me know if you have any questions. lindaluvs2stamp@aol.com

Thanks so much for stopping by today.

Have a “Perfect Day” ~

blog-closing-small

TODAY’S STAMPIN’ SUPPLY LIST …


Showcasing Embossing Folders with beautiful cards …

Hello Stampin’ Friends,

So … what did you think about the cards I shared with you yesterday? Did you notice 2 new ones? Yes, I added two, never before seen cards!

Today I’d like to share the details of those cards with you. Let me start with the wedding card …

000_1967

I used the Beautifully Baroque folder on Pool Party card stock. The “doubled” butterfly is done with vellum paper and the new Butterfly Thinlits Dies. The addition of the pearls really makes the butterfly stand out.

The salutation comes from the stamp set “Big News” and was stamped in Pool Party.

The second card was the “Baby” card …

000_1970

This one is done in Pink Pirouette and Basic Gray and showcases the “Zig Zag” folder. The greeting comes from the “Celebrate Baby” stamp set. I love the combination of stamps that allow you to make many different types of baby cards.

I finished off the card by layering the flowers punched from the Boho Blossom punch.

Don’t forget … the folders are ON SALE through Monday, February 2nd. Click on any of the items below for more information.

Thanks for stopping by.

Hope you have a beautiful day ~

blog-closing-small


Wedding Wishes in White …

Hello Stampin’ Friends,

Yesterday I said I would share with you a wedding card, a bit nontraditional but I think you will like it. I’ve been using the butterfly a lot lately and today you will see how I incorporated it into my card.

When we think of weddings, we think of white … with a touch of color. Well that is exactly what my thoughts were on my card to. My base is Whisper White with a hint of Wisteria Wonder, and then I added a touch of sparkle with the Dazzling Diamonds Glimmer Paper.

000_1899

You can see my layers and then I topped that off with a final piece of Whisper White that was embossed with our new “Spring Flowers” embossing folder.

Now it was time for my butterfly in Whisper White … no, Dazzling Diamonds Glimmer Paper! For a more cost effective approach … I cut my butterfly out of the glimmer paper that I used for my mat …

000_1901

then simply placed the embossed piece of white over it and popped it up with Stampin’ Dimensionals to give it more character. (I should have cut my Wisteria butterfly from the mat too!)

Here is the card fully assembled … The Wisteria butterfly behind the Dazzling Diamonds butterfly gives it a bit of a shadow effect, quite stunning!

000_1904

A simple “Congratulations” is all it needed and I got that from the Itty Bitty Banners stamp set, and used the Bitty Banners framelit to cut it out. Simple yet elegant, and it is prettier in person.

I think this would also make the perfect birthday card. My Mom loves butterflies so I’ll just switch out the greeting and have the perfect card to give her.

I hope you enjoyed today’s card share, and I thank you for stopping by.

Have a wonderful weekend ~

blog-closing-small

TODAY’S STAMPIN’ SUPPLY LIST …

000_1905

Weekly Deals and Card Share …

Hello Stampin’ Friends,

Today I am going to share the Weekly Deals with you, along with two cards that I made using the “Make a Cake” stamp set that is on our Weekly Deals list!  I’m not sure if we’ve ever had a stamp set before … that is so cool!

CM1634BWe hope you enjoy this week’s Weekly Deals!

Make A Cake Clear-Mount Stamp Set Item # 126742
Regular Price: $11.95
Discounted Price: $8.96

Punch Pack Item # 118309
Regular Price: $16.95
Discounted Price: $12.71

Secret Garden Framelits Dies Item # 129372
Regular Price: $24.95
Discounted Price: $18.71

Summer Starfruit 1-1/4″ Striped Grosgrain Ribbon Item # 132980
Regular Price: $8.95
Discounted Price: $6.71

Island Indigo Baker’S Twine Item # 125575
Regular Price: $2.95
Discounted Price: $2.21

Brights Glimmer Brads Item # 121006
Regular Price: $4.95
Discounted Price: $3.71

Gingham Standard Stampin’ Around Wheel Item # 130110
Regular Price: $6.50
Discounted Price: $4.88

Recipes By Design Digital Kit – Digital Download Item # 118869
Regular Price: $9.95
Discounted Price: $5.97

Today’s card share is a couple of cards that I had made using the Make a Cake stamp set …

My “Bride & Groom” card was created in 2012 and not only uses the “Make a Cake” stamp set, but the flower punch from the “Punch Pack” which is also included in the Weekly Deals.  The layering look is created by “scrunching” the flower until the cardstock peels into layers (only then ends).  Just give it a try … it is quite easy.

This designer paper is no longer available, but there are so many lovely papers you could use and match up to the color scheme of the wedding.  The ribbon is the White Organza, and I love this because you can dye it any color simply by adding a few drops of re-inker fluid into some water, then dip your ribbon.  Easier yet … just color it with your marker!

The greeting comes from the “Sweet Essentials” stamp set.  Also used on this card is the Polka Dot embossing folder and the Basic Jewels – Pearls.

000_1209

As always, I will put the ingredients with links at the very end of my blog for your convenience.

My second card was created in 2013 as one of the first cards I shared when this blog was created.  I used the “Make a Cake” stamp set and combined it with the fun technique of “weaving”.

You simply weave together scrap pieces of designer paper or cardstock to create a fun and interesting mat or background.

On this card, I stamped my cake image directly onto the designer paper and then cut it out to fit into the cake piece.  This makes cake decorating so easy!

The “Make a Wish” greeting also comes from the very versatile “Sweet Essentials” stamp set.  The embossed background was created with the “Square Lattice” embossing Folder.

100_1763

The punches used for this card are the 1-3/4″ Circle punch, and the “Modern Label” punch that I also used on yesterday’s card.

Thank you for taking time out to visit me today.

blog-closing-small


So Happy Together …

Hello my Stampin’ Friends,

It’s finally Friday!!  Wooooooooooo Hooooooooooooo!  I’m not complaining … my work week went very fast, and we closed the candy store on Tuesday because of the bitter cold, so it was a short week too.

Today’s card share will warm your heart.  A sweet and simple card created with heart … and with punches!  You can use it for Valentine’s Day or an Anniversary.

000_0691

I knew I wanted to use our Red Glimmer Paper for the card, in fact, the entire card was designed in my head (now you know it won’t be hard to make – lol)

I simply punched out the red glimmer paper with the “Postage Stamp Punch”.  I then punched 3 hearts out of a strip of Whisper White using the Small Heart Punch.  Then I centered the 1″ Square Punch over the heart and punched out the square.  It is so much easier to center the hearts that way, instead of trying to punch the heart out of the square.

I mounted the white heart squares onto the red glimmer paper using the Stampin’ Dimensionals.  I then mounted each of the completed squares using the Glue Dots onto the Whisper White mat.

The mat is 5″ x 3-3/4″ and is mounted onto the card front using Stampin’ Dimensionals.

Since my “A Dozen Thoughts” stamp set was still on my table from yesterday’s card … I chose the “happy together” for my greeting.

000_0688

Not to waste the hearts … I stamped the greeting onto one of them, and then layered it over the stamped greeting to add a bit of dimension onto the bottom half of the card.  The other two hearts are on the inside of the card.

You will notice that the main part of the stamping in the heart is “to”… for the two of you together!

000_0690

Thanks for stopping by!

Have a “happy” weekend ~

blog-closing-small

Here is a list of supplies used for today’s card …

 ITEM

 PRICE

 DESCRIPTION

131056

$26.95

 A Dozen Thoughts Stamp Set – WOOD

131059

$18.95

 A Dozen Thoughts Stamp Set – CLEAR

122344

$15.95

 Postage Stamp Punch

117193

$5.95

 Small Heart Punch

124094

$15.95

 1” Square Punch

Clicking on the item number will link you to my on-line store.  THANK YOU!

Friends are the flowers …

Hello Stampin’ Friends,

Today I wanted to share a scrapbook page with you.  It is one that I did with my Scrapbook Club last year.

September kicks off my 2013-14 club sessions, and it’s so great to see all my stampin’ friends again!  We may start out as strangers at the beginning of the year, but by the end … we have made new friends.  Oh yes, and we have learned some fabulous stampin’ techniques too!

My color pallet for this page was inspired by nature.  Next time you go to the Farmers Market or grocery store, take a close look at the colors … this page was inspired by an eggplant.  I used Elegant Eggplant and Old Olive … and think they look beautiful together.

000_0202

The beautiful stamp used comes from the “Flowering Flourishes” stamp set found on page 118 of our Idea Book & Catalog.  I began with stamping Old Olive ink onto the Old Olive Cardstock … color on color produces a rich and beautiful image.  If you prefer a more subtle image… you can use your VersaMark® pad instead.

I then stamped my image, using the Old Olive onto the white cardstock to really make the image POP!  To highlight the flowers on the stamp, I punched out flowers the “Boho Blossoms” punch.  The Boho Blossom punch can be found on page 183 in the Idea Book & Catalog.

000_0202-B

To add some fun dimension to my flowers … I hold them in the palm of my hand and the push the tip of a pen into the center.  It curls up the petals and leaves a perfect mark for me to place my rhinestone.

Using the rhinestones ( pg.171 / 119246) finishes off the page so perfectly.  This page could be used for “friends”, for a wedding page, your grandmother or mother …. for almost any occasion, and how beautiful.

000_0202

I just used my computer and “Word” to create the verse on the page … each of the white squares are 3 x 3, except for the center and the Elegant Eggplant mat which measures 3-1/4 x 3-1/4.

Don’t forget, you can take this scrapbook page and turn it into a card.  Inspiration for our cards, scrapbook pages and for our color pallets can come from anywhere…. just stop and take a look around you.

Thanks so much for stopping by my blog today!

blog closing-small

Love & Laughter …

Hello Stampin’ Friends,

I hope you had a nice relaxing weekend, or had a great time if you were out and about!  I stayed in my stampin’ room and created some neat projects to share this week.

Yesterday… I said I would be featuring the “I AM ME” designer series paper all this week, so, today is day number one.

As I looked at each pattern, I began to come up with some ideas of what I wanted to do, based on the stamp sets I have.  The paper pattern I used today has simple scallops of white on pool party.  With that …

I chose the “Love and Laughter” stamp set (If you click on the title, you can view the stamp set).  Another set that I had to have, but did not get the chance until now.  I think we all do that, and I hope that I can inspire you to break out those stamp sets you have not used yet.

000_0177

This stamp set is so dainty and beautiful, that I decided to use the “Shimmery White” paper … It has a beautiful shimmer to it, without over powering your images.

Next, I embossed the lower part of the cardstock with the “Delicate Designs” embossing folder.  I thought it added a beautiful touch of texture, and just felt that it belonged on the card.

The Delicate Designs folder comes in a set of 2 … the lace border I used and snowflakes (at least that what I thought they were) and the coordinate with the Large Scallop Edgelits Die on page 188.

I wanted to add a ribbon but it seemed a bit heavy, so I pulled out my “Pool Party Bakers Twine” … just enough to add a pop of color and to draw attention to the embossing.  My apologies … the “Pool Party” is discontinued.

To complete the card, I wanted to add a little “bling” and immediately thought of the gorgeous “Frosted Finishes” Embellishments!  Who said you had to use them just for Christmas cards!  I love it on this card.

Hmmm… we may need a bit more postage for this card, but well worth it!  The bride is going to love it, and I’m sure you’ll impress many in the room.

Here is a list of the ingredients for today’s card ….

 ITEM

PRICE

 DESCRIPTION

 128430

$22.95

Love & Laughter – WOOD

 125477

$17.95

Love & Laughter – CLEAR

 130138

$10.95

I Am Me Designer Series Paper

 101910

$7.95

Shimmery White Paper

 132150

$6.95

Frosted Finishes Embellishments

If you do not have a demonstrator, and live in the United States … you can shop at my on-line store 24-7.  Clicking on the item number will take you to my store, and show you a picture of the product and give you a description of the item.  I would be honored to be your demonstrator.

000_0177

Let me know if you like today’s card … I’d love to hear from you.

Thanks for stopping by.

Tomorrow I’ll share a “wheely” fun card, so be sure to stop back for day 2 of the I Am Me – featured Designer Series Paper showcase.

Have a great day!

blog closing-small

New Stamp Set Parade … Day 6

Hello Stampers …

 and a Happy Sunday to you.  Looks like we are in for a beautiful day today (and tomorrow too) before it gets hot and sticky again.

Today our card will be the 6th out of our 7 day new stamp set parade.  Or … should I say cards!  I am showing you two versions of the wedding card I created.  Each will highlight one new In-Color; Crisp Cantaloupe and Coastal Cabana!

Today’s featured stamp set is: LABEL LOVE
101_1344

I have posted a couple samples using Label Love before, because it is very versatile.  That makes card making a whole lot easier and cost effective… one set, many different cards!  130622L

Here is a complete list of supplies:

Stamp Set: LABEL LOVE (W-130619 / C-130622)

Artisan Label Punch (130920) Coordinates with stamp set

SAVE 15% WHEN YOU BUNDLE… the stamp set & punch (W-132723 / C-132722)

BigShot (113439) / Beautifully Baroque Folder (130917)

Punches: Elegant Butterfly (127526) and Bitty Butterfly (129406)

Glue Dots (103683) to adhere the “butterflies”

Basic Pearls (119247) to embellish the “butterflies and ribbon on Cabana Card”

101_1350The pearls were used on the Coastal Cabana card to accent the ribbon and draw your attention to the greeting.

Cardstocks: Coastal Cabana (131297) and Whisper White (100730)

Ink: Coastal Cabana (131175)

Ribbon:  3/8″ Ruffle Stretch Trim – Coastal Cabana (130024)

101_1353

The pearls used on the Crisp Cantaloupe are delicately placed to highlight the embossing and then onto the greeting as a focal point.

Cardstocks: Crisp Cantaloupe (131298) and Whisper White (100730)

Ink: Crisp Cantaloupe (131176)

Ribbon:  3/8″ Whisper White Taffeta Ribbon (109070)

You can shop 24-7 from my on-line store by clicking the link below… or feel free to contact me.

blog insert - shop now

Have a great day and thanks for stopping by …

blog closing-small