We are over the hump and on our way to the weekend! We are also half way through our Halloween week card share.
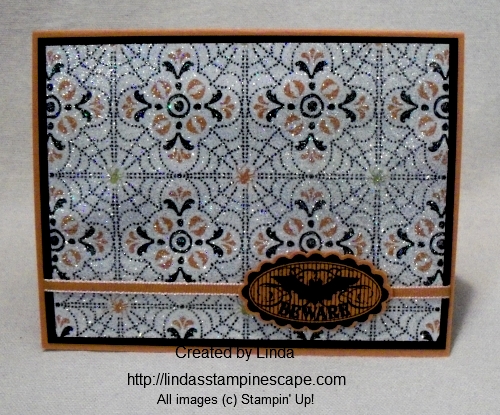
Today’s card is super simple and super glittery! I began with one of my favorite patterns from the “Witches Brew” Designer Series Paper. Cover the entire piece with the VersaMark™ … I actually just dab the pad right onto the paper.
Then I dip it into my “Iridescent Ice” Embossing Powder. When you heat this… watch closely to make sure it is melting properly. That’s it! I love the way this looks, and the technique has several names, but I call it the “Dazzling Diamond Dust” technique.
I also embossed the “Beware” which comes from the “Halloween Bash” Stamp set located on page 21 of the Holiday catalog. After embossing, I added the Black Stampin’ Glitter (132206) to just the bat, to tie in that “sparkle”.
I said it was simple … and you can do this to any Designer Series Paper. So if you have someone that loves that “glitz”, just add this simple technique and they’ll be starry eyed, and think you are the bestest!
Hope you are enjoying my Halloween card feast … only 2 days left! So get your “booty” back here tomorrow because you won’t want to miss this quick -n- cute card either .
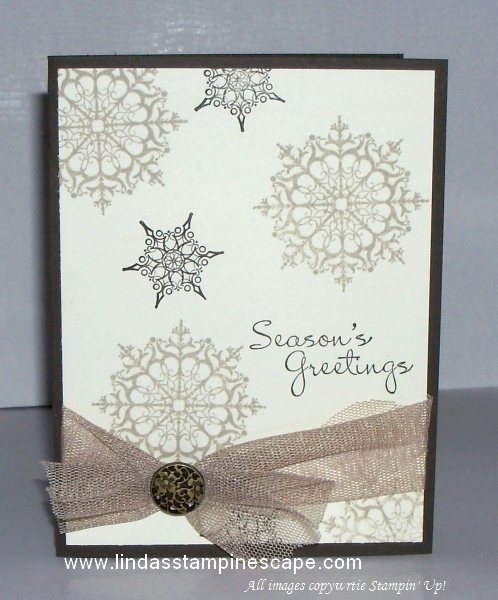
How are you liking the Halloween card share so far? Today I am going to show you the “Joseph’s Coat” technique, with a bit of a twist.
The colors I have chosen to use today are: Basic Black, Pumpkin Pie, Summer Starfruit, and Whisper White. I am also using the same Designer Paper I used yesterday, from the Witches Brew Designer Series Paper pack.
First thing I did was measure my stamp so I could get the color effect I was looking for. I used a 1 inch strip of white, starfruit and pumpkin and taped them (on backside) together. Make sure they are butted up to each other very tight, with no gaps.
Next, ink up the Halloween greeting stamp from the “Halloween Hello” stamp set with VersaMark™ and stamp it over the multi-color strip of cardstock … then heat emboss with clear embossing powder.
Then, using black ink … ink up your brayer and roll it back and forth over the image until covered evenly. Take a paper towel and whip off excess ink from the embossed area … your greeting will “appear” but will have a “smudgy” look to it. I think it gives it a bit of a “spooky” look, which is perfect for this time of year.
I added the new Pumpkin Pie Chevron Ribbon (130015) to give the card a “pop” of color. To balance out the card I added 3 rhinestones colored with a black Sharpie … then put a pop of Starfruit behind them so they would stand out more.
I’ll be back … tomorrow with another Halloween themed project.
Happy Tuesday! I hope you enjoyed yesterday’s stampin’ tip / technique with glitter, but today we are going to put away the glitter, because it’s time to pull out the punches!
Yep, today’s card share is a sweet and simple punch card. Punch art is one of my most popular stampin’ events… those classes always fill up fast. Today we are using the 2-1/2″ and 1-3/4″ circle punches, the owl punch and the 1-3/4″ scallop punch.
Again, I began with the “Witches Brew” Designer Series Paper (I’m trying to keep your supplies to a minimum, by using the items over and over). I matted that with a piece of Pumpkin Pie and backed it with Basic Black.
The tree limb was cut (free handed that one) out of Chocolate Chip cardstock and then embossed with the “Woodgrain” embossing folder.
The moon is easy … punch a 2-1/2″ circle then sponge the edges to create some depth to the paper.
Next I punched out the owl. To create his wings, I punched a 1-3/4″ circle and cut it in half. Then I used the scallop punch to create the points on his wings … a small single circle punch would work too. I just lined up the point where the straight edge meets the curved edge and punched 2 scallops…. then I line up 1 scallop and punch. Yes, it’s a bit tedious but it looks cool. If you have an easier way … I would really love to hear how to do it quicker.
His little smile and teeth were hand cut … it was easy and again, it makes him look cute (not scary like real bats – but that’s a whole other story!)
To finish off the card I added a simple ribbon, the 1/8″ Pumpkin Pie Taffeta Ribbon.
Tomorrow I have another little stampin’ trick up my sleeve, so stop back and check it out.
Yesterday I kicked off a week-long Halloween project share. Each day I will share with you some fun, frightening and creative projects. I also have some new stampin’ techniques and tips for you. My reason for sharing early … is it will give you time to order any supplies you need to create your own Halloween projects.
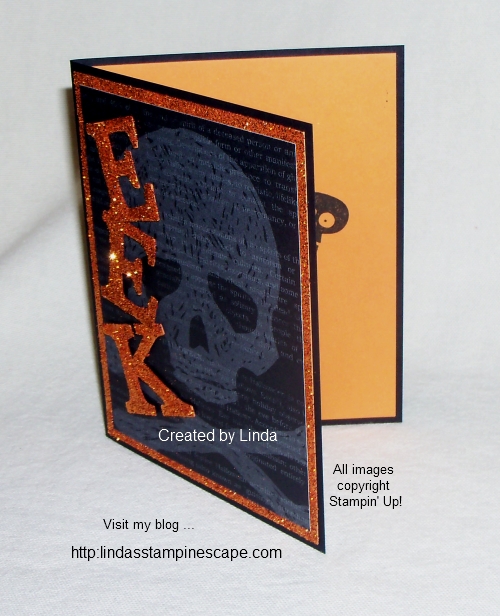
Today’s card is a bit more frightening, but not difficult to create at all.
I prefer the “SNAIL” (104332) Adhesive, however, some of you like to use the Multipurpose Liquid Glue (110755) because it holds so well, and it will work great for this project too. You will also want the “Silicone Craft Sheet” (127853) I think it’s a must have item for all your stampin’ projects.
You see …
The silicone sheet resists any of our adhesives and makes doing this project super simple! I just run my Snail Adhesive over the cut out alphabet, then cover it with glitter. Viola … that easy! This will work great for you glue lovers too.
Here’s a great stampin’ tip and cost saver, for those of you who make multiple cards… To create the “glitter paper” look underneath the Designer Series paper skull, I just ran my Snail adhesive around the edges, then covered it with our glitter. No need to paint or die your Silver Glitter paper … just “snail” and stick your glitter! Glitter lovers rejoice!
Now, for a peek inside …
I used the “Halloween Hello” stamp set to wish my recipient a Halloween greeting but it seems my little friend is a bit shy and isn’t going to show you at this time. Just click on any of the “highlighted” stamp sets or accessories to view them.
Hope you enjoyed the card and stampin’ tips I’ve shared today. Let me know what you think about them … I’d love to hear from you. Sharing on a blog is much quieter than my classes … I miss the oooohs and aaaahs! lol
Can you believe that September is almost over, where does the time go?! The passing of September means one thing … Halloween is just around the corner. Those of you, who know me, know that I love Halloween. It appears I’m not the only one, as it is the second most celebrated / decorated holiday of the year (second only to Christmas).
On that note, I want to celebrate Halloween all this week with fun and frightening projects with you. Since it is Sunday … nothing too scary. In fact, it’s fun … you won’t believe where these cute little pumpkins came from!
Get out your Holiday catalog and turn to page 25 … You got it! I used the “Snow Day” stamp set to create my jack-o-lanterns!
Oh yes … you can see it now, can’t you! Isn’t that awesome. How cute is that! I drew the faces and the vines onto my pumpkins … too easy. Now … that is a versatile stamp set!
I also used the new Chalk Marker and some glitter to highlight the facial features (eyes, nose, & mouth) and the Argyle Embossing Folder to create some fun texture.
Did You Know?
The original jack-o’-lanterns were carved from turnips, potatoes or beets. (From the History Channel)
Every October, carved pumpkins peer out from porches and doorsteps in the United States and other parts of the world. Gourd-like orange fruits inscribed with ghoulish faces and illuminated by candles are a sure sign of the Halloween season. The practice of decorating “jack-o’-lanterns”—the name comes from an Irish folktale about a man named Stingy Jack—originated in Ireland, where large turnips and potatoes served as an early canvas. Irish immigrants brought the tradition to America, home of the pumpkin, and it became an integral part of Halloween festivities.
So just a little fun and trivia for you today. Thanks for stopping by!
I’ll have some hauntingly fun cards for you this week, so make sure you stop back.
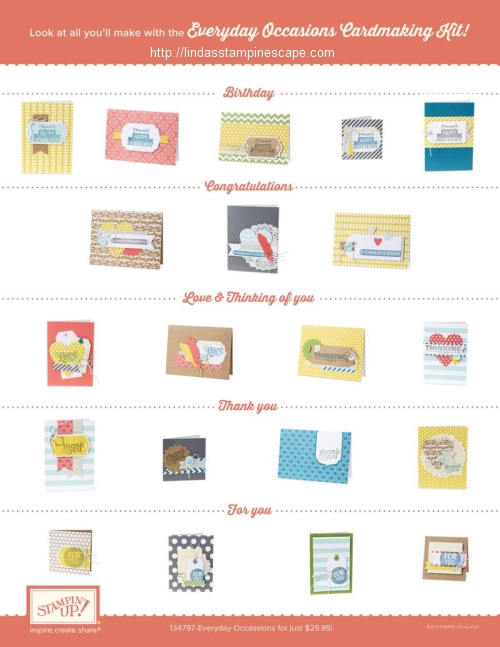
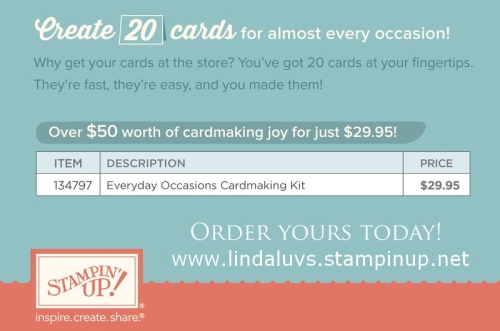
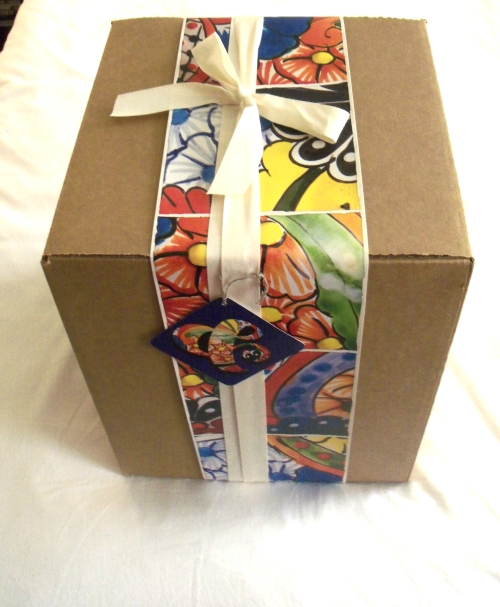
WOW … What can I say except this is an exceptional bargain! Our NEW “Everyday Occasions” kit … you can make 20 (yes, 20) delightful cards for only $29.95 (plus shipping & tax). You’ll receive the stamps, ink, pre-cut cardstock, envelopes, fun embellishments and full color photos to create your projects – 20 all occasion cards.
Why go to the store when a birthday, graduation, wedding or even a time for expressing gratitude comes up? The Everyday Occasions Cardmaking Kit puts cards for all of those events right at your fingertips, and best of all, they’ll be handmade! The kit contains everything necessary (minus adhesive and scissors) to create 20 beautiful cards for almost any occasion, and it comes in a beautiful box to store them in.
Here is a view of the cards you can create:
The kit also makes the perfect gift for that creative someone you know!
The Everyday Occasions Cardmaking Kit is a fantastic means to introduce stamping & card making to your friends! It was developed with the new stamper in mind. It is a simple, fun experience at a great price!
Just a note:
If giving this wonderful kit as a gift to a new stamper, you may want to consider purchasing the SNAIL adhesive (104332) and Paper Snips (103579) along with the Everyday Occasions kit. Christmas is just around the corner … what an awesome gift to receive! So shop early as this kit is available while supplies last.
Whether you purchase for yourself of as a gift, you will delight in the opportunity this fantastic new kit will provide. If you have any questions, you can always contact me!
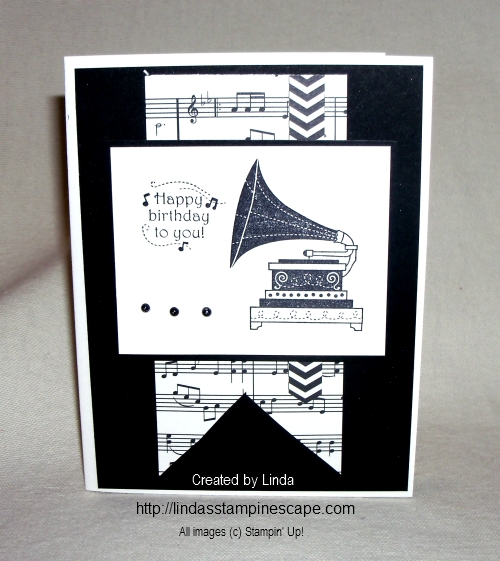
Today I’m going to share another “Quick -n- Easy” card for all of you who have a lot of birthday cards to make. September is full of birthdays in my family… and it even runs into October!
When stampin’ this card for my friend, because we have known each other for ………. we’ll enough about that, I was feeling a bit nostalgic. So I went to my “go to” nostalgic stamp set “Timeless Talk” – page 19 of our big catalog.
Of course I’m going to pair it up with the “Modern Medley Designer Series paper. I know that I have a few of you hooked on that paper. I love it all … which means you use it “all”… no waste!
Here I have made a quick banner out of the musical note paper and added another strip of DSP for a contrast.
I popped up the stamped section with our “Stampin’ Dimensionals” and to finish it off …. HERE COMES A STAMPIN’ TIP: I used my black Sharpie® marker to color my pearls. Oooooooooooh … I just love the way that looks!
Now how sweet and simple is this card! Easy to make for your BFF (Best Friend Forever). Celebrate today and call a friend.
Today I’m going to share with you, my rendition of summer turning into autumn on a card.
I began with Whisper White layered onto Whisper White. I took my top piece and created a “reverse mask” … take a piece of old or scrap paper and cut out a section that you can sponge and stamp. If you are not comfortable cutting a mask with your paper cutter… you can easily create a “reverse mask” with the use of one of our many framelit dies or by punching out that area.
Now … place your “reverse mask” and begin sponging, leaving the center a bit lighter to create a beautiful dimension on your card. Next, you can stamp your image (please note that if you use cardstock, you will see it does not go to the edge). I used only Wild Wasabi for the sponging and the stamping. The color difference is all in the way you sponge … start light, you can always add more (but you can’t take away). I prefer the regular sponges.
Remove your reverse mask, and you will have a beautiful design element on your card. If you’d like, you could just stamp a greeting to complete the front. However, since I wanted to show the transition to fall … I added my fall leaf. I used the “Magnificent Maple” stamp set found on page 18 of our Holiday Catalog. For the leaf, I began with So Saffron then did the rock and roll technique to edge the leaf with Wild Wasabi and Tangerine Tango.
I added (sponged with sponge dauber) a little more So Saffron into the center of the leaf to make it “pop” a little more!
I used the “Happy Day” stamp set found on page 112 of our Idea Book & Catalog for my greeting. To finish off the card, I added Stampin’ Dimensionals to “POP” up the front piece with all the stamping.
Thanks so much for stopping by and welcoming autumn in with me!
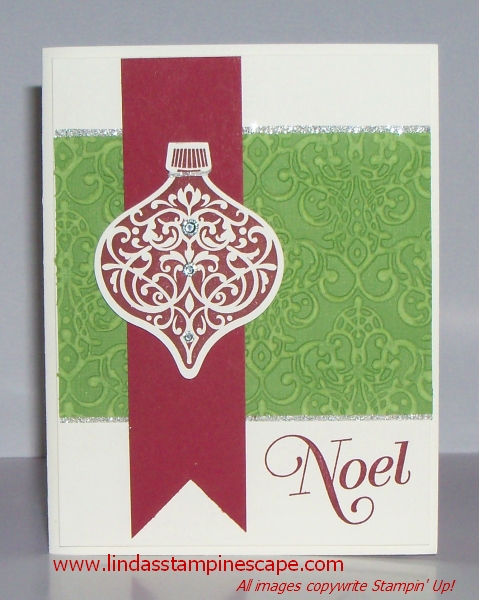
Today I want to share with you the “carry over” stamp sets that are not in the catalog but are still available to order. You guessed it, its Christmas sets! Plus, I’ll share some of the beautiful cards we made last year at my clubs, classes and the annual Holiday retreat!!
First, is the “Ornament Keepsakes” stamp set (128048 – W / 128051 – C) and the beautiful greetings from “Greetings of the Season” (128030 – W / 128033 – C)
I used the “Coordinations Cardstock as a background, a Cherry Cobbler banner that draws your eye to our focal point … the ornament! I then embellished with scraps (you got it) of the Silver Glimmer Paper (124005) and top it off with those precious “gotta have” Rhinestones (119246)
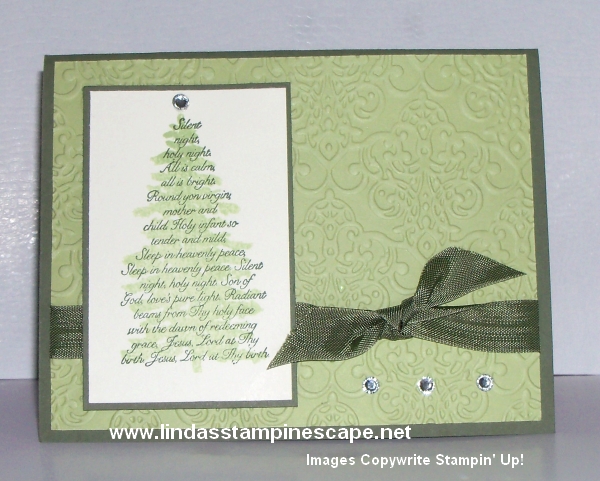
Next, the fabulous Two-Step Stamp Set, “Evergreen” (127970 – W / 127973 – C) You can make this with Always Artichoke and the NEW Pear Pizzazz or go wild and choose another color scheme!
Last but definitely not least … 2 great samples from the stunning “Snowflake Soiree” (127922 – W / 127925 – C) stamp set. The first is done in a soft neutrals pallet… Early Espresso, Very Vanilla, and Crumb Cake. It’s such a warm greeting for the holiday season. I used a brad from one of my favorite embellishments; “Vintage Brads” to tie the card together!
The second is so simple, yet simply beautiful. A very festive card when done in Whisper White and the simply delicious Cherry Cobbler!
It’s not too early to start thinking about the Christmas cards that you want to share with your friends and family.
If you can’t wait and want to purchase any of the items I shared with you today, just click on the link below to get started.
Thank you so much for stopping by …
I appreciate that you take time out of your busy day to visit me!
Hope you are doing well on this fine Tuesday. Today I’m going to share a card that I received for my birthday (no, it’s not my birthday… it’s in April). I was going through some of my cards and thought you would all like this one.
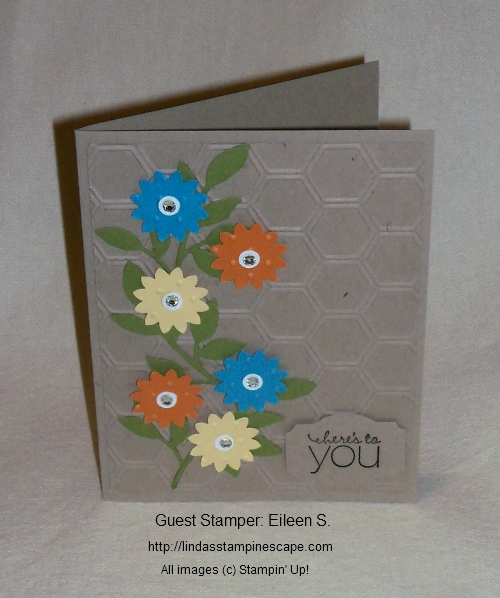
So grab your Bigshot and a couple of punches, and you will have this cute card in to time.
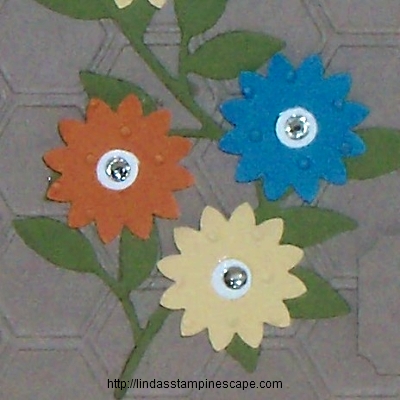
First, you’ll be trimming the front piece to 4″ x 5-1/4″ … then run it through the Bigshot using the Honeycomb (129378) folder.
While you have the BigShot ready, grab your Old Olive cardstock and cut out the leaves using the “Little Leaves (114511) Sizzleit”. Don’t put it away just yet … you will need it to emboss your flowers – they are embossed with the “Perfect Polka Dot” (117335) Embossing Folder.
You will need the “Boho Blossoms” punch (119858) to create the flowers, then for the center, get your Owl Builder punch and use the “eyes” for the center of the blossoms! To finish off these cute little flowers … just add rhinestones. What girl doesn’t like a little bit of bling!
Although the greeting is no longer in the current catalog, we have many wonderful greeting sets.
I hope you enjoyed my birthday card as much as I did … It’s so cute!
Do you want to be a guest stamper? Send me your cards … All current Stampin’ Up! products* and I’d love to share your work. Who doesn’t want a little recognition for a job well done. I love seeing the beautiful cards you make!
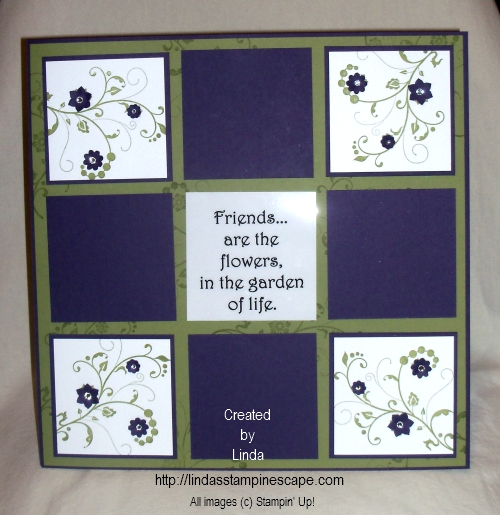
Today I wanted to share a scrapbook page with you. It is one that I did with my Scrapbook Club last year.
September kicks off my 2013-14 club sessions, and it’s so great to see all my stampin’ friends again! We may start out as strangers at the beginning of the year, but by the end … we have made new friends. Oh yes, and we have learned some fabulous stampin’ techniques too!
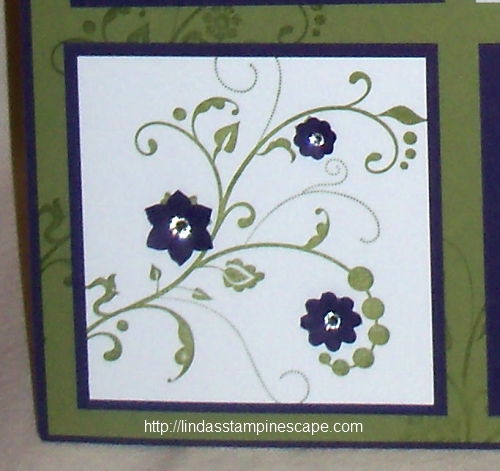
My color pallet for this page was inspired by nature. Next time you go to the Farmers Market or grocery store, take a close look at the colors … this page was inspired by an eggplant. I used Elegant Eggplant and Old Olive … and think they look beautiful together.
The beautiful stamp used comes from the “Flowering Flourishes” stamp set found on page 118 of our Idea Book & Catalog. I began with stamping Old Olive ink onto the Old Olive Cardstock … color on color produces a rich and beautiful image. If you prefer a more subtle image… you can use your VersaMark® pad instead.
I then stamped my image, using the Old Olive onto the white cardstock to really make the image POP! To highlight the flowers on the stamp, I punched out flowers the “Boho Blossoms” punch. The Boho Blossom punch can be found on page 183 in the Idea Book & Catalog.
To add some fun dimension to my flowers … I hold them in the palm of my hand and the push the tip of a pen into the center. It curls up the petals and leaves a perfect mark for me to place my rhinestone.
Using the rhinestones ( pg.171 / 119246) finishes off the page so perfectly. This page could be used for “friends”, for a wedding page, your grandmother or mother …. for almost any occasion, and how beautiful.
I just used my computer and “Word” to create the verse on the page … each of the white squares are 3 x 3, except for the center and the Elegant Eggplant mat which measures 3-1/4 x 3-1/4.
Don’t forget, you can take this scrapbook page and turn it into a card. Inspiration for our cards, scrapbook pages and for our color pallets can come from anywhere…. just stop and take a look around you.
and a Happy Saturday to you! It’s a little gloomy outside today, that’s OK … makes for a great stampin’ day!
This afternoon I’ll be setting up my Stampin’ Studio for my “Christmas Stamp Camp” tomorrow. So today I thought I would share with you a little inspiration for card ideas.
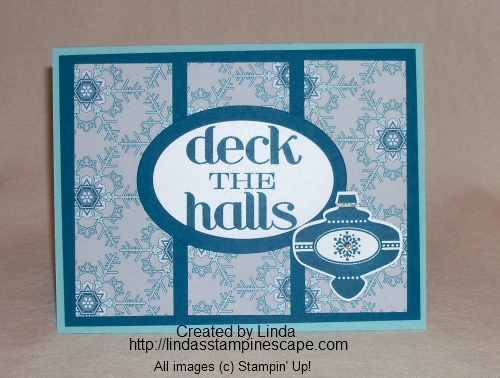
I began with some left over designer series paper from my last stamp camp, and came up with this quick and cute card. My paper is the “Winter Frost Specialty Designer Paper” located on page 29 of the Holiday catalog.
Because our designer paper is designed to coordinate so nicely, the core colors I am using are the Pool Party and Island Indigo.
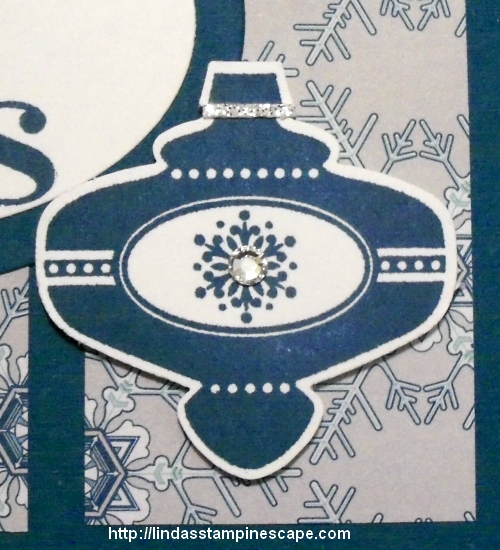
Next I decided to use the “Deck the Halls” stamp from the “Christmas Messages” stamp set on page 34 of the Holiday catalog. I love when Stampin’ Up! puts the inner verses for our cards along with the greetings…. makes life so much easier!
I wanted to jazz it up a bit more, so I added one of those cute new ornaments from the “Christmas Collectibles” stamp set. And talk about making life easier … Stampin’ Up! has a coordinating punch, the “Christmas Ornament” punch so we don’t have to cut these out! Both of these items can be found on page 35 of the Holiday catalog.
To finish off the card, I added a little bling! First as sliver of the Silver Glimmer paper, and then a rhinestone in the center of my ornament.
Wow … wasn’t that easy! And quick!
I hope you enjoyed today’s inspiration for Christmas …. Thanks so much for stopping by.
Happy Friday to you … I hope you have an enjoyable weekend planned.
I will be having a wonderful weekend with some of you … Saturday morning with my Technique Club and Sunday afternoon with my Christmas Card Stamp-a-stack group. It’s always a good weekend when you stamp with friends.
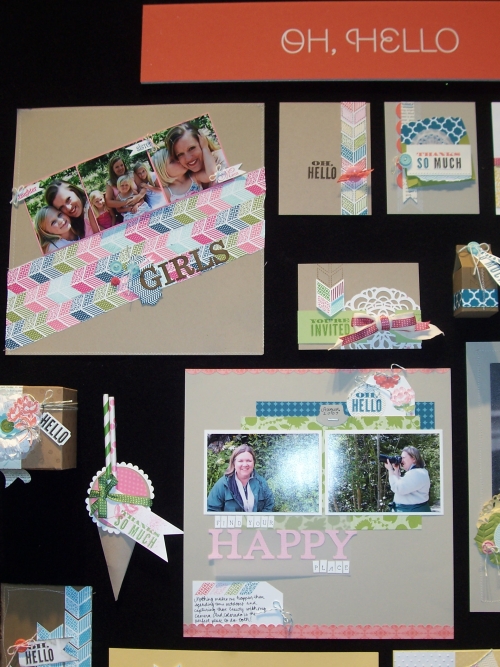
Speaking of stampin’ friends … today I would like to share with you some beautiful cards that I had taken photos of at Leadership last year.
Leadership is a gathering of Stampin’ Up! demonstrators who have achieved the level of Senior Supervisor and above. We share stampin’ and business ideas, receive training from the home office, and just have a great time hookin’ up with old friends and making new ones.
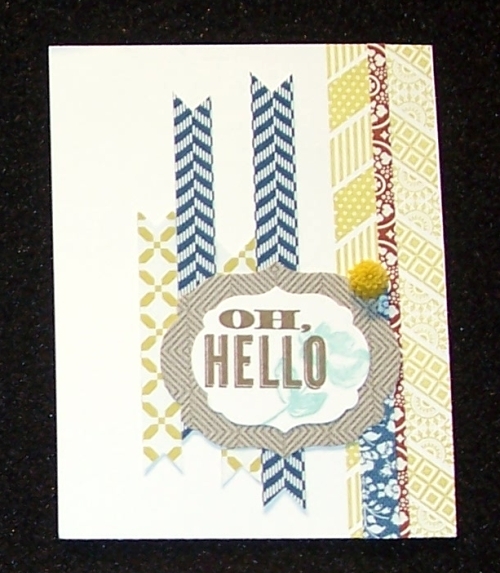
I do not know who that talented demonstrators are who created these cards, but I’m grateful that they share their talents. The following photos are their creations using our “Oh Hello” Stamp set …
Aren’t they fantastic! I love that we can see so many different stamping styles and color pallets. So much inspiration, when we attend the Stampin’ Up! events. You could always join us …. contact me! I’d love to share with you the benefits you would receive as part of my Stampin’ Stars and the Stampin’ Up! family.
I hope you enjoyed the card share, and thanks for stopping by.
Today I want to share with you some of the news and products coming from Stampin’ Up! I have two products that are now available to purchase, two new photopolymer stamp sets to show you, and more!
First lets begin with our fabulous products. I know you have all been waiting for the new BFF of your Framelits and Edgelits! The exclusive Magnetic Platform to hold your Framelits and Edgelits in place when you cut.
The video you are about to see showcases our new “Expressions Framelits” along with the Magnetic Platform. Enjoy …
Please note: * The platform produces a magnetic field—like all magnetic fields, it may interfere with pacemakers, magnetic strips on credit cards, and cell phones if they are too close to the platform.
The next product I want to share with you is the Envelope Punch Board …
If you are in my clubs, you will be using all these items “hands-on” very soon. If you are not, don’t worry … I will be hosting some great classes that feature these products. I’ll keep you posted.
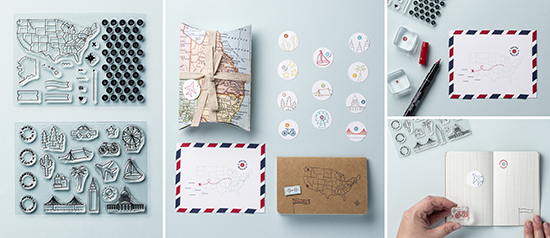
Next, I’d like to show you 2 of our newest Photopolymer stamp sets. These are so cool … Of course they are great for scrapbookers, but just think of the neat school projects your kids could make with these sets!
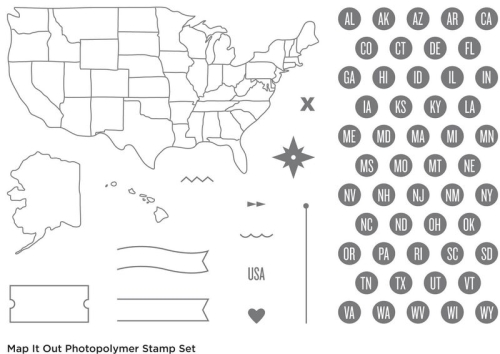
Here is the “Map it Out” stamp set …
And here is the “Greetings From” stamp set …
I just think these are the perfect stamp sets for teachers, and kids for their school projects … geography, social sciences, or even to decorate their book covers (do kids still do that?). Just think of the possibilities! FUN.
I also want to share our current special with you, the “Butterfly Bundle” … too cute!
Offer: Get 15 percent off when you buy this bundled butterfly stamp set and punch!
Stampin’ Up! has added NEW items to the Clearance Rack! You may click on the link (Clearance Rack) or the picture … and shop at anytime from my on-line store or just check out what’s on sale!
Some items are up to 80% Savings … Now that’s a deal!
Today I wanted to share a bit of my Stampin’ Up! incentive trip with you … if not for you, I would not get to experience all these wonderful places. Our destination … Sunny San Diego!
We are on our way and flying over the Grand Canyon. Even from the airplane the view is spectacular.
We had a smooooth landing, in fact, after I got done saying so, the pilot told us too!
This is our hotel … the US GRANT. A San Diego Icon since 1910, the palatial US GRANT hotel is situated in the city’s lively and historic downtown Gaslamp Quarter.
This is our room … yes, Stampin’ Up! spoils us. And yes, I did have to try out the bed… awesome. Really, count them, there are 7 pillows on that bed!
Once we settled in at the hotel, we decided to get something to eat. Eileen had promised her grandson that she would try fish taco’s … so off we were to find a place that served fish. There are soooooooooooo many restaurants in the Gaslamp district it’s hard to choose one. We chose ….
Eileen had her fish taco’s and I tried Grilled Mai-Mai, it was the best meal I had the whole trip (and there were many).
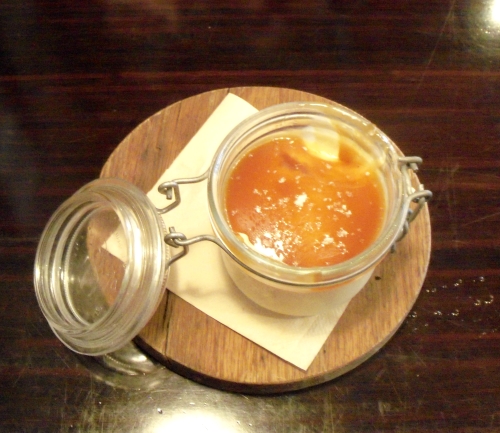
As full as we were, we tried a new dessert ….
You guessed it, the Butterscotch pudding with the rum! Oh my gosh … it was awesome! Warm caramel and sweet with that touch of sea salt. If you’re ever in San Diego … I would recommend a stop at Spike Africa’s. (No … they did not pay me to say that) LOL
We walked back to the hotel and then off to the mall to check it out. Not really in a shopping mood, we walked back to the hotel.
We had dinner across the street at the Yard House, they are known for their selection of beers. I tried one from Hawaii … not bad, and the burger was awesome.
Once back to our hotel … there was a “pillow gift” left on my bed
A beautiful vase as a remembrance of our stay in San Diego. Let me say, Stampin’ Up! does it right.
Hope you enjoyed my first day in San Diego, and “THANK YOU” for making it possible.