Sweet Music …

Hello Stampin’ Friends,

Today is a quick and simple post for a quick and simple card.  Inspired by the group of ladies who participated in my “Timeless Talk” class, I’m sharing another card using the paper design they suggested.

000_0105

They thought that this pattern from the Modern Medley Designer Series paper would work great with this stamp set … so here it is.  I think they are right, don’t you?

With a little help from my BigShot and the Circle Collection Frame-lits, I highlighted the phonograph.  This sweet but simple card would work nicely for a birthday or just to “send a note” to your friend.

I added a few banners from scrap pieces of the Modern Medley paper and tied it all together with the beautiful “Crochet Trim”.  Everything you need to make this card can be found in our current catalog.

Here is the list of ingredients to make the card:  You may click on the item numbers and it will take you to the catalog page.

126605

Timeless Talk Stamp Set – Wood / $22.95

126607

Timeless Talk Stamp Set – Clear / $16.95

126926

Modern Medley Designer Series Paper / $10.95
118481 Crochet Trim / $6.95
113439  BigShot Die Cutting Machine / $99.95
130911  Circles Collection Frame-lits / $26.95

Have a great day and I’ll see you tomorrow!

blog closing-small

SIMPLY TIMELESS …

Hello Stampin’ Friends!

I can’t believe it’s Friday already, however I am sure there are some of you who are sayings … “It’s Finally Friday”.   Time seems to be flying by, which brings me to today’s post.

Last night I hosted a stamp class using my favorite new stamp set in the Idea Book and Catalog… Timeless Talk.  I love the nostalgic look of this set and have probably said so a million times.  The class was based upon 3 simple ingredients.

000_0087

First and foremost is the “Timeless Talk” stamp set (Wood – 126605 / Clear – 126607) found on page 19 of the catalog.  Second is the “Modern Medley” Designer Series Paper (126926) that is on page 164.  And the last ingredient to the class was the Basic Pearls (119247) on page 171.

I held true to the coordinating colors of the “Modern Medley” Designer Series Paper … Basic Black and Very Vanilla.  I also added a splash of Real Red on a couple of the cards.  On this card I added the “Real Red” (119247) Stitched Ribbon.  This card really reminds me of yesteryear… when days were calmer, and more relaxed.

000_0091

We had a nice time in the class and talked about how this precious stamp set brings back memories.  We also had a good laugh as we discussed “party lines” …  something kids now days would not understand.   And phone numbers were not as long as your social security number.  Our old number was 4-7725! THE GOOD OL’ DAYS!

If you are interested, I would be available to host this class for you and your friends … just contact me ( lindaluvs2stamp@aol.com ).

Enjoy your day  … and remember, the weekend is almost here!

blog closing-small

Birthday Fishes (Wishes)…

Hello Stampin’ Friends,

Today I would like to share with you a card that we did at a past stamp camp.  Masculine cards are always a hit and much needed.

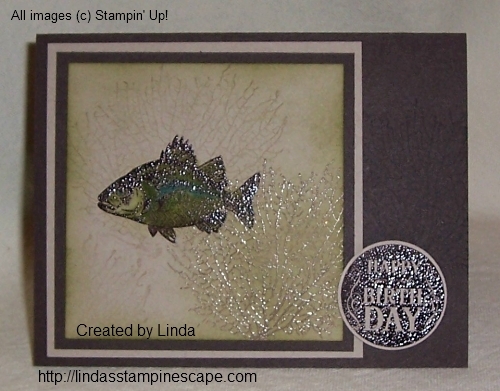
The stamp set I used is “By the Tide” (Wood – 131910 / Clear – 129120).  When I saw this stamp set in the Spring Catalog I knew I had to have it.   Imagine the possibilities … I think this stamp set is so versatile.

129120L

I will admit, it was the fish that attracted me to the “By the Tide” stamp set, as I used to fish with my grandpa, my dad, and even with my mom.  Fishing was always something I did as a kid (unfortunately, not much anymore).

You will be using the “power of the VersaMark” (102283) on this card… watermarks and heat embossing are two techniques used to create the depth of underwater life!

000_1375

We begin with our heat embossing … I inked up the first (what I call sea weed for this card) with VersaMark™ and the fish in Chocolate Chip – then use clear emboss powder and heat.

You will also ink the birthday greeting (From the stamp set “Blue Ribbon” (Wood – 131964 / Clear – 125981)) in Chocolate Chip and emboss.  The new formula ink pads work great for embossing!

Now that your embossing is done, you will stamp (with VersaMark) the remaining sea weed… this will create the illusion of the sea weed being “behind” the fish!  We also stamped it on the base of the card, just for fun!

Once you have completed your stamping… you can color in your fish and sponge the edges for just a bit more depth and color.

So…  I mentioned how versatile this stamp set is, and I think you can create any style of card with this set.  From manly to whimsical (I would use the seahorse for that) to anything in between.  Here is another sample …

000_1377

I love the clean and simple look of this card, and so totally different from the fish card.  The greeting comes from the stamp set “Sweet Essentials” (Wood – 132085 / Clear – 126457) found on page 41 of the catalog.

I believe both of these cards were done at the same stamp camp… to show the versatility of this stamp set.

Speaking of stamp camps … I have my “Christmas in July … Oops August” Stamp Camp on Monday the 26th.  There is still time to RSVP.  You will be making 10 fabulous Christmas Cards (with envelopes) that will showcase our Holiday Mini Catalog.  You won’t want to miss this … it’s a great way to get a “hands-on ” approach to your Christmas cards!

Remember… if you see a word or phrase highlighted, it will take you to that link when you click on it.  For example … the Christmas in July will take you to my calendar of events.

Thank you for stopping by today!  And a “Thank You” to Ann-Marie for her comment yesterday and many other posts … I will be sending you a package of our beautiful “Rhinestones” for being an active participant to my blog!

I have all sorts of surprises coming, both here on by blog and for my club and class members!

Have an awesome day!!

blog closing-small

Hello there!

Hello there stampers …

Today I want to share a card with you that I whipped together so I could announce an upcoming class!  It is my favorite new stamp set in the catalog … Timeless Talk.

000_0053

I love the nostalgic look of this stamp set.  I’ve always loved the old phonographs, my grandma and grandpa actually had a Victrola.  Oh memories (hmmm… might have to do a scrapbook page too).

126607S

My “TIMELESS TALK” class will be held at my Stampin’ Studio on Thursday, August 15th at 6pm.  I have the details listed on my calendar, and will be sending out the “Upcoming Class” list to those on my e-mail list.  Click on the “my calendar” to view.

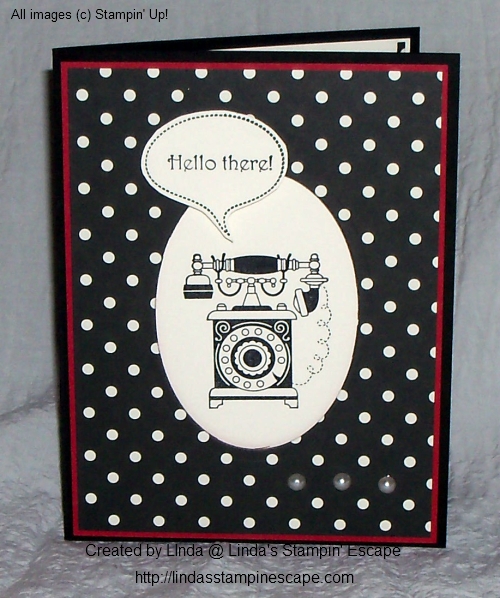
The picture of the card does not show the dimensions (layering) of the actual card.  The “Modern Medley” (126926) Designer Series paper and the Real Red mat behind it, were cut out with the “Ovals Collection (129381) Framelits, then popped up with the Stampin’ Dimensionals to frame that cute phone!

Don’t you miss those kind of phones?  I had to laugh… someone had just told me the other day they wished they had the old style phones because you can’t slam down the receiver of a cell phone!  I just smiled … I didn’t ask.  But, it’s true! lol

000_0053

For the greeting, I cut that out and then added the stampin’ dimensionals to pop that up too.  It just gives it so much dimension.  And you know me, I couldn’t stop there … I just had to embellish it a bit further with the pearls.  They are always a nice touch and so inexpensive to use.

Last but not least, I added a scrap piece of the designer paper inside the card to match the front … why let it go to waste!  I often use the scraps to coordinate the envelopes (that’s cute).  Just make sure you adhere it down well so it doesn’t get caught in those automated sorters at the post office.

Pretty simple card to make, but it is so cute.  Sure to bring a smile to someone’s face.  And isn’t that why we make cards.

I hope you enjoyed today’s card, and that you can make it to my class … I know you are just going to fall in love with those cards.

Have a great day and share a “hello” with someone!

blog closing-small

Guest Stamper … Eileen S.

Hello Stampin’ Friends,

Today I’m going to share another card from my downline meeting on Saturday.  I didn’t post this with the Halloween themed cards is because it just didn’t quite fit in …

It’s a wonderful “man” card from the stamp set “Wetlands” (Wood – 126695 / Clear – 126697) found on page 69 of the big catalog.

000_0052

The card was made by my sister and downline member, Eileen.  I think her color choice suits a masculine card well… Night of Navy and Soft Suede.  Love the look!

To add dimension, Eileen used the “Window Frames Collection” framelits (129021).  You can find those on page 186 of the big catalog.  Do you have a catalog?  If not, let me know and if you are one of my customers I would love to get that to you right away.

You get added dimension by stamping the color on color like Eileen did with the wheat background.

Eileen added a fun design element by “Paper Piercing”.  It is an age old technique made easy with the coordinating “Paper Piercing Pack – Festive” (127857 / page 179).  Don’t you think that it adds that special touch to the card, and yet keeps it “masculine”.  Who doesn’t need man cards!

Would you like to be a “Guest Stamper”?  I would love to share your work … just please use Stampin’ Up! supplies.  Contact me for the address.

Thanks for stopping by today.

blog closing-small

August Best of 25 Stamp Set & Card

Hello Stampin’ Friends!

I was excited, as you can image, when I saw the Best of 25 flyer for August…   I’m a bit of a Halloween fanatic, but never really expected Stampin’ Up! to release the best of 25 Halloween!  But here it is, and it has some of my favorites too!

I love the house and the tree in this set, so today I’m going to share with you a card I created using the tree.

NA_25Year_Best-of-Stamps_flyers_best-of-halloween_NA_thCLICK ON THE IMAGE TO VIEW FLYER / PRINT

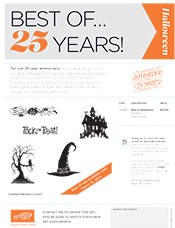
For our 25-year anniversary, Stampin’ Up! is bringing back some of their favorite stamp images from the last quarter century and combining them into 12 sets, which will release— one set per month—during 2013. Even better, along with some great classic images, each “Best of” set will also include a never-before-seen image!


Hang on to your 25-year proof of purchase sticker, and adhere it to your Stampin’ Up!® collectors card, which is included with each stamp set.  If you don’t have one, let me know … I will get one to you right away!

For every six Best Of sets you buy, you can send in your collectors card for a FREE set of your choice valued up to $14.95! Must be redeemed by April 30, 2014

blog insert - shop now

If you click on the “Shop Now” button, it will take you to the Halloween section.

When you get to the Halloween items, check out the banner … Isn’t that cool.  I just may have to create that for the Halloween party this year.

000_0034

I used the “masking” technique to create the moon…. then sponged the sky with Elegant Eggplant and Night of Navy ink.  I stamped all images with the black StazOn.

The greeting is from the stamp set “Halloween Bash” found on page 21 of the Holiday Catalog.  After stamping it, I cut off the “celebrate” then the “halloween” … leaving a bit of the “crawly” so I could adhere the “celebrate” over the top.  Hope that made sense!  lol

I don’t know what it is about Halloween, but I really do enjoy the holiday!  Must be the spooky movies I watched as a kid.  Feel free to share you thoughts about Halloween, or this card!  Thanks.

Have a wonderful day ~

blog closing-small

Using scraps to make something CUTE!

Happy Tuesday Stampers!

How are you this fine day.  I have to tell you, I was a bit in a struggle with this post today.  You know, one of those days when your creativity bulb doesn’t seem to be shining as bright as it usually does.  So, here is what I did …

I went into my stash of cards and started looking for some inspiration.  I know, I know, I can go on Pinterest or other spots to find inspiration … but I make it my mission to create something “NEW” for you everyday!   I invite you to follow me on Pinterest … create a board and pin any or all of my samples for quick reference.

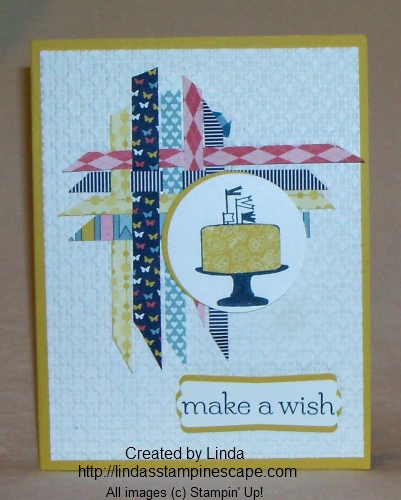
So here is the card I came across, and when I had it on display in my Stampin’ Studio, everyone was raving over it.  It’s different, and it’s pretty easy, and … it uses up our scraps!  One of the best “techniques” we should all know.
100_1763

The designer series paper on this card has since retired but the stamp set is “Make a Cake” found on page 17, and the greeting is from the “Sweet Essentials” stamp set, both sets are found in the 2013-14 catalog.

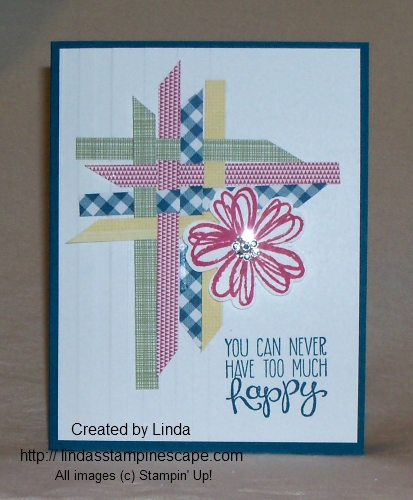
Now … onto my “UPDATED” version.  I think it is too cute!
better

Isn’t this the best way to use up scraps!  Then top if off with that cute little flower from the “Flower Shop” stamp set and you can’t go wrong.  Really … “You can never have too much happy”!  Isn’t that a cute saying?  It comes from the stamp set Yippee-Skippee on page 37 of the 2013-14 catalog!  It’s one of the FREE stamp sets I got when I went to convention this year.  I love convention, it’s also a great place to be inspired, see old friend, making new ones and just have fun.

When using your designer scraps (and yes, you can use regular cardstock too) all you need to do is weave the scrap pieces together.  I lay them out to see what colors I like next to each other.  You need to be a bit careful when flipping it over to adhere it to your card so it doesn’t come apart.  Mine is a bit crooked … Did you notice?

To help you with the products I used on this card, here is a list of ingredients:

 ITEM

 PRICE

 DESCRIPTION

 129310

 $10.95

Gingham Garden Designer Series Paper

 130939

 $23.95

Flower Shop Stamp Set – WOOD

 130942

 $17.95

Flower Shop Stamp Set – CLEAR

 130939

 $16.95

Pansy Punch

 131341

 $18.95

Yippee Skippee Stamp Set – WOOD

 131344

 $14.95

Yippee Skippee Stamp Set – CLEAR

 119246

 $4.95

Rhinestone Basic Jewel

 123128

 $9.95

Stripes Embossing Folder

blog insert - shop nowSo, next time you are looking for inspiration, you can always go back into your stash of cards, come back here and click onto one of the categories that describe the type of card you need, or find me on pinterest!

ONLY 2 MORE DAYS …

Offer Dates: July 1-31, 2013

Offer Details: Buy three packs of select Designer Series Paper and get one for free!

The Fine Print:

  • These items do not qualify for the offer:
    • Designer Series Paper Stacks
    • Specialty Designer Series Paper
    • Designer Series Paper ordered through hostess benefits
  • Orders may be placed on any type of order (workshop, customer, or online).
  • No limits. Order six? You’ll get two for free. Nine? You’ll get three for free.
  • Check out our Designer Series Papers in the annual catalog pages 151, 153, and 154.

Choose from the Designer Series Paper packs below for super savings in July!:  ENDS JULY 31st

Did yo know, that if you click onto one of the words highlighted in pink, it will take you to a link to show you that item of viewing place.  Check it out and let me know how you like it.

Have a great week!
blog closing-small

Birthday Balloons …

Hello Stampin’ Friends ~

Happy Friday to you all … hope you are enjoying this weather!  How nice it was to come home from Convention knowing that the oppressive heat you had was gone.  Sorry you had to go through that!

Today I’d like to share with you a simple and “quick to make” Birthday card.  It seems we always need birthday cards.  Don’t you find some months are loaded with birthdays?  April and September are big ones for me.

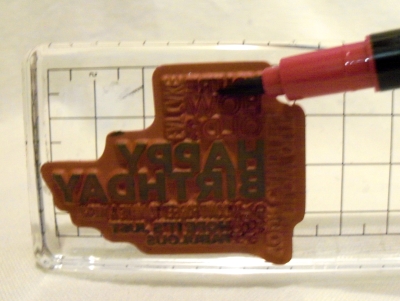
I also have some stampin’ tips for you to use while making this card.  First, we will be using makers to color our stamp, which comes from the stamp set “Delightful Dozen”.

122652L

Any birthday set would work for our card, but I like the Delightful Dozen because it covers so many occasions… great for new stampers, or anyone who likes to get a lot of use out of there stamp sets.

OK … back to our stampin’ tip!  When coloring your stamps (known as Direct to Rubber Coloring) you will want to keep the end of your markers as flat as possible, not directly coloring with the “tip”.  Coloring with the wider section and not the very tip, will keep your markers lasting longer.

101_1721

Oh yes, and when using multiple colors … start with the lightest and work your way to the darkest.  Here I used: Summer Starfruit, Bermuda Bay, and Rich Razzelberry.

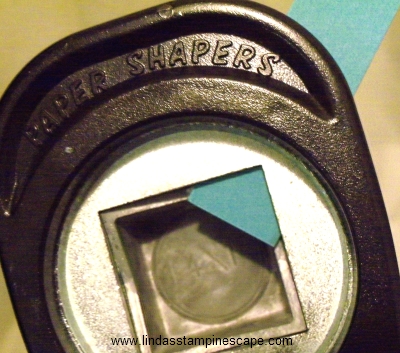
My second tip is how to create “flags”.  You can easily get that perfect end by using your square punch.  Begin by sliding your cardstock into the punch and line up the corner of the punch to the center of your cardstock.  Then, make sure both sides of the cardstock are even (it will look like a house).

101_1718

It’s really all in the alignment, and simple when you get the hang of it.  Just a little practice and you’ll be on your way to perfect flags (or banners as some call them) either way … they’re HOT on cards right now.

Now on to the card ….

101_1722

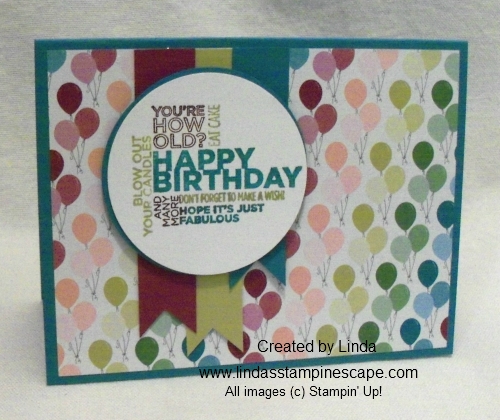
Now … isn’t that cute!  And so easy, just use DSP (Designer Series Paper) a couple of scrap pieces of cardstock – punched to create flags, and a greeting!  Who doesn’t love simple and fast cards?!

The birthday greeting was punched out using the 2-1/2″ (120906) Circle punch.  I also punched out 2 Bermuda Bay circle to add a pop of color behind the greeting.  You will notice it doesn’t go all the way around (because it’s the same size) but it’s just enough color to add a bit more dimension.

I used the fun, fun, fun, “Birthday Basics” (130145) Designer Series Paper.  If you think it’s cute in the catalog, wait till you get it in your hands!  Oh my gosh … I fell in love with it.  With 10 grandchildren, this will really come in handy.

Please don’t forget that the Designer Series Paper is currently on sale … Buy 3 / Get 1 FREE! (Sale ends July 31st).

Click here to view Designer Paper Promotion / Go to bottom of post

Let me know what you think of this paper.  Do you already have it already?  Let me know by dropping a line in the comment box.  Thanks!

blog closing-small

Whooooo’s Birthday?

Hello stampin’ friends ~

Whoooooooo’s got a birthday?  Oh my gosh… I have had this cute owl punch for so long and I have not taken the time to play with it like I should have, so today I’m sharing with you, my latest creation.  He’s so cute; you’re going to fall in love with him.

101_1430

This card really is simple to make…

Begin with a designer series paper in a green tone (Suggestions: Subtles (130135) Color Collection Designer Series Paper Stacks / or GinghamGarden (129310) Designer Series Paper – either of these will work great)

You will also need:

 ITEM

 PRICE

 DESCRIPTION

 118074

 $16.95

Owl Builder Punch

 100730

 $8.50

Whisper White Cardstock

 119686

 $6.95

Early Espresso Cardstock

 128703

 $16.95

Perfectly Penned Stamp Set – WOOD

 122892

 $12.95

Perfectly Penned Stamp Set – CLEAR

 104199

 $4.50

Linen Thread

 126974

 $5.95

Early Espresso Classic Ink Pad

I created the leaves out of scrap cardstock that coordinated with my paper, then folded it in half.  I then folded it again, creating the lines. 

The paper snips works great to cut the grass … just don’t try that in your backyard!  (Bad joke… sorry!)

128703LHere is the Perfectly Penned stamp set. Do you have this set yet?

I find myself using this quite a bit.  It’s fun and cheerful and that is usually what we want to accomplish when we send someone a card.

Thanks so much for stopping by today.

Have a wonderful day!.

blog closing-small

Hello Sweet Friend …

Happy Wednesday Stampers ~

What a response I’ve been getting from my stampers about the appreciation party!  I am “honored” to know that you are so excited and hyped up after the event that you can’t sleep … I thought it was just me!!  We might have to start an “after-party” stamp camp!

As promised … I am posting the winner of “My Favorite Sample Board” … the Six-Sided Sampler stamp set!  I had so much fun creating the sample cards that went on the board (wish I would have taken pictures of the boards!)  Next time!!

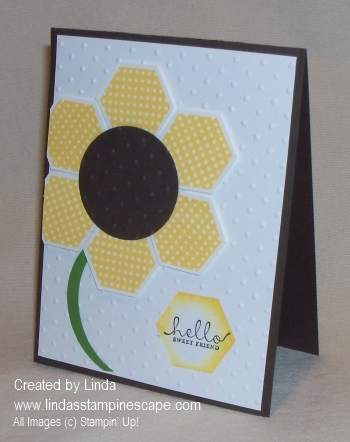
One of my favorite cards is … 101_1395

I think the flower is just too cute!  I used the hexagon stamp with the “polka dots” and stamped it in Daffodil Delight.  The punch makes making petals a breeze!

Then, with the polka dot embossing folder – I embossed the Early Espresso circle and the Whisper White background.  To create the stem, I used the large oval punch and a piece of Garden Green cardstock.

I wanted to do something a bit different for the greeting, so I punched out a hexagon and tucked the greeting behind it.  The greeting was stamped on a separate piece of cardstock and sponged with Daffodil Delight so it would stand out more.  The photo is a bit deceiving … it almost looks like it’s on top.

Hello Sweet Friend Card

Item Number


Description

page #

Price

130953

Wood

Six-Sided Sampler Stamp Set

125

26.95

130956

Clear

Six- Sided SamplerStamp Set

125

18.95

130919

Hexagon Punch

180

15.95

132725

Wood

Six-Sided Sampler BUNDLE

125

36.50

132724

Clear

Six-Sides Sampler BUNDLE

125

29.50

117335

Perfect Polka Dot Folder

191

7.95

101610

Stampin’ Sponges

164

3.5

You may purchase the stamp set and punch separately BUT … I suggest you save 15% and purchase them as a bundle (highlighted in yellow).  The link below will take you directly to my on-line store, and the Six-Sided Sampler (clear) is on page 2.  Please let me know if you have any questions with purchasing on line or with the card.blog insert - shop nowTomorrow I’ll share with you a bit more about the contests and give-a-ways!  I think I’m still reelin’ from the fun.  I’ll be posting up-coming classes (with dates) soon.

 Have an awesome day!

blog closing-small

Polka Dot -n- Flower Shop Parade …

Hello Stampers!

Welcome to a brand new week.

We have officially entered the summer season so what better to celebrate than a parade!  This week I will be posting a “parade” of new stamp sets that I will be featuring at my upcoming Hostess / Customer Appreciation Party!

Each day will feature a new stamp set … keep a list as I will be hosting a “Guess my favorite new stamp set” challenge at the party.  If you are interested in attending … leave a comment or message me!

Today’s featured stamp set is … FLOWER SHOP

101_1309

Along with the Flower Shop stamp set, I used the new “Million & One” stamp set – stamped in Old Olive.  I love the font on this set, it is so beautiful.

The flower was stamped using VersaMark and heat embossed with the Tangerine Tango Embossing Powder.  It is slightly darker than the Pumpkin Pie Polka Dot Parade Designer Series paper I used, but still looks good.

And if you’re going to give someone a card that says “A Million & One Thanks” … don’t you agree, it needs some bling!  I not only used the Rhinestones, but added a little more sparkle to the flower by using Crystal Effects and Dazzling Diamonds Glitter!

Here is a list of the items used today:

STAMP SETS:

Flower Shop (W- 130939 / C-130942)

Million & One (W-126375 / C-126377)

CARDSTOCKS & PAPER:

Polka Dot Parade Designer Series Paper (126902)

Very Vanilla Carstock (101650) 8-1/2″ x 11 Neutrals Collection

Old Olive Cardstock (100702) 8-1/2″ x 11 Brights Collection

FUN SUPPLIES:

Pansy Punch (130698) Coordinates with the Flower Shop stamp set

Rhinestone Basic Jewels ( 119246)

Dazzling Diamonds Glitter (102023)

Crystal Effects (101055)

Tangerine Tango Embossing Powder (123106)

Heat Tool (129053)

blog insert - shop now

Click on the link above to shop for any of these items.

Wishing you a wonderful week ahead…

and don’t forget to stop back each day to see the new “featured” stamp sets.

blog closing-small

Happy Birthday Brother …

Hello Stampers ~

I don’t know about you, but this month is just flying by for me!  Can you believe it is already the 18th of June!

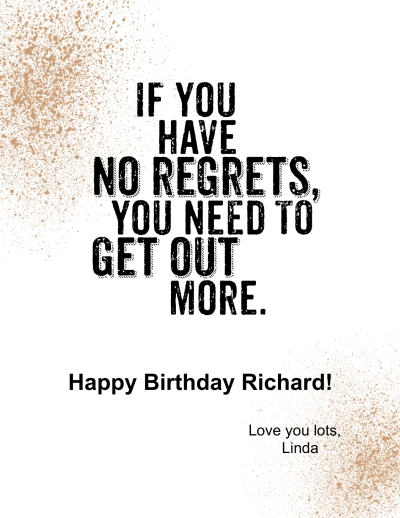
On that note … I’d like to send a Happy Birthday out to my brother Richard today.  I created a “quick card” using the “My Digital Studio” software.  I will admit, that I have had it for a while, but have spent most of my time creating slide shows and scrapbooks with it.  For some reason, I just never got around to creating cards with it!

So today, my brother will get the first Birthday card that I created with my MDS program!

man_birthday-001

I must say, one of my favorite things about the “My Digital Studio” … is that nothing retires!  Once you purchase a download – it’s yours to use forever!  I just love the classic car which comes from  “Adventure Awaits” download.  I have a soft spot for the “vintage look”.

 The inside greeting comes from “Fantabulous You“… I couldn’t resist!   There are so many different styles of downloadable goodies, including some of your favorite stamp sets!

man_birthday-003

I love using the MDS… it is fun and you can let your creativity run wild!  If you don’t like what you did, you can just delete it.  How cool is that!

And for those of you who are busy or have busy little hands around, when you’re interrupted… just hit the save button!  (No clean up required)  It’s a great time saving tool that can get you back to your card and scrapbook projects.

Give it a try … Stampin’ Up!  offers a 30-day FREE Trial.  Just click on the button below … It’s fun, it’s easy and you can always delete your mistakes! (tee hee)

CM554T

Let me know when you try it out, and feel free to share you projects with me.  You can e-mail them to me @ lindaluvs2stamp@aol.com (Maybe YOU could be my next “creative” guest!)

Have an awesome day!

blog closing-small

Cutest Babies Ever …

Happy Monday!

Welcome to a brand new week and a more stamping samples!  I have been in my stampin’ studio all weekend preparing for my upcoming Hostess / Customer Appreciation & Catalog Kick-off party!

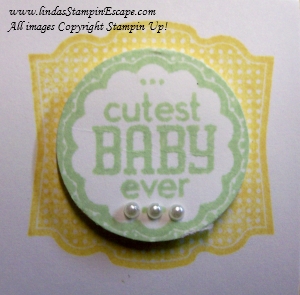
I have decided to focus on 7 brand new stamp sets and “Label Love” is one of them!  This is the stamp set I used to create today’s cute baby card.

Babies have been on my mind lately… Amy from my Thursday night Technique Club  just had a sweet baby boy “Cody”, and rumor has it … Marlene from my Wednesday night Technique group just became a grandma!  Still waiting the details on the baby!  So this is dedicated to both of them …

6-16-13A

I love how the colors work perfectly for a baby card.  From the Subtles collection I used the So Saffron, Pink Pirouette, and the returning Soft Sky, then from our new In-Color collection the new Pistachio Pudding.

Again, the stamp set is “Label Love” found on page 33.  Although I did not use it, Label Love comes with a coordinating punch!  Here I used the 1″ Circle Punch to spotlight one of the “Cutest Baby Ever”.

101_1289      101_1288

I also used the small heart punch in So Saffron, Pink Pirouette, and Soft Sky to compliment the embossed hearts on the card created with the hearts from the Adorning Accents Embossing Folders.  You just can’t have too much heart when it comes to babies!

Then I added a soft embellishment with the pearls … Some believe that pearls were formed by the passage of angels through the clouds of heaven.  Over time, the pearl has become the symbol of purity and innocence.  How perfect for a baby card.

If you liked and need any of the items used to create this card, just click on the link below and it will take you to my on-line store.  You may shop 24-7 (even in your jammies!)

blog insert - shop now

Please feel free to leave a comment if you enjoyed the card today,  I’d love to hear from you!

Have a wonderful week ~

blog closing-small

Dream … The Open Sea

Hello Stampers!

Just a quick post today … I know your busy!

I wanted to share a card (I cased from a fellow demonstrator) that we did at one of my all day stampin’ events.  It’s a great “MAN” card and we used the “Triple Time” Technique.  It’s just perfect for the “Open Sea” stamp set (page 101)

Dream - june 15 13

The colors just make this card!  We used Crumb Cake, Very Vanilla, and “my new black” …. Early Espresso!

I also want to show you a close up of the beautiful “Antique Brads”  (117273) – they go with so many styles of stamping.  This little one worked perfect for our nautical theme.

bradHave an awesome Saturday!

blog closing-small

A Million Thanks …

Happy Friday Stampers!

The weekend is finally approaching!

As promised, the card I made for you today highlights 2 of our new colors.  First, the “Crisp Cantaloupe” from the new In-Colors and the “Smoky Slate”.  I really like this color, and it’s going to go with a lot of colors.

I’m going to do something a little different … I’m going to show you some great new products out of the catalog first and then lead you into the card!

Let me introduce you to one of the pretty flowers (there are 6) in the “Flower Shop” stamp set found on page 94 of the catalog.  I stamped this in the Smoky Slate … then punched it with the coordinating punch “Pansy” (130698).  I love it when our stamp sets have coordinating punches, makes life so much easier!

101_1269

Next … “WASHI TAPE”!  Man is this stuff fun to play with!  this is the Epic Day This & That Designer Washi Tape (131269)  I used the “gray” to coordinate with my card, but there are 2 other rolls that come with it.  Then I topped the flower and washi tape off with our Basic Pearls (119247).

101_1268

Here’s just a little shot of the inside of my card … stamp it a couple times and add a strip of washi tape.  I have begun stamping inside of my card, just because everyone opens them up to see what’s inside (even if you’re only showing a sample!) I love it!

101_1265

OK … now the card!

With our yummy “Crisp Cantaloupe” and the “Smoky Slate”.

Don’t you think they look good together!

101_1263

A Million and one Thanks for taking this stampin’ journey with me!  You will find the “Million & One” stamp set on page 161.  I fell in love with this set as soon as I saw it.

Maybe I’ll make the next card with the other stamp in that set … “Fabulous is what you are” and I believe it!

Have a great weekend ~

blog closing-small