Warmth & Wonderful Christmas Greetings …

Hello Stampin’ Friends,

I hope you are having a wonderful weekend!  I have another Christmas card to share with you today.  I guess my mind is just on Christmas these days … I’ve been placing candy orders at work (for Christmas) and I’m preparing for my Holiday Retreat at home, so … Christmas, Christmas, Christmas.  I don’t mind, it’s quite fun.

I did however have a bit of a break today as our town celebrated Trick or Treat.  I had an Alien invasion … and he brought his kitty along!  lol …  It is my youngest grandson Isaiah and his sister, Hailey.

000_0307-small

Here is my little alien revealed… A bit of a shock for Hailey I see!  Makes for good scrapbooking captions, doesn’t it!!

000_0308-small

We didn’t have too many trick or treaters, so as I was busy designing cards (Eileen was cutting) … I set the bowl of candy out and let them have fun!  To my surprise, there was still candy remaining in the bowl.

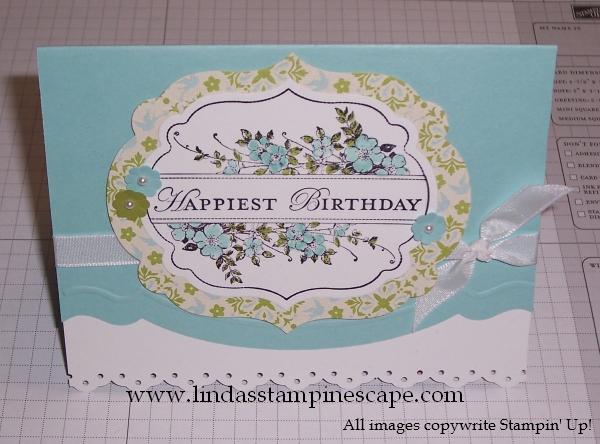
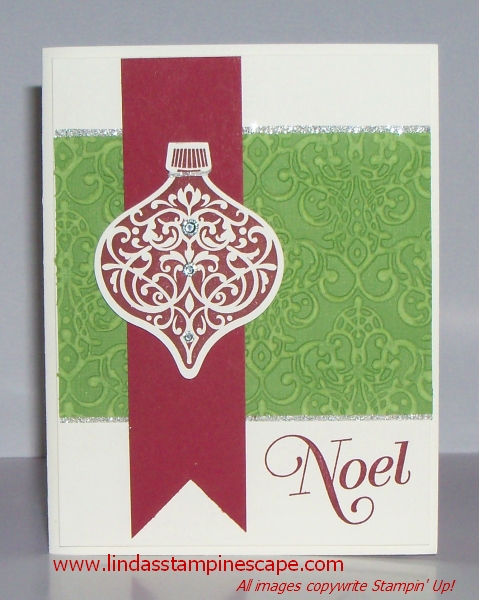
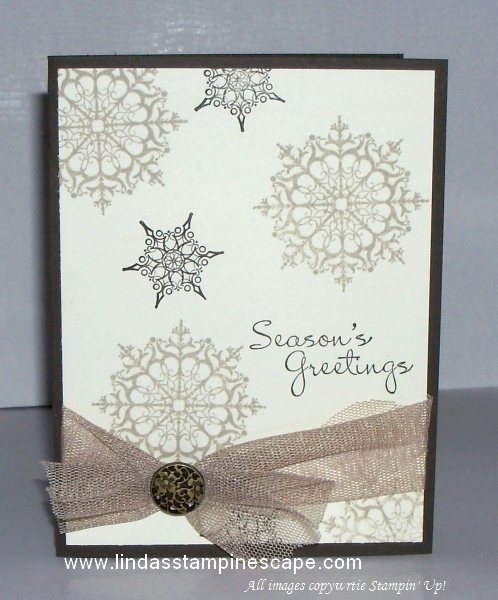
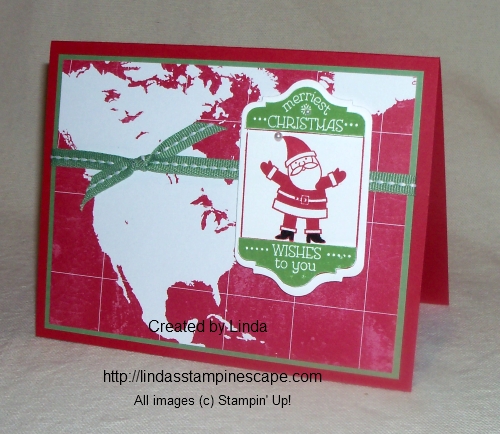
Now … on to today’s card share.  It is a simple card but heck, when you have to make a bunch of cards, simple is the way to go.

I started with a Whisper White base, then embossed the next layer of Whisper White with the “Northern Flurry” Embossing Folder.  I love the way layering white on white looks.

000_0316

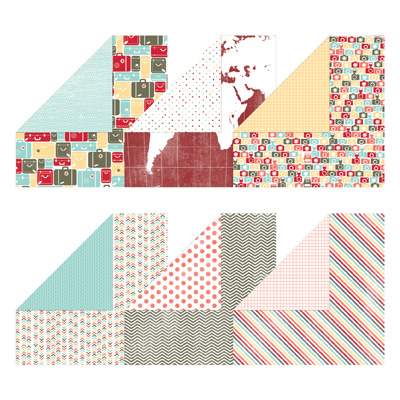
Believe it or not, the strip of designer paper was a scrap piece left from my club cards this month.  It comes from the “Season of Style” paper pack in the Holiday Catalog.

I then topped off the designer paper with the “Cherry Cobbler Seam Binding” … this is one of my favorites for ribbon.  The seam binding lays nicely and ties so easily.  One tip though … when tying your bow, don’t pull from the ends because it frays easily, grab it closer to the knot.

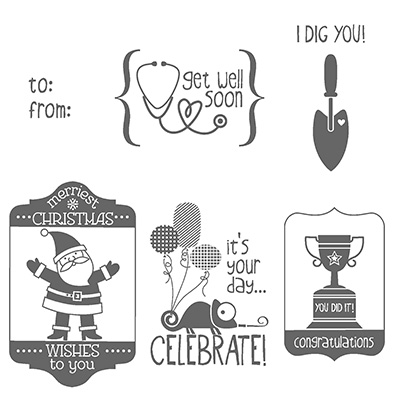
I looked around a bit for a greeting that I thought would like nice with this card… then I found it in the “Warmth and Wonder” stamp set.  This is a Hostess set from the Holiday catalog.

000_0317

You can your “Warmth & Wonder” Stamp set for free with qualifying sales / order of $150 or more.

131883L

Ask me how you can do an on-line party (lindaluvs2stamp@aol.com) then we’ll get you this set and more for free!  We all need supplies for our Christmas cards, so get in touch with your friends and let’s get together!

Enjoy the rest of your weekend,

blog closing-small

Here is a list of supplies used for today’s card …

 ITEM

 PRICE

 DESCRIPTION

 131880

 Hostess

Warmth & Wonder – WOOD

 131883

 Hostess

Warmth & Wonder – CLEAR

 120902

 $7.95

Northern Flurry Emboss Folder

 132181

 $6.95

Season of Style Paper Pack

 120922

 $6.95

Cherry Cobbler Seam Binding

Clicking on the item number will link you to my on-line store.

25% OFF 25 STAMP SETS… Samples included!

Hello stampin’ friends …

Don’t you just love it when Stampin’ Up! rolls out another fabulous promotion?  Well, they’ve got another one!  We’ve been celebrating Stampin’ Up!’s 25th anniversary all year-long.  It started with an amazing Sale-a-Bration with Silver Glimmer Paper.  Then they introduced the Best of 25, a monthly limited-edition collection of stamps from the last 25 years.  This month … hostesses earn an additional $25 of hostess rewards on orders greater than $250.   Those are all great, right … well,  this new promotion will knock your socks off!

DemoHeader_25for25_demo_October22-28_NA

From now through Monday (October 28), Stampin’ Up! is offering a 25% discount on 25 pre-selected stamp sets.  Can it get any better!  They are some of our “hottest” stamp sets which includes, fabulous greeting sets, beautiful holiday sets, alphabet and single stamp sets.  I have the link below for you to view the entire list of 25 stamp sets. I’m making my list up right now … how about you?

I want to share samples from a few of my favorite stamp sets that are included in this promotion …

Label Love –

101_1344

Apothecary Art –

000_1004

Morning Post Alphabet –

000_1286

If you click on the title of the stamp set … it will take you directly to that stamp set.

If you would like to view the entire list of 25 stamp sets on sale at 25% OFF, click directly on the flyer below …

Humongous_List_of_Stamps_on_Sale_NA_th

Please let me know if you have any questions or would like to order … I’m here to help.  You may also order directly from my On-line Store 24/7 … however, this sale ends October 28th.

Have an awesome Wednesday!

blog closing-small


TWO 4 TUESDAY: Scrapbook page & Fun Technique!

Hello Stampin’ Friends,

I missed you yesterday.  I was off catching up with friends, preparing for my upcoming Holiday Retreat, and just life in general.

So, today I will share 2 projects!  First is a Fall Scrapbook page, and the second is a fun technique that I shared with my clubs last year.

My fall page is all about the beautiful colors of fall.

100_5941

The leaves were created with the “Autumn Accents” Bigz die (127812) found on page 192 of our annual catalog.  This die makes collecting leaves quick and easy.  You will also see the “textures” on some of the leaves … a little roll through the BigShot with the “Perfect Polka Dots” embossing folder and the Core’dinations (129956 / pg.157) sandable cardstock – Neutrals collection.  Yep, a little sanding highlights the texture by exposing the core color which is lighter than the outer layers.  Simple to make … just add your pictures and some journaling and you have another page done!

My second project is a cute fall card using the “Faux Tile” Technique:

100_5947

I did create this card last year.  If you have not noticed, we have discontinued the glossy cardstock – which I used here.  If you don’t have any left in your stash … go to any office supply store and purchase the glossy photo cardstock, it works the same.

You will need the “Simply Score” Scoring Tool (122334 / pg.178) for this technique.  By using the  glossy cardstock, you eliminate a couple of steps from the original “Faux Tile” technique.  Cut your cardstock to the desired size for your card.  Place onto “Simply Score” tool and score every 1/2 inch.  Turn carstock 45 degrees (on it’s side) and score every 1/2″ creating a tile pattern.  Now, just simply stamp your images onto the card.  I used the “Gently Falling” (pg.65) stamp set.  My final step was to brayer over the entire piece … careful not to push too hard, you want your “grout” lines to show.

If you don’t have access to the glossy … you can use our Whisper White, score, and stamp, the next step would be to lightly tap your VersaMark pad onto the tiled area (Not too hard … you don’t want VersaMark in the creases).  Then emboss with clear embossing powder.  This will give you a that real tile / grout look!  Just takes a bit longer than the “simple version” described above, but stands out a bit more.

I’d love to hear what you think about this technique.

Thanks for stopping by … I will be back tomorrow with another fun project.

blog closing-small

Simply Beware … Glitter Technique

Hello Stampin’ Friends,

We are over the hump and on our way to the weekend!  We are also half way through our Halloween week card share.

Today’s card is super simple and super glittery!  I began with one of my favorite patterns from the “Witches Brew” Designer Series Paper.  Cover the entire piece with the VersaMark™ … I actually just dab the pad right onto the paper.

000_0245

Then I dip it into my “Iridescent Ice” Embossing Powder.  When you heat this… watch closely to make sure it is melting properly.  That’s it!  I love the way this looks, and the technique has several names, but I call it the  “Dazzling Diamond Dust” technique.

I also embossed the “Beware” which comes from the “Halloween Bash” Stamp set located on page 21 of the Holiday catalog.  After embossing, I added the Black Stampin’ Glitter (132206) to just the bat, to tie in that “sparkle”.

I said it was simple … and you can do this to any Designer Series Paper.  So if you have someone that loves that “glitz”, just add this simple technique and they’ll be starry eyed, and think you are the bestest!

000_0248

Hope you are enjoying my Halloween card feast … only 2 days left!  So get your “booty” back here tomorrow because you won’t want to miss this quick -n- cute card either .

Have an awesome day!

blog closing-small

Totally Batty …

Hello Stampin’ Friends,

Happy Tuesday!  I hope you enjoyed yesterday’s stampin’ tip / technique with glitter, but today we are going to put away the glitter, because it’s time to pull out the punches!

Yep, today’s card share is a sweet and simple punch card.  Punch art is one of my most popular stampin’ events… those classes always fill up fast.  Today we are using the 2-1/2″ and 1-3/4″ circle punches, the owl punch and the 1-3/4″ scallop punch.

000_0238

Again, I began with the “Witches Brew” Designer Series Paper (I’m trying to keep your supplies to a minimum, by using the items over and over).   I matted that with a piece of Pumpkin Pie and backed it with Basic Black.

The tree limb was cut (free handed that one) out of Chocolate Chip cardstock and then embossed with the “Woodgrain” embossing folder.

The moon is easy … punch a 2-1/2″ circle then sponge the edges to create some depth to the paper.

Next I punched out the owl.  To create his wings, I punched a 1-3/4″ circle and cut it in half.  Then I used the scallop punch to create the points on his wings … a small single circle punch would work too.  I just lined up the point where the straight edge meets the curved edge and punched 2 scallops…. then I line up 1 scallop and punch.  Yes, it’s a bit tedious but it looks cool.  If you have an easier way … I would really love to hear how to do it quicker.

000_0240

His little smile and teeth were hand cut … it was easy and again, it makes him look cute (not scary like real bats – but that’s a whole other story!)

To finish off the card I added a simple ribbon, the 1/8″ Pumpkin Pie Taffeta Ribbon.

Tomorrow I have another little stampin’ trick up my sleeve, so stop back and check it out.

Thanks for “hangin’ out” with me today!

blog closing-small

Happy Birthday to you …

Hello Stampin’ Friends,

Today I’m going to share another “Quick -n- Easy” card for all of you who have a lot of birthday cards to make.  September is full of birthdays in my family… and it even runs into October!

000_0230

When stampin’ this card for my friend, because we have known each other for ………. we’ll enough about that, I was feeling a bit nostalgic.  So I went to my “go to” nostalgic stamp set “Timeless Talk” – page 19 of our big catalog.

126607S

Of course I’m going to pair it up with the “Modern Medley Designer Series paper.  I know that I have a few of you hooked on that paper.  I love it all … which means you use it “all”… no waste!

126926L

Here I have made a quick banner out of the musical note paper and added another strip of DSP for a contrast.

000_0230

I popped up the stamped section with our “Stampin’ Dimensionals” and to finish it off …. HERE COMES A STAMPIN’ TIP:  I used my black Sharpie® marker to color my pearls.   Oooooooooooh … I just love the way that looks!

Now how sweet and simple is this card!  Easy to make for your BFF (Best Friend Forever).  Celebrate today and call a friend.

I’ve shared several of cards using that set; You can view these just by clicking on the name ... “Sweet Music” , “Simply Timeless” and “Hello There“.

I’ll be back with more stampin’ tips and stamped projects …

Have an awesome weekend,

blog closing-small

Carry-over list and card share …

Hello my stampin’ friends ~

Today I want to share with you the “carry over” stamp sets that are not in the catalog but are still available to order.  You guessed it, its Christmas sets!  Plus, I’ll share some of the beautiful cards we made last year at my clubs, classes and the annual Holiday retreat!!

CLICK HERE TO VIEW / DOWNLOAD CARRY-OVER LIST

 First, is the “Ornament Keepsakes” stamp set (128048 – W / 128051 – C) and the beautiful greetings from “Greetings of the Season” (128030 – W / 128033 – C) 

101_1251

I used the “Coordinations Cardstock as a background, a Cherry Cobbler banner that draws your eye to our focal point … the ornament!  I then embellished with scraps (you got it) of the Silver Glimmer Paper (124005) and top it off with those precious “gotta have” Rhinestones (119246)


Next, the fabulous Two-Step Stamp Set, “Evergreen” (127970 – W / 127973 – C) You can make this with Always Artichoke and the NEW Pear Pizzazz or go wild and choose another color scheme!

101_1244

Last but definitely not least … 2 great samples from the stunning “Snowflake Soiree” (127922 – W / 127925 – C) stamp set.  The first is done in a soft neutrals pallet… Early Espresso, Very Vanilla, and Crumb Cake.  It’s such a warm greeting for the holiday season.  I used a brad from one of my favorite embellishments; “Vintage Brads” to tie the card together!

101_1249

The second is so simple, yet simply beautiful.  A very festive card when done in Whisper White and the simply delicious Cherry Cobbler!

101_1247

It’s not too early to start thinking about the Christmas cards that you want to share with your friends and family. 


If you can’t wait and want to purchase any of the items I shared with you today, just click on the link below to get started.

 blog insert - shop now

Thank you so much for stopping by …

I appreciate that you take time out of your busy day to visit me!

blog closing-small

Greetings Around the World …

Hello Stampin’ Friends,

A bit chilly here is Wisconsin this morning, but fall is approaching so we were expecting it.  I love the cool nights and warm days… it makes for great bonfire weather!

Well enough of that, time to move on to my last card in the series of cards I created with the “I Am Me” Designer Series Paper.  I hope you have enjoyed the cards I have shared so far…  I would love to hear your thoughts on them.

Today’s card will take you around the world with a very special fellow … Santa Claus, also known as Saint Nicholas, Father Christmas, Kris Kringle.

100_1778

I have teamed up my designer paper with the Ronald McDonald House Charities stamp set “Tag It”.  Please note, that with each purchase of the “Tag It” stamp set … $3 will be donated to the Ronald McDonald House Charities.

* If you click on the RMHC name, it will take you to their website, where you can find out more about this wonderful charity.  Here are the stamps included in the stamp set.

130303L

To create the look on the tag, I first stamped the image in Real Red, and cut it out using the “Chalk Talk Framelit Dies which coordinate with the Tag It stamp set.

Next, I stamped the image Wild Wasabi and cut out the area I wanted to highlight.  I then used our Stampin’ Dimensionals to “pop” it up.

I did add a pearl to finish off Santa’s hat … then just add a ribbon, and your done!

100_1779

I thought this was a fun way to showcase the designer paper with the world map.  I think it was also make a good scrapbook page to those of you who travel… hmmm, there’s an idea!

Again, I would love to hear your thoughts on my series of cards done with the “I Am Me” designer series paper.

To view any of the products highlighted today … just click on the “highlighted” words.

Stop back tomorrow as I will share a bit of my Stampin’ Up! incentive trip to San Diego.

Thanks so much for stopping by today!

blog closing-small

Thank you so much …

Hello Stampin’ Friends,

Today I have a quick & easy card for you, showcasing the “I Am Me” Designer Series Paper … and what better way to do that, than a card with a sampling of the papers!

100_1782

The card was totally created using multiple circle punches … can’t get much easier than that!  Simply punch out different sized circles from your designer series paper and adhere them to your card front.  I used Basic Gray … however, it appears (at least on my computer) as navy… ?

I layered my card, so I could run the piece with the circles through the Bigshot to give it even more texture!

100_1780

The greeting comes from the stamp set “Lots of Thanks” (W- 129687 / C – 129690) and is stamped in basic gray.

Today’s quick and easy card … comes with a quick and easy post.

Enjoy your day!

Thanks for stopping by.

blog closing-small

SMILE! … I have an easel card for you!

Hello my Stampin’ Friends!

Smile!  On day four of my “I Am Me” Designer Series paper showcase, I have decided to use the paper with the cute little camera’s on.   Here is a pic of all the sheets and their backsides!I AM ME DSPWith that in mind … I decided to make my card a “picture” card.  It’s really easy when you use the framelits … I chose the NEW “Circle Collections” (130091) Framelits to match the lens of the cameras!

This is my sister Ruthie.  We were at our family reunion and were having fun with the photo opportunities!  I believe that was back in the 90’s … She looked great, glad you can’t see my hair-do! LOL

000_0190

I figured since I was using a photo on the front of my card, I would make an “easel card”.  How cool is that … and easy.  I used the “Happy Day” stamp set (W-130294 / C-130297) for both the front and inside of the card.  You will find this stamp set is great for scrapbooking too.

000_0191

To hold the card front (easel) in place, I used the Brights Collection (130931) Candy Dots … how “yummy” are they!  And I combined them with the Candy Dots Brad Bases (132293) page 171.  I love the way the look together.

I also like how the candy dots and the circle framelits tie into the camera theme of the card.

000_0192

To create the easel …  begin with a half sheet of cardstock 4-1/4″ x 11″ … fold it in half to create your base.  Now “fold” the top flap of your base card in half.  Create your card front (4-1/4″ x 5-1/2″) and secure to the bottom half of the top flap of your base card.  You can see by the photo that only the bottom half of the top flap and the card front are adhered together… this allows the card to lay flat for mailing.

I have 3 more cards coming in my “I Am Me” Designer Paper Showcase.

Thanks for stopping by!

blog closing-small

Love & Laughter …

Hello Stampin’ Friends,

I hope you had a nice relaxing weekend, or had a great time if you were out and about!  I stayed in my stampin’ room and created some neat projects to share this week.

Yesterday… I said I would be featuring the “I AM ME” designer series paper all this week, so, today is day number one.

As I looked at each pattern, I began to come up with some ideas of what I wanted to do, based on the stamp sets I have.  The paper pattern I used today has simple scallops of white on pool party.  With that …

I chose the “Love and Laughter” stamp set (If you click on the title, you can view the stamp set).  Another set that I had to have, but did not get the chance until now.  I think we all do that, and I hope that I can inspire you to break out those stamp sets you have not used yet.

000_0177

This stamp set is so dainty and beautiful, that I decided to use the “Shimmery White” paper … It has a beautiful shimmer to it, without over powering your images.

Next, I embossed the lower part of the cardstock with the “Delicate Designs” embossing folder.  I thought it added a beautiful touch of texture, and just felt that it belonged on the card.

The Delicate Designs folder comes in a set of 2 … the lace border I used and snowflakes (at least that what I thought they were) and the coordinate with the Large Scallop Edgelits Die on page 188.

I wanted to add a ribbon but it seemed a bit heavy, so I pulled out my “Pool Party Bakers Twine” … just enough to add a pop of color and to draw attention to the embossing.  My apologies … the “Pool Party” is discontinued.

To complete the card, I wanted to add a little “bling” and immediately thought of the gorgeous “Frosted Finishes” Embellishments!  Who said you had to use them just for Christmas cards!  I love it on this card.

Hmmm… we may need a bit more postage for this card, but well worth it!  The bride is going to love it, and I’m sure you’ll impress many in the room.

Here is a list of the ingredients for today’s card ….

 ITEM

PRICE

 DESCRIPTION

 128430

$22.95

Love & Laughter – WOOD

 125477

$17.95

Love & Laughter – CLEAR

 130138

$10.95

I Am Me Designer Series Paper

 101910

$7.95

Shimmery White Paper

 132150

$6.95

Frosted Finishes Embellishments

If you do not have a demonstrator, and live in the United States … you can shop at my on-line store 24-7.  Clicking on the item number will take you to my store, and show you a picture of the product and give you a description of the item.  I would be honored to be your demonstrator.

000_0177

Let me know if you like today’s card … I’d love to hear from you.

Thanks for stopping by.

Tomorrow I’ll share a “wheely” fun card, so be sure to stop back for day 2 of the I Am Me – featured Designer Series Paper showcase.

Have a great day!

blog closing-small

Dare to Dream card …

Happy Friday Stampers!

Whew … we made it.  Just kidding, I saw a poster that said that, but I must admit, I am happy the weekend is almost here.

Yesterday I told you that I would be sharing a card with you, that I created from a picture that inspired me.  I saw the picture on Pinterest and though it would make a beautiful card.

000_0157

It’s hard to believe but I began with Whisper White cardstock!   Although the cardstock I used for matting  is Calypso Coral… my camera made it look a bit pink.  The background for the card was created entirely by sponging.

Here is my inspiration …

31.05.12-Serengeti

If you click on the picture… you can see it in all it’s grandeur, and if you look closely, you can see the elephants.  I hope you find it as inspiring as I did.  I often look at nature for inspiration in designing and in the color pallets I choose.

For my card, I started with the foreground or “land” part of the card.  I sponged Basic Gray ink, layering it to create highlights and low-lights.  Then I moved into the sunset … beginning with Daffodil Delight, Calypso Coral and then Marina Mist.    I added the clouds next, using the Whisper White Craft Ink.

000_0161

The trees (from Serene Silhouettes) were stamped with the Black StazOn, as was the “Dare to Dream” from the Loving Thoughts stamp set.  If you click on the stamp set name, it will take you to the page so you can view the entire stamp set.

I hope you enjoyed today’s card and feel inspired to go outside and take a walk, or stamp a card for a friend… better yet, with a friend!

Have a great weekend,

blog closing-small

So many candles … so little cake!

Hello Stampin’ Friends,

Hope you had an awesome weekend!  I heard it was “hot” outside, so I never ventured out … I’ll get my share of the heat today!  I always wondered why it was either “way too hot” or raining on the days I hold my stamp camps.  Must be God’s way of telling me I picked a good day to stay inside and stamp!

With so many birthday’s in my family coming up, I thought I would share another birthday card with you today.  It’s quick and easy to make and as promised, I’m using the “Birthday Basics” Designer Series paper again.  I just love the new “Smoky Slate” color, so I used that as the base of my card.

000_0124

As you can see, I changed up the fold of the card a bit today.  I had my share of measuring things being in the  Quality Assurance field for over 20+ years … so, I just folded in the larger (left) side past the center point of the card, then I folded the what was left of the cardstock up to meet the edge!  I did use my bone folder to crisp up the folds.

000_0125

000_0130

I pulled out the BigShot for this card, as I do on many… once you start, it’s hard to stop.  Kind of like a good bowl of ice cream!  After stamping the greeting from the “Bring on the Cake” stamp set … I cut them out using the Circle Framelit dies.  And since I was already using it, I thought I would try out my new “Envelope Liners” Framelit Die.  Now that’s what I call coordinating your card and envelope!

I also embossed the mat to my greeting with the “Petals of Plenty” folder … I was hoping to create enough dimension to look like the cute little blossoms on the designer paper.  And of course, I had to add a bit of bling!

000_0121

To jazz up the inside, I added a strip of the designer paper and used the Happy Birthday – also from the “Bring on the Cake” stamp set.  It just finishes off the card so nicely.

Here is a list of today’s ingredients.  Click on the item number if you wish to purchase anything you saw today.

128490

Bring on the Cake Stamp Set – Wood / $38.95

121958

Bring on the Cake Stamp Set – Clear / $27.95

130145

Birthday Basics Designer Series Paper / $10.95
130911 Circles Collection Framelits / $26.95
132172  Envelope Liners Framelit / $26.95
116824  Petals –a-Plenty Emboss Folder / $7.95

Hope you enjoyed today’s card.

Have a great week,

blog closing-small

Walk on the Wild Side …

Hello Stampin’ Friends,

Yahoo… It’s Thursday and the weekend is fast approaching!  I’m looking forward to getting more stamping done.

Much to do this weekend … my clubs start in September and I have to design their projects, and get their schedules out this weekend.  I will also be sending the announcement for our annual Fall Retreat this weekend!  It’s so much fun 🙂

Today I want to take a you back to nature with the “Walk on the Wild Side” stamp set.  I thought it was time to share another “Man Card”.  This is a nice stamp set, and I will be sure to share more projects using this set with you.

000_0109

I used the “Sweater Weather” Designer Series paper for our background.  I love using the plaids for masculine cards, but I think this one would work great on a boys birthday card as well.

Although one of the colors listed on this paper is “Chocolate Chip” … I chose to use the “Early Espresso” as my base color.  I thought it made all the colors on the paper “pop” more.

132184L

To give it the real “manly” look, I added a banner using the Burlap Ribbon … oh my gosh, I love this stuff!  You can use it for your cards, scrapbook pages and to tie bows on everything fall!

000_0111

Stampin’ Tips for today’s card:

1. Remember when coloring direct to rubber, don’t use the tip of the marker but the sides … it colors your image faster, and you won’t destroy your tips.

2. The Burlap Ribbon was adhered with the Mini Glue Dots… they work great.  You could also use the “sticky strip” but the glue dots were so easy to use.

Here is a list of supplies used for today’s card…

130354

Walk on the Wild Side Stamp Set – Wood / $19.95

130357

Walk on the Wild Side Stamp Set – Clear / $14.95

132184

Sweater Weather Designer Series Paper / $10.95
132140 Burlap Ribbon / $7.95
119855  Large Oval Punch / $15.95
119856  Scallop Oval Punch / $16.95

Have a wonderful day and “Thanks Much” for stopping by….

but before you go, go back to the top of my page and click on the “P” – my Pinterest Page and follow me on Pinterest too.  Thank you!

blog closing-small

Sweet Music …

Hello Stampin’ Friends,

Today is a quick and simple post for a quick and simple card.  Inspired by the group of ladies who participated in my “Timeless Talk” class, I’m sharing another card using the paper design they suggested.

000_0105

They thought that this pattern from the Modern Medley Designer Series paper would work great with this stamp set … so here it is.  I think they are right, don’t you?

With a little help from my BigShot and the Circle Collection Frame-lits, I highlighted the phonograph.  This sweet but simple card would work nicely for a birthday or just to “send a note” to your friend.

I added a few banners from scrap pieces of the Modern Medley paper and tied it all together with the beautiful “Crochet Trim”.  Everything you need to make this card can be found in our current catalog.

Here is the list of ingredients to make the card:  You may click on the item numbers and it will take you to the catalog page.

126605

Timeless Talk Stamp Set – Wood / $22.95

126607

Timeless Talk Stamp Set – Clear / $16.95

126926

Modern Medley Designer Series Paper / $10.95
118481 Crochet Trim / $6.95
113439  BigShot Die Cutting Machine / $99.95
130911  Circles Collection Frame-lits / $26.95

Have a great day and I’ll see you tomorrow!

blog closing-small