Cool Technique with Embossing Folders!!

Hello Stampin’ Friends ~

I am excited that the weekend is here, and today I kick off a new season of my Stampin’ Technique Clubs. Our September technique will focus on different ways you can use your embossing folders… and I chose the new “Woodland” folder.

Today I will show you something fun to do with your folders (they’ll make 2 more!) I can’t show them to you yet because it will spoil their fun. I began my card by embossing the trees using Soft Sky cardstock

000_2528

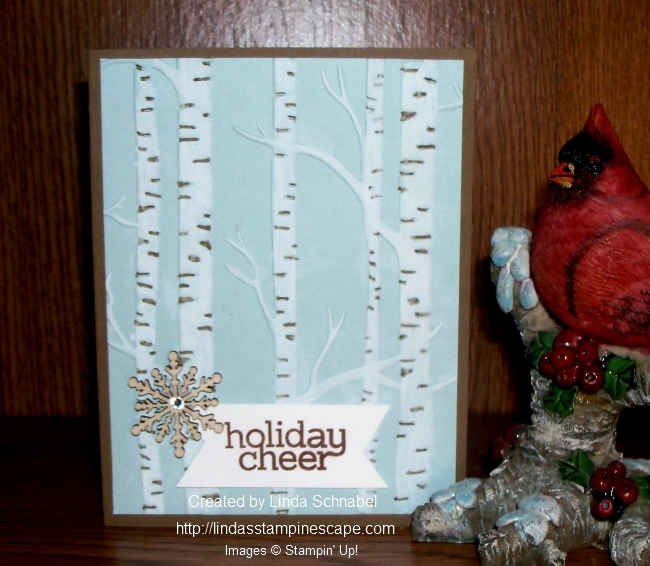
Using the “White Stampin’ Chalk Marker” – I colored the trees and branches to highlight them even more. Wow … it looks so cool and it’s so easy to do!!

I colored in the indented areas of the tree with my Soft Suede marker to coordinate with the base of my card. Don’t you think it makes the tree more realistic looking? I love White Birch … I think it’s my favorite tree!

000_2530

I added a simple greeting (I think this one got past my purging of discontinued sets) and then added one of the new “Snowflake Elements” to add texture and continue the “woodland” feel of the card.

I didn’t want a lot of glimmer on this card, so I added just a touch with a rhinestone in the center of the wooden snowflake. You could easily add glitter to the branches to create a shimmery snow effect!

000_2525

What a simple way to make an impact (the WOW effect) on your card… just by coloring the embossed area.  Hope you enjoyed today’s technique tip!

Thank you for taking time to visit with me today.

I hope you have a wonderful weekend ~

blog-closing-small

Remembering the anniversary of 9-11-01. We will never forget.

TODAY’S STAMPIN’ SUPPLY LIST …


Halloween Scares & Savings …

Hello Stampin’ Friends,

On this beautiful Sunday I am going to share with you some Halloween card samples … and savings!  Now days we all have a tighter budget, so why not shop our Clearance Rack!

Today I will focus on the Witches Brew Designer Series Paper It’s priced at only $4.39 and one of my Halloween favorites… Now that’s something to scream about!

I love the Clearance rack, because it may be discontinued from the catalog, but it’s still available and discounted, some up to 80%!!

134925LOn my first card I teamed up the Witches Brew DSP with the Bootiful Occasions stamp set ….

000_0261


The second of my card samples really showcases the Witches Brew DSP … to view the original post CLICK HERE.

100_2188


Here is the cute little bat I created with the Witches Brew DSP in the background …

000_0240

Last by not least is the card that I teamed my favorite Halloween designer paper “Witches Brew” with one of my favorite techniques … CLICK HERE to view the original post.

000_0245

Oh well … one more!  Here is the cute sign I put up at the candy store.  I thought it was quite appropriate and downright cute!!  I’ll be using that sign again very soon at the Candyman on Main.

000_0214

OK … ONE MORE!!  This card is one sweet treat!

000_0095

I hope you enjoyed today’s collection of the Witches Brew Designer Series Paper card samples.  Don’t ever “Be Afraid” to check out all the frightfully awesome products in our CLEARANCE RACK.

Have a beautiful day ~

blog closing-small

Although the Witches Brew states $10.95 … the price at checkout will be $4.39


Fun, Friends & Free Stuff …

Hello Stampin’ Friends,

Today I have a great card to share with you that features the “Good Greetings” stamp set!  Great news…  From now until Oct. 31,  YOU will be able to earn the exclusive Good Greetings Stamp Set when your stampin’ party or customer order reaches $300!  That’s in addition to the other exiting benefits!

That’s right, a FREE stamp set in addition to all the other exciting and generous benefits you get when you host a party from through Oct. 31! This versatile stamp set covers holidays from Halloween to Valentines and more.

6a00d8354941d869e201b7c6d472dd970b-500wi

Let’s get ready to party!  The only way to earn this exclusive stamp set is to host a party or place a qualifying order; the Good Greetings Stamp Set will not be offered for purchase and only lasts until October 31!

I am teaming up the “Fall Fest” stamp set from the Holiday catalog with the “Good Greetings” stamp set.  I shared a Fall Fest card with you as a sneak peek, but the catalog went live yesterday.  Click HERE to see that card share.

I used the “masking” technique to create the moon and cloud effect, using Daffodil Delight, Elegant Eggplant and Night of Navy.

000_1418

 The pumpkins were stamped with the Pumpkin Pie and topped off with the Old Olive marker.  The faces were done in StazOn.  I also sponged Pumpkin Pie on the pumpkins so the lines weren’t so obviously white.

My greeting was highlighted with the use of the Word Bubble Framelit dies… It’s a great stamp set!  I’d love to help you earn it 🙂

Stop back tomorrow, I will share a card featuring the “Good Greetings” stamp set and “Festival of Tree’s” stamp set from the Holiday catalog .

Thanks so much for visiting me…

Have an awesome day ~

blog-closing-small

Here is a list of ingredients used to create the card (except the Hostess set: Good Greetings/ Listed above)  Click on any of the items for more details or begin shopping.


“Hello” to another Sneak Peak!

Hello Stampin’ Friends,

Today I am sharing with you Eileen’s swap card from our Star’s group meeting on Friday.  It’s a sneak peek as this set is not available until Thursday!

Eileen used the “Four Feathers” Bundle (W-137629 / C – 137630) you can purchase the stamp set or framelits separately but a 15% savings sounds good to me!

Love the colors on this card… reminds me of a warm fall day!  Eileen used Crushed Curry and Cajun Craze.  She used the “Arrows” textured folder to create the background.

Eileen Swap

I love how Eileen used the Scalloped Tag Topper punch with the “Four Feathers” bundle to create the focal point of the card.  She topped off the tag with the Gold Metallic Bakers Twine.

Also highlighted on the tag is the new “Color me Autumn” Washi Tape … coming in the Holiday catalog.

Eileen used the “Gorgeous Grunge” stamp set to add a bit more color to the Crushed Curry feather … I think it turned out spectacular!

Eileen Swap-close up

It’s amazing that adding that little bit of color makes the feather really “pop”.

I appreciate the visit today.  I’m sure you’ve enjoyed Eileen’s card as much as I have.

Here is a quick reminder of our current promotions … just click on anyone of them to get more details.  Thank you.

                       6a00e54f95df92883401b7c6d00655970b-500wi                    6a00e554f4a3a4883401a511ee0d9d970c-800wi

Header_PP50percent_July1614

Hope you have a fabulous week ~

blog-closing-small


Lovin’ what I do …

Hello Stampin’ Friends,

Man … I love being a Stampin’ Up! demonstrator!   If you read the blog yesterday you know I just met with my downline  (people I have recruited into my stampin’ family) and that I will be sharing those swaps with you.

Yesterday I spent the day finishing and packing up the Make & Takes for the Hostess / Customer Appreciation Party … Oh, I can’t wait for my stampers to arrive!  I’m so excited … we are going to have a blast!  I’ll post 🙂  It is amazing the lives you touch when you are in this business.

So today … I’m going to share the Make & Take I presented to the Star’s group…  A Masking Technique and a some stampin’ tips!

With summer coming to an end and fall right around the corner I wanted to share not only a new stamp set, but a something to really highlight it.

000_1386

Lets begin with the masking, I used two post it notes together (if you don’t have the longer ones) … make sure the “sticky” edges are to the inside where you will be sponging.

I began with Daffodil Delight and started 1/3 of the way down the area to be sponged, this way the darker area is where you begin and you work your way up so the top is lighter.  You can always add more color but you can’t take it back off.

The Pumpkin Pie – start 2/3 of the way down so as you move up, it’s lighter and will blend beautifully with the Daffodil.  The Blackberry bliss will start at the bottom and again, work your way up.  STAMPIN’ TIP: I do this technique of sponging in a circular motion because that helps blend it nicely too.

The stamp set is the “HOLIDAY HOME” (135095) from the Holiday Catalog.  It is a photopolymer set so yo won’t have to worry about those smaller images falling off the blocks … they stick so nicely and being clear, it’s a breeze to align!

000_1387

We stamped the tallest of the 3 houses in this set (there is also fun stuff for Christmas… very versatile) then we colored the house in to create a silhouette!  Don’t you just love it!  We left the windows alone so the color from our sponging would come through.

I just have to let you know that this stamp set has coordinating framelits (135857) and you can purchase it as a bundle (137631) too!  Catalog orders can begin AUG.28th in !!  Please let me know if you did not get your catalog.

000_1386

Thanks so much for the visit … be sure to check back daily as I will be posting more of the Star’s gathering swaps and pics and samples from my Appreciation Party!

Here is a quick reminder of our current promotions … just click on anyone of them to get more details.  Thank you.

                       6a00e54f95df92883401b7c6d00655970b-500wi                    6a00e554f4a3a4883401a511ee0d9d970c-800wi

Header_PP50percent_July1614

Have a super Sunday~

blog-closing-small


Fabulous Friday … Glimmer Brads and so much more!

Hello my Stampin’ Friends!

How are you today!  I am simply fabulous … and totally excited to share this card and some fun stampin’ tips with you!  I know that I have been doing my “Fast -n-Furious” on Friday’s but the ideas for this card, just kept blooming ….

My idea was to show you a simple and pretty card showcasing the “Glimmer Brads” that are currently featured in our “Weekly Deals”.   Punch 3 flowers with the Petite flower punch and put a coordinating color brad into it.  That was my original idea.

Then I thought … oooh, wouldn’t it be pretty if I put some glimmer paper behind it?  Aaahh … then I thought, why don’t I dye the silver glimmer paper to match the cardstock and glimmer brads!  Hmmm … good idea!

Oh, but it didn’t stop there, I needed a ribbon!  I have 3 bolts of the silver ribbon from the “Celebrate the Everyday” catalog … so I’ll use that!  Hmmm… wonder if you can dye that too?  Answer … YES!  Yes, you can!

000_0975

So … what do you think?  Glitter lovers rejoice … all the shine without all the glitter mess.  I will take you step by step through the card and share how I created it.

You will need the Silver Glimmer paper and Silver Ribbon, along with the bottles of ink refills to coordinate with your cardstock, Sponge daubers and the Glimmer Brads.  If you do not want inky fingers … you may want so gloves too! LOL  (I’ll post ingredients at the end, as always)

To dye the Silver Glimmer paper, I dampened my sponge dauber with water … it really helps move the ink around.  It should be damp … not wet.  Put a few small drops of the ink onto the glimmer paper and begin to “daub” your paper.  You’ll be making the motion of a sewing machine … up and down with the dauber (You cannot slide the dauber across the glimmer paper) until the ink is spread evenly onto the paper.   You can always add more ink … either to your paper or to the dauber itself.

000_0977

Now that you have ink on your daubers, I gently brushed them on the ends of my punched flowers to create a bit more dimension.  I then used my bone folder to slightly curl up the edges of the flower.  I poked a hole in the center of my flower with my Paper Piercing tool and then inserted the coordinating glimmer brad.

To dye the silver ribbon … simply place your dauber over the ribbon, and pull the ribbon out from under the dauber.  The ink on the dauber will dye your ribbon.  Turn the ribbon over and repeat the process.  It looks best when dyed on both sides.

000_0975

Make sure you give the paper and the ribbon time to dry, otherwise you will get ink marks on your card base.  If you have the new Stampin’ Up! heat gun … you can use the low setting to help dry it.

I hope you are as excited as I am to play with these fabulous techniques.   I just can’t believe that I never thought of dying that silver ribbon before!!  You know me, I love to dye my ribbons.

Watch for more projects from me using these dying techniques!  Don’t be afraid to send me “your” creations (you can e-mail me a photo at:  lindaluvs2stamp@aol.com

Thank you so much for sharing your day with me!

Have a fabulous Friday!!

blog-closing-small

JUST A NOTE: You will get the sale price when you purchase the Glimmer brads, even though it does not show here.  The “Express Yourself” stamp set that I used for my card share today is a “HOSTESS” set which you can get FREE with an order of $150 or more.

Please let me know if you have any questions:  lindaluvs2stamp@aol.com


Technique Tuesday: Wooden Elements

Hello Stampin’ Friends,

And H-E-L-L-O-O-O April!  I think spring is finally here 🙂

Yesterday I showed you the March Paper Pumpkin and how much fun I had creating different looks with the supplies they sent.  What I didn’t know was that Paper Pumpkin actually turned one yesterday!  And in true Stampin’ Up! fashion, they threw a party …

Paper Pumpkin Turns One!

Even more amazing is the incredible year Paper Pumpkin has had.

  • We’ve sent out 229,000 Paper Pumpkin projects (say that three times fast!) to our friends.
  • We’ve helped over 45,000 women bring out their creative sides—(and we know that they were just waiting to break out)!
  • We even had 13,000 take advantage of our Free Marker offer—ended yesterday!

Yep. Not bad for something that is only ONE-year old!

To celebrate, we held a birthday party at our Riverton Campus, complete with yummy cake, festive balloons, and even party hats.

I told you it was a fun company to be associated with!  Well hang in there because my 15th anniversary is next year, and in Stampin’ Up! fashion … I will be hosting parties, specials and more all year long.  Don’t worry, you will be invited to them all!

I also told you yesterday that I would show you some fabulous products that we have in our “Celebrate the Everyday” catalog that you could use to recreate the techniques I showed you.  We will be using the “Essentials Wooden Elements” and the “Watercolor Wonder Designer Note Cards”.

000_0519

On my “Life Doesn’t Have to Be Perfect” card … I used the “Direct to” technique in which we applied the Ink Pad directly to our wood element, the heart.  You can see I dragged the ink pad across the heart for a streaked look, as compared to yesterdays card when I fully inked up the wood greeting.

I teamed this card up with the Perfect Pennant Bundle, which includes the Perfect Pennant stamp set and the Banners Framelit Dies.

000_0518

Yesterday’s card I stamped a pattern onto the wood, today I actually stamped a greeting onto the wood element.  I also sponged the edges.

As you can see, the Wooden Elements are very versatile and you can use many techniques on these fun embellishments!

These two cards were also very quick and easy to create, with this combination of note cards, elements and the bundle … the possibilities are endless!

Here are the items that I used to create these cards…

I hope you were inspired to try out some of these fabulous products and / or the techniques I used on the Wooden Elements.

I thank you for dropping by today!

Have yourself a terrific Tuesday ~

blog-closing-small

Technique Tuesday … Kissing Technique & Video

Hello Stampers ~

Today is my second post for Technique Tuesday.  I will be sharing a Stampin’ Up! video tutorial along with my card share… yes, I will have a card for you too.  I thought it would be a great way to for you to see how the technique is actually done… almost like being a member of my Technique Club.

I’m going to start with a Stampin’ Up! video that introduces you to the “Kissing Technique”.  Enjoy!

Kissing

with
Emily Montoya
Have you ever heard of the kissing technique?We’re not talking about the technique with your sweetie-we’re talking about the one with stamps! Check out this sample featured in this video, see how the butterflies have an extra texture? It’s the beautiful product of two stamps getting together!

Wasn’t that fun!  How did you like the finished cards … so cute.  Here is the card that I created using the “Kissing” Technique:

Now for my card …

I thought it would be fun to add a little “kiss” to the frosting on the cupcakes from the “Build a Cupcake” stamp set and kissed it to the “Hello Doily” stamp.  I inked up the the frosting of the cupcake and kissed it to the Doily to create the neat pattern you see.

000_0905

Of course I then had to pull out the coordinating punch “Cupcake Builder”. Ahhh, so much easier than cutting them out.  My color pallet for today comes from the Retro Fresh Designer Series Paper: Very Vanilla, So Saffron, Coastal Cabana and Baked Brown Sugar … with a touch of Strawberry Slush added in!

I added a touch of the Retro Fresh DSP and topped it off with the Coastal Cabana Ruffled Stretch Ribbon.  Speaking of “topping” things off… I colored 3 of the larger pearls with a red Sharpie, and the put them on my cupcakes.

Finally, my greeting comes from the Perfectly Penned stamp set.  I don’t know what I will do when they retire that set… I use it all the time!

000_0907

Hope you take the time out of your busy day for a little kissing 🙂

Thanks for checking out my blog today!  Check out below for a list of today’s ingredients.

Wishin’ you a terrific Tuesday!

blog-closing-small

Technique Tuesday & Weekly Deals

Hello Stampin’ Friends,

So … How did you like the “Glitter Paper” technique yesterday?  So simple, and so pretty!  Well that brings me to my exciting announcement…  I am featuring a “technique” each Tuesday!  Yep, Technique Tuesday and it begins today with the wonderful “Chalkboard” technique!

I also have the weekly deals for you … and are they great!  I have them all, so look forward to seeing some projects made with a few of these items!

Today’s card share is simple to do, and looks so nostalgic with the Chalkboard Technique.  I have chosen “Another Great Year” stamp set as my featured set today.

BIRTHDAY

I have seen several ways to do this technique … here is my take on it.  Simply begin with a piece of Basic Black cardstock and wipe your embossing buddy across it.  This will help keep the stray embossing powder off your card and gives you the appearance as if you just wiped off a chalk board!  At least you don’t have to clean the erasers!  Ooops … showing my age again!

Next, ink up your desired image with the white CRAFT ink.  I like to flip my stamps so the rubber is up when inking … it gives you much more control and you can see how exactly where you are placing the ink.

000_0853

Stamp image onto black cardstock…. Sprinkle the White embossing powder over your inked area, tap off excess, and emboss with heat gun.

Now you can add some designs, or color in parts of the image with our fabulous “Stampin’ Chalk Marker”.  It was meant for this technique and is fun and easy to use.  Here I highlighted part of the banner and added a simple border around the card.

000_0856

You can use this technique alone as your focal point as I did today, or frame it with one of our beautiful designer series papers – that would really make it pop!  My technique clubs made Christmas cards using this technique, so feel free to experiment … and have fun.

The Chalkboard technique is really hot right now … just take a look around, you’ll be surprised  at how many different places you will find it.

Thanks for visiting me today ~

blog-closing-small

Here is a list of supplies used for today’s card …

 ITEM

 DESCRIPTION

133038

 Another Great Year Stamp Set – WOOD

133041

 Another Great Year Stamp Set – CLEAR

103083

 Embossing Buddy

101731

 Whisper White Craft Ink

132133

 Stampin’ Chalk Marker

109132

 White Embossing Powder

129053

 Heat (Gun) Tool

119246

 Rhinestones

Weekly Deals

We hope you enjoy this week’s Weekly Deals!

Dress Form Pop’ N Cuts Item # 130100
Regular Price: $21.95
Discounted Price: $16.46
Circles #2 Originals Die Item # 114526
Regular Price: $15.95
Discounted Price: $11.96
3 Inch Circle Originals Die Item # 122125
Regular Price: $17.95
Discounted Price: $13.46
Chevron Textured Impressions Embossing Folder Item # 127749
Regular Price: $7.95
Discounted Price: $5.96
Set Designer Frames Textured Impressions Embossing Folder Die Item # 123130
Regular Price: $8.95
Discounted Price: $6.71
Peekaboo Frames Bigz L Die Item # 124587
Regular Price: $32.95
Discounted Price: $24.71
Argyle Textured Impressions Embossing Folder Item # 127750
Regular Price: $7.95
Discounted Price: $5.96
Ahoy, Matey Ensemble – Digital Download Item # 130078
Regular Price: $14.95
Discounted Price: $8.97

Thinkin’ Spring …

Hello Stampin’ Friends,

Whew … didn’t think it would take me this long to get back to my computer today!  Sorry for the late post, too many chores last night.  Once I sat down … I was out for the count and woke up around 3:30 this morning!  We’ve all had those days, and now I’m back down in my stampin’ studio!

Today’s card is to inspire you to Think Spring!  I was happy to hear that our forecast of 5 to 8″ of snow has now turned into only 1 t0 3 inches!  I can deal with that.

000_0837

I chose the “Watercolor Wonder” designer series paper.  The design is the Daffodil Delight and Tangerine Tango watercolor sheet.  Those colors are so warming, and that is just what we need right now!

The designer paper is cut to 5-1/4″ x 4″ … that will leave a 1/4″ border when you adhere it to the Whisper White card.

The front of the card is also Whisper White and cut to 5″ x 3-3/4″ … then emboss it using one of your favorite embossing folders and the Bigshot.  My apologies for grabbing the one that was from the Holiday catalog … let’s hope they put it back in the new 2014-15 Catalog!  It’s not on the Clearance Rack so let’s keep our fingers crossed!

000_0839

I used the cute little “Petite Petals” punch found on page 33 of the Occasions catalog.  Center your punch in the middle of your card front that you just embossed and punch.  Then punch out additional flowers on each side of the center flower.

Now … for the ribbon.  You may remember this technique from my February 22nd post (Faux Dipping) where I colored it with marks and spritzed it.  If not, your in luck because this time I took pictures to help explain how I did it.

000_0832

I began with the 3/8″ Whisper White Taffeta Ribbon and colored it with my Daffodil Delight and Tangerine Tango Markers.  Just slide your “brush end” (it also has a writing end) across the ribbon, don’t be afraid to go darker.

Once your finished inking up your ribbon, place it on some paper towel.  The paper towel will absorb some of the ink, that is why it’s OK to go darker when coloring it.  Fill your Stampin’ Spritzer with water and spritz over your ribbon… the more water you spritz on, the lighter your ribbon will become.  Set aside to dry.

000_0834

Tip:  You can the new Heat Tool to dry your ribbon because it actually has a low setting for drying!

I love this technique and it looks so nice with the Watercolor Wonder Designer Series Paper.  Give it a try… it really is quite easy and can add a stunning look to your card.

Thanks for stopping by today.

blog-closing-small

Here is the list of ingredients I used today …

132994

 Watercolor Wonder Designer Series Paper  / $10.95

133322

 Petite Petals Punch / $12.95

109070

 Taffeta Ribbon – Whisper White / $6.95

126185

 Stampin’ Spritzer / $2.95 – Set of 2

119247

 Pearls Basic Jewels / $4.95

 You may view or purchase any of these items just by clicking on the item number.  It will take you directly to my stampin’ store.  Shop 24/7 – 365

Thank you.

Window to the World …

Hello Stampin’ Friends,

How are you this fine Friday?  It’s warming up a bit and the sun is shining today, and you are ready this blog … so it’s a good day!  I’m glad you are here.

Today I want to share a card that I had made in one of my technique classes last year.  I don’t usually post items that were done in my clubs or classes … but, I’m having technical difficulties with my camera.  And – this is a really cool card!

There are actually 2 techniques used on this card, reverse spotlighting and stamping on window sheets ….

000_1244

Don’t you just love it!  We began by creating a “mask” with the 2-1/2″ circle punch.  Once we had our mask, I chose to use the colors of a sunrise, something soft yet would pull your eye directly into the card.  Before pulling off the mask, we stamped the birds with “Basic Grey”.  I wanted you to see the image, but not over power the sunrise.

Next, we positioned the “Window Sheet” over the card and stamped the tree image onto it using Black StazOn.  It really pops … doesn’t it!  Using the window sheet gives the card a totally unique dimension.

The card is finished off with the beautiful “Daffodil Delight” Seam binding.  I love how easy the seam binding is to use, and the yellow completes the card.

Here is a list of supplies used for today’s card …

 ITEM

 PRICE

 DESCRIPTION

 132073

$24.95

 Serene Silhouettes – WOOD

 127324

$17.95

 Serene Silhouettes – CLEAR

 114323

$4.95

 Window Sheets

 120906

$16.95

 2-1/2” Circle Punch

 101406

$7.95

 StazOn Ink Pad

 125583

$6.95

 Daffodil Delight Seam Binding

Clicking on the item number will link you to my on-line store.

Thanks so much for stopping by …

Have an awesome day.

blog closing-small

TWO 4 TUESDAY: Scrapbook page & Fun Technique!

Hello Stampin’ Friends,

I missed you yesterday.  I was off catching up with friends, preparing for my upcoming Holiday Retreat, and just life in general.

So, today I will share 2 projects!  First is a Fall Scrapbook page, and the second is a fun technique that I shared with my clubs last year.

My fall page is all about the beautiful colors of fall.

100_5941

The leaves were created with the “Autumn Accents” Bigz die (127812) found on page 192 of our annual catalog.  This die makes collecting leaves quick and easy.  You will also see the “textures” on some of the leaves … a little roll through the BigShot with the “Perfect Polka Dots” embossing folder and the Core’dinations (129956 / pg.157) sandable cardstock – Neutrals collection.  Yep, a little sanding highlights the texture by exposing the core color which is lighter than the outer layers.  Simple to make … just add your pictures and some journaling and you have another page done!

My second project is a cute fall card using the “Faux Tile” Technique:

100_5947

I did create this card last year.  If you have not noticed, we have discontinued the glossy cardstock – which I used here.  If you don’t have any left in your stash … go to any office supply store and purchase the glossy photo cardstock, it works the same.

You will need the “Simply Score” Scoring Tool (122334 / pg.178) for this technique.  By using the  glossy cardstock, you eliminate a couple of steps from the original “Faux Tile” technique.  Cut your cardstock to the desired size for your card.  Place onto “Simply Score” tool and score every 1/2 inch.  Turn carstock 45 degrees (on it’s side) and score every 1/2″ creating a tile pattern.  Now, just simply stamp your images onto the card.  I used the “Gently Falling” (pg.65) stamp set.  My final step was to brayer over the entire piece … careful not to push too hard, you want your “grout” lines to show.

If you don’t have access to the glossy … you can use our Whisper White, score, and stamp, the next step would be to lightly tap your VersaMark pad onto the tiled area (Not too hard … you don’t want VersaMark in the creases).  Then emboss with clear embossing powder.  This will give you a that real tile / grout look!  Just takes a bit longer than the “simple version” described above, but stands out a bit more.

I’d love to hear what you think about this technique.

Thanks for stopping by … I will be back tomorrow with another fun project.

blog closing-small

Birthday Fishes (Wishes)…

Hello Stampin’ Friends,

Today I would like to share with you a card that we did at a past stamp camp.  Masculine cards are always a hit and much needed.

The stamp set I used is “By the Tide” (Wood – 131910 / Clear – 129120).  When I saw this stamp set in the Spring Catalog I knew I had to have it.   Imagine the possibilities … I think this stamp set is so versatile.

129120L

I will admit, it was the fish that attracted me to the “By the Tide” stamp set, as I used to fish with my grandpa, my dad, and even with my mom.  Fishing was always something I did as a kid (unfortunately, not much anymore).

You will be using the “power of the VersaMark” (102283) on this card… watermarks and heat embossing are two techniques used to create the depth of underwater life!

000_1375

We begin with our heat embossing … I inked up the first (what I call sea weed for this card) with VersaMark™ and the fish in Chocolate Chip – then use clear emboss powder and heat.

You will also ink the birthday greeting (From the stamp set “Blue Ribbon” (Wood – 131964 / Clear – 125981)) in Chocolate Chip and emboss.  The new formula ink pads work great for embossing!

Now that your embossing is done, you will stamp (with VersaMark) the remaining sea weed… this will create the illusion of the sea weed being “behind” the fish!  We also stamped it on the base of the card, just for fun!

Once you have completed your stamping… you can color in your fish and sponge the edges for just a bit more depth and color.

So…  I mentioned how versatile this stamp set is, and I think you can create any style of card with this set.  From manly to whimsical (I would use the seahorse for that) to anything in between.  Here is another sample …

000_1377

I love the clean and simple look of this card, and so totally different from the fish card.  The greeting comes from the stamp set “Sweet Essentials” (Wood – 132085 / Clear – 126457) found on page 41 of the catalog.

I believe both of these cards were done at the same stamp camp… to show the versatility of this stamp set.

Speaking of stamp camps … I have my “Christmas in July … Oops August” Stamp Camp on Monday the 26th.  There is still time to RSVP.  You will be making 10 fabulous Christmas Cards (with envelopes) that will showcase our Holiday Mini Catalog.  You won’t want to miss this … it’s a great way to get a “hands-on ” approach to your Christmas cards!

Remember… if you see a word or phrase highlighted, it will take you to that link when you click on it.  For example … the Christmas in July will take you to my calendar of events.

Thank you for stopping by today!  And a “Thank You” to Ann-Marie for her comment yesterday and many other posts … I will be sending you a package of our beautiful “Rhinestones” for being an active participant to my blog!

I have all sorts of surprises coming, both here on by blog and for my club and class members!

Have an awesome day!!

blog closing-small

Simply Scored Spring Flowers …

Hello Stampers ~

I hope you’re enjoying the beautiful weather we have finally received!  I see many facebook posts about getting your gardens in, so I thought I would share this pretty bouquet of flowers with you!

100_5322

I took this picture at the 2011 Stampin’ Up! National Convention who’s theme that year was “GROW”… so what better way to convey the “grow” message than with flowers!  They are so pretty and they spread cheer to anyone receiving them, and my guess, to the givers too.

They are quite simple to make… just get out your Simply Score Tool (122334) and your favorite Designer Series Papers or cardstock!

Accordion-folded Flower

Directions:

1) Cut card stock or Designer Series paper to 12″ x 3/4″.

2) Score strip every 1/4″ the entire length of the card stock and accordion fold the score lines.

SAB09_techniquee_1

3) Adhere ends of card stock together (Sticky Strip works best).

SAB09_techniquee_2

4) Holding the card stock with two hands, twist one edge of the strip into the center as shown to create a flower shape.

SAB09_techniquee_3

5) To hold the flower together, I use a hot glue gun and my Silicon Craft Sheet (127853) to hold shape in place.  Just add a dot of hot glue directly onto your Silicon sheet and press the center of your flower into it.  It’s soo cool … it just lifts right off and holds your flower firm.

6) Adhere a punched circle to the flower center on one or both sides.

Tip:Experiment with different sizes and score intervals to create the desired shape of your flower.

blog insert - shop now

Have fun … and feel free to send me photos of your creations!  I would love to see them.

blog closing-small

Happiest Birthday …

Hello Stampin’ Friends ~


I have birthday wishes for you today!  We are always looking for a pretty card to send to our BFF, so grab your BigShot and lets get stamping!


You will need the Apothecary Art  (128415 – W / 125527 – C) and the Loving Thoughts (128436 – W / 125845- C) stamp sets,  the Labels Collection Framelits (125598), the Adorning Accents Emboss Folder (125601) and Edgelits (125595).


This simple layout can be used with any Designer Series Paper and coordinating cardstocks.  You could use the NEW Gingham Garden with Pear Pizzazz or Afternoon Picnic with Coastal Cabana!


000_1004

For the embellishments I used the flower from the Itty Bitty Shapes Punch Pack (118309) and 3/8″ Whisper White Taffeta Ribbon.

blog closing-small