Hobby Haven: Thinking of You Card

Hello Stampin’ Friends ~

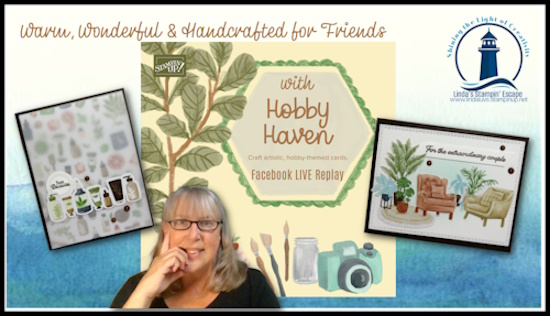
Yesterday I shared a card from the NEW Hobby Haven Designer Series Paper— today I bring you another layout and paper pattern. This delightful collection brings your favorite pastimes to life—whether you love baking, sewing, reading, or simply enjoying the little things. Each sheet is filled with charming illustrations that practically beg to be turned into heartfelt cards, thoughtful tags, and adorable gift packaging. With two sheets of precut pieces (yay for quick crafting!) and tons of fussy-cutting possibilities, you can layer, pop up, and personalize to your heart’s content.

My color palette? An inviting mix of warm and cozy hues like Coastal Cabana and Early Espresso. It’s sweet, it’s whimsical, and and with so many different hobbies featured – you can create a special card like I have here. Perfect for the seamstress in the family or your beautiful friend who shares her creativity one stitch at a time!

I used a 4″ x 5 1/4″ piece of the Hobby Haven designer paper as my backdrop … with the sewing of course. The vellum is used to tone down the designer paper but still let it shine through. I then fussy cut the sewing machine and the pin cushion. I die cut a circle (you can use any you have handy) mine comes from the Snowflake Kisses bundle.. this will be my focal point.

From the same bundle, I die cut the rectangle to stamp my greeting on because it looked like it was “stitched” around the edges. The “Thinking of You” comes from the Simply Said stamp set and conveys my intent when sending this special card. I layered this slightly of center from my focal point but added the pin cushion in to make the perfect grouping.

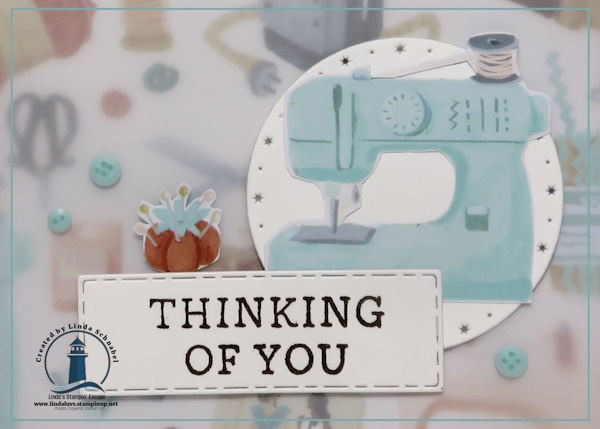
To complete my card, I added the cute “Dear Dots” embellishments and if you look closely, you’ll see that I turned them into little buttons with the help of my Stampin’ Blends! How cute is that!!

Thank you for stopping by and checking out my creation!

The Beauty of Christmas in Red & Gold

Good Morning Stampin’ Friends ~

There’s something so classic and elegant about red and gold at the holidays — and today I’m sharing a card that brings that traditional beauty to life. This card highlights the Traditional Labels Bundle paired with the gorgeous red-and-gold poinsettia pattern from the Traditions of Christmas Designer Series Paper. I’ve included every measurement and step-by-step instruction so you can recreate it exactly (or use it as a jumping off point for your own variations). Let’s make something beautiful!

Measurements:

  • Red Cardstock: 8 ½” x 5 ½” – Score at 4 ¼” and 3 ½” x 2 ½” – greeting
  • Basic White cardstock:  4” x 5 ¼” – inside
  • Gold Foil:  4” x 5 ¼”
  • Designer Paper: 3 ¾” x 5”
  • Gold Mesh Ribbon: Approximately 24” – to create a fluffy bow!

Instructions:

  • Start with Real Red cardstock measuring 8 ½” x 5 ½” to make your card base.  Score at 4 ¼” and burnish.
  • Attach Designer paper onto Gold Foil Specialty Paper / cardfront
  • Wrap approximately 14” around card front and tie a knot on the right-hand side – but not to edge
  • Stamp Greeting onto small Real Red with VersaMark
  • Emboss greeting with Gold embossing powder
  • Die cut greeting with shaped die from Traditional labels bundle
  • Adhere die cut greeting over ribbon & onto cardfront with dimensionals.
  • Weave remaining ribbon back and forth over knot and secure it with loose ends of the tied ribbon.  Tie with knot and trim ends.
  • Using liquid glue, embellish with sequins as desired.
  • Secure white cardstock to inside of card. 

This card is a lovely way to showcase the Traditions of Christmas poinsettia paper — the red and gold are pure holiday glamour, and the Traditional Labels Bundle makes sentiment placement quick and beautiful. I hope you enjoy making this as much as I did! If you try it, please share a photo — I’d love to see your color choices and embellishment ideas. ❤️🎄

Have a warm and beautiful Sunday … enjoy your day!

Big Hugs & Peaceful Gardens Suite

Hello Stampin’ Friends ~

Today we’re turning our attention to one of the most serene and versatile collections in the Mini Catalog—the Peaceful Garden Suite.

If you love crafting with beauty, calm, and a touch of elegance, this suite is going to tug at your creative heartstrings. Between its soothing color palette, organic floral imagery, and the refreshing mix of textures, Peaceful Garden brings a breath of fresh air to your projects—whether you’re creating for the holidays or well into the new year.

My card begins with the classic A2 size in Secret Sea cardstock—one of those colors that just wraps your project in a soft, peaceful glow.

To build the foundation, I reached for one of the gorgeous floral patterns from the Peaceful Garden Designer Series Paper. With just a quick trim to 4″ x 5-1/4″, this layer fills the card front with gentle beauty and effortless charm. This suite’s paper is incredible because every pattern feels soft and nature-inspired, making it easy to pair with any sentiment or occasion.

Next came the labels from the Peace on Earth Bundle. I love when a die set gives you options, and these two label dies are perfect for creating clean, dimensional focal points:

  • The largest label was cut from the dark glimmer paper—it adds just the right amount of sparkle without overpowering the design.
  • The smaller label was die-cut from Basic White, giving me the perfect place to stamp my greeting.

And speaking of greetings…
I chose “Big Hugs for a Good Friend”—a heartfelt, anytime sentiment that shows just how wonderfully versatile this bundle really is. Yes, it shines during the holidays, but sentiments like this carry your creativity long past December. Think friendship cards, encouragement cards, thinking-of-you cards… this bundle has year-round opportunity written all over it.

To elevate the elegance, I added the stunning Misty Moonlight & Silver Edged Ribbon. It pairs beautifully with the cool tones in the Peaceful Garden Suite and gives a soft shimmer without being too bold.

For the final touch, a sprinkle of the Hues of Blue Embellishments brought everything together with a gentle sparkle that echoes the designer paper and glimmer label. These little gems are subtle but impactful—they catch the light just right!

If you’re looking for a suite that can carry you through winter, spring, and beyond, this is it. Thanks for stopping by ~

Simply Sunday: Simply Beautiful Traditions of Christmas

Hello Stampin’ Friends ~

There’s something magical about crafting on a Sunday morning—especially when we blend the classic beauty of Christmas with a fresh, modern twist. Today’s project is all about celebrating the Simply Beautiful Traditions of Christmas using the gorgeous Traditions of Christmas Suite, but with a little unexpected flair… PINK! Yes, pink is everywhere this year—Halloween, fall décor, and now Christmas cards. And honestly? I’m here for it!

I began with a soft Bubble Bath card base measuring 8-1/2″ x 5-1/2″, scored at 4-1/4″. Clean, simple, perfect. For the card front, I trimmed a piece to 4″ x 5-1/4″ and ran it through the Peaceful Greenery Embossing Folder. This embossed frame is everything—delicate leaves, soft texture, and a beautiful focal point that sets the stage for the entire card.

Inside that embossed frame, I heat embossed the sentiment in gold embossing powder, using the “Just for You” from the Traditional Labels Stamp Set. Even though this suite leans into Christmas, this sentiment gives the card wonderful versatility. With just one phrase, this becomes an all-occasion card wrapped in festive elegance. Perfect for my daughters December 23rd birthday!

For the finishing touch, I die cut one of the stunning floral sprays from the Traditions of Christmas Specialty Designer Paper. The gold foiling on this collection is absolutely breathtaking, and layering that spray along the embossed frame instantly elevated the card—no stamping required!

As I look at the finished card, I’m thinking it could use just a sprinkle more sparkle… maybe a few of the Traditional Sparkling Sequins to catch the light and add that extra holiday charm.

If you’re loving today’s Simply Sunday project, imagine the endless combinations you can create with the Traditions of Christmas Suite. From quick & elegant cards like this one to rich, traditional holiday creations—it’s truly a suite that does it all, without overwhelm.

Wishing you a creative and peaceful Sunday, my friends. 💗✨

One great layout … Two beautiful cards!

Hello Stampin’ Friends ~

Today I’d like to share one of my favorite “quick -n- easy” card layouts that gives you that WOW look, without all the work! You’ll love the ease … they’ll love their card!

Ready for some fun!? Let’s begin with the card base … Start with a piece of 8 1/2″ x 4 1/4″ cardstock (I will supplies colors later when I share the cards) Score and fold at 4 1/4″. This give you a 4 1/4″ x 4 1/4″ square base. This means your inside piece and the designer paper on the front is 4″ x 4″. I love this dimension for my designer paper because it means you get 9 fronts from one sheet!!

Now here’s where the magic really starts to shine! Once you’ve created your base layers, it’s time to add a die-cut shape to the top half of your card. This simple step transforms your layout from “pretty” to “WOW!” in just seconds.

Just be sure your total card height stays within 5-1/2″ so it still slips perfectly into your envelope. Trust me—once you see how easy these are to make, you’ll be making these all the time!

Circles are hands-down my favorite die-cut shape to play with—they’re classic, clean, and instantly eye-catching! On our first card, I paired the Stylish Shapes dies with the Spotlight on Nature die, and oh my goodness… that combination creates the coolest rugged, textural look! If you want to step up your layers like I did on the card (verses my instructions above), just trim your Calypso Coral cardstock to 4″ x 4″ and your Beautiful Gallery Designer Paper to 3-3/4″ x 3-3/4″.

From there, I stamped the florals from the Gallery Blooms Bundle, colored them with Stampin’ Blends, and die-cut those beauties to tuck around the circle. Those little floral clusters pull the whole design together and make the focal point pop!

But here’s the fun part about this layout… you don’t have to stick with circles! Let your creativity run wild with any of Stampin’ Up!’s amazing layering dies. For my second card, I reached for the Everyday Arches Bundle, and it completely changed the feel of the layout—same concept, totally different vibe.

One of the stars of this card is the Everyday Arches Bundle from Stampin’ Up!. This versatile bundle includes a clean and elegant 13-stamp photopolymer set along with 10 nesting arch dies. The stamps feature heartfelt sentiments in graceful arched shapes—perfect for encouragement, friendship, or thank-you cards. Now pair it with the Everyday Skies 6″ × 6″ paper … an absolutely dream! One side features hand-painted cloudscapes, evoking sunrise, sunset, or the calm of an overcast day, while the other side offers more subtle, all-purpose patterns. Even better? The Everyday Skies DSP is on the Last Chance list and currently discounted to $8.75, so this is a fantastic time to grab it before it’s gone.

I’m absolutely in love with how this layout comes together — it’s clean, but with so much personality. Like I said, it’s one of my favorites, and you can see how this one pattern can looks so differently when changing out dies and papers!

If you’re looking for a layout that’s both powerful and effortless, give this one a try. Thanks!

Stepping It Up with the Extraordinary Flora Bundle!

Hello Stampin’ Friends ~

Yesterday I shared a simple — yet simply beautiful — card using the Extraordinary Flora Washi Tape, and today we’re taking things to the next level! I pulled out the Extraordinary Flora Bundle and let the creativity flow…

I began with a Basic White card base and added a Flirty Flamingo card front for that bright, cheerful pop of color. Before adding anything else, I stamped the floral images in Flirty Flamingo ink onto the card front. I just love what stamping color-on-color does for a project… it creates this soft, subtle dimension that feels like a whisper of texture. It’s such an easy way to build a beautiful background without overpowering your focal point.

Since I already had the ink open, I stamped my “Just a Note” sentiment from the Simply Said stamp set — one of my favorites for timeless greetings, onto a white piece of cardstock and then die cut from the Stylish Shapes Dies. Then the real fun began! The moment you start die-cutting the florals from the Extraordinary Flora tape, the magic truly happens. Those soft watercolor designs come to life when they’re cut, layered, tucked, and lifted. I arranged mine around the sentiment, creating a playful, joyful bloom of color that feels like a handcrafted hug. It’s amazing how something as simple as layering die-cuts can turn a card into an experience.

To finish off my design, I added Holographic Resin Dots for a touch of sparkle — they catch the light in the sweetest way — and tied a tiny bow from white baker’s twine to bring everything together. A simple card becomes a special card when you add these little touches.

And that’s what I love most about creating… and sharing… and sending cards. There’s something truly heartwarming about crafting with intention, knowing that when someone opens that envelope, they’ll feel seen, loved, and remembered. Whether it’s a birthday, a thank-you, or just a note to brighten someone’s day, handmade cards carry a bit of our hearts with them.

Thanks for stopping by today, my friends.

Extraordinary Flora Washi Tape Steals the Spotlight

Hello Stampin’ Friends ~

If you’re ready to make a bold floral statement in your paper crafting, then the Extraordinary Flora Washi Tape is your new best friend. This isn’t your average skinny washi — at a generous 3-¼″ wide, it’s like a watercolor garden unfurling right on your cardstock. The tape is a feast for the eyes, alternating between dreamy pinks and purples in the same botanical motif, which gives you double the creative possibilities in one roll. It feels vibrant, lush, and completely show-stopping.

What I love most is how instantly it transforms even the simplest card. I applied a strip of this gorgeous tape onto Basic White cardstock — with a pop of Highland Heather behind it and the Brick embossing folder for texture and suddenly before I knew it, my “simple card” looked like something straight out of a boutique. If you enjoy quick crafting without sacrificing the “wow,” this tape is going to be your new best friend.

You can also use it for backgrounds, embellishments, gift wrap accents, planner pages, scrapbook layouts — this tape gives you enough length (a full 10 yards!) and enough artistic flair to create over and over again. It’s bright, it’s happy, and it brings the look of hand-painted art to your projects with almost no effort at all.

If you’re looking for a way to add major floral “wow” to your cards this season, treat yourself to a roll of Extraordinary Flora Washi Tape. It’s beauty, ease, and creativity all rolled into one — and I promise, once you try it, you’ll be reaching for it again and again. Let your creativity bloom big!

Thanks for stopping by today, my friends. Let your creativity bloom big!

Silent Snowfall Shines in This Eye-Catching Diagonal Card Front

Hello Stampin’ Friends ~

Today I’m excited to share two beautiful winter cards featuring the Silent Snowfall Specialty Paper and the Snowflake Kisses Dies. These cards were part of last week’s Facebook LIVE—if you missed it, no worries! You can catch the full video replay on YouTube by simply clicking the link. Every Tuesday night I go LIVE to share tips, techniques, new products, and plenty of creative inspiration. My goal is always the same: fun, simple cards that are beautiful yet easy to recreate, and these winter cards fit that perfectly.

For both designs, I started with an A2 tent-fold style card base—11″ x 4¼”, scored at 5½”. From there, the magic happens! The first card features that stunning diagonal-cut front using the dreamy Silent Snowfall paper backed with sparkling glitter. One angled cut is all it takes to turn a traditional card into a real wow piece. The Snowflake Kisses Dies add the perfect frosty finishing touch. The second card follows the same layout and the same coloring technique using the blending brushes. I stepped it up a bit with more sparkle, showcasing the Peaceful Garden Glimmer paper and some additional layering.

All the dimensions, cutting instructions, and step-by-step details can be found right in the video, so grab a notebook if you want to jot them down. Whether you’re looking to try a new layout or simply love winter crafting, these cards will warm your heart with creativity.

CLICK HERE TO VIEW ON YOUTUBE

Thank you for joining me today …. I hope you enjoy the projects and feel inspired to give this diagonal-cut design a try!

We have our Winner! 🎉 Branching Out Bundle

Hello Stampin’ Friends ~

I’m so excited to share that the winning card from our Fall/Holiday Stamping Retreat Attendee Swap was created by the talented Kellie Marquart! Her beautiful card stole the show with its elegance, detail, and creativity — all featuring the Branching Out Bundle.

This bundle is a true gem for nature lovers and those who enjoy crafting projects with warmth and meaning. The Branching Out Stamp Set lets you build lifelike pine branches by layering delicate images of needles, berries, and pinecones — or use them individually for a more subtle look. Whether you’re creating a cozy Christmas card, celebrating friendship, or simply sharing love and gratitude, this set delivers timeless beauty and versatility.

Kellie’s design perfectly showcased the bundle’s potential — and what made it even more special was how she turned this Christmas-themed set into a delightful Birthday card! With natural tones, subtle textures, and a heartfelt sentiment, she proved that a little creativity can stretch your seasonal sets far beyond the holidays. Her card truly captured the spirit of the season and the joy of handmade giving.

Congratulations, Kellie, on a well-deserved win! 🌿✨ Your card was a true work of art.

If you love seeing (and creating!) beautiful cards like Kellie’s, be sure to join us for our next Stamping Retreat! You’ll enjoy creative inspiration, hands-on projects, and the chance to connect with fellow crafters who share your passion — plus, you might even be our next card swap winner! 🌟

Thank you all for joining me today!

Runner-Up Spotlight – Jolly Holly Bundle Beauty! 🎄

Hello Stampin’ Friends ~

It’s time to celebrate our Runner-Up in the Fall Stamping Retreat Attendee Swap Contest — the talented Toni Morgan! 🌟

Toni created this stunning Christmas card using the Jolly Holly Bundle, and oh my goodness… it’s SO Christmas! 🎅💚 You all know how much I love holly — it’s one of those timeless images that just says “holiday season” to me, and Toni captured that beautifully.

She started with a Cherry Cobbler card base, then embossed the front with the coordinating Jolly Holly Hybrid Embossing Folder. This folder is really special — it’s one of those unique tools where a die fits inside the folder so you can cut and emboss at the same time! Talk about a timesaver that adds an instant wow factor!

Toni layered her design with a Very Vanilla mat, perfectly framing the card front and her greeting (stamped in Cherry Cobbler, of course!). One of the things my customers love most about Stampin’ Up! is the color coordination — the way ink, paper, and embellishments all match beautifully — and Toni showcased that perfectly here.

For her focal point, Toni used the two rectangular dies from the bundle — one to cut into the Cherry Cobbler layer, exposing the Very Vanilla beneath so she could stamp her sentiment, and the other to create a delicate gold frame that she layered around it. Such a clever design element! ✨

To complete her card, she stamped, colored, and die-cut the holly to adorn her framed sentiment, creating that festive finishing touch. And because Toni has an amazing eye for detail, she added the Cherry Cobbler & Pearl Adhesive-Backed Berries to her embossed background — giving her card texture, shine, and even more Christmas cheer. 🎁

This bundle was one of our Spotlight Sessions during retreat, so not only did attendees receive Toni’s beautiful swap card, but they also got to create three additional cards I designed to showcase the highlights of this wonderful bundle.

Toni’s card truly captures the joy and elegance of the holiday season — full of texture, color, and creativity. It’s no wonder she took home Runner-Up honors in our Attendee Swap Contest! 🏆❤️

I’ll be back tomorrow with our WINNER and her card. Thanks for stopping by!

Third Runner-Up Spotlight – Attendee Swap Fun! 🎉

Hello Stampin’ Friends ~

Today we’re sharing the 3rd runner-up from our Fall Stamping Retreat Attendee Swap, and let me tell you — this one is just stunning! 🌟

This beautiful card was created by Karie Kahrs using the Traditions of Christmas Suite. At first glance, you might think, “Christmas card,” but Karie took her creativity to the next level… she turned it into a Birthday Card! How clever is that? So many of us have loved ones with birthdays close to the holidays who prefer a “real” birthday card — this is pure inspiration! 🎂✨

The base of the card is Old Olive, with coordinating mats and a banner to frame the design perfectly. Karie die-cut the floral piece from the suite and popped it up on her focal point, creating dimension and a gorgeous layered look.

Here’s where her creativity really shone: the birthday greeting was heat embossed in gold, giving it that elegant, celebratory feel. She then added a swatch of gold foil paper behind the flowers and sentiment to make everything pop. And to top it off, she added the Traditional Sparkling Sequins in Gold from the suite — just the perfect finishing touch! ✨💛

This card is a fantastic example of taking a Christmas-themed suite and using it beyond the holidays. Karie’s design proves that a little imagination and clever use of products can create something totally unique — and that’s exactly why she earned 3rd place in our Attendee Swap Contest! 🏆

We hope Karie’s card inspires you to look at your stamp sets and papers in a whole new way. Who says Christmas products are just for December? 😉

Thanks for joining me today … stop back for our 2nd runner up tomorrow!

Heartfelt Creations with Hobby Haven Paper

Hello Stampin’ Friends,

If you love cozy, creative projects, you’re going to adore the Hobby Haven 12″ x 12″ Specialty Designer Series Paper! This collection is filled with charming illustrations inspired by life’s simple pleasures — from baking and sewing to reading and relaxing. It’s the perfect paper to bring warmth and personality to your handmade cards, scrapbook pages, and gift packaging.

What makes this paper even more fun to work with are the two sheets of precut pieces — ready to use for quick accents — and the fussy-cutting potential that lets you add depth and detail to your designs. Whether you’re crafting for yourself or sending a little handmade love to a friend, Hobby Haven helps you capture those heartwarming moments that make life special.

In my latest Facebook LIVE Replay, I’m sharing two beautiful card ideas using this delightful paper pack:

✨ The first card uses vellum to gently calm the background and make the die cut sentiment stand out — a simple trick with an elegant effect!

✨ The second card turns two cozy chairs into a sweet anniversary card, perfect for celebrating love and togetherness.


You can catch the full video tutorial below and see how both cards come together step-by-step. 🎥 Watch here / Just Click Here

I hope these ideas inspire you to take a fresh look at your designer papers and find new ways to make them warm, wonderful, and from the heart. 💗

Happy Stampin’,
Linda

Turn Patterned Paper into Pure Autumn Elegance 🍁

Hello Stampin’ Friends,

Yikes!! It’s been a bit since I’ve been here with you, however I’m back and with another version of the last card I posted. It was such a bit hit, I thought you’d like to see this layout done with a different bundle! Today I’m using the Autumn Toile Designer Series paper.

This gorgeous paper pack brings in a classic toile motif—think delicate, vintage-inspired scenes in rich autumn colours. The “toile” style gives it that timeless elegance, making it perfect for those fall cards that feel both cozy and refined. With its intricate imagery of trees, pumpkins, animals, and more, this collection instantly elevates any project. Let the Autumn Toile… take center stage …

Because the paper itself is so striking, you don’t need a lot of extras—the pattern can stand on its own, letting you focus on framing or accenting it rather than adding tons of clutter.

To create the card, start with a base that’s 8-1/2″ x 4-1/4″, then score and fold it at 4-1/4″ to form a perfect square card. The designer paper is then cut into an easy 4″ x 4″ piece which leaves NO waste of your designer paper. When attaching your circle dies with the greeting, use a ruler or template to keep the total height at 5-1/2″—that way, your masterpiece fits neatly into a standard envelope.

I hope this little project inspires you to pull out the Autumn Toile paper and the Spotlight on Nature dies and get crafting. It’s such a satisfying combination: the timeless charm of toile, the precision and framing of the dies, and your own creative twist. Whether you’re making a few quick cards for fall gatherings or designing something special for a loved one, this pairing delivers warmth, elegance, and ease.

Thank you for stopping by, I hope you are enjoying a beautiful Sunday!

Simply Sunday: Traditions of Christmas Card

Hello Stampin’ Friends ~

Happy Sunday! Today’s project brings together two of my favorite things from the Holiday Mini Catalog—the Traditions of Christmas Specialty Designer Series Paper and the Traditional Labels Bundle. These two pair beautifully to create timeless cards that capture the spirit of the season while staying easy and fun to make.

The Traditions of Christmas Designer Paper is a classic choice for holiday crafting. With bold poinsettias, delicate white flowers, and lush greenery accented with gold foil, it offers a warm and traditional palette that feels just right for Christmas. Pair that with the Traditional Labels Bundle, which includes versatile greetings and perfectly sized dies, and you have everything you need for cards that are both elegant and effortless.

For today’s card, I chose patterned paper featuring red poinsettias, white flowers, and hints of Pool Party and Old Olive greenery upon a Secret Sea backdrop. The base of the card is Pool Party cardstock (8 1/2″ x 5 1/2″, scored and folded at 4 1/4″), which makes those seasonal colors pop. I die cut the double label banner from the Traditional Labels in Pool Party cardstock and stamped my greeting in Cherry Cobbler ink to tie in with the poinsettias.

Popping the sentiment up with dimensionals adds just the right amount of depth and texture. Although I didn’t, I suggest a few embellishments finish it off. Even this simple layout, our card still shines.

What I love about this design is that it’s perfect for beginners while still looking polished enough to impress. The die-cut label gives it that “next level” look without adding any complicated steps, so it’s a win for both new and experienced stampers alike.

Thanks so much for joining me for this Simply Sunday inspiration! I hope today’s project encourages you to reach for the Traditions of Christmas Designer Paper and the Traditional Labels Bundle as you craft your holiday cards. These products are truly timeless and will help you create keepsakes that capture the magic of the season.

Until next time, happy stamping!

Tone-on-Tone Elegance: A Fresh Look with the Autumn Toile Suite

Hello Stampin’ Friends,

Are you ready for another way to showcase the Autumn Toile Suite? Today’s card is all about subtle elegance with just the right amount of detail. I love how the products in this suite give you the flexibility to create everything from bold and dramatic designs to soft and sophisticated layouts. This time, we’re letting texture take center stage with a leafy background that is both understated and beautiful.

For the front of my card, I cut the intricate leafy background die from Very Vanilla cardstock and adhered it directly onto a Very Vanilla layer. This tone-on-tone technique creates a soft, textured backdrop that looks rich without being overwhelming. I mounted this layer onto an Early Espresso card base for a striking frame.

Next, I die cut a piece of the Autumn Toile Designer Series Paper, along with an Early Espresso mat, using the Nested Essentials Dies. This creates the perfect focal point, balancing the detailed background with the warmth of patterned paper. For the greeting, I stamped in Early Espresso ink to keep the look cohesive and finished the card with a touch of sparkle from the Streaked Dots embellishments.

It’s amazing how the suite comes together—whether you want a bold metallic die cut, a patterned focal point, or a simple textured background like today’s card, the Amber Autumn Bundle and Autumn Toile Designer Paper give you endless options. By now, you’ve seen several styles of cards with this suite, and I hope you’re as inspired as I am! Imagine all the possibilities waiting in your stamp room when you add this suite to your collection—it’s a fall crafting essential.

Thanks for stopping by today.