The Warmth of Mittens …

Hello Stampin’ Friends ~

I hope you had a wonderful weekend. I spent mine in my Stampin’ Studio with a club on Saturday and then a whole lot of stampin’ and creative juices flowing to complete my Holiday Retreat. I’m so excited!

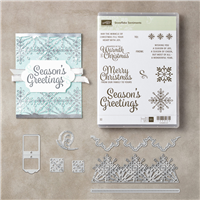
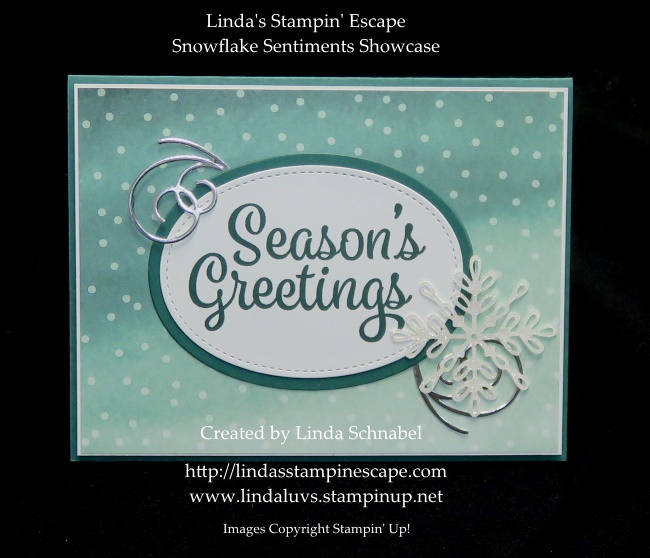
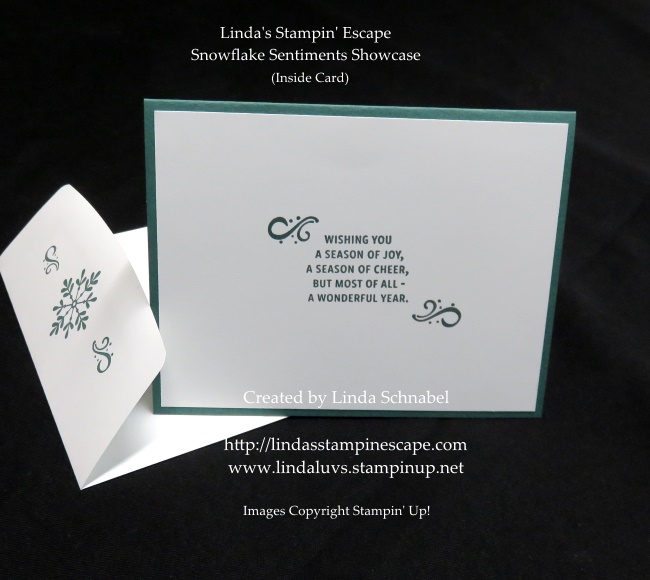
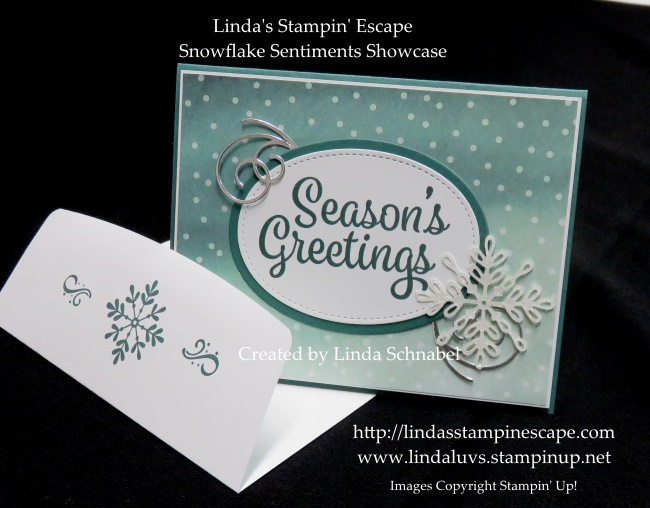
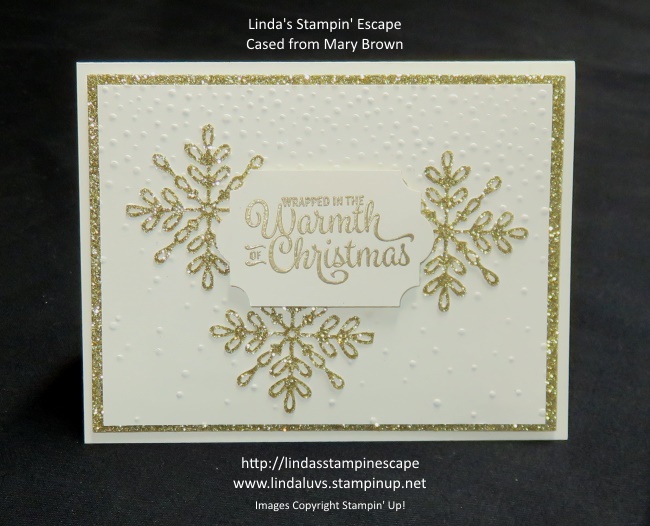
The last couple days I have shared creations from the Snowflake Sentiments bundle … an elegant one, a quick -n- simple one, so today I thought we should have some fun!! I’m going to warm your hearts with some cute little mittens!

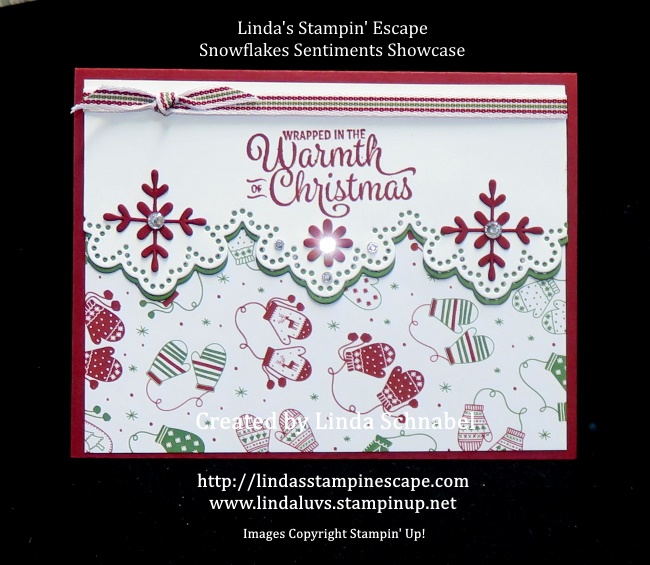
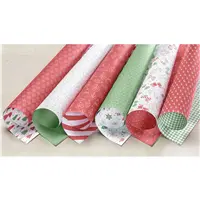
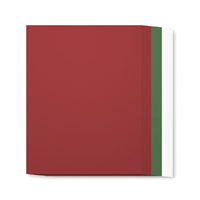
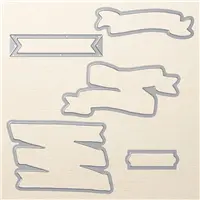
I love this fun card because it also look nostalgic … the beautiful edge framelit reminds me of a doily! The little holes are part of the framelit. I layered it with Garden Green to pull that color out of the mitten pattern from the “Be Merry” Designer Series Paper.

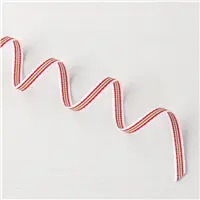
I love how the snowflakes cut out and fit right into the shape of the edgelit die … there is also a snowflake stamp that fits in there as well. Just had to add a little sparkle to my snowflakes so I brought out the Rhinestones and topped off the card with the “Quilted Christmas” 1/4″ ribbon.

I hope you enjoyed that touch of home with this fun and nostalgic card … stop back tomorrow to see what I’ll come up with! It will be the last of my Snowflake Sentiments showcase.

I know it’s Monday … but have a great day!

Today’s Stampin’ Supply List ….


Simply Sunday: Season’s Greetings

Hello Stampin’ Friends ~

Today I have another card created from the Snowflake Sentiments bundle. I have had many requests to showcase more than one card when doing the popular bundles.

I hope you got to see the “glamorous” Gold and Vanilla cards that I shared yesterday … oh so pretty! Today I’m using one of my favorite new In-Colors “Tranquil Tide” … all stamps and dies used today are again from the Snowflake Sentiments.

With the exception of the Oval Framelits and Stitched Shapes Framelits … these were used for the “Season’s Greetings” which comes in the bundle. I love the little swirls that come in this bundle – I used the Silver Foil for these, and the Dazzling Diamonds Glimmer paper for the snowflake.

Our designer paper comes from the “Delicate Daisy” paper. Hint… Hint … this is one of the designer papers that are currently on sale (Buy 3 / Get 1 Free).

The inside was stamped with this wonderful sentiment and with little swirl that are included in the bundle as well. I also created a matching envelope by using the snowflake stamp and the swirl.

Super Simple to create … just a little stamping and a few runs through the BigShot and you are ready for assembly.

Thank you so much for joining me this Sunday. Stop back tomorrow, I have a cute Christmas card that features 2 more of the dies (you haven’t seen) that are included in the Snowflake Sentiments bundle.

Enjoy your Sunday ~

Today’s Stampin’ Supply List …


Warmth of Christmas

Hello Stampin’ Friends ~

Yes, a little late with my post today but I couldn’t pass up sharing these 2 cards! Today I have a guest stamper: Chris W.  She is in one of my Stamp Clubs and changed up her card so I thought I would feature it and share the flexibility of the Snowflakes Sentiments Bundle.

First, I will share one of the cards we made during our October club. I cased this card from the talented fellow demonstrator – Mary Brown.  I made my card using Very Vanilla instead of the Whisper White Mary used. I loved that Mary cut the snowflakes apart to create her card, so we did as well …

Cutting the snowflakes apart was a big hit, but how would you love to see the card with the design cut per the die? Well, that is what Chris did and I love the way the snowflakes look draped down from the top.

Either way … the cards are beautiful. Retreat worthy … don’t you think!? AND … if you think they look pretty here, you should see them in person! LOVE the Sparkle!!

Stop back tomorrow as I have more to share with you from the beautiful Snowflake Sentiments bundle!

Thanks for stopping by today!

Hope you are having a good day ~

Today’s Stampin’ Supply List …


Snowflake Sentiments Bundle

Hello Stampin’ Friends ~

This month my clubs are getting to play with the Snowflake Sentiments Bundle. I love the stamp set for the beautiful greetings for the front of my card and the coordinating sentiments for the inside. 

 Watch the video where Stampin’ Up! trainer, Donna, showcases how diverse this bundle is for creating picture perfect holiday projects.

Create beautiful holiday cards and winter-themed decor with the Snowflake Sentiments Bundle, containing the Snowflake Sentiments Stamp Set and Swirly Snowflakes Thinlits Dies.  Save 10% when you buy the stamp set and Thinlits together!

For the next couple of days, I will show you several more cards that I have created with this fabulous bundle, so be sure to stop back!

Thanks for checking out my blog today ….

Happy Friday!


Happy Christmas Card

Hello Stampin’ Friends ~

Just a quick post today to share a cute card that can be found on my website: http://www.lindaluvs.stampinup.net  that was made by the Stampin’ Up! home office.

I also have my creations on there as well. So just a little reminder to check it out from time to time … I’ve added some recently but have more to share!

Stamps
• Oh, What Fun Stamp Set

Paper
• Garden Green Cardstock
• Whisper White Cardstock
• Quilted Christmas Designer Series Paper

Ink
• Real Red Classic Stampin’ Pad®

Accessories and Tools
• Christmas Around the World Embellishments
• Stitched Felt Embellishments
• 5/8″ Burlap Ribbon
• Quilted Christmas 1/4″ Ribbon
• Big Shot™
• Stitched Shapes Framelits™ Dies
• Holly Textured Impressions Embossing Folder™

Thank you for sharing a part of your day with me.

Hope you have a beautiful day ~

World Cardmaking Day: Part 2

Hello Stampin’ Friends ~

With just days left of the World Card making day promotion, I wanted to share a few more of the stamp sets along with samples made. It’s a great way to see the value of a stamp set, besides we all like to see beautiful cards 🙂


Rely on these stamps for lots of texture and personality, regardless of your project. It’s farmhouse chic and a true creator’s dream.

Price: $22.00 $18.70

You know how to create the card background, and these stamps will make it easy to get the right words in place every time. A mixture of fonts and styles will find you reaching for this set everytime you’re in a card-making mood!

STAMPIN’ TIP:  Combine these wonderful sentiments with our Designer Series papers that are on sale now to create Quick -n- Easy cards!

Price: $18.00 $15.30


Picture yourself lying in the sun, sipping your favorite beverage, kids playing nearby, soft music playing, and everything on your to-do list and every household chore is already done. That’s the same feeling you’ll get from this lovely floral stamp set. It really is just delightful.

Price: $17.00 $14.45
I hope you have enjoyed this little tour through these amazing stamp sets the past 2 days… there are more that are on sale! Just check out the links below.
Thanks much for stopping by today.
Hope your day is a good one!
Check out all of the World Cardmaking Deals here …


Create Cheer, Any Time of Year

Hello Stampin’ Friends ~

What’s nicer than having a hot drink on a chilly day in fall or winter? Whether for Halloween, the holidays season, or for cheering up a friend, this set has it all… The Merry Café Stamp set!

Use the versatile Merry Café Stamp Set to create festive cider or peppermint cocoa images to invoke cozy warmth during the holiday season.

Perfectly paired with the Coffee Café Stamp Set, Merry Café can be used to make heartfelt gestures year-round, as there is no seasons’ end to the joy of reaching out and sharing a cup to reconnect and renew friendships.

This stamp set coordinates with the Coffee Cup Framelits dies. If you already have the Coffee Café Bundle, you will definitely want the Merry Café Stamp Set to complete your set!

Don’t forget the Designer paper to coordinate with your holiday cards … On Sale Now … Buy 3 … Get 1 FREE, may I suggest the Coffee Break, Spooky Nights, Painted Autumn and the Be Merry Designer Series Paper.

Thanks for dropping in …

Hope you have a wonderful day ~


Halloween Week: Meet me at the Gate!

Hello Stampin’ Friends ~

Today is my last post for “Halloween Week” … and I’ve saved the best for last! I’m using the Graveyard Gate bundle and this gate is extraordinary! I love it!!

Make sure you keep following my posts, because you will see this gorgeous gate many more times!!

I started by cutting my gate with the help of the Precision Base plate and the Die Brush … makes creating this detailed gate much easier. Once the gate closes … you must lock it, and that is done with the dies that are included in the bundle.

Next, I worked on my background. I began with Whisper White paper and a 1-1/4″ circle punch and used it as a mask for my moon.  I sponged Daffodil Delight around the moon, then Elegant Eggplant, and Night of Navy after that. When I removed my mask, a bright white moon showed above! I dabbed the sponge over the moon just a bit to make it look more realistic.

I then sponged the bottom of the card with the Archival Black ink… I did not wait till it was fully dry, I stamped my gravestones over the top using Craft Whisper White! The white picked up some of the colors from the other inks and created an aged gravestone … so cool!

Here is a sneak peek at the inside… all done with one ink pad, just stamping off the ink on the gate so it looks lighter.

This entire bundle is so much fun, and don’t think that it’s only for Halloween. Make sure you follow my blog because I will be sharing more ideas from this great bundle.

There’s only 1 more month to Halloween so I shared the list of ingredients that I used to create this card.

Thanks so much for walking through the graveyard with me. I hope you enjoyed the techniques I used to create this card.

Happy Friday and enjoy your weekend!

TODAY’S STAMPIN’ SUPPLY LIST…

SCRAPBOOKING: Lori’s First Halloween

Hello Stampin’ Friends ~

Today I’m going to share with you a quick -n- easy scrapbook page that was created out of scraps! A couple of weeks ago our Stamp Club made a Halloween card …

And I used the cut out circles to create the background for today’s scrapbook page.  I simply just glued the circles on using the Tombo Multi-Glue.

The title was created from my computer, the kitty’s were created from the “Spooky Cat” bundle and “Spooky Night” Designer Series paper. I thought it was appropriate since she was dressed as a little kitty cat!

You won’t want to miss out tomorrow … I’m using the Graveyard Gate Bundle. It’s been a HOT search on Pinterest!

Thanks for checking out my blog today.

Hope you day is a beautiful one!

Today’s Supplies used to create the scrapbook page …


Halloween Week: Treat Boxes

Hello Stampin’ Friends ~

Today I have a quick -n- sweet little treat for you today! I’m showcasing our Acetate Boxes! These boxes are a quick -n- easy way to share a sweet little treat with a neighbor or loved one.

Our first little box is found on page 195 of the Annual Catalog and is perfect to share a yummy treat with. The belly band around the box is from the “Halloween Nights” Designer paper  … even the cute little pumpkin was cut from another sheet/pattern of the designer paper.

The larger acetate box can be found in the Holiday Catalog on page 13, and holds a little bit bigger type of treat! I’m sure that you can think of all types of goodies to put inside. Again the belly band is from the “Halloween Nights” Designer paper … and so is our cat. The cat is actually punched out with our new cat punch, also found in the Holiday Catalog on page 53.

So if you’ve got some specials little ghouls or goblins that are expecting a Halloween treat … make them something special in just a wink of the eye!

Thank you for joining me today for this little treat …

Have a great day!

Here is a list of the supplies used in today’s projects. Just click on them for more information or to begin shopping. Thank You!


Halloween Week: Technique Tuesday

Hello Stampin’ Friends ~

Hope you have kicked off a good week! Today I’d like to invite you to my Technique Tuesday being held during my Halloween Week!

Our technique today is masking … but I have a special stampin’ tip to share with you that will make masking with the Seasonal Chums stamp set possible.

Because the stamps are created as “tags” … they are placed “head to head” so when folded, you can die cut a cute little tag that has a front and back … you can see this on my blog yesterday.

You can see the lines that I’ve drawn on my stamp … that is where I’ll cut them apart. I call the cut a “Puzzle Cut” so that the two pieces can be put together tightly and will then work properly with the it’s coordinating dies.

Now you are ready to stamp as your single stamp has now turned into two!!

When doing the masking technique, I stamp my image on a scrap piece of paper (not cardstock) and then cut inside the line. This way you don’t get the “unstamped” space or gap.

Stamp your Jack-O-Lantern in the center of your cardstock, then place the paper pumpkin (mask) over the top. Now you can stamp your plain (back) pumpkins … remove your mask and your plain pumpkins will appear as if they are behind the Jack-o-Lantern!

Color your desired way …. Watercolor pencils, Aqua Painters or you can use markers like I did here.  I matted my artwork on Basic Black cardstock and then onto two different patterns from the Spooky Nights Designer paper.

I finished off my card with some of the left over Bakers twine from my September Paper Pumpkin kit. I like the orange bling on it … lol.

Hope you enjoyed today’s tutorial, tips … and card. I would appreciate if you could like my post (bottom left hand corner) or drop me a comment.

Thanks so much for stopping by today. Hope you join me for my Wednesday … WOW!!

Have a great day ~

TODAY’S STAMPIN’ SUPPLY LIST …


Seasonal Chums: Jack-O-Lantern

Hello Stampin’ Friends ~

Today is day 2 of my “Halloween Week” … oooooh we are going to have so much fun!! There will be cards, projects and even a scrapbook page!

Today’s card is one of the projects we made at our September Stamp Club. The Seasonal Chums bundle is a cute new item in the Holiday catalog (page 47) and are more than just “tags”. Look what we did …

We made a cute little window card that exposes our greeting and highlights our Jack-o-lantern. The images are easily cut out with the coordinating framelits dies.

The background was created with the “Brick Wall” embossing folder and gives our card the added texture it needed. 

The Circle and Stitched framelits were used to create our window … a double cut on the Lemon Lime cardstock gives us a pop of color and draws your eye to the focal point.

Our little Jack-o-lantern was colored with the Blender pens and ink pads … including his backside! The grass was pulled from the “A Little Wild” stamp set which also has the double stamps.

Thanks for joining me today. Stop back tomorrow to see what else you can do with these cute little stamps!

Have yourself a wonderful week!

TODAY’S STAMPIN’ SUPPLY LIST ….

Simply Sunday: Trick or Treat

Hello Stampin’ Friends ~

Today I’m so excited to kick off “Halloween Week” … All week long I’ll be sharing Halloween cards, projects and more with you! Can’t believe that Halloween is just around the corner, so here we go!

Today’s card is super simple!! I began with the “Spooky Night” Designer Series paper. The piece I’m using was designed to stamp on … Isn’t that cool!!

Can you see the one in the center with the moon and tree branch?

That’s what I used. It cuts to a perfect 3 x 3 square, or you could trim it a little smaller to add a mat behind it … which is what I did. I also used what I call the “fun dots” designer paper as my background!

Super cute … Super easy! Take your 3 x 3 moon with branch designer paper and stamp your owl directly onto the designer paper!! I used the Archival Black ink and the owl from the Spooky Cat stamp set!

Our Trick or Treat greeting also comes from the “Spooky Cat” stamp set and then was cut out with the single banner from the “Bunch of Banners” framelits dies.

Did you notice the Lemon Lime In-Color cardstock behind the owl and greeting? I just wanted a pop of color and this did the trick!

I want to Thank You for stopping by today. I hope you hang with me all week to see all the fun and creative Halloween projects I have in store for you!

On that note … I wish you a good day!

TODAY’S STAMPIN’ SUPPLY LIST …


Would you like a FREE Exclusive New Stamp Set?!

Hello Stampin’ Friends ~

Just want to share with you a great offer and a great way to earn an Exclusive New Stamp Set FREE!

The holiday catalog is now live, which means that you’re already making a list of all the great stamps and accessories you want to get.  Why not host a Holiday Stampin’ Party and get your hands on that free set—available today through the end of October.

All you have to do is host a party with $300 in sales by October 31. What’s exciting besides the new catalog is that the Merry Patterns Stamp Set is exclusive to the host promotion and will not be available after the last day of October. Start contacting your friends and neighbors today!

You gather the friends … I’ll bring the Make & Takes! I’ll show you some of the great new items plus you and your friends will have a blast making some cute cards!!

Get ready for the Merry Patterns Host Set! Stampin’ Up! trainer Brandi shows off this exclusive stamp set and how you can earn it yourself. Check it out, then contact me today to find out how you can get this exclusive stamp set.

Let me know if I can help you earn this fabulous exclusive stamp set, I have some great ideas to show you, or let me know what you’d like to see! Contact me to book your stampin’ party or book show at lindaluvs2stamp@aol.com  

This little cutie tops off the new Pizza Box! There is no limit to the fabulous creations you can make with this exclusive stamp set!

FYI … Both of my September hostesses have earned it so far!!!

Thank You for checking out this wonderful offer …

Have a wonderful day ~

Ready for a creative challenge? And Fun!

Hello Stampin’ Friends ~

Ready for a creative challenge? While these projects are designed for more avid stampers and crafters, don’t let that intimidate you, newer crafters!

Bundle and save! Buy these two coordinating products and save 10%.

Painted Harvest Photopolymer Bundle
Send someone the beauty of autumn with this sunflower-themed set!
* Quantity: 13 photopolymer stamps
* Suggested clear blocks (sold separately): a, b, d

Leaf Punch
* Punched image: 1-1/2″ x 1-1/2″ (3.8 x 3.8 cm)
* Sleek body style
* Large surface area offers precise cutting and leverage
* Locks to store
* Slim and stackable

These are great projects to push yourself outside your artistic comfort zone. Giving you the flexibility to create a watercolor look, this set also includes Designer Series Paper with a hand-painted look.

Sunflowers, pumpkins, acorns, and much more painted in a beautiful retro style, echoing motifs from the Painted Harvest Stamp Set. With this Designer Series Paper, you’d wish autumn would stay forever!

Each sheet is double-sided for double the creative options. Use as background paper, for tags, or for holiday treat bags.

* 12 sheets, 2 each of 6 double-sided designs
* 12″ x 12″ (30.5 x 30.5 cm)
* Acid free
* Lignin free

Coordinating colors: Cajun Craze, Crushed Curry, Daffodil Delight, Early Espresso, Garden Green, Lemon Lime Twist, Peekaboo
Peach, Soft Sky, Tangerine Tango, Very Vanilla

One more project …

Thanks for stopping by ~

Have a beautiful day!