Fun Cutting Pattern + Fun Fold + Sentimental Park Bundle = Fabulous Cards

Hello Stampin’ Friends ~

I’m thrilled to share the cards and the cutting pattern from my Facebook LIVE last night. I will share the replay with you which walks you through the cutting pattern, how to assemble and then finished cards created with the Sentimental Park Bundle. Plus you’ll learn a really cool way to use your Sentimental Park label dies.

Let’s watch the video first ….

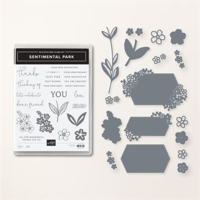
Pretty cool right? A special Thanks to LeAnne Greff for sharing her Designer Paper pattern with all of us. The Dandy Designs makes picking patterns pretty easy too, and the Sentimental Park bundle … is it on your Wish List now? I love sentiment stamp sets and the fact that we can create so many with this set is amazing, and I love dies that are not like all the rest.

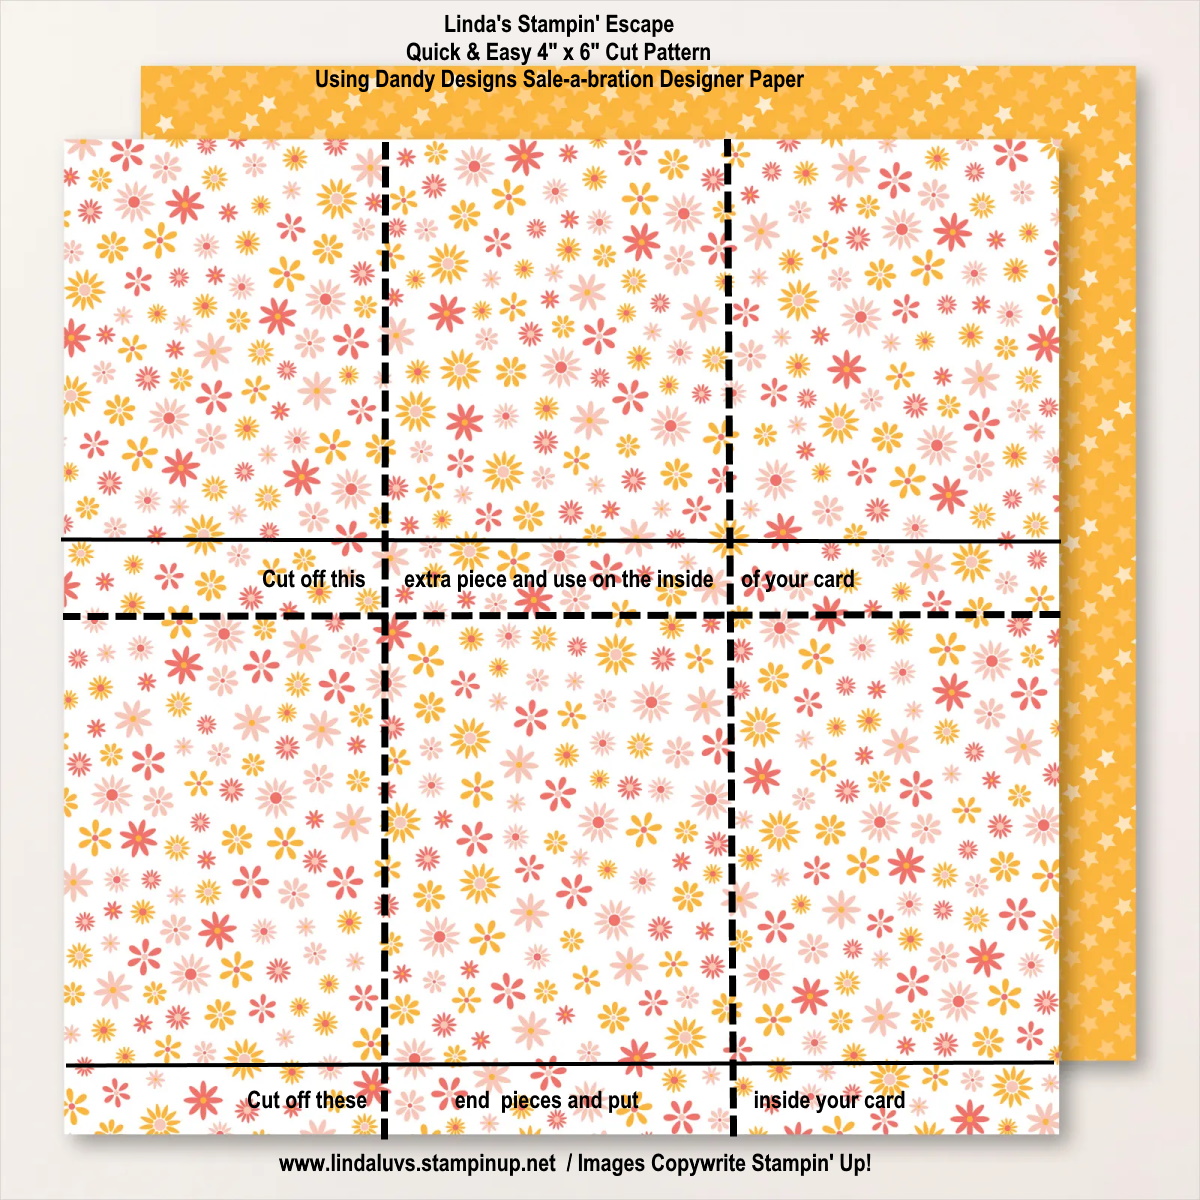
Here is a “cheat sheet” so you can remember the cutting dimensions. Feel free to click on the image and download it so you can keep it in your files.

Between the video and the pattern, I hope you feel inspired enough to make some of these up yourself. I will share the rest of my color pallets with you the next few days but let’s get a better look at the ones I did last night …

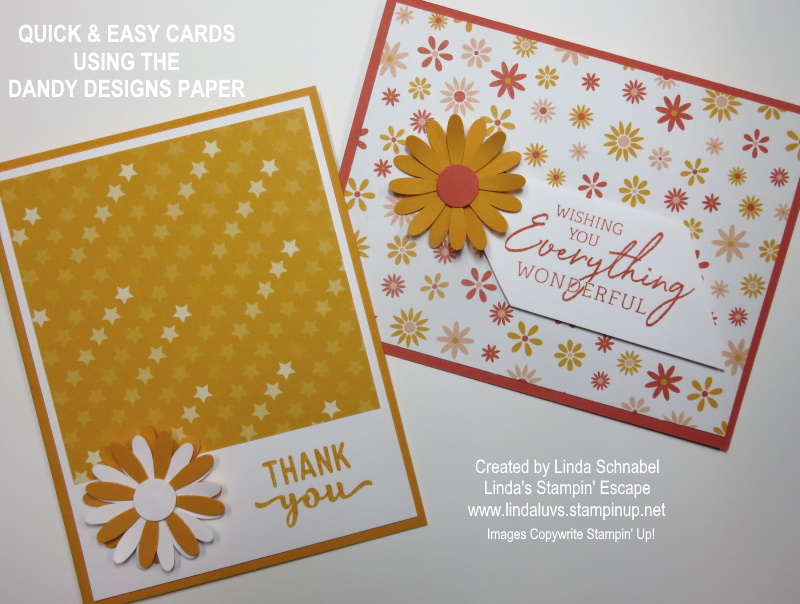
On this card I only used 2 of the 4 patterns that I cut. I used the smaller of the two label dies with the flowers (it’s so cute) then I added the Fresh Freesia Opaque Adhesive Backed Gems and a swatch of the Fresh Freesia ribbon.

Next up is the cute flowers, you can use them separately, or layer them as I did …

I used the second smallest circle from the Stylish Shapes dies for my greeting on this card. Can you see the embossing on the flowers in the center… too cute.

Another card for you …..

This is the largest of the dies with the floral pieces on it. I also used the Opaque Adhesive-backed Gems on this card … they were right, but I used my Stampin’ Blends to color them so they popped on the die cut. I also added Wink of Stella to the flowers.

Now we’re going to use this die to cut a piece of Fresh Freesia ….

This one is special because we can tuck the solid die cut label and tuck it into the floral one … I flipped when I figured this out. Image this in whites, it would make a perfect wedding card. Add Gold and turn it into an anniversary card. The possibilities are endless … see why I fell in love with this amazing bundle!?

Love this cute cutting pattern, and trust me, you can use this pattern with any of your favorite designer papers. So I hope you go into your stamp room today and try it out. And if you fell in love with the Sentimental Park bundle, I have the link for you below … just click on it and you can have it in your stampin’ stash soon.

Thank you so much for hanging out with me today.

Have a beautiful day ~

The supplies I used to create today’s card is listed here ….

Creating beauty with Scrap paper … and a cute card!

Hello Stampin’ Friends ~

Today I’m thrilled to share this beauty I created with scraps left over from tonight’s Facebook LIVE. It’s so cute! I’m using the Dandy Designs Designer paper from the Sale-a-bration catalog. I’ve got a really cute project planned for tonight’s LIVE so I hope you join me at 6:30 HERE.

So my scraps are 1″ wide and then I cut them down to 3-1/2″ in length so they would fit when I laid them out on my card. The colors are so bright and cheery and well … that Daisy returns (I think I am waiting impatiently for Spring!) or I just want to cheer up a friend and everything just goes together so nicely.

My greeting comes from the NEW Sentimental Park stamp set from the Jan-April Mini Catalog and is stamped in Coastal Cabana. I die cut my greeting with the largest of the banners from the Stylish Shapes dies, this is a great set of dies to have because there are the banners, circles and squares.

Thanks so much for joining me today, I hope you consider joining me tonight for my Facebook LIVE to see what I’m doing with the rest of that designer paper!!

Have a great day ~

Supply List for today’s card ….

Quick & Easy Dandy Designs Thank You Card …

Hello Stampin’ Friends ~

Today I have one more card from my quick & easy cut patterns I shared yesterday. It comes from the 4″ x 6″ pattern cut down to 5-1/4″ …. using the Dandy Designs as well and mounting it onto a Coastal Cabana cardbase.

The greeting comes from the Charming Sentiments stamp set and stamped with Coastal Cabana ink … I just cut the points off the square to create a look similar to the squares on the designer paper.

I punched 6 daisies out and layered them to create 3 flowers and added Coastal Cabana to the centers. These add so much dimension and texture to your card and they are cute!

Once those daisies are popped up with dimensionals, I added a little Wink of Stella to the centers to add a little sparkle. Not much else to say … this card is that simple, but will bring a smile to who ever receives it.

I think we all like making quick & cute cards ….

Thank you for stopping by today. Have a wonderful week.

Supply list for items used to create this card ….

Simply Sunday: Quick & Easy Cards with the Dandy Designs Paper

Hello Stampin’ Friends ~

Today I’ll share a few Quick & Easy cards that I created with the Dandy Designs Designer paper in the Sale-a-bration Catalog. The idea behind these creations is to “cut” your designer paper and use it! lol

We begin by cutting 4″ strips from our 12 x 12 Designer paper … then cut it in half (6″). From there we trim it down to 5-1/4″. This gives us a nice border around our card base, and that little left over piece can be used to decorate the inside of your card.

All of my cards have been embellished with the Medium Daisy Punch ….

With this quick & easy cut pattern, you can create 6 cards per sheet ….

This is just a representation of the cut pattern and NOT “exact” measurements.

Next up we have a 4″ x 4″ cut pattern with results in 9 cards per sheet. There are more ways to use both of these cut patterns. I’m just sharing the most popular / simple card designs. Also note that the peek of paper behind the designs cut is the reverse side of the these designer paper sheets.

This is just a representation of the cut pattern and NOT “exact” measurements.

On this card we are creating a card with the 4″ x 4″ square with a twist … We cut the square piece of designer paper diagonally … from corner to corner. Then you attach to card at opposite ends to create the “Split Card Technique”. How cool is that!

You can use this fun and easy technique with any designer paper but with 48 sheets in the Dandy Designs package you will have an endless supply of fun, and so many card possibilities. Dandy Designs is one of the choices in FREE merchandise during Sale-a-bration.

My last card also uses the 4″ x 4″ piece, however we trimmed it down a 1/4″ off the top and side so we could have a nice border around it …..

These quick & easy cards were all created during my LIVE presentation yesterday for my Catalog Launch party. I go LIVE on Tuesday Nights at 6:30 with New Products, Fun Folds or Techniques … always a fun time and great projects! Hope to see you there.

Thank you for stopping by this Sunday. Have a wonderful day ~

Supply List for today’s cards ….

You are the Key to My Heart

Hello Stampin’ Friends ~

Yesterday I kicked off my Catalog Launch party … It was a great start. My Stampin’ Friends are the Key to my Heart because they are the Heart of my business and they make my stamping classes, clubs and retreats so worth while and so much fun.

This is the Alternative project I shared yesterday ….

Here are the cards I shared during my LIVE demonstration on Facebook last night …..

I even gave away a FREE “Key to my Heart” Paper Pumpkin kit last night. All the names of the attendee’s watching LIVE were in the drawing … yep, all they had to do was join in and watch.

Here is the awesome February kit: Remember that there are Sale-a-bration Rewards when you subscribe to one of our three Pre-Paid options.

Thank you so much for stopping by today … Why don’t you join us on my Linda’s Stampin’ Escape Facebook page.

Have yourself an amazing weekend.

Here are the Paper Pumpkin Subscriptions …. It’s a great time to check out Paper Pumpkin because you will earn FREE product during Sale-a-bration!

Key to My Heart: Alternative Paper Pumpkin Card

Happy Friday Stampin’ Friends ~

As promised, I’m back to share my Alternative Card from the Key to My Heart Paper Pumpkin kit. I used most of the items from the January kit except for the Vellum oval that I cut from the Framed Florets Dies.

The original design has 3 padlocks on the front … I borrowed one! Then I knew I wanted to use the Key to “unlock” their heart. I used the vellum oval to really highlight my heart lock and key, and with dimensionals on back, it gives it dimension as well.

I added a little bow to my key which is included in the January Paper Pumpkin kit, and it ties in the color of our heart lock. Then I stamped my greeting in Fresh Freesia and trimmed the ends off the banner.

One of the main reasons I love the Paper Pumpkin kits is the Exclusive Stamp Sets!! Not to mention you can collect many colors of “spots” ink pads and the ease of having a kit so you can whip out a card when needed … no lengthy though process to design your own card.

Stampin’ Up! thinks of everything because you also get a coordinating envelope, and that’s what Stampin’ Up! and Paper Pumpkin is all about …. COORDINATION. Making our lives easier.

Thank you so much for checking back to see my alternative card.

Have yourself an amazing weekend.

Here are the Paper Pumpkin Subscriptions …. It’s a great time to check out Paper Pumpkin because you will earn FREE product during Sale-a-bration!

Share a Milkshake Fun Fold Card

Hello Stampin’ Friends ~

Today I’d like to share the card that I demonstrated on during my Facebook LIVE last night: My Share a Milkshake Fun Fold Card. Sorry I couldn’t get the video to download, but you can view it HERE on my Facebook page. It will be much easier and quicker to understand how the card is created, plus I shared some tips as well.

So you know I’m highlighting the Share a Milkshake, the Designer Paper comes from our Sale-a-bration catalog!! The Dandy Designs has 48 – 12″ x 12″ sheets in the yummiest colors: Balmy Blue, Calypso Coral, Fresh Freesia, Granny Apple Green (what I used for my card base) Mango Melody and Petal Pink.

Let me show you the “closed” view … If you watched my LIVE last night, you will see a few changes!

Boy … that mint ice cream with hot fudge really does look delicious! And, I added the cherry on top and a greeting which I stamped in hot fudge, OH … I mean Early Espresso. The greeting comes from the Charming Sentiments bundle.

The vellum cardstock was cut with the Stylish Shapes Dies, a great staple to have in your stash because it has circles … squares … and banners for your greetings. I popped up the greeting and the ice cream with the small stamping dimensionals.

Ok … now lets get to the FUN in this fun fold. The card base is 8-1/4″ x 4-1/4″ then scored at 2-3/4″. The “z” part of our Fun Fold that gets attached to the front measures 9″ x 3″ and scored at 3″ and 6″. The striped designer paper measures 4″ x 2-1/2″. The two pieces for the “z” measure 2-3/4″ x 2-3/4″.

Now … isn’t that fun!? The front flap opens to the left but the “Z” folds over the top of that! You really need to head over to my Facebook page and check out the video HERE. The “sweet” sentiment on the inside comes from the Share a Milkshake bundle… Don’t you think those two fonts look nice together? Almost like they were made to be paired up … like the cherry on top!!

Thank you for stopping by and sharing a your time with me … Hope you enjoyed the Ice Cream!

Have a great day ~

Here is a list of the supplies used for this card …

Dainty Delight Makes the Perfect Gift Card Holder …

Hello Stampin’ Friends ~

Today I’m going to show you what I did with the last piece of the Dainty Flowers designer paper to create the Perfect Gift Card Holder. Great for Birthdays, Graduations, Thank You’s and more. Isn’t this just the cutest?

You start with a half sheet of cardstock measuring 11″ x 8-1/2″ … score at 2″ and 5-1/2″. The 5-1/2″ score it to fold your card in half, the 2″ section gets a piece punched out of it and then it’s tucked under to create the pocket for your Gift Card. I used Tear & Tape Adhesive along the edges to secure it.

I used a piece of 5-1/4″ x 4″ piece of Dainty Flowers for the inside … the right side will be exposed when the card is closed. The Label Me Lovely Punched was used to punch the piece out of the pocket and for my sentiment.

I created an area for you to write in … the Basic White measures 3″ x 4″ and the Mango Melody mat is 3-1/8″ x 4-1/8″…. and you won’t be able to see it while the front is closed so your message is safe! lol

The front Mango Melody piece used to mat the designer paper measures3-3/8″ x 4-1/8″, making the Dainty Flowers designer paper 3-1/2″ x 4″. I used Framed Florets for my sentiment on the front and punched it with the Label Me Lovely punch. The Mango was punched and then cut in half and then adhered to the top half and bottom half (see the split on this back view).

Those pretty flowers sure can make an adorable card to wish someone a happy birthday and tuck a little something in there for them to treat themselves.

Thanks for stopping by today, I hope these sharing these cards with the beautiful Dainty Flowers Designer papers has inspired you pick a pack up for yourself.

Have a wonderful Monday ~

Here is a list of supplies used for today’s card …

Simply Sunday: Simply Gorgeous Dainty Flowers Card

Hello Stampin’ Friends ~

Happy Sunday! Today I’m sharing a super simple card that is Simply Gorgeous using the Dainty Flowers Designer paper you can get FREE during Sale-a-bration.

For those who don’t know what Sale-a-bration is, it’s Stampin’ Up!s most anticipated time of year because YOU can earn FREE “exclusive” products now through February 28th. Yes, sometimes the freebies sell out, so I don’t hesitate to get the ones I love first! Click HERE to learn more about Sale-a-bration.

Early in the week I shared a cutting technique using the Dainty Flowers (CLICK HERE to see post) and now I want to share what I did with some of the left overs! This piece is 12″ x 6″ – it’s simply cut in half, so you have another sheet just like this one (and a full one too!).

These will show the left over pieces from my first card (they are marked on the paper). Now I’d like to share my finished card and give you the simple instructions to create your own card ….

If you take a look at the layout of the Dainty Flowers paper I have “marked” … the pattern piece I chose for today’s card is on the right. My colors were chosen to highlight the daisies of Mango Melody with Early Espresso centers. The third color I used was Old Olive to bring in my greens from the designer paper.

The Early Espresso card base is 8-1/2″ x 5-1/2″ and is scored and folded at 4-1/4″ (basic A-2 size). I had to trim the top off my designer paper from 6″ to 5-1/2″ to match my card base. The Mango Melody mat behind the Dainty Flowers designer paper is 5-1/2″ x 3-3/4″. Simple measurements for this simply beautiful card (the designer paper does all the work)

Speaking of this designer paper, I had to share a close up so you could see the “look” of texture that it has. We don’t have to do anything … it’s already there for us. It adds such a warm and natural look with these beautiful flowers. And the flowers, well … I have fallen in love with the “watercolor” look. It truly is a work of art, and to share this masterpiece …. just add cardstock.

And a sentiment, which comes from the Dainty Delights stamp set. I suggest the bundle so you don’t have to “fussy cut” any flowers, the dies will do that for you! I’ll share more of that with you as well. Today the sentiment was punched using the Double Oval Punch.

Just so you know, when you purchase the Dainty Delights bundle, you can chose the Dainty Flowers Designer paper for FREE! It’s a perfect pairing. I will also be hosting a Dainty Delights Class in February.

I thank you for taking time out of your Sunday and sharing it with me.

Have a beautiful day ~

Here is a list of supplies used for today’s card. You can click on any image to learn more about it, or to begin shopping with me. Thank you!!

Dainty Flowers Thank You Card …

Hello Stampin’ Friends ~

Today I have a great Thank You card for you created with the Dainty Flowers Designer Series paper. This was just one of the cards that my Stamp Club members made this month. I wanted to highlight the lovely paper you can choose for FREE during Sale-a-bration with a purchase of $50 or more … and if you love this paper, you will want the Dainty Delight bundle. You can find it on page 55 of the NEW Jan – April Mini Catalog.

I choose the pattern with the oval flowers, you can do so many different things with these, today I’m sharing a quick and simple way ….

I started with a Blushing Bride card base and then chose one of the floral stamps from the Dainty Delight stamp set and stamped the front with Blushing Bride ink. This technique adds the look of texture/ and dimension, and I just like the way it looked!! lol

Once the designer paper was trimmed down, I added an Old Olive mat to the paper. This pulls the greens out of the paper and compliments the Blushing Bride. You can pop this up with Stampin’ Dimensionals but I did not. I saved that dimension for my greeting ….

The greeting comes from the Dainty Delight stamp set and was stamped in Old Olive. Then I cut it out with the largest banner from the Stylish Shapes dies. I then cut another banner from Blushing Bride to use as my mat … I cut that in half horizontally and attached it so then ends showing on opposite ends. Then I popped it up using Stampin’ Dimensionals.

Take a close look at the paper … see the texture? This is “actually” in the paper! It appears to have been run though an embossing folder but it was not. Amazing!!

Such a pretty card, and it’s because of this beautiful paper. I’ll have more cards to share with you tomorrow so stop back, or better yet … Click on the “Follow My Blog” tab in the upper right hand area of this blog.

Thank you for joining me today, I hope it’s a good one for you!

Here is a list of supplies used to make today’s card …

Fun Folds & Dainty Flowers

Hello Stampin’ Friends ~ Today I’m sharing the video replay of last nights Facebook LIVE. I’m demonstrating step by stop how to create the Front Flip Fun Fold Card … it’s quite simple and a lot of fun to create.

DIMENSIONS:

Card Base 8-1/2″ x 5-1/2 scored and folded at 4-1/4″. Cut at 1-1/4″ from edge to score line, flip over and cut 1-1/4″ to score line. Secure the 1-1/4″ flaps to card base.

Designer Paper / Cut 2 – 1″ x 4″ pieces for outer pieces and 2-3/4″ x 4″ for center. Also cut a 2-3/4″ x 4″ piece of white for inside.

Let’s take a look at the video …

Here is the Dainty Flowers designer paper and the cutting pattern I used for the Front Flip Fun Fold card ….

This will give you a little more clarity of the directions … a picture is worth a thousand words! I even added the “hint” for the two pieces you can create another 2 cards with.

Now we can take a look at the completed card ….

My greeting comes from the Dainty Delight bundle and was punched out using the Double Oval punch … the Old Olive paper behind the greeting is actually the back of the designer paper!

And I couldn’t forget to decorate the inside ….

The little flower on the inside is actually a sprig from the oval wreaths that I fussy cut and glued inside. The sentiment comes from the Framed Florets stamp set and works beautifully with the Dainty Delight bundle.

I hope you enjoyed the glimpse of the Enjoy the Adventure cards as well, this truly is a “FUN” Fold!!

Thank you for hanging out with me today, hope your day is a good one!

Here is the list of supplies used to create today’s card ….

Simply Sunday: Dainty Flowers

Good Morning Stampin’ Friends ~

Welcome to my Simply Sunday post of Dainty Flowers. You will find this beautiful paper in the Sale-a-bration catalog, and is FREE with a qualifying purchase of $50. Today kicks of several days of beautiful cards created using the Dainty Flowers Designer paper and the Dainty Delight Bundle.

Today the main focus is on the Dainty Flowers Designer Paper ….

I went a little darker than the Old Olive by using the Mossy Meadow which really highlights our floral Blushing Bride pattern. The flowers on our background paper mimics the floral piece in which we highlighted here.

This pretty patterned paper was cut from the center of the sheet that also has the floral oval designs. This paper was not embossed, the texture you see on it, is part of the paper design.

This floral piece measures 5″ x 3-3/4″ with a mat slightly larger. The greeting was stamped with Mossy Meadow and comes from the Dainty Delight bundle. I simply trimmed off the edges with my scissors at an angle. I used dimensionals on the right side of the piece.

I embellished the card with my Opaque Adhesive Backed Gems to add some drama… or should I say texture! lol It’s so easy to make beautiful cards using this gorgeous designer paper.

Thank you so very much for spending part of your Sunday with me. Enjoy your day!

Here is a list of the supplies used to create today’s card ….

Enjoy the Adventure Parade of Cards …

Hello Stampin’ Friends ~

Let’s get a close up of the Enjoy the Adventure cards … Today I will be sharing my cards from the LIVE along with the dimensions so you can recreate them for yourself because the Sale-a-bration and Mini catalogs have gone LIVE today!! Woo hooo … YOU can finally get your hands on your favorite stamps, dies and those awesome designer papers.

My first card was the “Thank You” card … the simplest of the bunch. The base comes from the Cards & Envelopes which coordinate with the Memories & More Card Pack. I simply cut down the 4″ x 6″ Thank you card to 3-1/2″ x 5-1/2″ (so a 1/2″ off the top and 1/2″ off one side). I then colored in the THANK YOU with Mint Macaron and Petal Pink Stampin’ Blends. Super Simple!

On to the next card, we begin with the Mango Melody and Petal Pink card base. These are scored for you so they fold nicely …

I took a second card base and cut off the front, then I cut the front down to 3-1/4″ x 4-1/4″ (you’ll get 2 from the front piece). I then layered the “heart” card which measure 3″ x 4″ … not cutting needed.

The rest is easy as I used the die cut adhesive backed elements from the sticker sheet included in the Enjoy the Adventure Memories & More Card Pack. Each of the elements were popped up with Stampin’ Dimensionals and then brushed with Wink of Stella.

The next card also starts with the Mango Melody and Petal Pink card base…

This card is all about layers … the bottom two layers are actually 2 of the 3″ x 4″ cards from the card pack. The two smaller pieces; the Petal Pink is 4″ x 1-3/4″ and was attached vertically, then the Mango Melody piece 3-1/4″ x 3/4″ was layered vertically. Both of these smaller pieces were cut from the 1/2 front that was left over from the second card!

The Happy Birthday (popped up) and Stars are elements from the sticker sheet. The three little dots come from the Adhesive Backed Milky Dots.

Now … I have one more card to share with you. If the first card was a bit too simple for you, this card will show you how you can get the same look, but a little more jacked up …

The card begins exactly how our first card was created, except I took the left over pieces cut off and found a full “THANK YOU” to trim down and color … this will give us more dimension. Then I punched a scalloped heart from vellum to place behind the “Thank You” so it stands out more.

It’s amazing how some simple changes can add so much to a card. These card packs are fun to play with, I better pull out a scrapbook before I use up all my pieces! lol

Thank you for joining me today. Which one of these cards is your favorite??

Here are the products used for today’s cards … Click on any one of them, it will take you to my OnLine store ….

Enjoy the Adventure Cards …

Hello Stampin’ Friends ~

WOW … do I have some great cards to share with you today. I have taken the Enjoy the Adventure Memories & More Card Pack and turned the cards into “cards” you can send using the Memories & More Cards & Envelopes. Using the Card Pack you can quickly capture life’s special moments by scrapbooking … and the cards and envelopes and you can create quick and easy cards.

Join me to watch the replay of last nights Facebook LIVE where I share several cards cards I created using the Enjoy the Adventure Memories and More Card pack …

As promised, I have a cute card created with the two Memories and More packages and the Adorable Owls. This one was so easy to create, first the Mango Melody / Petal Pink card base from the Cards & Envelopes package, and then the so grateful card which I used Stampin’ Dimensionals to pop it up.

There was no extra cutting of cards to create this look … I just used the cards directly from the pack.

This sweet little owl (there are 3) from the Adorable Owls was stamped with Momento ink and colored with the Smoky Slate Combo pack, along with Balmy Blue for they eyes, Mango Melody for the Bow tie and then Daffodil Delight for the beck and feet.

The owl is fussy cut … which means no dies, you have to cut it out yourself.

I also added three of the Opaque Adhesive-backed Gems to draw in your eye and give the cards some additional texture. It’s so easy to create cute cards from these card packs … Both the Enjoy the Adventure and Adorable Owls will be available in just one day!! Woot Woot!

If you’re newer to stamping or if you just want to grab the Enjoy the Adventures packets so you can create your own quick cards. I hope you were inspired today with these designs.

When you stop back tomorrow, I’ll have dimension & more for the cards and a “stepped up” card for you!!

Thank you for taking time our of your day to join me.

Have a wonderful day ~

Be My Valentine Card with Adorable Owls

Hello Stampin’ Friends ~

I am tickled pink to share today’s card with you. With Valentines Day approaching quicker than we’d like to think and I cannot get enough of these little owls from the Adorable Owls so they are highlighting my card again today. The Adorable Owls will be FREE during Sale-a-bration with a qualifying order.

First let me start with the Sweet Talk Designer Paper … it’s on the Clearance Rack and is as adorable as these owls!

The sheet I chose has the two patterns you see … one on the front and one on the back, and then I used the Black Glitter Washi Tape from the Holiday catalog that retires on the 4th of this month. I used Real Red for my card base to coordinate with the Sweet Talk Designer paper. Let’s take a look …. Now let’s talk about our Adorable Owls!!

I stamp them with Momento Ink on Basic White Cardstock, and then color them with our Stampin’ Blends Alcohol markers. Yesterday I used the Smoky Slate Combo pack to color and today chose the Natural Tones Stampin’ Blends.

I used 200 from the Deep Tones, and 500 from the Medium Tones Combo. The Natural Tones come in combo packs of two, but they are two different tones. I begin coloring with the 500 Medium tone and then color in my darker 200 marker, then I go back over with the lighter color. I also use the color lifter if I think it’s too dark or go outside of the lines, so the areas that look “highlighted” are actually done with the color lifter.

I decked out my gent with a nice blue bow tie to match his eyes – I used Light Balmy Blue and Light Night of Navy for both. My lady has Dark Pool Party and Dark Bermuda Bay eyes and she is adorned with a necklace created with the NEW Opaque Adhesive Backed Gems.

My greeting comes from the NEW Share a Milkshake bundle and stamped with StazOn ink (doesn’t smear on vellum) and then die cut using the 2nd largest circle from Stylish Shapes. This card uses the Sweet Talk from the Clearance Rack for a sweet Valentines Day and the Adorable Owls… they sure named them correctly!

Thank you so much for stopping by for a visit.

Have a wonderful week ~

Here is a list of supplies used to create this card …. The Share a Milkshake and Opaque Gems will be available January 5th, and the Washi Tape retires after the 4th. The Adorable Owls will be FREE during Sale-a-bration with a qualifying order.