Kissing Technique Card Share …

Hello Stampin’ Friends,

It appears I ran into some technical problems yesterday and my post didn’t show up when expected. Hopefully everything is back to normal!

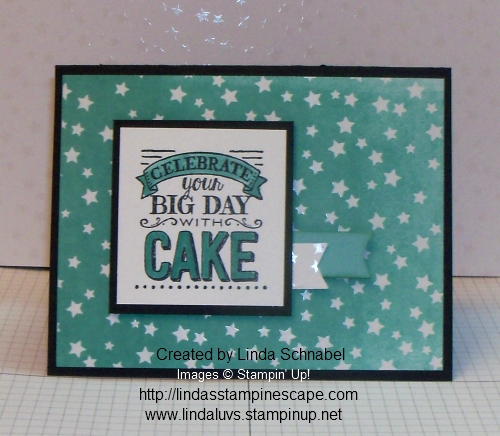
Today I have a card to share with you that illustrates the kissing technique. Hope you got the chance to watch the video yesterday (or this morning!). I chose the “I Think You’re Great” stamp set from the new catalog. It has the perfect stamps for the kissing technique.

000_2317

I inked up my cloud in Marina Mist and “kissed” it to the scalloped pattern stamp … It makes the cloud look a bit fluffier! The beautiful sun comes from the “Kinda Eclectic” stamp set and the greeting from our Ronald McDonald House Charities stamp set “Sprinkles of Life”.

I used the new Silver Metallic Thread to create my silver lining behind my cloud. I think it turned out pretty cute.

From this angle you can see that I used Stampin’ Dimensionals to pop us the front of my card…. just a little added dimension.

000_2320

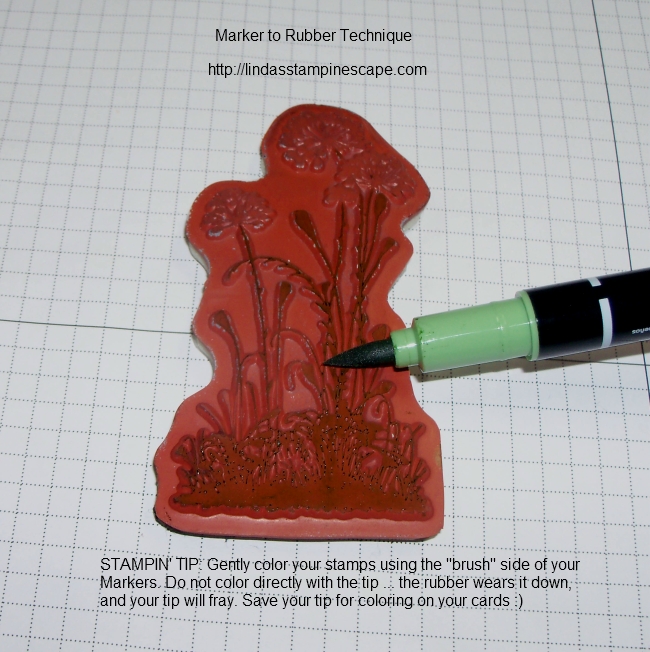
As for the Kissing Technique Tip … If you’re working with a larger solid image in a lighter shade, you can kiss it to a more detailed image inked up in a color that is darker than your solid.  For example … use the solid balloon from “Celebrate Today” and kiss it with “World Map” or “Corner Garden”.  Play with it and have some fun!

Till tomorrow … have a great day.

Thanks for stopping by ~

blog-closing-small


Kissing Technique Video …

Hello Stampin’ Friends,

(Sorry for the lateness … Don’t know why it did not post!)

Today I have a video for you that shows how easy it is to create using the kissing technique.  It’s really simple but adds some “zing” to your card.

Sit back and enjoy the video …

Now stop back tomorrow to see what I have created using the kissing technique. I’ll also have a great “tip” for you that really makes this technique say “wow”.

I also want to wish my daughter Nichole a very happy birthday today!!

See you tomorrow …

Have a wonderful Friday ~

blog-closing-small

Simply Sunday: A Watercolor Technique

Hello Stampin’ Friends,

Today I’m going to share with you a card inspired by the technique that I’m doing with my Technique Clubs this month. A simple technique that really has that “WOW” factor. You will need a clear block, some markers and a stamp set of your choice.

On today’s card, I’m using the stamp set “Wetlands” and the sandpipers from that set, block “H”, the “Marina Mist” marker from the Soft Subtles and “Soft Suede” from the Neutrals Collection of markers. I know my club members are going to enjoy this one!

000_2288

I use the lightest of the two colors first, so the Marina Mist is scribbled onto the top half of the block, then the Soft Suede on the bottom half. Fill your Stampin’ Spritzer with water and simple spritz the block until it begins to bead. Then press it onto your cardstock (we used Whisper White). You will actually see the color pull into the cardstock … Hold it down for a bit till the water is absorbed.

000_2293

Let it dry somewhat and then you can stamp your sandpipers onto your watercolor image. You will never get two to look the same, and that is the beauty of this watercolor technique.

My greeting comes from the stamp set “Choose Happiness”.  I like the way the font compliments the line image of the sandpipers. YES … Sometimes less is more. Adding extra embellishments just because you have them, would take away from the simple message of this card.

I’d love to hear your thoughts about the use of embellishments. Don’t get me wrong … I like my bling too! lol

Thank you for joining me today. I have listed the supplies below, just click on them for details about the product or to begin shopping at my online store.

Have a beautiful Sunday ~

blog-closing-small

000_2291

TODAY’S STAMPIN’ SUPPLY LIST …


Walk in the Wild 3

Hello Stampin’ Friends,

Today is my last of 3 cards that I have made for you with the “Walk in the Wild” stamp set.  I may have used one stamp set, but I have shown you three different techniques.

Today’s card share illustrates the “Reverse Masking” technique … so simple but so effective.

000_2243

I used the “Labels Collection” framelits to create my mask, then I placed it onto the Very Vanilla and sponged Pear Pizzazz around the edges. Then with the Mossy Meadow ink and our ever popular “Lovely as a Tree” … I stamped layers of the pine to create stunning dimension.

I used “Close to Cocoa” to stamp my quail onto the front and then my greeting.  Although there is no layering, the Reverse Masking technique give an appearance of dimension.

Thanks for coming back ~ Hope you enjoyed all three of my “Walk in the Wild” series cards.

I’ll be back tomorrow with the Weekly Deals…

Have a fabulous Monday!

blog-closing-small

TODAY’S STAMPIN’ SUPPLY LIST …


Something New for You!

Hello Stampin’ Friends,

A quick post for you today … I hear we are having a beautiful sunny day and I think you should go out and  enjoy it!  I plan on it … as soon as I get off work.

So … something new for you!  Did you already see part of it yesterday?  Look up at the black banner at the top of my blog … I have added 3 new pages!

  1. Product Videos: These will highlight new products. Right now I have 5 videos showcasing products in our current Occasions Catalog.
  2. Stamping Technique Videos: You will find some fun techniques here, all in video form. Someday I’ll be making my own videos for you, but until then … you’ve got the best: Stampin’ Up!
  3. Stamping Retreats: This page explains more about our annual stamping retreats. Please let me know if you have any questions … I’d love to answer them for you.

I hope you enjoy exploring the new pages I have added to my blog. I want to give you the best information I can on our products and awesome techniques.

NOW … AN INVITATION 

Skip to the fun with us this Friday, May 8 at 8:00 PM (CT) for a special livestream at YouTube.com/PaperPumpkin.

intheknow_PaperPumpkin_2.23.2014_NA

If you’ve ever wondered what Paper Pumpkin was about … here is a fun way to discover it. Stampin’ Up! is going to make it super easy for you to become the newest subscribers. Don’t be late because we’ll jump right in and have a lot to cover in a short time. See you then!

DemoHeader_PastKits_Demo_Feb18_NA

Hey …let me know if you’ll be watching!  I will 🙂

Have a great day ~

blog-closing-small

Marker to Stamp Technique … Birthday Wishes

Hello Stampin’ Friends,

Sorry I missed you yesterday … life just got the best of me, and I took the day off from my blogging.  I’m fine, more concerned with loved one’s right now, plus busy at work.

While at our stamping retreat my granddaughter burned herself when her bowl of soup fell into her lap. They took her to Children’s Hospital (after two non-productive visits at West Bend) where they preformed surgery to clean up the wounds. She is doing much better and wants to go back to school to see her friends! Doc say’s NO … not yet, they must heal a bit more.

I also want to send prayers out to my dear friend A.K. who is battling cancer. We miss you in our Monday club / and will at retreat … we love you and are praying for you every day

Today’s card share is a simple card illustrating the “Marker to Stamp” Technique. I also have a video below from our Stampin’ Up! creative crew.

000_2160

I used the Serene Silhouettes stamp set and colored in Blushing Bride and Wild Wasabi.

I teach my stampers how to hold the marker when coloring a rubber stamp … because it can be rough (due to the design) Lightly color your image with the side of the marker, never the tip. It will save your tip from fraying.

000_2154

I am happy to share with you a new Stampin’ Up! video and a card that I created using this technique. I will also highlight a few tips for doing this technique.

Also … New items are being added to the Clearance Rack today! CLICK HERE TO VIEW

Now lets watch the video first …


Hope you enjoyed the video and my card today. Please let me know if you have questions.

000_2157

Thanks for dropping by today ~

Have a great one!

blog-closing-small


Simply Sunday … Sending Loving Thoughts

Hello Stampin’ Friends,

I hope this post finds you enjoying a beautiful weekend. After many days of rain, it was so nice to see the sun again.

Today I have a card for you where I have combined two simple techniques to create one beautiful card. I began with masking off a section of my card and sponging Mossy Meadow and Lost Lagoon into that area.

000_2137 

Before peeling up the mask, I added the Bokeh technique … to create the background. Then I peeled off the mask and stamped the Serene Silhouettes over it using the Memento Ink Pad.

To complete my card I added a simple greeting from the Love & Sympathy stamp set.

The techniques of masking (with sponging) and Bokeh are simple to do and together they create a stunning focal point for your card.

000_2138

Thank you so much for stopping by my blog today.  I have posted a list of ingredients below for your shopping convenience … just click on any of the items for details or to start your shopping.

Enjoy the rest of your weekend ~

blog-closing-small

TODAY’S STAMPIN’ SUPPLY LIST …


Spring is Coming ….

Hello Stampin’ Friends,

Today I’m going to share a card with you that will warm you like spring! The warm color combination of Rose Red and Daffodil Delight bring this card to life. The magical background was created using a technique call “Bokeh” ….

000_2102

This is one of the cards I created for a Make & Take project at my March Star’s by Design Team meeting … My technique club participants will be thrilled to know that they will be learning this technique in our April meetings! They however will have two totally different designs, along with a technique sheet!

I will share the details of the technique with you in April, after my technique clubs are held. It’s really not that far away.

I used the “Petal Potpourri” stamps set with the coordinating “Flower Medallion Punch”. You can bundle these two items and save 15% … love that!  Also featured on the card is the “And Many More” stamp set … a must have in your collection. We just can’t have enough greeting sets, can we?

I hope you enjoyed this touch of spring, and have a wonderful day.

Thanks for stopping by ~

blog-closing-small

Today’s Stampin’ Supply List …

Click on any of the items for more details or to begin shopping.


Fun … New … Stampin’ Up! Videos

Hello Stampin’ Friends,

Today I want to share some great videos that Stampin’ Up! has just released on their YouTube Channel. Why am I sharing these? Well, the first one covers the “Irresistibly Yours” Specialty Designer paper that I have posted for the past two days, along with the newest of our Sale-a-bration papers; the Sheer Perfection Vellum (I’m waiting for mine to come, should be here today!)

We all love learning new techniques, so grab a cup of coffee, sit back and relax & enjoy the Coloring Techniques – Sale-a-Bration Papers …

The next video is a recently released Sale-a-bration item; For Being You Stamp set. I have showcased this in past posts. Enjoy the Watercolor Wash Technique ….


And last but not least is the “A Happy Thing” stamp set. I’m showing you this one because it is one that I do not have so I thought you might find the video … Watercoloring with Blender Pens

There are only 8 more days of our Sale-a-bration period, I don’t want you to miss out! Please let me know if you have any questions, or need my help in any way. You can contact me @ lindaluvs2stamp@aol.com

Thanks for stopping by and checking out the videos.

Have a wonderful Monday ~

blog-closing-small

Today’s Stampin’ Supply List …

CLICK HERE TO PLACE YOUR ORDER in my online store anytime, or click any of the photos below to go right to that item online.

Simply Sunday … You’re the Best!

Hello Stampin’ Friends,

Today I have a cute card for you, and as promised I have used the “Irresistibly Yours” Specialty Designer Paper and the “Simply Wonderful” stamp set.

Yesterday you saw Brenda’s swap that showcased sponging on the “Irresistibly Yours” Specialty Designer Paper and I have shared in a previous post (Click here to view) how to create a watercolor background with your Aqua Painters. You can also brayer this fabulous paper but …

today I’m going to show you how simple it is to use your markers and just color!

000_2088

Using my Pool Party, Bermuda Bay and Island Indigo markers (the original Stampin’ Write markers) nothing fancy … I simply colored the first 3 spaces with Pool Party, the next 3 with Bermuda Bay, the next 3 with Island Indigo, then back to Bermuda Bay until all the lines were filled in.

Then I used a “baby wipe” to clean off my specialty paper …. I wiped off the excess in the direction of the lines. Quick & gentle … just enough to get the excess ink off, it also helps soften any lines from my coloring.

000_2088-B

Using my 3 colors from light to dark also created the “Ombre” look… a very popular technique!

I did team up the Sale-a-bration items with the Bundle of the “Petal Potpourri” stamp set and coordinating “Flower Medallion” punch that is in the Occasions catalog – page 23. If Stampin’ Up! bundles it … I purchase it, I love the 15% savings!! Gives me more money to buy more goodies!

To finish off my flower, I added some of our Dazzling Details glitter adhesive (glitter glue) to the center. I think it adds just enough glitter without being over powering.

000_2088-C

How simple was that!? Just image all the color combinations you can do with this simple technique. This paper is amazing … you don’t want to miss out! Our Sale-a-bration period ends March 31st and all you need to do is make a purchase of $50 before shipping & handling and pick the Irresistibly Yours paper for your Sale-a-bration freebie!

I have the list of ingredients for making this card below. just click on any one of them to see more details or go to my on-line store.

000_2090

Thank you so much for stopping by my blog today.

Have an awesome Sunday!

blog-closing-small

Today’s Supply List …

Guest Stamper: Brenda M

Hello Stampin’ Friends,

Today I want to share with you a card I received from one of my downline members, Brenda! We had a team meeting last night, and of coarse we stamp and swap … so there will be more beautiful samples I will be sharing with you.

Brenda’s card is a celebration of Sale-a-bration! Her card showcases some of the fabulous items you can get free with a $50 purchase during Sale-a-bration …. and we have less than 2 weeks : (   to get all the freebies we need!

000_2079

Let’s begin with the stunning background piece Brenda created with the “Irresistibly Yours” Specialty Designer series paper. These come white with a glossy white pattern so you can color using a variety of techniques! Brenda created her’s by simply sponging the colors onto the paper and then wiping off any excess…. it really is stunning!

The beautiful butterfly and the flower come from a Sale-a-bration stamp set that was added to the already hefty list of freebies! This is the “Nature’s Perfection” stamp set…

139100G

And last by definitely not least is the “Simply Wonderful” stamp set Brenda used for her greeting. I love this stamp set, it has wonderful “useful” greetings with nice fonts … aren’t we always looking for new and more greetings!

139128G

000_2083

I hope you enjoyed Brenda’s card as much as everyone in our Star’s group did!  I will have more of our swaps to share in the upcoming week.

Be sure to stop back tomorrow for my “Simply Sunday” … I will also be featuring the “Irresistibly Yours” paper and the “Simply Wonderful” stamp set!

Thanks so much for stopping by …

Have a wonderful Saturday!

blog-closing-small

Weekly Deals & More …

Hello Stampin’ Friends,

So sorry I missed you yesterday, I took the day off to purge! I bought myself a new printer and new lights for my stampin’ studio, so I pulled everything out of my computer corner, vacuumed, scrubbed walls … and finally got the new printer set up! Yeah … my technique clubs will be so excited to get the technique sheets again!!

Speaking of my technique clubs … you may join in!  That’s right, with a $35 order, you will receive the current months technique sheet and projects! For example … this month our technique was “Blendabilities meets Heat Embossing”. If you place a $35 or more (before shipping & taxes) on-line and I will send you our projects!

Just as my club members do …  I know you will enjoy the technique sheet and projects (usually 2 cards). I am making this “retro-active” so anyone who has placed an order with me beginning in January 2015 … watch your mail box! You can join in at anytime … I will try to post my technique of the month in my class schedule (Just click on any of the Technique Clubs to view)

Please let me know if you have any questions.

blog-closing-small

Now … On to the Weekly Deals! I think Stampin’ Up! is a bit punchy because they have 3 awesome punches on sale for us this week …

What's Up What’S Up Punch Item # 133781
Regular Price: $16.95 US
Discounted Price: $12.71 US
Celebration Basics Kit Item # 133007
Regular Price: $14.95 US
Discounted Price: $11.21 US
Mosaic Punch Item # 131267
Regular Price: $15.95
Discounted Price: $11.96
Pansy Punch Item # 130698
Regular Price: $15.95
Discounted Price: $11.96
2014-2016 In Color Backgrounds Designer Series Paper Stack Item # 133705
Regular Price: $21.95
Discounted Price: $16.46
Pumpkin Pie 1/4″ Cotton Ribbon Item # 134565
Regular Price: $5.95
Discounted Price: $4.46
Daffodil Delight 1/4″ Cotton Ribbon Item # 134559
Regular Price: $5.95
Discounted Price: $4.46
Amped Up Ampersands Kit – Digital Download Item # 134844
Regular Price: $9.95
Discounted Price: $5.97


Guest Stamper … Patti S

Hello Stampin’ Friends,

Brrrrrr … It’s cold outside!! But I have a lovely card I’d like to share with you today from one of my stampin’ friends … Patti S. that is sure to warm you up.

I knew I had to show you this card when I opened the envelope. I am not as comfortable stamping “Collage” style and really haven’t used my “Gorgeous Grunge” stamp set to it’s full potential, but Patti’s card showcases it so well … I love it!

000_1986

Besides the “Gorgeous Grunge” stamp set, Patti used the stamp set “Flowershop”. What a great way to use these two sets together. The collage style or technique is using several stamps to create a cohesive design and this card is a perfect example.

Now … I’m not positive on the colors but it looks like our 2014 – 2016 In-Colors; Hello Honey, Lost Lagoon, and Tangelo Twist! Now there is a way to showcase your in-colors, and you know they go well together!

Patti chose the “A Dozen Thoughts” stamp set for the greeting and then highlighted it by adding the Bakers Twine directly below it.

To finish off the card she dotted some glitter glue into the center of her flowers which really draws your eye to the flowers. Beautiful card!

000_1983

OK … now that you get a closer look at the cardstock, do you think the colors are So Saffron, Marina Mist and Tangerine Tango?  Either way the color combination is stunning!

Thank you so much Patti for the beautiful card, and thank you all for stopping by today.

000_1986

Have a warm and wonderful day ~

blog-closing-small

TODAY’S STAMPIN’ SUPPLY LIST …


Simply Sunday Birthday Card …

Hello Stampin’ Friends,

Today it’s time to Celebrate your Big Day with Cake! And while we’re celebrating … let’s Sale-a-brate with FREE specialty paper! Today I’m sharing another technique that can be used on our “Irresistibly Yours” designer paper… Brayering over the stars!

I combined it with the “Ombre” technique: a color scheme that transitions from a lighter to darker shade. I only used the Coastal Cabana so the shading is very subtle. I brayered one layer over the entire card and then working from the left side, I added more color until I got the desired effect.

000_1918

Once you are done with the brayering, wipe off the excess ink from the card (the star’s will not absorb the color) and watch them pop!

I teamed my specialty paper with the “Big Day” stamp set … both are from our Sale-a-bration catalog and you can get them free. During Sale-a-bration you can chose exclusive items with each $50 you purchase. Gather your friends and have a party, or pass the book and do it on-line, or take those tax refunds and place your own order (I have many who do this during Sale-a-bration!)

I have a great tip for you today too … You can extend your banners by simply cutting a piece of cardstock that will slide through the punch (as shown below) and then pull to desired length. How sweet is that!

000_1914

Did you notice that the little white banner has been punched with the “Irresistibly Yours” designer paper. The banner punch is in our big catalog and can be found on page 223.

000_1915

A great birthday card for anyone at any age! Those are the best cards to have on hand.

Thanks for stopping by today!

Enjoy your day ~ 

blog-closing-small


Spotlighting Sympathy cards …

Hello Stampin’ Friends,

Yesterday I shared a “Wedding Card” with you, today I share a “Sympathy Card” … two stages of life that we go through and make cards to show our friends and loved ones that we care.

I wanted to create something simple because I find it very difficult to sit down and stamp a sympathy card when I need one, so I tend to turn to my designer paper. With all the beautiful designer papers we have, it’s not hard to find one that fits the occasion we need.

I chose the new “Adventure Bound” Designer Series Paper Stack found in the Occasions Catalog. Last time I used this paper I simply stamped my image directly onto the paper and mounted it onto the cardstock, however today I wanted to take it up a notch so I decided to do a “Spotlight”.

To create a “Spotlight” on my card I used the “Square Framelit Die” and I lined it up to the corner of the sun on my paper …

000_1908

Once I cut out my square, I mounted it onto a piece of Basic Black cardstock. Now I was ready to mount my spotlight onto the base of my card. The card base is Almost Artichoke and I used some black cardstock behind the paper to make it stand out more.

000_1909

The spotlight was mounted using the Stampin’ Dimensionals to add dimension too …

000_1910

I then stamped my salutation of “With Sympathy” from the “Bloom with Hope” stamp set. Please note that this is a Hostess stamp set and is not for sale but available as an exclusive stamp set when you place or host a qualifying stamping order or party. Contact me with any questions you may have.

I used Whisper White craft ink and the White embossing powder for my greeting … the combination of the two really makes it stand out so much more.

I took the piece of paper that I cut off of my designer paper and placed it on the inside to create a feeling of harmony on the card. The inside words also come from “Bloom with Hope” and were stamped with Black StazOn™ … my favorite black ink! I love that it’s a true black.

000_1912

Hope you enjoyed today’s card and take some time to create a few “Spotlight” cards of your own. I have always liked this technique when stamping, now I love that it works so well using these fabulous designer papers too. I didn’t have the heart to cover this one up with anything.

000_1910

Thanks for coming by today …

Have a great Saturday!

blog-closing-small

Today’s Stampin’ Supply List … Click on image for more details