Wonderful Weekly Deals…

Hello Stampin’ Friends,

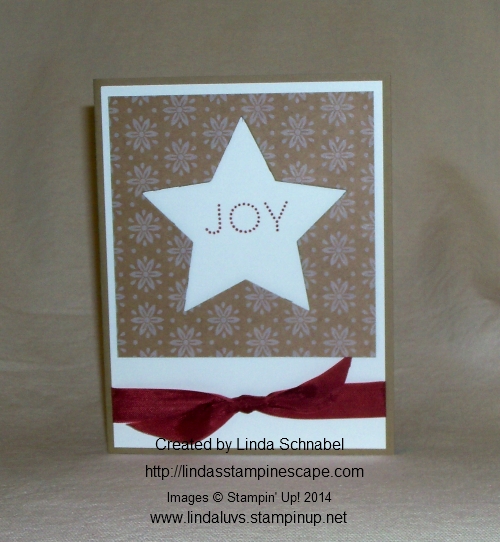
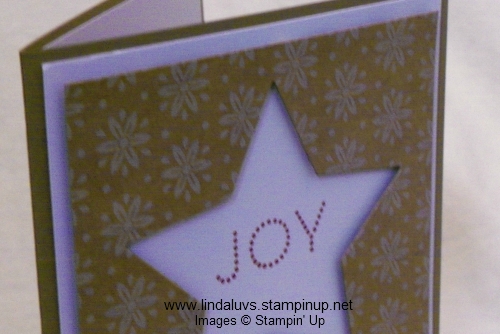
I know that I said I would be sharing one more card with my leftover pieces from retreat, however I wanted to share this weeks “Weekly Deals” with you …

Main_weeklydeals_olo_10.7-31.2014_SP_UK

We hope you enjoy this week’s Weekly Deals!

133375G Large Triangle Punch Item # 133375
Regular Price: $15.95
Discounted Price: $11.96
Silver Stampin’ Glitter Item # 133756
Regular Price: $3.95
Discounted Price: $2.96
Twine Baker’S Early Espresso Item # 123124
Regular Price: $2.95
Discounted Price: $2.21
Boys Will Be Boys Wood-Mount Stamp Set Item # 134135
Regular Price: $24.95
Discounted Price: $18.71
Shaker Frames Item # 124155
Regular Price: $4.95
Discounted Price: $3.71
Basic Black 3/4″ Chevron Ribbon Item # 130010
Regular Price: $8.95
Discounted Price: $6.71
Island Indigo 3/4″ Chevron Ribbon Item # 131151
Regular Price: $8.95
Discounted Price: $6.71
Grateful Heart Thanksgiving Ensemble – Digital Download Item # 127620
Regular Price: $14.95
Discounted Price: $8.97

For more details or to purchase any of the products shown, just click on the highlighted products description and it will take you to my on-line store.

You can combine the Weekly Deals with items from the annual catalog, holiday catalog or the Holiday supplement… you can even add items from the Clearance Rack!

Just click on any of the pictures below and you’ll be magically transferred into the pages of these fabulous catalogs …

CM1995B

CM2008B

CM493B

Please let me know if I can help you in any way!

Thanks so much for stopping by.

blog-closing-small

The Star’s are Shining Brightly …

Hello Stampin’ Friends,

Yesterday I told you that I was going to share with you another idea from my scraps, today it’s a 3-D project using the flip side of the paper.

First I will tell you that I cut the “Under the Tree” Designer Specialty Paper into 4 x 4 inch squares … it made cutting the star’s for my retreat projects easier.

Today I turned my scrap into luminaries …

000_1630

Such a quick and easy project! Cut some vellum into 4 x 4 squares and tape them to the inside of the cardstock. Then I taped my sides together with …. washi tape! That way if I made a bit of a mistake (crooked) I could lift it up, reposition and attach the side.

000_1632

Tomorrow I will have one more product share for you using my scrap pieces. How’s that for saving money! Then we can spend it on more fun stampin’ stuff! LOL

Have a fabulous week ~

blog-closing-small

Stampin’ Supply List …

Holiday Joy …

Hello Stampin’ Friends,

Happy Sunday to you! Today I’d like to share a simple card that I created out of my scraps from a retreat project!

Each retreat we create name tags for our guests, that are hung on the doors to their rooms. It’s just a cute little way to welcome them, and they get to take them home. Sorry I don’t have a photo of them this time.

This year we used “Star’s” … so not letting anything go to waste, I turned it into a card!

000_1625

I used the Baked Brown Sugar which coordinates well with the “Under the Tree” Specialty Designer Series Paper, and Whisper White. And of course, the BigShot and Star Framelit Dies.

The negative from the star is what I’m using for my card, and popping it up with Stampin’ Dimensionals to create that fabulous dimension we all love.

000_1628

My greeting “JOY” comes from the Project Life December Wonder Photopolymer Stamp Set …

136562G

You can find this stamp set in the 2014 holiday supplement. If you need the new supplement, please let me know. If you are a regular customer of mine, you will find it tucked in your last order 🙂

I coordinated my Cherry Cobbler seam binging with my greeting to complete the card. Don’t you just love sweet and simple Christmas cards!

000_1625

Thanks for stopping by and be sure to check back tomorrow as I will show you another version.

Have a simply serene Sunday ~

blog-closing-small

STAMPIN’ SUPPLY LIST …

Just click on any of the items listed for more details or to begin your shopping.


The Natural Beauty of Ornamental Pine

Hello Stampin’ Friends,

Wooo Hooo … the weekend is here and we’re kickin’ off November! Hope you had a good week.

Today I want to share with you a card that we had several discussions over at our retreat last weekend..

One of the ladies found a card on Pinterest and I commented that we had made that card at Alice’s stampin’ party as a Make & Take, but I changed the colors. For the life of me, I could not remember what colors I used! So here it is ladies …

000_1619

The base color used was “Crumb Cake” …I teamed it up with Early Espresso. My pine was stamped in the new “Mossy Meadow” ink and the stem filled in with the Espresso marker.

The smaller piece of Crumb cake was cut at 4″ x 2-3/4″ and the Espresso mat at 4-1/4″ x 3″. Simply place the smaller Crumb Cake onto the center of your folded base (I tack mine down with a bit of adhesive so it doesn’t move) and then stamp … use firm, even pressure and you’ll get a great image.

Pick up your smaller piece and mount it to your mat, then mount the mat directly onto the base. It’s so pretty… and so easy!

This was not my original design, I just “cased” it (Copy And Share Everything) and switched up the color scheme for a more natural look. You can follow me on Pinterest as well … CLICK HERE!

Don’t forget your coordinating envelope … and stamp that too! It’s always a treat when you open your mailbox and find a hand stamped card!

000_1623

Stampin’ Tip: Make sure your ink pads are properly inked to get the best stamped image. It’s always best to purchase an ink refill when you purchase your ink pad. If you have not done this, ink refills make a great filler when your adding to your orders.

I’d love to hear what you think, feel free to leave a comment below.

Thank you for taking time to visit me today ~

Have an awesome Saturday … see you tomorrow!

blog-closing-small

STAMPIN’ SUPPLY LIST …


Holiday Sweet Treats …

Happy Friday Stampin’ Friends,

And Happy Halloween! Today I have a quick -n- quick sweet treat to share with you. I’m using the “Tiny Treat Boxes” from the Holiday Catalog – page 10 to be exact.

These cute little boxes are quick and easy to pop up and have 25 in the package for only $6.95… perfect for passing along a sweet treat.

000_1617

To decorate I used designer paper to create a belly band … just think, you can do this for birthdays, Halloween, wedding favors – the possibilities are endless!

My flower was created with the (yes, it’s retired) 5 petal punch stamp set, but I know many of you have this punch, and I wanted a poinsettia as my flower. The center petals comes from the Boho Blossom punch.

We colored the pearls with the Blendabilities marker … and they turned out so cute.

These cute little boxes were made for my retreat attendees as a pillow gift on Friday night. Each box contained two Christmas truffles …. yum!

It’s that time of year again … and here in Wisconsin, we woke up to snow on the car!

Have a wonderful day ~

blog-closing-small

Gratitude for Days Project …

Hello Stampin’ Friends,

Today I would like to share with you one of our new Simply Created Kits … Gratitude for Days. The kit includes 33 note cards, 30 pockets, stickers, binder clips and bakers twine. It’s a wonderful way to journal what you’re grateful for…. instructions are included.

Here is a video that gives you an alternate way to use the Gratitude for Days Simply Created Kit …

STAMPIN’ SUPPLY LIST from Video …

blog-closing-small

Project Life by Stampin’ Up! Product Giveaway!

Hello Stampin’ Friends,

Slight change of plans today … you know how you tuck something away so it won’t get damaged or lost, and then you can’t find it … well that’s what I did with my swap cards!

However,  I have some updates and announcements to share with you, and I’m sure my swaps will turn up as I finish unpacking my supplies.

675642_c69bdad61755a4545431e5fc79c28d02

  • Are you a scrapbooker or memory keepers who have never heard of Project Life by Stampin’ Up!

  • Are looking for affordable solutions for documenting their life?

  • Are looking for creative yet easy ways to get their photos into albums?

 Here’s your chance to WIN … CLICK HERE TO ENTER!

One lucky winner will win a complete Project Life by Stampin’ Up! prize pack including every product available in the product line! You could also win one of 100 Project Life by Stampin’ Up! Card & Accessory Packs.

PROJECT LIFE GIVEAWAY CLICK HERE TO ENTER!

There is NO obligation … just enter for a chance to win some amazing product!

 Header_Recruiting_demo_10.1-31.2014_US

There are just a few days left, so don’t miss your chance to earn free Designer Series Paper for six whole months!

For more information CLICK HERE or contact me lindaluvs2stamp@aol.com

contact me hostess special

Only 2 days left to get your free “Good Greetings” stamp set … pass your catalog, collect the orders and give me a call 262-334-1009 or place the order on my on-line store! CLICK HERE

 Please let me know if you need any help with the great promotions listed, and be sure to enter to WIN the Project Life by Stampin’ Up! giveaway! I did!

Have yourself a wonderful Wednesday.

See you tomorrow ~

blog-closing-small

Our retreat stamping was in the bag …

Hello Stampin’ Friends,

Today is Day 2 of my “Holiday Retreat” series and I would like to take you along to our first stamping session on Friday evening.  After a dinner of hot turkey sandwiches, fruit salad, taco dip & chips and more, we retreated to our stamping area …

Stamp room - blog post

I set up the area before my guests arrive so they can just come in and begin the fun. The projects are pre-cut for them but they still get to do some of the BigShotting, embossing and punching.  On Friday we began with a project, an awesome bag they could take their cards home in and pass on for a gift.

I’m sure some of you recognize the “Paper Pumpkin” bag … One of the benefits of being a Paper Pumpkin supscriber is that you can order “past kits” when available … and this is one of my favorites!  I’ve personally used them many times.   Click Link for more information …

DemoHeader_PastKits_Demo_Feb18_NA

I jazzed it up with our beautiful “Under the Tree” Specialty Designer Series paper found on page 5 of the Holiday catalog. A touch of Old Olive behind it really highlights the snowflake pattern.

000_1613

The precious snowflake comes from the “Snowflake Card Thinlit Dies” and is done in the stunning Champagne Glimmer Paper. I will admit that the large Rhinestones used for the center are now discontinued, but my guests learned how easy it is to color any of their Rhinestones and Pearls with our Blendabilities … we used the “Skin Tone Assortment”.

I swapped out the ribbon from the kit and used the “Natural & Old Olive” Two-Tone Trim for the handles … they look so cool! All the colors came together so nicely to create a beautiful holiday bag that could be given to a man or women.

Tomorrow I’ll be sharing a few of the swap cards that my ladies created … we did an all occasion swap! There was a lot of talent in out stamping group!

The Stampin’ Supply List for today’s project is listed below.

Thanks for stopping by ~

blog-closing-small

Just click on the “Weekly Deals” to view.

Main_weeklydeals_olo_10.7-31.2014_SP_UK


STAMPIN’ SUPPLY LIST ….


Road to the Holiday Stampin’ Retreat …

Hello Stampin’ Friends,

Today I will be sharing a part of our Holiday Retreat with you. Follow me for wonderful trip on our road to the Holiday Retreat ….

10409707_10203171091703724_8630962295075691698_n

Photo was taken by Kris H.

We stay at the beautiful Green Lake Conference Center in Green Lake, WI.  Our house is a 1930 English Manor and nestled beautifully on the lake. This photo was taken during our lunch break … a time set aside so our guests can dine and then explore these beautiful grounds.

63934_740939272609550_6715905335555713241_n

This is the view  inside that greets our stampin’ friends as they arrive…

IMG_20141024_104027

The fireplace is adorned with a touch of Christmas Cheer and the dazzling little Curvy Keepsake boxes. Each guest got to take one home with them. We treat them to many little surprises throughout their retreat stay.

IMG_20141024_103758

Close up shot of our shimmery delights ….

IMG_20141024_103846

We added contrasting tags on our boxes to highlight the snowflake embellishment, and then embellished the snowflake with a rhinestone in the center!

One of the projects our guests made was this cute little Santa box also created with the Curvy Keepsakes die. Both of the boxes were inspired by a collection of boxes I have found on Pinterest.

000_1612

Click here to view my “Curvy Keepsakes” Pinterest Collection

I also have for you, a quick video on how easy it is to create these fabulously fun boxes…

I hope you have enjoyed the journey so far, I will be back tomorrow with more of our Holiday Retreat.

Thanks for stopping by ~

blog-closing-small

STAMPING SUPPLY LIST …

I’m back from our Holiday Stampin’ Retreat ….

Hello Stampin’ Friends,

I am back today from my Holiday Stampin’ Retreat. Each fall I host a stampin’ retreat to kick off the holiday season. It’s a time for my stampin’ friends (aka customers) to get away, relax and make some wonderful holiday cards and fun projects.

1901299_740543995982411_7848053151612984471_n

We also host a swap … everyone brings a set of cards and the winner recieves a $30 gift certificate. They vote for their favorite cards.

IMG_20141026_073015

We all enjoyed a beautiful weekend, had some well deserved downtime, and enjoyed each others company … another wonderful group of ladies.

Here are just a few comments:

Ann W – Thanks! What fun we had!

Alice K – Projects were lovey as always! Wonderful time.

Cheryl G – Had a great time at the stamping retreat! Thank You!

Kris H – Thanks for a great weekend!


 63934_740939272609550_6715905335555713241_n

Thank you for your patience in resuming my posts … Follow my blog this week for a bit more on the retreat and a showcase of some of the beautiful swap cards, and more.

Have a great week ~

blog-closing-small

Savings, Free Cardstock, Free Stamps … Oh My!

Hello Stampin’ Friends,

Today I want to share with you the weekly deals which include a couple of great stamp sets, some fun folders and more. If you need a stamp set for kids, the “Little Buddies” is perfect and if you want something a bit more “manly” … the “Setting Sail” is the answer to your problem.

CM1634B

I love the folders and the “Zig Zag” and “Fun Frames” are great additions to your embossing collection. Here is the entire list. Just click on any one (or more) for full details or to begin shopping.

Header_Recruiting_demo_10.1-31.2014_US

If you’ve ever wondered what it would be like to be a demonstrator … October is the perfect time to give it a shot try – with no commitment and no penalty to drop. During the month of October, when you sign up to be a Stampin’ Up! demonstrator, you will earn one FREE package of Designer Series Paper each month for six months. That’s a GREAT bonus to an already great deal… $125.00 of products for $99! You know I love Stampin’ Up! and now you’ll be part of our dynamic and fun Stampin’ Up! family. Click HERE to learn more or Contact me at lindaluvs2stamp@aol.com


contact me hostess special

It’s not too late to pass around that catalog and get your FREE “Good Greetings” stamp set.  Contact me and I’ll set up a Hostess Code for you, where your friends can order directly on-line and their order will be shipped directly to them! We will just need to close before the 31st so you can get YOUR FREE Stamp Set and Hostess goodies!

6a00d8354941d869e201b7c6d472dd970b-500wi

There is so many exciting promotions going on … let me know if you have any questions. That’s what I’m here for.

Have a wonderful Wednesday … it’s Friday for me, last day of work so I can pack up and present a fabulous weekend stampin’ retreat. I’ll be sure to share part of the experience with you.

You can also LIKE my Linda’s Stampin’ Escape Facebook page to follow the fun.

Thanks for stopping by!

blog-closing-small

Christmas Super Stars …

Hello Stampin’ Friends,

Today I’d like to share with you some fabulous ideas from our NEW “Holiday Supplement” … that’s right, for the first time ever Stampin’ Up! has released a supplement to our Holiday Catalog!  It is full of new & exciting products designed for you in mind and to meet your Holiday needs by providing fabulous kits for home decor, card making, and memory keeping.

 20141020TH_HolidaySupplement_en-US

CLICK HERE TO VIEW / CONTACT ME TO GET A COPY

My favorite, and the one I’m going to focus on today is the “Many Merry Stars” Simply Created Kit. Yes, a kit … designed so even novice stampers can create these fabulous stars. I like that, a time saver, especially around the holidays.

6a017744af3aa5970d01b7c6f6e15c970b-500wi

The Many Merry Stars kit is filled with die-cut pieces, peel-and-stick adhesive edges, and accents galore! Easy… yes, but you can still put your own twist to them if you’d like. Here are a few ideas from the home office …

0e8f316c55d8c9d682b830824e8f70bb

You can make fun and colorful ornaments for your tree with the Many Merry Stars kit from Stampin’ Up!


2ef4b8c23454ea3a5054d407bc9d86f9

Make your table setting with really sparkle with the adorable star boxes… I love this idea!

8efe677b45c59a1b609dc6fe64d8ef0e

And how about using them for …. Christmas Cards! So, so many things you could do, these are just a few.

 I’ve got mine, and you can be sure my house will be filled with these stars! Heck, I may even use them to “gift” with … because they are so adorable! I will finally have something neat to put those “gift cards” in!

Let me know if you would be interested in getting together to create some of these … we’ll have cookies and hot chocolate too! Just leave me a message below!

Thanks for stopping by today.

Have yourself a terrific Tuesday ~

blog-closing-small

ORDER YOURS TODAY …. Just click on the link below


All is Calm Christmas …

Hello Stampin’ Friends,

I hope you had a wonderful weekend. It’s Monday and back to work for many of us, so I’d like to begin with a simple, calm Christmas card.

Yesterday I showed you an easy layout which included the dimensions you’ll need to make the card. I also suggested that you could use this layout for any type of card, so today I’m here to show you …

000_1606

The card was created using the Lost Lagoon cardstock and “All is Calm” Designer Series paper. The pop of Whisper White really makes the “Merry Christmas” stand out. The greeting comes from the “Making Spirits Bright”, found on page 48 in the Holiday catalog.

All of the layers are “popped” up, using the Stampin’ Dimensionals … it gives so much depth and texture to the card.

I couldn’t resist adding the beautiful silver glimmer snowflake to really make the card feel like Christmas. The snowflake comes from the Snowflake Card Thinlet Dies (9 dies) in our Holiday Catalog.

000_1608

Hope you enjoyed my Christmas version of the simple layout I shared yesterday, and thank you for stopping by.

Have a great week ahead ~

blog-closing-small

LINDA’S STAMPIN’ SUPPLY LIST


Simply Sweet Layout …

Hello Stampin’ Friends,

Today’s card share is all about the layout and showcasing the designer paper … Motley Monsters!  This is the last in my Halloween series of cards and super simple to make!

000_1601

Here I have the “ghostly” side of the designer paper … the large piece is 4 x 3-1/2″ and the small is 4 x 3/4″. The Whisper White is also 4 x 3/4″ and all are mounted on the Sahara Sand cardstock.

My greeting is from the Paper Pumpkin kit … those stamps sure come in handy!

On this card I just used another pattern in the Motley Monsters and everything else remained the same!

000_1602

Just think … Birthdays, Christmas … anything!  Let your imagination run wild.

The first card sample was popped up with dimensionals, and looks even better than the photo.

Let me know what you think … and have fun with this layout!

Enjoy the rest of your weekend ~


Simply Halloween

Hello Stampin’ Friends,

Today I have a cute, super simple Halloween card for you…

000_1594

I used the “Freaky Friends” stamp set – I just had to have that little skeleton! Look at him just standing there … isn’t he just the cutest!

The “Happy Halloween” comes from that tried and true greetings set … Tiny Tiny Wishes. One of my go-to stamp sets.

I simply stamped my skeleton and greeting with Whisper White “CRAFT” ink and embossed it with white embossing powder. Most people use the VersaMark for embossing, but I love the way the “white on white” works.

The majority of my stampers who have done this technique, have purchased a White Craft pad.  You can find it on the bottom of page 210 in the Stampin’ Up! catalog or just click on the link in my Stampin’ Supply List at the bottom of this post.

I layered it on Elegant Eggplant and mounted it onto the Pumpkin Pie cardstock.

000_1596

I used a bit of bling from the September Paper Pumpkin kit to finish off my card … SIMPLE.

Thank you for dropping by today! Stop back tomorrow for my last post of my Halloween Series. I will be highlighting the Freaky Friends and Motley Monsters Designer paper.

Have a wonderful day ~

blog-closing-small

STAMPIN’ SUPPLY LIST …