Celebrate St. Patrick’s Day with a Touch of Crafty Charm!

Hello Stampin’ Friends ~

Today, the world celebrates the spirit of St. Patrick’s Day. It’s a day where green reigns supreme, shamrocks dance in the breeze, and the luck of the Irish is celebrated far and wide. What better way to honor this festive occasion than by crafting a card that embodies the essence of this joyous day?

Today I’ve conjured up a delightful ode to St. Patrick’s Day with my latest creation – a green and gold card adorned with a charming shamrock made of die-cut hearts. Let’s dive into the enchanting details …

The heart of our design lies in the Radiating Stitches Dies – a set that allows you to create intricate shapes with ease. By arranging these die-cut hearts in the shape of a shamrock, we capture the essence of luck and love intertwined. But what’s a shamrock without its stem? Fear not, for crafting the stem is as easy as a flick of the wrist with a circle punch. Simply punch twice from the edge of your cardstock, and voila – the perfect stem to complete our shamrock.

Now, let’s talk about the greeting which comes from the Throughout the Year stamp set. In crafting, there’s a technique called omitting – covering up part of the image and inking only the part you want to stamp. This technique adds depth and dimension to your creations. For our St. Patrick’s Day card, we’ve used this technique to highlight a festive message. And what better way to frame our greeting than with a gold mat, reminiscent of a shimmering coin found at the end of a rainbow? Then embellished with more gold from our Blooming Pearls collection.

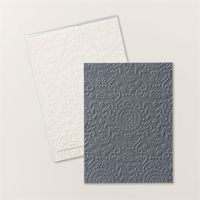
But the magic doesn’t stop there. The background of our card is embossed with the Countryside Blossoms Embossing Folder to give it a Celtic look, paying homage to the rich cultural heritage of Ireland. Image each swirl and knot which tells a story of tradition and folklore, adding an extra layer of charm to our St. Patrick’s Day creation. Bringing it all together is the spirit of St. Patrick’s Day – a day filled with laughter, joy, and a touch of mischief. This card captures the essence of this beloved holiday.

From my crafting home to yours, may your St. Patrick’s Day be filled with laughter, love, and the magic of handmade creations. Sláinte!

Thank you / Buíochas for joining me today!

Introducing April Paper Pumpkin: Delicate Wings

Hello Stampin’ Friends ~

Are you ready to spread your creative wings and let your imagination take flight? Then get ready to soar with the April Paper Pumpkin kit – Delicate Wings! This month’s kit is all about embracing elegance, with delicate butterfly pop-up die cuts, shimmering champagne foil, and an all-occasion, sophisticated color palette. Whether you’re crafting for a special occasion or simply want to add a touch of beauty to your projects, the Delicate Wings kit has everything you need to create stunning handmade cards and more.

But that’s not all! For those who want to take their crafting to the next level, we’re excited to announce the availability of an Add-On kit. Packed with coordinating dies; two butterflies… they layer! a hexagon shape and a “thanks” die, the Add-On kit is the perfect complement to the Delicate Wings Paper Pumpkin kit, allowing you to expand your creative possibilities even further. These dies also coordinate with the May and June Paper Pumpkin kits.

Don’t miss out on the opportunity to spread your wings and create something truly beautiful with the April Paper Pumpkin kit – Delicate Wings. Subscribe by April 10th to ensure you receive this exquisite kit delivered right to your door. Join the Paper Pumpkin family today and discover the joy of crafting with purpose and passion. CLICK HERE TO SUBSCRIBE

Thanks for stopping by today, enjoy your week!

Embrace the Essence of Easter with the Enchanting Easter Lilies Bundle

Happy Sunday Stampin’ Friends,

As we approach the sacred season of Easter, it’s a time for reflection, renewal, and reverence. One of the most beautiful ways to capture the spirit of this holy occasion is through heartfelt crafting. And what better way to do so than with the captivating Easter Lilies bundle?

With this bundle, I embarked on a creative journey, selecting the Glorious Grape shade, a color imbued with symbolism that echoes the essence of Lent – penance, humility, and a profound sorrow for the suffering of Jesus. It’s a hue that speaks volumes, reminding us of the sacrifices made and the journey of faith we undertake during this solemn period.

Complementing this regal color, I opted for Crumb Cake cardstock and embellishments, elements that gracefully symbolize the enduring symbol of Christianity – the cross. As I worked with these materials, I felt a sense of connection to the profound narrative of Easter, each choice and embellishment placed carrying the weight of centuries of tradition and faith.

Stamping palms with Garden Green ink onto Garden Green cardstock, I couldn’t help but marvel at the versatility of this bundle. While Easter may be its focal point, its potential extends far beyond the confines of a single holiday. It’s a tool for expressing devotion, gratitude, and joy throughout the year, infusing every creation with a touch of spiritual significance.

This bundle isn’t just about crafting; it’s about crafting with intention. It’s about infusing each project with meaning and purpose, allowing creativity to intertwine with faith in a truly profound way. Whether you’re creating cards, decorations, or keepsakes, the Easter Lilies bundle serves as a conduit for both artistic expression and spiritual reflection.

As we prepare to celebrate Easter, let us embrace the beauty of this season and all it represents. Let us take a moment to pause, to create, and to connect with the deeper significance of the holiday. And what better way to do so than with the enchanting Easter Lilies bundle, a treasure trove of inspiration and symbolism waiting to be explored.

I thank you and appreciate you taking time out of your Sunday to stop by my blog today. God Bless.

My apologies, I did not realize that the embellishments I used had been discontinued. May I suggest the Brushed Metallic Dots as they could represent the nails in the cross.

Unveiling Paper Pumpkin’s All-Occasion Card Kit / Memorable Meadows

Hello Stampin’ Friends ~ In a world filled with digital communication, there’s something profoundly special about receiving a handcrafted card. It speaks volumes about the sender’s care and thoughtfulness. And for those who want to do it simply … I introduce Paper Pumpkin’s latest offering, the Memorable Meadows kit.

Embrace Elegance with Memorable Meadows:

Imagine a tranquil landscape stretching before you, a scene painted with delicate brushstrokes and vibrant hues. That’s precisely the ambiance Paper Pumpkin’s Memorable Meadows kit brings to life. With its detailed landscape scenery, vellum pieces reminiscent of morning mist, and wood-pressed embellishments evoking the rustic charm of the countryside, every card crafted becomes a work of art…. and it’s designed for you!

What sets the Memorable Meadows kit apart is its versatility. Whether you’re expressing heartfelt gratitude with an elegant thank you card, celebrating a loved one’s birthday with whimsical charm, or simply letting someone know they’re on your mind with a thoughtful gesture, this kit has you covered. The all-occasion sentiments included offer a myriad of ways to convey your sentiments, ensuring there’s a perfect message for every occasion.

As if the Memorable Meadows kit wasn’t enticing enough on its own, Paper Pumpkin sweetens the deal with a special March offer. Each subscription kit this month comes with a complimentary gift—an additional photopolymer stamp set. Expand your stamping arsenal and unlock even more creative potential as you embark on your crafting journey with Paper Pumpkin.

As we navigate the complexities of modern existence, let us not forget the simple joys that enrich our lives. Take a moment to embrace the art of crafting with Paper Pumpkin’s Memorable Meadows kit. Lose yourself in the beauty of intricate landscapes, revel in the joy of creative expression, and delight in the connections forged with each card sent. With every stroke of your pen and every carefully placed embellishment, you’re not just crafting cards—you’re crafting memories that will be cherished for years to come.

Crafting Magic with Flight & Airy Designer Series Paper, Heartfelt Hello’s Stamp Set, and Everyday Detail Dies

Hello Stampin’ Friends ~

Today, we’re diving into the realm of creativity and exploring the delightful synergy that occurs when we combine versatile crafting materials. In this blog post, we’ll shine a spotlight on three amazing products: the Flight & Airy Designer Series Paper, the Heartfelt Hello’s Stamp Set, and the Everyday Detail Dies. While not a bundle per se, these items harmonize effortlessly to unlock a world of artistic possibilities. Best part? The Flight & Airy Designer Series Paper and the Heartfelt Hello’s Stamp Set are available in the Sale-a-bration catalog, making them even more irresistible with qualifying purchases, because they are exclusive and FREE!

Let’s start with the Flight & Airy Designer Series Paper. True to its name, this paper collection exudes a sense of lightness and elegance. With its dreamy patterns featuring delicate florals, beautiful birds, and soft color palette, it’s perfect for adding a touch of whimsy to any project. Whether you’re creating cards, scrapbook layouts, or home decor pieces, this paper serves as a versatile backdrop that sets the stage for creativity to take flight.

Next up, let’s talk about the Heartfelt Hello’s Stamp Set. This stamp set is all about spreading love and positivity with its heartfelt sentiments and charming imagery. From sweet greetings to thoughtful messages, each stamp is designed to convey warmth and sincerity. Paired with the Flight & Airy DSP, it adds a personal touch to your creations that’s sure to make hearts flutter.

Last but not least, let’s explore the Everyday Detail Dies. These versatile dies are the perfect finishing touch for your crafting projects, adding intricate detail and dimension with ease. Whether you’re die-cutting delicate embellishments or creating striking borders, these dies elevate your creations to new heights of beauty and sophistication.

Now let me show you how these 3 items work together like a beautifully choreographed dance. For both of my cards I am using the Largest of the rectangle dies (upper left-hand corner of picture above), this die cuts two ways. I started with a piece of Basic White cardstock cut to 5″ x 3 3/4″, as it cuts, it leaves you with two pieces … a frame and a second rectangle I’ll use on the “second” card. Let’s look at our framed design:

The designer paper in the back was cut to 5 1/4″ x 4″ so it would peek out from behind our frame. The beautiful bird was “fussy” cut from the designer paper and our greeting was Heat Embossed in white and embellished with the Iridescent Rhinestones … just a little bling for mama.

Here you will get a good feel on all the dimension this adds to your card …

Time to shift our creativity to the center piece of the large rectangle die cut. Let’s begin with some Misty Moonlight and our blending brushed for just a hint of color to highlight our birds. Our backdrop piece of designer paper also comes from Flight & Airy and was cut 3/4″ larger than the rectangle piece.

Our greeting, from the Heartfelt Hello stamp set was stamped with Misty Moonlight Ink and die cut from the smallest rectangle in our featured die set today: the Everyday Details Dies.

In the world of crafting, the possibilities are truly endless, and the Flight & Airy Designer Series Paper, Heartfelt Hello’s Stamp Set, and Everyday Detail Dies are here to help you unlock your creativity and bring your artistic visions to life. Whether you’re a seasoned crafter or just starting out, these products offer a winning combination of beauty, versatility, and fun. So why wait? Dive in, unleash your imagination, and let the magic begin!

Thank you for joining me today. Have a Happy Wednesday!

Class Announcement: Perennial Postage

Are you ready to embark on a creative journey filled with beautiful lavender florals, butterflies, postage dies and sparkling embellishments? Then look no further because I am thrilled to invite you to my Perennial Postage Class, where we’ll explore the art of blending these essential elements of stamping.

In the Perennial Postage Class, we will explore the numerous possibilities of coordinating our die-cutting, stamps, and designer paper to create lovely cards. This class is designed to inspire and elevate your crafting, whether you are new, or a seasoned pro. From mastering fun techniques to discovering innovative ways to combine patterns and textures, every card promises to be a delight to the eye.

Prepare to be immersed in a world of creativity and fun! Our Perennial Postage Class is not just about learning—it’s about enjoying the process, unleashing your imagination, and embracing the joy of crafting together. With laughter, camaraderie, and plenty of exciting projects to work on, every session promises to be a memorable experience you won’t soon forget.

 —it’s time to let your creativity bloom in the Perennial Postage Class!

  • Date: Wednesday, February 28th
  • Time: 10 am / I will add a  6:30 pm Class if I have enough interest.
  • Cost: $25 / Includes all projects, envelopes, snacks & more!
  • Location: My Stampin’ Studio / West Bend
  • RSVP: By Sunday, February 25th

Don’t miss out on this fantastic opportunity to elevate your stamping skills and connect with fellow crafting enthusiasts. Reserve your spot today and get ready for an unforgettable journey in the world of Perennial Postage!

Introducing the March 2024 Paper Pumpkin Kit: A Springtime Delight!

Hello Stampin’ Friends, 

Spring is just around the corner, and what better way to welcome the season of renewal and freshness than with our latest Paper Pumpkin Kit? This March, we’re thrilled to present a kit that embodies all that nature has to offer, and this kit coordinates with the with the Meandering Meadows Suite Collection (item 162745).

The Paper Pumpkin kits by Stampin’ Up! offer a delightful crafting experience with a plethora of benefits. Firstly, these all inclusive crafting kits provide convenience and simplicity, as they come with pre-designed projects and all the necessary materials, saving time and hassle for you no matter what level of crafter you are… just beginning or totally experienced! I’ve been doing this for 24 years, and I love to discover new products and techniques. This makes it easy.

Secondly, the March kit’s coordination with the Meandering Meadow Suite ensures a seamless crafting experience, allowing you to easily expand your creative possibilities and match our projects with other coordinating products. You also have the option to purchase our exclusive “add on” dies! You must be a Paper Pumpkin subscriber to order these.

Moreover, these kits foster creativity and inspiration, offering a platform for crafters to explore new techniques and experiment with different designs. Did I mention that a FREE Gift is included in the March Kit?

What I love about Paper Pumpkin is that the subscription model offers flexibility, allowing you to easily manage your crafting schedule and receive exciting new projects every month. It makes our crafting an enjoyable and stress-free experience. Overall, Paper Pumpkin kits bring joy, creativity, and convenience to crafting enthusiasts, making them a beloved choice for creative expression.

Thanks for dropping in and checking out my blog today. 

Have a great Valentines Day!! ❤

One more thing!! During Sale-a-bration you can choose FREE Exclusive Sale-a-bration Items when you purchase one of the subscriptions below. Win / Win!! We’ve also added on some of our Favorite Items from the catalog you can choose from. I’ll post that picture below ….

Upcycling Leftovers: Shaker Card for Valentine’s Day

Hello Stampin’ Friends ~

In my last blog post I shared the “Double Box Fold” Card with you, but what do you do with the leftovers? You repurpose your leftover materials to craft a charming shaker card. If you’re a fan of recycling and getting creative with what you have on hand, this project is perfect for you! Are you ready to add an extra touch of love to your Valentine’s Day greetings?

Cut a piece of clear acetate sheet slightly larger than the opening of the leftover piece. Adhere it to the backside of the die-cut piece using adhesive, ensuring it covers the entire opening securely.

Carefully apply foam adhesive strips around the edges of the die-cut piece, creating a border around the acetate window. Make sure there are no gaps where the sequins could escape. Pour a generous amount of Loose Silver Sequins onto the center of your card base. Sprinkle in some hearts from the Sending Love Dies to add a romantic touch to your shaker card.

Now, carefully place the acetate-covered die-cut piece over the card base (centering it), and ensuring the sequins and hearts are securely trapped inside. Press down firmly on the edges to seal the shaker element.

Once your shaker portion is complete, it’s ready to add a greeting and embellish. Greeting comes from the Throughout the Year stamp set and die cut with the Everyday Details Dies. I glued a few of my sequins on the card front to embellish, and then embellished my embellishments by adding the Iridescent Rhinestones inside of them. I also add a couple hearts at the top for a pop of color and interest.

Now it’s ready to spread love and joy to your friends and family. Whether you’re mailing it to a loved one or hand-delivering it with a hug, this handmade creation is sure to bring a smile to their face. PS. Swap out the greeting for an All Occasion / Just Because I Care card!!

Thanks for joining me today ~

Exploring the Watercolor World Stamp Set

Welcome back, stampin’ friends!

Today, we embark on a journey through the vibrant realm of watercolors, highlighting the Watercolor World stamp set. This stamp can handle a treasure trove of possibilities, inviting us to unleash our creativity. Today I’ll share just four unique stamping techniques. Alongside, I’m pairing it with complementary stamp sets to elevate our creations to new heights with the right sentiments.

Grab a coffee, tea or whatever you like and join me for a short video that brings these magical techniques to life. This is a replay of my Facebook LIVE last Tuesday. Just click on the image to view …

The Watercolor World stamp set invites us to embark on a journey of boundless creativity, where every brushstroke tells a story and every impression leaves a lasting impression. From heat embossing to emboss resist, each technique offers a glimpse into the endless possibilities that lie within our grasp. 

Let’s take a closer look at our cards ….

Let’s delve into our basic stamping and embossing, accompanied by the Thoughtful Expressions Bundle. This technique marries simplicity with refinement, as we create timeless masterpieces with ease. Combined with embossing folders, the Watercolor World stamps transform into captivating works of art, ready to adorn any occasion.

Ready to immerse yourself in the magic of direct-to-rubber stamping technique? Then enhanced by the Sending Smiles stamp set which dances across the continents! This technique introduces a delightful twist to traditional stamping, infusing your creations with a watercolor-inspired allure. The Stitched with Whimsy dies also creates not only texture, but the feeling you are traveling with them.

Our third technique, emboss resist, is a testament to the versatility of the Watercolor World stamp set. Paired with the He’s All That stamp set, we embark on a journey of exploration and experimentation. As we apply layers of color over our heat embossing, intricate designs emerge, unveiling a world of possibilities. Witness as the stunning effects of emboss resist unveil intricate patterns (our continents) and textures, captivating the eye and igniting the imagination. So fun and so easy to do.

Our final technique is a blend of elegance and charm. With the Perennial Postage Bundle by our side, we’ll embark on a journey of heat embossing on designer paper. This method infuses sophistication into our projects, adding depth and dimension effortlessly. Watch as the intricate designs of the Watercolor World stamp set come to life against a backdrop of luxurious patterns. 

As we pair these techniques with complementary stamp sets, we unlock new dimensions of inspiration and innovation, transforming simple materials into works of art that delight the senses and nourish the soul. So, gather your supplies, unleash your imagination, and let the Watercolor World stamp set be your guide on a voyage of discovery and delight. 

Thank you for hanging out with me today. And remember … I’ll be going LIVE again tonight with a beautiful FUN FOLD Card you won’t want to miss. Join me on my Facebook page.

A Perfect Pairing: Perennial Postage Dies and Sending Love Bundle

Hello Stampin’ Friends ~ Today, I’m excited to introduce a perfect pairing that takes your handmade cards to new heights – the Perennial Postage Dies and Sending Love Bundle. These two sets seamlessly come together, allowing you to craft beautiful greetings that will surely warm the hearts of your loved ones. I don’t normally share cards from my classes, but today I will. Keep an eye out for my upcoming classes!

Birthdays are special occasions, and what better way to celebrate than with a personalized touch? The Wanted to Say Dies offer a versatile and elegant way to express your birthday wishes. These dies beautifully complement the Perennial Postage set, creating a harmonious blend of sophistication and sentiment.

Adding the right background to your cards can elevate the entire aesthetic. For our featured creation, we’ve chosen the Flight & Airy Watercolor design from the FREE Sale-a-bration item collection. This exquisite designer paper brings a whimsical and dreamy element to your cards, creating a perfect backdrop for the Perennial Postage Dies and the Wanted to Say sentiment.

Additionally, the 6 x 6 Lighter than Air Designer Paper from the Spring Mini Catalog adds a touch of elegance to our Happy Birthday Greeting. The delicate patterns and soft color palette of this paper create a visually stunning contrast, making your card a true work of art.

Now, let’s talk about the Sending Love Bundle, which is the ideal companion for the Perennial Postage Dies. This bundle includes a set of coordinating stamps and dies, allowing you to create intricate and charming mailboxes & envelopes to accompany your cards. The attention to detail in both sets ensures that your creations are not just cards but expressions of love and thoughtfulness. 

With the Perennial Postage Dies, Sending Love Bundle, and the carefully chosen designer papers, you have the perfect recipe for creating heartfelt and visually stunning cards. Whether it’s a birthday celebration or any other special occasion, let your creativity soar with this perfect pairing. Create Card, send, and spread love with every handmade creation!

Thank you for spending part of your Sunday with me!

Most Adored Double Box Fun Fold Card

Hello Stampin’ Friends ~ As we continue our journey through the enchanting world of crafting with the Most Adored Specialty Designer Paper, today marks the 4th day of exploration. In this blog post, my spotlight hues for the day are the rich Cherry Cobbler and Shaded Spruce. The floral patterns of the paper come to life as we unleash the magic of Stampin’ Blends. The Pansy Patch stamp set takes center stage for a heartfelt sentiment, while the Stitched with Whimsy Dies add a touch of whimsical charm. Let’s take a look at today’s creation! 

I thought it would add some excitement by highlighting my paper with the Double Box Fold, a fun fold that lays flat in the envelope for mailing. The Most Adored Specialty Designer Paper, in the pretty floral pattern, becomes a canvas for creativity. Using Stampin’ Blends in Cherry Cobbler and Shaded Spruce, infuse vibrant hues into the delicate blooms. The seamless blending of colors adds depth and dimension, transforming the paper into a work of art that harmonizes perfectly with the regal touch of gold. 

For the sentiment, I chose the Pansy Patch stamp set, which offers a perfect blend of grace and sentimentality. Stamp a heartfelt message onto the card, and then use the Stitched with Whimsy Dies to frame and highlight the sentiment. The intricate stitching adds a touch of sophistication, making the sentiment a visual focal point on the card.

What do you think of my version of this fancy fold card?

Here are the Measurements:

Colored Base: 4 1/4″ x 9 1/2″. Score at 6″, 6 1/2″, 8″ and 9″
Colored Front Panel: 3″ x 5″. Score at ½″ x 1 1/2
Designer Series Paper: TOP: 4″ x 5 1/4″ BOTTOM: 4″ x 1 1/4″
White Backing: 4″ x 5 1/4″ (This area is for you to write)  White Card Front: 2¾″ x 3 1/4″

On the Flip Side

We continue the fun with project #2: Our Scallop Gift Card Box found on page 126 of your Annual Catalog. The Scallop Gift Card Box, enhanced by the captivating “flip side” of today’s featured Most Adored Specialty Designer Paper; the Flirty Flamingo Swirl, exemplifies the art of playful gift presentation.

When you flip open the top, your recipient will discover their favorite Gift Card, you could even create your own!! Elevate your gift-giving experiences with this charming creation that combines style, surprise, and the timeless allure of handmade craftsmanship.

As we continue this crafting journey, the potential for inspiration and creativity remains boundless. Stay tuned for more enchanting discoveries with the Most Adored Specialty Designer Paper. 

Thank you for checking out my blog today, hope your day is a good one!

Here is the list of supplies used for today’s projects. Clicking on any image will take you directly to my Online Store. Thank you!

A Handcrafted Masculine Card in Green & Gold

Hello Stampin’ Friends ~

In this blog post, we’ll explore the creation of a stunning card using the Most Adored Specialty paper and incorporating the captivating “Ink Dragging Technique.” The result is a visually striking combination of Shaded Spruce and Gold, enhanced further by the use of Gold Foil sheets and a touch of sentiment from the “He’s All That” stamp set.

To begin, select the Most Adored Specialty Paper as the canvas for your card. To add depth and dimension, employ the Ink Dragging Technique using Shaded Spruce ink. The gentle strokes of color will create a captivating visual effect, giving the paper an alluring quality.

Next, I introduced the Gold Foil Sheet to complement the rich Shaded Spruce tones. Cut and layer the foil strategically / cutting diagonally allowing it to bring out the luxurious gold accents on the card. For a heartfelt touch, use the “He’s All That” stamp set to heat emboss your sentiment in gold. Once embossed, utilize the Heartfelt Hexagon Punch to give the sentiment a distinctive shape, adding a touch of sophistication to the card.

On The Flip Side:

When you turn over the Most Adored gold pattern it reveals a delightful surprise on the flip side. Against a backdrop of flirty flamingo, white floral hearts bloom, creating a charming contrast. This pretty design adds an element of playfulness to our overall card design. 

For the greeting, I used the “Sending Smiles” stamp set and coordinating Sending dies. Cut out the delicate elements and arrange them onto your card front. To accentuate the design, embellish with silver pearls from the Festive Pearls package. These pearls add a touch of elegance to our card.

Crafting a handmade greeting card is an art form that allows for the expression of creativity and thoughtfulness. By showcasing the allure of the Most Adored Specialty Paper, either card is sure to leave a lasting impression on its recipient.

Thanks for taking time out of your Sunday to check out my cards today.

“Most Adored: A Glittering Affair in Gold and White”

Hello Stampin’ Friends ~ 

Continuing my highlights of Color Combinations; today, we delve into the enchanting realm of gold and white, a pairing that exudes opulence and sophistication. Our spotlight shines on the Most Adored specialty designer paper adorned with this stunning duo. 

At the heart of this masterpiece lies the Gold and White Specialty Designer Paper, that whispers of elegance and luxury. The intricate rose pattern in shimmering gold elevate this paper from ordinary to extraordinary. Each petal brushed with a touch of magic – the Wink of Stella glitter brush. This subtle yet enchanting addition brings the roses to life, creating a mesmerizing sparkle that captures the essence of sophistication. 

The sentiments come from the “Enduring Beauty” stamp set, embossed in gold and die-cut using the Scallop Contours Dies, adding a touch of intricacy to the overall design. The marriage of elegant script and the golden-white palette creates a sentiment that resonates with enduring charm, making it perfect for an anniversary or wedding card.

On the Flip Side: A Playful Contrast

As we flip over the designer paper, a delightful surprise awaits – a Real Red background adorned with small white hearts! I wanted to add a playful touch and die cut it with the Scallop Contours Dies.

The sentiment on this side hails from the “Bee Mine” stamp set, mirroring the whimsical charm of the small white hearts. The “Happy Valentines Day” sentiment with the hand stamped hearts are die-cut with the Something Fancy Dies, creating a harmonious connection between the elements. This playful touch evokes feelings of joy and warmth, making it ideal for projects celebrating love and friendship.

Today, we’ve explored more creative options using the Most Adored Specialty Designer Paper, where gold and white weave a tale of timeless elegance, and its flip side, adorned with playful Valentine patterns, which adds a touch of whimsy to the mix. What makes this experience even more delightful is the opportunity to acquire it for free with a $50 purchase during Sale-a-bration.

With every stroke of the brush, and every heartfelt sentiment, the Most Adored Specialty Designer Paper in gold and white becomes a canvas for your imagination. I have more color and techniques to share so be sure to pop in everyday. Better yet, Click the “Follow Me” button at the top right side of my blog! 

Thank you for joining me today. Happy Saturday!

I’ve added the links to the products used for your shopping convenience …

Most Adored Gold with Night of Navy Accents

Hello Stampin’ Friends,

In the world of crafting and creative expression, certain elements stand out as timeless and beloved. Gold is undoubtedly one such element, radiating opulence and sophistication. Today, our product spotlight revolves around the Most Adored, and we’re going to explore how Night of Navy, a rich and deep hue, beautifully complements the regality of gold. 

The Most Adored Designer paper has captured the hearts of stampers worldwide with its premium quality and versatile appeal. Along with the Gold Foil designs and cute Valentine designs on the “flip side”, what makes it so popular is that you can get it for FREE during our Sale-a-bration promotion, with a qualifying purchase.

For today’s creative adventure, we turn our attention to Night of Navy. This deep, dark blue is synonymous with elegance and pairs seamlessly with the richness of gold. I used the swirl pattern and infused it with Night of Navy ink and my Water Painter. It appears to be dancing harmoniously with the golden accents, creating a mesmerizing effect.

I used the Watercolor Wash Technique over the Most Adored Designer paper, as it dries it lightens, so I went back over some areas with more ink to get the true Night of Navy color too. The die cut circles with a border of circles comes from the Everyday Detail Dies. And to take it over the top … I embossed the Paper Butterfly in Gold and embellished it with gold pearls from the Festive Pearls collection. 

On the flip side, we delve into the romantic realm with Card #2. Here, I used both sides of this sheet of designer paper with punched Hearts, and die cut the little hearts from our Sending Love Dies. As we approach the season of love, this creation becomes the perfect canvas for a heartfelt Valentine’s Day card. The Basic White background adds a sense of stability, making the hearts pop with warmth and affection.

My greeting comes from the Throughout the Year stamp set. You all know I love my sentiment sets, especially when they provide so much versatility as this one does. This was highlighted by die cutting the greeting from the Something Fancy Dies.

I’ll conclude the Most Adored collection, with its resplendent gold and Valentine themed flip side takes center stage in the world of crafting. The Night of Navy emerges as the perfect companion, adding depth and elegance to our project. So, whether you’re crafting a mesmerizing swirl pattern or crafting a heartfelt Valentine’s Day card with punched gold hearts, embrace the magic of Most Adored Designer Series paper.

Thank you for joining me today, I’ll meet you back here tomorrow featuring yet another color combination, and flip side card!

Trusty Tools Masculine “Valentine” Card

Hello Stampin’ Friends, 

I’m so excited to share this adorable card with you today. I’m introducing the Trusty Tools Designer Series Paper – a crafting essential that adds a touch of creativity and charm to your projects! As part of the exclusive designer series, this paper is a must-have for any stamping enthusiast looking to elevate their creations. With its vibrant colors, intricate patterns, and high-quality design, the Trusty Tools DSP is sure to inspire your imagination.

I created this for my Tutorial Group I’m in ….

Measurements:

  • Cardstock: Basic Black 8 ½” x 5 ½” Scored and folded at 4 ¼”
  • Cardstock 2:  Basic White: 5 ¼” x 4” (Inside) and scrap for greeting
  • Cardstock 3: Poppy Parade 5 ¼” x 4”
  • Designer Paper: Grid Design: 5” x 3 ¾” plus fussy cut 2 pencils / tape measure and cut strip of tape measure DSP
  • Vellum Cardstock: Scrap piece large enough to die cut postage die

Instructions:

  • Score and fold Black cardstock at 4 ¼” / Attach White cardstock to inside
  • Attach Grid design designer paper onto Poppy Parade and then attach to front of cardstock
  • Stamp greeting with Poppy Parade Ink  onto scrap white cardstock and fussy cut.  Attach it to strip of tape measure design and piece together using dimensionals.
  • After fussy cutting designer paper elements, attach them to tape measure designer paper with dimensionals (as shown on sample).
  • Die cut postage rectangle from Vellum Cardstock and secure with Stampin’ Seal  to left hand side of cardfront, leaving a nice border around the other 3 sides.
  • Remove backs from dimensionals and attach your assembly to cardfront over vellum.
  • Using hearts die from the Sending Love dies, die cut from Poppy Parade and attach with Glue Dots. 
  • Send the love 

What makes it even more exciting is the opportunity to earn this fantastic paper for FREE with a qualifying purchase during Sale-a-bration! Imagine unlocking a world of artistic possibilities while enjoying the perks of complimentary crafting supplies. Don’t miss out on this limited-time offer – indulge your passion for crafting and let the Trusty Tools Designer Series Paper be the secret ingredient that takes your projects to the next level! 

Thanks for stopping by, have a superb Saturday!