I’ve got one more card from the Peace & Joy Bundle that I would like to share with you. I think I’m just fascinated with the layering of a greeting!
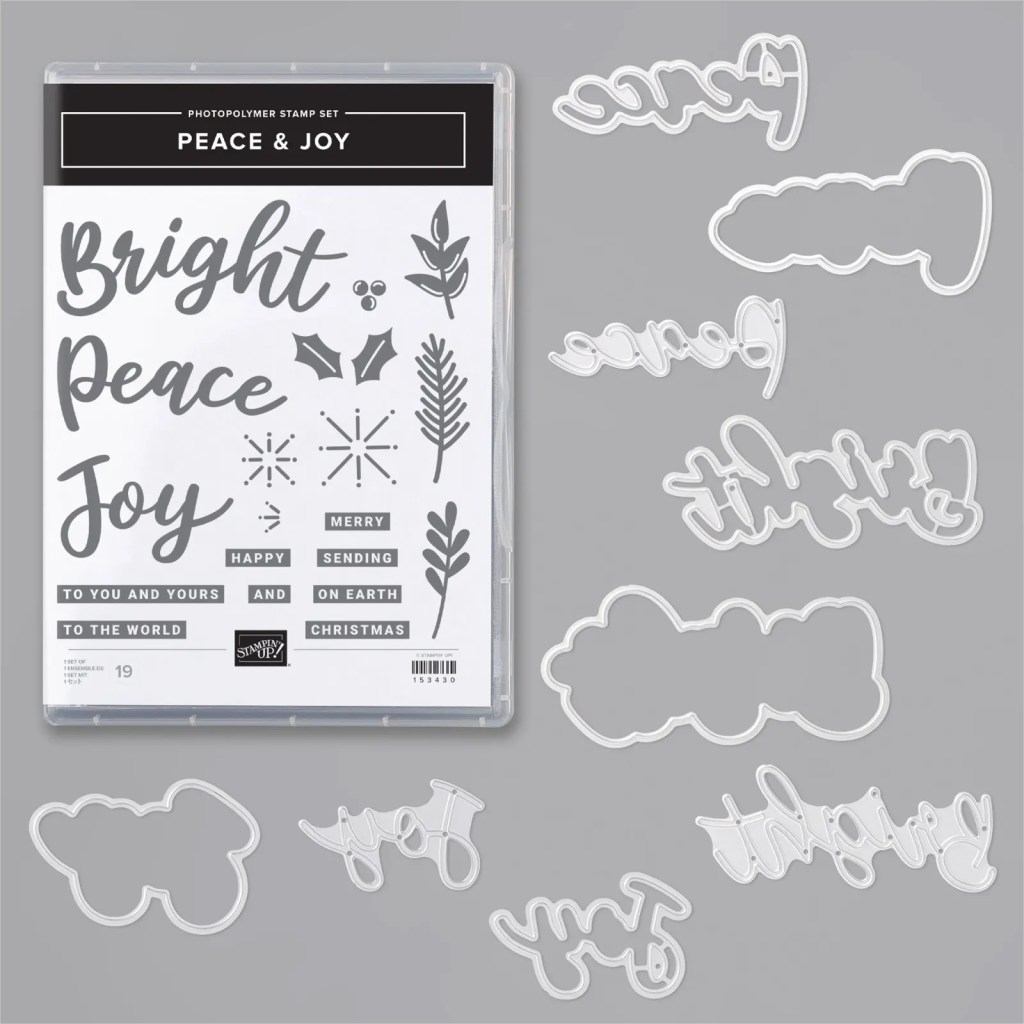
Check out the the Peace & Joy Bundle! This bright, cheerful bundle includes the Peace & Joy Stamp Set and Joy Dies and if you purchase them together using the special bundle item number, you’ll get them at a 10% discount!
The Peace & Joy Bundle has everything you need to create festive, fridge-worthy holiday cards! I love layering the dies to add depth and dimension to my holiday greetings. With this bundle, you can stack, stamp, layer, and more!
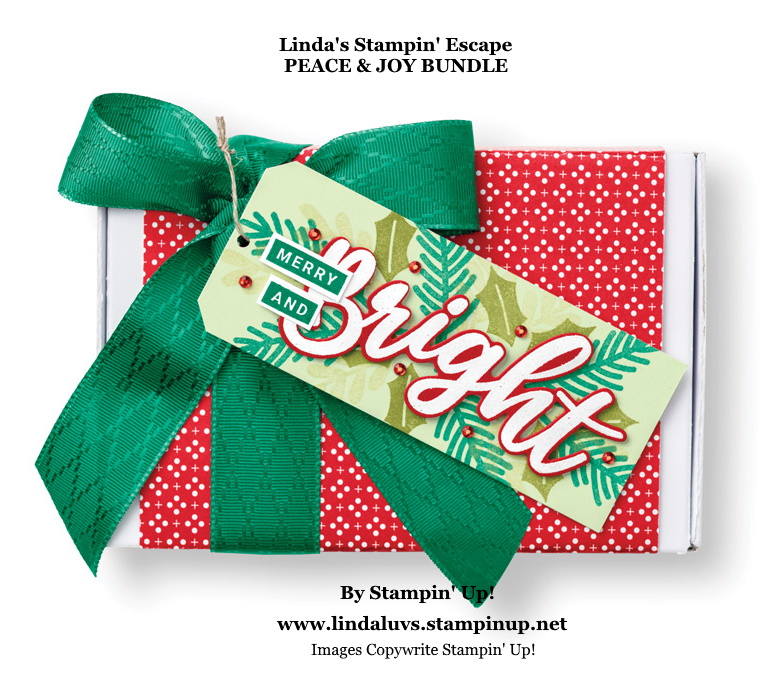
So cute and so much fun to create … Don’t you think this has that “nostalgic” look? Fit’s right in with my genealogy! This bundle is also perfect for gift giving … take a look!
Wrapped in the pretty Heartwarming Hugs Designer Series Paper and tied up oh so sweetly with the Wonder of the Season Ribbon, this gift box will “brighten” anyone’s holiday.
Thank you for joining me today, and to all of you who checked in on my yesterday. Hope you enjoyed today’s projects.
Have an amazing day, and brightens someone’s day if you can.
I’ve shared some Christmas with you to get you thinking about your Christmas card list, however, today I want to share something exciting coming for my favorite season …. Fall. The beautiful changing colors, the warm days and cool nights, the season of thanks, there is just so much to celebrate! I want to introduce you to Hello, Pumpkin … our September Paper Pumpkin kit.
What IS Paper Pumpkin? Paper Pumpkin is our monthly subscription service that offers fun ‘n’ easy papercrafting projects for crafters of any skill level! In these themed all-inclusive kits, subscribers receive pre-cut paper pieces, embellishments, ink, and an exclusive stamp set. As the subscription continues, subscribers will have a collection of cards and other creations for a variety of occasions, in addition to a stockpile of supplies!
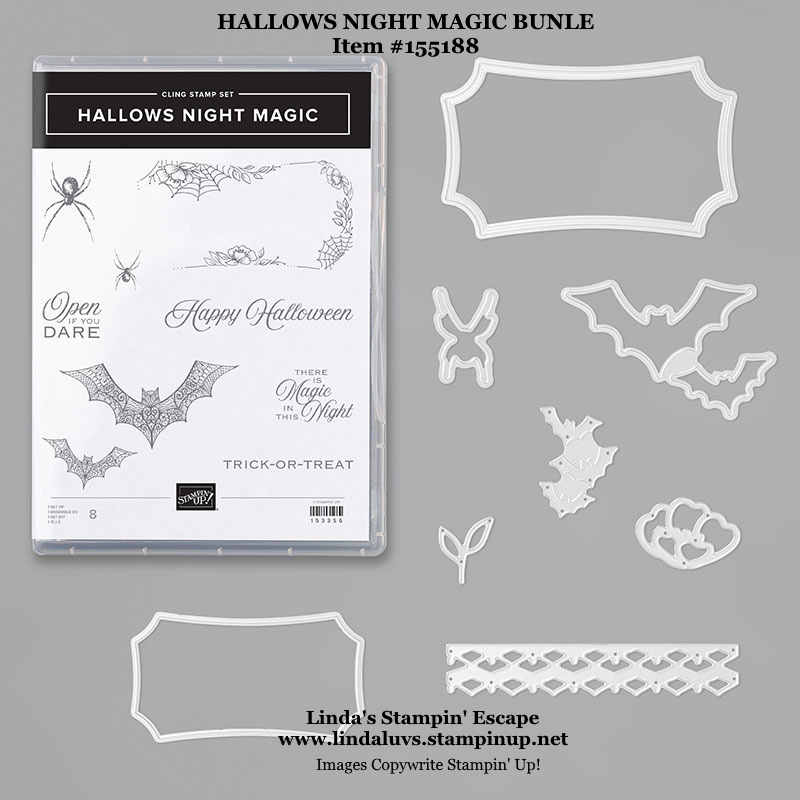
September’s kit is a must-have for those who love to celebrate all things spooky. But, for those who don’t enjoy the Halloween haunts, the multi-occasion stamp set combined with a variety of die-cut and reversible paper pieces offers many ways to customize your fall crafts!
The Hello Pumpkin Paper Pumpkin Kit includes enough supplies to create 20 cracker box treat packages celebrating Halloween, Thanksgiving, and the autumn season. Make them all the same, or mix ‘n’ match!
Coordinating Colors in our Hello Pumpkin kit are …
Prepare to celebrate with the September Paper Pumpkin Kit! There’s so much to love about fall—some love the haunts of Halloween, many love the time to give thanks, and others love the changing colors and cooler temperatures….
Whatever you love most about fall, September’s kit has everything you need to celebrate the season your way! Between a multi-occasion stamp set and enough supplies to design 20 cracker box treat packages, you can create custom fall crafts to celebrate Halloween, Thanksgiving, pumpkins, and leaves. Whether you make them all the same or mix ‘n’ match your crafts, there’s something for everyone in this kit!
You can subscribe to the Hello Pumpkin Paper Pumpkin Kit between August 11th and September 10th. SUBSCRIBE HERE but don’t wait until the last minute … some kits have sold out before the deadline.
Let me know if you have any questions about our Paper Pumpkin crafting kit. I’d be happy to answer them. You can subscribe by clicking the link above or selecting a Pre-Paid Subscription below.
Thanks for hanging out with me today, I’ll meet you back here tomorrow!
Here are the links to the Pre-Paid Paper Pumpkin kits …just click on the image and it will take you to my online store, and you can continue with your purchase.The 12-month Subscription Qualifies YOU for Hostess Rewards ($22.00 Free Merchandise of your choice!!)
Are thoughts of Christmas going through your mind yet? Kind of hard when it’s 92 degrees and humidity levels the same … it was way to hot -n- humid for me, so thinking about Christmas helped cool things off!
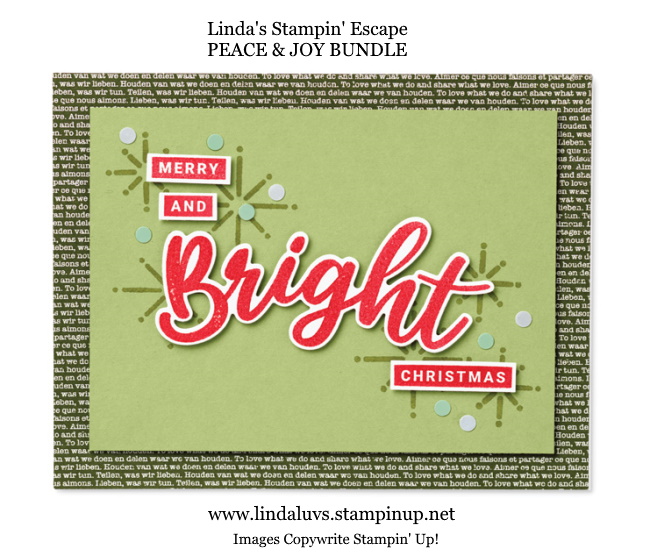
I have another sample from the Peace and Joy bundle for you today … a little more stamping on this one.
Beginning with an Old Olive base and card front … the card front is stamp in various images with Old Olive ink. Then the Old Olive is stamped onto the Whisper White to create a focal point.
The die cuts are done in Real Red, Cherry Cobbler and Gold Foil … then layered to create the dramatic greeting that catches your eye.
Layers on layers on layers with the Peace & Joy Bundle! The 9-piece Joy Dies were made for stacking to create eye-catching, dimensional holiday cards for your loved ones.
Thanks for coming by today, how are you enjoying this bundle? I’d like to here.
Sorry I missed you yesterday … I was lost deep in family genealogy charts, but I will make it up to you today with two projects.
I’d like to tell you about a pair of products you’re sure to enjoy this upcoming holiday season: the Peace & Joy Bundle! This bright, cheerful bundle includes the Peace & Joy Stamp Set and Joy Dies and if you purchase them together using the special bundle item number, you’ll get them at a 10% discount!
The Peace & Joy Bundle has everything you need to create festive, fridge-worthy holiday cards! I love layering the dies to add depth and dimension to my holiday greetings. With this bundle, you can stack, stamp, layer, and more!
So cute and so much fun to create … Don’t you think this has that “nostalgic” look? Fit’s right in with my genealogy! This bundle is also perfect for gift giving … take a look!
Wrapped in the pretty Heartwarming Hugs Designer Series Paper and tied up oh so sweetly with the Wonder of the Season Ribbon, this gift box will “brighten” anyone’s holiday.
The holidays are right around the corner! Have you started your Christmas cardmaking yet? The Peace & Joy Stamp Set and Joy Dies are the perfect pair to help you on your way. When purchased together in the Peace & Joy Bundle, both products are 10% off! Send me a message or follow the link in my profile to grab a bundle of your own!
Thank you for joining me today, and to all of you who checked in on my yesterday. Hope you enjoyed today’s projects.
Have an amazing day, and brightens someone’s day if you can.
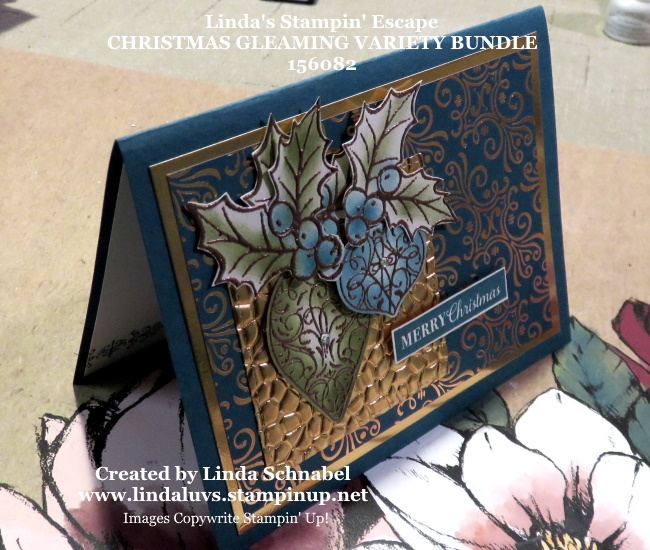
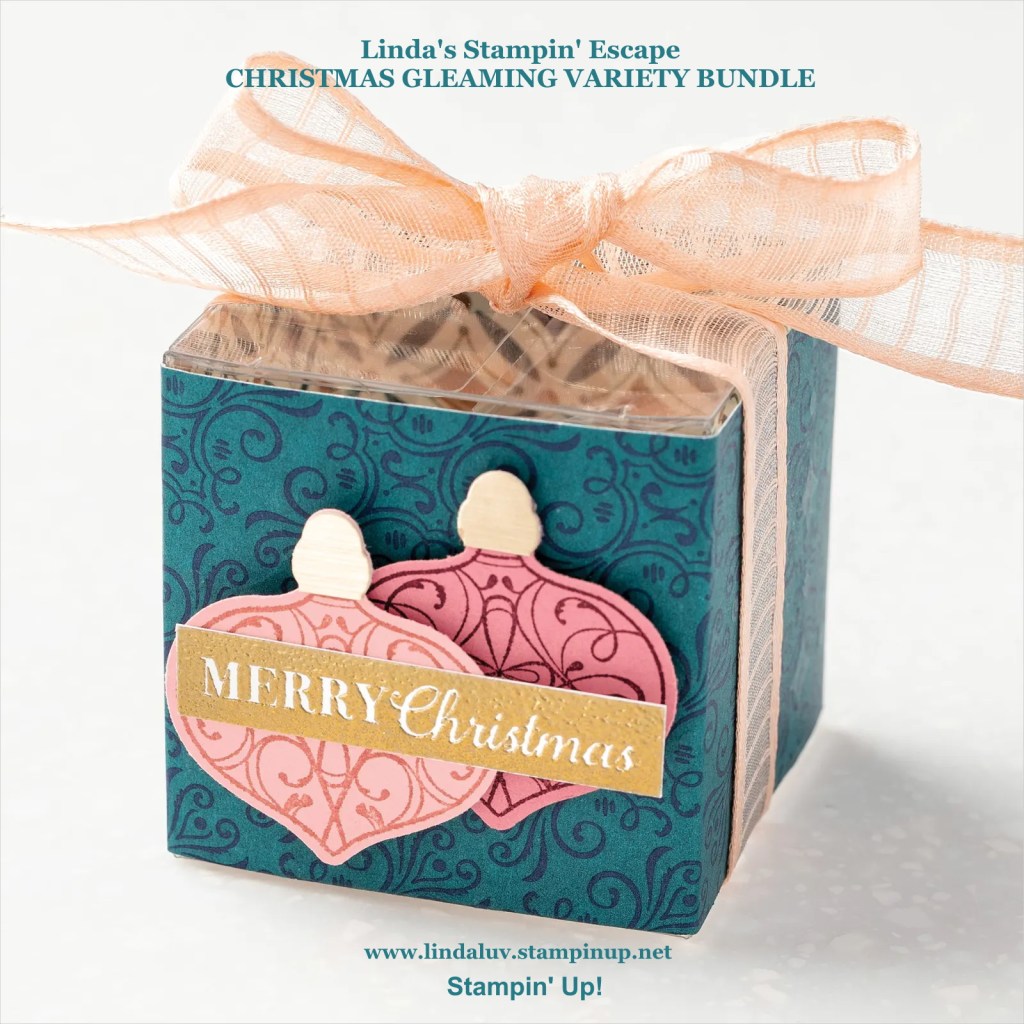
This past week (yes, it’s finally the weekend!) I shared 5 beautiful cards from the Ornate Garden Suite, today … I’m going to share a stunning Christmas Cards from one of my favorite “returning” bundles … the Christmas Gleaming Variety Bundle!
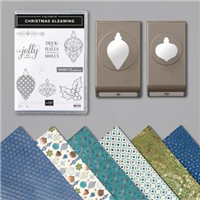
This stunning bundle is back and now you can get all three items, stamp set, two punches and the designer paper for one price of only $63.00. This bundle was used for the Grande Finale at my Holiday Retreat last fall … if you missed it, now is your chance to get it back on your Wish List.
I began with the Pretty Peacock cardstock for my base and brought in the Copper Foil to highlight the filigree on the specialty designer paper. The Copper Foil was embossed with the Hammered Metal 3-D Embossing Folder ….
I embossed my images in Copper (which is no longer available) however, my original was done with Early Espresso and is just as beautiful once the colors are sponged onto them. Once I sponged on the color, I punched out the ornaments and fussy cut the holly.
The greeting was stamped onto the Very Vanilla (as were our ornaments) and then cut out. My holly, Pretty Peacock Ornament and the greeting were all popped up with the Stampin’ Dimensionals.
STAMPIN’ TIP …. The Copper Foil piece that was embossed with the Hammered Metal Embossing Folder was cut out of the Copper Foil Sheet that mats our pretty designer paper … it’s a great paper saving technique.
If you’re looking for that perfect Holiday Bundle, gift one to a friend or one for yourself …
Thank you for joining me today. Enjoy the day ~
TODAY’S STAMPIN’ SUPPLY LIST … If you liked the products used in today’s projects, I have links for you below. Just click on the item you would like more information on, or to begin your shopping. It will take you directly to my website. Thank you ♥
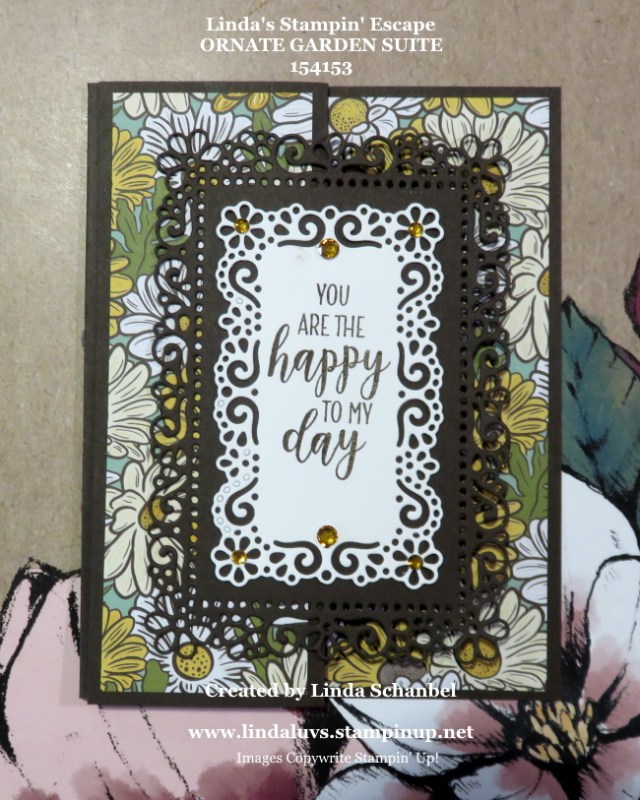
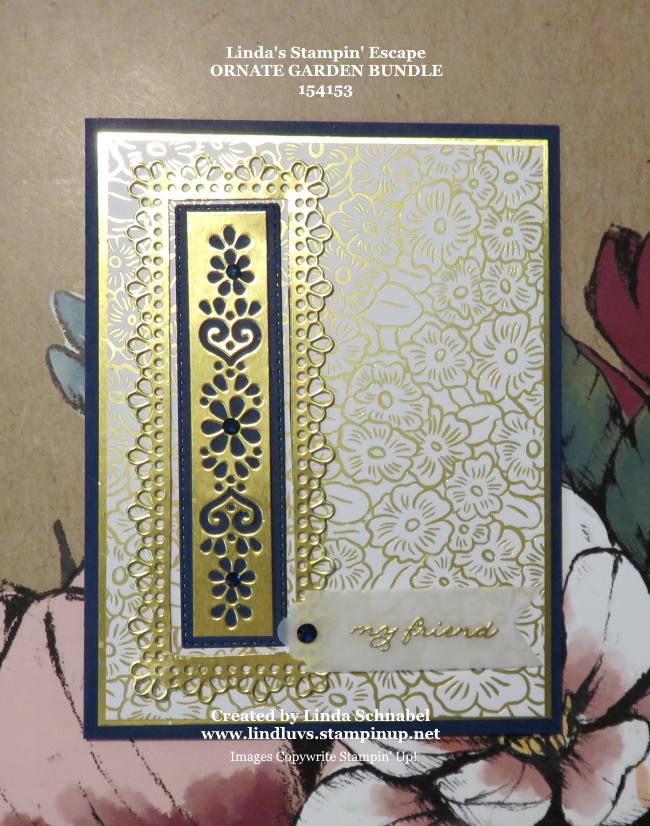
It’s kind of fun to see all the cards on one page, however … I’m not going to wait you wait any further! I wanted to share another of the “foil” specialty designs included in the Ornate Garden Designer Specialty Paper …
I was not sure what color I wanted to use with the Gold, so I googled “what compliments “metallic gold” … and of course they said black, also a coral, however I went with the Navy, Night of Navy in Stampin’ Up! colors. I think it adds a warm richness to the card.
I also wanted to share with you some of the other “layering” dies that coordinate with the pretty little pattern I like to use. I cut out the center of the largest die cut (the one that surrounds the design) but you would not have to. I thought it lightened up the layering a bit, and highlighted the Navy.
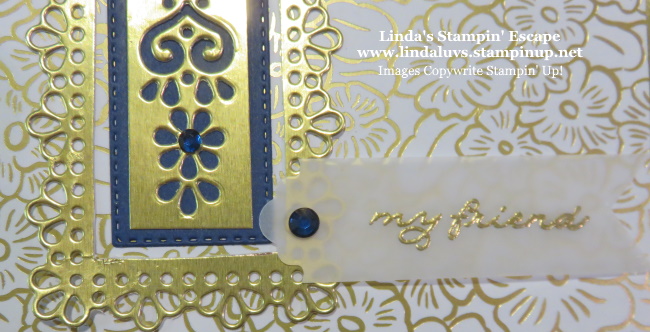
Here is a close up ….
Once die cut and attached to the card, I added some Night of Navy Rhinestones from the Holiday Rhinestone Basic Jewels collection. One of the Rhinestones also anchors my greeting, which was embossed in gold on Vellum cardstock and punched out with the new Lovely Labels Pick a Punch (two designs on one punch!).
I hope you have enjoyed my parade of cards this week, I will be back tomorrow with another new stamp set to share with you.
Have a wonderful day ~
TODAY’S STAMPIN’ SUPPLY LIST … If you liked the products used in today’s projects, I have links for you below. Just click on the item you would like more information on, or to begin your shopping. It will take you directly to my website. Thank you ♥
Ornate Garden Suite … remember that I will send you a PDF file of all the Instructions (step by step) with photos how to make all the cards shown this week, and 2 BONUS Cards!! You will also get the “Bonus Cards” sent to you as a “Thank You”…
How do you take advantage of this great offer? Just purchase $50 or more of the Ornate Garden suite from me (either from my on-line store or I can help you place your order). And I will send them to you! Oh yes, you will also qualify for my Virtual Rewards points.
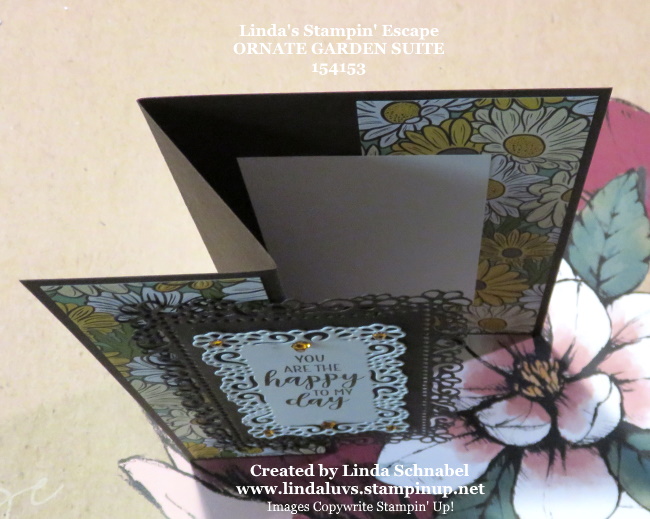
Day 4 of my Ornate Garden Suite parade of cards and today we layer. These delicate dies are created for layering and they are the focal point of today’s card.
My card base is Early Espresso and is paired with another pattern of the Ornate Garden Specialty designer paper. It is actually cut in half as today’s card is a “Z FOLD” ….
As you open the card, it exposes the layering and how such an intricate “looking” card can be simple to create. Our greeting comes from the “Country Home” stamp set which can be found on page 89 of the Annual Catalog.
The designer paper is only applied to the ends of the card. The layers of die cuts are attached to the left or “Z”.
I’ve added some white cardstock so you can add a note to your card, it is hidden by the layers. You could use a full quarter sheet of designer paper inside and then the white for your sentiments but I like the contrast .
A simple “Z Fold” just adds a little surprise when opening up the card. I like them because the are easy to create and fun to open.
I hope you have enjoyed another way to use the Ornate Garden Suite … remember that I will send you a PDF file of all the Instructions (step by step) with photos how to make all the cards shown this week, and 2 BONUS Cards!! You will also get the “Bonus Cards” sent to you as a “Thank You”…
How do you take advantage of this great offer? Just purchase $50 or more of the Ornate Garden suite from me (either from my on-line store or I can help you place your order). And I will send them to you! Oh yes, you will also qualify for my Virtual Rewards points.
Thank you for stopping by today. I will share my final card in this parade of cards tomorrow 🙂 The offer will last all month long.
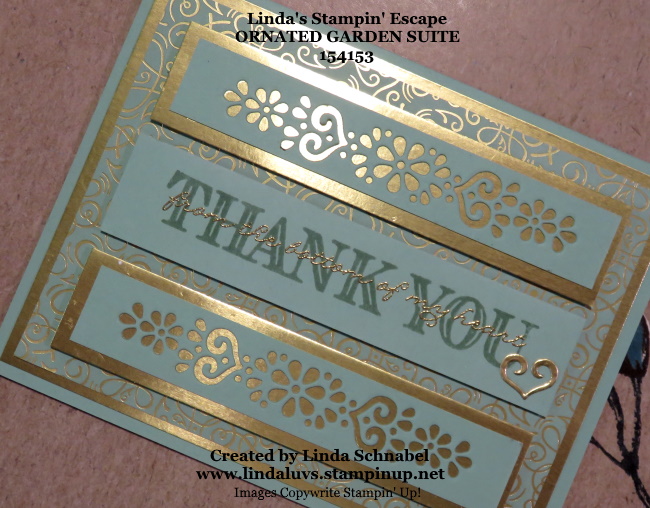
Sorry I’m posting late today but you know what they say … good things come to those who wait. I think this one is my favorite so far, done in Mint Macaroon and Gold, it shines a light on true gratitude sent from the heart.
I used the pretty little die that I used on my belly band on yesterdays card (see it here). to create a cute pattern and highlight the gold in the in the designer paper.
I wanted to tone down the stark “Thank You” because the card is on the soft side of design so I stamped Mint Macaron onto Mint Macaron …. once dried I embossed the “from the bottom of my heart” in gold on top of the Thank you.
Did you catch the little heart on the card? Look at the pattern of the die cuts …. yep, it’s from there! The gold die cut piece will be on one of the two “bonus” cards that you will get when you purchase $50 worth of products from the Ornate Garden Suite.
My Special: I will send everyone who purchases a minimum of $50 in Ornate Garden products from me; A PDF file of full instructions & color photos for all 5 cards shared this week on my blog plus 2 bonus cards!!! You will be able to recreate my cards with ease as all measurements and step by step instructions will be sent via email and in full color.
Thank you for checking back and stopping in to see me today. I will continue with out Ornate Garden Cards tomorrow …
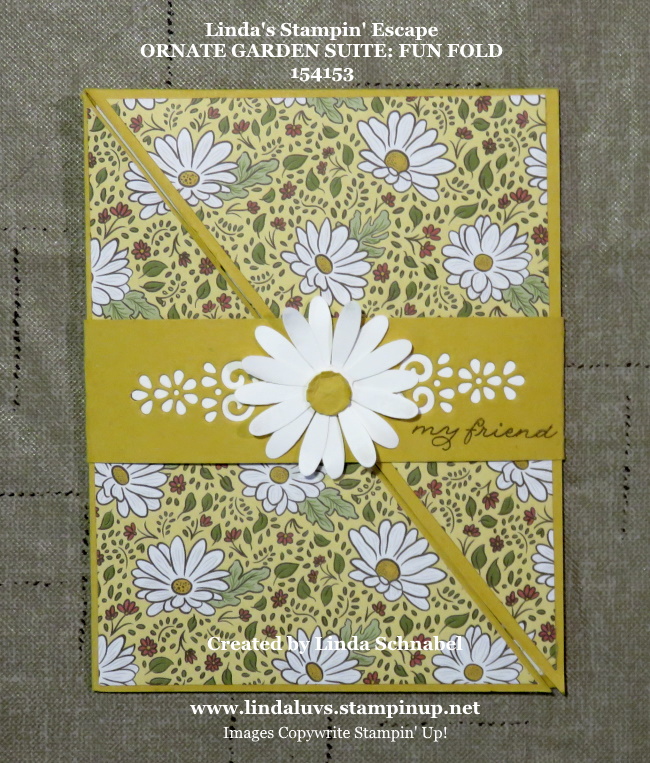
Today is the second day of the week and the second day of my Ornate Garden parade of cards. I have a Fun Fold for you today, the Triangle Fold …
From the outside it doesn’t look a whole lot different than any normal card, but this cute little belly band hides the secret! As you can see, I’m sharing another pattern from the Ornate Garden Specialty Designer paper and another one of the dies included in the suite / bundle.
As you slide the belly band off ….
The fun emerges … the left side folds out as does the top exposing your sentiments to friends and family. It’s always fun to get a card that is just a little different from the norm.
I decided to do a matching die cut on the inside of my card as well as the belly band. It really ties the card together and just adds a little texture to the inside of the card.
I used the Medium Daisy punch for another layer of fun to this card, and I think it highlights the die cut nicely and still leaves a little room for a greeting.
My Special: I will send everyone who purchases a minimum of $50 in Ornate Garden products from me; A PDF file of full instructions & color photos for all 5 cards shared this week on my blog plus 2 bonus cards!!! You will be able to recreate my cards with ease as all measurements and step by step instructions will be sent via email and in full color.
Thanks for joining me this Tuesday, and I’ll see you tomorrow with another Ornate Garden card.
Happy Monday to you! We are beginning a new week, a new month and I’ve got a new line up of cards to share with you! Starting today and going through the week, I will be sharing beautiful card creations from the Ornate Garden suite … and I will have a special promotion to go along with it.
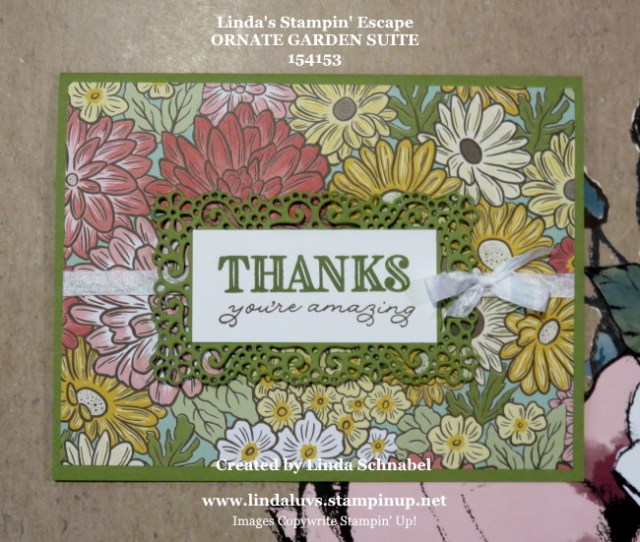
Today’s card highlights three (3) of the items included in the suite; the Ornate Garden Specialty Designer paper, the Ornate Thanks stamp set and the Ornate Layers die set. This suite offers so many amazing options ….
The lovely flowers in the Ornate Garden Suite Collection are a modern take on classic Victorian florals. The gold foil accented paper, gems, and shimmery ribbon will add sparkle and elegance to your projects. You’ll love what you can do with this versatile collection. Share your gratitude with the included sentiments or pair with any sentiments for all-occasion projects.
I used the bright floral pattern as my background and the beautiful ornate die to highlight my greeting. The sentiments in the Ornate Thanks stamp set are perfect for sharing your gratitude to your friends and loved ones.
Here is a close up of the die …
The detail in these dies is amazing and I had no trouble cutting them out. I know many of my stampin’ friends like to add a sheet of wax paper for easy release. So if you want to create intricate layers and accents for handmade cards and other paper crafts using the Ornate Layers Dies.
To complete my card I added a piece of Whisper White on the inside and Whisper White Crinkled Seam Binding Ribbon in a pretty little bow.
I will send everyone who purchases a minimum of $50 in Ornate Garden products from me; A PDF file of full instructions & color photos for all 5 cards shared this week on my blog plus 2 bonus cards!!! You will be able to recreate my cards with ease as all measurements and step by step instructions will be sent via email and in full color.
Thank you for stopping in today. Please let me know if you have any questions on my Ornate Garden offer … or anything else.
Have an amazing day!!
TODAY’S STAMPIN’ SUPPLY LIST … If you liked the products used in today’s projects, I have links for you below. Just click on the item you would like more information on, or to begin your shopping. It will take you directly to my website. Thank you ♥
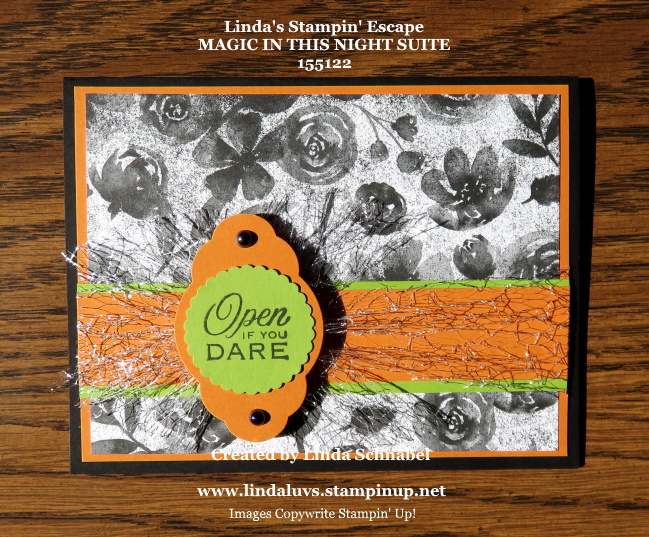
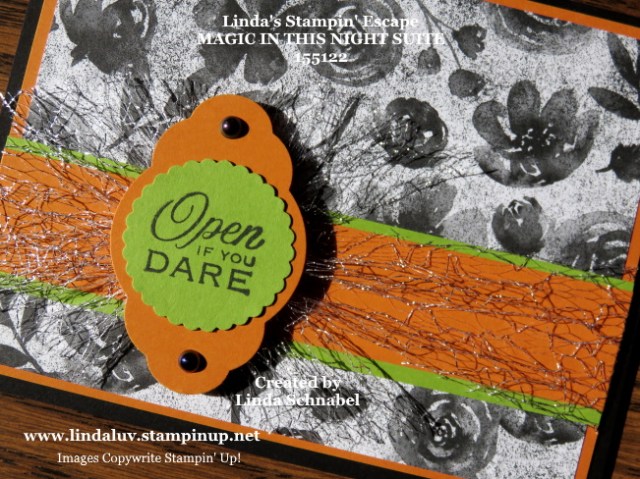
A sunny Sunday here today paired with one more card share from the amazing “Magic in this Night” suite. I’m beginning by simply flipping over the designer series pattern from yesterday to a floral surprise.
I’m also going back to more traditional Halloween colors by using Basic Black, Pumpkin Pie and Granny Apple Green … these layers of color are sure to make the Magic in this Night designer paper stand out.
A band of color across the front was used to also highlight the Metallic Mesh Ribbon. A big bow was created to nest my greeting on and make it pop! I stamped the “Open if you Dare” from the Hallows Night Magic stamp set on Granny Apple Green and backed with Pumpkin pie. You can use any combination of punches or layer with any one of our beautiful layering dies.
Today’s Simply Sunday card was completed with the Iridescent Pearls … they are so cool, and fit in with this product suite perfectly. This is the last of my Magic in the Night series of cards for a bit, but I’ll be back with more as time get closer to Halloween.
I also want to let you know that my OnLine store is getting a “facelift” and should be easier to use. I’m so excited! This covid has tied my hands to in-home classes but I’ll keep sharing here, on my facebook page and more …
I’ll be back tomorrow with another great project. Thank you for taking time out of your Sunday to join me today.
TODAY’S STAMPIN’ SUPPLY LIST … If you liked the products used in todays projects, I have links for you below. Just click on the item you would like more information on, or to begin your shopping. It will take you directly to my website. Thank you ♥
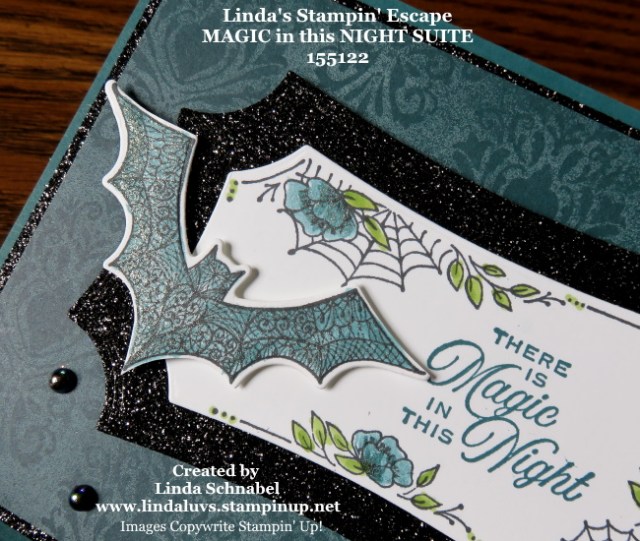
I am so excited to share today’s card with you … it is my second card creation from the “Magic in this Night” suite. Along with all the hauntingly stunning images from this suite, I will be sharing a neat technique with you.
Yesterday I used basic Halloween colors so today I focused on the color pallet in the suite, and I fell in love! My card base and designer paper pattern are the Pretty Peacock … the richness of this color and the delicate images in the stamp set turned this into a WOW card ….
I chose the Pretty Peacock design that reminded me of wallpaper in a grand Queen Anne home from days gone by. I wanted to add the feeling of “Magic in this Night” so I matted the designer paper with the Black Glitter paper… before mounting it, I cut out the mat for my greeting border from the center (perfect paper saving technique).
I stamped the border and wanted to add color to it but also wanted that “shimmer” so I used this simple by over looked technique: I began by tapping my ink pad onto a clear block … then get the Wink of Stella pen. I used my Wink of Stella as a paint brush and picked up the ink from the block and painted my flowers. I love this technique of coloring my flowers, you can add more ink to darken where wanted.
I also colored in my bat with the ink and Wink of Stella… this technique just adds to the magic of this card. The leaves were colored with the Granny Apple Green Stampin’ Blends Duo.
The sentiment was stamped with Pretty Peacock into the border and then die cut. Once cut, I secured it onto the black glitter paper using the Tombo glue … it works best on glitter paper.
This assembly was popped up to create some dimension, and then the bat was also popped up! I could not resist adding the Iridescent Pearls and I’m glad I did because it really balanced and completed the card (and they are pretty!).
Are you a Halloween fan? And what do you prefer … the fun, the scary, or an elegant look of Halloween?
I thank you for stopping by today to check out my creation. Enjoy your day!
TODAY’S STAMPIN’ SUPPLY LIST … If you liked the products used in todays projects, I have links for you below. Just click on the item you would like more information on, or to begin your shopping. It will take you directly to my website. Thank you ♥
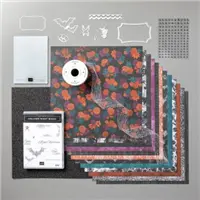
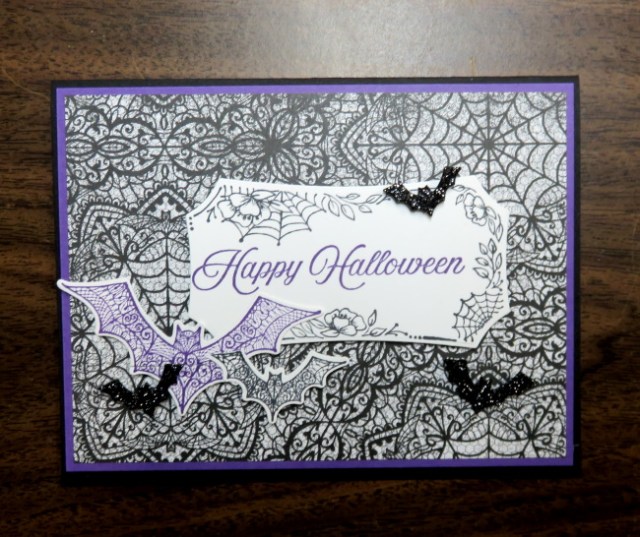
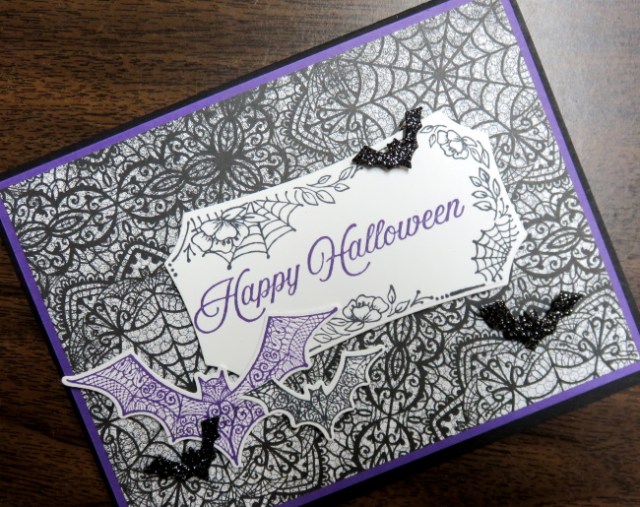
It’s Friday and I have a frighteningly beautiful card to share with you today. It’s created from the Magic in the Night Suite from the new Mini Catalog. I’m mailing today but for those who live close to me … schedule a time with me to pick up your new mini!!
The Magic in this Night Suite will add a touch of spooky elegance to your projects with detailed imagery and striking colors, just check out the designer paper …
The color pallet for the Magic in the Night designer paper is; Pretty Peacock, Blackberry Bliss, Cajun Craze and Basic Black. The pattern I used is the same as the Cajun Craze pattern on top but in Black. The lace is pretty and perfect for dressing up my card.
I backed (matted) my designer paper with a traditional Halloween color of purple, in our world known as Gorgeous Grape! The two detailed bats are on one stamp but far enough apart to ink them separately … which is what I did. They are then cut out with the coordinating dies.
I used the coordinating dies to cut my greeting out as well which is framed with the stunning frame …
The cute little bats are also die cut from the Halloween Magic Dies using the amazing Black Glitter paper … one cut and done, because these three bats are all on one die!
Just looking at this card gives me even more ideas for creating hauntingly beautiful cards for this Halloween season … and I’m sure I’ll find more to use some of these items than on Halloween!
Thank you for hanging out for me today and taking a peek into the new Mini catalog full of Holiday goodies!
Have a great day, and I hope you have a wonderful weekend planned.
Here is a list of the products used on these cards … Find out more information about these products by clicking on the image … or you can begin your shopping from here as well. Thank you!
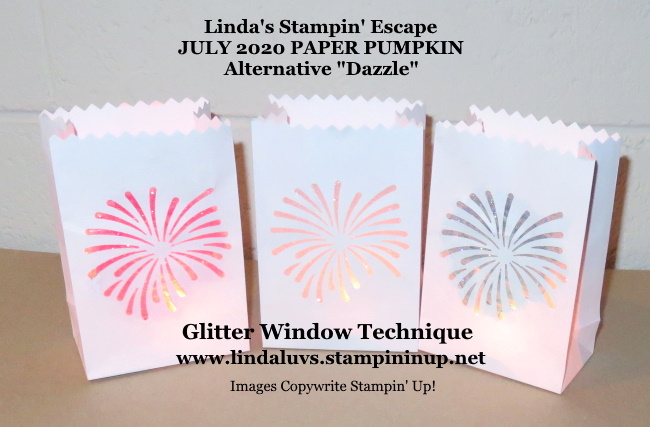
Today I’d like to share a cute project that is perfect for celebrating on Summer Nights. I’ve got something to brighten your night and add a little sparkle … just in case the star’s aren’t out!
I’m making Sparkling Luminaries …. perfect to decorate your tables or even to line the driveway. These little cuties were fun to make … If you do not have the Paper Pumpkin kit, you can use lunch bags or small white bags from the $ Store and use a punch or die to create a design.
Step 1: I started with the pre-die cut luminaries that are included in the July 2020 Paper Pumpkin kit.
Step 2: is to add “Clear Packing Tape” to the inside of the bag with the “sticky” side facing … out! I used a pencil with a touch of adhesive to hold the tape steady while it “eased” it into the bag.
Step 3: Spread Dazzling Diamonds Glitter over the sticky side of the tape and rub it in good … tap off excess glitter.
Step 4: Using the Stampin’ Blends Markers … Color the tape from the inside of the card, this will dry and not rub off.
Now it’s time to add your candles and light ’em up! Here is a close up so you see the pretty sparking of the Dazzling Diamonds …
Aren’t those just the cutest luminaries? You could keep them simple or jazz them up even more by stamping the “burst” image you’ve seen the past two days or add some of the Glitter Stars included in the kit or even some Rhinestones …
HOW WOULD YOU PREFER YOURS? As Is … or …. Jazzed up.
Thanks so much for joining me today. I’ll see you tomorrow with a Sneak Peek into the new Mini Catalog.
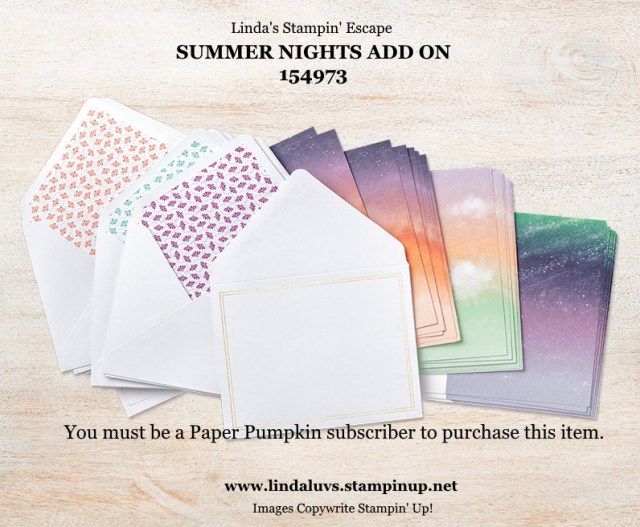
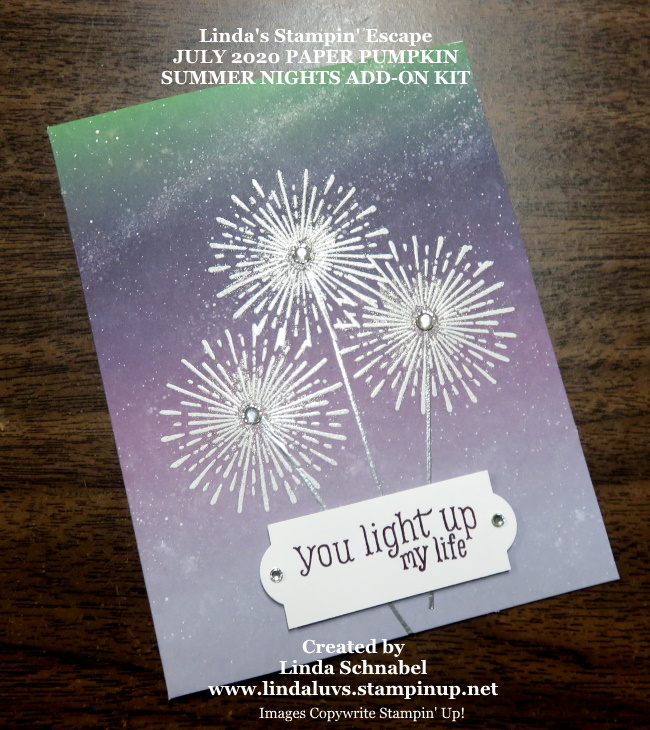
Today I’m sharing a card that I created using the Summer Nights Add-On kit that coordinates with the July 2020 Paper Pumpkin.
Yesterday I shared my “Fireworks” card using the Joseph’s Coat technique (click here to view post) I used the “burst” image to create the fireworks, and I will be using them again for today’s card.
I chose the background with the Blackberry Bliss … there are three different color patterns and 8 of each pattern, plus it includes coordinating envelopes.
I heat embossed the “burst” image in White and then embossed the stick or line image in silver creating a “Sparkler”!! You all know what I’m doing next don’t you … You guessed it, brushed on the Wink of Stella to add the shimmer.
The greeting comes from the July 2020 Paper Pumpkin kit and teamed up with the Summer Nights Add-On, it this will be the first of many to adorn more fun creations.