Day 2 of 12 Days of Christmas: Peaceful Painted Trees with a Touch of Pearl

Hello Stampin’ Friends ~

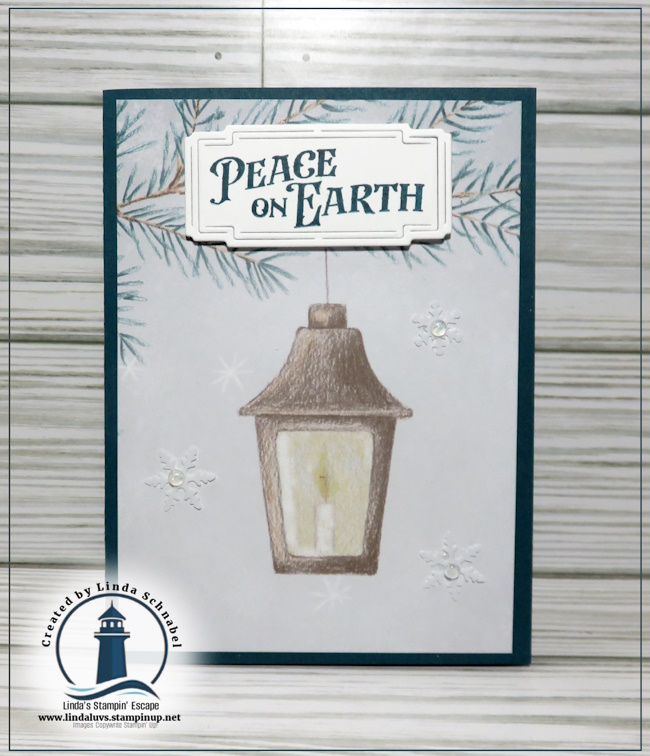
Welcome to Day 2 of my 12 Days of Christmas celebration! Today, I’m thrilled to share a card that combines elegance with ease. This design features the stunning Painted Trees 3-D Embossing Folder, the Peaceful Season Bundle, and introduces the dazzling Pearlized Enamel Effects – Basics. This card was a hit with my Stamp Club, where members enjoyed learning the step-by-step process to create it. Now it’s your turn to dive in and see just how simple it is to bring this beautiful design to life!

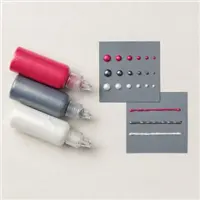
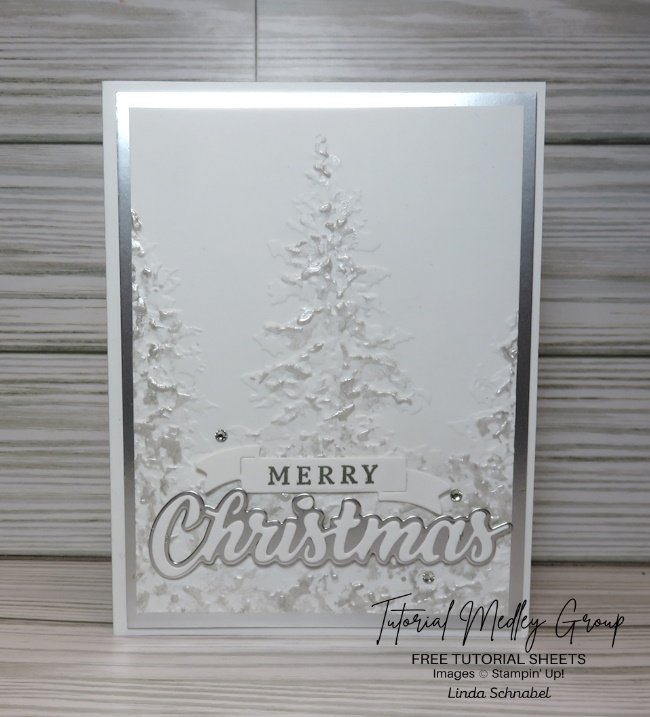
Christmas cards hold a special kind of magic, and the Painted Trees 3-D Embossing Folder delivers that magic effortlessly. The intricate trees scene provides a textured backdrop, setting the stage for a serene, peaceful holiday message. Pairing it with the Peaceful Season Bundle—complete with coordinating stamps and dies—adds layers of charm. To top it off, the Pearlized Enamel Effects add just the right amount of shimmer, and truly highlighting our trees.

Step-by-Step Instructions:

  1. Card Base:
    Night of Navy: 8 1/2″ x 5 1/2″ scored and folded at 4 1/4″. Attach 4″ x 5 1/4″ piece of Basic White to the inside / stamp sentiment if desired.
  2. Basic White / Embossed Trees:
    Cut to 3 3/4″ x 5 1/2″. Using the Painted Trees embossing Folder, place your white cardstock in the center of the folder and “center” the largest tree to be the focal point of your card.
  3. Add Pearlized Details:
    Now for the fun part! Using a Sponge Dauber, lightly tap the Pearlized Enamel Effects onto your trees to add delicate covering on them, truly highlighting the beautiful detail of the embossing folder. Set aside and let dry while you continue.
  4. Gold Foil Mat::
    The Gold mat is 4″ x 5 1/2″. Using the “detailed” CHRISTMAS die from the Peaceful Season Bundle, you will place this in the center of the Gold Mat and die cut your greeting. At this time, using a scrap piece of Night of Navy… cut the coordinating Mat / Bold CHRISTMAS die. Adhere the two die cut pieces together with glue, and don’t forget the dot for your “i”.
  5. Assemble the Card:
    Begin by layering your greeting over the embossed trees. Add “MERRY” at this time. Now place your embossed tree piece over the Gold Mat. Now is the perfect time to add the beautiful Night of Navy and Gold Glitter Ribbon to your piece. Once you’ve added your bow, attach this assembly to your card base. You can adhere directly or add Stampin’ Dimensionals to pop it up.
  6. .Embellish:
    This will complete your card! I added the Gold Textured Adhesive Backed Dots. Feel free to use any of your favorite embellishments… I just wanted to stick with the GOLD and NAVY theme, as it’s so elegant.

This card was a joy to make and a delight to give. The combination of texture, elegant embossing, and that touch of pearly shine creates a timeless holiday greeting that anyone would cherish.

I hope you’ve enjoyed the Step by Step Instructions and feel inspired to give this card and the Enamel paint technique a try. The Painted Trees 3-D Embossing Folder and Peaceful Season Bundle are must-haves for your holiday crafting, and the Pearlized Enamel Effects truly elevate your designs. Let me know if you recreate this card—I’d love to see your version!

Stay tuned for Day 3 of my 12 Days of Christmas, where more holiday inspiration awaits.

Happy crafting ~

🎄 Welcome to my 12 Days of Christmas – Day 1! 🎄

Greetings Stampin’ Friends ~

The holiday season is upon us, and there’s no better way to get into the spirit than with handmade crafts that come straight from the heart! Over the next 12 days, I’ll be sharing creative inspiration for your Christmas crafting, so be sure to check back daily. Let’s kick things off with a project that’s equal parts festive, elegant, and oh-so-easy to recreate!

Today, we’re spotlighting two fabulous products that will elevate your holiday projects: the Sentimental Christmas Designer Series Paper and the Christmas Labels Bundle. These items are your new best friends for creating beautiful handmade cards, gift tags, scrapbook pages, and more.

The Sentimental Christmas Designer Series Paper exudes a cozy, vintage charm that captures the essence of the season. Think warm, rich colors, timeless patterns, and designs that instantly set a nostalgic mood.

The Christmas Labels Bundle, which includes stamps and coordinating dies, is a must-have for your holiday toolbox. Save 10% when you buy the bundle instead of purchasing the stamps and dies separately! Not only does it save you money, but it also saves you time by effortlessly cutting out your stamped images.

For today’s project, I’ve created a simple yet stunning card featuring the lantern design from the Sentimental Christmas paper. The lantern is so beautifully detailed that it becomes the star of the card. To complete the look, I added a bold “Peace on Earth” greeting using the rectangular die from the Christmas Labels Bundle.

Here’s how easy it is to make:
1️⃣ Cut a piece of the lantern-patterned paper; 4″ x 5 1/4″ to fit your card front. Pretty Peacock Card Base measures 8 1/2″ x 5 1/2″… then scored and folded at 4 1/4″.
2️⃣ Stamp “Peace on Earth” (or your favorite sentiment!) with Pretty Peacock Classic Ink and use the coordinating die to cut it out. The bundle makes it an easy choice!
3️⃣ Attach the greeting to the card with a few dimensionals for a polished look. Embellish!

That’s it! This card is a breeze to assemble and perfect for making multiples—ideal for spreading holiday cheer far and wide.

Join the Fun!

This is just the beginning of my 12 Days of Christmas series! Every day, I’ll showcase a new project to inspire your holiday creativity, featuring tips, techniques, and must-have products. Whether you’re a seasoned crafter or just starting out, there’s something here for everyone.

Be sure to stop by tomorrow for Day 2, where I’ll share another festive idea to spark your imagination. Let’s make this Christmas extra special with handmade touches!

🎅 Happy Crafting,
Linda

Transforming a Scrapbook Kit into Adorable Holiday Cards

Hello Stampin’ Friends ~

Hope those of you from the US enjoyed a beautiful Thanksgiving day. Today, I’m excited to share two adorable cards I created using the Snow Day Scrapbook Kit! These kits are packed with coordinating elements that make crafting a breeze. What’s even better is the abundance of leftovers you’ll have after completing the scrapbook pages. With these extras, you can keep the creativity flowing by making additional pages or, like I did today, crafting charming cards!

This kit includes supplies to create three predesigned two-page scrapbook spreads. Each page is 12″ x 12″, allowing lots of space for photos and journaling. The whimsical color palette is a fresh take on classic winter patterns. Here is just one pages ….

I’ve put together a short video explaining how I created these cards, so be sure to check it out for all the details. Both cards showcase the Spotlight on Nature Dies, which add a unique touch and interest to the designs. Let me walk you through each card:

The first card features several die-cut circles, two of which are showcasing the kit’s beautiful patterned paper. I selected a combination of snowflakes and a cozy village scene. The houses became the focal point of the card, creating a warm and inviting winter vibe.

For the second card, I used the dies to expose the snowflake-patterned paper beneath, adding a layered dimension. Then, I fussy cut one of the snow globes from another sheet of the patterned paper to serve as the centerpiece. It was such a quick and easy way to bring the card to life while highlighting the kit’s charming details.

These cards are proof that scrapbook kits aren’t just for memory-keeping—they can be a fantastic resource for card-making, too! I hope these ideas inspire you to think outside the box and maximize your supplies. Don’t forget to watch the video for a closer look at how these cards came together. Just click on the video image below ….

Thank you for joining me on this Friday!! Happy crafting! ✂️

Greetings from my home to yours ….

Holiday Fun Fold Card with a Gift Card Pocket

Hello Stampin’ Friends ~

The holidays are fast approaching, and what better way to spread joy than with a handmade card that doubles as a thoughtful gift? Today, I’m excited to share a Holiday Fun Fold Card with a Gift Card Pocket—a project that’s as delightful to make as it is to give! This design is perfect for every occasion once you have the pattern down, but my first example is packed with holiday cheer using the Sentimental Christmas Designer Paper and the Christmas Labels Bundle.

Let’s talk about the stars of the first card! The Sentimental Christmas Designer Paper is a dreamy mix of soft holiday hues. Its double-sided designs make it easy to mix and match patterns for the perfect card composition. Whether you’re a fan of elegant florals, or snow-dusted scenes, this paper has something for everyone!

Paired with the Christmas Labels Bundle, creating a polished and professional look is a breeze. This bundle includes beautiful label dies and a stamp set filled with heartfelt holiday greetings and seasonal accents. The dies are sized perfectly to layer and customize, making them a must-have for holiday crafting.

I’ve included a video tutorial where I walk you through the dimensions and step-by-step instructions for creating this project.

For the second card, I switched things up with the Take a Bow Designer Paper. This paper features festive designs of candy cane stripes, holly, plaids, polka dots, and stars in red and green. It’s perfect for creating a more lighthearted design that’s great for kids, coworkers, or anyone who loves a bit of holiday sparkle.

What makes this card truly special is the built-in gift card pocket. It’s a wonderful way to give a little extra without the hassle of bulky packaging. The fun fold design also makes the card itself feel like a gift! You’ll love how easy it is to adapt this pattern for birthdays, weddings, and more—simply swap out the paper and stamps to suit the occasion.

This project is a perfect blend of versatility, beauty, and practicality that you’re sure to love. The fun fold design can be adapted for any occasion, making it a go-to pattern for birthdays, weddings, holidays, and more. Handmade cards add a heartfelt, personal touch, showing your loved ones just how much you care. Plus, the built-in gift card pocket is both functional and stylish, turning your card into a thoughtful, multi-purpose gift. Best of all, this design is a great way to use your crafting stash—mix and match your favorite Designer Papers and stamp sets to create something truly unique.

So, grab your supplies and watch the video again to start creating your own Holiday Fun Fold Cards. Happy crafting, and may your holidays be filled with creativity and cheer!

Wow… Create 16 Fast & Beautiful Holiday Cards

Hello Stampin’ Friends ~

🎄 Today, I’m thrilled to share a simple yet incredibly elegant way to make your holiday card-making fast, fabulous, and fun! Imagine creating not just one, but 16 stunning holiday cards—all from a single sheet of the breathtaking Regal Winter Designer Series Paper (DSP). With its vibrant watercolor florals, hand-painted designs, and rich seasonal hues, this paper sets a heartwarming holiday tone that your friends and family will adore!

Let’s dive into this super-efficient design, perfect for anyone who loves beautiful, handmade cards without spending days on end making them. And the best part? We’re pairing it with the Christmas Labels Bundle, which is packed with gorgeous sentiments and die-cut frames that add a touch of class to each card. With this approach, you’ll have everything you need to make your holiday greetings truly special!

Step 1: Cut Your Paper—3 x 3 is the Magic Number!

To get started, take a 12 x 12 sheet of the Regal Winter Designer Paper and cut it down into 3 x 3-inch squares. This will give you 16 individual squares—the perfect size to build a gorgeous set of cards quickly. Each 3 x 3 piece showcases a unique section of the paper’s hand-painted design, meaning each card will have its own charm and character while still looking like part of a cohesive set.

Quick Tip: Feel free to mix and match paper patterns if you want an extra pop of variety! The Regal Winter DSP coordinates beautifully, so each card will have a harmonious holiday look.

Step 2: The Christmas Labels Bundle—Adding Elegance & Class

Now that we have our DSP squares ready, it’s time to bring in the Christmas Labels Bundle! The bundle includes beautifully crafted sentiments and label frames that add an instant touch of elegance to your cards. Here’s a closer look at what’s included:

  • Stamp Set Sentiments: Warm and festive sentiments that are perfect for holiday wishes. From classic “Merry Christmas” to heartfelt “Season’s Greetings,” these stamps have every message you need for your cards.
  • Label Frame Die Cuts: The die-cut frames are the stars of the show! They’re delicately designed to enhance your sentiment stamps and give each card a professional, polished look. Plus, they’re versatile enough to be used on tags, paper cup sleeves, and other Christmas crafts!

Simply choose a sentiment for each card, die-cut a frame to surround it, and you’ll be amazed at how refined and finished each card looks.

Step 3: Assemble & Adorn!

Now comes the fun part—assembling your cards! I’ve used a Basic White background to highlight the paper and add some texture… use your favorite embossing folder. Next, place a 3 x 3 square of the DSP onto a 3 1/4″ x 3 1/4″ mat in a coordinating color and center it onto the card front. Then layer on your label frames with the sentiment stamped inside. To make each card uniquely special, add a few embellishments like rhinestones, pearls, or a sprinkle of glitter.

And just like that, you’ve got 16 holiday cards that look as though they were designed by a professional!

Why Handmade Cards Make the Best Gifts

The joy of receiving a handmade card is truly something special. When your loved ones open their mailbox to find one of your beautiful creations, they’ll feel the warmth and care that went into making it. Every brushstroke of color, every carefully chosen sentiment, every loving touch—it all comes together to create a moment of joy and connection.

Sending handmade cards isn’t just about sharing holiday wishes; it’s about sharing a piece of your heart with those who matter most. Each card becomes a keepsake, a small token of love they can hold onto throughout the season and beyond. Even my landlord has saved each card I have made for them!!

Let’s Make This Holiday Season Extra Special

So, if you’re ready to create gorgeous holiday cards that will warm hearts and make spirits bright, be sure to add the Regal Winter Designer Series Paper and Christmas Labels Bundle to your crafting stash. Whether you’re a seasoned card maker or a newbie looking to try something special, this combo is perfect for you. With just one sheet of 12 x 12 DSP and this versatile bundle, you can make 16 cards quickly, beautifully, and with that touch of elegance every holiday card deserves! Each sheet creates 16 cards … and there are 12 sheets per package! Hmmm …. is that enough for your Christmas Card list?!

Shop today and start creating cards that your family and friends will treasure. Because nothing says “I’m thinking of you” like a handmade card made with love.

Thank you for joining me today ~

Stunning Card with the Peaceful Season Bundle

Hello Stampin’ Friends ~

I’m so excited to share the latest card I created using the Peaceful Season Stamp Set and Dies Bundle, a must-have for your holiday crafting! This bundle offers elegant holiday sentiments for sending heartfelt messages to your loved ones. What makes this bundle truly special are the coordinating dies, which beautifully enhance the stamped sentiments. The dies include elegant shapes that frame the greetings and add a polished, dimensional look to your cards.

For the card I’m showcasing today, I wanted to create something truly special, highlighting the beauty of a peaceful winter landscape….

The background was created with the Painted Trees embossing folder, which adds a wonderful textured forest scene. I enhanced the raised tree outlines with Pearlized Enamel Effects in White, giving the card a frosty, shimmering look—perfect for capturing the essence of a peaceful, winter day.

The Peaceful Season Stamp Set and Dies Bundle is perfect for any crafter looking to create timeless, sophisticated holiday cards. The sentiments are versatile and can be used for cards, tags, and even gift packaging, while the coordinating dies help elevate your projects by adding layers of dimension and elegance.

Plus, the bundle works wonderfully with other seasonal products, making it easy to integrate with embossing folders, designer paper, and embellishments in your existing collection.

If you’d like the PDF tutorial for this card, including step-by-step instructions and a complete list of supplies, just leave me a note in the comments below! I’d be happy to send it to you, so you can recreate this stunning holiday card for your loved ones.

I hope this post inspires you to try out the Peaceful Season Stamp Set and Dies Bundle for your holiday crafting! The combination of heartfelt sentiments and beautiful die-cut elements makes it easy to create cards that are both meaningful and visually stunning.

Be sure to visit my online store or click the links below to add this bundle to your crafting stash. You won’t want to miss out on using it for your upcoming holiday projects!

Happy crafting! ❄️

Discover the Beauty of the Nests of Winter Suite

Hello Stampin’ Friends,

As we embrace the changing seasons, I’m excited to share one of the most versatile suites from the new Holiday Mini Catalog: the Nests of Winter Suite, featuring the Winterly Tree Top Bundle. Whether you’re a cardmaker, scrapbooker, or simply someone who loves creating with paper, this suite offers a beautiful array of elements to enhance your projects for any occasion, all year long.

One of the standout features of the Winterly Tree Top Bundle is the intricately designed pine frame die. This die adds an elegant and natural touch to your creations, perfect for highlighting winter scenery or framing your favorite photos. On today’s card, we paired this frame with the stunning Winter Meadow Designer Paper, showcasing how it beautifully accents the serene winter landscape.

Imagine using this pine frame in your scrapbooking layouts—framing those cozy winter memories like family gatherings, snow days, or holiday celebrations. It’s an effortless way to draw attention to the heart of your project; your photos. The frame adds just the right amount of detail, enhancing without overwhelming.

While the Nests of Winter Designer Paper features gorgeous images of birds with coordinating dies, I decided to “fussy cut” the bird used on today’s card. There’s something soothing about the process of cutting out these delicate images by hand—it’s a creative ritual that many of us enjoy. Fussy cutting allows for precise placement, adding a personal touch that makes each card feel truly special.

What I love most about the Nests of Winter Suite is its versatility. While it’s perfect for creating stunning winter scenes and holiday cards, the suite can easily transition to any time of year. The elements within the Winterly Tree Top Bundle, such as the pine frame and bird images, can be used for birthday cards, thinking-of-you notes, and even nature-inspired projects.

The Nests of Winter Suite satisfies every creative need, offering you endless possibilities for cardmaking, scrapbooking, and beyond. Whether you love the calming process of fussy cutting or prefer the quick efficiency of coordinating dies, this suite gives you the tools to create meaningful projects with ease.

If you’re ready to elevate your crafting experience and bring your winter (and year-round!) creations to life, I encourage you to add the Nests of Winter Suite to your collection. Discover the Versatility of the Nests of Winter Suite: A Year-Round Creative Must-Have! Let the pine frames highlight your favorite moments, and allow the delicate bird images to inspire your next project.

If this is a “must have” for you … leave a comment and let me know if I have inspired you with this beautiful card.

Thanks for joining me today!

Christmas in July “FUN FOLD” Card / Video

Hello Stampin’ Friends ~

Last night’s Facebook LIVE class was an absolute joy! If you missed it, don’t worry—you can catch the replay in the enclosed video. We had a fantastic time exploring the creative possibilities of the Merriest Trees Dies and the stunning NEW Iconic Celebrations patterned paper. Today, I want to share some highlights from our session and give you a closer look at these wonderful products.

First, lets watch the video for a step-by-step guide and some creative inspiration.

CLICK HERE TO VIEW VIDEO

The Merriest Trees Dies are an absolute must-have for your holiday crafting. These dies are incredibly versatile and perfect for creating beautiful, layered Christmas trees that add dimension and elegance to any project. During my LIVE, I demonstrated how to use these dies to create this beautiful FUN FOLD card.

Here are some of the stand out features of the Merriest Trees Dies …

Intricate Designs: The dies include detailed tree shapes and decorative elements like stars and ornaments, allowing you to create intricate and eye-catching designs.

Layering Capability: With multiple sizes and shapes, you can layer the trees to add depth and dimension to your projects.

High-Quality: Made with precision, these dies ensure clean cuts every time, making your crafting process smooth and enjoyable.

The Iconic Celebrations patterned paper is a brand new addition to our Online Exclusive collection, and it’s already a favorite! This designer paper is perfect for adding a festive touch not only to your holiday projects, but was designed to use all year long!

Ready to get started on your holiday crafting? Don’t wait—add the Merriest Trees Dies and Iconic Celebrations designer paper to your collection today! These products are perfect for creating beautiful, handmade holiday items that will be cherished for years to come.

Happy crafting, and see you at my next Facebook LIVE class!

Introducing Winter Meadows Designer Paper for Father’s Day and more!

Hello Stampin’ Friends,

Today I’m sharing 6 cards using the Winter Meadows Designer Series Paper from Stampin’ Up! This collection isn’t just a celebration of the season; it’s a canvas of versatility waiting to unfold and brings the beauty of nature right to your fingertips. Each design of this exquisite paper was hand-painted making it perfect for your creative projects.

One standout feature is the deer page, meticulously crafted to perfectly fit onto a card front. The repeating pattern allows you to effortlessly cut each sheet into six pieces, providing a seamless background for your cards. Making this paper perfect for Fathers Day or a Birthday!

Let’s delve into the magic of quick and effortless card-making! Here are six simple yet stunning card ideas utilizing the Winter Meadows Designer Series Paper, promising to spark creativity …

  1. Classic Christmas Charm: Layer the grey tone pretty paper with a Pretty Peacock, add a simple ‘Let it Snow’ sentiment for a simple and pretty holiday card. I know many of you create your holiday cards “way” before the snow flies!

2. Winter Wonderland: And a sentiment of ‘Make the Season Sparkle’, pair it with Lost Lagoon cardstock, add a touch of Wink of Stella and adorn with Iridescent Rhinestone embellishments for a serene winter scene.

3. Father’s Day Sophistication: I cut the designer paper to 3 3/4″ x 5″, this card I used the Misty Moonlight to mat it, it’s earthy tone and wrap one corner with Bakers Twine for some texture. You’ll stamp with a ‘Happy Father’s Day’ sentiment to create a refined touch.

4. Birthday Bliss: Next I used the Blueberry Bliss as a backdrop for a colorful birthday card, surrounded by coordinating bakers twine and embellishments. The greeting was created from the Curved Occasions Bundle

5. Holiday Elegance: Trim the designer paper as the others, layer it on the soft Moody Mauve cardstock, add some Wink of Stella and stamp a ‘Happy Holidays’ sentiment. Time to embellish it with Festive Pearls.

6. Sending Warmth: Create a layered look with your designer paper with the Snowflake Magic on the Smoky Slate card base, adding a versatile sentiment that suits any occasion. Plus we’re adding a few Festive Pearls to complete our look.

The Winter Meadows Designer Series Paper isn’t just a seasonal delight; it’s a crafting essential that transcends boundaries. Its adaptability and charm make it an invaluable addition to any crafter’s arsenal. With just a few creative tweaks, it effortlessly transitions from Christmas to birthdays to Father’s Day and beyond, promising endless possibilities for beautiful creations.

As a friendly reminder, while this paper is one of only two designer papers being carried over into the new catalog, there will be a slight increase in price. But trust us, the unparalleled beauty and quality of Winter Meadows Designer paper are worth every penny.

Thank you for hanging out with me today. Enjoy your day.

“A Season of Reflection and Gratitude: A Message This Christmas”

Merry Christmas Stampin’ Friends,

On this Christmas Eve I write to you as you may have noticed my absence over the past few days, and I wanted to take a moment to share a glimpse of why these days have been incredibly precious to me.

This year has been marked by a profound loss for my family. In October, we said goodbye to my great grandson, Armani. His departure left a void that seemed insurmountable. But amidst this heartache, something beautiful emerged—our family grew closer, drawing strength from each other in a way we hadn’t before. (I was helping him put his Christmas presents together last year).

The past few days and during Christmas are about cherishing every moment with my family. We’ve held each other a little tighter, laughed a little louder, and found solace in being together during this holiday season. That little boys love touched so many. 

In the midst of this personal journey, I’ve been profoundly moved by the unwavering support you’ve shown me, both personally and in my stamping business. Your kindness, messages of encouragement, and understanding during this time have meant the world to me. Your support has been a source of comfort, and I’m deeply grateful for each and every one of you who has been there for me.

From the depths of my heart, I wish you a blessed Christmas. May the holiday be filled with warmth, peace, and the joy of being surrounded by those you hold dear. 

Merry Christmas my friends ~

Touch of Whimsy your Style? Try the Festive & Fun Stamp Set

Hello Stampin’ Friends,

Are you looking to add a touch of whimsy and color to your holiday cardmaking? Look no further than the delightful Festive & Fun stamp set, coupled with the versatility of Stampin’ Blends markers! Specifically designed for ease and creativity, these tools can transform a our cute giraffe stamp into a vibrant, eye-catching focal point.

One of the standout features of the Festive & Fun stamp set is its charming giraffe illustration. This adorable character becomes a joy to color using Stampin’ Blends. These alcohol-based markers offer smooth and seamless blending, allowing both novice and experienced crafters to achieve professional-looking results effortlessly.

The secret to achieving stunning color depth lies in the layering and blending capabilities of Stampin’ Blends. Begin by selecting your desired shades for the giraffe’s body: Lemon Lolly & Medium Naturals. I used the Cherry Cobbler, Shaded Spruce and Smoky Slate to color the rest. With the fine and brush tips of the markers, apply the lighter shade as the base layer and gradually add depth by layering the darker shade. I go over again once I lay down the darker color which really blends them and creates a visually appealing finish.

I used the Scallop Contour Dies to highlight my images and took it one step further by coloring the stitch lines around the die … the Designer paper is a Walk in the Forest. For each package of designer paper sold, $3 will be donated to a charity (Toy’s for Tots) in our area.

If you caught my video / post yesterday … you’ll notice that “brushing” technique using the Shimmer White Embossing paste on my tree. So, unleash your creativity and bring this adorable giraffe to life with the vivid hues of Stampin’ Blends markers. Even a subtle change in designer papers and layer can add to the festivities! Don’t forget that Wink of Stella on your Star and ornaments!!

Time to grab your Festive & Fun stamp set, Stampin’ Blends markers, and Nested Essentials Dies, and embark on a colorful crafting escapade today!

Thanks for stopping by and Happy crafting!

Crafting Magic: Christmas Ornament Cards from Scraps

Hello Stampin’ Friends ~

Join us on a creative journey as we make stunning Christmas Ornament Cards using simple materials and your leftover paper scraps. Gather your window sheets, leftover designer paper scraps, and a die-cutting machine. Ensure you have a variety of scrap papers in complementary colors and patterns, allowing for a mix-and-match design on your Christmas ornament cards.

Begin attaching strips of designer paper onto the window sheet. This is a fantastic opportunity to use up those beautiful but leftover paper pieces from previous projects. Once you’re satisfied with your paper arrangement, run the window sheet through the die-cutting machine, I used the largest circle in the stylish shapes dies. While your machine is out … add some texture to your card by embossing the card front, just be sure you stamp your greeting first, then emboss.

Now that you have your beautifully crafted ornament, it’s time to attach it to the front of your card. Use your favorite adhesive to secure the ornament, ensuring it stands out as the focal point. The transparent window sheet adds a touch of elegance, giving the illusion that the ornament is floating on the card. 

To enhance the festive vibe, add a ribbon or twine bow to the top of the ornament… I used the metallic twine to coordinate with my designer paper. This small embellishment can add texture and dimension to your Christmas card. Don’t be afraid to get creative! 

Creating Christmas Ornament Cards from scraps not only allows you to repurpose materials but also results in unique, handmade cards that will surely stand out during the holiday season. Don’t you just love spreading joy while showcasing your creativity, and your friends and family love when you hand craft their cards! 

Thanks so much for joining me today … Remember, you can use this technique on any die cut shape you want.

Twelve Weeks of Christmas: Week 10 / Garden Walk

Hello Stampin’ Friends ~ 

Today I’ll be sharing my Twelve Weeks of Christmas: Week 10 Video along with the individual cards, including a brand new one not shown during the video!! I’m highlighting the amazing and versatile Garden Walk Designer Series paper. You’ll see quick cards, split cards and ways to highlight it. Teamed with the designer paper is the Throughout the Year stamp set. Grab your coffee and let’s take a look at the video ….

Yesterday I shared the poinsettia card, here is a reminder …

Just to help you see different patterns from the designer paper and different styles of cards! Next up is a collage of banners that’s backlit with some brushed color ….

You got to hear how each of these were made so I won’t be covering that here. Our next 2 cards were created when I cut down the 6 x 6 designer paper into 4 – 3 x 3 sheets. Our first is super simple to create and is a great layout when you need to make many cards quickly ….

Next is the second of those 4 – 3 x 3 inch squared and is created with one of my favorite / simple card techniques: Split Cards! Simply cut from corner to corner diagonally ….

And lastly … this card was created with the help of the Patchwork Pieces dies. Don’t ever be afraid to pull out those dies and experiment! You just may fall in love with your creation ….

With yet another pretty pattern, your creativity can soar and choosing a color pattern is easy, just follow what’s in the paper. My card base is the Calypso Coral which was embossed with the Timeworn Type embossing folder. I wanted some texture on my card, and this made it easy. 

Once I die cut the Garden Walk designer paper with the Patchwork Pieces dies, I mounted it onto Pretty Peacock cardstock … I wouldn’t have put these two colors together myself, but they sure do look good together. 

My greeting was stamped in Pretty Peacock and die cut with the Stylish Shapes dies. I then grabbed a flower from another die set to embellish my card. 

Creating all of these cards with the combined elements of Garden Walk Designer paper and the Throughout the Year stamp set brings out the magic of both the paper and stamp set. Add these to your wish list and let your creativity flow! 

Thank you for joining me today … I hope you enjoyed this showcase

Don’t forget …. FREE SHIPPING on Thursday for all orders over $75. Plus, I have a FREE Gift for all who use the Host Code: HJ2ENVG4 

Celebrate National Poinsettia Day with Garden Walk Designer Paper!

Hello Stampin’ Friends,

December 12th marks a delightful celebration – National Poinsettia Day! What better way to honor this festive occasion than by creating a beautiful card adorned with the Garden Walk Designer Paper? This versatile paper collection is a treasure trove of patterns perfect for all occasions and holidays, making it an ideal choice for your crafting endeavors.

Teaming up this splendid paper with the “Throughout the Year” stamp set elevates your creations to a whole new level. This stamp set is a true companion to the Garden Walk Designer Paper, offering a range of sentiments suited for different times of the year. Whether you’re celebrating holidays, sending heartfelt messages, or marking special occasions, this stamp set has you covered.

Creating a card with these combined elements brings out the magic of both the paper and stamp set. Imagine a stunning Poinsettia-themed card, adorned with rich reds and lush greens from the Garden Walk Designer Paper. Pair it with a warm and thoughtful sentiment from the “Throughout the Year” stamp set, and you have a heartfelt creation ready to spread joy.

I chose Pretty Peacock for my base to pull that beautiful rich color out of the designer paper, then I framed the Garden Walk Designer paper with the basic white. I enhanced my greeting with the Silver & White Sheer ribbon … dressed it up like a Christmas present, then added a few Silver embellishments from the Festive Pearls. So, whether you’re making cards, scrapbook pages, or other paper crafts, let this combination be your inspiration for spreading happiness and warmth throughout the year.

If you’re “looking” for inspiration, join me tonight on Linda’s Stampin’ Escape at 6:30 pm Central Time … LIVE with this combination of the Garden Walk Designer Series Paper and the Throughout the Year Stamp Set. Looking forward to seeing you there! Till then, have a great day!

Embrace Elegance with Night Divine: Featuring the Z-Fold

Hello Stampin’ Friends,

YIKES … I’ve been AWOL for 5 days! Still dealing with my daughters “unknown” illness (it’s been two months) hopefully we will get some answers or something DONE on Thursday. Geez … even the weathermen have a better track record than these doctors, and emergency room technicians.

Anyhow … on with the good stuff!! Today I have a beautiful card for you: The Night Divine stamp set, a beacon of elegance, it shines brilliantly in today’s spotlight. Join us as we explore its grace and the stunning Z-Fold creation, marrying Very Vanilla and Gold in a symphony of sophistication.

The Night Divine stamp set is a testament to the beauty of this holiday season and the birth of our Lord. Even in this cards simplicity, the message shines through as it is the focal point of our card when heat embossed in Gold.

The choice of Very Vanilla cardstock sets a tone of refined grace, providing the perfect canvas for the gold accents to shimmer and captivate.

The Z-Fold card highlights our sentiment and places it center stage, adorned in the regal hues of Very Vanilla and Gold. The Z-Fold, known for its dimensional appeal and captivating layout, perfectly complements the elegance of the Night Divine stamp set.

Let the Night Divine bundle guide you to create awe-inspiring cards that celebrate elegance and grace. Thank you for joining me today …. I have a surprise for you!

Surprise! It’s time for FREE SHIPPING! On 14 December 2023, you can shop and save on all qualifying orders of $75 or more. What a great way to stock up on all your favorite products from the catalog, Online Exclusives, kits, and more!

Please keep in mind that because of the Christmas season, the distribution center may fall behind typical shipping timeframes. We will do all we can to return to our regular service levels as quickly as possible. Any orders placed during this promotion are not guaranteed to arrive before or by 25 December.

Let me know if you have any questions, or if you need help placing an order. Thanks again, and have a wonderful day.