Today I have another of my coloring techniques to share with the pretty “True Love Designer Series Paper”- (Retiring). I’ll refresh you with yesterday’s card and then share a new one with you. This fun designer paper is perfect for a variety of coloring techniques … it’s black & white!!
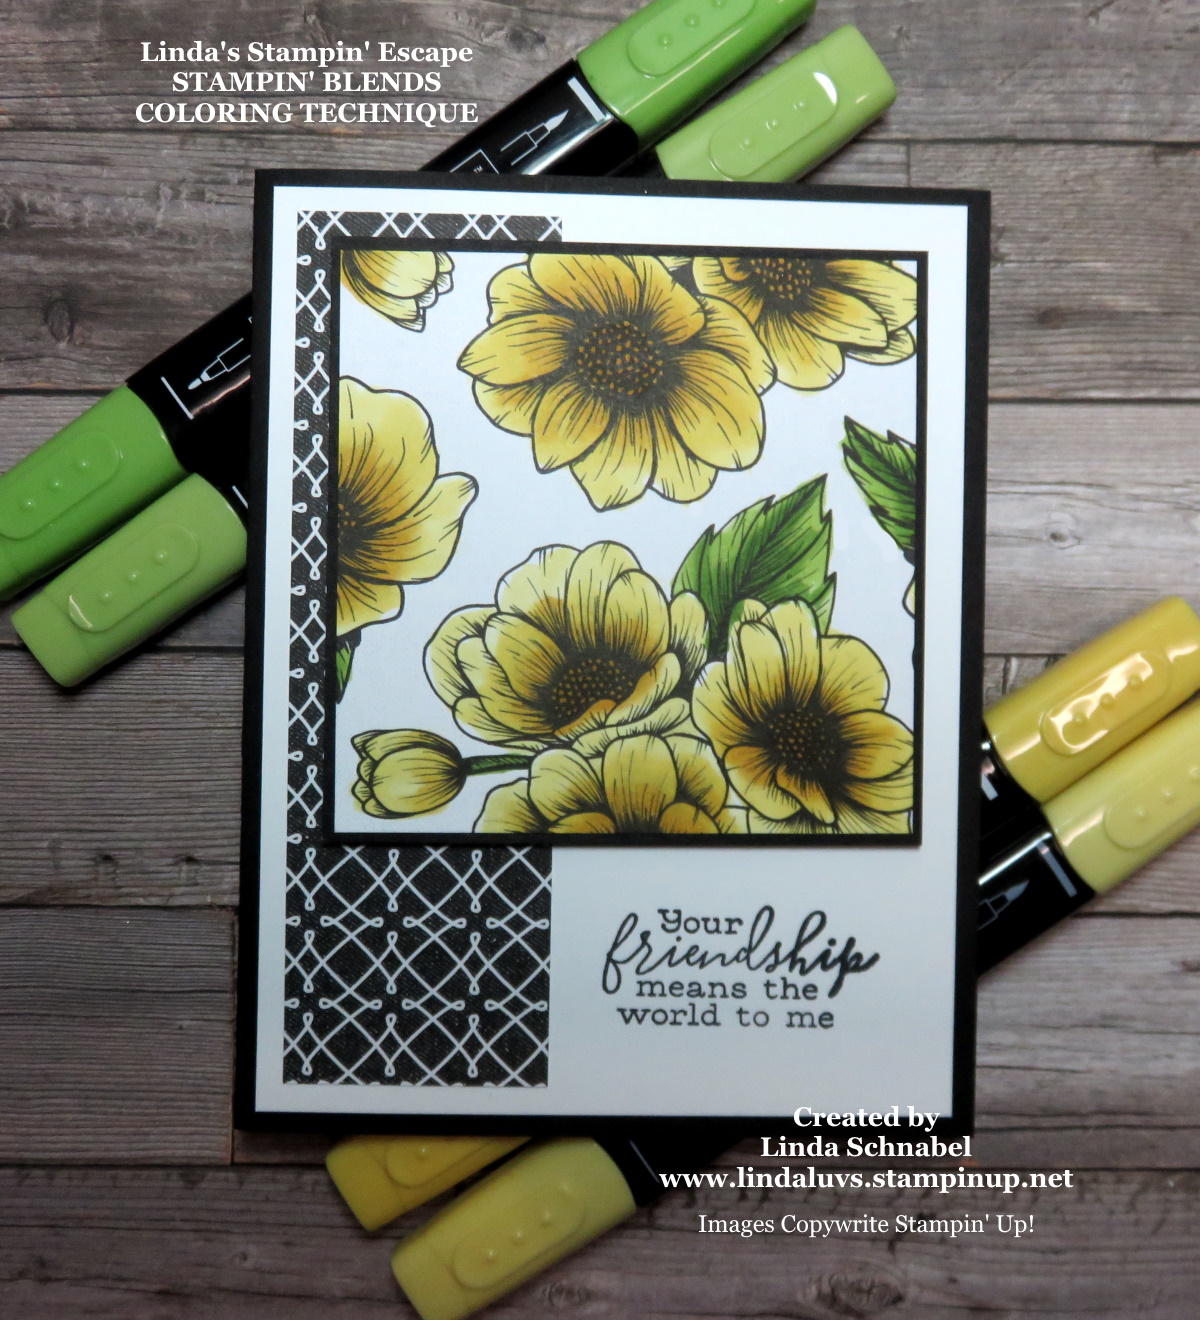
I am going to share today’s technique using the same designer paper pattern as I did yesterday. I want you to see the difference you get when using different techniques.
I’m using the Stampin’ Blends to color my designer paper today … don’t you just love coloring! I find it very relaxing and the Stampin’ Blends allow you to blend colors effortlessly and get such beautiful vivid colors….
Instead of the soft background that was created yesterday using the Blending Brushes, the control of the Stampin’ Blends leaves your background clean and open … so cool. For my greeting I used the “Free as a Bird” stamp set again.
I cut down my designer paper to 3-1/4″ x 3-1/4″ and matted it with Basic Black measuring 3-1/2″ x 3-1/2″. This was popped up after I laid a 1-1/2″ x 5″ strip of the “True Love Designer Series Paper” … just another pattern.
Thanks for checking back today, don’t forget to put my Facebook LIVE on your schedule for Tuesday Night at 6:30.
Have a great day ~
TODAY’S STAMPIN’ SUPPLY LIST … If you liked the products used in today’s projects, I have links for you below. Just click on the item you would like more information on, or to begin your shopping. It will take you directly to my website.Thank you ♥
Oh my the weekends go fast, don’t they! Hope you’ve been doing something fun, creative … or just enjoying spring coming. I have been playing with different coloring techniques and such with the pretty “True Love Designer Series Paper”- (Retiring). So for the next couple of days I will be sharing these creations and then on Tuesday, the designer paper will be highlighted when I demonstrate a “FUN FOLD” on my Facebook LIVE at 6:30. I hope you follow along!
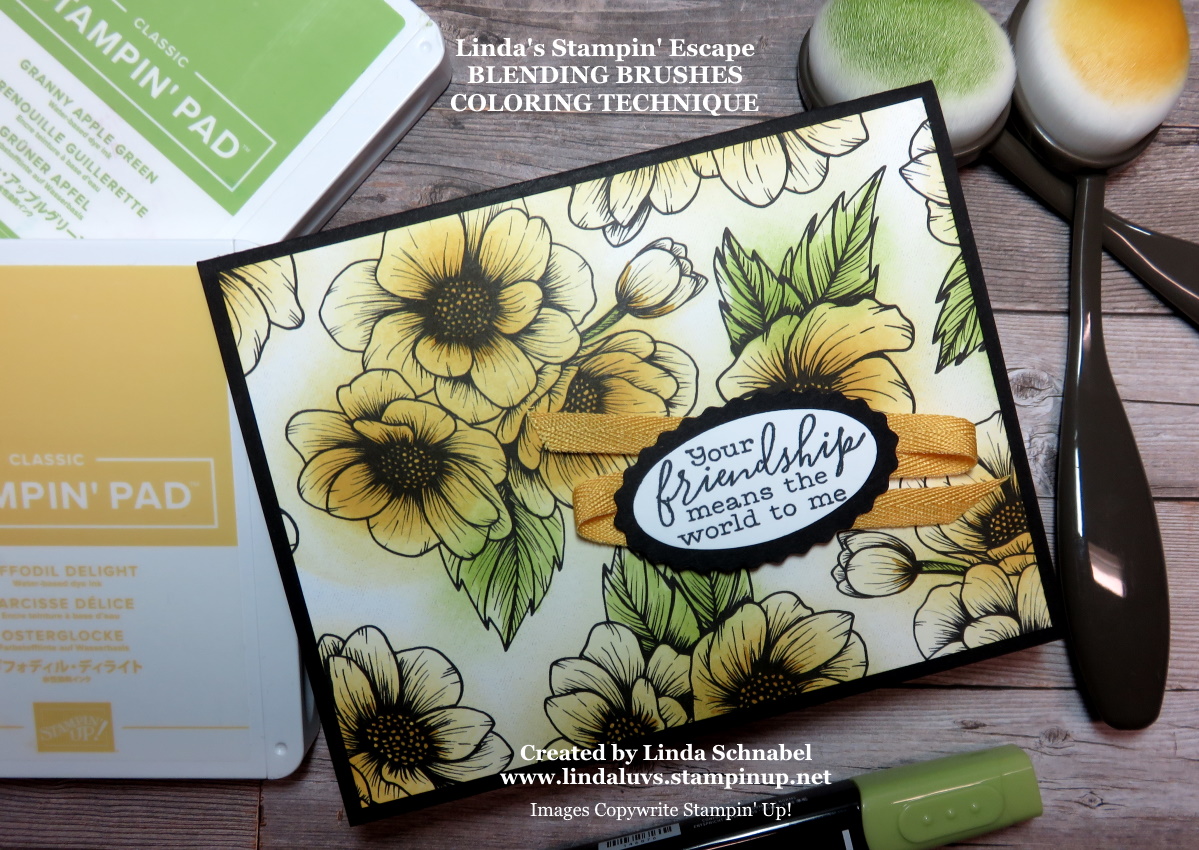
This fun designer paper is perfect for a variety of coloring techniques … it’s black & white!! Today I’m keeping it quick and simple by just applying color with our Blending Brushes … did I say “quick”!!
This pattern is so pretty and easy to use the blending brushes because the flowers are bigger than some of the other floral patterns in the pack. On these flowers I actually started in the center and worked my way out in a circular motion.
I did just a little for the green … I kind of stroked the color on the single ones and then I went back in with the coordinating Granny Apple Green Stampin’ Blend to create a more detailed leaf.
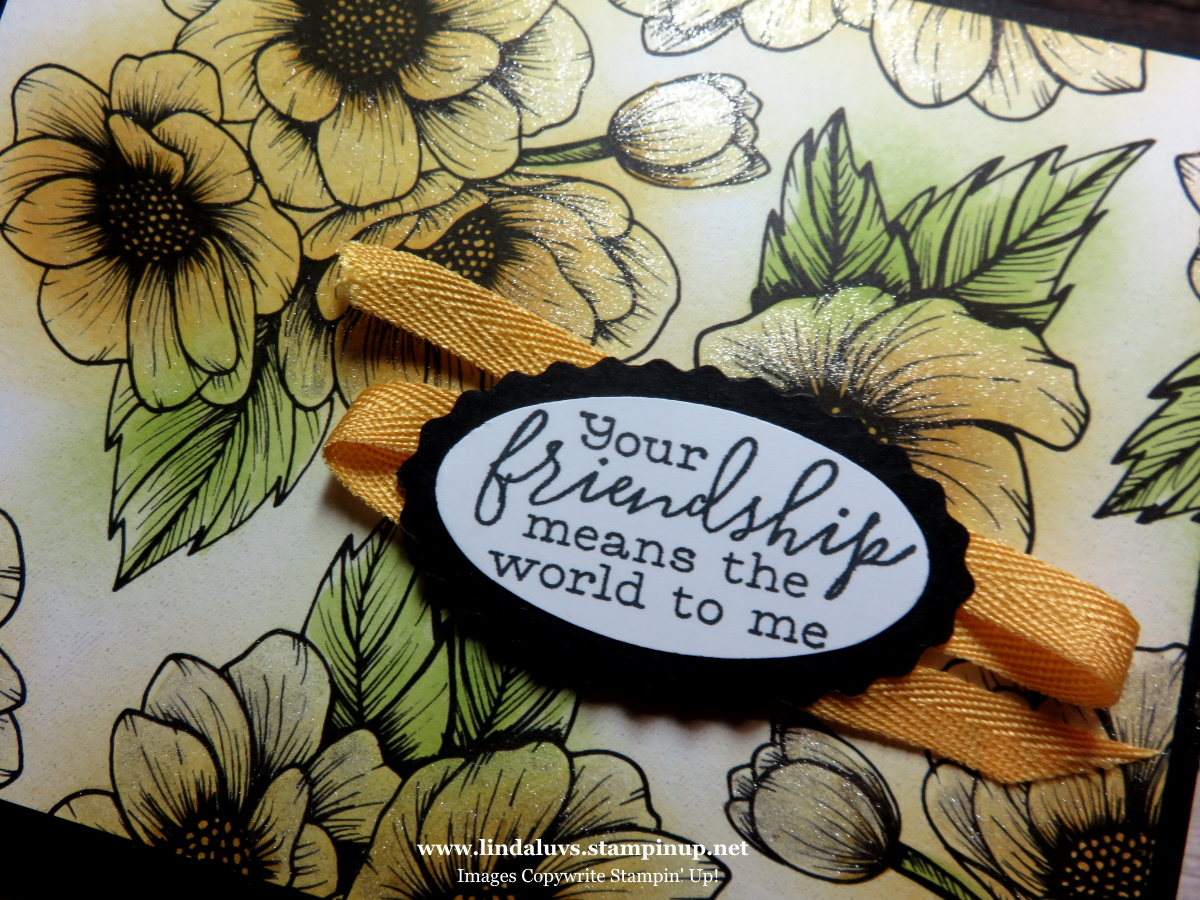
The background has a soft pattern which created a textured look … so cool. I did my greeting using the “Free as a Bird” stamp set. It was punched with the Double Oval punch which is currently in the Mini Catalog.
To highlight my greeting, I added a layering of the Bumble Bee Ribbon (retiring) … it’s so simple to do; I just fill the back of the greeting with adhesive and then just lay the ribbon down. I use dimensionals then to help hold the ribbon and to pop it up.
What do you think … Do you like the addition of Wink of Stella to the card?? The first two pictures were taken without Stella!!
I hope you enjoyed today’s simple color creation, and join me daily to see additional coloring techniques with this paper … and don’t forget to head to my Facebook page on Tuesday for my LIVE presentation using a fab Fun Fold!!
Thanks for stopping in to visit today …
Enjoy the rest of your weekend.
TODAY’S STAMPIN’ SUPPLY LIST … If you liked the products used in today’s projects, I have links for you below. Just click on the item you would like more information on, or to begin your shopping. It will take you directly to my website.Thank you ♥
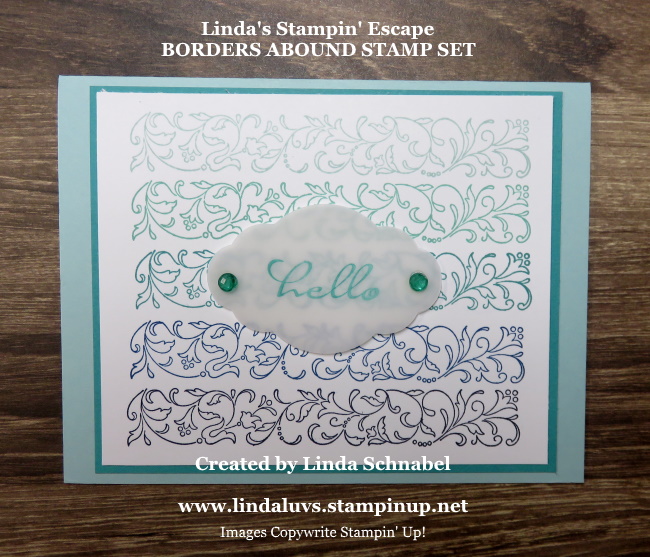
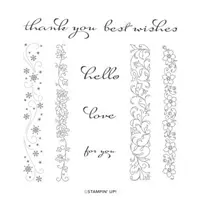
How is your weekend going so far? Hope well … today I’m sharing a parade of cards created with the Borders Abound stamp set. I love this set because the font is sooo beautiful and your can do so many things with the borders, so sit back and join me as we go through many different style creations you can do with this amazing stamp set.
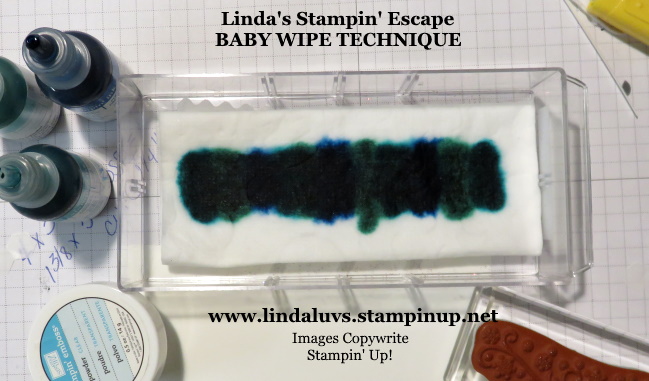
The first two cute cards will showcases the Baby Wipe Technique. You will see two different ways to use those baby wipes!!
I am using Pool Party, Coastal Cabana and Pacific Point. You begin by laying out your baby wipes (I used the kind from the $ $tore) and then you add a few drops of ink in each color onto your baby wipe…
I chose these colors because I picked the snowflake border from the Borders Abound stamp set … now you can use this “inked” baby wipe as your new multi-colored stamp pad. I’m starting simple on my first card ….
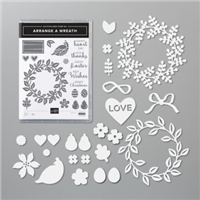
I stamped my “multi-colored” snowflakes near the bottom and then added my Christmas greeting … this comes from the “Arrange a Wreath” stamp set. I believe I used this on the 5 cards I shared with you on Sunday (Click Here to View). The snowflakes were kissed with Wink of Stella … just a touch to add a subtle sparkle, and then I layered with the Pool Party to tie it all together. I wish the picture showed the Wink of Stella … so delicate.
My next Baby Wipe technique card, I used the same snowflake border stamp, but this time it’s inked with VersaMark so I can emboss my Whisper White card front in Clear Embossing Powder. Once embossed …. I took my “inked” baby wipe and ran it over the clear embossed image. WOW What a fun impact it creates on your card …
This is one of those fun techniques (one of my favorites for Fall cards) where you get more bang for your buck because you can create two different looks from your Baby Wipe technique.
Next up is a card that I created an Ombre effect. It showcases a succession of color … Pool Party, Coastal Cabana, Bermuda Bay in the center, then Pacific Point and Night of Navy.
This fun card can be done in an array of colors; pinks, greens or your primary colors … any of these would be pretty. Since my Bermuda Bay is the center color, I used it as my mat, ink for my greeting and Stampin’ Blends to color my embellishments.
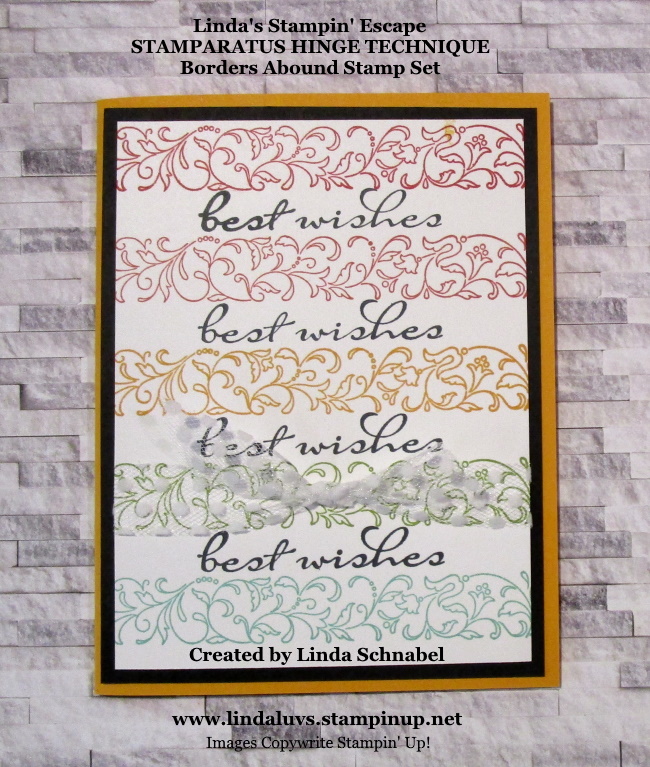
Next, I want to share a card that is similar but I used my “Stamparatus” with this one so I could create even placement with each stamp and then the ability to stamp my greeting in between ….
I used the filigree border from the Borders Abound stamp set and aligned it onto my cardstock and then picked up the stamp with my plate … now you’re ready to stamp! The colors used are Poppy Parade, Calypso Coral, Mango Melody, Granny Apple Green, and Coastal Cabana …. each color was achieved by moving the plate down hinge by hinge.
Isn’t that cool … all the cards are so different, but wait … I have more!! I began this card with the “Emboss Resist” technique and ended up with not one, but two amazing cards!!
I could fill this page with instructions but wait … I have a video to share with you. Need a refill on your coffee? Filler up, sit back end enjoy … it’s not really that long! I just want you to be comfortable.
Have you fallen in love with that stamp set like I have? I’m so sad that it is on the retirement list! I must have said it a hundred times … I ❤ the font!! So here are a couple more cards that I used the greetings one ….
The last two cards feature the Peony Gardens Designer Series Paper … that will be retiring too. Don’t get me wrong … I’m super excited to get my hands on those new items, but it is still hard to see these old friends go … away …. forever!! Get yours while you can, it’s all available only while supplies last.
I hope you enjoyed today’s technique and cards … I’d love to know what you’d like to see. Leave a comment below so I can better meet your stamping needs.
Thanks for the visit today, it’s appreciated. See you tomorrow!
Here is a list of the product I used to today’s cards. Find out more information about these products by clicking on the image … or you can begin your shopping from here as well. Thank you!
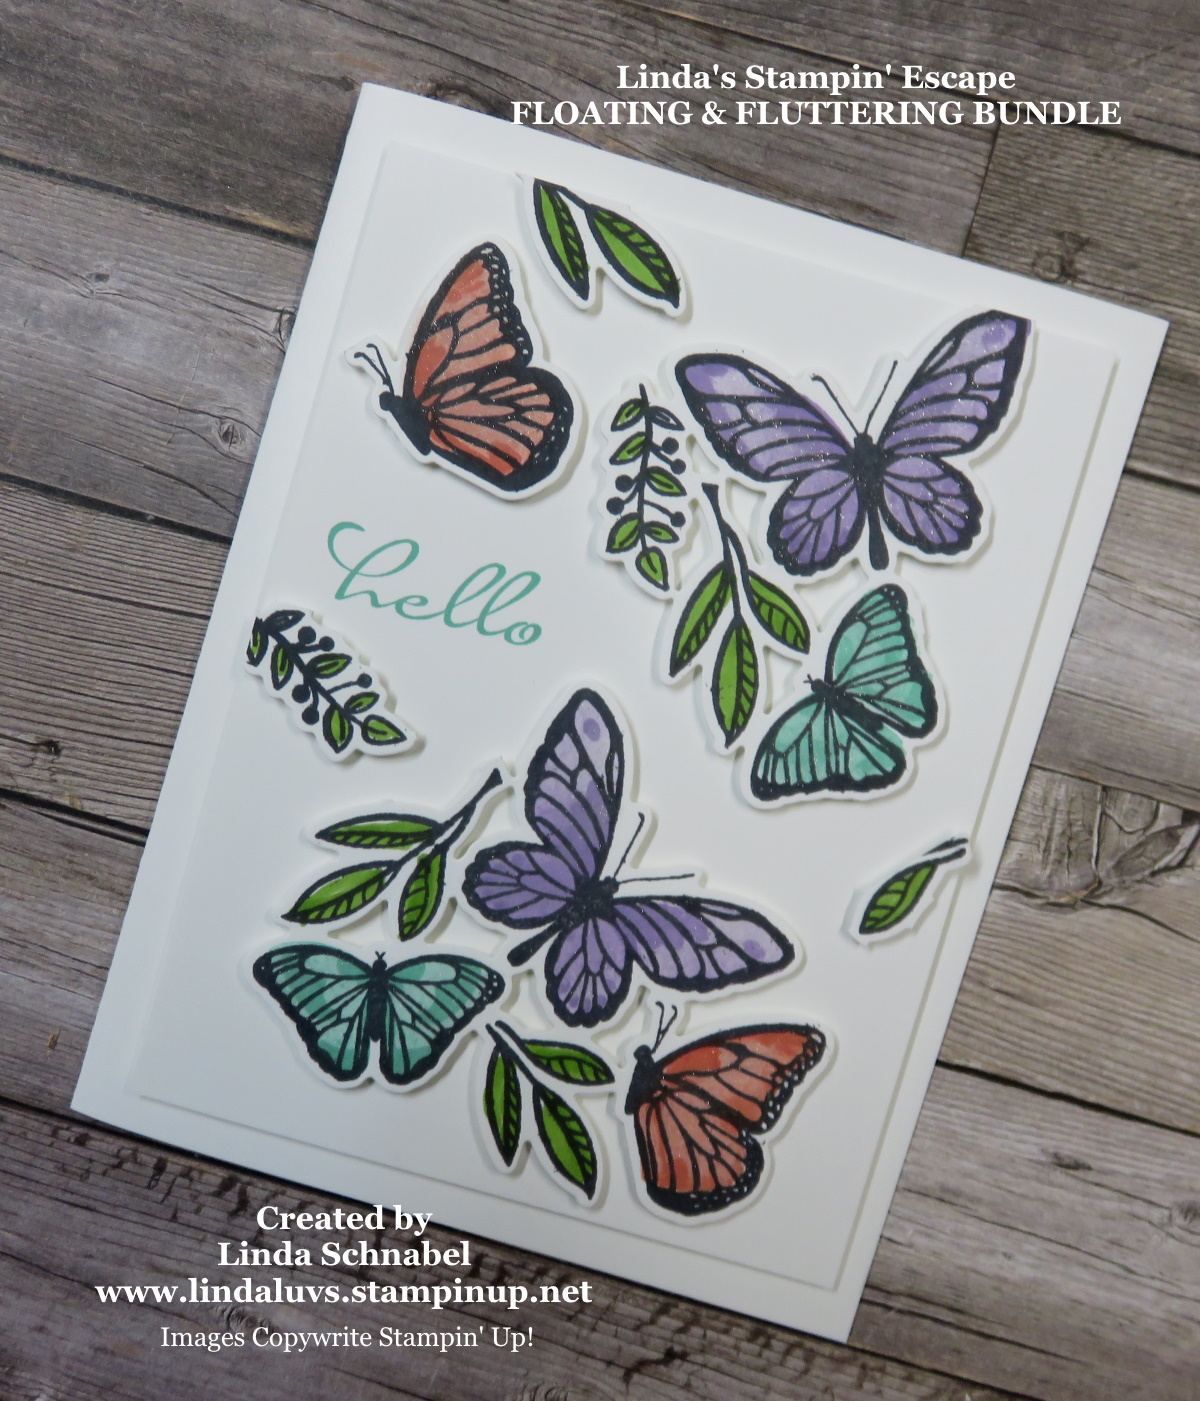
Today I’d like to share the beauty of the Floating & Fluttering Bundle. This amazing stamp and die set can create beautiful cards. Not only will I share the cards, but videos to show you how to make them. Then … if you decide you would like to purchase this bundle from me, I will invite you into my classroom where I have 3 more stunning cards (with video) … Just click on the > arrow to begin the videos!!
Let’s begin with the simple “floating” butterflies …
The video will explain step by step how easy it is to create this beautifully textured card, and how I colored the butterflies.
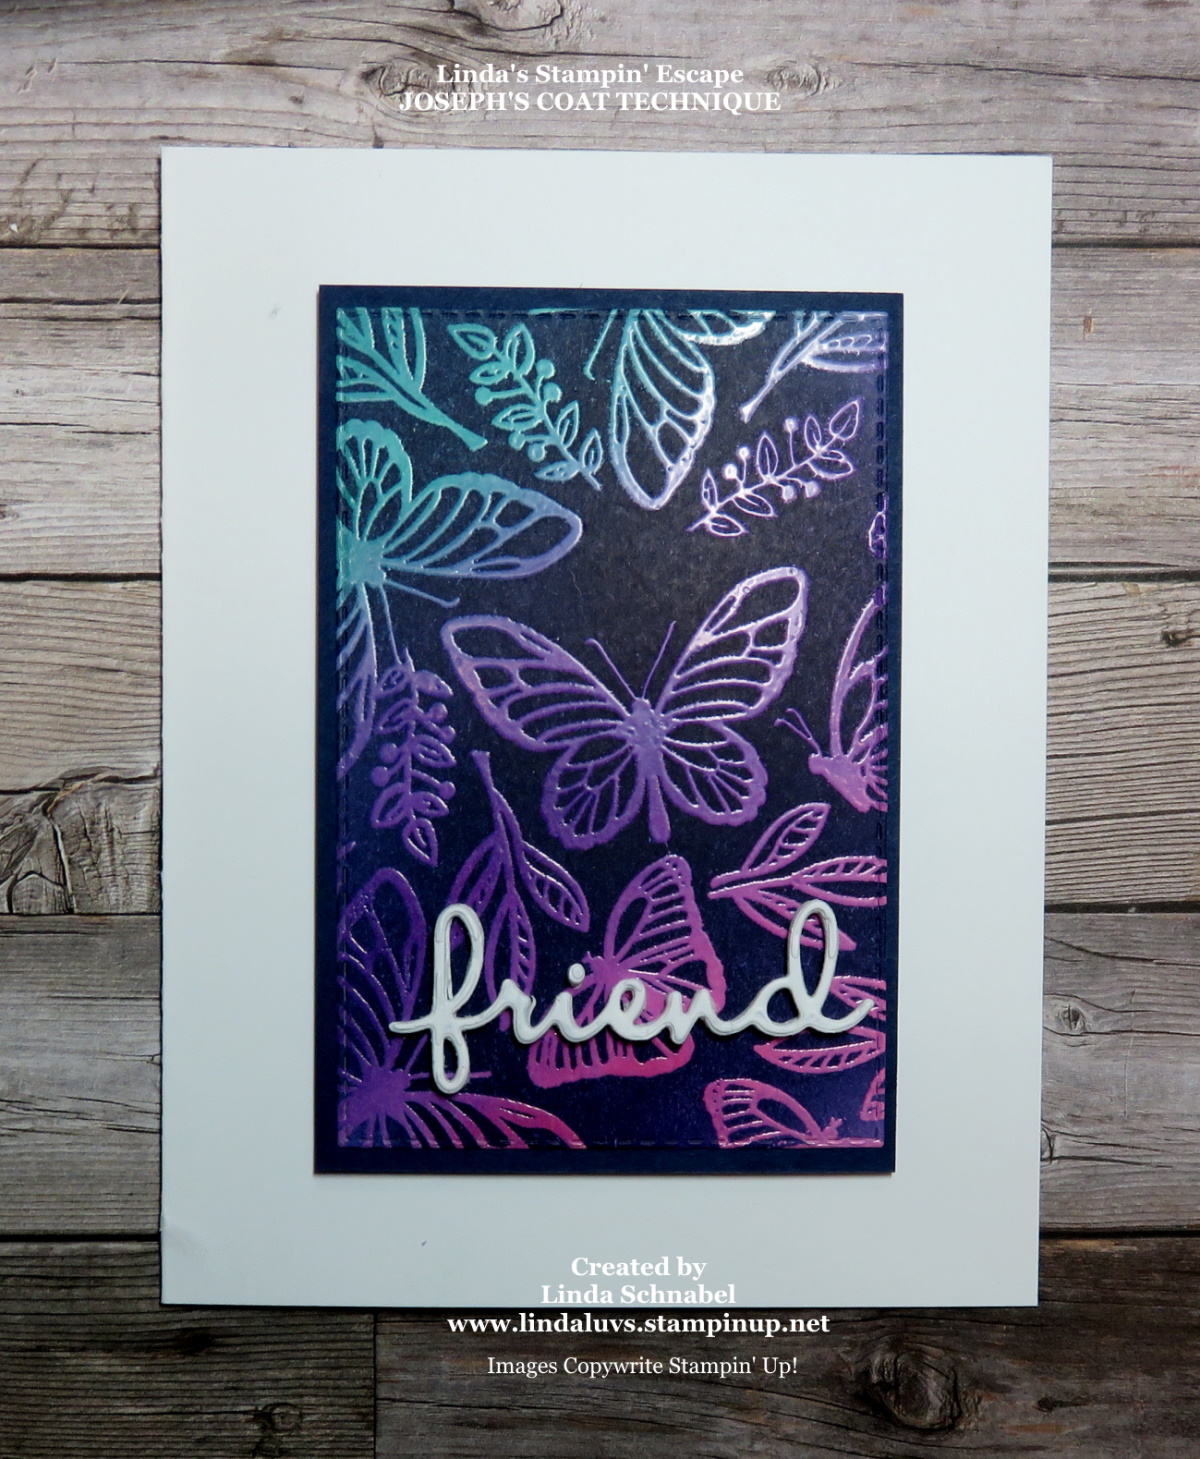
The next card I’d like to share again is the Joseph’s Coat technique …
I used a little bit of a twist on this card, the wonderful “Blending Brushes”. You will fall in love with the magic of Joseph’s Coat and the pop of color this creates …
Isn’t this a fun and magic technique!! Think of the colors you could use … Your friends will be amazed when they see your card.
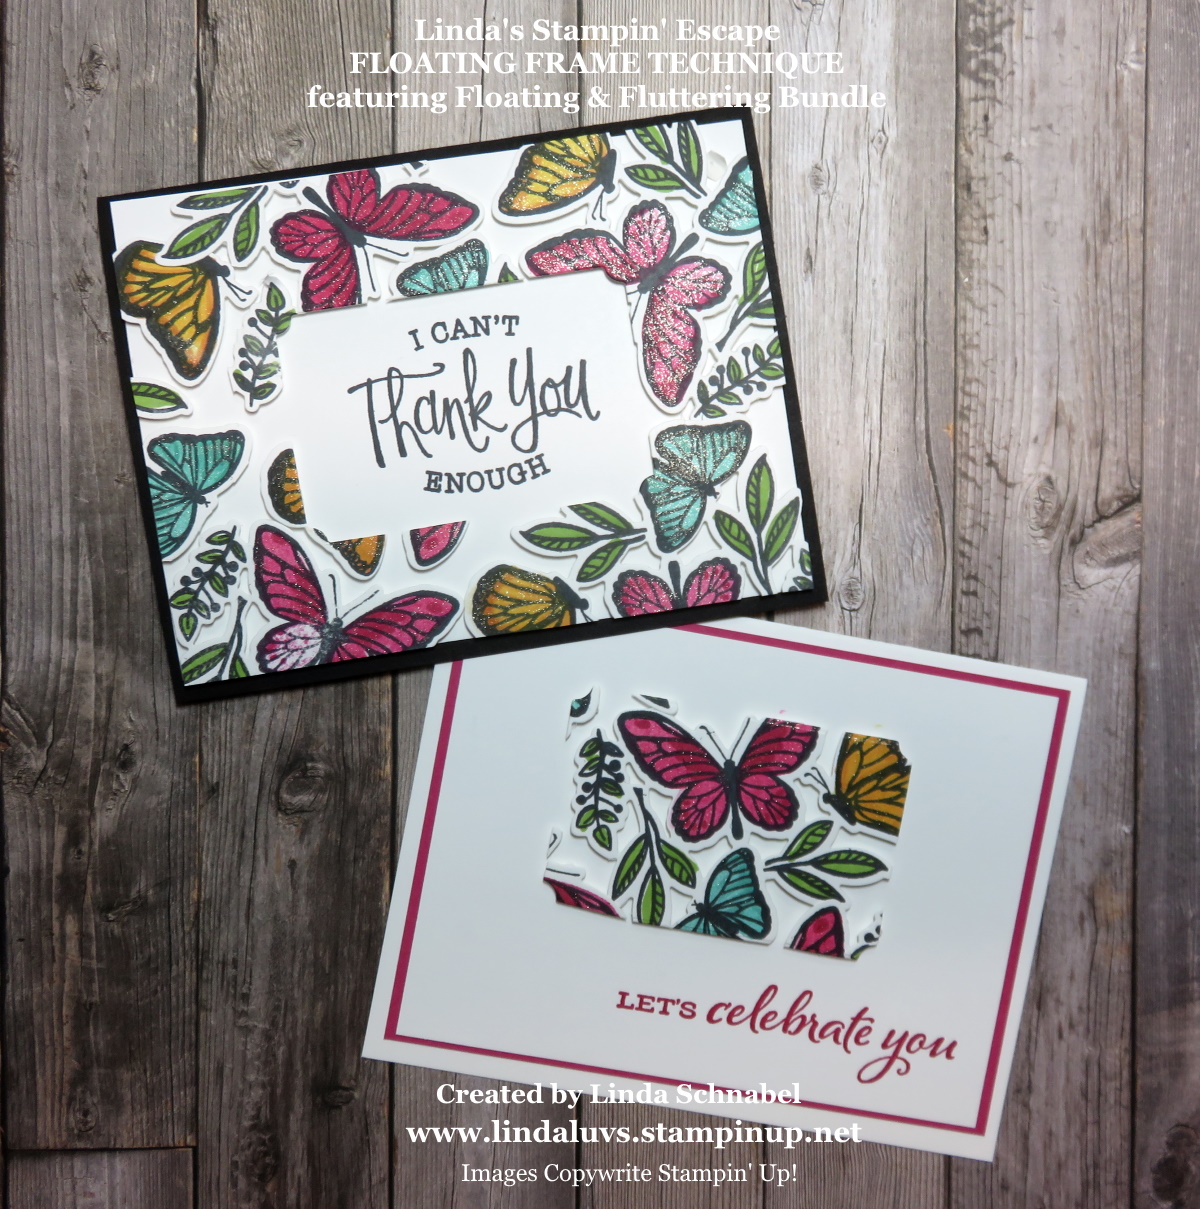
They will be equally amazed at the next technique ….
The Floating Frame Technique; it takes a little patience but as my stampin’ friend Olivia said “I like you get 2 cards for your effort- and they both look great! I will be trying these cards soon. Also I love press n seal- use it a lot in the kitchen and for things around the house. Never thought to use it for stamping so that just blew my mind! Thanks for the tip” Let’s take a look at the “Floating Frame” Technique …
I hope you enjoyed this showcase of cards & videos that highlight the Floating & Fluttering Bundle and some of the cool techniques that really embrace it. But don’t stop here, there are more right here on this blog, just put Floating & Fluttering Bundle in the search box. You will find the video’s on My YOUTUBE Channel.
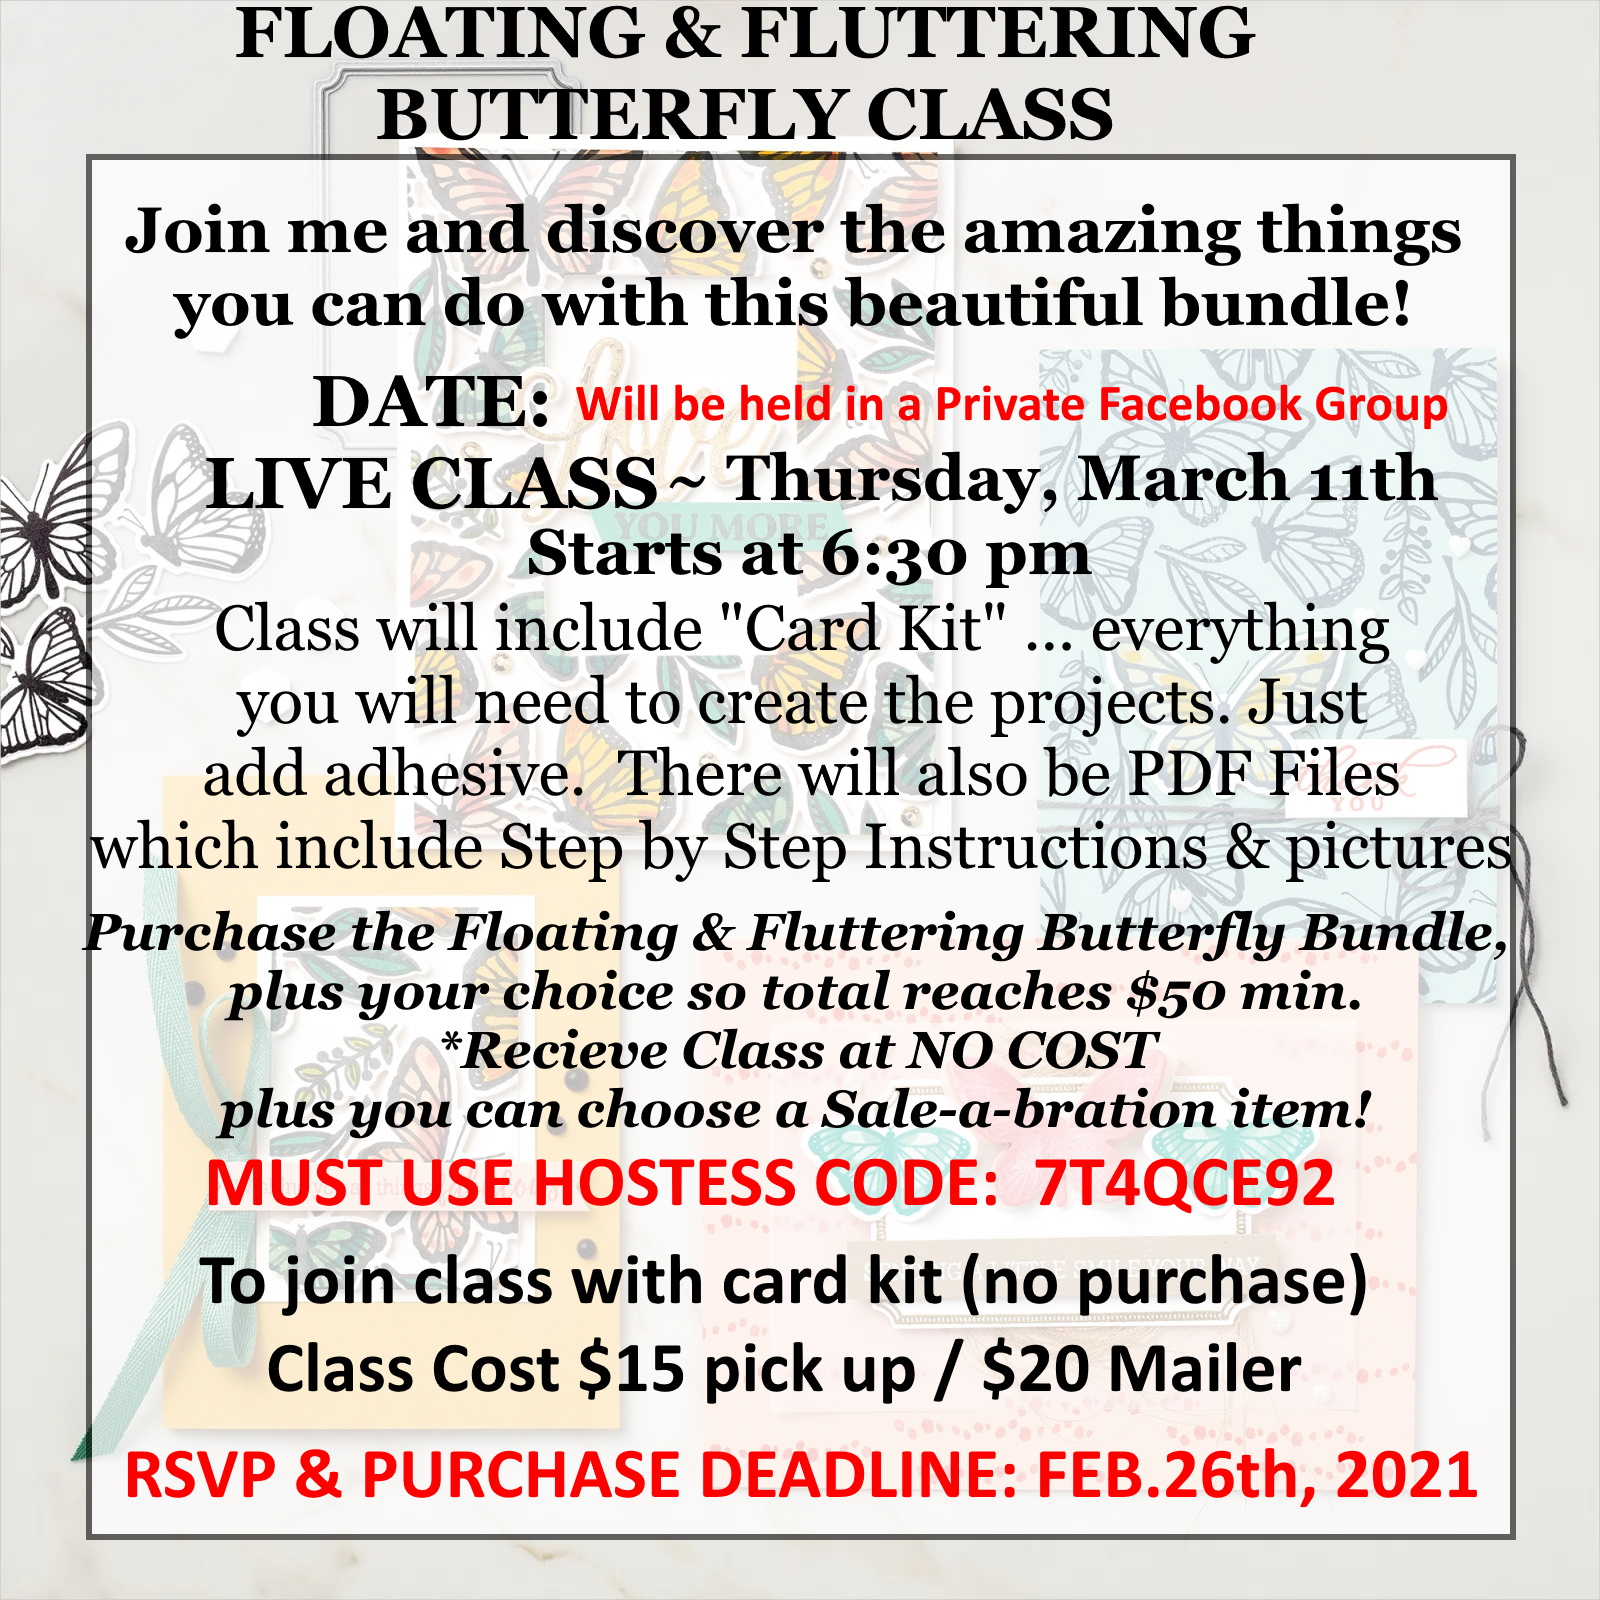
Then … if you decide you would like to purchase this bundle from me, I will invite you into my Facebook Classroom where I have 3 more stunning cards (with Step by Step video featuring all 3 cards and PDF – Written Directions with Photos)Use Hostess Code: 4GGHUT22 This will be open until the end of March. You can also CLICK THIS LINK! to get your bundle.
Thank you so very much for hanging out with me today.
Have a great weekend!!
TODAY’S STAMPIN’ SUPPLY LIST … If you liked the products used in today’s projects, I have links for you below. Just click on the item you would like more information on, or to begin your shopping. It will take you directly to my website. Thank you ♥
Today I’m going to share with you “how to” create two cards with the “Floating Frame” technique. I have also included my video from last nights Facebook LIVE presentation. Grab a cup of coffee as I share these amazing cards with you …
The video will show you step by step how I created these amazing cards with this different technique, who knew that a common food wrap from your kitchen would be so helpful!! Let’s see the floating …
Now join me for the video … Got your coffee? Maybe even a note pad!! When you watch how I remove the film from the butterflies, it works best when you pull to the side (like I did at the end) than trying to pull up. Have a look …
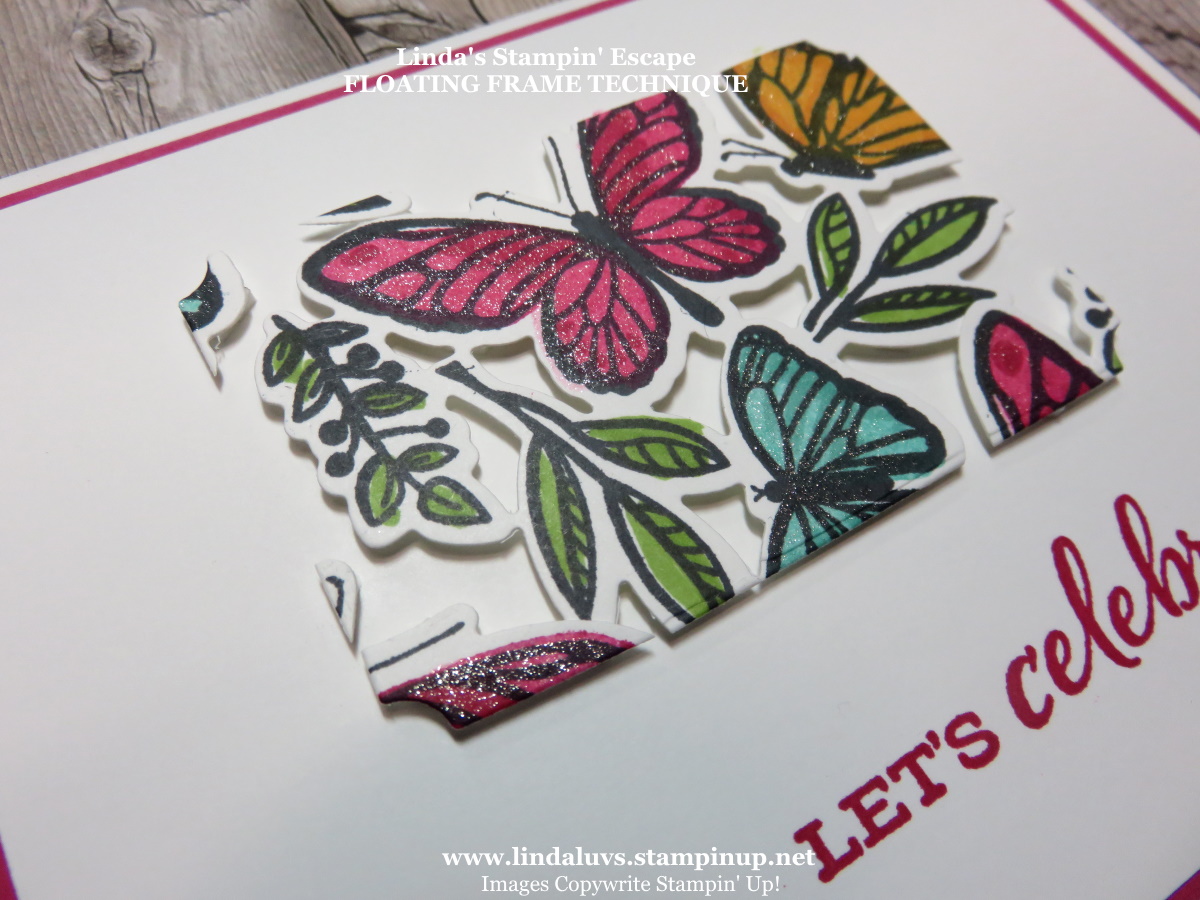
I love coloring so that part of the technique was easy, and the new dies make it easy to cut them out too … I don’t even mind putting all of the dimensionals on, just takes me a while to pick them all off … LOL! Once you peel off the film it uncovers an effect as if the butterflies are actually floating.
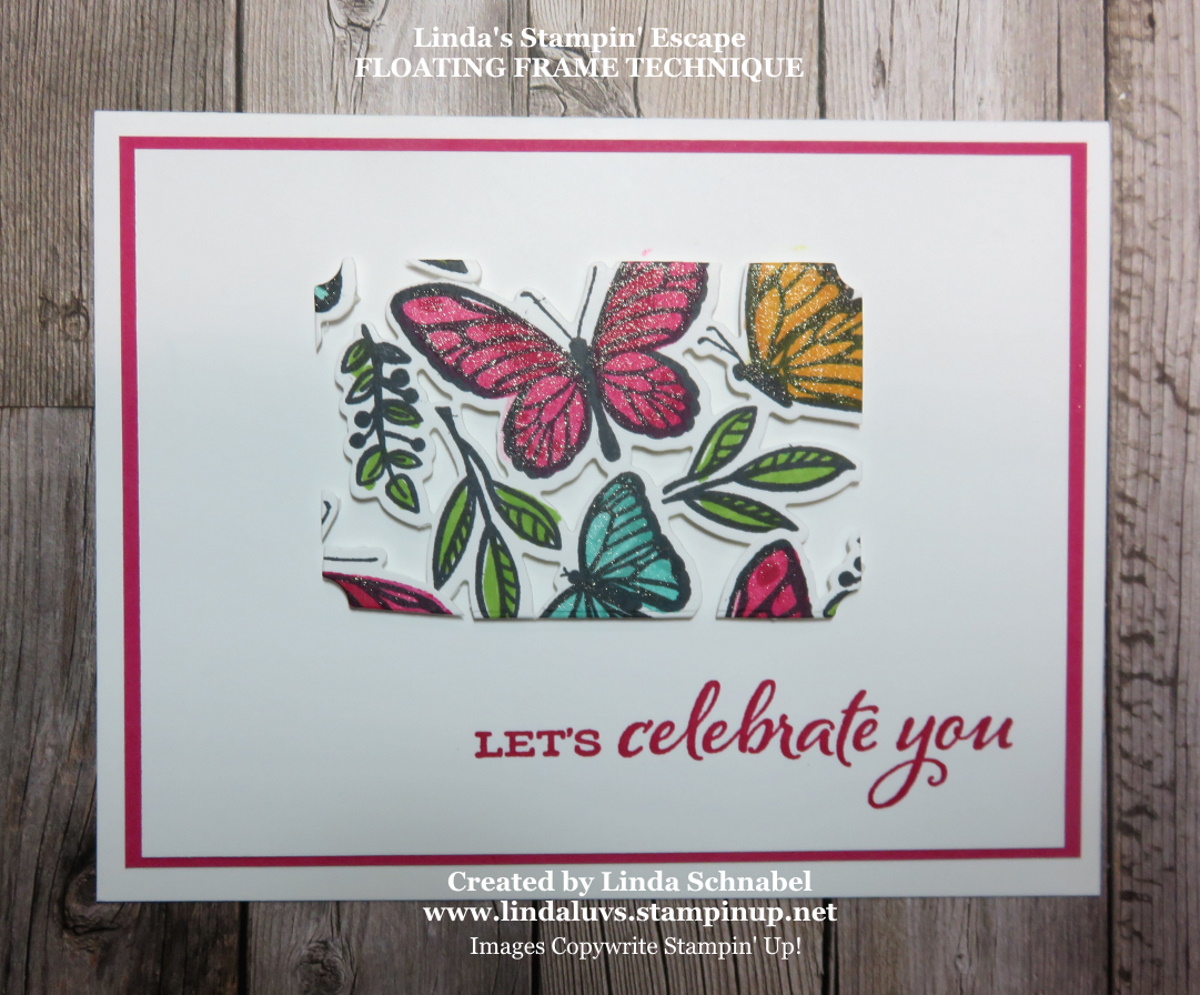
I promised to show you a second card, one with the piece that was cut while creating the frame …
I placed the piece down onto the card front and peeled off the film just like in the video … including the Wink of Stella!! I stamped my sentiment from the Sunflower Celebrations stamp set in Melon Mambo, then added a coordinating mat and attached the entire front to the Basic White card base. Here is a close up …
So what do you think? Is this your kind of technique … Will you be trying it? I’d love to hear from you, please comment below. I think the Floating & Fluttering Bundle is an easy way to start learning how to make these cards because the are mainly joined together.
I enjoyed making these cards … I’m going to love sending them out ❤ I thank you for joining me today, I hope you have an amazing day!
TODAY’S STAMPIN’ SUPPLY LIST … If you liked the products used in today’s projects, I have links for you below. Just click on the item you would like more information on, or to begin your shopping. It will take you directly to my website. Thank you ♥
Today I’m going to share another card and a video using the Floating & Fluttering Bundle. I will show you how to use the Two-step Stamping technique with a minimum of ink pads!! This is a great tip for new stampers who don’t have it all … yet 😉
Join me for this short video, hopefully you’ll catch a few more tips and techniques to use in your stamping …
Oh my gosh … don’t you just love those butterflies! The dies were designed to make these butterflies look like they are floating, and if you didn’t catch it in the video, I have a close up here …
The colors I used were the Highland Heather, Calypso Coral and Coastal Cabana … if you want to pair these colors to create a darker butterfly you could add Gorgeous Grape, Terracatta Tile and Bermuda Bay.
You could always add a touch of color to the edge of the wings like I did in the video. Either was these butterflies are quite stunning …
I hope you will join me for my Butterfly Class … you will learn even more about these butterflies. I have a private Facebook page for the class, there you will find even more samples!! Join us …
You can order your bundle by CLICKING HERE … once I receive notification, I will contact you with more information and a link to the Class Room.
Thank you so very much for joining me today. I hope you have a beautiful day ~
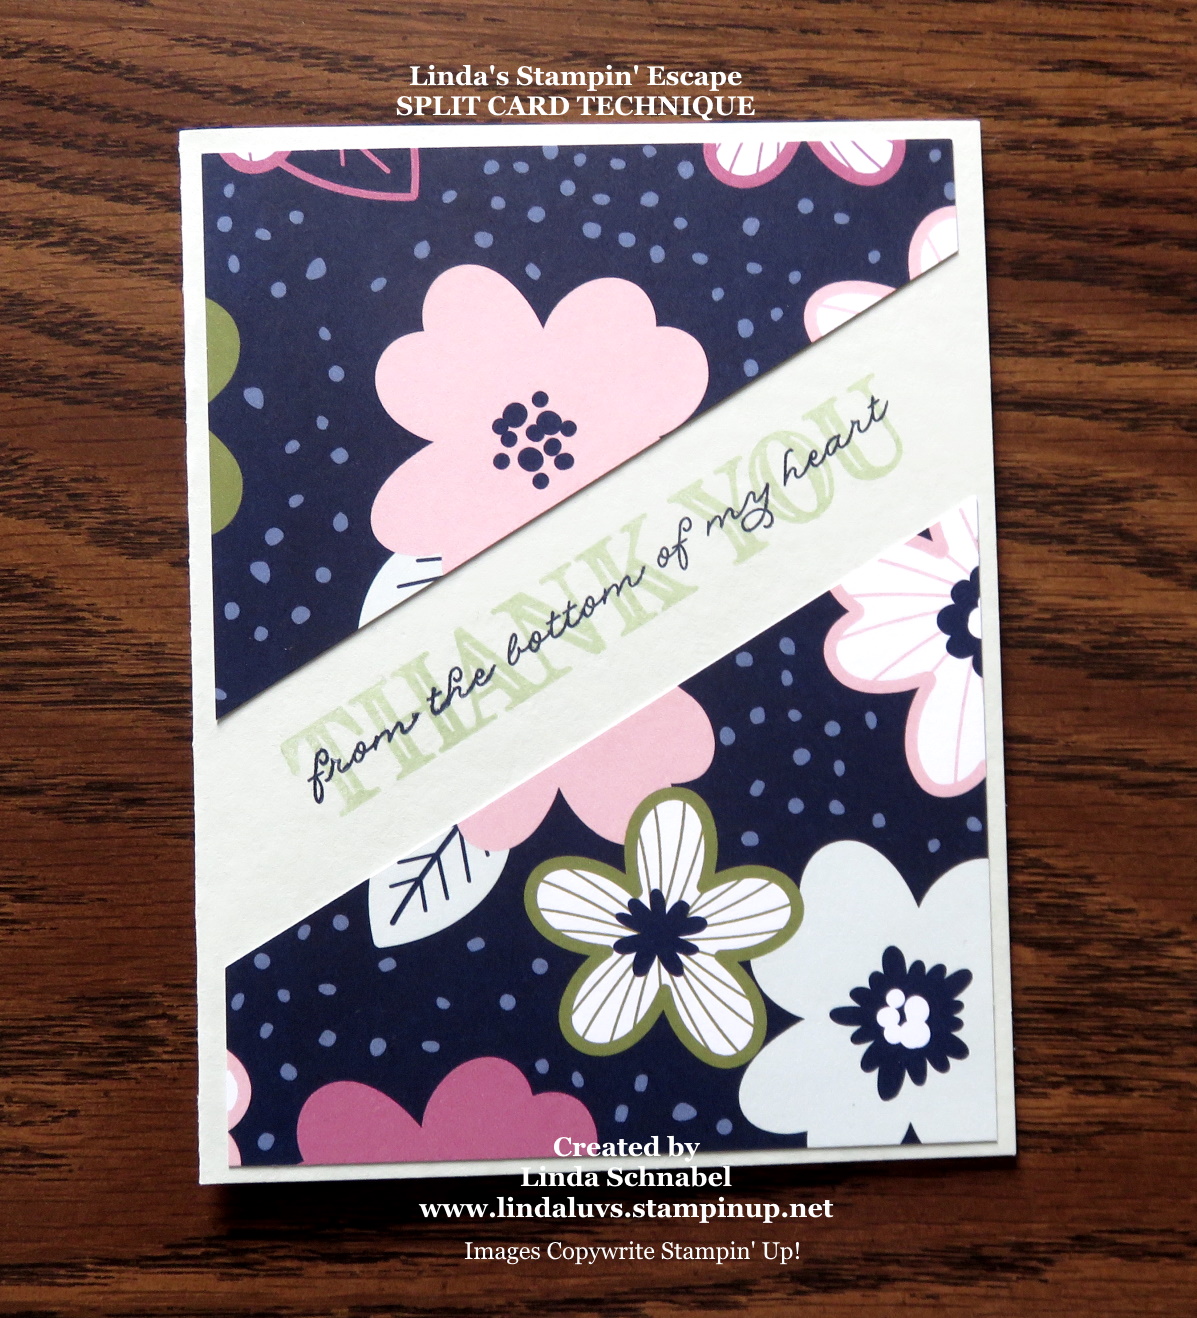
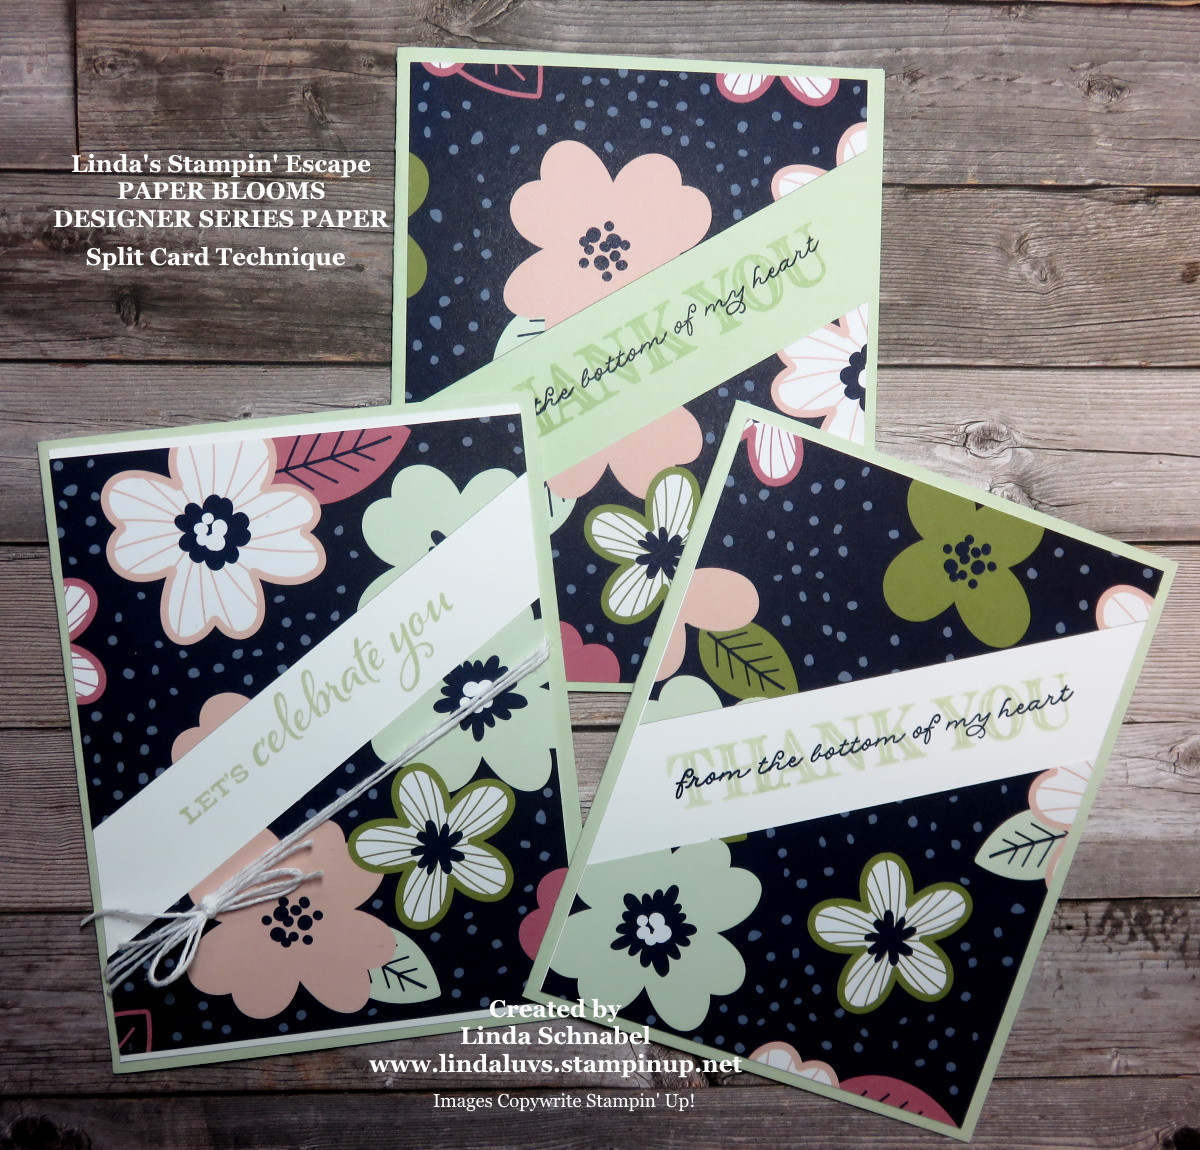
Today I’m going to share more of the cards that I made using the Split Card Technique. This technique is quick -n- easy on only uses a 4″ x 4″ piece of designer paper … NO Waste! I am also keeping the video on my blog so you can watch it again. Did you know that if you use your mouse to “hover” over my little picture – you can subscribe to my YouTube Channel right away … How cool is that!
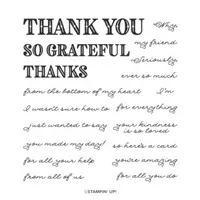
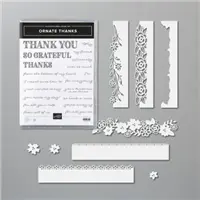
OK … Lets start with the first card (remember to watch the video to learn how/where to cut) … this is the most simple of the three cards. I just cut my Paper Blooms designer paper and attached it directly to the card. Then using the “Ornate Thanks” stamp set, I stamped the Thank You in Soft Sea Foam and then the coordinating sentiment is stamped in Night of Navy … both colors are in our designer paper (No Guessing) so easy!
Our next card adds in a piece of Basic White cardstock … it’s cut 4″ x 5-1/4″ and I layered my Paper Blooms Designer paper and attached it to the top and the bottom, leaving only the center exposed. I stamped my greeting exactly the same on this one as I did the last … just to show the difference. It does lighten up the card a little and makes the greeting pop more.
What is fun about these cards is that each one is slightly different … the Paper Blooms has a scattered pattern of flowers, you will find other papers that will allow them all to look a like.
On our last card …. I am using the Basic White cardstock again, but this time I’ve let some of it exposed on the top and the bottom of the card. It creates a nice balance. To add some texture to the card, I wrapped some white Bakers Twine around it and tied a double bow. My greeting is stamped in Soft Sea Foam and comes from the Celebrate Sunflowers stamp set.
The video will show you two ways to cut your 12 x 12 designer paper and then give you samples so you can get a better picture of what I want to show you. Sit back … relax … enjoy …
I hope you enjoyed getting a close up look at these cards and another look at the video. I love to hear when you are excited about a new technique, thank you!
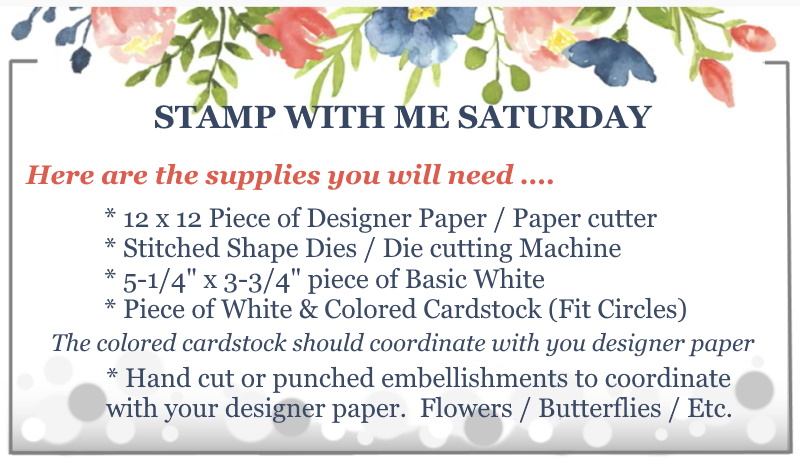
NOW … I’d like to invite YOU to join me for a fun Stamp Class … It’s STAMP WITH ME Saturday!! Tomorrow at 10: 30 am, meet me on my Linda’s Stamp’ Escape Facebook page; I’ll be LIVE and looking to stamp with you!! I’m going through step by step how to make another FUN FOLD Card and it “features” designer paper! There is NO Cost, I just want to gather with you and stamp!
HERE IS WHAT YOU WILL NEED …
Thank you for joining me on my blog today …
Have an awesome day!!
TODAY’S STAMPIN’ SUPPLY LIST … If you liked the products used in today’s projects, I have links for you below. Just click on the item you would like more information on, or to begin your shopping. It will take you directly to my website. Thank you ♥
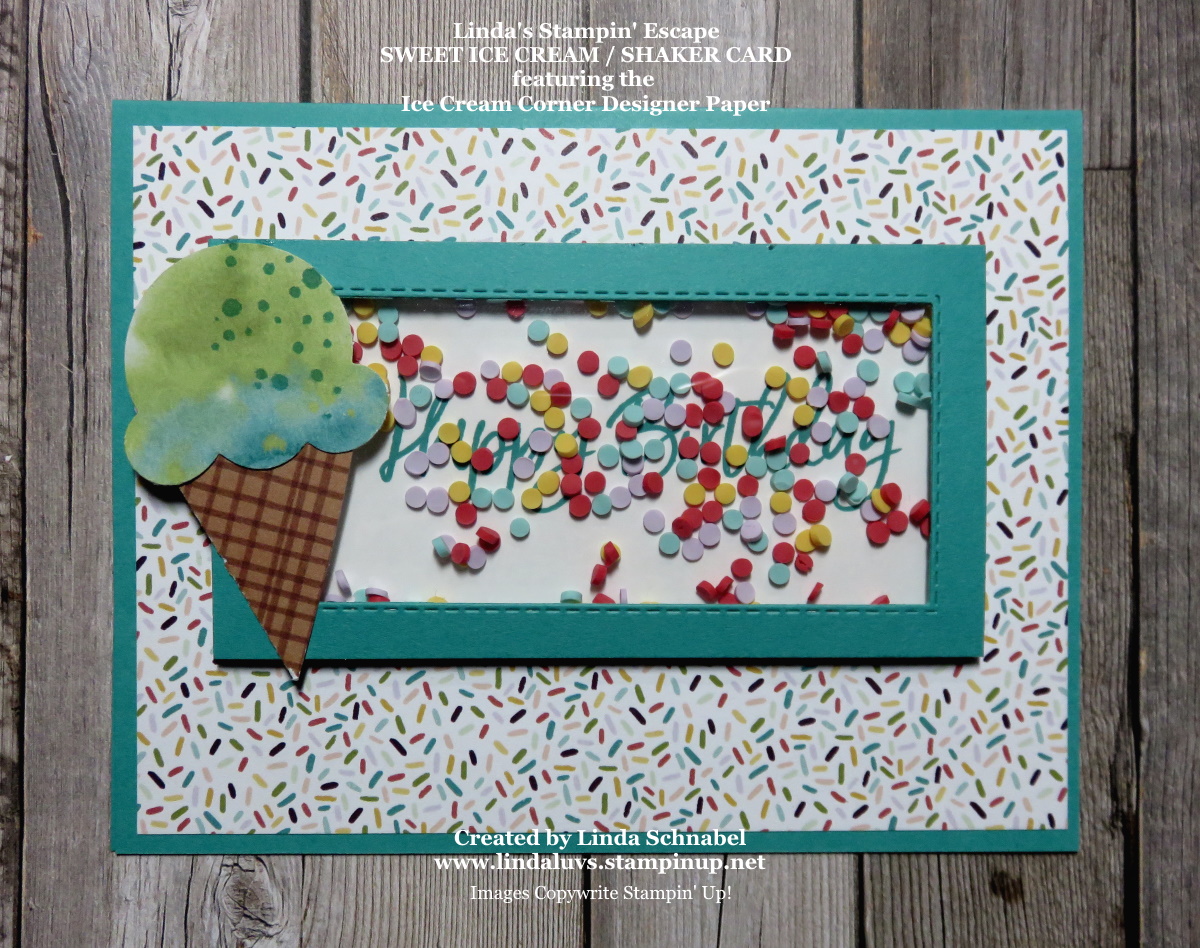
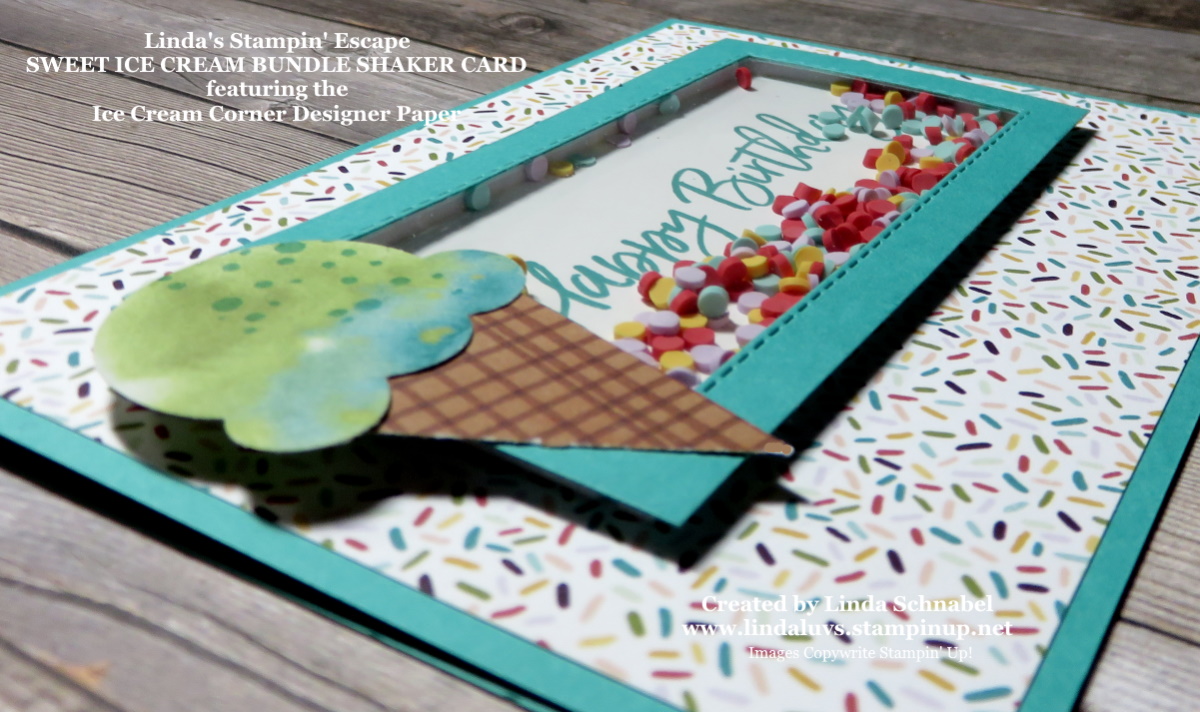
There is nothing better than sprinkles on ice cream or inside your “Shaker Card” … and that is what I have for you today! The Shaker card was a hit at my house, my grandkids like to pick out the cards I should send them … lol!! I like to surprise them ❤
I used the Ice Cream Corner Designer paper as my background and to punch out my Ice Cream Cone …
The background is from the Ice Cream Corner Designer Paper … I picked the sprinkle design. I cut my window out of the Bermuda Bay using the Rectangle Layered Dies, and then attached the window sheet to the back. Once the window sheet is attached I used the Adhesive Strips to create the height needed for the “shaker”.
You have the greeting stamped … I used the “Happy Birthday” from the bundle and then sprinkled my “Ice Cream Corner Sprinkles” onto the greeting and laid the window sheet assembly on top. With a little adhesive, I attached the “shaker” to the card.
I punched out the Ice Cream and the Cone from the Designer paper!! It was designed to make creating your cones easier!! I attached it directly to the “shaker”…
Easy to see why this fun shaker card was a hit!! And another sample for you made with the Sweet Ice Cream bundle!
Thanks much for hanging out with me today, I hope you have a good one!
TODAY’S STAMPIN’ SUPPLY LIST … If you liked the products used in today’s projects, I have links for you below. Just click on the item you would like more information on, or to begin your shopping. It will take you directly to my website. Thank you ♥
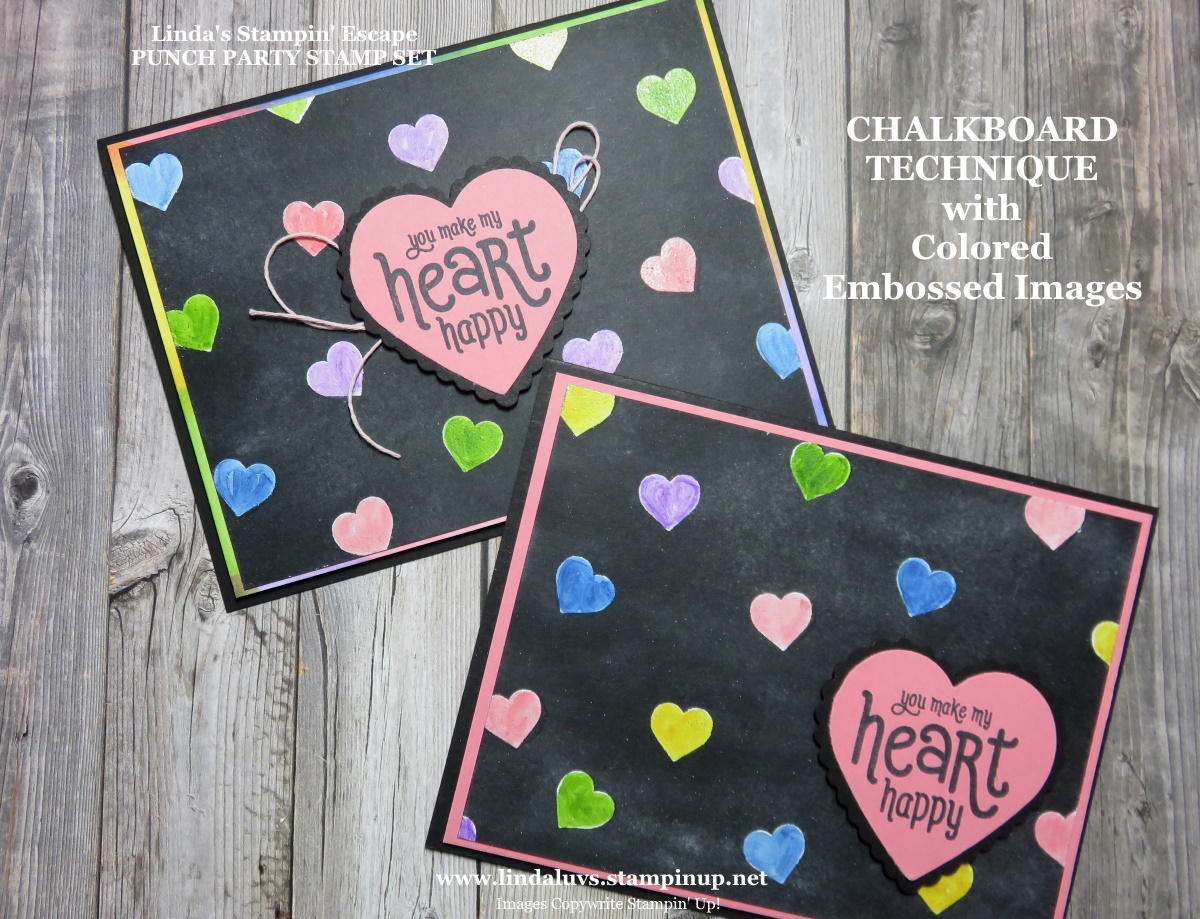
Today I have two techniques in one card for you; the Chalkboard technique and the “Coloring Embossed Images” … and together they just pop off the page! This is the card I created for my technique Tuesday LIVE last night, but I have a surprise … I have the other card that I suggested on the video! I am using the PUNCH PARTY stamp set again.
Kick back for a moment and watch the video (only about 20-25minutes) …
Such fun and easy techniques that together really make the card pop. The second card that you see is using the technique of coloring the “mat” multiple colors … I think it turned out pretty good. I just ran the Stampin’ Blends around the edge of the mat and then I ran the “Color Lifter” over it all to lighten and blend the colors together better.
Before placing the heart down onto the card, I wrapped some of the Bakers Twine from the “Snailed It” suite just to added a little extra texture and fun to the card. I really do like how the multicolored “mat” turned out… it draws your eye all around the card!
I hope you enjoyed today’s technique share and that you give it a try! It really is as easy as it looks, and you end up with a colorful FUN Card!
Thank you so much for joining me today, I’d love to hear what you think about these two techniques.
Have yourself a day that “makes your heart happy” ~
TODAY’S STAMPIN’ SUPPLY LIST … If you liked the products used in today’s projects, I have links for you below. Just click on the item you would like more information on, or to begin your shopping. It will take you directly to my website. Thank you ♥
Today I have another “DRAPERY FOLD” card for you … from Deb Anderson. Deb caught my Facebook LIVE demonstration on the Drapery Fold and was inspired to try it out … and she shared this sample with me ….
Deb used the Snowflake Splendor Designer Series paper for her card …
It is fairly simple to make and does not need a lot of supplies, and it’s fun! It give you a touch of “fanciness” on your card but slides into the envelope quite easy.
I have a video for you to watch, my Technique Tuesday video from my Facebook LIVE last night. Have a bit of a rest and watch the video …
What did you think … ?? This is the type of card that looks fancy but is pretty easy to make. Any designer paper could be used for this style of card. I chose to use the Poinsettia Place suite… such a pretty pattern and a natural background to accent the fold.
I have written down the measurements for you ….
I also showcased both cards in the photo … the one on the left is the one where the drapery fits from end to end, and the one on the right is the one I trimmed off to create a border all the way around my card front.
I hope I inspired you to try out this simple yet pretty “FUN FOLD”, then I’d LOVE to see what you create.
Have yourself a wonderful day, and thank you for spending part of it with me.
TODAY’S STAMPIN’ SUPPLY LIST … If you liked the products used in today’s projects, I have links for you below. Just click on the item you would like more information on, or to begin your shopping. It will take you directly to my website. Thank you ♥
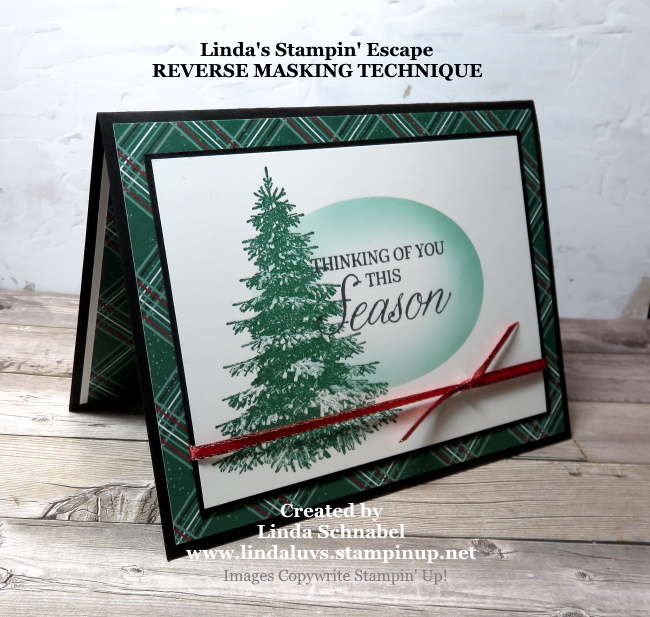
I have my video to share with you today … I am demonstrating the “Reverse Masking” technique and highlighting two different mediums you can use to create your reverse mask! I also have some additional stamping tips to share with you. Sit back and enjoy the video …
What a fun and easy technique this is …. It’s an oldie but a goodie!! I love how this technique creates depth to your card without all the layers and hazzle! Which one of the mediums to do this technique do you prefer? The sponge daubers or the brush? The Blending Brushes will be available in the upcoming Jan – June Mini catalog!
I used Shaded Spruce for my sponging and for the tree and of course it is the main color of our designer paper which comes from the Wonder of the Season and is called the “Tis the Season” 6 x 6, and is layered onto the Basic Black card base.
The Tree and Greeting both come from the Winter Woods stamp set … it was Hot, Hot, Hot last year but I think it’s the perfect year round stamp set!
A little piece of the extra designer paper was adhered inside to coordinate our entire card. The pretty gold edged Real Read ribbon is from the All the Trimmings Ribbon Combo pack.
Thank you for stopping by my blog and checking it out.
Have a beautiful day ~
TODAY’S STAMPIN’ SUPPLY LIST … If you liked the products used in today’s projects, I have links for you below. Just click on the item you would like more information on, or to begin your shopping. It will take you directly to my website. Thank you ♥
Today I’d like to share my Facebook Live video and card that I created using the Stampartus and highlighting the Mirror Image Technique. You will discover the “secret” or simple trick to creating the Mirror Image.
I’m also very excited to share with you that Stampin’ Up! has extended the Online Extravaganza until Midnight (MT) tomorrow!
Sit back, grab your coffee and enjoy the short video …
The video explains the steps that I took to come up with the size and layout of the stamped area… and also explains the background I’ve used. It is actually one of the backgrounds I demonstrated the Embossing Paste with last week!
Let’s get a closer look at the card …
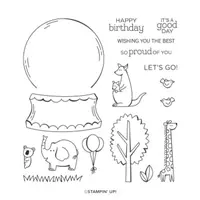
Our cute giraffes come from the Zoo Globe stamp set, and our verbiage come from the Well Said stamp sets.
The background was created with the Shimmery White Embossing paste and the masks … you can watch the video HERE.
Now before we go … lets take a look at the layering and see how amazing a few Stampin’ Dimensionals can change up a card! Besides the beautiful texture you get from the Embossing paste, you ‘ll get great dimension and height.
I hope you enjoyed today’s card and are inspired to try this fun technique. Please don’t forget that all of the items used in today’s card are available in the Online Extravaganza (with the exception of the Memento Ink) …
With hundreds of items On Sale … I’d be happy to help you with your Holiday Shopping List.
Thank you for hanging out with me today. I hope your day is a good one.
TODAY’S STAMPIN’ SUPPLY LIST … If you liked the products used in today’s projects, I have links for you below. Just click on the item you would like more information on, or to begin your shopping. It will take you directly to my website. Thank you ♥
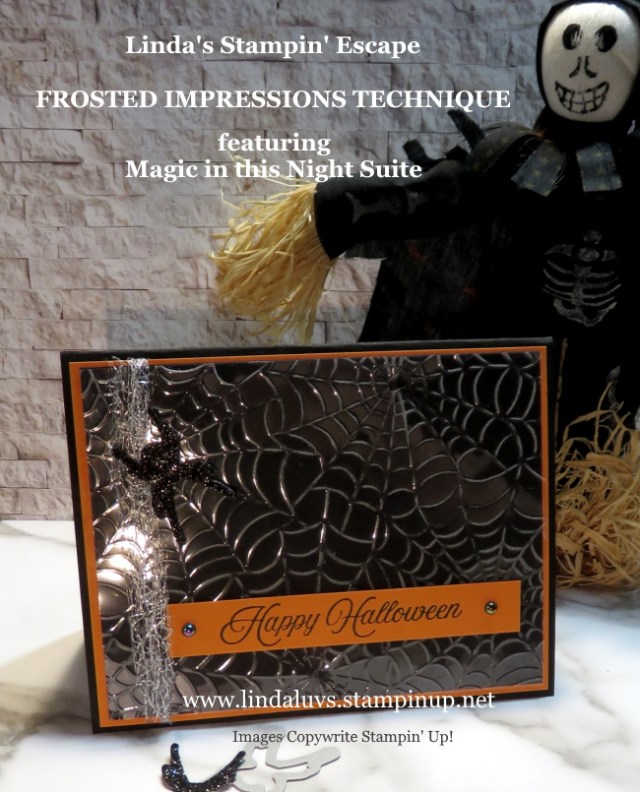
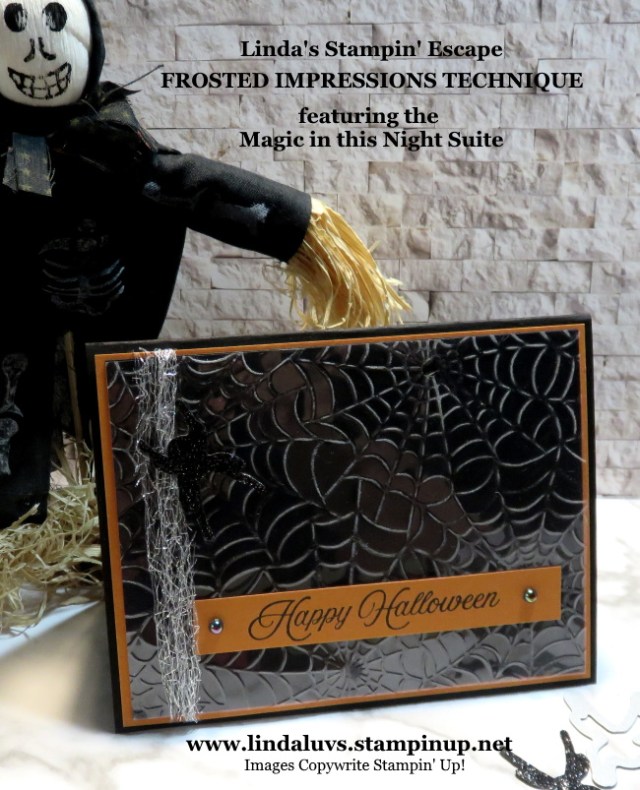
Today I have the coolest technique to share with you, and it is so simple you will ask yourself “why” you didn’t think of it myself? lol This technique is called Frosted Impressions.
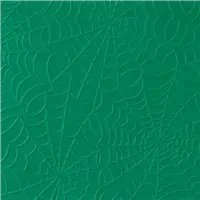
You will need your window sheets, an embossing folder and an embossing machine, I tried out the new Stampin’ Cut & Emboss by Stampin’ Up! I love it’s size, the smooth roll and the fact that each plate is numbered (I’ll share more about that another time). I used the “Cobwebs” embossing folder …
I emboss your Window sheet with your favorite folder and then use sand paper to create the “frosted” look. Watch my short video to see exactly how I did this …
Wasn’t that simple? And it’s so cool … Emboss, sand, and you have a cool background!! I thought the spider webs were appropriate for upcoming holiday … but I truly believe those snowflakes in the mini catalog would be stunning.
I used the many of the components from the Magic in this Night Suite; I’ll have a list for you below.
Now … a quick reminder that today is our 24 hour Stamp Sale … you’ll want to stock up with this stellar price! For one day only, you can purchase select cling and photopolymer stamp sets at a 15% discount.
Click on this image below for a PDF listing every stamp set that will be on sale … you can view or print off the list!
For 24 hours on 23 September—from 12:00 AM to 11:59 PM (MT) … choose your favorites from the select number of cling and photopolymer stamp sets from the 2020–2021 Annual Catalog that are available for purchase at a 15% discount.
You can place an order through me, or shop directly through my online store. The store will have a category entitled “Stamp Sale” that displays every stamp set on sale to ensure a quick and easy shopping experience.
Click Here to Visit My Store
I hope you enjoyed this fun and easy technique …. give it a try. And let me know if you have any questions or if you need help placing your order.
Thank you so much and enjoy your day!
TODAY’S STAMPIN’ SUPPLY LIST … If you liked the products used in today’s projects, I have links for you below. Just click on the item you would like more information on, or to begin your shopping. It will take you directly to my website. Thank you ♥
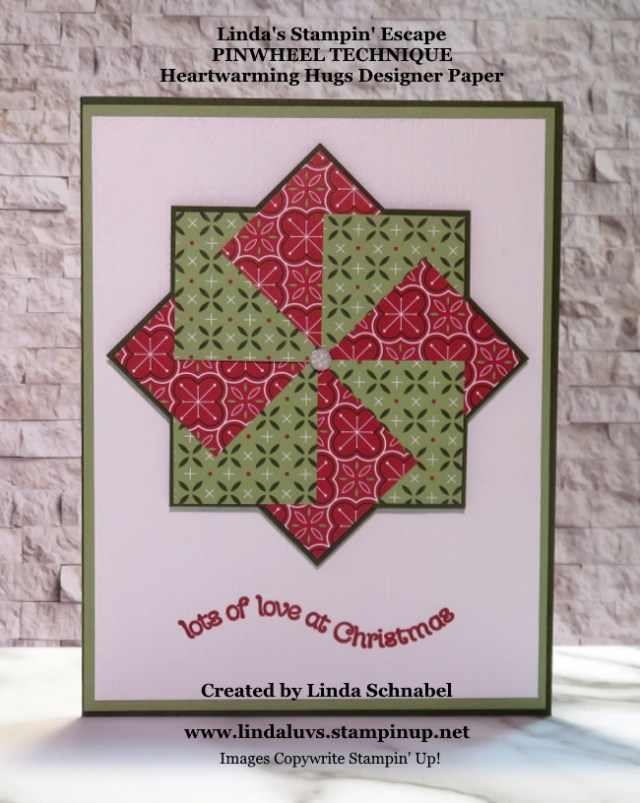
Today I have two cute cards for you created with the Heartwarming Hugs Designer Series paper and the Pinwheel Technique. This technique is a great way to use up your designer and / or paper scraps!
This paper crafting technique is much, much easier than it looks … quite simple in fact, and I’d like to show you today …
How did you enjoy the demonstration and do you think it’s as easy to make as I said it would be? I think this technique is one of those timeless cards that we can keep bringing back!!
This first card is the one I demonstrated and includes the Heartwarming Hugs designer series as a background and the Light Me Home stamp set used for the greeting. I also tipped the Pinwheel to look a little more like a star.
The second card …
This was designed for those stampers who like the “less is more” look … a clean, crisp look. The Pinwheel really stands out against the white background.
The greeting comes from the “Itty Bitty Christmas” stamp set, and with the aid of my Stamparatus … I could stamp it 3 times to get it bold and bright. Once stamped, I embossed it with the Subtle 3-D embossing folder.
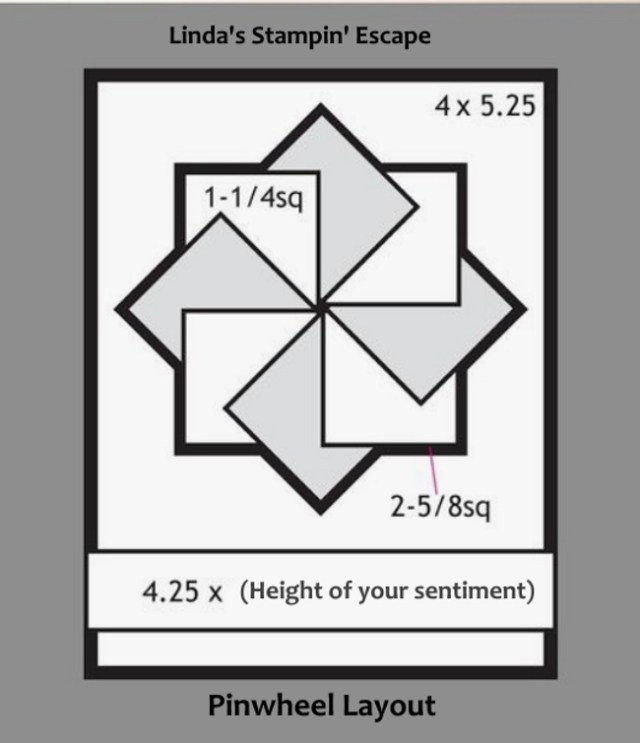
Here is the template with dimension for the Pinwheel card …
I hope the card samples inspire you and the layout helps you picture your next card! As promised in the video, I have a PDF File attached that you can download and print.
Thank you so much for joining me today. Stop back tomorrow as I will be sharing an alternative layout to the Pinwheel card.
Have an amazing day ~
TODAY’S STAMPIN’ SUPPLY LIST … If you liked the products used in today’s projects, I have links for you below. Just click on the item you would like more information on, or to begin your shopping. It will take you directly to my website. Thank you ♥
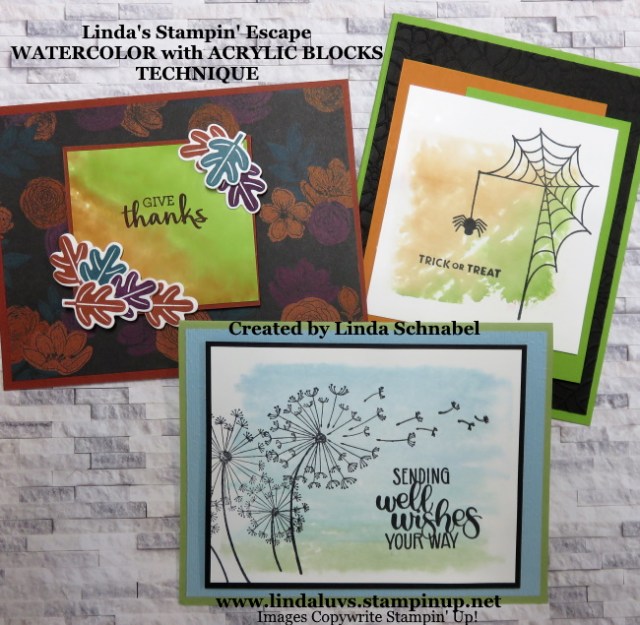
Today I’ll be sharing my Facebook Live presentation of Watercoloring with Acrylic Blocks and the three cards I created using this technique. Last night I shared two of the three cards. Kick back and watch the video, you’ll see how these cards found their beginnings …
The first was my quick -n- cute Halloween card from the Festive Corners stamp set. I used the Stampin’ Write markers to apply the ink to the block and then spritzed it with water.
I’m using the Festive Corners stamp set …. again!!
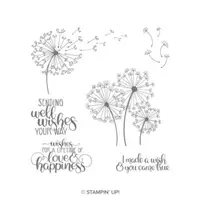
The second card I created using the markers on the Acrylic Blocks features the Dandelion Wishes stamp set and the markers to create a background.
My colors are Balmy Blue, Pool Party, Bermuda Bay and Pear Pizzazz …
I used my Stamparatus for my sentiment, it allows my to ink it several times so it’s nice and dark and becomes the focal point of the card.
The second way to use this “Watercolor” technique on the Acrylic Blocks is to put the ink from the ink pad directly onto the blocks. It is applied thicker so the image will be bolder …
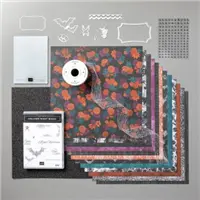
I used the Arrange the Wreath bundle and the Magic in this Night Designer Series paper to create this card. The fall leaves surrounding the greeting creates the perfect focal point for this card. Leaf colors are Pretty Peacock, Blackberry Bliss and Cajun Craze which coordinates with the designer paper.
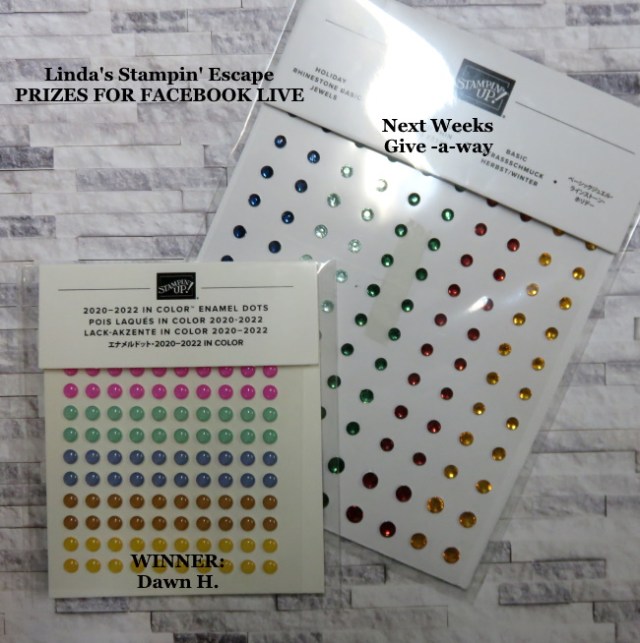
If you watched the video … you know that each week I do a drawing from all the people who watched and commented on the video … I invite you to join us next week Tuesday for another Technique! Here’s the prizes …
I miss meeting with all my stamping friends face to face, so the Facebook Live seems to get me a little closer to my friends!
Here is one last look at the three cards I created with this FUN technique …
The Watercolor technique using Acrylic Blocks can be used for any one, any stamp set … any holiday! Just look, we have a “Get Well”, a “Halloween” and a “Card of Thanks”.
Thank you for joining me today. I’d like to know how you enjoyed today’s cards…
Have a wonderful day!
TODAY’S STAMPIN’ SUPPLY LIST … If you liked the products used in today’s projects, I have links for you below. Just click on the item you would like more information on, or to begin your shopping. It will take you directly to my website. Thank you ♥