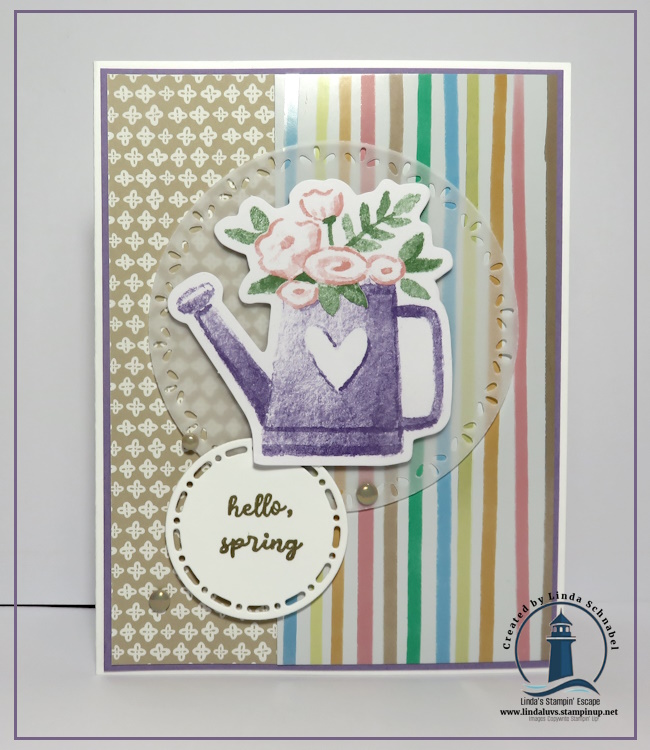
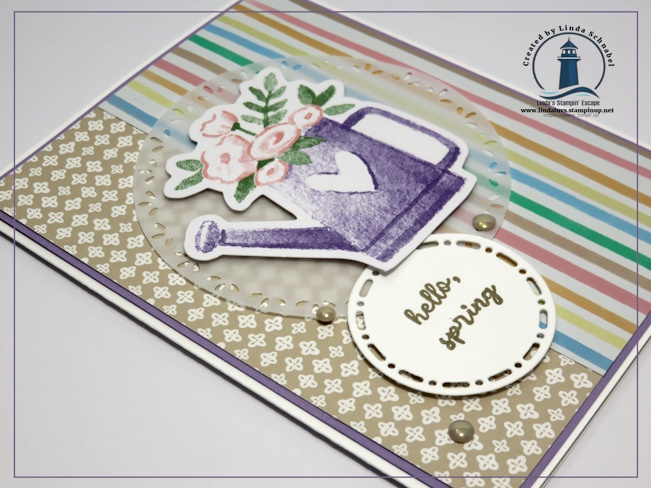
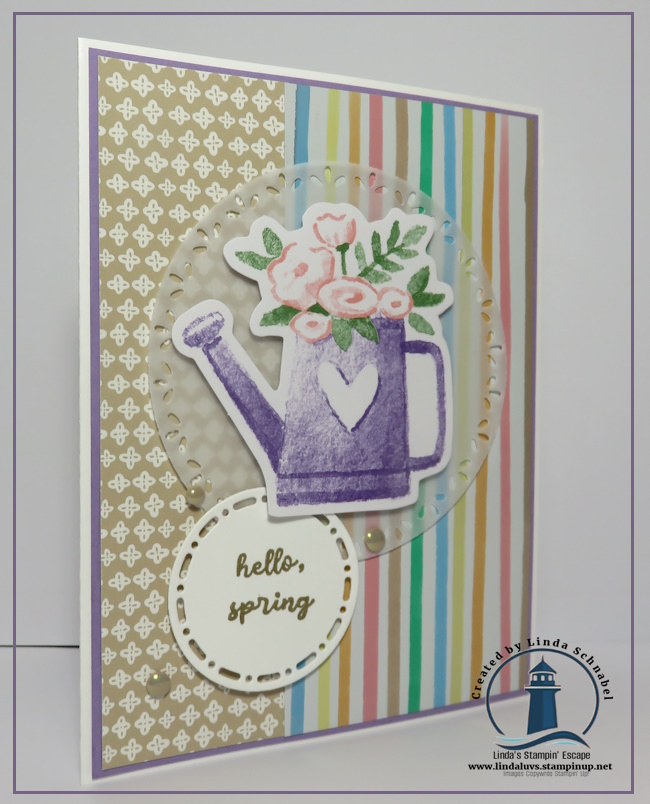
On Sunday, I shared a sweet little bunny card created with the Easter Time Mix & Match Ephemera Pack, and today I’m back with another simple, spring-inspired design—this time featuring the charming watering can. I love how this pack makes it so easy to create beautiful cards without overthinking every detail. The soft pastels, playful spring imagery, and ready-to-use pieces truly let the ephemera do the work for you, which makes crafting feel relaxing and joyful… just the way it should be.
For today’s card, I paired the watering can ephemera with coordinating patterned paper that instantly says spring is here. The vertical stripes add a cheerful pop of color, while the softer patterned panel balances everything out beautifully. The watering can—filled with delicate spring blooms—becomes the perfect focal point, layered over a subtle die-cut circle for a bit of texture and dimension. A simple “hello, spring” greeting finishes the card without taking away from the artwork, making this a lovely design for birthdays, happy mail, or just because.
I’m sharing the replay of my LIVE demonstration / a step-by-step video that walks you through both cards—the bunny card from Sunday and today’s watering can card. In the video, I share all the measurements, layering tips, and simple tricks I use so you can confidently recreate these designs or use them as inspiration for your own spring cards. Whether you’re brand new to cardmaking or just looking for something quick and stress-free, this project is a great reminder that beautiful cards don’t have to be complicated.
I hope you enjoy today’s card as much as I enjoyed creating it. I hope you enjoyed the video … soaking in the inspiration, and most of all—have fun crafting.
Thanks so much for stopping by and spending your time with me. 💕
Have you ever fallen in love with a piece of designer paper and thought, I don’t want to waste a single inch of this!? If that sounds like you, you’re going to LOVE today’s project. I’m sharing a fun, eye-catching designer paper fun fold that not only maximizes your paper but also delivers a big WOW factor with very little effort. This is one of those cards that looks fancy and impressive, yet comes together easily—perfect for using up your favorite papers while making something truly special.
One of my favorite things about this fun fold is how efficient it is. With just a few strategic cuts and folds, you’ll be amazed at how much impact you get with little to no waste. It’s a fantastic way to stretch your designer paper, especially those patterns you’ve been hoarding because they’re “too pretty to cut.” Trust me—this design lets the paper shine while keeping the process simple and enjoyable.
In today’s Facebook LIVE REPLAY / YouTube video, I walk you through the entire process step by step. You’ll see exactly how the folds come together, how the layers create that WOW moment when the card is opened, and how easy it is to adapt this design using different designer papers, colors, and themes. Whether you’re crafting for birthdays, thank-you cards, or just for fun, this fold is one you’ll come back to again and again.
🎥 Watch the video below to see this designer paper fun fold in action and learn how to maximize your paper while creating something truly impressive. Grab your supplies, craft along with me, and don’t forget to leave a comment—I’d love to hear which designer paper you’re excited to try with this fold!
If you loved this fun fold and the idea of getting more WOW from your designer paper, be sure to check out the supplies I used—you can easily recreate this design or make it your own with papers you already have on hand. This fold is incredibly versatile and looks amazing with just about any designer series paper. And if you’re hungry for more creative ideas, fun folds, and stamping inspiration, make sure you’re subscribed to my YouTube channel and following along here on the blog so you never miss a project. Crafting should be fun, relaxing, and inspiring—and I’m so happy to share that creative escape with you.
🎉 Join me next Tuesday at 6:30 pm on my Linda’s Stampin’ Escape Facebook page LIVE as I launch my Mini Catalog Kick-Off Party—stamping, inspiration, specials and crafty fun await!
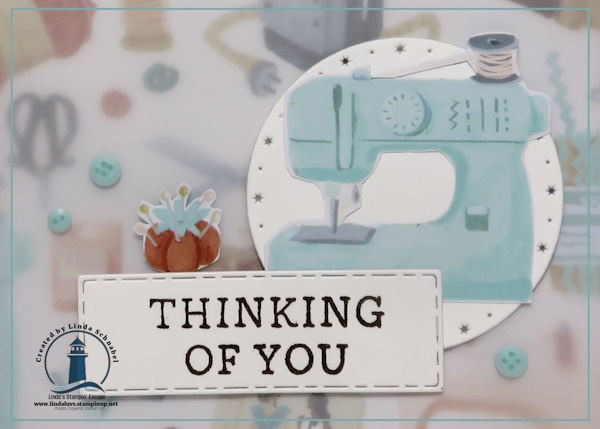
Yesterday I shared a card from the NEW Hobby Haven Designer Series Paper— today I bring you another layout and paper pattern. This delightful collection brings your favorite pastimes to life—whether you love baking, sewing, reading, or simply enjoying the little things. Each sheet is filled with charming illustrations that practically beg to be turned into heartfelt cards, thoughtful tags, and adorable gift packaging. With two sheets of precut pieces (yay for quick crafting!) and tons of fussy-cutting possibilities, you can layer, pop up, and personalize to your heart’s content.
My color palette? An inviting mix of warm and cozy hues like Coastal Cabana and Early Espresso. It’s sweet, it’s whimsical, and and with so many different hobbies featured – you can create a special card like I have here. Perfect for the seamstress in the family or your beautiful friend who shares her creativity one stitch at a time!
I used a 4″ x 5 1/4″ piece of the Hobby Haven designer paper as my backdrop … with the sewing of course. The vellum is used to tone down the designer paper but still let it shine through. I then fussy cut the sewing machine and the pin cushion. I die cut a circle (you can use any you have handy) mine comes from the Snowflake Kisses bundle.. this will be my focal point.
From the same bundle, I die cut the rectangle to stamp my greeting on because it looked like it was “stitched” around the edges. The “Thinking of You” comes from the Simply Said stamp set and conveys my intent when sending this special card. I layered this slightly of center from my focal point but added the pin cushion in to make the perfect grouping.
To complete my card, I added the cute “Dear Dots” embellishments and if you look closely, you’ll see that I turned them into little buttons with the help of my Stampin’ Blends! How cute is that!!
Thank you for stopping by and checking out my creation!
If you love quick & easy cards that pack a big “wow,” you’re in the right place! Today I’m sharing a North Pole Delivery Fun Fold that’s not only adorable—but it also features my favorite paper-saving trick to help you stretch every sheet.
We’ll be crafting with a trio of gorgeous Designer Papers: North Pole Delivery, Hobby Haven, and the NEW Easter Joy… and trust me, you’re going to want them all by the time we’re done. Grab a cozy seat, hit play, and let’s create something magical together!
Card Base = 11″ x 4 1/4″ Score & at 5 1/2″ then slide over and cut at 2 1/4″
Cut another 4 1/4″ x 2 1/4″ piece from left over card stock.
Inside / Designer paper = 4″ x 5 1/4″
Basic White: Cut 2 – 4″ x 2″ pieces to attach to mats
Frontc Flap / Designer paper = 4″ x 3″
Let’s take a closer look at each card … Here is our North Pole Delivery card that was featured in the video. It’s full of cheer and whimsy, this patterned paper set features dogs, bears, and more animals delivering holiday letters and packages in classic Christmas colors of reds and greens. Plus, you get two sheets of pre-cut images for easy accents!
I really love this easy fun fold and it works for any occasion … Here is the Hobby Haven! This is a fun designer paper to work with! It will bring your favorite pastimes to life … Charming illustrations inspired by baking, sewing, reading, and other simple pleasures!
My last feature “Easter Joy” …. SNEAK PEEK into the January / April Mini Catalog (Available January 6th, 2026). Hop into creativity with Easter Joy 12″ x 12″ Specialty Designer Series Paper! This delightful patterned paper brings the charm of spring to your handmade cards and paper crafting projects. Features playful bunnies, Easter eggs, blooming flowers, and festive baskets, all with a hint of metallic foil shine.
As you can see, this easy fun fold truly steals the show—it’s versatile, beginner-friendly, and works beautifully across every season and theme. From the whimsical holiday charm of North Pole Delivery, to the cozy, everyday delights found in Hobby Haven, and finally the fresh spring sparkle of the NEW Easter Joy Designer Paper, this fold lets each pattern shine in its own special way. One simple layout, endless possibilities!
If one (or all 😉) of these papers has caught your eye, now is the perfect time to add them to your craft stash and start creating cards that wow. Thank you so much for watching along with me—be sure to check the links below and let this fun fold inspire your next handmade creation.
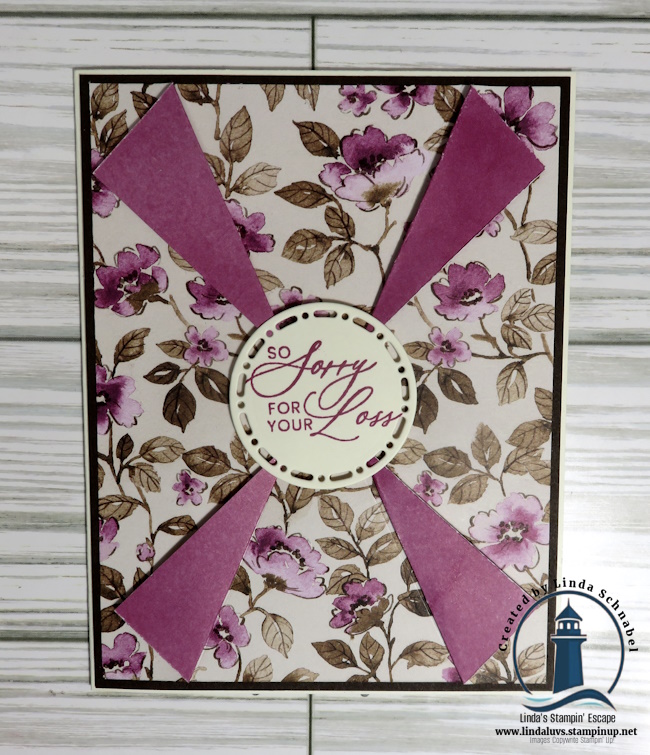
There’s something so classic and elegant about red and gold at the holidays — and today I’m sharing a card that brings that traditional beauty to life. This card highlights the Traditional Labels Bundle paired with the gorgeous red-and-gold poinsettia pattern from the Traditions of Christmas Designer Series Paper. I’ve included every measurement and step-by-step instruction so you can recreate it exactly (or use it as a jumping off point for your own variations). Let’s make something beautiful!
Measurements:
Red Cardstock: 8 ½” x 5 ½” – Score at 4 ¼” and 3 ½” x 2 ½” – greeting
Basic White cardstock: 4” x 5 ¼” – inside
Gold Foil: 4” x 5 ¼”
Designer Paper: 3 ¾” x 5”
Gold Mesh Ribbon: Approximately 24” – to create a fluffy bow!
Instructions:
Start with Real Red cardstock measuring 8 ½” x 5 ½” to make your card base. Score at 4 ¼” and burnish.
Attach Designer paper onto Gold Foil Specialty Paper / cardfront
Wrap approximately 14” around card front and tie a knot on the right-hand side – but not to edge
Stamp Greeting onto small Real Red with VersaMark
Emboss greeting with Gold embossing powder
Die cut greeting with shaped die from Traditional labels bundle
Adhere die cut greeting over ribbon & onto cardfront with dimensionals.
Weave remaining ribbon back and forth over knot and secure it with loose ends of the tied ribbon. Tie with knot and trim ends.
Using liquid glue, embellish with sequins as desired.
Secure white cardstock to inside of card.
This card is a lovely way to showcase the Traditions of Christmas poinsettia paper — the red and gold are pure holiday glamour, and the Traditional Labels Bundle makes sentiment placement quick and beautiful. I hope you enjoy making this as much as I did! If you try it, please share a photo — I’d love to see your color choices and embellishment ideas. ❤️🎄
Have a warm and beautiful Sunday … enjoy your day!
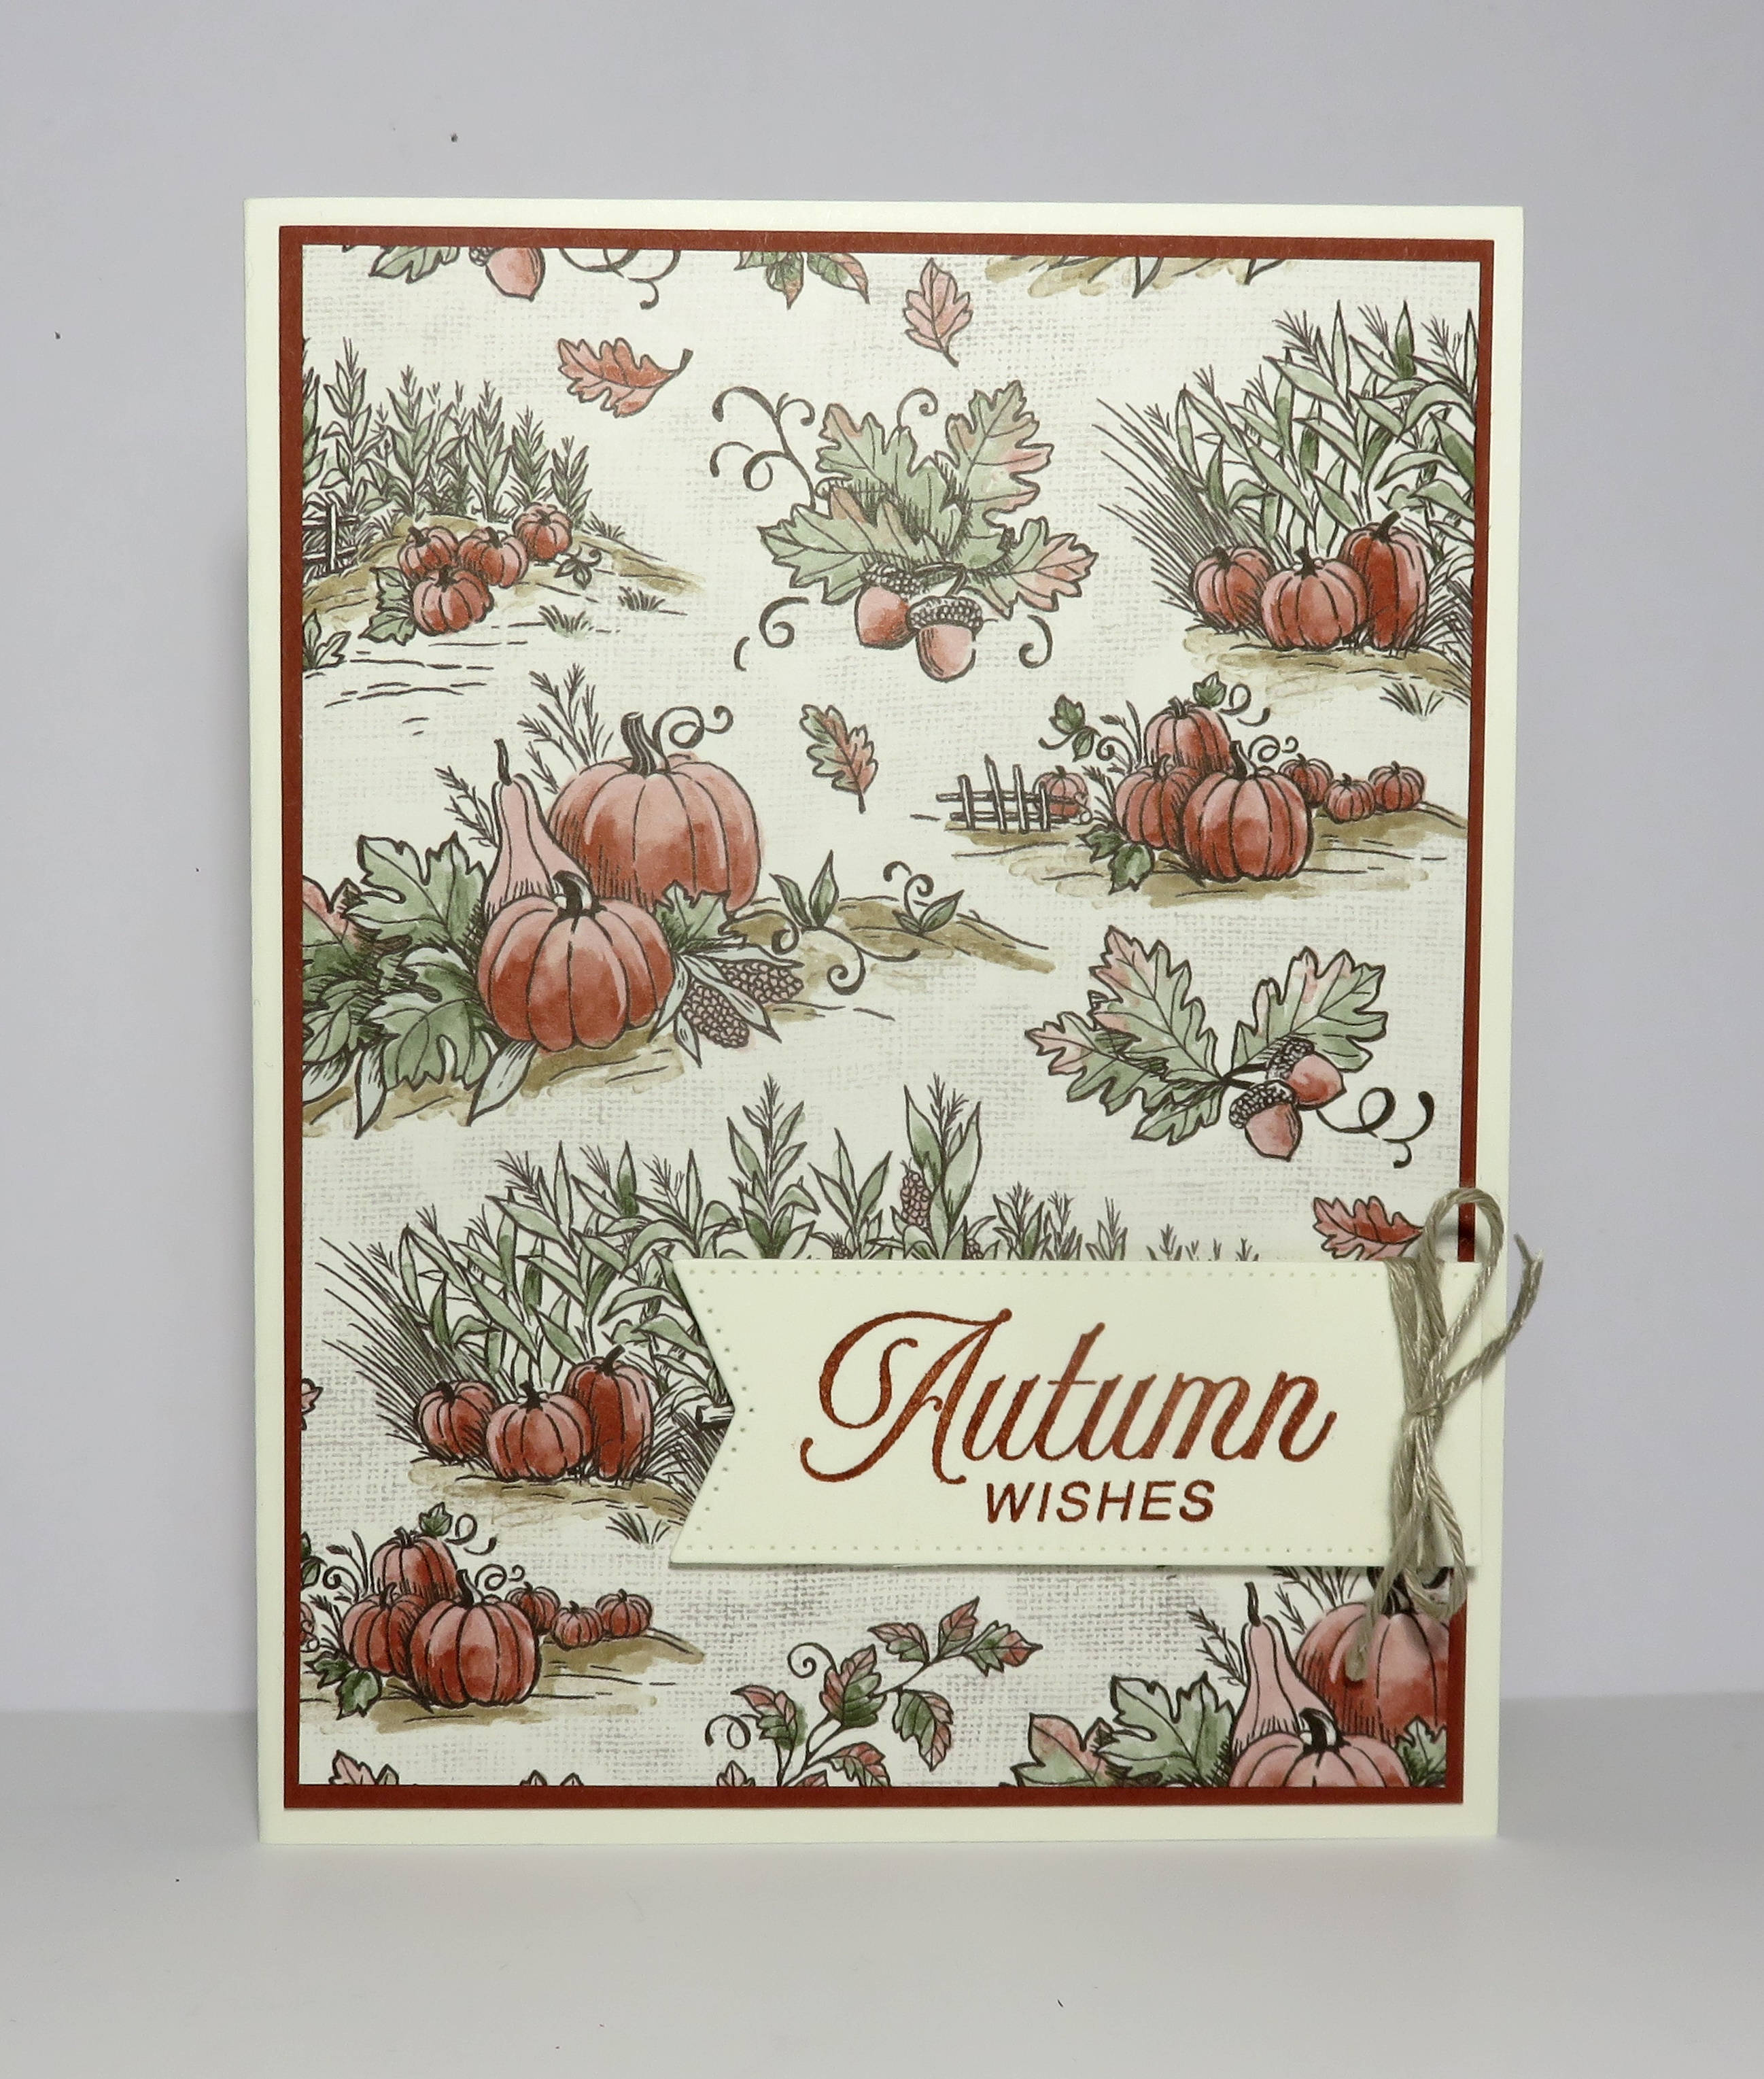
Bring an air of sophistication to your fall crafting with the Autumn Toile 12″ x 12″ Designer Series Paper. My Simply Sunday post is the perfect time to showcase how easy it can be to create beautiful cards when you have paper this stunning. With its intricate imagery of trees, pumpkins, animals, and more, this collection instantly elevates any project. Inspired by traditional toile wallpaper, each sheet carries a timeless elegance that’s both classic and seasonal—making it ideal for harvest gatherings, Thanksgiving greetings, or simply sending a touch of autumn warmth to someone special.
For today’s cards, I let the Autumn Toile Designer Series Paper take center stage. The detailed patterns are so striking that little else is needed—just a coordinating sentiment or die-cut accent, and you have a card that looks like it took hours to make. This is what I love about Simply Sunday projects: minimal effort, maximum beauty. The paper practically does the work for you, allowing you to spend more time enjoying the creative process and less time fussing over details. Whether you’re a beginner or a seasoned crafter, these designs open the door to quick, elegant cards that feel sophisticated and heartfelt.
If you’ve been searching for a way to refresh your fall crafting, the Autumn Toile Designer Series Paper is a must-have. Its timeless patterns pair beautifully with the season and add a touch of elegance that’s hard to resist. Imagine how lovely your handmade cards, scrapbook layouts, or even 3D projects will look when dressed in these graceful designs. Don’t wait—add this stunning paper to your collection today and bring the warmth and elegance of Autumn Toile to all of your harvest-season creations.
Thank you for checking out these quick -n- easy cards today.
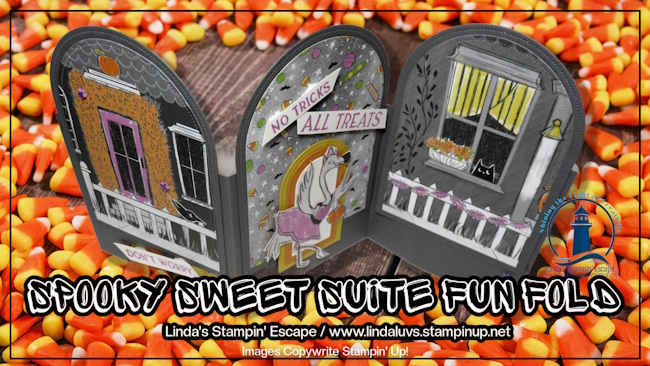
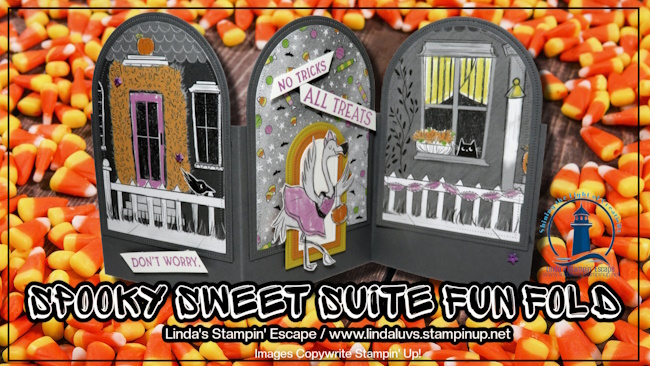
Halloween is creeping closer, and I’ve got a real treat for you today! A Fun Fold Card 🎃 We’re diving into the Spooky Sweet Suite Collection—a must-have for creating Halloween magic that’s more sweet than scary. From adorable costumed critters to a charming haunted house die, this suite has everything you need to whip up cards, tags, scrapbook pages, and treat bags that will delight ghosts and goblins of all ages!
Inside this suite, you’ll find:
Stamps featuring a costumed dog and cat (seriously, how cute are they?)
Dies that make creating your haunted house a breeze
Patterned paper with whimsical, not-too-spooky designs
Treat bags, ribbon, and shiny stickers—because it’s all in the details!
And today… we’re taking it up a notch with a spook-tacular Fun Fold card! Fun Folds always bring that extra “wow” factor, and when paired with the Spooky Sweet Suite, you’ll have a card that stands out in any Halloween lineup.
Let’s begin with the base: Cut to 10-1/2″ x 3-1/2″ and score at 3-1/2″ and 7″. Next you’ll cut 3 arches in the same color cardstock as your base. The size depends on what type of effect you want, and how much of the base you want to leave exposed.
Next, you’ll cut 3 pieces of the patterned paper … use the die that is one size smaller than the background. I used the house fronts to draw attention and then the candy background because that panel will be the core of the card.
Before you put those Arches dies away …. cut out three (one of each size) in the colors of candy corn. I’ll be using this as the focal point and highlight our little die cut flamingo. The flamingo was fussy cut from one of the patterned designer paper sheets. Then all you need is to stamp the greetings in Petunia Pop ink and cut and attach them to your card. I added some of those cute little purple glitter stars that come in this suite.
This card may look like a challenge but it is really simple to create!! Don’t wait too long to grab your supplies—especially the Everyday Arches Dies. They are the perfect match for this project and are currently on the Last Chance List (translation: once they’re gone, they’re gone!).
Whether you’re crafting cards to send a boo-tiful hello, making tags for treat bags, or decorating your scrapbook with a little Halloween charm, this suite is packed with possibilities. So grab your suite, pick your favorite patterned paper, and let’s get spooky!
Thanks for joining me for a spooky sweet card you’ll enjoy making and your recipients will be enchanted by!
STAMPIN’ TIP: When attaching your arches to the base, make sure you stay within a 5-1/2″ length so it fits in your envelope. I use a piece of colored cardstock that measures 5-1/2″ x 4-1/4″ as my guide! Easy.
There’s something truly magical about the holiday season—cozy moments, heartfelt giving, and the joy of creating something special with your own hands. The Peaceful Garden Suite captures all of that and more with its elegant designs and timeless charm. Whether you’re crafting Christmas cards, heartfelt tags, or scrapbook pages filled with memories, this suite offers everything you need: graceful sentiments, versatile tools, and beautiful coordinating paper that you’ll reach for long after the holidays have passed.
During a recent LIVE, I showcased two cards created with the same layout but each with a completely different look. One featured the Peaceful Greenery 3D Embossing Folder, which creates a stunning embossed frame with delicate filigree and greenery surrounding a large open space—perfect for your stamped images or sentiments. The other card highlighted the Peaceful Garden 12″ x 12″ Designer Series Paper, which has beautiful dove and greenery images on one side and soft tone-on-tone washes on the other. The paper is perfect for holiday crafting, but its gentle designs make it just as lovely for all-occasion projects.
ThePeaceful Greenery 3D Embossing Folder
The embossing folder creates a stunning embossed frame with delicate filigree and greenery surrounding a large open space, which I used the dies and stamp set to add the greeting, and are backed with the beautiful glimmer paper. The die cut doves are recognized as symbols of peace and goodwill, and brought all together makes a beautiful Christmas card with dimension and texture.
Peaceful Garden 12″ x 12″ Designer Series
As you can see, the layout of the two cards is the same, right down to the greeting (I only changes the color of the glimmer paper). The patterned paper I used gives a soft background and is perfect for Christmas, or switch out the greeting to either Sympathy or the Heartfelt Prayer stamps and change the entire feeling of this card, showing the versatility of this suite.
Both cards came together quickly, yet each offered its own personality: the embossed version was rich with texture and a little more luxurious, while the designer paper version had a softer, layered elegance that’s wonderful for creating multiples with ease. That’s what I love about this suite—it’s so easy to mix and match, whether you prefer the tactile beauty of embossing or the graceful flow of patterned paper.
If you’re looking to create projects that are both elegant and versatile, the Peaceful Garden Suite Collection is a wonderful addition to your crafting lineup. The coordinating products take the guesswork out of designing, allowing you to focus on what matters most—sharing a little handmade joy.
If you haven’t added the Peaceful Garden Suite to your collection yet, this is the perfect time to do so. It’s one of those suites that will serve you beautifully for the holidays and long after the season is over.
Thank you for stopping by my blog today. I hope these two cards inspired you.
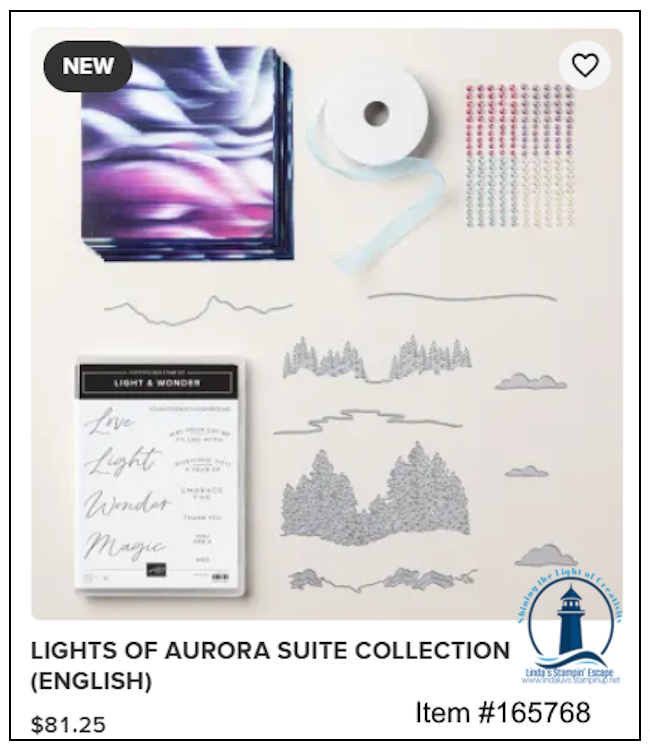
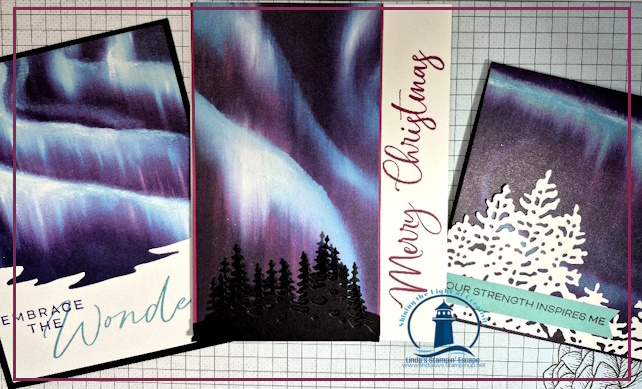
Have you ever sat beneath a starry sky, watching the Northern Lights dance across the horizon? That same sense of wonder comes alive with the Lights of Aurora Suite. This stunning collection was designed to capture the magic of the aurora borealis and bring it right to your craft table. Today, I want to share not only the beauty of this suite, but also a few different ways you can create with it, so you can see just how versatile and inspiring it can be.
Inside this suite, you’ll find designer paper that swirls with cosmic color, dies that create breathtaking natural landscapes, and all-occasion sentiment stamps that make your handmade cards shine for any moment worth celebrating. Add in the frosted iridescent gems and a touch of sheer blue ribbon, and suddenly your creations feel as if they’re glowing beneath a winter sky.
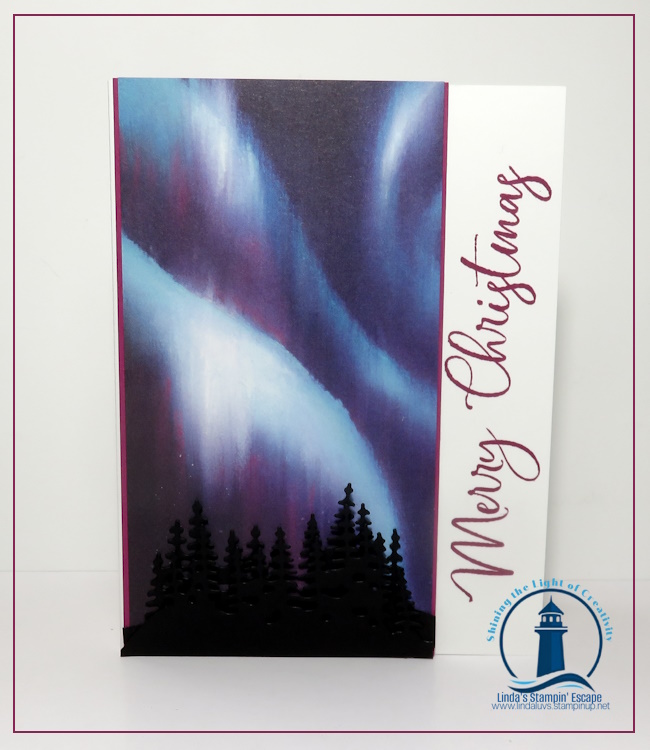
The first of my cards is a simple combination of the stunning paper, a die and a hand stamped greeting in Berry Burst …. Don’t you love the look of stamping your greeting sideways? Different & fun!!
The palette is rich and dreamy—Azure Afternoon, Balmy Blue, Basic Black, Berry Burst, Blackberry Bliss, Gorgeous Grape, Highland Heather, Lost Lagoon, Petunia Pop, Pool Party, and Very Vanilla—perfect for creating depth, drama, and soft blends that mirror the night sky. With just a little ink, some cardstock, and your favorite adhesive, you can make truly magical projects.
The second card again used the pretty patterned paper and a unique die (I can’t wait to play with this more) and a combination of stamps to create our greeting.
Join me in today’s video, where I’ll share how I used this suite to craft cards that feel like they’re kissed by the lights themselves. Let’s explore the possibilities together and bring that celestial beauty into your hands and onto your paper!
The Lights of Aurora Suite isn’t just about making cards—it’s about capturing a moment of wonder and sharing it with someone else. Each swirl of color, each delicate gem, and every shimmering ribbon can turn an ordinary card into a keepsake that feels like a little piece of the night sky.
If you’ve ever dreamed of creating something truly magical, this is your invitation to start. With its rich palette and versatile designs, this suite will take your crafting to new heights—whether you’re making a card for a special occasion or simply letting your creativity dance across the paper like the aurora itself.
The last card I’m sharing is a twist to the usual “black” die cut that represents a silhouette, I chose “white” to give you another option … to me it’s like a snowy scene. So fresh and pretty!
I hope this inspired you to see all the different ways you can bring that magical glow into your own crafting. Whether you create a simple card or a stunning layered masterpiece, this suite is ready to help your projects shine.
If it’s calling your name, now is the perfect time to add it to your collection—because every card you make with it will feel like a little piece of the night sky, ready to share.
Thank you so much for stopping by and sharing a moment under the “northern lights” with me today.
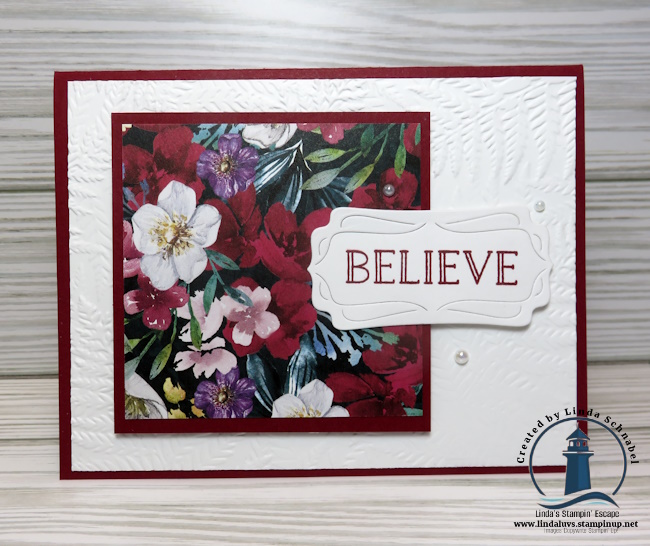
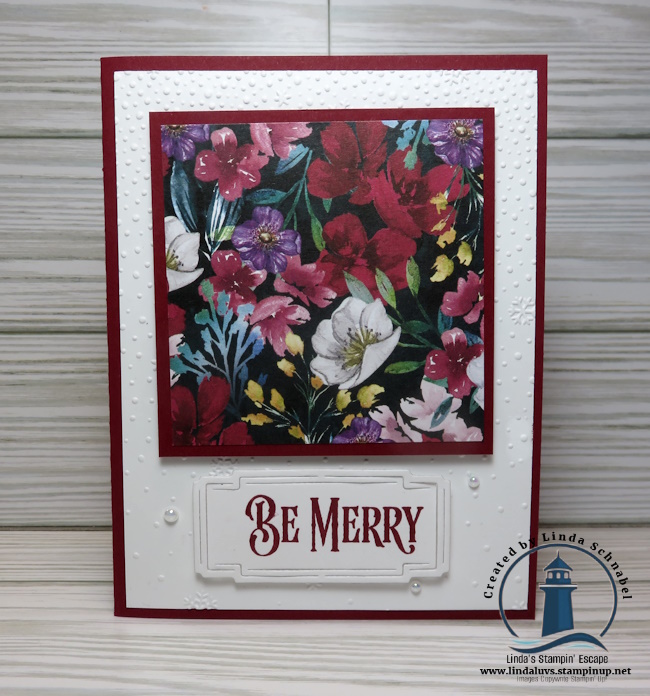
🎄 Today, I’m thrilled to share a simple yet incredibly elegant way to make your holiday card-making fast, fabulous, and fun! Imagine creating not just one, but 16 stunning holiday cards—all from a single sheet of the breathtaking Regal Winter Designer Series Paper (DSP). With its vibrant watercolor florals, hand-painted designs, and rich seasonal hues, this paper sets a heartwarming holiday tone that your friends and family will adore!
Let’s dive into this super-efficient design, perfect for anyone who loves beautiful, handmade cards without spending days on end making them. And the best part? We’re pairing it with the Christmas Labels Bundle, which is packed with gorgeous sentiments and die-cut frames that add a touch of class to each card. With this approach, you’ll have everything you need to make your holiday greetings truly special!
Step 1: Cut Your Paper—3 x 3 is the Magic Number!
To get started, take a 12 x 12 sheet of the Regal Winter Designer Paper and cut it down into 3 x 3-inch squares. This will give you 16 individual squares—the perfect size to build a gorgeous set of cards quickly. Each 3 x 3 piece showcases a unique section of the paper’s hand-painted design, meaning each card will have its own charm and character while still looking like part of a cohesive set.
Quick Tip: Feel free to mix and match paper patterns if you want an extra pop of variety! The Regal Winter DSP coordinates beautifully, so each card will have a harmonious holiday look.
Step 2: The Christmas Labels Bundle—Adding Elegance & Class
Now that we have our DSP squares ready, it’s time to bring in the Christmas Labels Bundle! The bundle includes beautifully crafted sentiments and label frames that add an instant touch of elegance to your cards. Here’s a closer look at what’s included:
Stamp Set Sentiments: Warm and festive sentiments that are perfect for holiday wishes. From classic “Merry Christmas” to heartfelt “Season’s Greetings,” these stamps have every message you need for your cards.
Label Frame Die Cuts: The die-cut frames are the stars of the show! They’re delicately designed to enhance your sentiment stamps and give each card a professional, polished look. Plus, they’re versatile enough to be used on tags, paper cup sleeves, and other Christmas crafts!
Simply choose a sentiment for each card, die-cut a frame to surround it, and you’ll be amazed at how refined and finished each card looks.
Step 3: Assemble & Adorn!
Now comes the fun part—assembling your cards! I’ve used a Basic White background to highlight the paper and add some texture… use your favorite embossing folder. Next, place a 3 x 3 square of the DSP onto a 3 1/4″ x 3 1/4″ mat in a coordinating color and center it onto the card front. Then layer on your label frames with the sentiment stamped inside. To make each card uniquely special, add a few embellishments like rhinestones, pearls, or a sprinkle of glitter.
And just like that, you’ve got 16 holiday cards that look as though they were designed by a professional!
Why Handmade Cards Make the Best Gifts
The joy of receiving a handmade card is truly something special. When your loved ones open their mailbox to find one of your beautiful creations, they’ll feel the warmth and care that went into making it. Every brushstroke of color, every carefully chosen sentiment, every loving touch—it all comes together to create a moment of joy and connection.
Sending handmade cards isn’t just about sharing holiday wishes; it’s about sharing a piece of your heart with those who matter most. Each card becomes a keepsake, a small token of love they can hold onto throughout the season and beyond. Even my landlord has saved each card I have made for them!!
Let’s Make This Holiday Season Extra Special
So, if you’re ready to create gorgeous holiday cards that will warm hearts and make spirits bright, be sure to add the Regal Winter Designer Series Paper and Christmas Labels Bundle to your crafting stash. Whether you’re a seasoned card maker or a newbie looking to try something special, this combo is perfect for you. With just one sheet of 12 x 12 DSP and this versatile bundle, you can make 16 cards quickly, beautifully, and with that touch of elegance every holiday card deserves! Each sheet creates 16 cards … and there are 12 sheets per package! Hmmm …. is that enough for your Christmas Card list?!
Shop today and start creating cards that your family and friends will treasure. Because nothing says “I’m thinking of you” like a handmade card made with love.
Today, I’m thrilled to share a stunning card created by a special guest blogger, Jo Ann, from my Design Team. This beautiful creation puts the exquisite Country Lace Designer Paper in the spotlight, paired perfectly with the versatile Spotlight on Nature stamp set.
The delicate lace patterns of the Country Lace Designer Paper add a touch of elegance and charm to any project, and Jo Ann’s design showcases just how stunning this paper can be. Whether you’re crafting for a special occasion or just want to add some beauty to your day, this card is sure to inspire you.
Now, here’s the exciting part: the Country Lace Designer Paper is currently on sale! This is a fantastic opportunity to stock up on this gorgeous paper, but hurry—the sale ends on August 31st. Don’t miss out on the chance to add this versatile and elegant paper to your collection at a discounted price.
Remember, the Designer Paper Sale is ending soon, so make sure to grab your favorites before they’re gone. The Country Lace Designer Paper is a must-have for any crafter, offering endless possibilities for creating elegant, timeless projects. Thank you, Jo Ann, for sharing this lovely card with us!
Happy crafting, and remember, you’re worth it! Treat yourself to these beautiful papers and enjoy the joy of creating something special.
UPDATE: I am no longer sending the PDF to this card. 6 / 2025 LJS
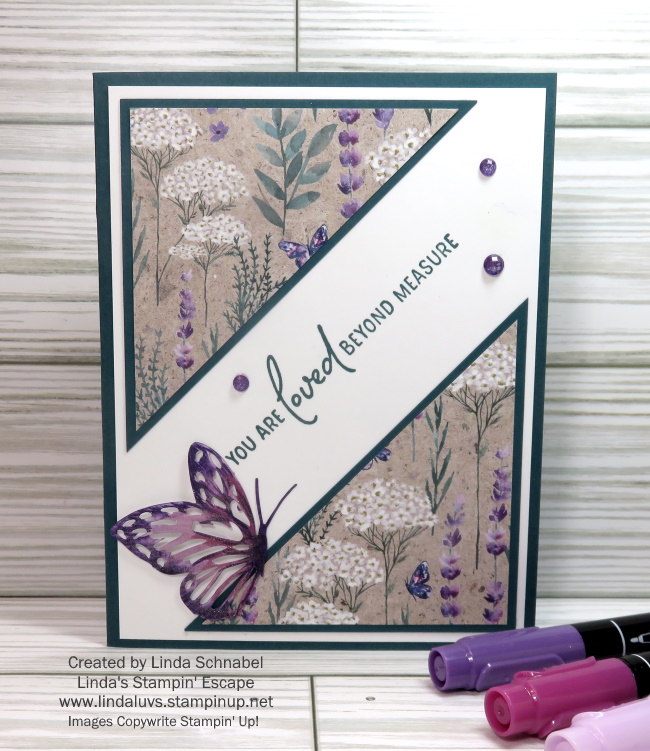
To my paper crafting enthusiasts … if you’re on the lookout for new and exciting ways to showcase your creativity, let me share this cute card with you. Today, we’ll explore a fantastic technique that not only lets you make a set of 16 cards effortlessly but also highlights the beauty of the Perennial Lavender Designer Series Paper that is ON SALE Now. Get ready to be inspired by the Split Card technique!
The Split Card technique is a simple yet impactful way to create stunning cards with a unique design. For this project, I’ve chosen the Perennial Lavender Designer Series Paper to be the star of the show. This exquisite paper features delicate lavender patterns that add a touch of elegance to any project.
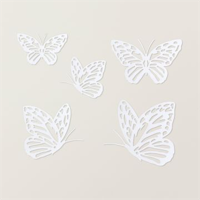
Start by cutting your Perennial Lavender Designer Series Paper into equal 3″ x 3″ squares. These squares will be the basis of your Split Card design. If you like the “matted” look, cut the your Shaded Spruce Cardstock squares at 3 1/4″ x 3 1/4″. Each will be cut diagonally from corner to corner (same with mat) then layer the designer paper to the mat. Arrange them in opposite corners on your cardstock, leaving a gap in the middle. The negative space created by the gap adds a modern and dynamic element to your cards, and a perfect space to add your greeting.
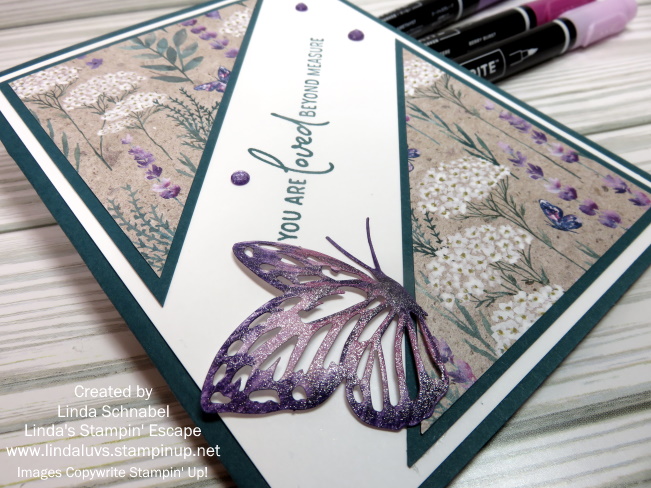
Now, let’s bring in the Paper Butterfly to take your cards to the next level. Choose the size butterfly you want and color it using the Highland Heather, Gorgeous Grape, and Berry Burst Stampin’ Write Markers. The combination of these vibrant hues will make your butterfly pop against the lavender background… and let’s not forget the “WOW” from the Wink of Stella. The Stella will actually “moisten” your inks so they will blend together.
To add a touch of sparkle and sophistication, embellish your cards with Purple Fine Shimmer Gems. These gems complement the color palette perfectly and bring a subtle shimmer to your creations. Place them strategically on the butterfly or around the negative space to enhance the overall visual appeal.
One of the fantastic aspects of the Split Card technique is its scalability. With just a single sheet of Perennial Lavender Designer Series Paper, you can create a set of 16 cards with ease. This makes it an excellent choice for batch card-making or creating personalized gifts for friends and family.
This simple technique allows you to explore your creativity and produce a stunning set of cards that will leave a lasting impression. Try it out … experiment with colors, and enjoy the joy of crafting! Comment below if you will be trying out the Split Card Technique.
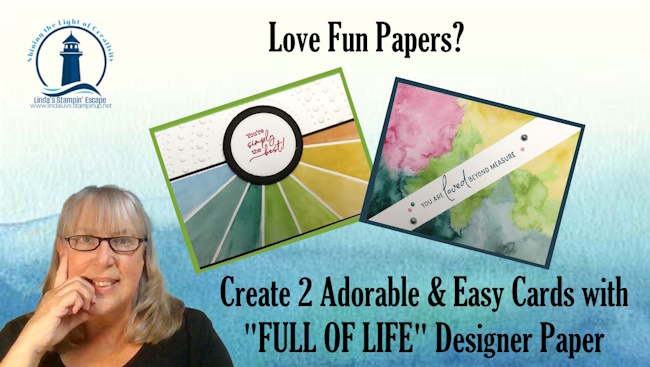
I’m thrilled to share with you two charming and simple cards that will surely bring a smile to your face. These cards were created using the bold and fun patterns from the Full of Life Designer Series Paper, and I’m excited to show you just how easy it is to make them.
But first, I have a special treat for you! Check out my latest YouTube video where I walk you through the entire process of making these delightful cards. Watch it by clicking HERE
Full of Life Designer Series Paper: Your Must-Have Crafting Companion
The Full of Life Designer Series Paper is bursting with vibrant colors and playful patterns, making it the perfect choice for any project. Whether you’re crafting birthday cards, thank-you notes, or just-because greetings, this paper will add that extra pop of joy.
Why You’ll Love This Paper:
Versatile Designs: Perfect for any occasion.
High Quality: Stampin’ Up! ensures the best quality in every sheet.
Easy Coordination: Matches effortlessly with other Stampin’ Up! products.
So which one did you like best … the greeting with black or the one with coordinating color?
Special Offer: Designer Series Paper Sale!
Now is the perfect time to stock up on your favorite Designer Series Papers, including the Full of Life collection! From now through the end of August, enjoy fantastic discounts on select papers. It’s a deal you don’t want to miss!
Why Shop Now?
Big Savings: Take advantage of the sale and get your favorite papers at a reduced price.
Bonus Coupons: Remember those Bonus Days coupons you earned in July? August is the perfect time to cash them in for even more savings!
Save and Save Again: Combine your sale discount with your bonus coupons to maximize your savings and get more for less.
Get Inspired and Start Crafting!
Don’t miss out on this fantastic opportunity to add the Full of Life Designer Series Paper to your crafting stash. Watch my latest YouTube video HERE to see these adorable cards in action and get inspired to create your own.
Happy stamping, and see you next time! 💌
P.S. Don’t wait! The Designer Series Paper sale ends August 31st, so grab your favorites while supplies last. And use your bonus coupons for extra savings. Happy crafting and happy savings!
Do you love the pretty papers from Stampin’ Up! as much as I do? Well, I’m thrilled to announce an incredible sale you won’t want to miss! From 6–31 August 2024, you can enjoy a fabulous 15% off select Designer Series Paper from the 2024–2025 Annual Catalog. This is the perfect opportunity to stock up on your favorite papers and maybe even discover some new ones!
Stampin’ Up!’s Designer Series Paper is a true work of art. Each sheet is hand-created by our talented in-house artists, who design, sketch, and paint the beautiful patterns you see. The quality and versatility of our paper make it ideal for all types of paper crafts. Whether you’re into card making, gift packaging, scrapbooking, or any other creative project, our Designer Series Paper has you covered.
Here is the stunning Perennial Lavender designer paper / You can read the original post by clicking HERE. Or click HERE for more samples!
One of the best features of our paper is the double-sided designs, offering you double the creativity with every sheet. Imagine all the beautiful cards, intricate scrapbook pages, and stunning gift packages you can create with these exquisite patterns! Oh one of my favorites, the Country Woods designer paper … You can get the details on this card, including a video by clicking HERE!
And last but not least is the stunning Winter Meadow …. perfect for your Christmas cards or wintery celebrations and scrapbook pages / Click HERE to learn how I created these 6 cards from one sheet of the Winter Meadow designer paper. You can watch the video and see the cards close up!
Don’t miss this chance to add to your paper stash and save. Head over to my Stampin’ Up! store between 6–31 August 2024, and take advantage of this fantastic sale, or you can click the links below to grab yours today!
Your crafting projects deserve the best, and this is the perfect time to get your hands on the highest quality Designer Series Paper at a great price. Thanks for stopping by … I hope my cards have inspired you to pull out your designer paper and start crafting.
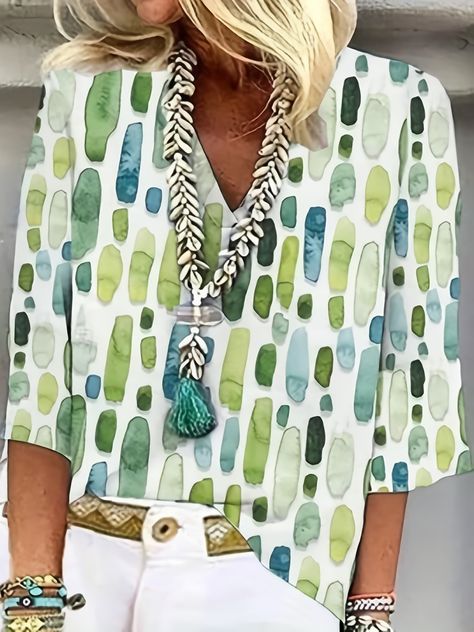
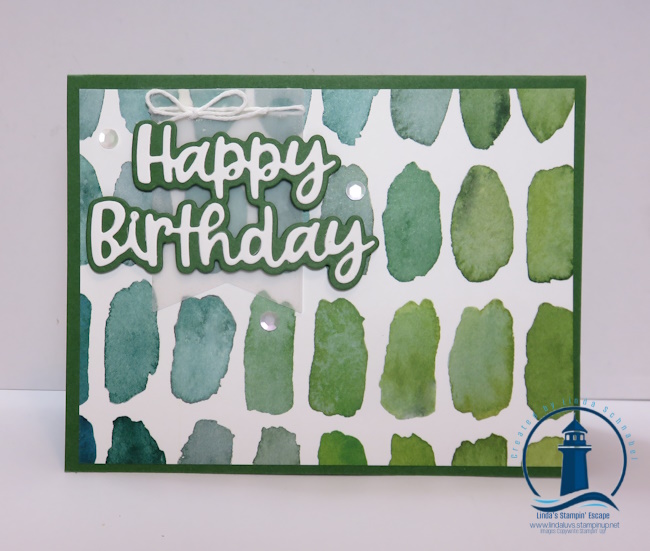
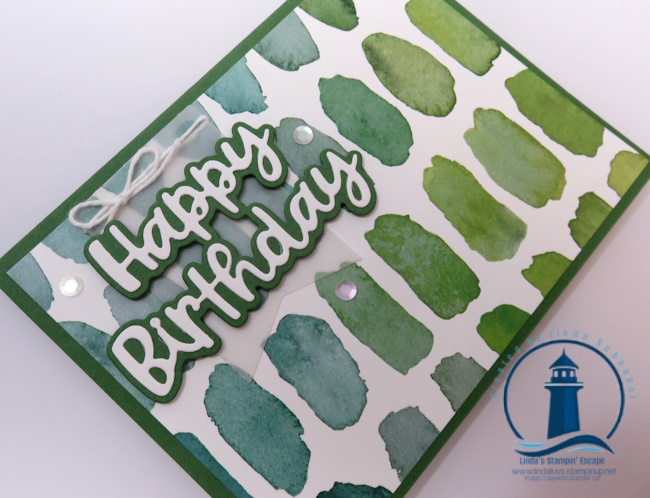
I’m thrilled to share a delightful find that brought a burst of joy to my crafting studio. While browsing through some fashion trends, I stumbled upon clothing patterns that beautifully mirrored the designs in our Full of Life Designer Series Paper! It’s a perfect reminder of how art transcends boundaries and finds its way into our everyday lives.
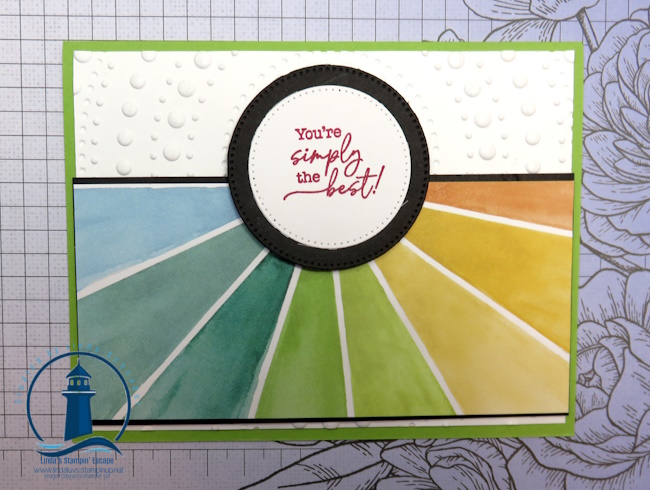
Full of Life Designer Series Paper is a stunning collection of 6″ x 6″ sheets, each featuring unique, hand-painted watercolor designs created by our talented in-house artisans. This set is a treasure trove of vibrant colors and playful patterns, including organic squares, circles, color wheels, and brushstroke designs. It’s perfect for adding a touch of artistry to your card fronts, accents, lovely layers, and more! Can YOU find the pattern??
Today, I’m showcasing a card that lets this beautiful paper take center stage. The design is simple yet intentional, allowing the bold and fun patterns to shine through. I’ve used the Full of Life paper as the focal point, complemented by a die-cut greeting from the Wanted to Say Dies. The result is a card that is both eye-catching and effortlessly stylish—perfect for any occasion.
The combination of the watercolor effects and the vibrant colors truly makes this card stand out. It’s a great example of how the right paper can transform a simple layout into something extraordinary. Whether you’re a seasoned crafter or just starting out, this paper is a fantastic addition to your collection. It opens up endless possibilities for creative expression, and I’d love to see what you all come up with!
Don’t forget, you only have a few more days to benefit from the Bonus Days promotion! For every $50 you spend, you’ll receive a $5 Bonus Coupon to use in August. It’s the perfect opportunity to stock up on the Full of Life Designer Series Paper and other favorites from the catalog.
Happy crafting, and I can’t wait to see the beautiful creations you make with this fabulous paper!
P.S. If you’re inspired by today’s project, be sure to share your creations on our Facebook page, Linda’s Stampin’ Escape. Let’s spread the joy of crafting together!