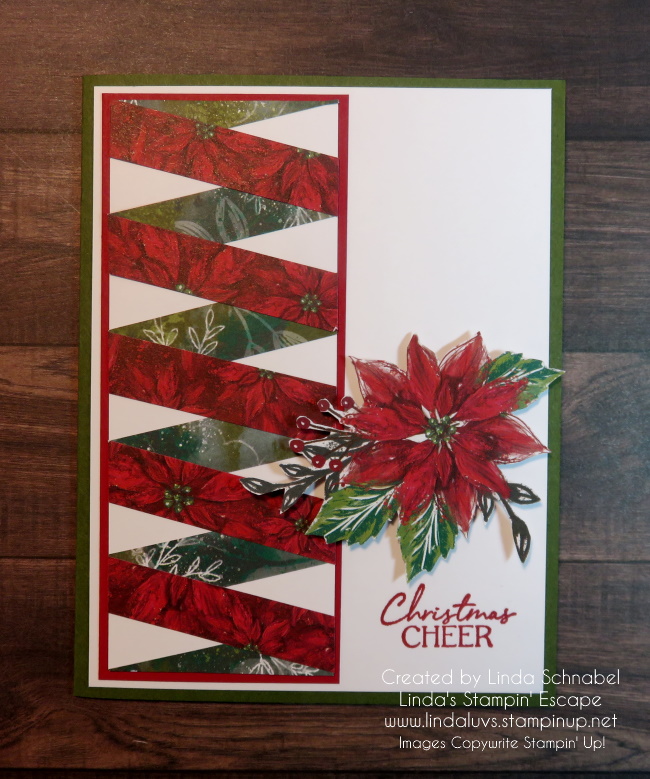
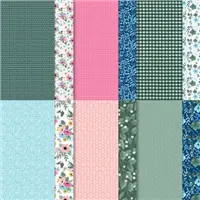
On Tuesday I shared the Twisted Ribbon Technique with you which included a video replay of my LIVE presentation … TODAY I want to share how to use the left overs of that Pretty Paper to make quick cards.
I shared how I save 3″ x 3″ squared when cutting, now let’s see how those make simple and quick cards. Great way to get those Christmas cards done if you haven’t!! (I know that feeling). Simple does not mean that your cards can’t be pretty.
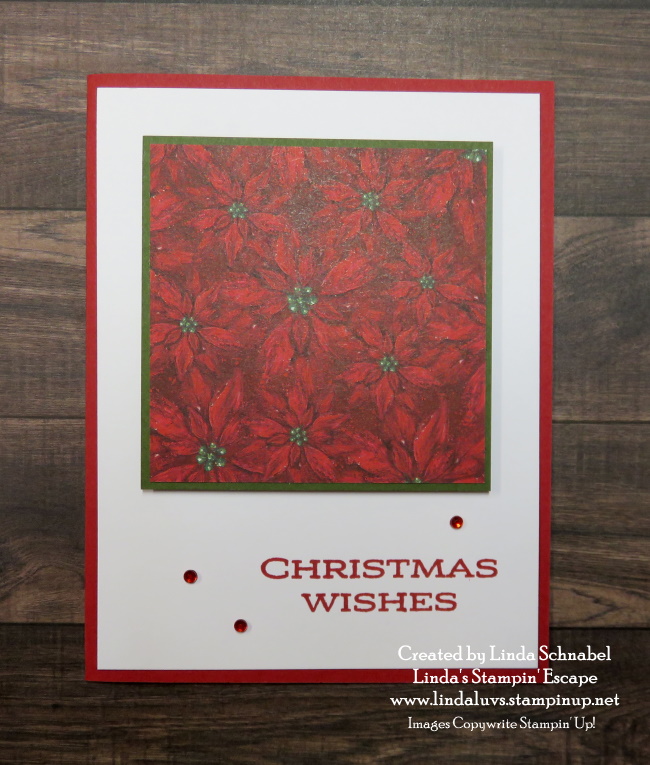
Here we have our 3″ x 3″ square in it’s simplest form ….
An easy way to step up your card is simply stamp a background … You could even use an embossing folder to add texture instead of ink. The greeting ends were punched to create a tag, and anchored with embellishments.
If you didn’t catch my LIVE presentation or did not take a look at the video yet, here it is ….
Sometimes it’s just nice to create cards with our scraps / leftovers that are easy, and simple … and pretty!
Thank you so much for joining me! Have a wonderful day.
I am so excited to share my cards and video with you today. Christmas is full of pretty paper and ribbons, and today I’m thrilled to show you the “Twisted Ribbon” Technique. In the video, you will also learn two different tips to creating this technique with ease.
Let’s watch the video and then I will share the cards with you …..
How fun is this technique!?? Oh my gosh …I am addicted!! And with the use of my template, it makes creating these cards fast and simple. Let’s talk “Core” dimensions / What you need to create the card. The punches or dies you can add for greetings and such are endless!! Just have fun with it.
Card Base: 8-1/2″ x 5-1/2″ then score at 4-1/4″.
Panel for ribbon technique: 5″ x 2″ … this allows you to add a mat and still layer!
Ribbons (Designer Paper): 3″ x 1/2″ (Sorry I said 1/4!)
I’ll begin with the card that I demonstrated in the video ….
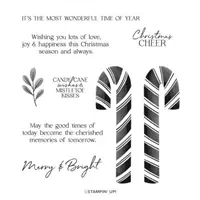
This card highlights the “Boughs of Holly” Designer Series paper. I complimented that with Real Red and Mossy Meadow cardstock. My greeting comes from the Sweet Candy Cane Stamp Set and Real Red ink.
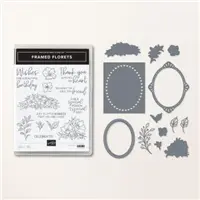
On this card I used the Framed Florets bundle and the Framed & Festive Stamp Set. The designer paper to create the “Twisted Ribbon” is the Fitting Florets! I also used the Timeworn Type Embossing Folder to add some texture to the card.
I got a bit more creative with this card … I cut 2-1/4″ off the front flap of my card and placed my “Twisted Ribbon” on the right side of the card. Now it shows with the card is open or closed!! My designer paper of choice is the “Santa Express” full of fun and whimsy!
To create the texture on the front flap, I used the Wintery 3-D embossing folder. My greeting comes from the Very Best Occasion stamp set and was punched out using the “Label Me Lovely” punch. Cardstock colors are Poppy Parade and Shaded Spruce.
My last card I shared also used the Santa Express Designer paper ….
I also used the Wintry on this card but I embossed the beautiful White Glimmer paper! I centered my “Twisted Ribbon” to give it another different look. The greeting comes from the Sweet Candy Cane stamp set and fits this card perfectly.
I had so much fun making these cards and I hope I inspired you to grab some of your designer papers and try out this technique.
Thank you so much for joining me! Have a wonderful day.
Here are some of the supplies used to create my cards. Don’t forget that there are many beautiful designer papers on the Clearance rack at low, low prices!
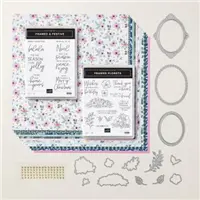
I am excited to share the Exclusive Framed Florets Collection with you today. I have a beautiful card that highlights the products and how they not only coordinate but “layer” together! I will also be sharing the video of my Facebook LIVE presentation last night.
So grab your favorite beverage and join me for my short video …
This collection of products is an extremely versatile bundle of seasonal, festive, and all-occasion designs, sentiments, and embellishments that you will love!
This promotion runs from 1 November 2022–4 January 2023 and includes a few exclusive items only available while supplies last:
Framed & Festive Cling Stamp Set
Fitting Florets 12″ x 12″ (30.5 x 30.5 cm) Designer Series Paper
Gold Adhesive-Backed Swirls
All these products have been designed to perfectly partner with the Framed Florets Bundle, which includes a Framed Florets Photopolymer Stamp Set and Framed Florets Dies.
I will post links below for your convenience.
Dimensions:
Card Base / Night of Navy = 8-1/2″ x 5-1/2″
Large Frame / Basic White = 5″ x 4″
Small Frame / Night of Navy = 4-1/4″ x 3-1/2″
Mat / Night of Navy = 5-1/4″ x 4″
Designer Paper = 5-1/8″ x 3-7/8″
I’m so happy that you joined me today. I will be sharing MORE samples from this amazing collection. In fact, if you aren’t following my blog, just click on the button in the upper right hand corner, and then you will receive an email each time I post.
Thank you and have a great day ~
Here is a list of the featured products and ingredients for my card …
Happy Monday! I hope you enjoyed this beautiful weekend … well, here in Wisconsin anyway 🙂 I hear some of you out west are getting a blanket of white! I’m not ready … I’m ready for Halloween and I’ve got more cards to share with you today.
I’m going to continue with the Scary Cute Bundle …
I teamed this card up with the Aspen Tree die! I love the background … It’s designer paper so you can’t get easier than that. CLICK HERE to view the original post.
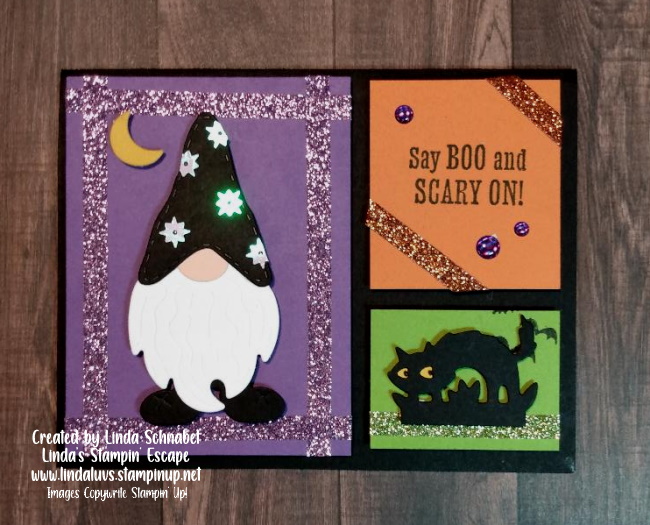
My Halloween Wizard via the Kindest Gnomes ….
This card uses the Scary Cute Bundle and Kindest Gnomes. It also features the Color Blocking technique.
If you are an old movie buff … especially Halloween Horror movies (Hammer Films) like the Mummy, then you will fall in love with this card.
This card uses the Linen Adhesive Backed paper to create a our mummies! We have to dirty up those bandages a bit so if you want to see more … CLICK HERE!
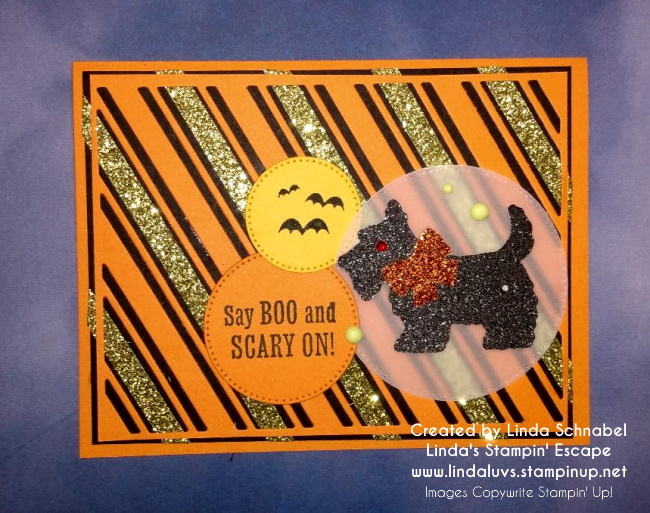
Here is a major mash up …. I have the dies from Sweet Candy Canes, the Scary Cute bundle and the Scottie Dog!
I have a lot of fun with that Scottie Dog … perfect all year long, and for any occasion.
Thank you for joining me again today, Have a great week!
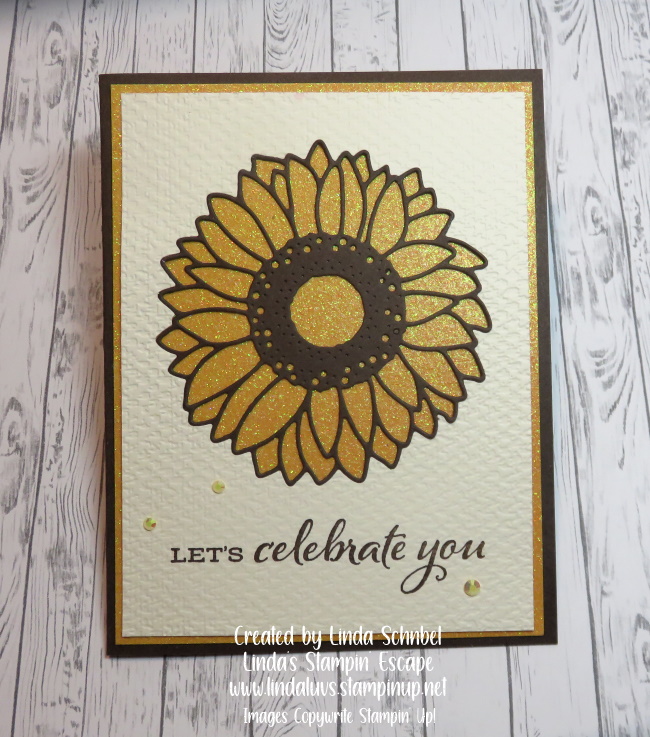
I’m excited to share today’s cards with you… Yes, I have 2 for you today!! It is a fun and creative way to use your Sunflower Dies without all the waste … and it looks so cool!! With prices rising all around use, it’s nice to be cost effective … you know, save some money by not wasting our cardstock!
I also will share the replay of a Facebook LIVE I had done several months ago ….
As promised … I’m going to give you the measurements for the cards
Measurements:
Cardbase: 8-1/2″ x 5-1/2″ … Score & Fold at 4-1/4″
Ombre Glimmer paper: 5-1/4″ x 4″
Cardstock for Sunflower Die Cut: 5-1/8″ x 3-7/8″
Very Vanilla Inside Cardstock: 5-1/4″ x 4″ plus scrap to punch greeting
This card is so cute and easy to make … After you die cut the sunflower out, you can place your flower back into the cut out area to create a unique look … I like mine embossed!!
Don’t be afraid to mix and match colors … it can really highlight the ombre paper underneath. Have some fun with it and add a patterned designer paper!!
I hope you caught my little tip for finding the perfect size greeting for the punch design you want to use … I do this all the time. Don’t forget to head over to my YouTube channel … there is a video that highlights the card you saw yesterday! CLICK HERE … and please subscribe!
Have a wonderful day and thank you for stopping by.
TODAY’S STAMPIN’ SUPPLY LIST … If you liked the products used in today’s projects, I have links for you below. Just click on the item you would like more information on, or to begin your shopping. It will take you directly to my website.Thank you ❤
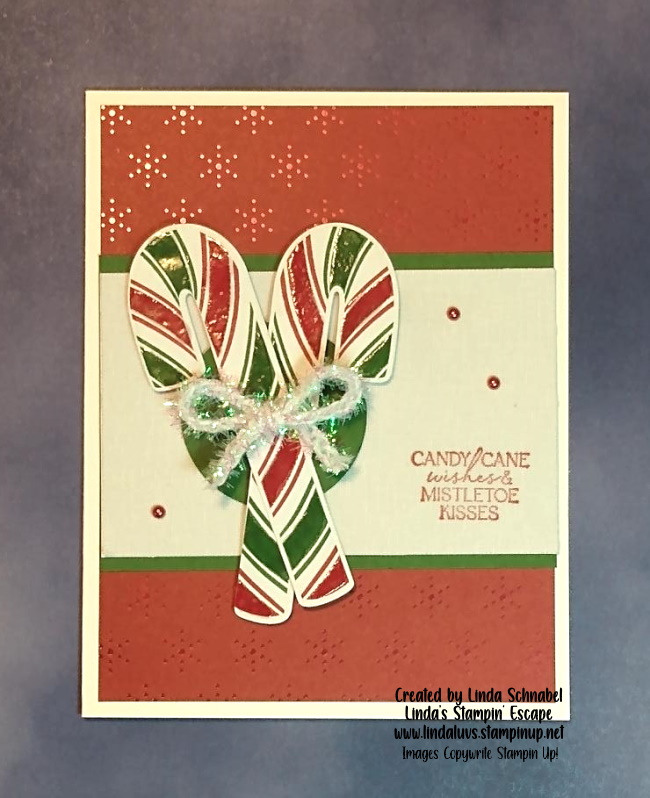
Today I’m sharing the replay of last nights Facebook LIVE; a quick tip for Heat embossing your designer paper and taking it to another level … amazing! For those who watched last night, you will see a change to my card!!
Here is the video replay ….
Don’t those candy canes just look YUMMY!! Here is the original version of the card ….
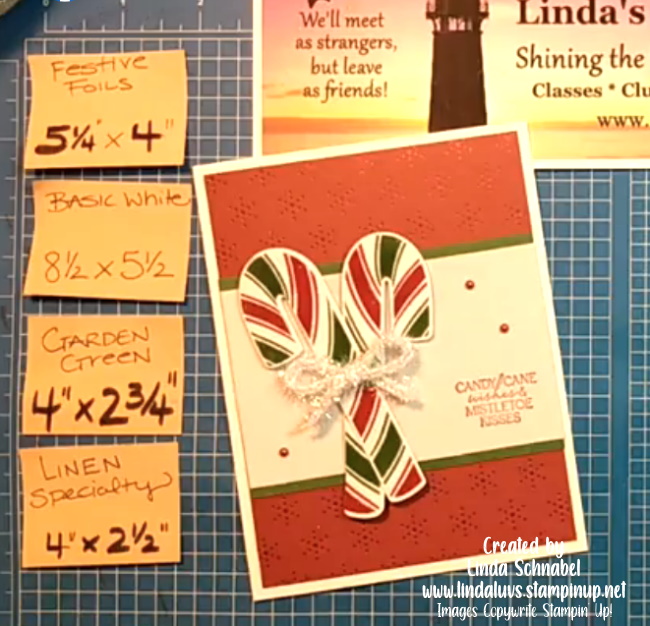
I did put the dimensions for the card in the video but here they are again (above) for quick reference . I will list the ingredients for the card below … the Festive Foils Specialty paper and the Iridescent Trim are both on the Weekly Deals through midnight September 28th.
Now lets take a little peek at what I did to the card after the camera was turned off. Remember the punched circles I had as back up??
I used the Garden Green circle behind the candy canes to make them pop even more! It also really highlights our Iridescent bow. Even though the parts to my card belong with other “suites” doesn’t mean that they don’t look good together.
The quick tip to embossing our candy canes was made easy with the use of the “Embossing Additions Tool Kit’ … very handy!! You’ll want to add that to your wish list ❤ I think this is just a fun way to embellish your designer paper and take it to the next level.
Give this technique a try … enjoy your day!
Thank you for hanging out with me.
Here is a list of ingredients used to today’s card ….
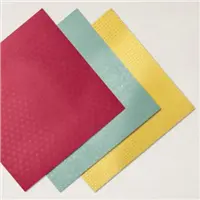
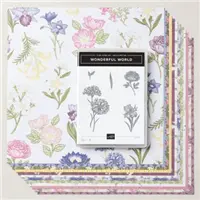
A Wonderful World … Celebrate the natural beauty found around the world with this stamp and paper bundle featuring prominent flowers from across the globe. The stamps and paper are designed to coordinate perfectly for handmade cards as beautiful as Mother Nature herself.
The Wonderful World Bundle includes the Wonderful World Stamp Set and the Wonderful World 12″ x 12″ (30.5 x 30.5 cm) Designer Series Paper. Let me show what a beautiful combination these two are together…
I’m teaming it up with the Corner Flip Fold … an easy Fun Fold that gives your card extra dimension and an additional pop of color by exposing the designer paper we are using on the inside…. Instead of trying to write down all of the instructions, I have created a video from my LIVE presentation during my Summer Sale-a-bration & Mini Catalog Celebration.
I hope that the video explains how to create the fun folds and shows how beautiful this bundle really is. I love the “Distinktive” stamps and how realistic they are…. those sponge daubers add color so nicely to the stamps as well.
Thank you for stopping over today and checking out my blog,
Here is a list of the products I used for my two cards shown in the video ….
This weekend I am hosting my Summer Sale-a-bration & Mini Catalog Celebration Party!! Woot Woot! Come on over … There will be Product Showcases, Games, Prizes, Specials and Live Demonstrations. I hosting this in a special Facebook Group as it allows me to do more for you. This is what the page header looks like …
Here is the link if you didn’t find your Facebook Invite … CLICK HERE the link and then request to join us. Everyone is welcome, including fellow demonstrators (I do however ask that you identify yourself as prizes are reserved for my customers and downline members) If it helps you learn how you can host a party, feel free to join in. 🙂
My Welcome Video …
We’re going to take a good look at the New Mini Catalog and the Sale-a-bration catalog … I’ll be featuring Fun Folds and Techniques during my LIVE Demonstrations.
I hope you join us … I kicked off the party on Friday the 12 but the LIVES start TODAY!!
Have an amazing weekend and I hope you’ll be joining me in my Facebook PARTY group!
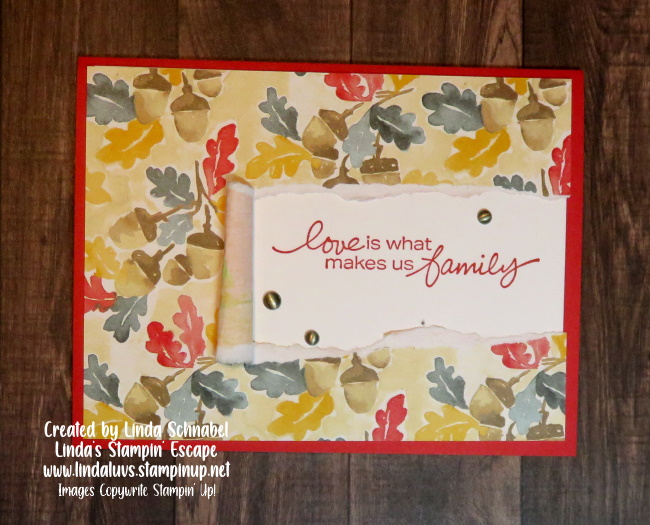
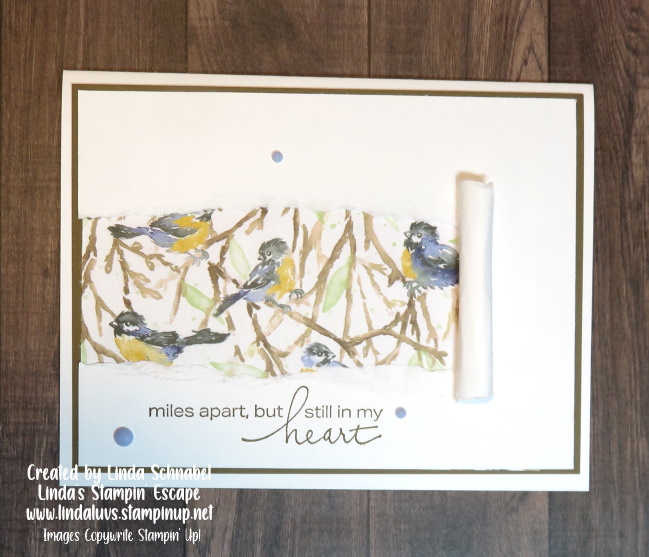
I’m thrilled to share today’s cards and technique with you … I have been playing around with the “Torn Window” technique and really had fun creating different looks. In the video I demonstrate how to do the “tear” on both the designer paper and cardstock. Take a look at the video … It is a replay of last nights LIVE and can be found on YouTube as well.
This is just the tip of the iceberg … there are so many different variations that you can create using the technique. The video shares the basic “how to” and I can’t wait to share more with you this weekend … I hope you plan on joining me for the Summer Sale-a-bration Mini Catalog Celebration Party!! Now let’s take a closer look at the cards …
Card Base is 8-1/2″ x 5-1/2″ scored and folded at 4-1/4″. The designer paper or mat will measure 4″ x 5-1/4″ … the white cardstock that you will tear will measure 1/8″ less than the mat; 3-7/8″ x 5-1/8″. The designer paper you tuck inside can be measured based on your opening.
Just a reminder to join me for my party this weekend to see more samples using this technique, plus LIVE demonstrations on some of the amazing products found in these catalogs… games, much FUN and prizes. CLICK HERE
I hope you enjoyed seeing this fun and easy technique, I love the fun that unfolds with this card… either a beautiful sentiment of a beautiful scene!
This weekend I will be hosting my Summer Sale-a-bration & Mini Catalog Celebration Party!! Woot Woot! I’m inviting you to join in on the fun … There will be Product Showcases, Games, Prizes, Specials and Live Demonstrations. I hosting this in a special Facebook Group as it allows me to do more for you. This is what the page header looks like …
Here is the link if you didn’t find your Facebook Invite … CLICK HERE the link and then request to join us. Everyone is welcome, including fellow demonstrators (I do however ask that you identify yourself and prizes are reserved for my customers and downline members) If it helps you learn how you can host a party, feel free to join in. 🙂
My Welcome Video …
We’re going to take a good look at the New Mini Catalog and the Sale-a-bration catalog … I’ll be featuring Fun Folds and Techniques during my LIVE Demonstrations.
I hope you join us … I will begin posting on Tuesday, August 9th with a lot of information, products and games and we’ll kick off the party on Friday the 12!!
Have an amazing week and I hope you’ll be hanging out with me in my Facebook PARTY group!
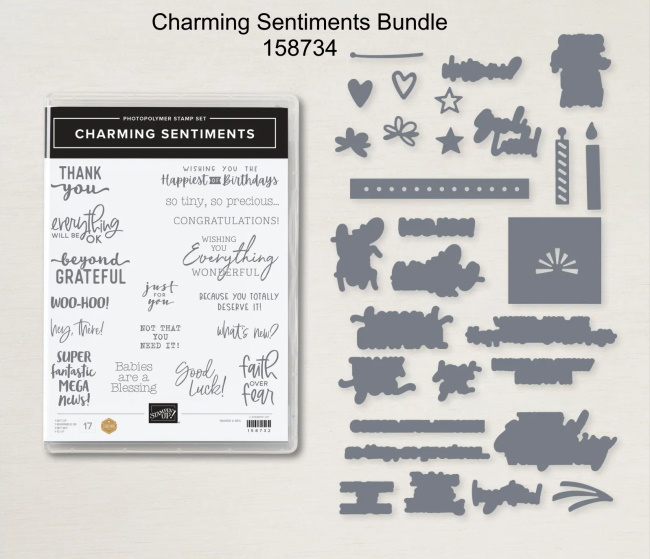
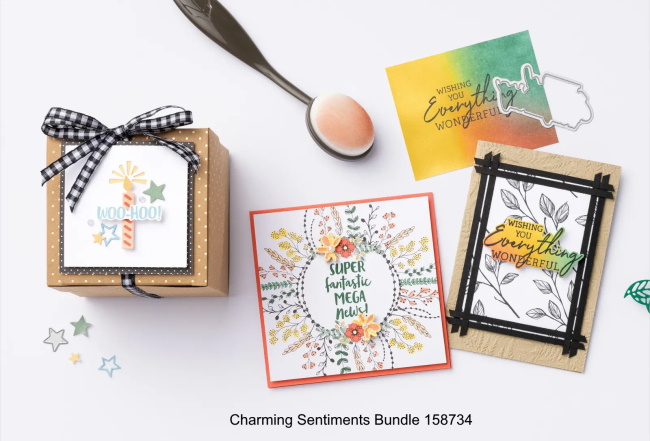
Today I’m going to share the replay of my Tuesday Night Facebook LIVE … it’s a mash up of the Notes of Cheer Card Kit and the Charming Sentiments Bundle.
You are going to love the great tips included in this video, but you are going to flip over how quick and easy it is to create the prettiest cards in just minutes. This is the main reason I have a few card kits sitting in my stamping room … when I need a card “NOW” … I grab one from one of the kits. Don’t get me wrong, I love sitting in my stamp room creating, but sometimes you just need a card!
In the video you saw me “change up” the card just a bit, enough to introduce you the the amazing Charming Sentiments bundle. I love a good sentiment set and this one is filled with goodies! And to top it off … it has a coordinating die set.
Today I have a special post, I want to show you an amazing tip for organizing the Charming Sentiments bundle. Wow … this will really make your life easier, and it’s sooo simple!
There are many dies for the sentiments and this QUICK TIP will get you stamping much quicker and without the frustration of trying to match up these dies to your stamped images. Take a look at my video ….
WOW … how easy is that!? Now you will know exactly which dies coordinate with the sentiment you just stamped. I use StazOn ink because it’s permanent ink and its such a rich black color … it should not wear off, were as a lighter color might. With just a little preparation in the beginning … stamping and die cutting these will be a breeze.
I only take one image/die at a time. This way, they go back onto the die card the way they were on it. If you use a magnetic sheet for your dies, simply cover one side with cardstock and then you can begin stamping the sentiments on that … it will work just the same.
I love this quick tip, it has saved me so much time when making my cards, it’s no longer a drawn out match-fest, it is quick and easy to find the coordinating pieces …
Thank you for taking time out of your Sunday to visit … I hope you have a beautiful day.
I have been showcasing several different bundles on my Facebook page during my Christmas in July event. Here is the Lights Aglow Suite which highlights two different bundles; the Christmas Light Bundle and the Brightest Glow Bundle. You’ll find them on pages 30 – 33.
Bring the magic of twinkling Christmas lights to all your seasonal papercrafts with the Lights Aglow Suite Collection. It includes all the coordinating pieces you need to make your handmade greeting cards and gift tags shimmer and shine.
Then I showcased the Boughs of Holly suite / Leaves of Holly Bundle. This beautiful bundle has coordinating designer paper which is simply stunning. Check it out on page 25 of the Mini Catalog. If you don’t have one yet, you can click on the catalog that is located on the right side of the screen … or reach out to me for one if you do not have a demonstrator already.
Make classic seasonal cards, tags, gift boxes, and scrapbook pages with the Boughs of Holly Suite Collection. This suite features holly leaves and berries in deep greens and rich reds that you can stamp, cut out, and embellish with beautifully designed paper, ribbon, and more!
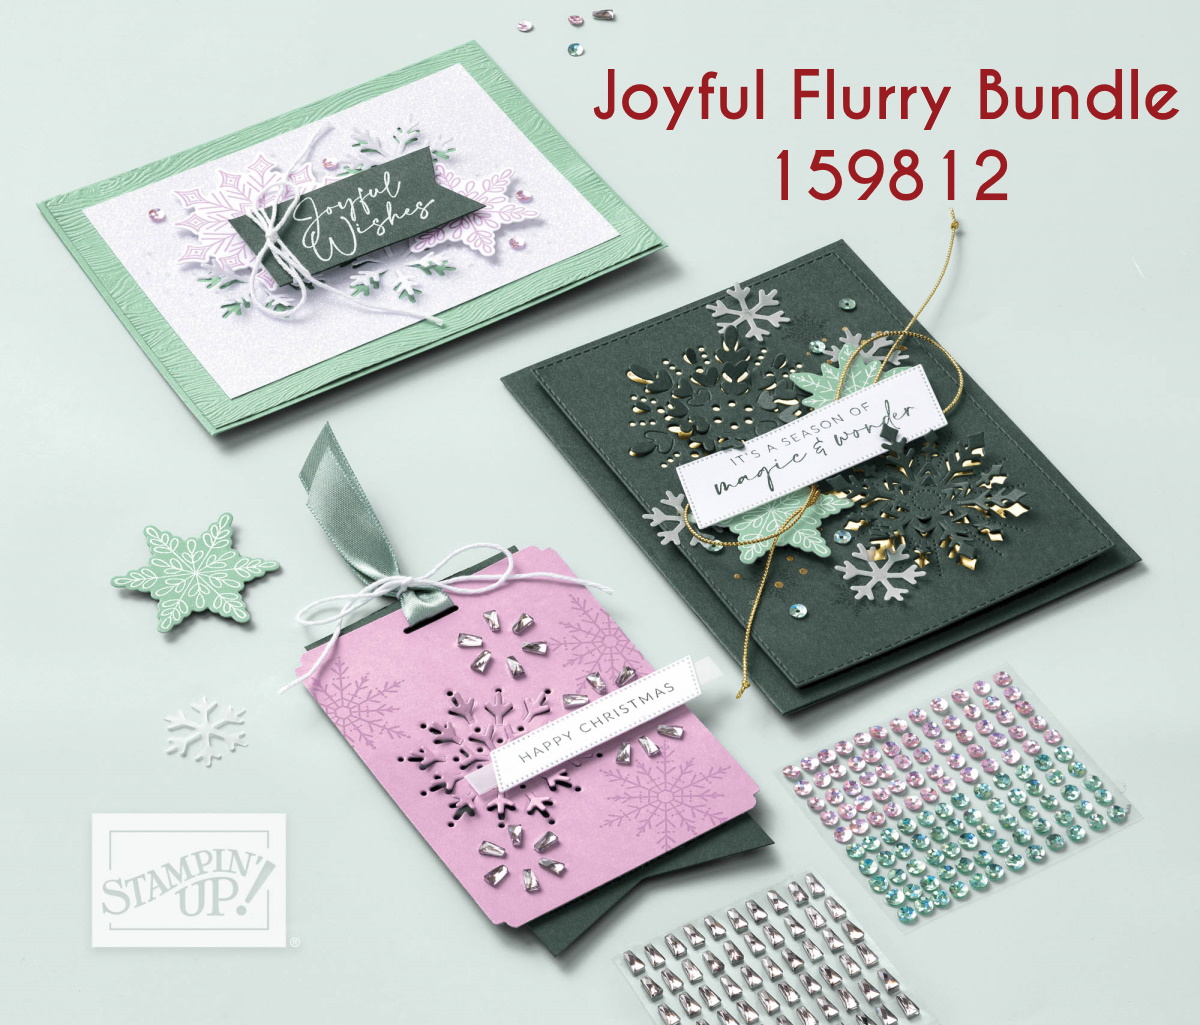
We also looked at the amazing Joyful Flurry … these are very special snowflakes! These dies don’t just cut them out, they make amazing patterns that add a beautiful texture to your card.
Create magical snowflake elements on your handmade cards and gift tags with the Joyful Flurry Bundle, Wonderful Snowflakes foil pieces, and more!
I would love to have you join me on my Facebook page for more samples, fun and tips … just CLICK HERE to get to my page. My Christmas in July event is only going on through the end of July so let me know if you need any help ….
This is a great time to get your holiday stamping needs/wants taken care of and collect some extra goodies for FREE! Thank you for joining me today … head on over to my Facebook page, we’d love to have you join us.
I’m thrilled to share the No Line Watercolor Technique with you today. It was scheduled for my Facebook LIVE yesterday but I had technical difficulties … well, it took me to more chances but I finally got my video!! It is too cool and pretty not to share.
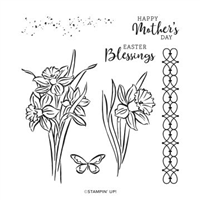
I’m using the Daffodil Daydream stamp set, it is such a beautiful flower to illustrate and do this technique with.
I invite you to watch the video along with me … I can’t wait to show you the simple steps it takes to create such a gorgeous card. You are going to fall in love with this technique because it’s going to make you look like a real artist! I’m no paint pro, but I sure like the way this looks.
As simple tip is too keep your darker colors in the recesses of your image. I also kept my water painter on the dryer side … it still has water but it easier to control your color when it’s not over wet, and the results are amazing. The dimensions for this card are also simple; Old Olive Card base is 8-1/2″ x 5-1/2″ … the front is a piece of watercolor paper measuring 4-3/4″ x 3-1/2″. The watercolor piece I stamped on measures 3-1/2″ x 2-1/4″ so my Old Olive mat was 3-3/4″ x 2-1/2″. I just used scrap pieces for my greeting.
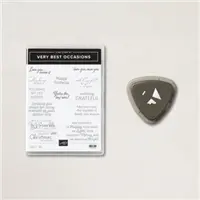
The greeting comes from a brand new bundle … the Very Best Occasions Bundle! That is also where the triple edge punch comes from that I decked out my daffodil with. It’s a great addition to my stamp & punch collection – I’ll be using them both many, many times.
I hope you enjoyed the video, especially those who joined me last night to support me LIVE before the internet went down.
Have a wonderful day! Thank you
Here is a list of the supplies I used in creating this card …
So happy you joined me today for my Watercolor + Embossing card techniques. I have two cards for you today along with the replay video of last nights Facebook LIVE presentation. You’ll see how easy it is, and more importantly … FUN!
Let’s take a look at the video and then I will present the cards along with the ingredients and any dimensions you may need.
I hope you are falling in love with this beautiful technique, and as I stated in the video … using ink from your stamp pads on your blocks is a simple way to start. AND less messy!! For the Watercolor Wash Resist technique, I am using the “Shimmery White” Cardstock which is cut to a quarter sheet … 5-1/2″ x 4-1/4″ to start. I like to keep it simple.
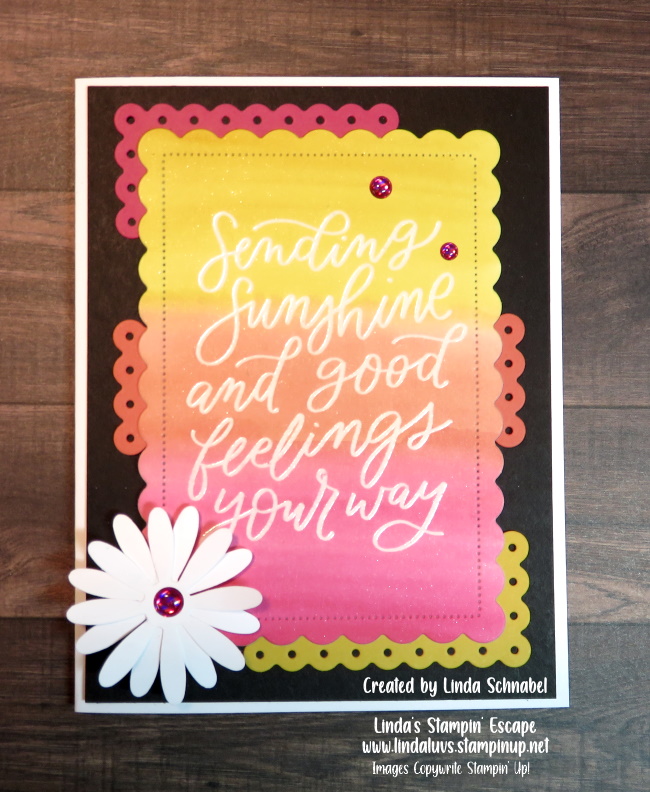
The stamped image comes from the Good Feelings stamp set which is full of happy! You can check out all the sayings included in the set at the bottoms of my post.
Once dried, I used the 2nd scallop frame from the Scallop Contour dies to die cut our design out. I used the small die from the same set to create the pop of color around our large die cut image. These were then layered onto a 5-1/4″ x 4″ piece of Basic Black and then layered onto the Basic White card base. While I had the White cardstock out, I punched two daisies and layered them onto my card … to finish it off, I used the Glossy Dots to tie it all together.
Now let’s take a look at the card that I designed from my second demonstration using the Splendid Thoughts bundle …
Embossing with the white emboss powder highlights your watercoloring and creates a soft beautiful look … watercoloring within an embossed image is easy and makes YOU look like the artist!! The soft look just pops against this stunning Fresh Freesia foil specialty paper from the Splendid Day Designer Paper. This was attached to the Basic White base is 8-1/2″ x 5-1/2″ scored and folded at 4-1/4″.
I used a medium scallop die to cut the Vellum cardstock on which I layered our watercolor images and die cuts from the beautiful foil paper. Layering the vellum onto the foil creates almost an iridescent look which just highlights the greenery even more.
Let me introduce you to the Charming Sentiments bundle … oh, I love this one!! So many greetings for so many occasions and they have coordinating and accent dies!! I love the way the greeting pulls my entire card together.
Thank you for hanging out with me today.
Here is the list of products I used on both of my cards. The bundles were selected just for you because they are so versatile and can be used year round … plus, either one will qualify you for a FREE Sale-a-bration item!! Let me know if you need any help with your order.